
You can absolutely shingle a patio cover yourself, and when the slope and structure are right, asphalt shingles give you a weathertight, long-lasting result that matches your house and costs far less than a pro installation. For step-by-step instructions, consult our guide on how to cover a patio with roofing. For step-by-step instructions on how to make a patio roof, consult this detailed guide covering plans, materials, and practical tips. The key requirements: your roof slope must be at least 2:12 (that's 2 inches of rise for every 12 inches of horizontal run), your framing must handle the load, and you need to follow the underlayment and fastening rules that your local code and the shingle manufacturer both spell out. Get those three things right and the rest is straightforward carpentry and roofing work that a capable DIYer can complete in a weekend or two.
How to Shingle a Patio Cover: DIY Guide, Tools & Permits

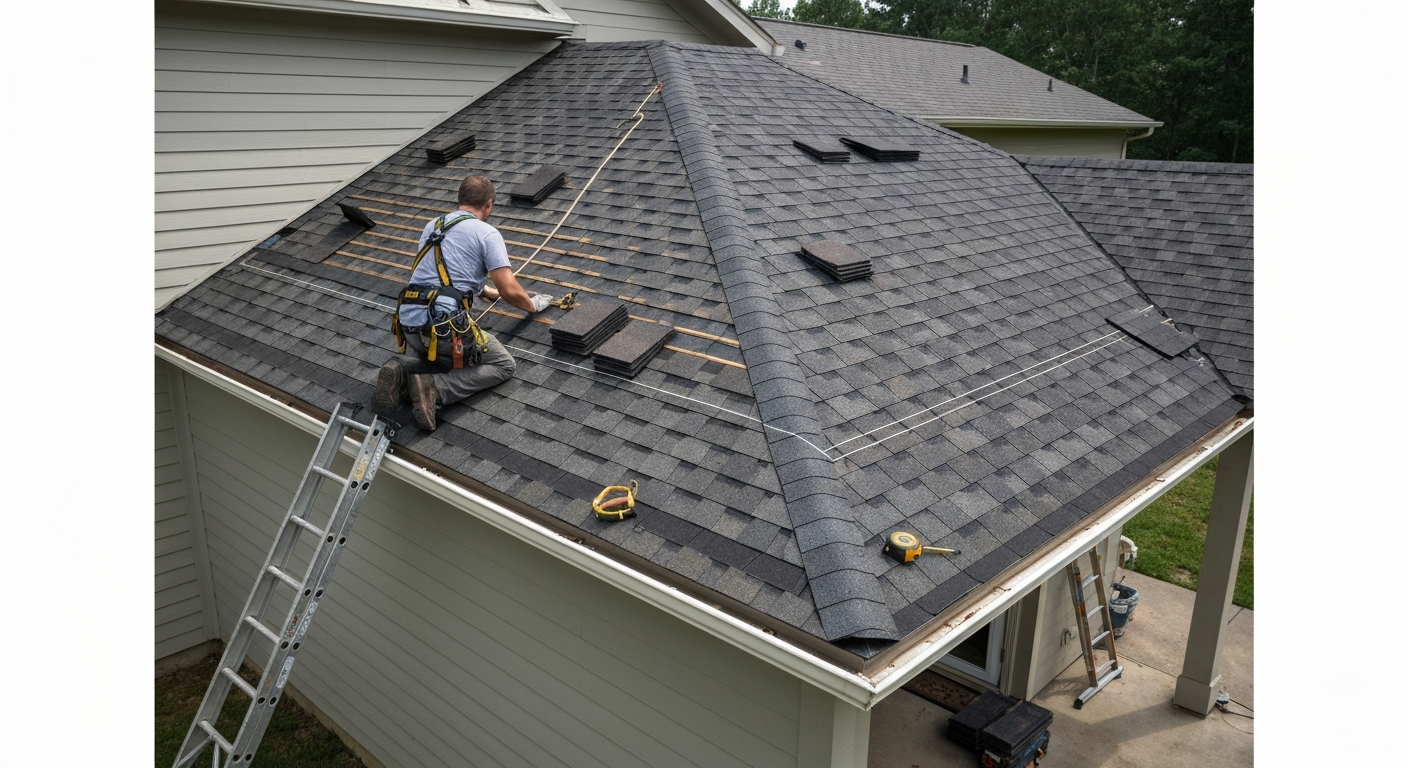
When and why to shingle a patio cover
Shingles make the most sense when you want the patio cover to look like a natural extension of the house rather than a tacked-on structure. If your home has a shingled roof, matching the material ties everything together visually and can even help with resale value. Asphalt shingles are also widely available, easy to source locally, and forgiving to install compared to some metal systems. The material cost for a basic 3-tab or architectural shingle runs roughly $100 to $150 per square (100 sq ft), and a patio cover of 200 to 300 square feet puts your shingle-only cost in the $200 to $500 range before underlayment, flashing, and fasteners.
Where shingles are less ideal: very shallow slopes below 2:12, patio covers that double as flat or nearly flat shade structures, and structures in extremely high-wind regions like South Florida where Miami-Dade product approvals and specific fastening schedules are mandatory. In those cases, a metal panel system often makes more engineering and code sense. But for most attached lean-to covers, gable-roof covers, and freestanding structures in typical residential zones, shingles are a completely legitimate choice.
Shingles vs. metal vs. aluminum: which one fits your project
Before you buy a bundle of shingles, it helps to honestly compare your three main roofing options for a patio cover. The right choice depends on your slope, your climate, your budget, and how much ongoing maintenance you want to take on.
| Factor | Asphalt Shingles | Metal Panels (Steel/Aluminum) | Aluminum Patio Cover Systems |
|---|---|---|---|
| Minimum slope | 2:12 (with double underlayment) | As low as 0.5:12 with lap sealant; standing seam lower still | Typically 1:12 or per manufacturer |
| Approximate material cost (per sq ft) | $1.00–$1.50 | $2.00–$4.00 (corrugated/exposed-fastener) | $3.00–$7.00 (pre-engineered kits) |
| DIY friendliness | High — familiar, widely documented | Moderate — cutting and sealing require care | Moderate — kit-based but proprietary connections |
| Lifespan | 20–30 years (architectural) | 40+ years with proper fastening | 20–40 years depending on finish and climate |
| Maintenance | Inspect and replace damaged shingles periodically | Check fastener seals every few years | Minimal — paint or anodized finish holds well |
| Aesthetic match to house | Excellent if house is shingled | Industrial look; not always a match | Contemporary look; suits modern homes |
| High-wind performance | Requires impact-rated shingles and minimum 4 nails/shingle per IRC | Standing seam excels; exposed fastener needs resealing | Engineered systems tested to wind ratings |
| Low-slope suitability | No — not below 2:12 | Yes — wide range of systems available | Yes — designed for shallow pitches |
My recommendation: if your framing already gives you at least a 4:12 slope and you want the cleanest look, go with architectural shingles. If your slope is between 2:12 and 4:12, shingles still work but you need double underlayment and ice-and-water membrane, which adds cost and labor. Below 2:12, stop and switch to metal or a purpose-built aluminum system. Trying to push asphalt shingles onto a nearly-flat surface is one of the most common mistakes I see on DIY patio projects, and it always ends in a leak within a season or two.
Site planning: slope, drainage, roof lines, and load paths
Good site planning prevents most of the problems that show up later. Start by deciding the direction your roof will drain. On an attached lean-to cover, water typically sheds away from the house toward the yard, which is correct. On a gable cover, both slopes drain to the sides, and you want those eaves clear of anything you don't want wet. On a freestanding structure, you have more flexibility, but the drainage side should point away from foot-traffic areas.
Measure your slope carefully before ordering materials. Drive a stake at the low end of the planned roof, run a level string from the high end, and measure the vertical drop over a 12-inch horizontal run. That ratio is your slope. A 4:12 slope on a 12-foot-wide patio cover means the ridge is 4 inches higher than the eave for every foot of run, so 4 feet total height difference across 12 feet. If you are attaching to the house, that ledger height has to work with your door height and any existing siding or flashing. Think through those numbers on paper before you cut a single piece of lumber.
Load path is the structural concept that keeps everything from racking or lifting. Every load from wind, snow, or the weight of the roof itself needs a clear path from the sheathing, down through the rafters, into the posts or ledger, and into the foundation or existing structure. On attached covers, the ledger bolt pattern is a critical link in that chain. The American Wood Council's DCA-6 guide and IRC prescriptive tables both specify that ledger connections require 1/2-inch bolts or approved lag screw schedules, not just nails. A City of San Diego example prescribes 3/8-inch by 5-inch lag screws at a maximum 16-inch on center where the ledger meets the dwelling. Check your local jurisdiction for the exact schedule required.
Permits, code, and inspections: what you actually need to know
Pull a permit. I know it sounds like extra hassle, but patio cover permits are usually straightforward and affordable, and they protect you when you sell the house or need to make an insurance claim. Most jurisdictions require a permit for any permanent attached or freestanding roofed structure regardless of size. In high-wind zones like Miami-Dade County, permits are non-negotiable and the county enforces specific product approvals for any roofing assembly used on residential structures.
From a code standpoint, the 2024 International Residential Code (IRC) sets the baseline that most states and municipalities have adopted in some form. For asphalt shingles, the key numbers from IRC Chapter 9 are: minimum slope 2:12, minimum four fasteners per strip shingle, and double-layer underlayment for slopes from 2:12 up to (but not including) 4:12. Your local building official may amend these, especially in snow or hurricane zones. In areas where ground snow load exceeds 70 psf, you need an engineered analysis referencing ASCE 7 load standards rather than prescriptive span tables.
When you apply for the permit, bring a simple site plan showing the footprint, the attachment point to the house (or post locations for freestanding), the proposed framing lumber sizes and spans, and the roofing material. Many jurisdictions offer over-the-counter approvals for straightforward patio cover projects. Plan for at least a framing inspection before you sheath and a final inspection after you finish roofing.
Safety before you get on the roof
Fall protection is not optional on roof work, even a low-slope 10-foot-wide patio cover. OSHA's residential construction guidelines require fall protection at 6 feet above a lower level, and even on a 3:12 slope you can slide fast if a shingle is loose or a boot hits a wet surface. For a DIY patio cover, a simple personal fall arrest system (PFAS) with a harness, a lifeline, and an anchor point on the ridge is inexpensive and takes about five minutes to set up. Ladder positioning matters just as much: the base should be 1 foot out for every 4 feet of height, and you should always secure the top of the ladder to prevent kickout.
- Wear rubber-soled boots rated for roofing work — smooth-soled sneakers slip on sheathing
- Set up scaffolding or a ladder standoff for any eave work; reaching over from a ladder at full stretch is how people fall
- Never work on a wet or dew-covered roof
- Keep the work zone below clear of people while you are moving materials overhead
- Have a helper on the ground: passing up bundles one at a time rather than overloading the roof surface prevents both falls and sheathing damage
- Wear eye protection when cutting shingles — fiberglass granules fly
- Dispose of old underlayment and shingle scraps regularly so the roof deck stays clear
Tools and materials checklist
This list covers everything you need for a typical attached lean-to or gable patio cover shingle job in the 200 to 400 square foot range. Buy 10 percent extra on shingles and underlayment for waste and cuts.
- Architectural asphalt shingles (quantity: roof area in squares plus 10%)
- Self-adhering ice-and-water shield membrane (entire deck if slope is 2: 12–4:12; eave edges at minimum for steeper slopes)
- Synthetic felt underlayment or 30-lb felt (for mid-field coverage on slopes 4: 12 and above)
- Metal drip edge, galvanized or aluminum, eave and rake length
- Step flashing, preformed galvanized, for wall/ledger intersections
- Counterflashing or pre-bent cap flashing for the ledger-to-house junction
- Roofing nails, 1-1/4-inch hot-dipped galvanized (for shingles), 1-inch for drip edge
- Roofing nail gun (pneumatic coil nailer) or hammer — a nail gun is strongly recommended for 200+ sq ft
- Air compressor if using nail gun
- Utility knife with hook-blade roofing blades (buy a pack of extras)
- Chalk line and chalk
- Tape measure, speed square, pencil
- Circular saw with fine-tooth blade for cutting ridge board and sheathing
- Roofing hatchet or pry bar for adjustments
- Caulk gun with roofing sealant (compatible with shingles and flashing)
- Ridge cap shingles or cut-down architectural shingles for ridge
- Roofing cement/plastic roofing cement for flashing bonds
- Ladder, ladder stabilizer/standoff
- Personal fall arrest harness, lifeline, and ridge anchor
- Safety glasses and work gloves
- Knee pads
- OSB or CDX plywood sheathing (7/16-inch or 1/2-inch) if decking is not already in place
Structural requirements, minimum slope, and what to do when you need more pitch
The structural side of a patio cover is where most DIYers underestimate the work. Rafter size and spacing are not guesses: they come from span tables published by the American Wood Council (AWC), and the right selection depends on your lumber species and grade, the spacing between rafters (typically 16 or 24 inches on center), your roof's live load (usually 20 psf for patio covers in most regions), and your dead load (the weight of the roofing materials themselves, typically 10 to 15 psf for shingles plus sheathing). In snow country, add the ground snow load factor from ASCE 7 for your specific location.
A common setup that works for most residential patio covers in temperate zones: 2x6 Douglas Fir No. 2 rafters at 24 inches on center for spans up to about 10 feet, or 2x8 at 24 inches on center for spans up to about 14 feet. Always verify against the AWC tables for your species, grade, and load assumptions before building. If your local ground snow load is above 70 psf or your project is outside standard prescriptive limits, you need an engineer to stamp the design.
If you measure your existing patio structure and find the slope is below 2:12, you have two realistic options. The first is to raise the ledger height at the house wall so the rafters tip up to an acceptable pitch. The second is to raise the outer beam or post height while keeping the ledger where it is. Either approach requires recalculating your rafter spans and verifying that the new load path still works. For a lean-to cover, raising the inner ledger by just a few inches over a 10-foot run can take you from an unusable 1:12 slope to a code-compliant 3:12. The IRC requires a continuous load path and uplift resistance per R802.11, so any reframing also needs to account for rafter-to-plate and post-to-beam connections with hurricane ties or equivalent hardware.
Framing a lean-to (single-slope) patio cover
The lean-to is the most common style for an attached patio cover and the friendliest to frame. The high side connects to the house via a ledger board, and the low side sits on a beam supported by posts. Here is how to frame it correctly. For step-by-step instructions on how to frame a patio roof, see our detailed framing guide. For step-by-step instructions on framing and attaching a patio roof, see how to build a patio roof (ref: 2b80a57a-1f89-489f-a638-851314b5b6b1).
- Lay out post locations: mark the outer post positions based on your patio dimensions, typically 8 to 12 feet on center. Dig footings to your local frost depth (minimum 12 inches in most zones, deeper in freeze-thaw climates). Pour concrete and set post anchors or set posts in concrete.
- Determine ledger height: measure up from the desired eave height at the outer beam, add your slope rise over the roof width (e.g., 4:12 slope over 12 feet = 4 inches rise per foot x 12 feet = 48 inches, so the ledger sits 48 inches higher than the outer beam top), and mark the ledger position on the house wall. Account for the rafter depth so the finished roof deck is below the door threshold or window sill.
- Install the ledger: remove siding in the ledger zone, position a pressure-treated 2x ledger board, and fasten it to the house framing (not just sheathing) with 1/2-inch bolts or lag screws per your local code schedule. Flash above the ledger with a full-length piece of step flashing or Z-flashing tucked under the siding, and seal the top edge with self-adhering membrane.
- Set posts and beam: cut posts to height, plumb and brace them temporarily, then set the outer beam on top. Secure beam-to-post connections with post caps and through-bolts.
- Install rafters: cut rafters to length with a bird's mouth notch at the outer beam and a ledger hanger or notch at the house. Space at 16 or 24 inches on center per your span table calculation. Toe-nail or use joist hangers at the ledger end, and use hurricane ties or rafter ties at the beam end for uplift resistance.
- Install blocking: add solid blocking between rafters at the outer beam and at mid-span for any rafter over 8 feet to prevent rotation.
- Sheath the roof: run 7/16-inch OSB or 1/2-inch CDX plywood perpendicular to the rafters with 1/8-inch gaps between sheets (for expansion). Stagger joints so no two rows line up on the same rafter. Nail every 6 inches along panel edges and every 12 inches in the field.
Framing a gable patio cover
A gable roof patio cover is structurally more complex but gives you a symmetrical, house-matching appearance. The ridge beam runs down the center and rafters slope to both sides. For an attached gable cover, one end ties to the house and the opposite end is framed out with a gable-end wall or knee walls. For a freestanding gable cover, both ends are framed the same way with posts at all four corners and a ridge beam supported at each end. Rafter pairs meet at the ridge and are held in tension and compression, so you need collar ties or a structural ridge beam (the latter eliminates the outward thrust entirely and is the better choice for longer spans). On a freestanding structure, all four post bases need to be anchored to footings with positive uplift connections.
Step-by-step shingle installation
Once the sheathing is down and inspected, you are ready to roof. If you want a step‑by‑step walkthrough specifically on how to roof a patio cover, see our detailed guide for practical tips and checklists. Work in this sequence regardless of whether it is a lean-to, gable, or freestanding cover. For a step-by-step walkthrough on materials and techniques, see our guide on how to roof a patio with shingles (internal resource).
Step 1: Install drip edge at the eaves
Drip edge goes on the eave (low edge) first, before any underlayment. Overlap pieces by at least 2 inches and nail at 12-inch intervals with 1-inch roofing nails. The drip edge should overhang the fascia by about 1/2 inch so water clears the wood. On rake edges (the sloped sides of a gable), drip edge goes on after the underlayment.
Step 2: Apply underlayment
For slopes 4:12 and above, start with a single layer of 30-lb felt or synthetic underlayment at the eave, working up the slope with 2-inch horizontal overlaps and 4-inch end laps. For slopes from 2:12 to under 4:12, the IRC requires double-layer underlayment: start with a full-width course at the eave, then overlap each subsequent course by half its width (this creates a double layer everywhere). Better yet, cover the entire deck with a self-adhering ice-and-water shield membrane at these shallow slopes, which is what GAF's low-slope bulletin (R-127) and Owens Corning and CertainTeed all recommend for the 2:12 to 4:12 range. Staple underlayment every 12 inches to keep it from shifting in the wind before shingles go down.
Step 3: Install rake drip edge (gable edges only)
On gable roofs, nail rake drip edge over the underlayment on the sloped sides. This sequence, eave drip edge under underlayment and rake drip edge over underlayment, is correct and ensures water that gets under the shingles at the rake still hits metal and drains away.
Step 4: Snap chalk lines
Snap a horizontal chalk line 11-7/8 inches up from the eave edge (that offsets the starter course and first course correctly for a 12-inch shingle). Then snap lines every 5 inches up the slope (for standard 5-inch exposure) to keep your courses running straight. On a short patio cover, a slight variation per course compounds quickly, so chalk lines are not optional.
Step 5: Install the starter course
A starter course is either a purpose-made starter strip product or a full shingle flipped upside down with the tab section cut off, positioned so the self-seal strip sits at the eave edge. The starter course seals the bottom edge and prevents wind lift. It should overhang the drip edge by about 1/4 to 3/8 inch. Nail it 3 to 4 inches from the eave edge.
Step 6: Nail the first and subsequent courses
Start the first full course flush with the starter strip bottom edge, offsetting joints by at least half a tab width from the starter course joints. Per the IRC, each strip shingle must have a minimum of four fasteners (nails or staples where permitted by manufacturer). Most architectural shingles specify four or six nails depending on wind zone, placed in the nailing zone marked on the shingle face, typically 1 inch above the cutout line. Drive nails flush, not over-driven or under-driven. A roofing nail gun set to the right depth makes this fast and consistent.
Work up the slope one course at a time, staggering joints by at least 6 inches from course to course. On a lean-to, you will eventually reach the wall of the house at the top. Stop short of the wall and handle that junction with step flashing (covered below).
Step 7: Install step flashing and wall flashing
Where the patio cover roof meets the house wall, step flashing is non-negotiable. This is one of the most common places leaks originate on DIY projects. Step flashing pieces are L-shaped metal, typically 4x4 inches or 4x8 inches. You interleave them with each course of shingles: lay a shingle, slip a step flashing piece over it tight to the wall, nail the flashing to the roof deck only (not the wall), then lay the next shingle over the flashing horizontal leg. Repeat up the slope. When done, each step flashing piece overlaps the one below it, so water running down the wall hits metal and diverts onto the shingles rather than behind them.
Over the step flashing, install a counterflashing or cap flashing that is embedded into the mortar joint or tucked under the siding and bent down over the step flashing faces. This two-piece system is what the IRC (R905.2.8) and every major shingle manufacturer requires. Seal the top edge of the counterflashing with roofing sealant or caulk, but do not rely on caulk alone without the mechanical overlap of the flashing pieces.
Step 8: Install ridge cap shingles
On a gable patio cover, once both sides are shingled up to the ridge, cap the ridge with purpose-made ridge cap shingles or with architectural shingles cut into thirds and bent over the peak. Work from one end of the ridge toward the prevailing wind direction so joints are protected from direct wind-driven rain. Each cap shingle overlaps the previous one, with the exposed portion matching your field shingle exposure. Use two nails per cap shingle, positioned so the next cap shingle covers the nail heads. On a hip or modified hip design, work from both ends toward the center and cut the last piece to fit.
Step 9: Seal and inspect
Walk the finished roof and look for any lifted shingle corners (press them down with roofing cement if the sealant strip has not bonded yet in cool weather), any exposed nail heads in non-standard locations (dab with roofing sealant), and any flashing joints that need a bead of compatible sealant. Look at the ridge from the ground to make sure it runs straight, and check the eave overhang for consistency.
Flashing at post bases and penetrations
On a freestanding cover, posts do not penetrate the roof, so post-base flashing is mostly about protecting the post footing hardware from water pooling. Use powder-coated post bases that hold the post above the concrete surface and allow drainage. On any cover where an electrical conduit, ceiling fan box, or similar penetration goes through the sheathing, use a roofing boot flashing sized for the pipe or conduit diameter, integrated with the shingle courses the same way a plumbing vent stack boot works on a house roof. These are inexpensive, available at any roofing supply house, and far better than trying to caulk around a bare penetration.
Ventilation and waterproofing considerations
Patio covers are typically open at the eaves and do not have an enclosed attic, which actually simplifies ventilation. The main waterproofing concern is the shingle-to-wall junction (handled with step flashing above) and the eave edge. If you are building an enclosed soffit on the patio cover, put soffit vents in to prevent any trapped moisture in the rafter bays from degrading the sheathing. For an open-rafter design with exposed underside, no ventilation detail is needed, but treat the exposed sheathing underside with a primer or paint before installation so it does not absorb moisture from humid outdoor air.
Finishing trim and cleanup
Fascia boards cover the rafter tails at the eave and rake edges and give the patio cover a clean, finished look. Use primed 1x6 or 1x8 cedar or PVC trim board, nail through the face into the rafter tails, and caulk the top edge before painting. Soffit material, if you want an enclosed underside, can be fiber cement, primed wood, or vinyl soffit panel. Run trim on the inside face of the outer beam if it is exposed to view. Paint or stain all exposed wood before it gets rained on.
Realistic cost and time estimates
A 12x16 foot (192 sq ft) attached lean-to patio cover with a 4:12 slope, standard architectural shingles, and basic framing lumber will typically land in the following ranges for a competent DIYer doing all the labor.
| Item | Estimated Cost (DIY) |
|---|---|
| Framing lumber (rafters, ledger, beam, posts) | $300–$550 |
| Concrete and post bases | $80–$150 |
| OSB sheathing (8 sheets at ~$25 each) | $200–$250 |
| Architectural shingles (2 squares + 10% waste) | $250–$350 |
| Underlayment and ice-and-water shield | $80–$150 |
| Drip edge and step flashing | $40–$80 |
| Fasteners, nails, hangers, hurricane ties | $60–$120 |
| Trim, fascia, and paint/caulk | $100–$200 |
| Permit fee (varies widely by jurisdiction) | $50–$300 |
| Total estimated materials + permit | $1,160–$2,150 |
Time estimate: plan on two full weekend days for framing and sheathing, and one weekend day for roofing a cover of this size if you have a helper. Solo work adds a day or more. A gable or freestanding design adds one to two additional framing days. These are honest numbers from real projects, not the optimistic estimates you sometimes see on project sites.
Common mistakes and how to avoid them
- Wrong slope: the single most common error. Measure before you frame. A slope below 2:12 will leak under shingles no matter how well you install them.
- Skipping the starter course: without it, the first course of shingles can lift in wind and water wicks up under the tabs at the eave.
- Nailing outside the nailing zone: nails too high miss the shingle below and leave that shingle unfastened; nails too low split the tab. Follow the manufacturer's nailing zone marking exactly.
- No step flashing at the wall: caulk alone at a wall junction will fail within a few years. Always use interlaced step flashing.
- Ledger attached to sheathing only: the ledger must go through sheathing and fasten to the house's structural framing (band joist or rim board). Sheathing alone cannot carry the load.
- Forgetting uplift connections: every rafter-to-beam and rafter-to-ledger connection needs a positive mechanical connection (hurricane tie, rafter tie, or code-approved equivalent) to resist wind uplift per IRC R802.11.
- Overloading the roof deck with shingle bundles: each architectural shingle bundle weighs roughly 65 to 80 pounds. Stack bundles over load-bearing points, not in the middle of a span.
- Skipping the permit to save time: an uninspected structural connection can fail, and an unpermitted addition can create problems at home sale or insurance claim time.
Maintenance after the job is done
Asphalt shingle patio covers are low maintenance once properly installed. Inspect the roof once a year, ideally in early fall before wet season. Look for any lifted or missing shingles, cracked ridge caps, and the condition of your step flashing and counterflashing at the wall. Reseal any flashing joints that show separation with a compatible roofing sealant. Clear any debris (leaves, twigs) that accumulates at the eave, particularly at the junction with the house wall, where trapped organic material can hold moisture and accelerate shingle degradation. Check for granule loss in gutters or on the ground below the eave, significant granule loss on shingles under 10 years old can indicate a defective product and may warrant a warranty claim with the manufacturer.
When to call a pro instead
Most homeowners with basic carpentry skills and a tolerance for heights can handle a straightforward lean-to patio cover with shingles. But there are situations where hiring a professional is the right call, not a defeat.
- Your local snow load exceeds 70 psf or you are in a Seismic Design Category D or above — these require engineered drawings, not just prescriptive span tables
- You are in a high-wind zone (Miami-Dade, coastal Florida, Gulf Coast) where product approvals and specific fastening schedules require professional installation to maintain validity
- The patio cover attaches to an older home with non-standard or unknown framing (e.g., manufactured home, post-frame construction, or a heavily modified legacy structure) where ledger attachment details need engineering review
- Your project involves a gable or hip roof over 400 square feet or a freestanding structure with a long ridge beam span exceeding 14 feet — structural member sizing starts to exceed straightforward prescriptive limits
- You are not comfortable with heights or fall protection equipment — there is no shame in hiring out the roofing portion and doing the framing yourself
- Your jurisdiction requires licensed contractor work for roofing permits — some areas limit roofing to licensed roofers even for homeowner projects
For everything else, this is genuinely achievable DIY territory. Take your time with the framing, do not cut corners on flashing, follow the shingle manufacturer's installation instructions for your specific slope, and get the inspections signed off. The result is a permanent, weathertight outdoor space that you built yourself and that adds real value to the home.
FAQ
What primary authoritative codes and standards must I research to ensure an accurate DIY guide on shingling a patio cover?
Start with the International Residential Code (IRC) chapters on roof assemblies and roof‑ceiling construction (slope, underlayment, flashing, continuous load path/R802.11). Add ASCE 7 for wind and snow loads (location‑specific design), and consult local amendments (e.g., state or county code supplements) for high‑wind/hurricane areas. These are the legal/engineering foundations your guidance must reflect.
Which manufacturer and industry technical resources are essential for correct shingle installation details?
Collect current installation instructions and low‑slope bulletins from major shingle manufacturers (GAF, Owens Corning, CertainTeed). Include product technical bulletins (e.g., GAF R‑127), nail/fastening schedules, underlayment requirements, and ridge/valley/step‑flashing guidance. Also use the NRCA Roofing Manual (Steep‑Slope Roof Systems) for industry‑accepted best practices and detailed flashing/termination details.
What structural and span references do I need for framing, rafters and ledger attachments?
Use the American Wood Council (AWC) prescriptive span tables and DCA‑6 guidance for ledger attachments. Reference IRC prescriptive provisions for attachments and the requirement for positive mechanical connections (bolt/lag/approved structural screws). Where prescriptive limits are exceeded or unusual loads exist, require an engineered design (referencing ASCE 7 for load determinations).
How should I research slope suitability and whether asphalt shingles are appropriate vs metal/aluminum?
Compare IRC slope rules for asphalt shingles (minimum 2:12; special low‑slope underlayment protocols from 2:12–<4:12) with metal roofing provisions (R905 sections) and manufacturer ESRs. Include manufacturer low‑slope instructions and local code amendments (e.g., Florida/Miami‑Dade) because metal systems and standing‑seam panels are permitted at lower slopes than asphalt. Explain performance, cost, and durability tradeoffs.
Which local and jurisdictional sources must I check before publishing site‑planning and permit guidance?
Check the Authority Having Jurisdiction (AHJ) — city/county building department — for permit thresholds, inspection requirements, and local prescriptive handouts (example: City of San Diego IB‑206). Also inspect product approval lists for high‑wind areas (e.g., Miami‑Dade). Provide clear instructions to verify local permit triggers and fastening/attachment specifics with the AHJ.
What engineering and hazard guidance should inform wind, uplift and snow load recommendations?
Use ASCE 7 for computing design wind and snow loads and FEMA/PNNL/IBHS guidance for thresholds that trigger engineered design (e.g., high ground snow loads, unusual geometry). Cite when a registered engineer is required (non‑prescriptive conditions, ground snow loads above local tabulated limits, complex or tall freestanding covers, or critical uplift paths). Include references to continuous load path requirements in the IRC.