Building a patio roof means choosing a roof style that fits your house and yard, setting posts or a ledger board, framing the roof structure, then layering on sheathing, a waterproof covering, and gutters. The whole project is DIY-able for most homeowners, but it has real structural and code requirements you need to respect before you pick up a saw. Here is how to do it from start to finish. If you want the quick overview of how to raise a patio roof, start with the attachment or free-standing plan, then move through layout, posts, ledger, and framing. If you want the step-by-step details, start with planning the roof pitch, framing members, and ledger or post layout.
How to Build a Patio Roof: Step-by-Step DIY Guide

Celia Vaughn
1 May 2026
Pick the right patio roof type first
The single biggest decision you make is whether your roof will be attached to the house or free-standing, and whether it will be flat (low-slope) or pitched. Everything else flows from that choice.
Attached vs. free-standing
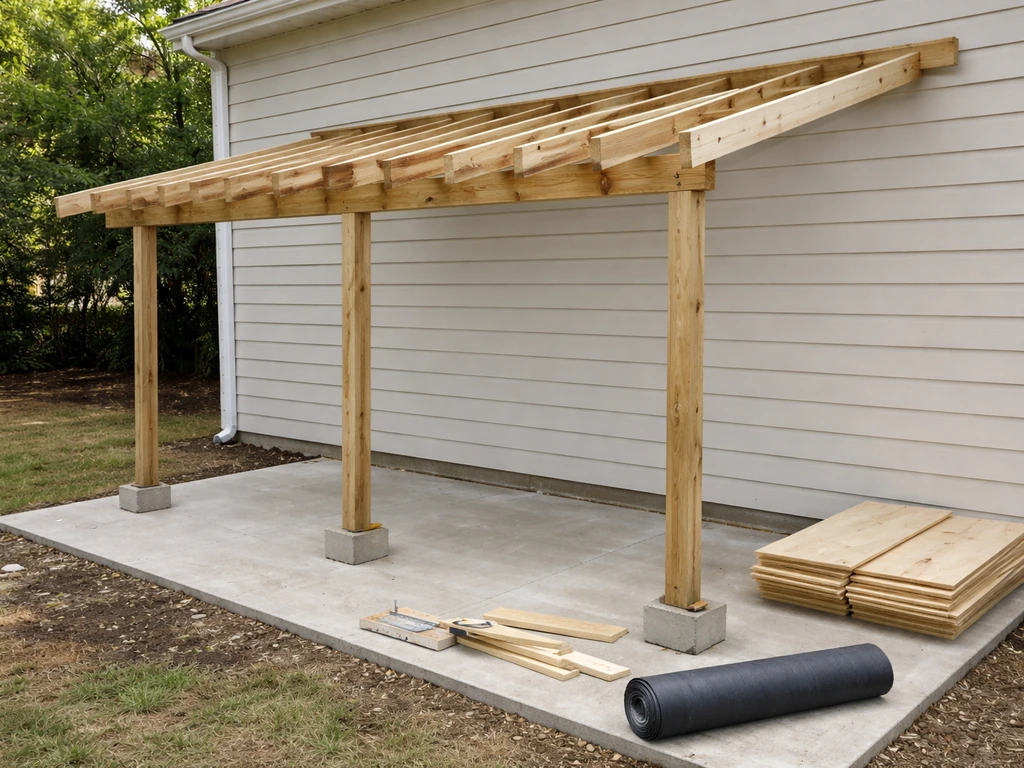
An attached patio roof ties directly to your house with a ledger board bolted into the rim joist or wall framing. It is the most common setup because one side of the structure is already supported. A free-standing patio roof has four (or more) posts and stands completely on its own, which gives you more placement flexibility but means you are engineering a full independent structure with footings at every corner.
Flat, shed, gable, and hip roof options
A shed roof (also called a lean-to) is the easiest to build: one slope, low on the outer edge, higher where it meets the house. A flat roof patio cover looks cleaner and works well in dry climates, but it still needs a minimum slope of 1/4 inch per foot (1/4:12 pitch, roughly 2% grade) so water actually drains off instead of pooling. A gable roof has two slopes meeting at a ridge and handles rain and snow better in tough climates. A hip roof slopes on all four sides, looks finished from every angle, and is the most complex to frame. For most DIYers doing this for the first time, a shed or low-slope roof attached to the house is the right starting point. If you want to go deeper on gable framing specifically, that style has its own framing sequence worth studying separately.
| Roof Style | Difficulty | Best For | Drainage Notes |
|---|---|---|---|
| Flat / Low-slope | Easy-Moderate | Dry climates, modern look | Must maintain min. 1/4" per foot slope |
| Shed (Lean-to) | Easy | First-time builds, attached setups | Single slope handles runoff naturally |
| Gable | Moderate | Rain-heavy climates, curb appeal | Ridge directs water to both sides |
| Hip | Hard | All-climate performance, visual finish | Four-way drainage, complex framing |
| Free-standing (any style) | Moderate-Hard | Detached patios, pergola replacement | Requires full footing system |
Site prep, measurements, and layout

Before you cut anything, spend an afternoon on the ground with a tape measure and a notepad. Measure the width of your patio slab or deck, then decide how far out from the house you want coverage. Standard attached patio roofs run 10 to 16 feet deep, but your specific patio may dictate that. Write down: house wall height at the attachment point, the distance out to the outer posts, and the total span width side to side.
Use batter boards and string lines to lay out post positions. Pull the strings square by using the 3-4-5 triangle method: measure 3 feet along one string, 4 feet along the perpendicular string, and the diagonal between those two points should be exactly 5 feet. If it is not, adjust until it is. Mark each post center with a stake. Common post spacing runs 8 to 10 feet on center, though your beam span tables and local code will confirm what is allowable for your lumber size.
One thing a lot of people skip: check for underground utilities before you dig. Call 811 (in the US) at least three business days before you plan to dig. It is free, it is required by law in most states, and it prevents catastrophic mistakes.
Planning: slope, loads, drainage, and permits
Slope and drainage
If you are building a flat or low-slope roof, the minimum slope is 1/4 inch of rise for every 12 inches of horizontal run. That is not just a suggestion. Single-ply membranes like TPO, EPDM, and PVC all require at least this pitch for water to drain reliably. In practice, set your outer beam slightly lower than your house-side beam to achieve this slope. On a 12-foot-deep roof, the outer beam sits 3 inches lower than the inner ledger. For a shed or pitched roof, even a modest 2:12 or 3:12 pitch handles rain well, and steeper pitches (4:12 and above) let you use standard asphalt shingles.
Structural loads: snow, wind, and dead load
Your patio roof must be designed to carry its own weight (dead load) plus live loads: people, equipment, and weather. The IBC sets a minimum live load of 10 pounds per square foot (psf) for patio covers. Once you have the loads figured out, you can move on to actually framing and building your patio roof safely how to make a patio roof. If you live where snow accumulates, the roof needs to handle your local ground snow load converted to a roof snow load using ASCE 7 methodology. Wind uplift is equally important in hurricane-prone or high-wind zones. The ASCE 7 Hazard Tool (available at asce7hazardtool.online) lets you look up your location's design wind speed and ground snow load in a few minutes. Do this before you finalize your framing plan.
Permits: do not skip this step
Most jurisdictions require a building permit for a permanent patio roof. You will typically need to submit a site plan showing location and dimensions, a framing plan, and sometimes engineered drawings. Some counties require all trusses to be engineer-stamped. In areas with significant snow or wind, building departments often want stamped drawings showing load calculations. If you are in one of those areas, budget a few hundred dollars to have a structural engineer review your design. It is money well spent compared to a denied permit or a structure that fails under load. Check your local building department website before you start, not after.
Materials: wood, metal, and aluminum compared
The three main material choices each have real trade-offs. Here is an honest look at all three.
| Material | Cost (relative) | DIY Friendliness | Durability | Best Use Case |
|---|---|---|---|---|
| Pressure-treated wood | Low-Medium | High (familiar tools) | Good with maintenance | Framing posts, beams, rafters |
| Aluminum (extruded systems) | Medium-High | Moderate (kit systems) | Excellent (no rot/rust) | Low-maintenance patio covers |
| Steel / Metal (tube/angle) | Medium | Low (welding or bolting) | Excellent | Long spans, commercial-style builds |
Pressure-treated lumber is the default choice for most DIY patio roofs. It is available at every home center, easy to cut and fasten, and strong enough for typical spans with standard 2x6 or 2x8 rafters. One important detail: when you fasten into pressure-treated wood, use hot-dipped galvanized or stainless steel hardware only. Standard zinc-plated or electroplated fasteners corrode rapidly when in contact with treated lumber, and that corrosion weakens the connection over time.
Aluminum patio cover systems (sold as kits with extruded beams, posts, and panel systems) are a great option if you want a low-maintenance result and do not mind paying more upfront. They go together with basic hand tools and are resistant to rot, rust, and insects. Many manufacturers provide engineered load tables with their systems, which can simplify the permit process.
Steel framing makes sense for long spans or commercial-looking builds, but unless you are comfortable with structural bolting or welding, this is one area where bringing in a fabricator for the metalwork and handling the finish carpentry yourself is a reasonable split.
Step-by-step: framing, posts, and ledger installation
Step 1: Dig and pour footings
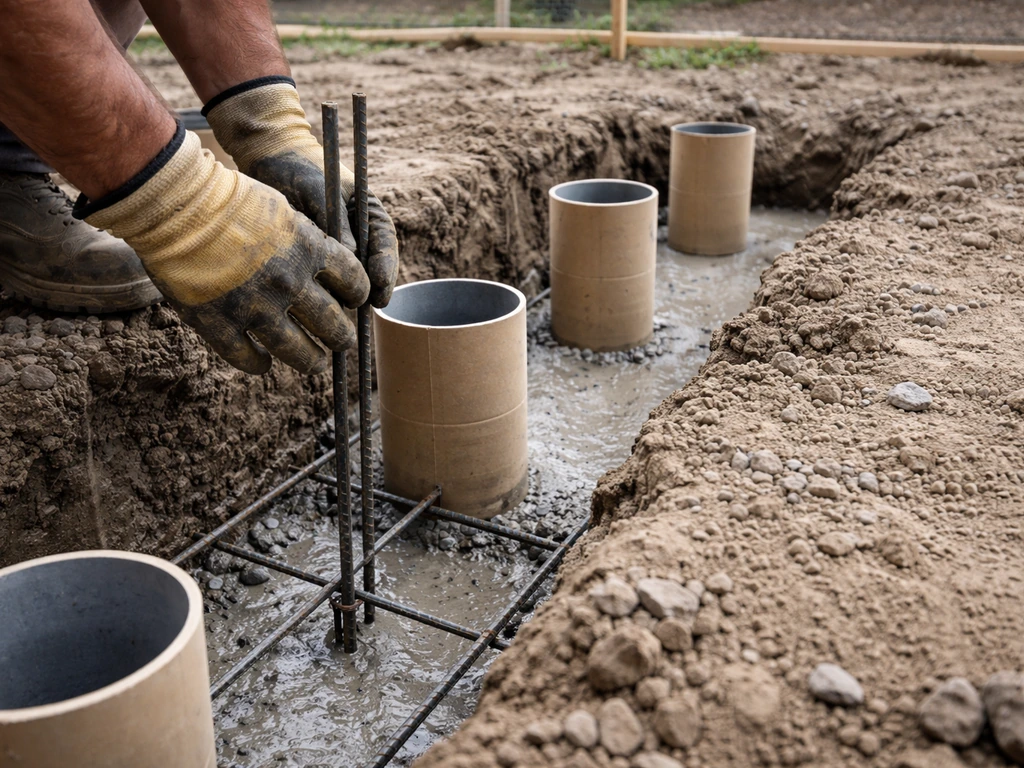
For a free-standing roof or the outer posts of an attached roof, you need concrete footings below your local frost depth. Frost depth varies from 0 inches in southern coastal areas to 48+ inches in northern zones. Call your building department or look it up on a frost map. Dig your holes to that depth plus a few extra inches, pour a concrete base, and set your post bases or anchor bolts while the concrete is wet. For slab-on-grade installs in frost-free areas, the IBC allows post bases directly on a slab at least 3.5 inches thick, provided each column load does not exceed 750 pounds. For heavier loads or frost-prone areas, you need independent poured footings.
Step 2: Set posts
6x6 posts are the standard for patio roof columns up to about 10 feet tall. Use a post level or a standard level held on two adjacent faces to plumb each post, then brace it temporarily with 2x4 diagonal braces staked into the ground. Do not permanently fasten anything until all posts are plumb and braced.
Step 3: Install the ledger board (attached roofs)
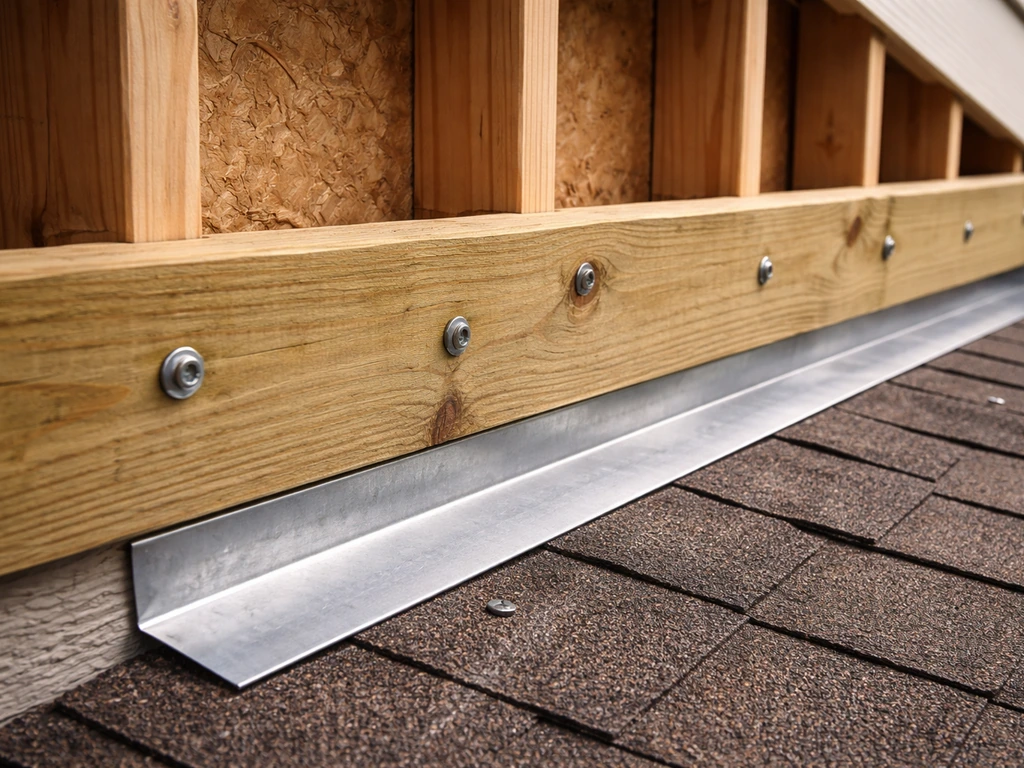
The ledger is the horizontal board that attaches to your house wall and carries the rafters on the house side. This is one of the most important connections in the whole structure, so do it carefully. First, snap a chalk line on the house wall at the height where the top of your ledger will land. That height determines your finished roof pitch. Remove any siding from that area (do not attach through siding). Attach the ledger with 1/2-inch lag screws or structural bolts that penetrate at least 1.5 inches into the house rim joist or structural framing, not just into sheathing. Fasten in a staggered pattern per the IRC ledger fastening table for your lumber sizes.
Flashing is non-negotiable here. Install galvanized Z-flashing along the top of the ledger before re-installing any siding above it. The flashing directs water away from the wall and prevents it from seeping behind the ledger where rot and mold start. For additional protection, consider a self-adhering flashing tape membrane over the fastener penetrations before the Z-flashing goes on. Fasten the Z-flashing with galvanized nails that penetrate at least 1 inch into structural framing.
Step 4: Install beams
Beams span between posts and carry the rafters. A common sizing for a 10-foot span carrying standard rafter loads is a doubled 2x10 or a single 4x10, but verify with a span table for your lumber species and load. Set beams into post caps (code-approved post-to-beam connectors) rather than toenailing. Post caps transfer loads properly and resist uplift.
Step 5: Frame the rafters
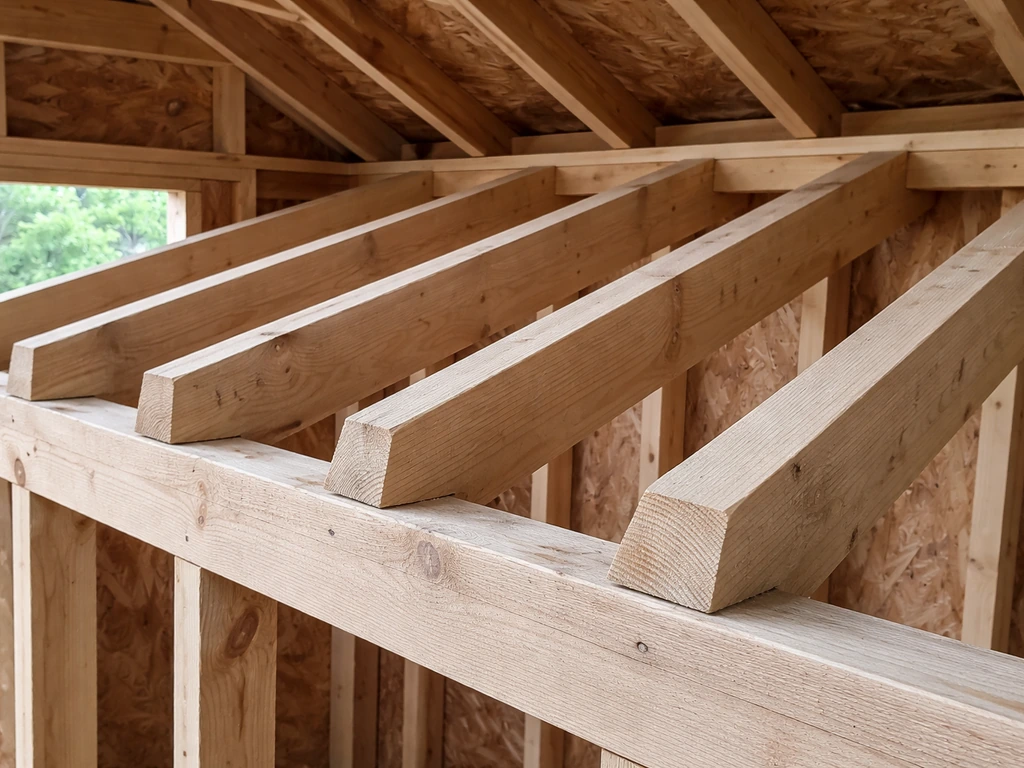
Rafters run from the ledger (or ridge, for a gable) out to the outer beam. For a shed roof, they are simple straight members with a bird's-mouth notch where they sit on the beam. Space rafters 16 or 24 inches on center depending on your sheathing type and roof load. For a gable roof, you will add a ridge board at the peak and cut opposing rafter pairs to match the pitch angle. Hip roofs require hip rafters running at 45 degrees from each corner, with jack rafters filling in between. If you are tackling a hip or gable build, study the framing layout before you start cutting.
Roofing details: sheathing, covering, waterproofing, and gutters
Sheathing
For pitched roofs (3:12 and above), install 7/16-inch or 1/2-inch OSB or plywood sheathing over the rafters. Stagger the sheet joints and leave an 1/8-inch gap between sheets for expansion. For low-slope or flat roofs with single-ply membrane systems, you can use the same sheathing as a substrate, or use a rigid insulation board system if energy performance is a priority.
Underlayment and ice barrier
On pitched roofs, apply roofing underlayment (30-lb felt or a synthetic equivalent) starting at the eaves and working upward with 6-inch overlaps. In climates with ice damming risk, the IRC requires an ice barrier that extends at least 24 inches inside the exterior wall line. That barrier must be either two layers of underlayment cemented together or a self-adhering polymer-modified bitumen sheet (the peel-and-stick type). Do not skip this in northern climates.
Roof covering options
For pitched roofs at 4:12 or steeper, standard asphalt shingles are the easiest and most affordable option. Install drip edge at the eaves before underlayment, then at the rakes over the underlayment. Shingle from the bottom up with the correct exposure. If you are using asphalt shingles for your pitched patio roof, follow these guidelines on how to shingle a patio cover. Roofing a patio cover with shingles follows the same sequence as any residential roof, just on a smaller scale.
For low-slope and flat roofs, use a single-ply membrane: TPO, EPDM, or PVC. EPDM (the black rubber membrane) is the most DIY-friendly because it is flexible, comes in large sheets that minimize seams, and bonds with contact cement or tape systems. TPO and PVC require heat-welded seams that need a hot-air welding tool, which adds cost and skill requirements. Whatever membrane you choose, pay close attention to edge terminations and wall flashings. The membrane must lap up walls at least 2 inches (follow your specific manufacturer's requirement) and terminate under counter-flashing or be sealed with appropriate termination bar. Poorly executed edge details are where nearly every flat roof leak starts.
Gutters and downspouts
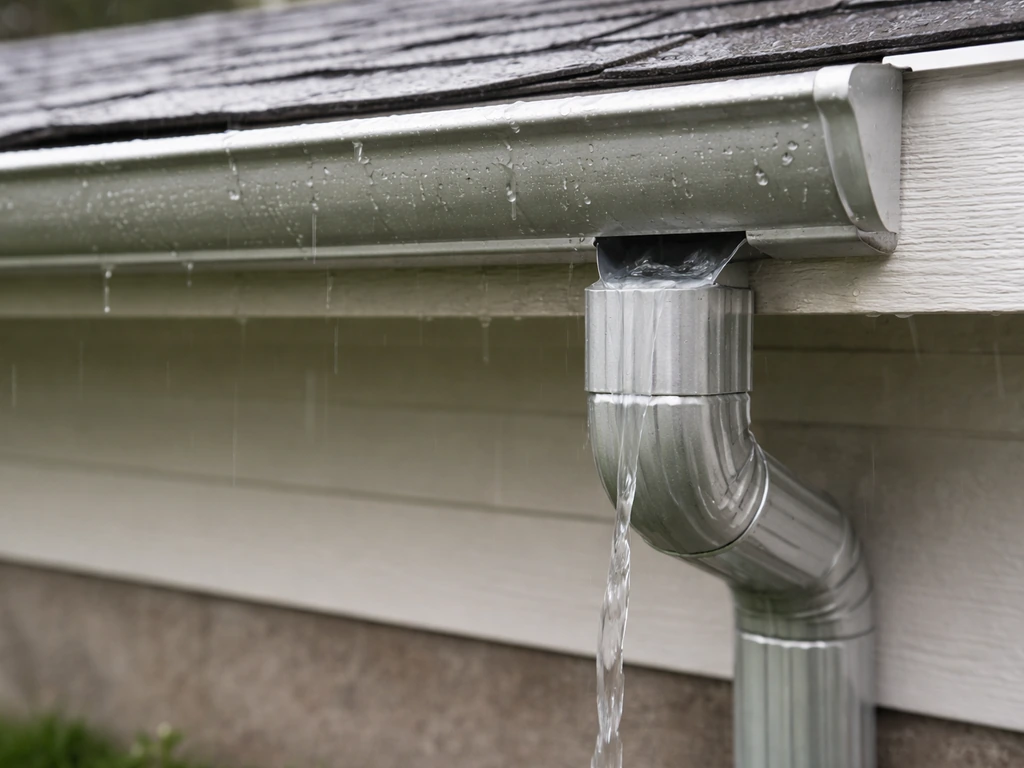
Even a small patio roof dumps a significant volume of water during a rainstorm, and you need to direct that water away from your foundation. Install gutters along the low edge of the roof. A good rule of thumb: space downspouts no more than 40 linear feet apart. Use downspout extensions to carry water at least 6 to 10 feet away from the house foundation before it discharges. Splash blocks help, but a solid extension aimed at a positive-drainage path is better. Do not let downspouts discharge into a low spot against the foundation wall.
Finishing, safety checks, and when to bring in a pro
Finishing touches
Once the roof covering is on, close out the fascia boards along the eave and rake edges, caulk any wall-to-roof transitions with a paintable exterior sealant, and reinstall any siding you removed around the ledger. If you have exposed wood framing on the underside, paint or stain it before closing it up. Touch up any post bases with rust-inhibiting paint if you used steel hardware.
Structural safety checks before you use it
- Pull on every post to verify it is firmly anchored and does not rock
- Inspect every ledger fastener to confirm it hit framing, not just sheathing
- Check all hurricane ties and post caps to make sure they are fully nailed
- Walk the roof deck (if accessible) and look for any soft spots in the sheathing
- Pour water on the membrane or sheathing surface and confirm it drains toward the gutter with no ponding
- Verify flashing laps are sealed and no gaps exist where the roof meets the house wall
When to hire a professional
This project is genuinely manageable as a DIY build for most of the common configurations, but there are a few situations where bringing in a structural engineer or licensed contractor is the right call. If your roof span exceeds about 16 feet between supports, if you are in a high-wind or heavy-snow zone, if the building department requires stamped drawings, or if you are attaching to a masonry wall (not a wood-framed house), get an engineer involved. Patio roofs must be designed for snow, wind, and uplift forces, and a structural engineer produces the permit-ready calculations that prove your design is safe. That is not optional in many jurisdictions, and the cost (typically $300 to $800 for a simple patio cover) is a small fraction of the total project.
Similarly, if you get partway through and the ledger connection to your house looks more complicated than expected (say, you find that the area behind your siding is a concrete or steel wall, or the rim joist is in a weird location), stop and consult a contractor before proceeding. The ledger is a structural connection, and guessing wrong there has real consequences.
Your next steps
- Decide on attached vs. free-standing and your roof style (shed, flat, gable, hip)
- Measure your patio and calculate your minimum roof slope based on the style
- Look up your local frost depth, ground snow load, and design wind speed
- Contact your building department to confirm permit requirements and submittal documents
- Select your materials (pressure-treated wood is the best starting point for most builds)
- Lay out post locations, call 811, dig footings, and start framing
The planning phase feels slow, but it is where you avoid expensive mistakes. Once footings are in and the ledger is on the wall correctly, the rest of the framing goes up quickly. Most DIYers finish the framing on a shed-style attached patio roof in a single weekend and complete the roofing covering the following weekend. If you are wondering how to cover a patio with roofing, follow the same sequence you would use on a residential roof, then finish with properly sealed edges and flashing roofing covering. Take it one phase at a time and you will have a solid, code-compliant patio roof that lasts decades.
FAQ
How do I choose between an attached patio roof and a free-standing one if my yard is uneven?
If the ground is uneven, free-standing posts can be easier to level, but you still must get each footing down to frost depth and keep the beam plane uniform. For attached roofs, the ledger height usually controls your pitch, so you may need to accommodate grade changes by stepping post heights on the free end or using adjustable post bases where allowed by the footing plan.
What is the safest way to deal with a ledger connection when my house has siding but not a clear rim joist location?
Do not guess. Locate the structural framing behind the siding using a stud finder, verify with measurements from known interior framing, and confirm with an exploratory hole before fastening. If you cannot confidently hit rim joist or structural framing with the required penetration, stop and redesign, because ledger fasteners into sheathing do not provide the needed shear and uplift resistance.
Can I build a patio roof without gutters and rely only on sloped roofing?
You generally should not. Even a properly pitched roof can dump high runoff during storms, which can undermine soil near the foundation or cause splashback against the house. Use gutters on the low edge when the patio is close to the foundation, and route downspouts away with extensions or a positive-drainage discharge path.
How do I prevent flat or low-slope patio roofs from leaking at the edges?
Flat roof leaks commonly start at terminations. Follow the membrane manufacturer’s required wall-lap height, use the correct termination method (counter-flashing or termination bar where required), and keep fastener penetrations sealed. Also pay attention to slope continuity, where low spots can hold water and force the membrane to resist pooling for long periods.
What should I do if my patio roof framing span is larger than what typical tables assume?
Re-check your loads and span with the exact lumber species, actual rafter/beam spacing, and roof covering weight, then confirm the connection details (post caps, hangers, and uplift resistance). If your span exceeds what typical DIY configurations cover, consider a roof kit with engineered load tables, or get stamped calculations so your beam and posts are sized to avoid mid-span deflection and permit issues.
How far apart should posts be, and when does post spacing become a structural problem?
Post spacing is limited by beam span, roof loads, and your local wind and snow design values, not just aesthetics. Even if a rafter spacing seems acceptable, too wide a post spacing can overload the beam and create excessive sag, which can also pull flashing seams over time. Use span tables and local code guidance, and verify with a beam design for uplift.
What is the correct fastening hardware when attaching to pressure-treated lumber?
Use hot-dipped galvanized or stainless steel fasteners rated for contact with treated wood. Avoid ordinary zinc-plated or electroplated screws and nails for ledger and structural connections, because corrosion can reduce pullout and shear capacity over time. If you are unsure, match the hardware to the treated lumber grade and follow the corrosion compatibility guidance from your lumber supplier.
Do I need an ice-and-water barrier on every patio roof location?
Only if you are in a climate with ice dam risk or where your local code triggers it, but northern and cold-wet areas commonly require it. The barrier must extend far enough up the roof, at least 24 inches inside the exterior wall line per common IRC requirements, and it must be properly overlapped and integrated with underlayment and drip edge.
What’s the best way to waterproof around where the roof meets the house wall?
Plan the sequence so water always sheds over, never behind, the flashing. Remove the siding where the ledger will be, install appropriate Z-flashing at the top of the ledger, and then reinstall siding. Consider sealing around any penetrations and adding a self-adhering membrane over fasteners if your setup allows it, but do not rely on caulk alone for primary water control.
When should I involve a structural engineer even if I’m doing the rest DIY?
Call an engineer if your roof is in a high-wind or heavy-snow zone, spans exceed about 16 feet between supports, you are attaching to non-wood framing, or the permit office requires engineered drawings. Also involve one if you discover unexpected conditions behind the ledger area (masonry, unusual structural layout, or missing rim/joist framing), because ledger design changes can require a full rework.
How do I calculate the roof snow load correctly for my permit plan?
Do not guess a roof snow load from ground snow alone. Use the required methodology for converting ground snow load to roof snow load as defined by your code, considering factors like exposure and roof slope. If you want to stay DIY, use the ASCE 7 tools for initial numbers, but confirm with local code requirements for what your jurisdiction expects on submitted plans.
What underside finishes can I do without trapping moisture?
If you have exposed underside framing, painting or staining helps protect wood, but you still need ventilation where required by your roofing build. Avoid sealing all sides of wood framing so tightly that moisture cannot dry. If you add rigid insulation on a low-slope system, follow the insulation and vapor control recommendations for your specific membrane assembly.