You can cover a patio with roofing by building an attached lean-to, a gable roof, or a freestanding structure over it, then applying metal panels, polycarbonate sheets, shingles, or fabric depending on your budget and goals. The whole project breaks down into five decisions: what style fits your space, what pitch sheds water properly, what material goes on top, how you frame and anchor it safely, and whether your local building department needs to sign off first.
How to Cover a Patio with Roofing: DIY Step Guide

Celia Vaughn
31 May 2026
If you want the roof to shed water properly and stay attached safely, you also need to know how to frame a patio roof. If you want a practical start-to-finish plan, follow our guide on how to build a patio roof, including framing, anchoring, and drainage details. Get those five things right and the roof will last decades. Skip one and you'll be dealing with leaks, sag, or a stop-work order.
Pick the Right Patio Cover Style First
Before you buy a single board, you need to pick a structure style, because that choice drives everything else: how many posts you need, how the roof ties into the house, and how water leaves the surface. There are four common options for DIYers.
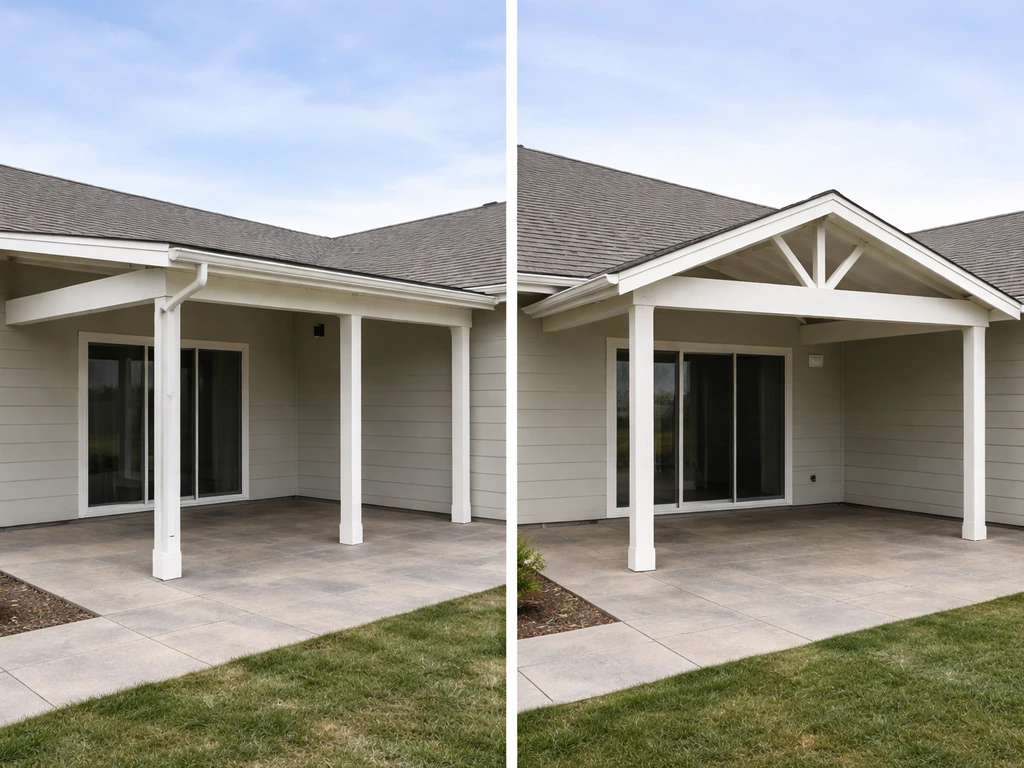
Lean-to (Attached Single-Slope)
This is the most popular choice and the easiest to build. One edge of the roof bolts to a ledger board on your house wall, and the other edge sits on posts at the outer edge of the patio. The roof slopes in one direction, away from the house, so rain runs off the front. It's simple, structurally sound, and shares the house wall as one support. The downside is that you're limited on headroom at the outer edge unless you set posts tall enough, and all your drainage lands along one front gutter line.
Gable Roof Patio Cover
A gable roof has a ridge at the peak and two slopes that drain to opposite sides. It gives you more headroom in the center and looks more like a permanent room addition than a tacked-on cover. It's noticeably more complex to frame, especially where the ridge ties into the house or stands on its own ridge beam. If you want to go this route, the section on framing a gable roof patio cover goes deeper on that specific build.
Freestanding Structure
A freestanding patio roof doesn't touch the house at all. It stands on four or more posts with its own beam system. This is the right call when you can't (or don't want to) attach to the house wall, when the patio is away from the house, or when your local code makes house attachment complicated. The tradeoff is that you need footings or post anchors at all four corners, and the structure has to be braced laterally so wind doesn't rack it.
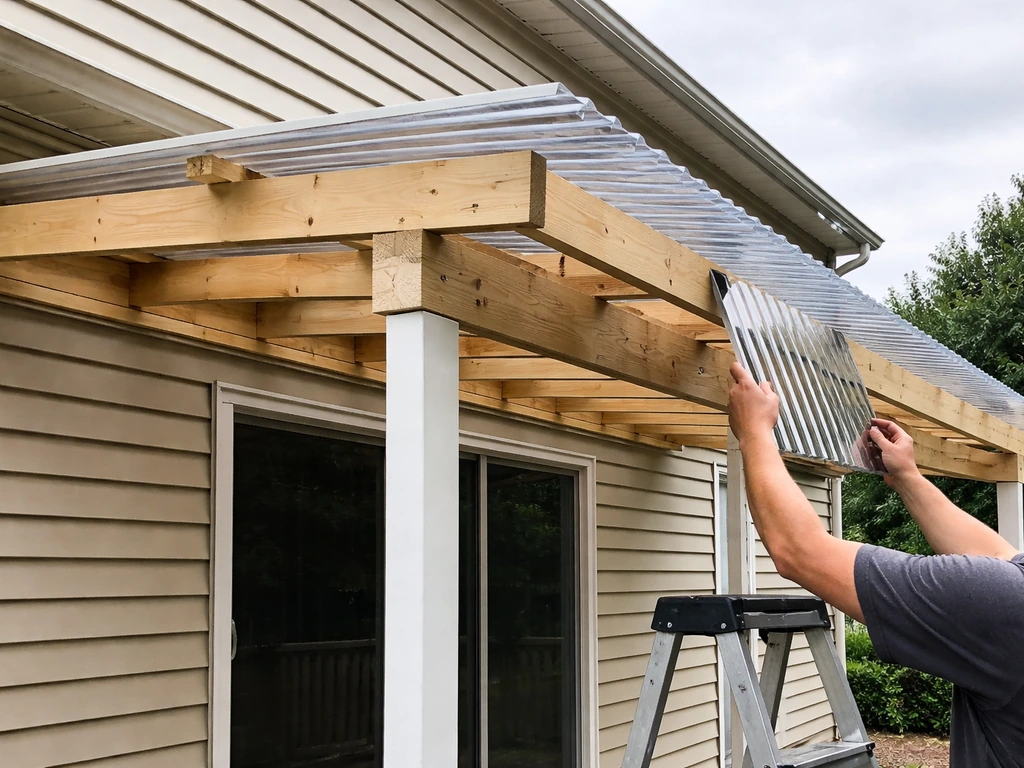
Pergola with Roofing Panels
A pergola frame (open rafters on beams and posts) becomes a real roof when you lay polycarbonate panels, corrugated metal, or fabric across the top. This hybrid approach is very popular because the open pergola framework is easy to build, and the panels drop in without complex framing. You still need to plan pitch and drainage just like any other roof, but the rafter spacing can double as your panel support structure.
| Style | Difficulty | Best For | Key Requirement |
|---|---|---|---|
| Lean-to / Attached | Easiest | Most patios adjacent to the house | Solid ledger attachment to house |
| Gable Roof | Moderate-Hard | Larger patios, permanent look | Ridge beam, matching house roofline |
| Freestanding | Moderate | Detached patios, rental/HOA limits | Concrete footings at all posts |
| Pergola + Panels | Easy-Moderate | Budget builds, translucent light | Adequate rafter pitch for drainage |
Measure, Plan Your Layout, and Sort Out Drainage

Most patio roof problems, including leaks, rot at post bases, and foundation wetness, come back to water going somewhere it shouldn't. Plan the drainage before you plan anything else. To get started, follow these steps for how to raise a patio roof from measuring and layout through drainage planning.
What to Measure Before You Design
- Patio dimensions: length and width in feet, measured from the house wall to the outer edge and side to side
- Height at the house wall: where the ledger or ridge will sit (usually just below the soffit or a window, whichever comes first)
- Height at the outer posts: what you want for clearance at the low end (7 feet minimum feels comfortable; 8 feet is better)
- Obstructions: existing downspouts, HVAC lines, electrical panels, windows, doors, and gas meters that the roof could interfere with
- Ground slope: does the patio slope away from the house already, or does water pool near the foundation?
Designing the Right Pitch
Roof pitch is described as rise-over-run: a 2:12 pitch rises 2 inches for every 12 inches of horizontal run. For a lean-to, that means a 12-foot-deep roof with a 2:12 pitch drops 24 inches from the ledger to the outer edge. Minimum pitch for metal panels and polycarbonate is typically 1:12, but 2:12 or steeper is much better for keeping water moving. Shingles need at least 4:12 to perform well. To find your pitch, divide the total rise (in inches) by the total run (in feet) and that gives you the rise per foot.
Common mistake: people set the ledger too low and end up with barely any pitch, or they slope the roof back toward the house instead of away from it. Both trap water against the wall. Always slope away from the structure.
Planning Gutters and Runoff
Every covered patio roof concentrates rainwater that would otherwise fall across a wide area and funnels it to one or two points. If those points discharge near your foundation, you've traded open rain exposure for a slow foundation problem. A practical sizing rule: allow 1 square inch of downspout cross-sectional area for every 100 square feet of roof. A standard 2x3-inch rectangular downspout has about 6 square inches of area, which handles around 600 square feet.
Most residential patio roofs are well under that, so one properly sized downspout per corner is usually fine. The critical detail is where that downspout ends: it needs to discharge at least 4 to 6 feet from the foundation wall, either through an extension or an underground drain tile. Any depression in the ground near your downspout discharge should be filled and regraded to slope away from the house.
Snow and Wind Loads
The 2024 International Residential Code specifies a minimum vertical live load of 10 pounds per square foot (psf) for patio covers, but if your area's ground snow load exceeds that, you design to the snow load instead. Check your local jurisdiction's adopted code for the design snow load in your ZIP code. Wind matters too, especially for uplift at the edges of the roof. Roof panels at eave and rake edges experience significantly higher uplift forces than the center, which is why edge fastening always needs to be tighter than field fastening.
Choose Your Roofing Material
The material you put on top of the frame affects weight, light, heat, installation complexity, and how long the roof lasts. Here's a plain-language breakdown of what DIYers actually use.
| Material | Weight (approx.) | Translucent? | Min. Pitch | Lifespan | DIY Difficulty |
|---|---|---|---|---|---|
| Corrugated Metal | 1-2 lbs/sq ft | No | 1:12 | 30-50 yrs | Easy |
| Standing Seam Metal | 1.5-2.5 lbs/sq ft | No | 1:12 | 40-70 yrs | Moderate |
| Multiwall Polycarbonate | 0.5-1 lb/sq ft | Yes (diffused) | 1:12 | 15-25 yrs | Easy-Moderate |
| Asphalt Shingles | 2-4 lbs/sq ft | No | 4:12 | 20-30 yrs | Moderate |
| Shade Fabric / Sail | Very light | Partial | Flat OK | 5-10 yrs | Easy |
Corrugated and Ribbed Metal Panels
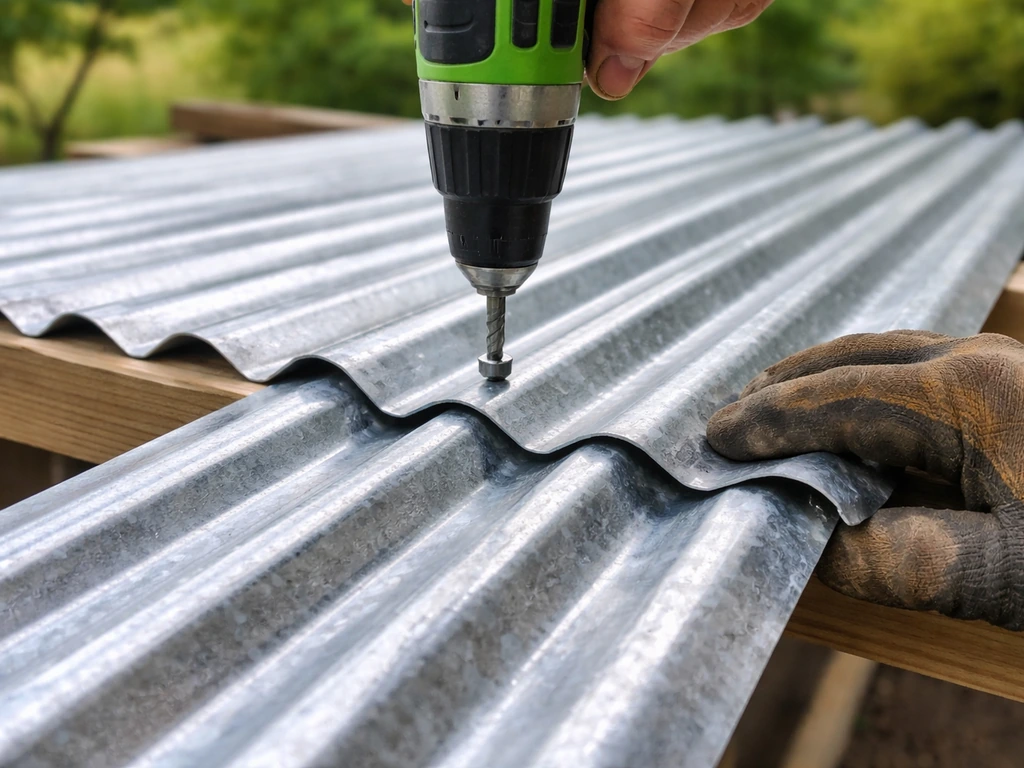
Corrugated metal (steel or aluminum) is the workhorse of DIY patio roofing. Panels come in 2 to 3 foot widths and 8 to 16 foot lengths. They screw directly to purlins (horizontal support boards between rafters) with self-drilling hex-head screws that have neoprene washers. Standard fastener spacing is 12 to 24 inches depending on your wind zone, with tighter spacing at the edges. Corrugated metal is loud in heavy rain and gets hot in direct sun, but it's cheap, durable, and fast to install.
Standing Seam Metal
Standing seam panels lock together with a raised seam and use hidden clips instead of exposed screws. This eliminates fastener penetrations through the face of the panel, which is the number one source of metal roof leaks over time. The clips allow thermal expansion and contraction, which is important for long panel runs. Standing seam is more expensive than corrugated and harder to cut, but it's significantly more waterproof and longer-lasting. If you're building something you want to forget about for 30 years, standing seam is worth the extra cost.
Multiwall Polycarbonate Panels
Polycarbonate panels let diffused light through while blocking UV and providing some insulation. The twin-wall and triple-wall versions (which look like a flattened cardboard structure in cross-section) are the most common for patio covers. Installation requires a glazing bar or aluminum framing system to hold the panels, U-channel profiles at the exposed ends to keep water and insects out of the channels, and a minimum 1-inch gap at the top of each panel to allow for thermal expansion.
This is non-negotiable: polycarbonate expands and contracts significantly with temperature changes, and panels installed too tight will buckle. The U-profiles at the bottom end of each panel must also be vented (not sealed solid) so any condensation that forms inside the channels can drain out. Sealing that end solid traps moisture, which degrades the panel from the inside.
Asphalt Shingles
Shingles match the look of the main house roof better than any other material, which makes them popular for attached gable covers that need to blend in architecturally. If you're installing asphalt shingles under a patio cover, you also need solid sheathing and proper layout for your roof pitch and drainage how to shingle a patio cover.
They require solid sheathing (OSB or plywood) under them, which adds cost and weight but also adds rigidity to the whole roof assembly. You need at least a 4:12 pitch for shingles to drain properly. The full shingling workflow, including felt underlayment, drip edge, and ridge cap, is covered in detail in the guides on how to roof a patio with shingles and how to shingle a patio cover.
Fabric and Shade Sail Systems
Fabric isn't waterproof in the same sense as hard roofing, but waterproof shade sail fabrics and tensioned canopy systems can shed rain well enough for many climates. These are easiest to install and remove but have the shortest lifespan and the least weather protection. Best for patios where you want partial shade rather than full waterproof cover.
Framing, Posts, Ledgers, Beams, and Rafters
A wobbly patio roof is almost always a framing problem. Either the ledger isn't bolted solidly into the house framing, the posts aren't braced against lateral movement, or the beam-to-post connections are relying on nails when they need hardware. Here's how to frame it right.
Ledger Attachment (Attached Roofs)
The ledger is the horizontal board that bolts to your house wall and carries one end of every rafter. It has to be anchored into the house's structural framing (rim joist, wall studs, or band joist), not just into siding or sheathing. Use 1/2-inch lag screws or structural bolts, typically 16 inches on center, staggered slightly so you're not splitting the same grain line. The ledger needs to be flashed so water from the house wall doesn't run behind it and rot the wall. Flashing goes over the ledger and under the siding above it, and the bottom of the ledger should be sealed or have a small gap to allow drainage.
Post Layout and Footings
Posts carry the weight of the outer beam and everything above it. For most residential patio covers, 4x4 posts are sufficient for heights under 8 feet, and 6x6 posts are the right call above that or for heavier roofing materials. Each post needs a footing below the frost line (check your local frost depth, which varies from 12 inches in the South to 48 inches or more in the northern US and Canada).
A simple tube-form footing poured with post-base hardware set in wet concrete is the standard DIY approach. Never just bury a wood post in dirt: it will rot within a few years. Set the post base hardware while the concrete is wet, use a level and stakes to hold it true until it cures, then bolt the post to the hardware.
Beams, Rafters, and Spacing
The beam runs horizontally along the outer posts and supports the low end of all your rafters. For a typical 12-foot-wide patio, a doubled 2x8 or 2x10 beam is common, but you should size it using a span table or your permit plan. Rafters run from the ledger (or ridge) down to the beam, typically 16 or 24 inches on center depending on the roofing material.
Metal panels and polycarbonate can often span 24 inches between supports, while shingles over sheathing allow more flexibility. Rafter-to-ledger and rafter-to-beam connections should use metal hangers or notched-and-bolted details, not toenails alone. Purlins (horizontal boards running perpendicular to the rafters, between them) are added for metal and polycarbonate installs to give panels intermediate support and a fastening surface.
Lateral Bracing
This is what most DIY builds get wrong. A roof can be perfectly built vertically but still rack sideways in a wind event if there's no lateral bracing. Diagonal knee braces from each post up to the beam (45-degree angle, bolted through) are the most common solution. Some builders also use horizontal blocking between rafters near the ledger. If you have a solid ledger bolted to the house, the house wall itself provides significant lateral resistance on that end, but the outer beam-and-post system still needs bracing.
Permits, Safety, and Code Reality
Most attached patio covers and any freestanding cover with posts require a building permit. That's not a bureaucratic nuisance: it's what ensures your structure is reviewed against load requirements, attachment methods, and setback rules. Skipping permits creates real problems when you sell the house or when your insurance adjuster sees the unpermitted structure after a wind event.
When You Need a Permit
Rules vary by jurisdiction, but the general pattern is: any patio cover attached to the house requires a permit, and any freestanding structure over roughly 200 square feet typically requires one too. Some cities issue permits over the counter for simple prescriptive designs (basic lean-to with standard rafter sizing), while more complex designs require engineered drawings and a plan review period. Electrical, mechanical, or plumbing work in or near the patio cover almost always requires separate permits even if the structural permit isn't triggered. Call your local building department before you start. The conversation usually takes 10 minutes and saves weeks of headache.
What Inspectors Look For
Framing inspections typically happen after the frame is up but before the roofing goes on, so the inspector can see every connection. They'll check ledger bolting, post bases, beam-to-post hardware, rafter hangers, and lateral bracing. A final inspection happens when everything is done. Common failures at inspection: undersized ledger bolts, missing post-base hardware, inadequate beam size, and no flashing at the ledger. Fix those before calling for inspection.
When to Hire an Engineer or a Pro
Hire a structural engineer if your design is non-standard (large spans, heavy roofing, high snow or wind loads, or attachment to an older home where the wall framing is unknown). An engineer's stamp on a drawing typically costs $300 to $800 and makes the permit process smoother. Hire a contractor if the ledger attachment requires opening walls, if you're in a high-wind or high-seismic zone, or if the roof height makes safe ladder work impractical for one or two people. There's no shame in framing the easy parts yourself and subbing out the footing work or the flashing.
Step-by-Step Build: Attached Lean-to Patio Cover
This is the most common DIY patio roof build. If you’re ready to start the build, follow a step-by-step approach to learn how to roof a patio cover from framing through weatherproofing. The sequence below assumes you've pulled your permit and have your materials staged. A 12x16-foot lean-to is a realistic one-weekend project for two people with basic carpentry skills.
- Mark post locations along the outer edge of the patio using stakes and string. Typical spacing is 6 to 8 feet on center, which determines your beam span.
- Dig footing holes below the frost line (check local requirement), set tube forms, pour concrete, and embed post-base hardware while wet. Let concrete cure at least 48 hours before loading it.
- Set posts in their bases and brace them plumb with temporary diagonal bracing nailed to stakes. Use a level on two faces of each post.
- Snap a chalk line at the correct height on the house wall for the top of the ledger board. Account for your planned roof pitch: if your ledger top is at 9 feet and your outer beam is at 8 feet for a 12-foot-deep roof, that's a 1-inch-per-foot pitch, which equals a 1:12 slope.
- Remove siding above the ledger line to expose sheathing (you'll tuck flashing under the siding above later). Locate studs or rim joist with a stud finder.
- Bolt the ledger board (typically 2x8 or 2x10 pressure-treated lumber) to the house framing using 1/2-inch lag screws, two per stud, staggered. Apply construction sealant behind the ledger before tightening.
- Install Z-flashing over the top of the ledger, tucking the top leg under the siding above. This is what keeps water from running behind the ledger. Do not skip this step.
- Cut posts to final height and install the outer beam. Use post-beam hardware or a notched-post detail, plus through-bolts. Check that the beam is level.
- Install knee braces at each post: 4x4 diagonal braces at 45 degrees, bolted through the post and through the beam. This is your lateral resistance.
- Install rafters from ledger to beam using metal joist hangers at the ledger end and hurricane ties or hanger hardware at the beam end. Space rafters at 16 or 24 inches on center per your material's requirements.
- If installing metal or polycarbonate: add purlins (2x4 boards) perpendicular to the rafters at the spacing required by your panel (usually 24 inches on center for most panels). If installing shingles: install OSB or plywood sheathing over the rafters.
- Install drip edge around the perimeter: along the eave (low end) first, then the rake edges (sides). Drip edge goes under the roofing material at the sides and over the underlayment at the eave.
- Lay your roofing material starting at the low end (eave) and working up. For metal panels, start at one rake edge and work across. Overlap each panel per manufacturer specs (typically one corrugation for corrugated metal, or follow the standing seam clip system for standing seam). For polycarbonate, slide panels into the glazing bar system and cap with the locking profile.
- Seal any penetrations (screw heads on exposed-fastener systems get butyl sealant tape under the panel at the top end; exposed screw heads should be factory pre-sealed with neoprene washers that are tightened snug but not over-torqued).
- Install gutters along the eave with hangers at 24-inch intervals, sloped 1/4 inch per 10 feet toward the downspout. Attach downspouts and add extensions to carry water at least 4 to 6 feet from the foundation.
- Call for framing inspection before roofing if your jurisdiction requires it, or a final inspection once complete.
Stepping It Up: Gable and Freestanding Variants
A gable roof patio cover follows the same basic sequence but adds a ridge board and two sets of opposing rafters that meet at the peak. The ridge board is supported either by a structural ridge beam (held up by a post or by the house wall) or by the opposing rafters acting in compression against each other with a collar tie or ceiling joist to resist outward thrust. Most DIY gable builds use a structural ridge beam because it's simpler and safer than relying on the rafter-thrust system. The full framing walkthrough for that specific style is covered in depth in the guide on how to build a gable roof patio cover.
For freestanding builds, the sequence is the same as the lean-to except that you have four corner posts instead of two, no ledger attachment to the house, and a beam on all four sides (or a beam on two sides with rafters spanning between them). Lateral bracing is more critical here because you don't have the house wall as a shear surface. Diagonal knee braces on all four corners, or blocking and knee braces in both directions, are the standard approach.
Finishing Details, Weatherproofing, and Keeping It Tight
This is where a lot of DIY patio roofs fall apart over time. The framing is fine, the panels are on, but water finds its way in through a gap at the wall, condensation pools inside polycarbonate panels, or the edge trim comes loose and a panel lifts in the next windstorm.
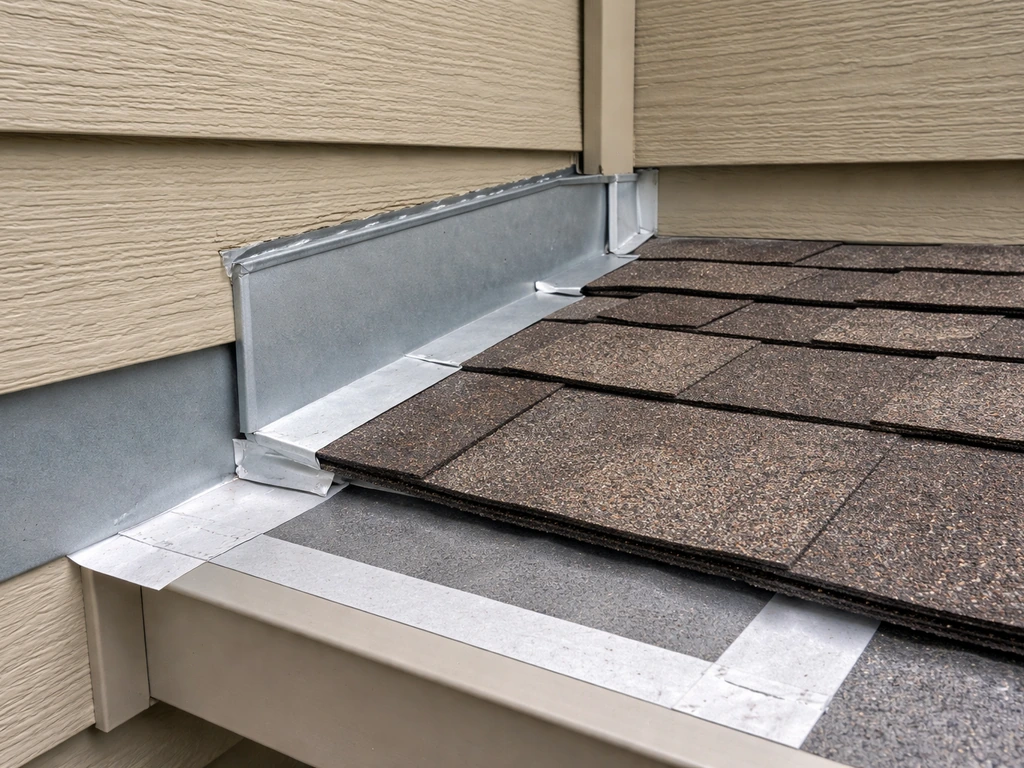
Wall Flashing Where the Roof Meets the House
Any place a roof panel or sheathing edge meets a vertical wall needs step flashing or counter flashing. For a lean-to, the sides of the roof where it meets the house wall (if the roof is narrower than the patio wall) need L-shaped flashing tucked under the siding and over the top of the roofing material. This is different from the ledger flashing at the top. What often goes wrong here is that builders caulk the gap between the panel and the wall instead of using proper flashing. Caulk cracks within 2 to 5 years and water gets in. Flashing lasts decades.
Edge Trim and Panel Finishing
Metal panel edges at the rake (side) should be finished with a formed rake trim that folds over the panel edge and fastens to the framing. This covers the raw panel edge, stops wind from getting under the panel, and looks clean. For polycarbonate, the end-lap profiles and U-channels are what seal the panel edges. The U-channel at the low end of a polycarbonate panel should be perforated or vented (many come with a micro-mesh tape that allows air but blocks insects) to let condensation escape. The U-channel at the top end is sealed solid to stop water entry. Getting these two confused is a very common mistake.
Condensation in Polycarbonate Panels
Multiwall polycarbonate is essentially hollow, with small channels running through it. In temperature swings, moisture vapor can get into those channels and condense into liquid. Proper installation with the correct end-cap profiles and a vented lower edge allows that condensation to drain out. If you seal both ends, you'll see persistent streaking inside the panels that won't go away and will eventually degrade the material from the inside.
Sealant and Caulk Points That Actually Matter
- Between the top of the drip edge and the first panel or underlayment course: use sealant tape (butyl), not liquid caulk
- Around any penetrations through panels (vent pipes, light fixtures): use a compatible sealant specified by the panel manufacturer
- At the ledger-to-wall joint: flashing handles the main water management, but a bead of paintable exterior sealant at the visible joint line looks clean and adds redundancy
- At lap joints between overlapping metal panels where they meet at the ridge or peak: many panel systems include a foam closure strip that fills the corrugation profile and blocks insects and wind-driven rain
Basic Maintenance to Make It Last
- Clear debris (leaves, pine needles, dirt) from the roof surface and gutters at least twice a year; debris traps moisture and accelerates corrosion and panel degradation
- Check and re-tighten any loose exposed fasteners on corrugated metal roofs annually; over-tightened screws can compress and crack the neoprene washer, and under-tight screws allow water entry
- Inspect flashing at the ledger and wall joints each spring; look for separation, gaps, or rust
- Check post bases for moisture accumulation or soil buildup against the post; maintain a clear air gap around post base hardware
- Inspect polycarbonate panels for yellowing or brittleness after 10 to 15 years; UV-protective coatings degrade over time and panels may need replacement
- Flush gutters and check that downspout extensions are still directing water away from the foundation, not back toward it
Before You Start: Your Practical Checklist
Run through this before you buy materials or pick up a shovel. It'll save you at least one expensive trip back to the lumber yard and possibly a permit violation.
- Measure your patio footprint (length x width) and record the height at the house wall and desired height at the outer edge
- Calculate your roof pitch based on those heights and the depth of the roof; confirm it meets the minimum for your chosen roofing material
- Decide on your roof style (lean-to, gable, freestanding, or pergola-with-panels) based on your patio layout and budget
- Choose your roofing material and note its weight, minimum pitch, and fastener/framing requirements
- Locate your frost line depth and determine footing size and depth for your posts
- Call your local building department to confirm permit requirements, setback rules, and whether a prescriptive plan or engineered drawings are needed
- Identify all utility locations (electrical, gas, water) near your post footing locations before digging; call 811 in the US to mark utilities
- Plan your drainage: where do gutters go, where do downspouts terminate, and is that location at least 4 to 6 feet from the foundation?
- Make a materials list including lumber, hardware (joist hangers, post bases, lag screws), roofing panels, flashing, gutters, and sealants
- Confirm you have the right tools: post-hole digger or auger, level, circular saw or miter saw, drill with appropriate bits, and a helper for setting beams and panels safely
FAQ
What height should I set the ledger or posts so my patio roof clears doors and furniture?
Start by measuring the clearance you need at the house end and at the outer edge (doors, ceiling fans, tall umbrellas). Use your chosen pitch to calculate the outer edge drop, then add at least 2 to 3 inches of margin for construction tolerances and roof thickness. If you plan to use polycarbonate or corrugated panels, remember they sit on purlins or glazing bars, so the final roof deck height is not the same as the frame height.
Do I need gutters and downspouts on a small patio roof, or can I just let water fall off the edges?
You can skip gutters if the roof edge discharges over landscaping away from the foundation, but most patio covers concentrate water into a narrow zone. A practical safeguard is to plan at least one controlled discharge point, typically a downspout or splash pad, so the runoff lands 4 to 6 feet from the foundation wall and can’t erode soil near piers or slab edges.
How do I prevent water from running behind the roof where it meets the house wall?
Use the correct flashing strategy at two different locations: ledger flashing at the top attachment point, and step or counter flashing anywhere the roofing or panel edge meets a vertical wall surface. Avoid relying on caulk as the primary water barrier at those transitions, because caulk joints fail when they flex or shrink with temperature.
What’s the best way to choose the roof pitch for my material and still keep the roof looking right?
Use the minimum pitch guidance for your top material, then check headroom. If you are forced into a shallow pitch, prioritize options that tolerate it better (for example shingles generally require a steeper pitch than metal or polycarbonate). Also confirm your pitch direction is away from the house, because reversing the slope is a common cause of trapped water and siding staining.
Can I anchor the ledger into siding sheathing or trim instead of structural framing?
No, the ledger needs to bite into structural framing like studs, a band joist, or rim joist. Fastening only to siding or sheathing can pull out in wind events and can also fail during inspection. If you cannot locate framing members precisely, open the wall area or use approved structural anchors once you confirm what’s behind the surface.
How tight should I fasten corrugated metal panels, and what spacing mistakes cause leaks?
Fasten with self-drilling screws that include neoprene washers and follow an edge-focused pattern, tighten edge zones more than the field, and avoid over-driving fasteners until the washer flattens excessively. Under-tightening or using the wrong washer type can allow vibration-driven leaks over time, especially near eaves and rakes where uplift is highest.
What’s the correct handling of polycarbonate panel expansion so it doesn’t buckle later?
Leave the required top expansion gap and do not over-constrain the panel at fasteners. Plan for thermal movement by using the recommended glazing bar system and keep the top gap free, if you install panels too tight in warm weather they can buckle as temperatures drop.
Should I seal both ends of multiwall polycarbonate to make it more watertight?
No, seal only where the system calls for a solid seal (typically the top end), and keep the lower end vented so condensation can drain out of the channels. Sealing both ends traps moisture, causes streaking, and can degrade the panels from the inside even if the roof looks intact.
How can I tell if my roof framing is braced enough for wind, before I cover it?
Look for a complete load path and diagonal resistance: diagonal knee braces from posts to the beam in at least one plane, plus lateral blocking where needed. If it’s attached to a house ledger, the house helps, but the outer beam-and-post system still must resist racking, especially for freestanding designs where there is no “shear wall” contribution from the house.
Where do most patio roof leaks start, even when the roof material is installed correctly?
Most leaks originate at transitions and interfaces: the ledger area, roof-to-wall sides, and panel edge terminations (rake edges for metal, end-lap and U-channel locations for polycarbonate). Another common culprit is using caulk where flashing should be, because caulk breaks at movement joints and hairline cracks.
What should I prepare for the framing inspection so I don’t fail it?
Have the frame completed but keep roofing off so connections are visible. Double-check ledger attachment into structural framing, post-base hardware presence, beam and rafter sizing per your plan, and that hangers or bolted connections are used where required. If you are missing flashing at the ledger before final assembly, delay any finish work until it’s ready.
When is it worth hiring a structural engineer instead of DIYing the spans and fasteners?
If your roof span is large, you expect heavier snow or higher wind loads, you are using an unusual attachment, or you are covering a wider area than typical, an engineer can prevent oversizing or under-sizing the beam and connections. It can also smooth permitting because the stamped design directly addresses the local jurisdiction’s load and anchorage expectations.
Can I use a permit-ready prescriptive plan if I’m changing something like panel thickness or roof material?
Often, small changes that only affect the top covering may still fall within the prescriptive assumptions, but changes in material weight, fastener type, or roof geometry can alter structural loads and fastening requirements. Before you proceed, confirm with the building department whether your specific materials and thicknesses still meet the approved design basis.