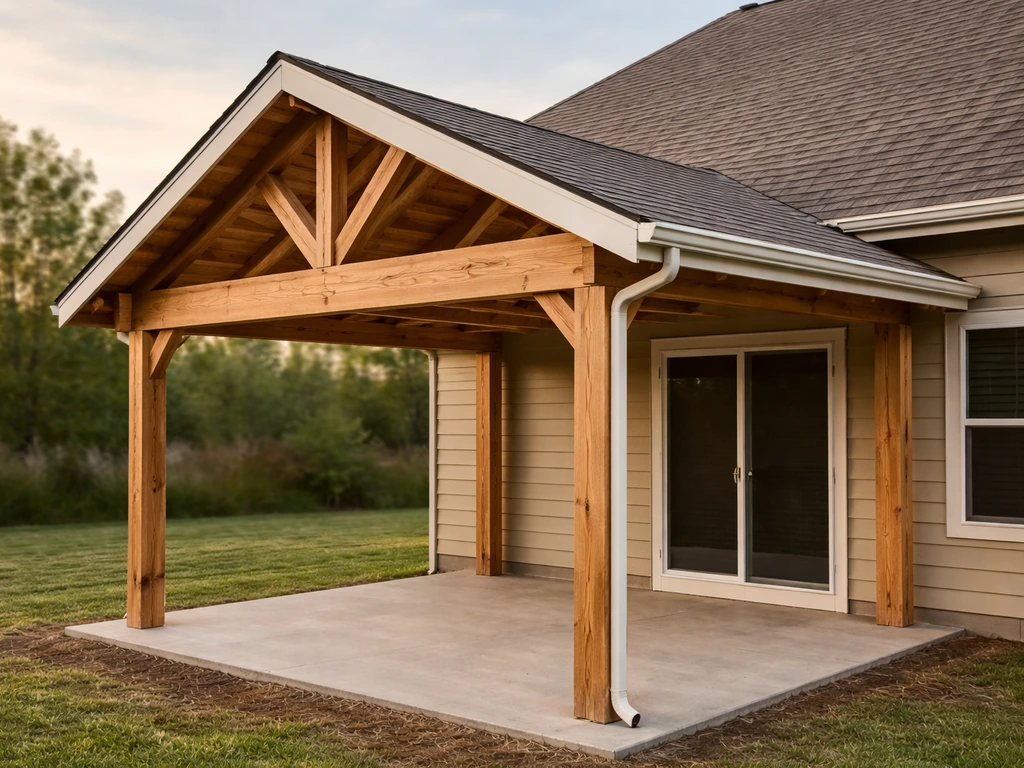
Building a gable roof patio cover is a serious but very doable DIY project. The basic process goes like this: plan your footprint and pitch, pull a permit, set your posts in concrete, install beams and rafters with a true ridge board at the peak, sheath it, and finish with shingles or metal roofing plus proper flashing and drip edge. Done right, it will handle wind and rain for decades. Done wrong, the ledger pulls away from the house or the roof leaks at the wall. This guide walks you through every stage so you know exactly what you're doing before you pick up a saw.
How to Build a Gable Roof Patio Cover DIY Guide

Celia Vaughn
27 May 2026
Project planning and measurements

Start on paper before you buy a single board. Sketch your patio footprint to scale, noting the house wall you plan to attach to (or whether you want a freestanding structure), and mark the finished dimensions. Common residential gable patio covers run 12x16 feet up to 16x20 feet, but your lot setbacks will narrow that down fast. Most jurisdictions follow rules similar to Garland, TX, which requires at least 10 feet from the rear property line and 6 feet from the side. Check your local rules before you commit to a size.
Once you have a footprint, decide your roof pitch. If you’re wondering how to raise a patio roof, start by confirming your measurements, pitch, and permit requirements before you build the frame. Once you know your roof pitch, you can frame a patio roof to match it and plan the rafter angles correctly. For a gable cover, a 4:12 pitch (4 inches of rise for every 12 inches of run) is the sweet spot for most DIYers: it drains well, looks proportional, and stays manageable on a ladder. You can go as low as 2:12, but at that pitch you need a double layer of self-adhering ice-and-water shield under the shingles to meet IRC R905 requirements, and it looks pretty flat. Anything above 6:12 is fine structurally but gets physically harder to work on. For a 16-foot-wide gable (8-foot run from each wall to the ridge), a 4:12 pitch gives you a ridge that sits 32 inches above the top plate. Write that number down, because it drives your ridge post heights and rafter cuts.
Calculate your overhang while you're at it. An 18-inch overhang on each side and at the gable ends keeps rain off your posts and out of your face. That means if your patio footprint is 16x20, your total roof width becomes roughly 19 feet and your total length becomes 23 feet. Mark all these dimensions on your plan. You'll need this drawing when you apply for a permit.
Per IRC Appendix BF, the finished structure cannot exceed 12 feet in height above grade. Measure from your existing concrete slab or ground level to the highest point you plan to frame. Add up: slab to beam bottom (your post height), beam depth, rafter depth, and ridge height. If that stack pushes past 12 feet, lower your post heights. For most standard single-story homes with 8- or 9-foot ceilings, you'll land comfortably at 9 to 10 feet finished height at the beam line, well within limits.
Materials and design options
You have three realistic material paths: pressure-treated wood, steel/aluminum tube framing, or a hybrid of wood posts with aluminum patio cover panels. Each has a genuine trade-off, not just a marketing pitch.
| Material | Pros | Cons | Best For |
|---|---|---|---|
| Pressure-treated wood | Easy to cut/modify, widely available, code-familiar to inspectors, takes any roofing | Needs periodic sealing/staining, heavier, vulnerable to rot if poorly flashed | Most DIYers; traditional look; shingle or metal roof finish |
| Steel tube framing | Very strong, slim profiles, long spans | Requires welding or bolted connections, harder to modify, needs primer/paint to prevent rust | Larger spans, high-wind areas, experienced builders |
| Aluminum patio cover systems | Rust-proof, lightweight, pre-engineered kits available | Kit systems limit custom sizing; not ideal for heavy tile or shingle roofing | Low-pitch covers with aluminum panel roofing; lower snow-load areas |
For a gable roof that you plan to shingle, pressure-treated lumber is the practical choice. Use PT 6x6 posts, a doubled 2x10 or LVL beam, and 2x6 rafters for spans up to about 14 feet. If your span is wider, bump to 2x8 rafters or consult a span table. The ridge board should be a 2x8 minimum so you have meat to nail into. Upgrade your hardware: use galvanized post bases, hurricane ties at every rafter-to-plate connection, and structural screws or 16d galvanized nails throughout. These aren't optional nice-to-haves; they're what keeps the roof on in a windstorm.
Permits, safety, and when to call a pro
Pull a permit. Full stop. Attached patio covers require a building permit virtually everywhere, and freestanding ones usually do too. The City of Anna, Texas also notes that patio covers and arbors still must comply with the International Residential Code, and that attaching the structure to a home may require the applicable building permit process described in its guidelines Attached patio covers require a building permit. This isn't just red tape. The inspector will catch problems before they become expensive failures, and an unpermitted structure can create real problems when you sell or make an insurance claim. Some jurisdictions (like Portland) allow smaller roofed structures under 200 square feet without a permit, but even those must still be built to code. When in doubt, call your local building department; a five-minute phone call saves a lot of headaches.
Your permit submittal typically needs a site plan showing setbacks, a framing plan with member sizes and spacing, and attachment details if you're tying into the house. IRC Appendix BF requires the structure to be designed for dead loads plus a minimum live load of 10 pounds per square foot, plus snow loads if those exceed that minimum in your area. In high-wind zones, you'll also need to show that your connections meet wind-pressure requirements. Your local building department may have a standard patio cover detail sheet you can download and use, which simplifies the process enormously.
On safety during the build: use scaffolding or pump jacks when working on the roof frame, not just a ladder propped against rafters. Wear fall protection when you're on the sheathed roof installing underlayment or shingles. Have at least one helper when you're lifting beams and setting the ridge board. A 16-foot doubled 2x10 beam is heavy and awkward, and trying to hold it while lag-bolting it to a post is how shoulders get hurt.
Consider hiring a structural engineer or experienced contractor if any of these apply: your span exceeds 16 feet, you're in a high-wind or high-snow-load area, your house has stucco or EIFS siding (ledger attachment through those materials is tricky), or the soil conditions where you're setting posts are questionable. The ledger attachment is one of the most failure-prone connections in residential construction, and getting it wrong is genuinely dangerous. If you're not confident in your ledger detail, pay a pro to design that one connection and handle the rest yourself.
Building the frame: posts, beams, and rafters
Here's the sequence that works. Get the foundation right first, then build upward.
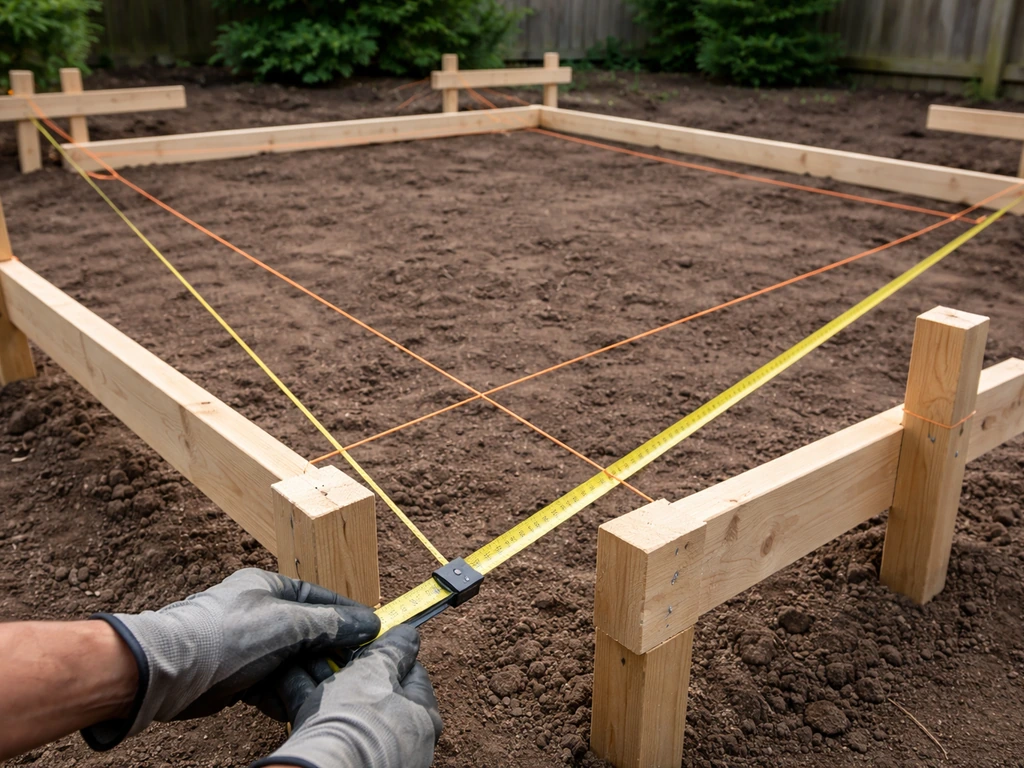
- Lay out your post locations using batter boards and string lines. Pull diagonal measurements (corner to corner) until both diagonals are equal, confirming your layout is square.
- Dig post holes to your local frost depth (check your municipality's requirement; 18 to 24 inches is common in mild climates, 36 to 42 inches in freeze zones). If you're mounting posts to an existing concrete slab, use code-approved post base anchors bolted into the slab with concrete wedge anchors drilled to the manufacturer's specified depth.
- Set posts plumb in concrete and brace them. Let the concrete cure fully (at least 48 hours before loading) before you proceed. For attached covers, the house ledger acts as the 'fourth post' on one side, so your post layout only needs to frame the outboard edge.
- Install the ledger board to the house framing if you're building an attached cover. Use 1/2-inch lag screws or structural screws into the house rim joist or wall framing at code-required spacing, typically every 16 inches staggered. Flash the top of the ledger with Z-flashing or step flashing that runs under the house siding, not over it.
- Lift and attach the beam. For a typical 12 to 16-foot span, a doubled 2x10 beam notched into or bolted to the post tops works well. Use post caps to connect beam to post for maximum connection strength. Get it level in both directions before fastening.
- Install the ridge board. This is the trickiest part of a gable roof. You need temporary ridge posts (vertical 2x4 supports) to hold the ridge at the correct height while you install the first pair of rafters. Calculate ridge height: run x pitch / 12. For an 8-foot run at 4:12, that's 32 inches above the top plate.
- Cut and install rafters. Each rafter needs a plumb cut at the ridge end, a bird's mouth notch (a triangular cutout where the rafter sits on the top plate or beam), and a tail cut at the overhang end. Use a speed square or rafter square to mark all cuts from a template rafter, then use that template to cut the rest. Install rafters in opposing pairs to keep the ridge from wandering. Secure each rafter to the top plate with hurricane ties.
- Install collar ties or ceiling joists at every other rafter pair if your pitch is 4:12 or steeper. These tie the two sides of the roof together and prevent the walls from spreading under load.
A common mistake at the rafter stage is skipping the bird's mouth notch or cutting it too deep. The remaining rafter depth after the notch must be at least two-thirds of the full rafter depth per IRC Chapter 8. Cut it too deep and you've created a weak point right where the load transfers to the wall. Use a sharp circular saw and finish the corner of the notch with a handsaw, not by overrunning with the circular saw blade.
Sheathing, roofing, and keeping water out

Once your frame is up and inspected (some inspectors want to see the rough frame before you sheathe), install your roof sheathing. Use 1/2-inch or 5/8-inch exterior-grade plywood or OSB, run perpendicular to the rafters with the long edge on the rafters. Stagger the joints and leave a 1/8-inch gap between panels for expansion. Nail at 6 inches on center at the edges and 12 inches on center in the field with 8d ring-shank nails. Don't skip the ring-shank nails in wind-prone areas; smooth shank nails back out.
Install drip edge first along the eaves (bottom edge), then lay your underlayment, then install the drip edge at the rakes (sloped side edges) on top of the underlayment. This sequencing matters: eave drip edge goes under underlayment so water that gets under the shingles drips onto the drip edge and off the roof, not behind it. Rake drip edge goes over underlayment to direct water off the edge. Fasten drip edge mechanically into the roof deck (not just the fascia) at a maximum of 12 inches on center. The drip edge should extend at least 1/4 inch below the roof deck edge. Seattle’s SRC Chapter 9 drip edge excerpt also specifies that drip edges extend not less than 1/4 inch below the roof and are mechanically fastened to the roof deck at not more than 12 inches on center The drip edge should extend at least 1/4 inch below the roof deck edge..
Underlayment for a 4:12 pitch: one layer of #30 felt or a synthetic equivalent lapped 2 inches at horizontal seams and 4 inches at vertical seams. If you're at 2:12 (the code minimum for asphalt shingles), you need a double layer of self-adhering ice-and-water shield over the entire roof surface, not just at the eaves. In cold climates where ice dams are a concern, run ice-and-water shield from the eave up to a point 24 inches inside the warm wall line, then use standard underlayment above that.
The wall flashing detail is where most DIY gable covers spring a leak. Where the roof surface meets the house wall, you need step flashing: individual L-shaped metal pieces woven alternately with each course of shingles, layered up the wall so each piece overlaps the one below. Then a continuous piece of counter-flashing (either embedded in the siding or installed under it) laps over the top of the step flashing. Water sheds over flashing, not behind it. This is not optional, and it's not something you skip because it looks complicated. If you get this wrong, water runs behind the siding and rots your wall framing.
Install your shingles from the bottom up, starting with a starter strip course at the eave with the adhesive strip facing down toward the eave. Shingle up the roof with standard 6-nail pattern, offsetting joints between courses by at least 6 inches. At the ridge, use ridge cap shingles (or cut full shingles into thirds) and nail them centered on the ridge with nails that penetrate at least 3/4 inch into the sheathing. If you're using metal roofing panels instead of shingles, follow the manufacturer's fastening pattern and use the gasketed screws provided, not generic drywall screws.
Anchoring, finishing, and gutters
Post anchorage is worth getting right. If you're mounting posts to a slab, the post base anchor needs to be set in solid concrete. Drill the hole size specified by the anchor manufacturer, blow it out with compressed air, set the wedge anchor, and torque to spec. This is the connection that keeps your cover on the ground in a wind event, so don't eyeball the torque.
Once the roof is on, install fascia boards on the rafter tails to give the overhang a clean finished look and provide a nailing surface for gutters. Use 5/4-inch PT or cedar for fascia that will last. Soffit material (the underside of the overhang) can be vinyl, aluminum, or painted plywood. If you close in the soffit, add soffit vents to allow air movement through the overhang so moisture doesn't trap against the sheathing.
Gutters are strongly recommended on the eave side of the roof. A gable patio cover without gutters dumps water right at the foundation perimeter of the patio, which accelerates cracking on concrete slabs and creates constant mud splash. Use a 5-inch K-style aluminum gutter with a 3-inch round downspout, pitched 1/4 inch per 10 feet toward the outlet. Mount gutter hangers at 24 inches on center directly into the fascia. Run the downspout at least 4 feet away from the patio edge with a splash block or extension.
For trim at the gable ends (the triangular face of the gable), install barge boards (also called rake boards) along the outer edge of the rake, and fill in the triangular opening with either open framing for a breezy look, lattice panels, or solid trim boards. Caulk all joints where trim meets the house and paint all exposed wood with an exterior primer and two finish coats within a few weeks of installation. Bare PT lumber will check and split if left exposed.
Cost, tools, and a realistic DIY workflow
For a typical 16x20-foot attached gable patio cover using pressure-treated wood and asphalt shingles, budget between $3,000 and $6,000 in materials depending on your region and lumber prices. If you hire out the labor, installed cost runs $20 to $50 per square foot, which puts a 320-square-foot project between $6,400 and $16,000 installed. Doing the work yourself with one helper is where the real savings are, though it's a two-weekend minimum for experienced DIYers and more like three to four weekends if you're learning as you go.
Permit fees vary widely, from $100 to $400 for most residential patio covers, and are almost always worth it for the plan review and inspection that comes with them.
Tools you need for this build
- Circular saw and miter saw (miter saw for rafter angle cuts makes life much easier)
- Framing nailer with 3-inch and 3.5-inch framing nails, plus a roofing nailer
- Drill/driver and impact driver
- Post hole digger or rented power auger
- 4-foot and 8-foot levels, plus a laser level for beam alignment
- Speed square and rafter/framing square
- Chalk line and tape measure (25-foot minimum)
- Reciprocating saw for trimming posts to height in place
- Scaffolding or pump jacks (rent these; don't improvise)
- Safety glasses, hearing protection, hard-soled boots, and fall protection harness for roof work
Sequencing your build weekends
- Weekend 1: Finalize plans, pull permit, order lumber. Lay out footprint, dig and pour post footings or set post base anchors. Let concrete cure.
- Weekend 2: Set and plumb posts, install beams and ledger (if attached). Frame gable roof: ridge, rafters, collar ties. Call for rough framing inspection.
- Weekend 3: Install sheathing, drip edge, underlayment, step flashing at wall, and roofing (shingles or metal panels). This is your most physically demanding day.
- Weekend 4: Fascia, soffit, rake/barge boards, gutters and downspouts, trim, caulk, and paint. Final inspection.
The sheathing and roofing day (weekend 3) is where most DIYers feel the most pressure, literally and figuratively. Work methodically from one side. Get all the sheathing nailed before you move to underlayment, all the underlayment down before you start shingles, and complete one full section before moving on. Trying to jump between stages is how you end up with an exposed sheathing during an afternoon thunderstorm. Keep heavy-duty poly tarps on site until the roof is fully shingled and flashed. Learning how to cover a patio with roofing starts with getting the flashing right and then finishing with shingles or metal panels that shed water correctly shingled and flashed.
This project is also closely related to the broader skills covered in how to frame a patio roof and how to roof a patio cover, which go deeper on framing layout and specific roofing material installation respectively. If you're considering shingles specifically, the full approach to how to shingle a patio cover covers the starter strip, nailing patterns, and ridge cap in more detail. If you are wondering how to roof a patio cover, follow the same workflow for sheathing, underlayment, flashing, and shingle or metal installation. All of those skills layer together here in the gable build.
One last honest note: if you get to the ridge and something doesn't look right, stop. A gable roof that's twisted or out of plane will cause headaches with every subsequent step. Take the time to re-check your ridge height, recheck that your rafter pairs are mirrored correctly, and make sure your ridge board is perfectly centered over the span before you nail everything home. A few extra minutes of checking saves hours of frustration later.
FAQ
Can I build a gable roof patio cover without attaching it to the house (freestanding)?
Yes, but your design loads and anchoring approach change. Freestanding covers need rigid lateral bracing or roof-to-beam bracing to resist racking, and many jurisdictions still require permits. If you want to avoid a ledger, plan for more robust post sizing and base anchorage, plus careful footing design to prevent differential settlement.
What roof pitch is best if I’m using metal panels instead of shingles?
Metal often performs well on lower pitches than asphalt, but the minimum pitch depends on the panel profile and manufacturer. Before choosing a pitch, confirm the panel system’s required slope so you don’t end up with inadequate drainage at seams and laps.
How do I figure out rafter spacing for my span and roof pitch?
Start with your design loads and local code, then match spacing to the structural capacity of your rafters and the roof sheathing thickness you plan to use. Don’t assume a standard like 16 inches on center fits every span, especially if you increase snow load or use wider sheathing spans.
How far can I cantilever rafters beyond the beam without creating a problem?
Keep cantilever short unless your framing plan specifically accounts for it. Extra overhang loads increase bending at the rafter-to-beam connection, which can pull hardware loose in wind. If you want a larger overhang, consider lengthening the beams or adjusting rafter spacing rather than relying on long cantilevers.
What should I do if the house wall is uneven or the siding is not flat?
Use flat, plumb attachment points and shim where appropriate, but do not just “tighten bolts until it draws in.” For ledger connections, uneven surfaces can leave gaps and stress fasteners unevenly, so check wall flatness before final fastening and verify the ledger sits fully supported.
Are there special concerns if my house has stucco or EIFS on the ledger side?
Yes. Ledger attachment through stucco and EIFS requires correct backing conditions and compatible flashing details, and the wall system may need specific fastener types and installation procedures. If you cannot confirm the substrate strength and the waterproofing plan, hire a pro to design that ledger detail.
How do I prevent leaks at the step flashing and counter-flashing area?
Lay step flashing so each shingle course sheds water over the previous piece, then install counter-flashing in a way that creates a continuous water path over the step flashing. Also verify you’re not relying on caulk as the primary sealant, since caulk fails at moving joints and temperature cycling.
Is one layer of ice-and-water shield enough if I’m in a cold climate but the roof is not very low pitched?
Sometimes, but you still need to follow the threshold your local code and the shingle underlayment instructions require. For steeper roofs, many installs use ice-and-water at eaves and critical zones only, but low pitches (like 2:12) typically require broader coverage. Confirm coverage limits for your exact pitch, climate, and shingle system.
Can I use regular nails instead of ring-shank nails for wind areas?
In wind-prone regions, ring-shank nails are specifically used to improve withdrawal resistance. If you use smooth shank nails, you risk nails backing out during wind events, which can cause sheathing and roofing failure. Use the fastener type required by the roofing and underlayment system.
What’s the correct way to set post anchors in concrete?
Follow the anchor manufacturer’s hole diameter, embedment depth, and torque requirements, and set them at the correct distance from the post edge. After drilling, blow out dust so the wedge anchor can fully engage, then torque to spec only after the post is plumb to avoid misalignment that can twist rafters later.
Do I need expansion gaps in sheathing if I’m working on a short patio cover?
Yes. Sheathing needs room to expand and contract, even on small roofs. A consistent small gap between panel edges helps reduce buckling and loosening over time, particularly if your area has large temperature swings.
Should I install gutters on a gable patio cover even if it’s “just a few inches above grade”?
Strongly consider it. Without gutters, concentrated runoff can repeatedly wet the slab or soil right at the foundation line, which can accelerate cracking and create persistent splash and mud. If you do add gutters, include a downspout extension or splash block so runoff lands at a managed distance from the patio edge.
What’s the most common framing mistake that causes the roof to look crooked?
Ridge placement and rafter pair symmetry. If the ridge board is not centered over the span, or if rafter cuts create pairs that are not mirrored, the roof can go out of plane. Before sheathing, re-check ridge height, line, and squareness so you don’t lock in a misalignment that shows up after the roof covering is installed.
When is it worth hiring an engineer or contractor for a DIY gable patio cover?
Hire help if the cover is large (wide spans), your area has high wind or snow, the ledger attachment must go into challenging finishes, or site conditions for footings and soil are uncertain. A targeted professional review of the ledger and connection details is often the most cost-effective place to spend money.