You can build a wood patio cover yourself in a long weekend or two, but only if you go in with a real plan. Pick your style (lean-to, gable, or freestanding), size your lumber for your local snow and wind loads, pull the right permits, set footings below frost depth, frame the structure with proper connectors, and finish the roof with flashing and drainage that actually keeps water out.
How to Make a Patio Cover Out of Wood Step by Step

Celia Vaughn
27 May 2026
If you want a complete walkthrough, this guide on how to build wood patio cover covers design, materials, and step-by-step framing. Do all of that and you'll end up with a structure that's safe, durable, and looks like it belongs on the house. Skip any of it and you'll be tearing something down later.
Pick your design and wood before you buy a single board
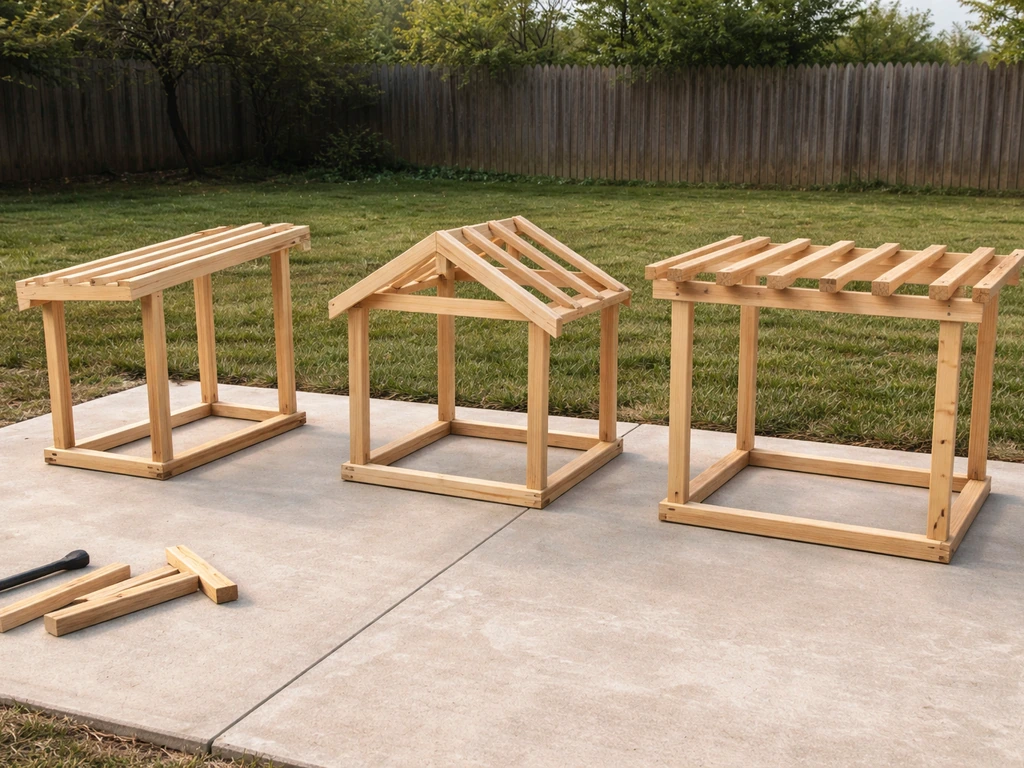
The three practical styles for a DIY wood patio cover are the lean-to (shed roof), the gable, and the freestanding pergola-style structure. Each has a different skill ceiling and different structural demands.
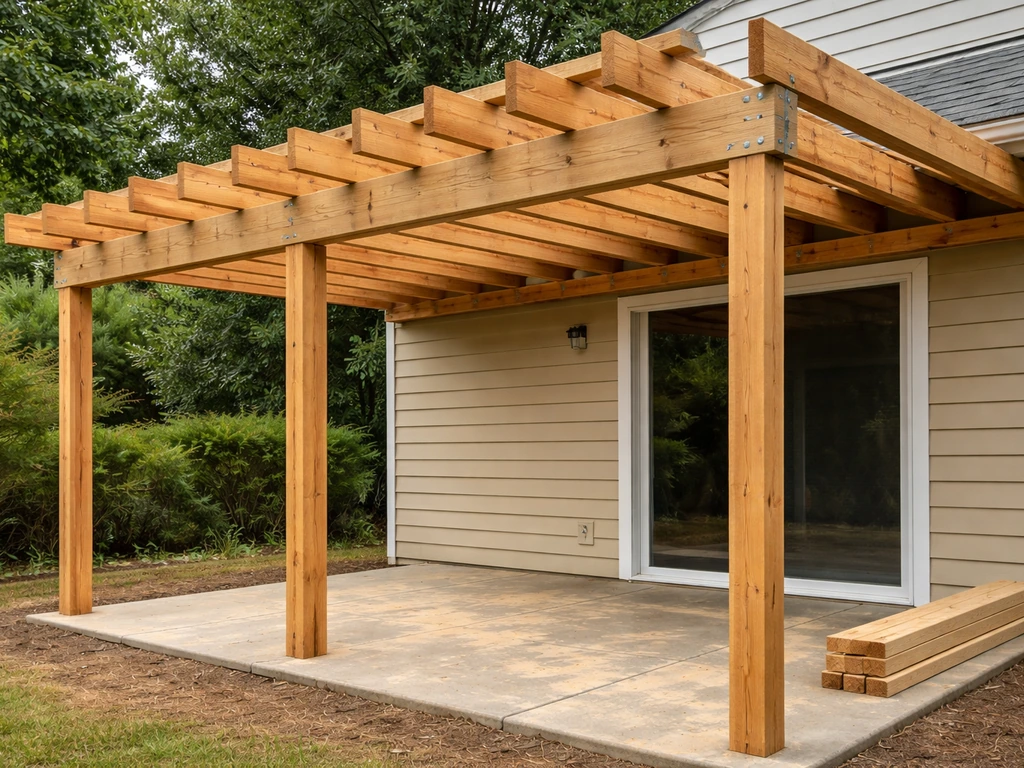
- Lean-to (shed roof): One slope draining away from the house. Easiest to build, lowest material cost, and the most forgiving for first-timers. It attaches to the house on one side and sits on posts on the outer edge. If this is your first build, start here.
- Gable roof: Two slopes meeting at a ridge, like a mini house roof. More visual impact, better drainage, and handles heavy snow loads well, but you're adding ridge framing, collar ties, and more precise cuts. Intermediate skill level.
- Freestanding structure: No attachment to the house. Needs four or more post footings, heavier beams, and diagonal bracing. More flexible on placement, but structurally you're on your own for all lateral loads.
For lumber, pressure-treated (PT) Southern Yellow Pine is the most common choice in the US for posts and anything near or touching the ground. Use PT rated for ground contact (UC4B) for posts set in soil or concrete, and above-ground rated (UC3B) for beams and rafters. If you want a better appearance for visible framing, Douglas Fir is stiffer, straighter, and holds fasteners well. Cedar and redwood are naturally rot-resistant, dimensionally stable, and look great, but they cost significantly more and you still need to seal them. Avoid using standard untreated SPF (spruce-pine-fir) for any structural outdoor framing. It will rot faster than you expect.
Common lumber sizing for a typical 12-to-16 foot span: 6x6 posts, 4x8 or 4x10 main beam, and 2x6 rafters at 24 inches on center. For spans wider than 16 feet or in high-snow regions, step up to 2x8 rafters or reduce spacing to 16 inches on center. When in doubt, use a span table from the American Wood Council (AWC) or run your sizing by your building department, since they check this anyway when you pull a permit.
Permits, codes, and structural planning, do this first
Most jurisdictions require a building permit for any permanent patio cover attached to the house or larger than roughly 200 square feet. Some areas require permits for freestanding structures too. The permit process forces you to think through your design before you build, which is actually useful. Submit a simple site plan showing dimensions, attachment method, lumber sizes, and footing depth. Your building department will tell you if you need an engineer's stamp for the design.
On structural loads: under the 2018 IBC Appendix I (which many local codes adopt for patio covers), your structure must be designed for all dead loads plus a minimum vertical live load of 10 psf. For example, ICC-ES ESR-4436 specifies a minimum live load requirement of 10 psf for patio covers minimum vertical live load of 10 psf for patio covers.
Where snow loads exceed 10 psf, snow load controls. You also have to account for minimum wind and seismic loads per your local code. What this means practically: if you're in a climate where snow accumulates, look up your ground snow load for your county (ASCE 7 maps or your building department has this), then calculate your roof snow load and size beams and rafters accordingly. Don't guess on this.
A 12x16 patio cover collecting 2 feet of wet snow can see 2,000 to 3,000 pounds of load.
For footings, the IRC (Chapter 4) requires foundations to be protected from frost. In practice, that means digging your post footings below your local frost depth, which ranges from zero inches in the Deep South to over 48 inches in northern states. The code sets a minimum depth of 12 inches below undisturbed ground where frost isn't a concern, but check your local frost line before you assume that applies to you. Your building department will have the frost depth for your area.
Everything you need to buy before you start
For a typical 12x16 attached lean-to patio cover, here's a practical materials list. Adjust quantities for your actual dimensions.
| Item | Spec / Notes | Approximate Quantity (12x16) |
|---|---|---|
| Posts | 6x6 PT, ground contact (UC4B) | 2-4 depending on design |
| Ledger board | 2x8 or 2x10 PT, above-ground (UC3B) | 1 at full width |
| Beam | 4x8 or doubled 2x10 PT | 1 at full width |
| Rafters | 2x6 PT or Doug Fir, 24" OC | 9-10 pieces |
| Blocking/fascia | 2x6 matching rafter stock | As needed for ends |
| Post base hardware | Simpson ABA66 or equivalent | One per post |
| Rafter hangers | Simpson LUS26 or equivalent | One per rafter |
| Joist/rafter ties | Hurricane ties, both sides | Two per rafter |
| Lag screws | 1/2" x 4" for ledger into house rim/band | 16-20 |
| Structural screws or bolts | 1/2" carriage bolts for beam-to-post | 8-12 |
| Concrete (tube form) | 60 or 80 lb bags, or ready-mix for large footings | 2-4 bags per footing |
| Flashing | Step flashing + continuous Z-flashing at ledger, aluminum or galvanized | Full ledger width |
| Roofing underlayment | 15 lb or synthetic felt, or self-adhering membrane | Cover full roof area |
| Roof covering | Metal roofing panels, corrugated polycarbonate, or cedar shingles | Per roof area + 10% waste |
| Drip edge | Aluminum, at eaves and rake | Perimeter of roof |
| Exterior wood sealer/stain | Semi-transparent, rated for exterior | Enough for all exposed wood |
| Corrosion-resistant nails/screws | Hot-dipped galvanized or stainless, #10 screws throughout | Multiple boxes |
One thing people routinely underestimate: hardware connectors. Simpson Strong-Tie connectors (post bases, rafter hangers, hurricane ties) are not optional decorations. They're structural. Every connector must be installed with the full specified fastener count listed in its spec sheet, using the nail or screw size it calls for. Using half the nails because it 'looks strong enough' is how structures fail in wind events.
Tools and site prep before you cut anything
You don't need a professional's toolbox, but you do need the right tools. The ones that matter most: a circular saw (a miter saw makes cleaner rafter cuts), a drill/driver with impact driver, a 4-foot level and a long string line, a speed square, a post hole digger or rented power auger, and a chalk line. For laying out the structure, also grab a 100-foot tape measure and some batter boards and string. If you're cutting rafters with a bird's mouth notch, a rafter square or stair gauge set on a speed square saves a lot of time.
Site prep starts with marking your post locations precisely. Use the 3-4-5 triangle method to ensure your layout is perfectly square: measure 3 feet along one string line, 4 feet along a perpendicular string, and the diagonal between those two points should be exactly 5 feet. Get this right before you dig a single hole. Common mistake: people dig holes first and then try to make the structure fit. You end up with posts slightly out of square and spend the rest of the project compensating.
For pressure-treated lumber handling: always wear gloves, eye protection, and a dust mask when cutting PT wood. The preservative chemicals are not something you want in your eyes or lungs. Let PT lumber acclimate on site for a few days before cutting if it arrived very wet (it often does). Coat all field cuts (any cut end) immediately with an end-cut preservative or copper naphthenate before installation.
How to frame the structure step by step
Step 1: Dig and pour footings
Dig your post holes to the required depth (below frost line, minimum 12 inches in frost-free zones). Make the hole at least 12 inches in diameter, or larger if your engineer or permit requires it. For a typical 6x6 post in a standard residential cover, a 12-inch diameter hole works. Pour 4 to 6 inches of gravel in the bottom for drainage, then pour your concrete. Set your post base hardware (like a Simpson ABA66) in the wet concrete immediately, using a level and your string lines to get exact position and orientation right. Check alignment from multiple directions before the concrete sets. Let concrete cure at least 48 to 72 hours before loading it.
Step 2: Install the ledger board (attached structures only)
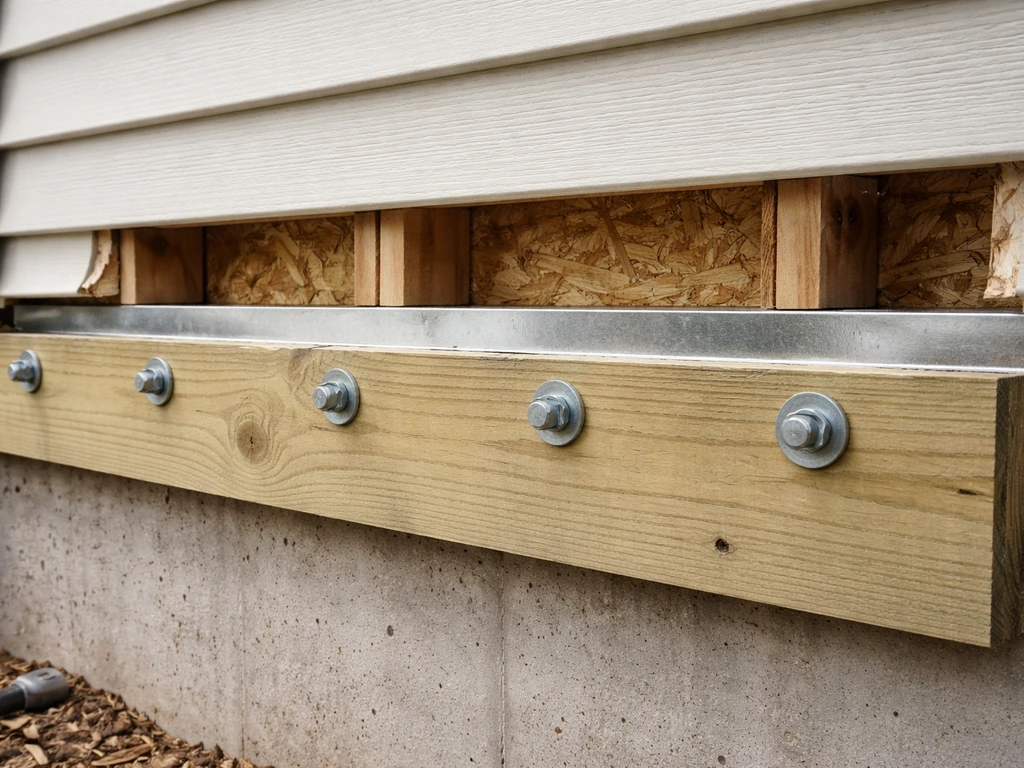
The ledger is the board you bolt to the house, and it carries half the roof load, so this has to be done right. Find the house rim joist or band joist behind the siding. Remove the siding in that area, or carefully cut it back so the ledger can be flashed properly. Mount the ledger with 1/2-inch by 4-inch lag screws or through-bolts into the rim joist every 16 inches, staggered slightly to avoid splitting. Do not attach a ledger only to sheathing or siding. It must go into structural framing.
Set the ledger height based on where you want the roof to end up. For a lean-to, the ledger is typically 1 to 2 inches below a door threshold or window, high enough to maintain a useful slope (1/4 inch drop per foot minimum, 1/2 inch is better for shedding water quickly). Flash the ledger now, before you go any further. More on that in the roof section.
Step 3: Set and brace posts
Set posts into the base hardware and check plumb on two adjacent faces. Temporarily brace them with 2x4 kickers staked into the ground at 45 degrees. Don't skip the temporary bracing. A post that's one degree off plumb creates compounding alignment problems as you build up. Secure the posts into the hardware with the full fastener count.
Step 4: Install the beam
The outer beam spans across the top of your posts. Use post cap hardware (Simpson BC6 or equivalent) to connect beam to post. If you're using a doubled 2x10 beam, nail or screw the two plies together with 3-inch structural screws every 12 inches in a staggered pattern before you lift it into place. Mark the top of the post so the beam sits at exactly the right height relative to the ledger to give you your intended roof slope. Re-check everything with a level and string line before fastening permanently.
Step 5: Cut and hang rafters
Mark rafter spacing on both the ledger and the beam at the same time so they line up. For a simple lean-to with a single slope, your rafter has a plumb cut at the top where it meets the ledger, and either a plumb or square cut at the tail end at the beam. If you're notching the rafter over the beam with a bird's mouth cut, the seat cut should be no deeper than 1/3 the rafter depth. Cut one rafter, test-fit it, and use that as a template for the rest. Install rafter hangers at the ledger and hurricane ties at the beam end. Don't use toe-nails alone at either connection.
For a gable roof, you'll also need to frame the ridge board first, set it at the correct height, and cut your opposing rafter pairs to meet at the ridge. If the gable-end framing is new to you, building a gable roof or an A-frame patio cover is a whole project in itself worth digging into separately before you tackle it.
Roof covering, flashing, and making it actually waterproof
The frame is just bones. What keeps your patio dry is the flashing at the house wall and the quality of your roof covering and drainage details. This is where most DIY patio covers fail. Not in the framing, but in the water management.
Ledger flashing
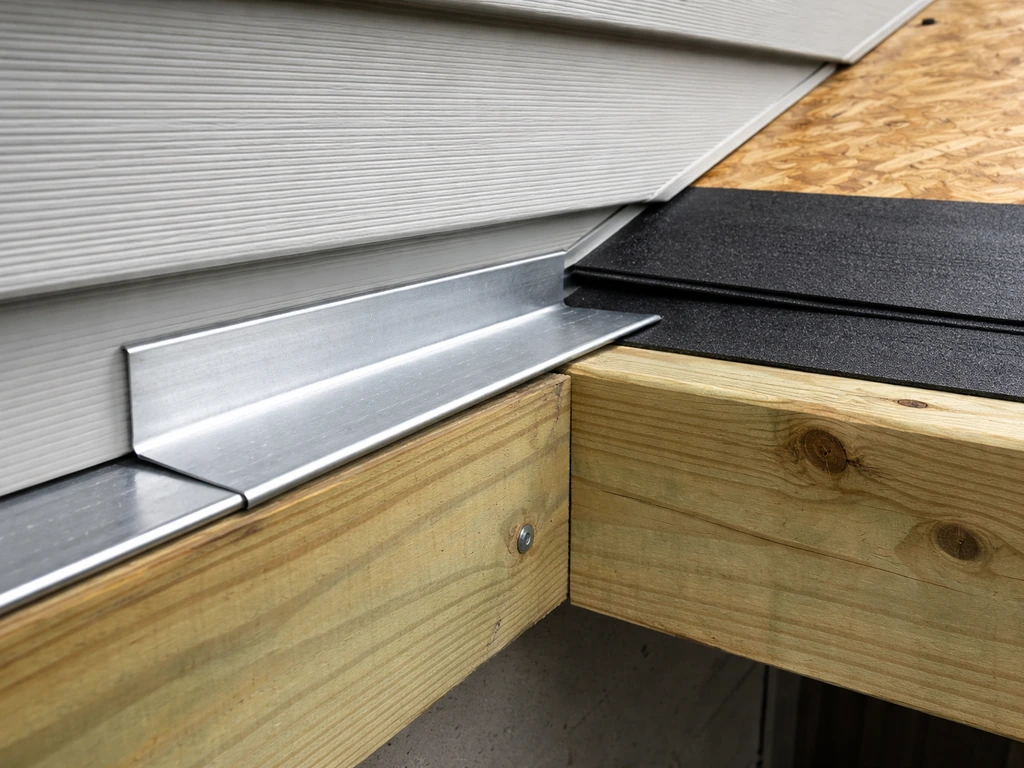
Before any roofing goes on, flash the ledger. Slip Z-flashing (continuous aluminum flashing bent in a Z profile) under the siding above the ledger, extending over the top edge of the ledger. This directs any water that runs down the wall onto the roof deck instead of behind the ledger where it will rot both the ledger and the house framing. This is one of those steps that's invisible once the roof is on, but if you skip it you'll be doing an expensive repair in 5 to 8 years.
Roof deck and underlayment
If you're using solid sheathing (1/2-inch CDX plywood or OSB), install it with the long edge perpendicular to the rafters and stagger the seams. Then run your underlayment: 15-lb felt works for most applications, but a self-adhering ice-and-water shield membrane for the first 2 feet above the eave (and in the full valley on a gable) adds real protection in wet or snowy climates. Install drip edge at the eave before the underlayment, and at the rake (side edges) on top of the underlayment.
Roof covering options
Standing seam or corrugated metal panels are popular on wood-framed patio covers because they're lightweight, durable, and shed water and snow well. If you want a metal patio cover, plan the roof framing height and fastener layout so the panels install securely and shed water correctly. Corrugated polycarbonate lets in diffused light and is easy to cut and install, but it can get hot in summer and can crack in very cold climates after 10 to 15 years.
Cedar shingles match the aesthetic of a wood frame beautifully but require the most installation skill and the most ongoing maintenance. For most people doing their first build, metal roofing panels over a wood-framed structure hit the best balance of cost, durability, and installation simplicity.
Ventilation and drainage
Even a simple patio cover benefits from some air movement under the roof deck to prevent condensation from building up and rotting the sheathing. If you're using solid sheathing and a closed roof assembly, leave a small gap at the ridge or install a continuous ridge vent. If you're using open rafter framing with no deck (like a pergola with metal panels laid directly on purlins), air moves freely anyway. Make sure your roof pitch drains water away from the house and that your gutters and downspouts (if installed) have clear paths to drain off the patio. Pooled water under a wood structure accelerates decay faster than anything else.
Attached to the house vs. freestanding: what to know before you decide
Attaching to the house is simpler to frame and uses fewer posts, but the structural connection to the house must be done correctly or you risk damaging your home's framing, allowing water intrusion, or creating a structure that pulls away in high wind. The ledger must attach to structural framing (rim joist, band joist, or house wall framing), not just sheathing or siding. This is non-negotiable. The flashing at the wall-to-roof junction is equally critical.
Freestanding structures avoid all the attachment concerns but require proper lateral bracing since nothing ties them to the house. If you choose freestanding, focus on lateral bracing and post-to-beam stability so the structure holds up in wind freestanding patio cover. Without diagonal knee bracing or moment-frame connections at the post-beam joints, a freestanding patio cover will rack under wind load. Standard knee bracing runs at 45 degrees from post to beam on at least two sides of the structure. Use through-bolts or structural screws and a proper connector, not just toe-nails.
Common mistakes with attached covers: not removing siding before ledger installation (creates a gap where water collects), using deck screws instead of lag screws or carriage bolts into rim joists (deck screws don't have the shear strength), and skipping flashing because it 'looks complicated.' Common mistakes with freestanding: underestimating footing size, skipping lateral bracing because it looks fine standing still, and not accounting for the full dead load plus live load at each footing.
Safety, inspections, and knowing when to call a pro
Safety during the build matters as much as the finished structure. Use scaffolding or a sturdy pump jack rather than leaning a ladder against fresh framing when you're working at height. Keep all cuts of PT lumber away from food preparation areas. When lifting beams with a helper, use temporary support ledges nailed to posts so you're not holding weight while trying to fasten. Wear eye protection and hearing protection when cutting.
If you pulled a permit, you'll have at least one inspection, usually a footing inspection before you pour concrete and a framing inspection before you close up the roof. Take these seriously. The inspector is checking your footing depth, your ledger attachment, your connector hardware, and your lumber sizing. Failing an inspection means rework. Passing one means you have documented proof your structure was built correctly, which matters for insurance and home resale.
Know where to draw the line on DIY. If your local frost depth exceeds 36 inches and you're handling large-diameter footings for a heavy structure, renting a power auger or hiring an excavation company for the holes is worth the money. If your span calculations are bumping up against the limits of standard span tables (say, a 20-foot clear span with a high snow load), get a structural engineer to review the design.
That stamp costs a few hundred dollars and it tells you the design is actually safe. If you're attaching to a house with an unusual framing system, a house that's been modified, or a wall where you can't clearly identify the structural framing, get an expert to evaluate before you start bolting things in.
The framing work itself is well within reach for most confident DIYers, especially a lean-to or simple shed-style cover. Freestanding structures and gable roofs raise the complexity enough that if you haven't framed a roof before, taking time to study the framing before you start is smart.
There are solid guides available on how to frame a patio cover step by step, and working through the framing logic on paper before you pick up a saw saves a lot of mistakes in the field. If you want the cleanest, most accurate results, review a full guide on how to frame a patio cover before you start cutting members.
If you want a deeper walkthrough, follow a full guide on how to build a lean-to patio cover from footings to roof covering. Whatever you build, take it one stage at a time: footings first, then posts, then beam, then rafters, then roofing.
If you want the full walkthrough, focus on planning your roof structure first, then work step by step through footings, posts, beam, rafters, and roofing how to build patio cover onboarding steps based on your plan. Don't rush a stage to move to the next one. The structure that takes two weekends to build properly will last 20 to 30 years. The one you rush through in a day often doesn't make it five.
FAQ
How do I prevent water from pooling at the ledger and underside of the roof?
Confirm you have a drain path from the start. For a lean-to, keep the roof pitch directed away from the house and ensure the lowest edge and any valley (if you have one) discharge beyond the post lines. A common failure is “sheet flow” that runs behind the fascia or pools at the ledger area, so plan drip edges and downspout routing before installing sheathing.
Can I build the patio cover without exposing the rim joist by just attaching to siding or sheathing?
If you need the cover to be flush to the siding or want a cleaner look, you still must flash the ledger properly. Remove the siding only where necessary to access structural framing, then install Z-flashing so water sheds over the ledger and over the siding cutback. Don’t rely on caulk as the primary water barrier.
What’s the most common mistake with metal connectors and fasteners?
Your best option is to use the connector and fastener schedule that matches your lumber size and load case, then stick to the spec fastener count. Many problems come from substituting different screw sizes, mixing ring-shank nails with screws, or skipping the “minor” connectors that resist uplift. If a connector requires two different fastener types, both must be installed exactly.
Do I need ventilation under a wood patio cover, and how do I do it on a mostly closed roof?
Yes, but you need to maintain ventilation. If you close the roof deck tightly (solid sheathing), create a ventilation channel (ridge vent, soffit vents, or controlled openings at the ridge/eaves) so moisture can escape. Without airflow, condensation can form under the roof covering and accelerate rot in sheathing and rafters.
Can I use deck boards or non-roof lumber for the roof surface to save cost?
Standard deck boards are not a structural substitute for roof framing. A deck-style surface is fine only if it’s part of an approved roof assembly and supported by properly sized rafters or purlins at the correct spacing. If you want a lightweight roof like corrugated panels, use the correct underlayment and fastening pattern rather than improvising with board spacing.
How much lateral bracing does a freestanding wood patio cover really need?
For freestanding covers, lateral bracing is what stops racking. Plan diagonal bracing on at least two sides and use through-bolts or structural screws with the specified connectors at post-to-beam joints. If you see the structure shift when you push on a corner during construction, you need more bracing before roofing goes on.
What order should I follow to avoid misalignment (posts not square, rafters not lining up)?
If you do it in the wrong order, your framing alignment will be off. Start with footings, then set posts in base hardware at the correct heights, confirm plumb, and only then fit the beam and ledger connection points (for attached designs). A good workflow also includes re-checking string lines after each major member is fastened permanently.
If my span is bigger than typical, how do I decide between bigger lumber and closer rafter spacing?
Because snow and wind vary by location, your lumber sizing can change. Use local ground snow load, then compute the roof snow load and verify rafter and beam spans with a span table or by your building department. For wide spans, reducing rafter spacing or stepping up rafter depth can be the difference between “fits on paper” and an inspection-approved structure.
Do I always need a permit to build a wood patio cover, even if it’s small?
Not always. Many places require permits for attached covers and for freestanding structures above certain size thresholds, and some require engineering stamps for higher snow loads or unusual geometry. The key is to ask your building department what triggers permits, inspections, and any engineer review before you buy materials.
What do inspectors usually focus on for attached wood patio covers at the ledger and framing stages?
Most inspectors want to see clear evidence of structural attachment. For the ledger, confirm you bolted into rim joist or band joist framing, not just sheathing, and that flashing is installed correctly behind or above the siding. For post bases, they’ll check that the connector type matches the design and that fasteners are installed with the full count.
How should weather and curing time affect my build schedule?
Budget for “drying and curing” time. Pressure-treated lumber can arrive wet, and concrete needs time to reach adequate strength before you load the structure. In cold weather, footings may require extra protection and longer cure time, so plan schedule buffers to avoid rushing beams onto fresh concrete.
What should I do if I can’t clearly find structural framing behind the house wall for the ledger?
Avoid a ledger connection if you cannot identify or access structural framing. If the wall has been modified, you cannot clearly locate the rim/band joist, or you see damage or rot, stop and have a professional evaluate before drilling and bolting. Building on the wrong substrate can create water intrusion and a weak structural connection.