
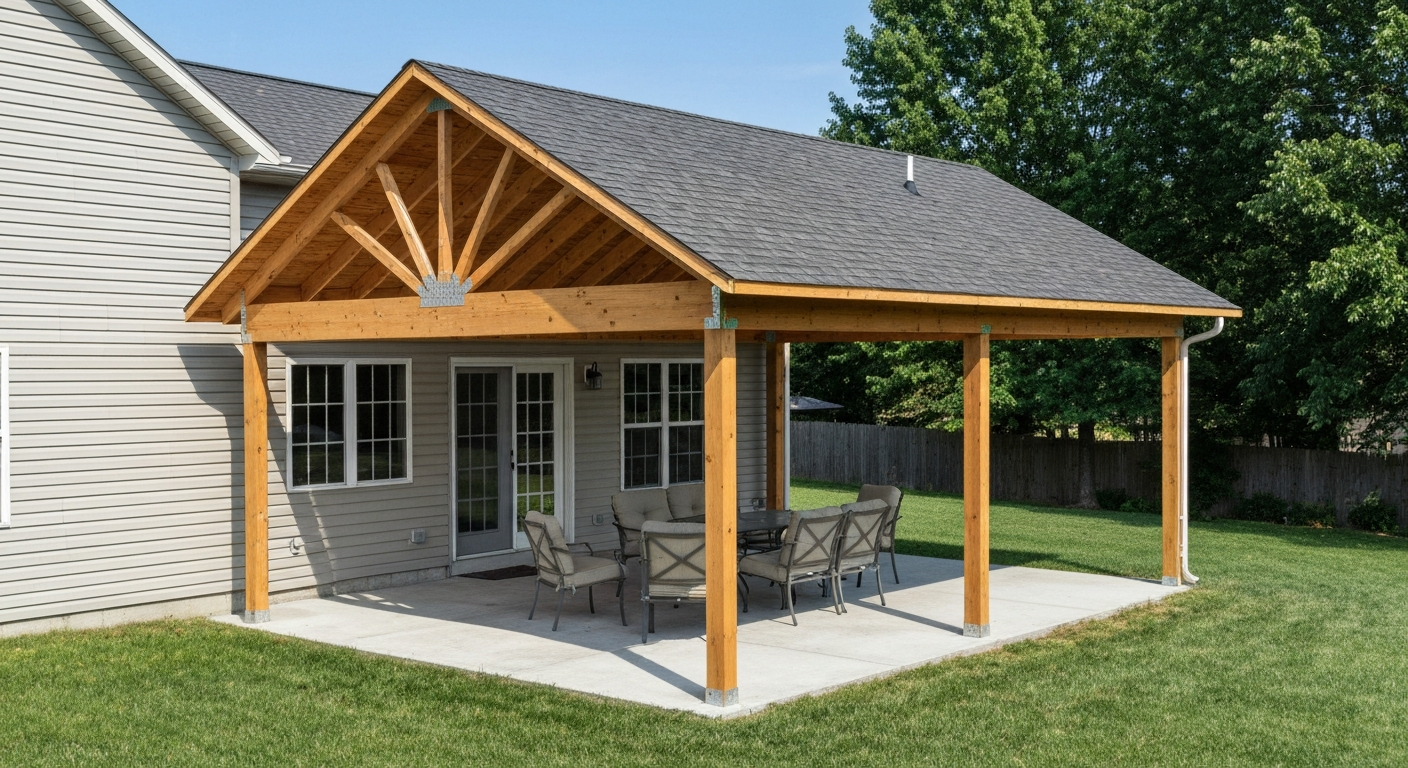
An A-frame patio cover uses two rafters that meet at a central ridge, forming a gable roof shape over your outdoor space. You can build one attached to your house or completely free-standing, using pressure-treated lumber, engineered wood, aluminum, or steel. A typical 12x16-foot attached A-frame patio cover costs between $1,800 and $4,500 in materials depending on what you choose, takes a long weekend to frame if you have a helper, and is a legitimate DIY project for someone comfortable with basic carpentry and concrete work. Here is exactly how to do it. For step-by-step plans and material lists on how to build a wood patio cover, consult the full guide. For a step-by-step walkthrough, see our guide on how to build patio cover.
How to Build an A Frame Patio Cover: Step-by-Step Guide

Celia Vaughn
16 Jul 2026
What an A-frame patio cover is and when to choose it
An A-frame patio cover is the same thing as a gable roof patio cover. The two sloping roof planes meet at a ridge board or beam at the peak, and the triangular end walls are called gable ends. This is different from a lean-to (shed roof) design, which has a single slope that typically drops away from the house. The A-frame style sheds water to both sides, handles heavy snow loads more efficiently than a low-slope lean-to, and looks like a natural extension of a house with a gable or hip roof. It also gives you more usable vertical clearance toward the center of the structure, which matters if you are hanging a fan, lights, or a ceiling. If your house has a gable roofline and you want the patio cover to match it visually, an A-frame cover is almost always the right call. If your goal is maximum simplicity and minimum cost, a lean-to can be faster to build. Both are solid DIY projects, and understanding the differences will help you decide which suits your situation.
Quick planning checklist before you start
Before you buy a single board or mix any concrete, work through these items. Skipping any one of them is where most project headaches come from.
- Site: Measure the exact footprint you want covered, check for underground utilities (call 811 before you dig), and note any overhead obstructions or drainage patterns that affect water runoff.
- Size: Confirm the width, length, and minimum clearance height you need. Most patio covers are 8 to 16 feet wide and 10 to 20 feet long. Larger spans require bigger lumber and may push you into engineered beam territory.
- Roof pitch: An A-frame cover needs at least a 3:12 pitch (3 inches of rise per 12 inches of run) for asphalt shingles and at least 2:12 for most metal roofing panels. Match your house pitch if you want it to look integrated.
- Loads: Determine your ground snow load and design wind speed for your location using the ASCE 7 Hazard Tool or your local building department. These numbers directly control your rafter and beam sizes.
- Budget: Get a rough materials estimate before finalizing your design. A 12x16 pressure-treated wood frame typically runs $1,800 to $2,800 in lumber, hardware, and basic roofing. Upgrade to engineered lumber or a metal frame and you can add $500 to $1,500.
- Attached vs. free-standing: Decide now, because the foundation, ledger work, and permit requirements differ significantly between the two approaches.
Permits and inspections: do not skip this step
Almost every jurisdiction requires a building permit for a permanent patio cover, attached or free-standing. The rules are determined locally, but most adopt the International Residential Code (IRC), which covers design loads under Section R301 and roof framing under Section R802. If your cover is attached to the house, ledger connections fall under IRC R507 (or equivalent), which specifies flashing requirements and fastener spacing. Some counties have simplified permit pathways for patio covers under a certain square footage, and a few rural jurisdictions do not require permits at all. The only way to know is to contact your local building department directly, usually through their website or a quick phone call. Ask specifically: Do I need a permit for an attached patio cover of X square feet? Do you have a standard detail sheet I can use? Will an inspection be required for the footings, framing, and final?
Getting a permit is not the bureaucratic nightmare most people fear. For a straightforward patio cover, many departments issue over-the-counter permits same day if you bring a simple site plan, a framing plan, and your footing layout. The permit fee is usually $100 to $400. What you are buying is the legal protection that your structure was built to code, which matters at resale and matters even more if you ever make an insurance claim after a storm. Do not build without one.
Project scope and early decisions
Attached vs. free-standing
An attached A-frame cover connects to your house via a ledger board bolted to the rim joist or wall framing. This saves you a row of posts and footings on the house side, and it is the most common approach for covered patios. The trade-off is that you must get the ledger connection right: poor flashing here is the leading cause of rot damage behind patio covers. A free-standing A-frame cover stands on its own posts with a beam on each side and a ridge beam or ridge board in the center. It is a bigger framing job and requires more footings, but it keeps the house structure completely uninvolved and is the right choice when the ledger location is inaccessible, the wall construction is unknown, or you simply want to place the cover away from the house.
Roof orientation and site drainage
For an attached cover, the ridge runs parallel to the house wall and the two roof slopes drain water to the sides (away from the house and toward the yard). This is the standard orientation and the one this guide is built around. If you orient the ridge perpendicular to the wall instead, one slope drains toward the house and requires a cricket or valley, which adds complexity. Keep it simple: run the ridge parallel to the house.
Span and load basics
The span of your rafters is the horizontal distance from the ridge to the outer beam, not the full width of the cover. For a 12-foot-wide A-frame cover with a central ridge, each rafter spans 6 feet horizontally. AWC rafter span tables are built around specific design loads: many table sets use a 30 psf roof live (or snow) load plus 20 psf dead load with a deflection limit of L/240. See the AWC's 2015 Span Tables For Joists And Rafters (American Wood Council) to confirm which table applies to your roof live/snow and dead load assumptions. Your local ground snow load converts to a roof snow load using a slope factor, so match your actual load scenario to the correct table. For most of the southern U.S. and mild-climate areas, 2x6 rafters at 24 inches on center are adequate for a 6-foot rafter run. In high-snow areas (40+ psf ground snow load), you may need 2x8 rafters at 16 inches on center for the same span. Always confirm against the AWC span tables or Southern Pine tables for your specific species, grade, and spacing.
Material options compared
Each framing material has a different cost, skill requirement, and long-term maintenance profile. Here is an honest comparison.
| Material | Typical Cost (materials only) | Skill Level | Durability | Maintenance | Best For |
|---|---|---|---|---|---|
| Pressure-treated pine (PT) | Lowest: $1,800–$2,800 for 12x16 | Beginner-friendly | Good: 15–25 years with care | Stain or seal every 2–3 years | Most DIYers; widely available; matches most homes |
| Engineered lumber (LVL/PSL) | Moderate: adds $300–$600 over PT for beams | Moderate; requires precise cuts | Excellent; won't bow or warp | Minimal if protected from moisture | Long spans, ridge beams, or wide headers |
| Aluminum (extruded systems) | Moderate–high: $2,500–$5,000 for 12x16 kit | Moderate; no wood skills needed | Excellent: 30+ years; no rot | Nearly none; wash occasionally | Low-maintenance builds; coastal or humid climates |
| Steel (tube or channel) | High: $3,000–$6,000+ depending on fab | Advanced; welding or bolted connections required | Excellent: 30+ years with coating | Paint/coat every 5–10 years to prevent rust | Large spans, commercial-grade look, or engineered designs |
For most homeowners tackling their first A-frame patio cover, pressure-treated Southern Pine or Douglas Fir is the right starting point. It is available at every lumber yard, it cuts and fastens with ordinary tools, and the prescriptive span tables make sizing straightforward. Use engineered LVL beams where you need a ridge beam or a long header span over 10 feet, because solid sawn lumber of that length will sag without real engineering. Aluminum kit systems are worth the extra cost if you hate painting and live somewhere humid. For step-by-step guidance specific to metal framing and panel installation, see a dedicated guide on how to build a metal patio cover. Steel makes sense if you have welding skills and want something that will outlast the house.
Materials and common sizes at a glance
| Component | Common Material | Typical Size (example: 12x16 ft cover) | Notes |
|---|---|---|---|
| Posts | 4x4 or 6x6 PT pine | 6x6 for spans over 8 ft or heights over 9 ft | Use 6x6 as a default for free-standing builds |
| Outer beam (each side) | Double 2x8 or 2x10 PT / LVL | Double 2x10 for 12-ft beam spans | LVL preferred for spans 10 ft and up |
| Ridge board / ridge beam | 2x10 PT or LVL | LVL 3.5"x9.25" for free-standing ridge beams | Ridge board (non-structural) vs ridge beam (structural) — free-standing requires a beam |
| Rafters | 2x6 PT pine or #2 Doug Fir | 2x6 @ 16" OC for 6-ft run at 30 psf snow; 2x8 at higher loads | Check AWC or Southern Pine tables for your load zone |
| Collar ties / rafter ties | 1x6 or 2x4 PT | Located in upper 1/3 of rafter height | Required unless a structural ridge beam is used |
| Ledger (attached builds) | 2x10 or 2x12 PT | Same depth as outer beam | Must be bolted per IRC R507; flash thoroughly |
| Roofing (asphalt shingle) | Architectural shingles, 30-year rated | 1 square = 100 sq ft; add 10% waste | Need min 3:12 pitch |
| Roofing (metal panel) | 5-V crimp or exposed-fastener panels, 29 ga steel or .032 aluminum | Standard 3-ft panels | Works at 2:12 and up; lighter than shingles |
| Joist hanger / rafter tie | Simpson LUS or H2.5 hurricane tie | Per connector schedule | Required in most jurisdictions; rated by load |
| Post base anchors | Simpson ABA or ABU post base | ABU66 for 6x6 posts | Set in wet concrete; keep post off slab |
| Lag screws / ledger bolts | 1/2" diameter hot-dipped galvanized or stainless | Per IRC R507 table spacing | Stagger two rows; minimum 1.5" into rim joist |
| Concrete (footings) | 3,000 psi premix or site-batched | 12–16" diameter x 12" deep minimum, below frost depth | Frost depth varies: 0" in south FL to 60"+ in Minnesota |
Tools and complete materials checklist
Power tools
- Circular saw (7-1/4" blade) — for framing cuts and rafter angles
- Compound miter saw — speeds up rafter bird's mouth and plumb-cut angles significantly
- Power drill/driver with 1/2" chuck — driving lag screws and structural fasteners
- Reciprocating saw — cutting notches and trimming posts in place
- Rotary hammer or post-hole auger (rented) — drilling into concrete for anchor bolts or digging footings
Hand tools
- Speed square and framing square — laying out rafter cuts and checking 90-degree angles
- Chalk line — snapping layout lines on the slab and marking beam positions
- 4-foot level and 8-foot level (or longer) — plumbing posts and leveling beams
- Tape measure (25-foot minimum)
- Hammer and nail set
- Utility knife — scoring housewrap and flashing
- Tin snips — cutting metal flashing
- Caulking gun
Safety gear
- Safety glasses — always, especially when cutting PT lumber (treated chemicals in sawdust)
- Dust mask or N95 respirator — pressure-treated lumber sawdust is a genuine health hazard
- Gloves — especially when handling PT lumber
- Work boots with ankle support
- Safety harness or fall protection if you are working above 6 feet on a ladder
- A reliable helper — never raise ridge beams or set roof framing alone
Hardware and consumables checklist
- Post base anchors (one per post)
- Post caps (one per post, sized for beam width)
- Rafter ties or hurricane clips (one per rafter end)
- Joist hangers if rafters frame into a ledger or beam pocket
- 1/2" x 4" lag screws or structural screws for ledger (quantity per IRC spacing table)
- 16d galvanized common nails (5 lbs minimum) and 10d galvanized joist hanger nails
- Structural LVL or beam hardware as required by manufacturer spec sheet
- Roofing underlayment (synthetic or 30# felt, 1 roll per 400 sq ft)
- Drip edge (aluminum, enough for all eave and rake edges)
- Step flashing (if roofing meets a wall — 1 piece per shingle course at wall intersection)
- Roofing nails (1-3/4" ring shank, 1 lb per square of shingles)
- Self-sealing cap nails for underlayment
- Exterior-rated construction adhesive
- Through-wall flashing (for ledger: 6" minimum height behind siding)
- Concrete (quantity per footing count and volume — 80-lb bags or ready-mix if more than 10 footings)
- Rebar: #4 (1/2") rebar for footings in seismic or high-wind zones
Footings, foundations, and post connections
Footing types and sizing
Every post in a patio cover needs a footing that transfers the load to undisturbed soil. The most common type for DIYers is a round concrete pier poured in a tube form (Sonotube). For a 12x16 attached cover with two outer posts, you typically have two footings on the outer beam. A free-standing cover of the same size needs four footings (two per side). A standard footing for a patio cover post is 12 to 16 inches in diameter and at least 12 inches deep into undisturbed soil, but the real rule is that the bottom of the footing must be below the local frost depth. In Atlanta, that is 0 to 6 inches. In Chicago, it is 42 inches. In Minneapolis, frost depth approaches 60 inches. If you pour above the frost line in a cold climate, the footing will heave seasonally and crack your structure. Look up your local frost depth on a USDA frost depth map or simply ask your building department.
For a typical attached 12x16 cover with 6x6 posts, a 16-inch diameter by 24-inch deep footing (below frost) is conservative and code-safe in most moderate-climate regions. If you are in a high-wind zone or carrying significant snow load, consult a local engineer for footing sizing. Always call 811 at least two business days before digging to mark underground utilities.
Post base options
Never embed a wood post directly in concrete, even if it is pressure treated. The post will eventually rot at the concrete interface. Instead, set a galvanized post base anchor (such as the Simpson ABU or ABA series) in the wet concrete while it is still pourable, using a template or the post itself to hold it in exact position. Let the concrete cure for at least 24 to 48 hours before loading the base. The post then sits in the base with a gap above the concrete, allowing moisture to drain. For 6x6 posts, use an ABU66 or equivalent rated for your design uplift load. In hurricane or high-seismic zones, confirm the base's allowable uplift capacity against your engineer's or inspector's requirements. The Simpson Strong-Tie Deck Connection Guide and their technical bulletins are a practical reference for matching connector models to load requirements. For connector selection and allowable capacities, consult Simpson Strong‑Tie (technical resources & product data) for technical bulletins like T‑C‑DECKLAT and the Deck Connection and Fastening Guide.
Footing spacing and layout
For an attached 12x16 cover, typical post spacing is 8 feet along the outer beam, giving you three posts (at each end and one in the middle) for a 16-foot beam. If you drop to a 12-foot-long cover, two posts at each end may be sufficient, but verify your beam size handles the span. Lay out footing positions using batter boards and string lines set at right angles to the house wall. Measure diagonally to confirm square: the diagonal measurements of your rectangle should be equal before you dig.
Step-by-step construction sequence
Step 1: Install the ledger board (attached builds)
The ledger is the backbone of an attached patio cover. It must be bolted directly into the house's rim joist or wall framing, not just into siding or sheathing. Start by snapping a level chalk line at your target ledger height (account for a slight slope away from the house: about 1/8 inch per foot keeps water from pooling). Remove siding and any housewrap from the ledger zone. The ledger itself is typically 2x10 or 2x12 pressure-treated lumber, the same depth as your outer beam so the tops are flush. Bolt the ledger with 1/2-inch diameter lag screws or through-bolts per the IRC R507 spacing table: typically two rows staggered, at approximately 12 to 16 inches on center depending on joist span and tributary load. This is not optional spacing, it is an engineered calculation built into the code table. For a step-by-step walkthrough on how to frame a patio cover, see our detailed guide.
Flashing is where most people cut corners and pay for it later. Install a continuous piece of step flashing or Z-flashing behind the siding and over the top of the ledger, with a minimum 6-inch vertical leg extending up behind the siding and a minimum 2-inch horizontal leg over the ledger face. The horizontal leg must slope away from the wall. Tuck the flashing under the siding, not over it. Seal the ends with butyl tape. Water that gets behind a ledger sits there and rots the rim joist of your house, which is a repair that costs $2,000 to $8,000. The flashing takes 20 minutes. Do not skip it.
Step 2: Set posts and outer beam
Once footings have cured, drop your 6x6 posts into the post bases. Brace each post plumb in two directions using temporary 2x4 diagonal braces nailed to stakes in the ground. Get the posts to the right height: for an attached cover, the post top should put the outer beam at the same elevation as the ledger top (or slightly below if you want the roof to slope outward). Cut posts with a circular saw and check level across to the ledger before committing. Install post caps on the post tops, then lift the outer beam into place. On a 16-foot run with three posts, you have about 160 pounds of doubled 2x10 to lift, so plan for at least two people and a set of temporary post supports or a beam cradle to hold it while you fasten. Face-nail and screw the beam into the post caps per the connector manufacturer's schedule.
Step 3: Install the ridge board or ridge beam
This is the step that separates an A-frame build from a lean-to. For an attached A-frame cover, the ridge runs parallel to the house, centered between the ledger and the outer beam. The ridge height above the plates determines your pitch: if your cover is 12 feet wide (6 feet of run per side) and you want a 4:12 pitch, the ridge sits 24 inches (4 inches x 6 run units) above the top plate level. Mark this height on a center post or temporary support and set the ridge board there. For a non-structural ridge board (where the rafters are tied together with collar ties or rafter ties), a 2x10 or 2x12 is typical. For a free-standing structural ridge beam that replaces collar ties entirely, you need an engineered LVL or PSL sized to carry the full roof load, get this sized by a local engineer or use the manufacturer's beam table for your span and load.
Step 4: Cut and install rafters
Rafter layout for an A-frame cover involves three cuts: the plumb cut at the ridge, the bird's mouth (a notch where the rafter sits on the beam or ledger), and the tail cut at the eave overhang. Use the roof pitch (rise over 12 inches of run) to set your speed square or miter saw angle for all plumb cuts. The rafter length formula is: rafter length = run x the square root of (1 + (rise/run)^2). At a 4:12 pitch with a 6-foot run, that is 6 x 1.054 = 6.32 feet of rafter, plus your overhang. Cut one rafter as a template, test it against the ridge and beam before cutting the rest. The bird's mouth should cut no deeper than 1/3 the rafter depth. Toenail or use a hurricane clip at each bearing point. Space rafters at 16 or 24 inches on center (match your span table selection) and mark layout on both the ridge and the outer beam before starting installation.
Common mistake: cutting the bird's mouth angle wrong so the rafter does not sit flat on the beam. Always dry-fit the template rafter and sight down the roof plane before duplicating the cut on all pieces. Another common issue is the ridge sitting out of level along its length, check it with a level and adjust your center support before setting rafters, because a twisted ridge produces a wavy roofline that is nearly impossible to fix after sheathing.
Step 5: Install collar ties or rafter ties
In a gable roof without a structural ridge beam, the two opposing rafters push outward on the beams or walls at their feet. Collar ties or rafter ties prevent this outward thrust. Collar ties are horizontal members connecting opposing rafters in the upper third of the rafter height. Rafter ties do the same job but are installed at the plate line and are more effective structurally. Per IRC practice, collar ties should be located in the upper one-third of the clear height between the ridge and the top of the wall. For a small patio cover, 1x6 or 2x4 collar ties at every other rafter pair (48-inch spacing) are commonly used, but check your local code. If you use a fully engineered structural ridge beam supported at both ends, collar ties may not be required, because the beam carries the load without thrust. Confirm this with your inspector before omitting them.
Step 6: Sheathing and roofing
For asphalt shingles, you need a solid or closely spaced sheathing surface: 7/16-inch or 1/2-inch OSB or CDX plywood is standard. Start sheathing at the eave and work toward the ridge, staggering panel joints. Leave 1/8-inch gaps at panel edges for expansion. Once sheathing is on, install metal drip edge along the eaves first, then roll out roofing underlayment starting at the eave and lapping each course 6 inches over the one below. Install drip edge on the rake (gable) edges over the underlayment. Apply shingles starting at the eave with a starter strip and working up the slope, nailing 4 fasteners per shingle in the nail zone (6 in high-wind areas). Cap the ridge with ridge-cap shingles. For exposed-fastener metal panels, skip the sheathing (panels span between purlins or directly to rafters) and follow the panel manufacturer's installation instructions for overlap, seam orientation, and fastener type. Metal panels work at pitches as low as 2:12 and are significantly faster to install than shingles.
Step 7: Flashing where the roof meets the house wall
If your A-frame cover's gable end meets a house wall (which it does on an attached build where the ridge runs parallel to the house), you need step flashing at that wall intersection. Install step flashing shingles, one L-shaped piece per shingle course, each lapped under the next shingle and over the previous flashing piece. At the top of the wall intersection, install a counter-flashing or extend the wall's housewrap down over the top piece of step flashing. Seal all penetrations with roofing-rated sealant. This is a detail that professional roofers get wrong frequently; do not assume it is fine until water proves otherwise.
Sample cut list for a 12x16 attached A-frame cover (4:12 pitch)
This is a working example, not a substitute for your own measurements. Adjust for your actual dimensions, overhang length, and local lumber availability.
| Member | Size | Quantity | Length (approx.) | Notes |
|---|---|---|---|---|
| Ledger | 2x10 PT | 1 | 16 ft | Attach to house rim joist |
| Outer beam | Double 2x10 PT | 2 pieces | 16 ft each | Face-nailed and bolted together |
| Posts (6x6) | 6x6 PT | 2 | Cut to height | Height = beam elevation minus post base height |
| Ridge board | 2x10 PT | 1 | 16 ft | Non-structural; supported at each gable end |
| Common rafters | 2x6 PT or #2 DF | 18 (9 pairs) | ~7 ft 9 in (incl. 12" overhang) | 16" OC; verify with span tables for your load |
| Collar ties | 1x6 PT | 5 | ~4 ft each | Upper 1/3 of rafter height, every other pair |
| Gable-end studs | 2x4 PT | ~10–12 | Cut to fit | Fill gable triangle at each end |
| Roof sheathing (OSB) | 7/16" OSB | ~9 sheets (4x8) | Full sheets | 2 roof planes, each ~6.3 x 16 ft |
| Roofing underlayment | Synthetic or 30# felt | 2 rolls | Per mfr sq ft coverage | One roll per roof plane |
| Architectural shingles | 30-yr rated | ~2.5 squares | Per mfr bundle coverage | Add 10% waste factor |
| Drip edge | Aluminum 3" x 3" | ~65 lin ft | 10-ft pieces | Eaves and rakes all perimeter |
| Lag screws for ledger | 1/2" x 4" HDG | ~24 | Per IRC R507 spacing | Two staggered rows |
Adapting this build for other patio cover styles
The A-frame framing sequence above is the most complex of the common patio cover styles, which means once you understand it, adapting to other styles is mostly a matter of simplification. For step-by-step lumber lists and woodworking tips, see how to make a patio cover out of wood. A lean-to (shed roof) patio cover removes the ridge entirely: the ledger is set higher than the outer beam, all rafters slope one direction, and there is no gable framing. For step-by-step guidance specific to a single-slope design, see our guide on how to build a lean to patio cover. It is faster to build and simpler to flash. A free-standing A-frame adds a second row of posts and a second outer beam in place of the ledger, and replaces the non-structural ridge board with a structural ridge beam sized by a span table or engineer. Deck-mounted versions of both styles follow the same framing logic, but the footing and post attachment details change: when building on an existing deck, you bolt post bases directly to the deck framing rather than pouring separate concrete piers, and the deck framing itself must be confirmed as adequate to carry the added roof load. For step-by-step guidance on framing a deck to support a patio cover, see how to frame a patio deck.
Finishing and long-term maintenance
Pressure-treated lumber comes from the yard with preservative chemicals but no weather protection. Within 6 to 12 months of installation (once the wood has dried to below 19% moisture content), apply a penetrating exterior wood stain or sealer to all exposed framing, fascia, and trim. This is not cosmetic, it prevents surface checking (cracking) that accelerates weathering. Reapply every 2 to 3 years. For exposed rafters under an open-lattice or open-framed patio cover, expect to spend about $80 to $150 in materials per application on a 12x16 structure. Inspect the ledger flashing and all fastened connections annually after freeze-thaw cycles and major storms. Check for loose hurricane clips, any cracking at beam-to-post connections, and signs of water staining under the ledger area. Catch these early and you are looking at a 10-minute fix; ignore them and you are looking at structural replacement.
Realistic cost ranges
| Build Type | Materials Only | Materials + Rental Tools | Notes |
|---|---|---|---|
| 12x16 attached, PT wood, asphalt shingles | $1,800–$2,800 | $2,100–$3,200 | Most common DIY build; 2 weekends of labor |
| 12x16 attached, PT wood + LVL ridge beam, metal roofing | $2,200–$3,400 | $2,500–$3,800 | Metal roofing adds speed; LVL adds cost but quality |
| 12x16 free-standing, PT wood, asphalt shingles | $2,400–$3,600 | $2,800–$4,000 | Two extra footings and posts add cost vs attached |
| 12x16 attached, aluminum system | $2,500–$5,000 | $2,700–$5,200 | No painting; faster install but less flexible design |
| 16x20 attached, PT wood, asphalt shingles | $3,200–$5,500 | $3,600–$6,000 | Larger span may require engineered beam design |
These ranges assume you supply the labor yourself and rent specialty tools like a rotary hammer or post-hole auger. They do not include permit fees ($100 to $400 typically) or the cost of any concrete work you subcontract. If you hire a contractor for the full build, expect to add $3,000 to $8,000 in labor on top of these material figures, depending on your region.
Troubleshooting common problems
- Sag in the ridge or center of the roof: Usually caused by undersized rafters for the actual load, a non-structural ridge board without adequate collar ties, or a center support that settled. Confirm your rafter sizing against the AWC span table for your actual load. Add a structural ridge beam or add collar ties if missing.
- Water pooling near the house at the ledger: Either the ledger is too close to level (add pitch — minimum 1/8 inch per foot slope outward) or the flashing has failed. Pull the base of the siding, re-flash, and re-slope.
- Posts twisting or leaning after first winter: Usually means the posts were not braced at installation and no knee braces or diagonal blocking were added. Install 45-degree knee braces from post to beam as permanent lateral support.
- Roofing nails backing out or shingles lifting: Caused by nailing in the wrong zone or using smooth-shank nails in a high-wind area. Re-nail with ring-shank roofing nails in the manufacturer's specified nailing zone, and add construction adhesive under any lifted tab.
- Rafter ties pulling away from rafter faces: Nail quantity was insufficient. Metal connector nails (10d x 1.5") must fill every hole in the connector per the connector schedule. Add more nails or replace the connector.
- Ledger fasteners in the wrong location (through a rim joist knot or near a notch): Reposition fasteners to avoid knots and notches. Minimum edge distance from the top of the ledger is 2 inches per IRC guidance.
When to call a pro or hire an engineer
Most attached A-frame patio covers in the 10x12 to 14x20 foot range, with standard pitches and modest loads, fall within prescriptive code limits and are well within reach of a capable DIYer. Call a structural engineer or licensed contractor when: your span exceeds what prescriptive span tables cover (typically rafters over 14 feet or beams over 14 feet unsupported); your site has a ground snow load above 50 psf or a design wind speed above 115 mph (ASCE 7 Exposure C); you cannot identify what the house rim joist or wall framing looks like before attaching a ledger; the patio cover is free-standing and over 16 feet in any direction; or your local jurisdiction requires engineered drawings for the permit. An engineer's stamp on a custom patio cover plan typically costs $300 to $800 and is worth every dollar when it is genuinely needed. A good building inspector is also your friend here: if you are unsure whether your footing size or rafter sizing is adequate, ask the inspector at your footing inspection before you pour concrete. Most will give you honest guidance right there.
The A-frame patio cover is one of the most rewarding structural builds a DIYer can take on. The framing geometry is satisfying to lay out, the result looks like it belongs there, and it will add real value and usability to your outdoor space for decades. Take the permit and planning steps seriously, follow the span tables and connector schedules, and the build itself is a very manageable two-weekend project with a helper and the right tools.
FAQ
What essential planning steps should the how‑to guide include before building an A‑frame (gable) patio cover?
Include a short planning checklist: confirm property setbacks and easements, determine roof orientation for shading and drainage, lookup site design wind speed and ground‑snow load (ASCE 7), check applicable local codes and permit triggers, decide attachment type (attached ledger, deck‑mounted, or free‑standing), select materials (pressure‑treated lumber, engineered lumber, or metal), estimate loads and member spans (use AWC span tables or manufacturer tables), create a cut list and materials checklist, and plan temporary bracing and access. Also identify utilities and mark underground services before digging footings.
When is a permit or inspection required for a patio cover and what code references matter?
Most jurisdictions require a building permit for new roofed structures, additions, or structural attachments to a house. Use the IRC design load and ledger requirements (R301, R507/R802 depending on attachment) and consult local amendments. If the cover affects egress, plumbing, or electrical, or if spans/loads exceed prescriptive limits (DCA‑6), plan to submit structural drawings. Always obtain required inspections for footings, framing, and final work; when in doubt call the local building department early.
Which load standards and technical references must the article cite for accurate design?
Use ASCE 7 for site wind and ground snow loads and apply the IRC for required design loads (dead, live/snow, wind). For lumber sizing and prescriptive spans, reference the AWC Span Tables for Joists and Rafters (STJR) and AWC DCA‑6 for prescriptive limits. For engineered lumber, use manufacturer span/beam tables (e.g., Weyerhaeuser Trus Joist TJ‑9000/TJ‑9020). For connectors and ledger fasteners, reference Simpson Strong‑Tie technical data and DCA‑6 guidance.
What material options and common sizes should the guide list?
Cover the main options: pressure‑treated Southern Pine or Douglas Fir dimensional lumber (2x6, 2x8, 2x10, 4x4 posts, 6x6 posts, glulam headers), engineered lumber (LVL/PSL headers and ridge beams in typical widths 1‑1/2" to 3‑1/2"), and metal framing (aluminum/steel extrusions per manufacturer). Include typical roofing options: asphalt shingles (match house), metal panels, polycarbonate, or corrugated metal. Provide a materials table with common member sizes and uses: rafters (2x6–2x10 depending on span and spacing), ridge beam or ridge board (2x8–2x12 or LVL), collar/rafter ties (2x4), posts (4x4 for short spans, 6x6 for larger loads), footings (concrete pads or piers sized per load and frost depth).
What tools and a complete materials checklist should be included?
Tools: circular saw, miter saw, reciprocating saw, drills/drivers, framing nailer (or hammer), level, plumb bob, framing square, chalk line, measuring tape, ladder/scaffold, temporary bracing, concrete mixer or wheelbarrow, posthole digger or auger, safety gear (glasses, gloves, hearing, fall protection). Materials: lumber per cut list, engineered headers/LVL if used, ledger flashing and through‑wall flashing tape, galvanized/SS structural fasteners and bolts (simpson connectors, post caps, hold‑downs), ledger screws/lag bolts per manufacturer, metal flashing for rake and eave, roofing underlayment and roofing material, drip edge, sealant, concrete for footings, rebar or anchors as required, joist hangers or rafter hangers, collar ties/rafter ties, paint/stain and preservatives.
What is the step‑by‑step construction sequence the article must present?
Sequence: 1) Site prep and layout — verify utilities, grade, and mark footing locations. 2) Footings and posts — dig to frost depth, form and pour piers or pads with anchors. 3) Ledger/beam attachment — install ledger with flashing or build free‑standing header supported by posts/beams; verify structural fasteners and water proofing. 4) Build and raise A‑frame rafters — cut seat cuts, birdsmouths, and ridge assembly; assemble on ground in pairs where practical. 5) Install ridge board or beam and secure rafters, add temporary bracing. 6) Install collar ties or rafter ties and any required lateral bracing. 7) Sheathing/roofing underlayment and roofing (shingles, metal, or panels). 8) Flashing, trim, gutters, and sealing against the house. 9) Finish carpentry, paint/stain, and final inspections.