Building a patio cover is one of the most rewarding weekend-to-weekend projects a homeowner can tackle. You can build a solid, attractive attached patio cover for roughly $1,500 to $5,000 in materials depending on size and what you use, and most DIYers with basic framing skills can get it done in two to three weekends. The core process is: pick your style and layout, pull a permit, set your posts or attach your ledger, frame your beams and rafters, and finish with roofing material and flashing. Everything in between is just details, and that's what this guide walks you through.
How to Build a Patio Cover: DIY Steps, Materials, Plans

Celia Vaughn
1 May 2026
Pick your patio cover type before you do anything else
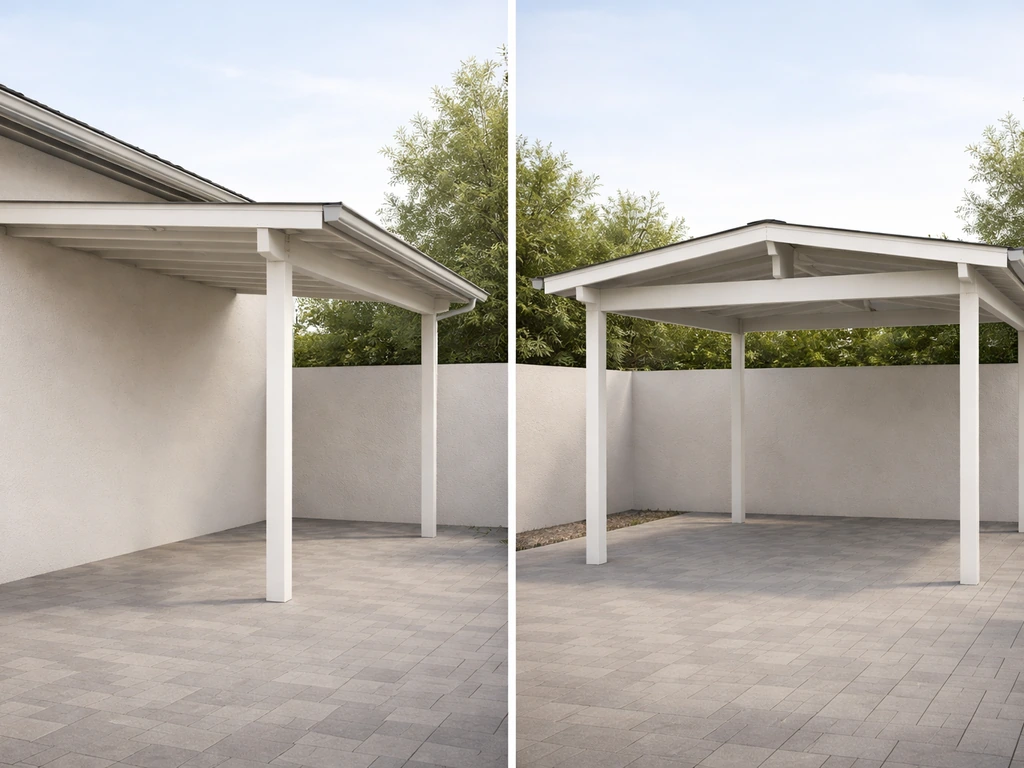
The biggest decision you'll make is whether you want an attached cover (one side hooks to your house) or a freestanding structure (stands on its own posts, away from the house). For most homeowners, attached is the right call, it's more economical, integrates naturally with the house, and is simpler to waterproof because you're working with an existing wall. Freestanding covers make sense when you can't easily access a house wall, or when local code restricts how close a permanent structure can be to the house.
Within those two camps, you're also picking a roof profile. The most common DIY-friendly styles are:
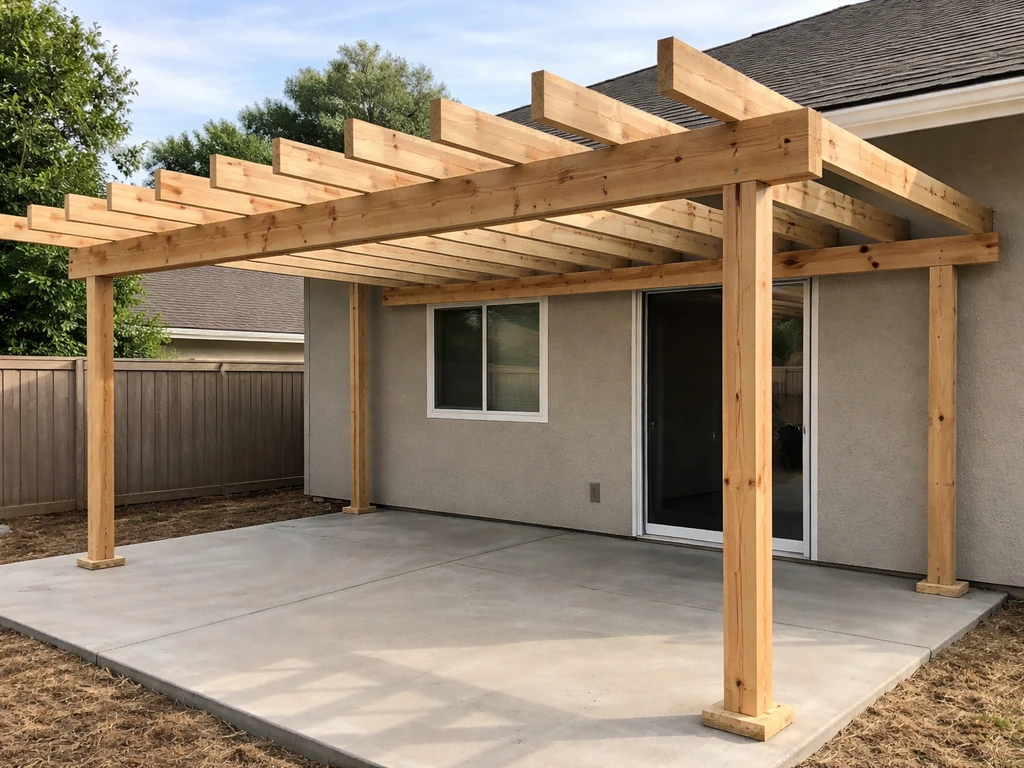
- Lean-to (shed roof): single slope, lowest complexity, great for small to medium patios. One side attaches to the house via a ledger board, the other side rests on posts. This is where most first-timers should start.
- Gable (A-frame): two-slope peaked roof, more visual impact, more structural work. A ridge beam runs down the center and rafters angle down each side.
- Flat or low-slope: common with aluminum and metal panel systems, typically used in warm dry climates. Drainage is critical here — even a 'flat' cover needs at least a 1/4-inch-per-foot slope.
- Freestanding pergola-style: open framing with no solid roofing, or with lattice/shade cloth. Structurally similar to a lean-to but doesn't need the same waterproofing.
For a simple, small patio cover, say, 10x12 feet attached to your house, a lean-to design is genuinely doable in a weekend once you have your permit and materials. For a lean-to patio cover, focus on getting the ledger, slope, and rafters right so the roof sheds water safely how to build a lean to patio cover. Larger builds, gable roofs, or anything over a deck that's elevated off the ground steps up the complexity considerably. Be honest with yourself about where you're starting from.
Permits, measurements, and design basics
Get a permit. I know that sounds like boilerplate advice, but patio covers are specifically governed by the International Residential Code (IRC Appendix H) and by local jurisdiction amendments. Cities like San Diego have dedicated information bulletins that describe exactly what documentation you need, including post anchorage and bracing details. Some jurisdictions offer an expedited or 'rapid review' pathway for standard light-frame wood patio covers when you submit drawings that follow pre-approved details. Skipping the permit risks a stop-work order, problems when you sell the house, and, more importantly, a structure that hasn't been checked against your local wind, snow, or seismic requirements.
Structural load requirements are not just bureaucratic paperwork. Under the IRC, a patio cover roof must handle a minimum vertical live load of 10 pounds per square foot (psf), but snow loads override that where applicable, whichever is greater governs (IRC Section R301.6). In a snowy climate, your design loads can be significantly higher. In a high-wind region, wind resistance per ASCE 7 methodology applies. Your permit reviewer handles this math for you, that's another reason to go through the process.
For measurements, start with these basics:
- Measure your patio slab or area: length (parallel to the house) and depth (how far out from the house you want the cover to extend). Standard residential covers run 10 to 16 feet deep and 12 to 24 feet wide.
- Check your eave height. Your ledger will typically attach just below the existing eave soffit. Measure from the ground to that point — this determines your header/ledger height and how much slope you can build in.
- Note the slope you need. For solid roofing (metal panels, asphalt, polycarbonate), you want a minimum 1/4-inch drop per foot of run. For a 12-foot-deep cover, that's at least 3 inches of drop from the house side to the outer edge.
- Locate your post positions. Posts typically land 6 to 8 feet apart on center depending on your beam span. Mark them on your patio slab to check for any underground utilities before digging or drilling for post anchors.
Sketch this out on graph paper, nothing fancy. A top-down view showing the slab outline, post locations, and beam layout, plus a side-elevation sketch showing the slope, is usually enough for a basic permit application. If you're building a gable or anything with complex framing, a more detailed drawing (or a plan from a supplier) will be required.
Wood, metal, or aluminum, which material is right for you
This is the choice that shapes everything downstream: your tools, fasteners, finishing work, and long-term maintenance. Here's a straight comparison:
| Material | Pros | Cons | Best For |
|---|---|---|---|
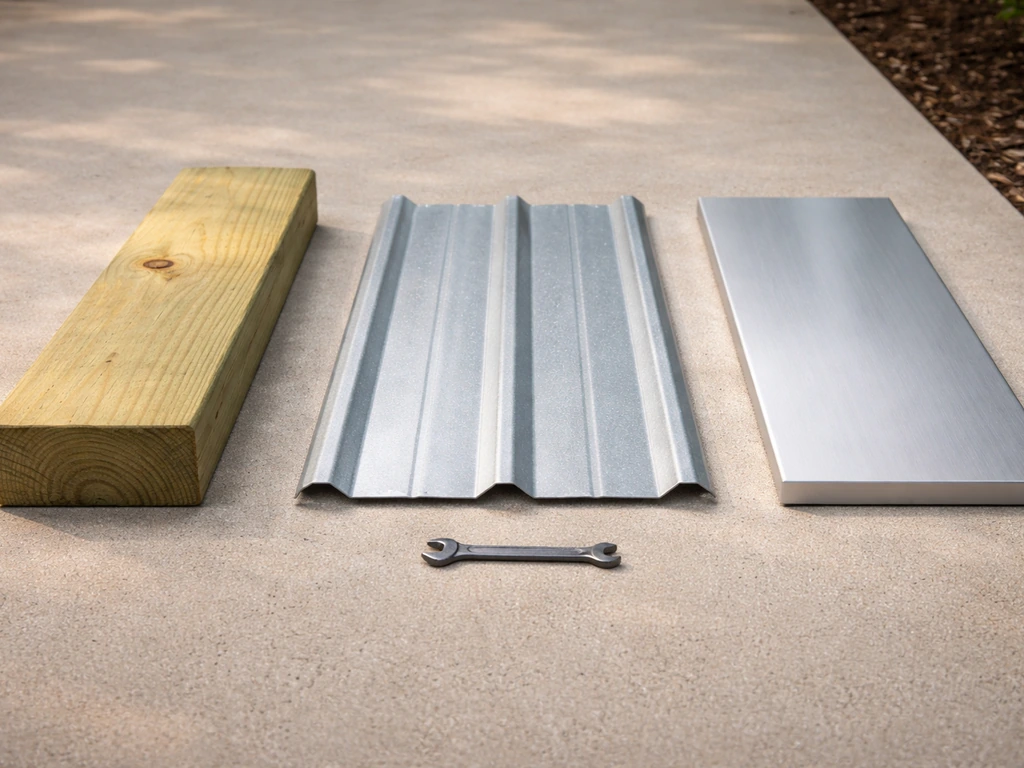
| Pressure-treated wood | Widely available, easy to cut and fasten, familiar to most DIYers, paintable/stainable | Requires regular sealing/staining, can warp or split, heaviest option | First-timers, painted/natural-look builds, most climates |
| Cedar or redwood | Natural rot resistance, attractive appearance, lighter than PT | More expensive, still needs sealing, harder to find in some regions | Decorative visible framing, dry/moderate climates |
| Aluminum (kit or custom) | Lightweight, rust-proof, low maintenance, available as DIY kits with pre-cut parts | Higher upfront cost, harder to modify once cut, limited DIY connection options | Coastal climates, low-maintenance priority, flat/low-slope designs |
| Steel/metal framing | Very strong, non-combustible, longer spans possible | Heavy, requires metal-specific tools (metal saw or grinder), susceptible to rust without proper coating | Large spans, fire-resistant builds, experienced builders |
My honest recommendation for most DIYers: use pressure-treated lumber for posts, beams, and rafters, and choose your roofing surface separately. PT lumber is forgiving, available at any home center, and works with standard framing hardware. If you love the idea of no-maintenance, consider an aluminum patio cover kit, these come with pre-drilled components, instructions, and all the hardware, and they're genuinely doable for someone who has never built anything before. For a wood patio cover, the framing approach is essentially the same as light-frame residential construction.
What tools, hardware, and supplies you actually need
You don't need a full carpenter's shop for this. Here's the practical breakdown:
Tools
- Circular saw (for cutting lumber) or miter saw if you have one
- Drill/driver with bits (3/8-inch and 1/2-inch for lag screws and bolts)
- Level — a 4-foot level and a torpedo level
- Speed square or combination square
- Tape measure (25-foot minimum)
- Chalk line
- Post hole digger or rotary hammer with concrete drill bits (if you're anchoring posts to an existing slab)
- Hammer or nail gun (framing nailer speeds things up but isn't required)
- Ladder — a 6-foot stepladder and an extension ladder for working at the wall
- Safety glasses, work gloves, hearing protection
Hardware and structural connectors
- Post base anchors (Simpson Strong-Tie or equivalent) — these anchor your posts to the concrete without burying wood
- Post caps for connecting beams to posts
- Joist hanger hardware for rafter-to-beam connections
- 1/2-inch lag screws or through-bolts for ledger attachment (the IRC ledger attachment table specifies spacing based on joist span — follow that table)
- Structural screws (e.g., LedgerLOK or equivalent) — these are code-recognized and faster to install than lag screws
- Hurricane ties or rafter ties at each rafter-to-beam connection
- Concrete anchors (Tapcon or wedge anchors) for post bases
- Flashing (step flashing, kick-out flashing) for the wall-to-roof junction
- Roofing fasteners appropriate for your chosen roofing material
Roofing and finishing supplies
- Roofing material: corrugated metal panels, polycarbonate panels, asphalt shingles over sheathing, or solid wood decking with roofing felt and metal cap
- Self-adhesive flashing tape (for sealing around the ledger/wall junction)
- Exterior caulk/sealant rated for UV exposure
- Paint, stain, or sealer for wood components
- Gutters and downspouts if you're routing water off the outer edge
Framing it right: posts, beams, rafters, and structural safety
This is the heart of the project, and it's where most mistakes happen. The framing sequence for an attached lean-to patio cover goes: ledger board on the house wall, then beam on the outer posts, then rafters spanning between ledger and beam. Every connection matters. For deck-style projects, the framing approach is similar, but you'll want to follow a dedicated plan for how to frame a patio deck from posts through joists and supports.
Posts
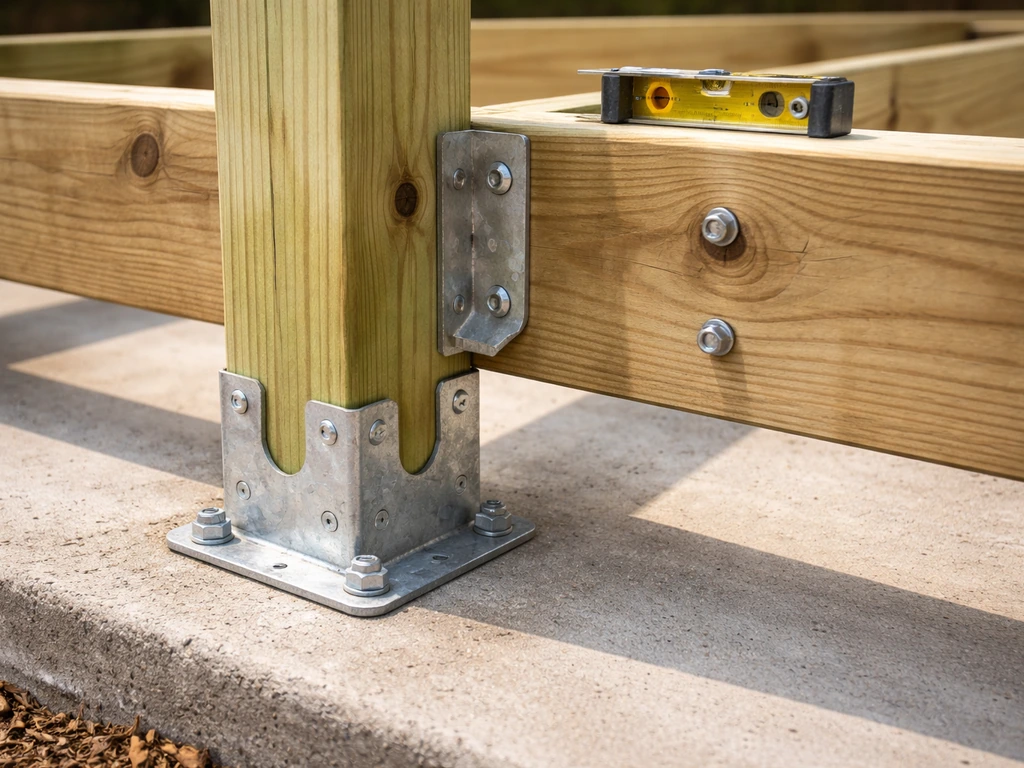
Use 4x4 posts for covers up to about 8 feet in height and 10 feet of beam span. Use 6x6 for taller posts or heavier loads. Never bury pressure-treated wood directly in concrete on a patio slab, instead, use a post base anchor bolted to the slab. Simpson Strong-Tie notes that [post bases generally do not provide adequate resistance to prevent rotation about the base](https://www.
strongtie. com/products/connectors/wood-construction-connectors/technical-notes/bases-caps-general-notes), so they are not recommended for non-top-supported installations like patio covers. This keeps wood out of standing water, is code-compliant in most jurisdictions (San Diego's approved sheets specifically reference post anchorage details), and makes future post replacement possible without jackhammering your slab. Common mistake: people set posts without checking plumb in two directions.
Use your level on adjacent faces before the concrete or anchor cures.
Beams
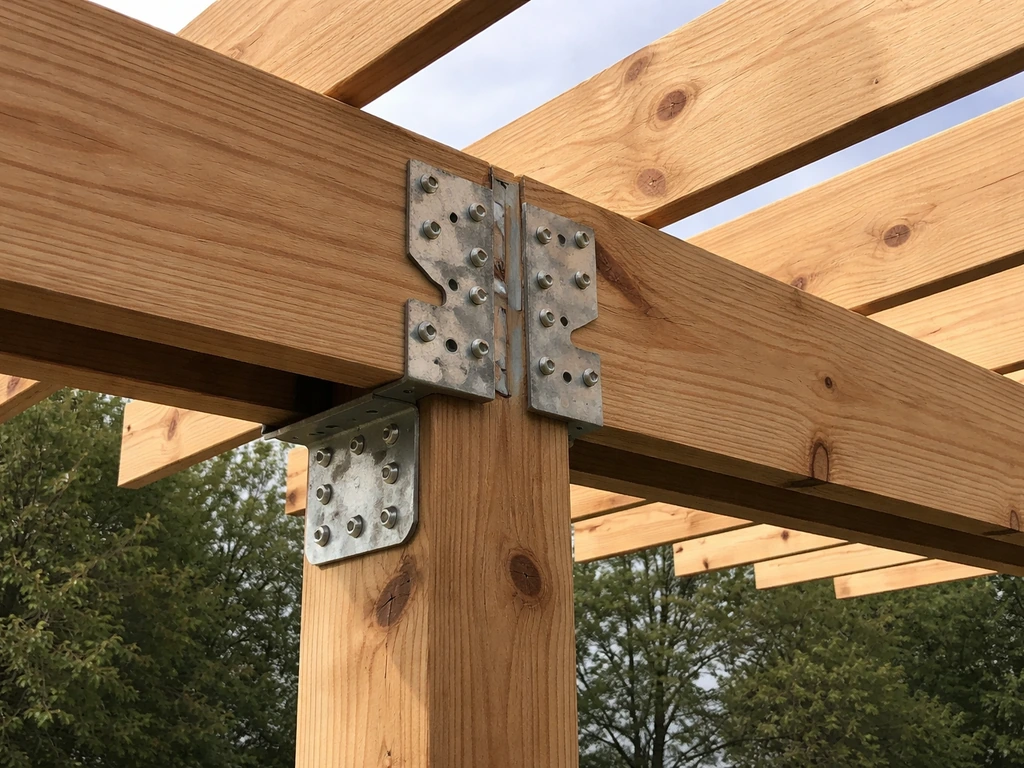
The beam runs across the tops of your posts and supports the outboard ends of your rafters. For most residential patio covers with posts 8 feet apart, a doubled 2x8 or 2x10 PT beam is adequate, but verify with a span table or your permit reviewer for your specific span and load. Connect beams to posts with post caps rated for the load, not just toenails. Toenails alone don't satisfy positive anchorage requirements under the IRC.
Rafters
Rafters typically run 16 or 24 inches on center, spanning from the ledger board at the house to the outer beam. Use 2x6 rafters for spans up to about 10 feet, 2x8 for spans up to 14 feet (always verify with span tables for your load conditions). Cut a bird's mouth notch where the rafter seats on the beam for a solid, level bearing surface, this is standard practice and prevents the rafter from rolling or shifting. Secure each rafter to both the ledger and the beam with proper metal connectors (joist hangers at the ledger, hurricane ties or rafter ties at the beam).
On structural safety: you are building something that will sit over people and outdoor furniture for decades, and it needs to resist wind uplift, not just gravity loads. Every metal connector you use, post base, post cap, rafter tie, resists specific force directions. Don't skip them to save a few dollars. In a high-wind area, your engineer or permit reviewer will look at these details closely.
Installing an attached patio cover: step by step
Think of this as your follow-along checklist. Work through it in order and you won't miss anything critical.
- Mark your ledger height on the house wall. Account for the slope you need — for a cover that drops 1/4 inch per foot over 12 feet, the ledger sits 3 inches higher than the outer beam.
- Locate wall studs or rim joist behind the house wall cladding. Your ledger bolts must hit solid framing, not just sheathing or siding.
- Install flashing first, then the ledger. Tuck the top leg of your flashing behind the siding or housewrap before you bolt the ledger. This is one of the most commonly skipped steps — and it's the one that causes rot and water damage behind the ledger over time. IRC R903.2.1 requires flashing at wall-roof intersections for exactly this reason.
- Attach the ledger with 1/2-inch lag screws or structural screws spaced per the IRC ledger attachment table. Space the ledger off the sheathing by about 1/2 inch using washers or a deliberate gap — this lets water drain through rather than pooling behind the board.
- Set your post base anchors on the slab. Use a chalk line off the house to keep them in a straight line. Drill into the concrete with a rotary hammer, set the anchors with the manufacturer's specified torque, and check alignment before setting posts.
- Set and plumb your posts in the anchors. Brace them temporarily with 2x4 stakes and screws until the beam is in place.
- Install the outer beam across the post tops using post caps. Check the beam for level before fastening.
- Cut and install rafters from ledger to beam at your chosen spacing (16 or 24 inches on center). Use joist hangers at the ledger and hurricane ties at the beam.
- Add blocking at the rafter tails (the outer ends) if your roofing material or design requires a fascia board. This also helps resist lateral racking.
- Install your roofing material over the rafter framework.
What often goes wrong at the ledger: people bolt straight through siding without flashing, or they use nails instead of lag screws. Nails in withdrawal (pulled straight out) are explicitly prohibited as the primary attachment method for ledger connections under the IRC. Use bolts or code-recognized structural screws, full stop.
Finishing: roofing, drainage, sealing, and inspections
Choose and install your roofing material
The most common DIY-friendly roofing options for patio covers are corrugated metal or standing-seam metal panels (fast, durable, great for low slopes), polycarbonate or acrylic panels (lets light through, good for greenhouse-style covers), and asphalt shingles over OSB sheathing (matches your house, more work to install). If you’re specifically planning how to build a metal patio cover, pay close attention to the panel type, fastening spacing, and weatherproofing details. If you go with metal or polycarbonate panels, make sure they're rated for the slope you built and follow the manufacturer's overlap and fastener requirements, exposed-fastener metal roofing typically needs a neoprene-washer screw every 12 to 16 inches at ribs.
Flash the wall junction correctly

At the point where your roof meets the house wall, you need step flashing woven up the wall and a kick-out flashing piece at the lower end of that run. The kick-out flashing is critical: it diverts water away from the wall and into a gutter (or off the edge) instead of letting it sheet down behind your cladding. According to the Building America Solution Center, this piece is required under IRC across multiple code cycles, yet it's the most commonly missing flashing detail on inspections. Integrate it with your housewrap or building paper so water can't find a path behind it.
Seal, drain, and protect
- Caulk the top edge of your flashing and any gaps at the wall junction with an exterior-rated, paintable caulk
- If you have a fascia at the outer edge, install gutters to manage runoff — water pouring off the outer edge of a cover will eventually erode your patio and can splash back onto people
- Seal or stain all exposed wood surfaces, including cut ends of PT lumber, within a few weeks of installation
- Check all metal connectors for any rust spots at cut edges and touch up with zinc-rich primer
Inspections and when to call a pro
If you pulled a permit (which you should have), you'll typically need a framing inspection before you install roofing and a final inspection once complete. Schedule these proactively, don't cover up your framing until the inspector has seen it. Most building departments are helpful if you ask questions during the process.
Call a pro or structural engineer if: your patio is elevated on a deck more than 30 inches off the ground, you're in a high-wind or seismic zone and your jurisdiction requires engineered drawings, your span between posts exceeds 12 feet, or you're building a gable-roof structure. These aren't impossible DIY scenarios, they just need proper engineering input before you build, not after.
Also consider calling a pro for the ledger attachment if your house has stucco, EIFS (synthetic stucco), or fiber-cement siding. Penetrating these materials without the right flashing sequence is a very common source of hidden water damage, and getting it right on the first try is worth a few hundred dollars in professional help.
Your next steps right now
Here's the sequence to get from 'thinking about it' to actually building. Follow this order and you won't spin your wheels:
- Measure your patio and decide on style (lean-to, gable, or freestanding) and whether you're attaching to the house
- Visit or call your local building department and ask what's required for a patio cover permit — ask specifically about any pre-approved details or rapid-review programs
- Sketch your layout (top-down and side elevation) and note post spacing and beam spans
- Choose your material (wood for most DIYers, aluminum kit if you want minimal maintenance) and get a materials list together
- Order or purchase your lumber, hardware, and roofing materials — allow a week for anything you're ordering online
- Install in the order outlined above: flashing and ledger first, then posts and beam, then rafters, then roofing
- Schedule framing inspection before covering up the structure
If you want to go deeper on any specific style, there's a lot more to cover: the framing details for a lean-to cover differ slightly from an A-frame or gable build, a freestanding structure needs its own post-footing approach, and a wood patio cover has different finishing considerations than an all-metal build. For an A-frame patio cover, the framing layout and roof pitch setup will guide how you size your posts, beams, and rafters.
Freestanding patio covers are built on their own posts and typically require a post-footing plan and framing sequence that differs from attached designs. A wood patio cover has its own finishing considerations, from material selection to weatherproofing details. This guide gives you the full roadmap, the style-specific guides let you zero in on exactly how to frame and finish the version you're building.
FAQ
How do I choose the roof slope for a patio cover so it drains properly?
Pick a slope based on your roofing material’s minimums, not just the “looks right” pitch. Many common covers (metal panels, polycarbonate sheets) have specific minimum slope and overlap rules, so verify the manufacturer rating and then set your rafter length and ledger height accordingly before you frame.
What footing plan should I use if my patio cover is freestanding?
Treat it like its own structure, with post footings designed for local soils and required depth, rather than reusing any “deck blocks” approach. Use a plan that includes footing size, number of posts, and lateral bracing (often needed for wind), then install bases at the correct elevations so the beam stays level.
Can I attach a patio cover ledger directly to siding or trim?
You generally need to connect to the structural framing (studs or rim/band framing) behind the finish materials, not just the siding layer. If you cannot locate solid framing, stop and adjust the design or use a contractor to plan a code-compliant ledger attachment and flashing sequence for your wall type.
What’s the safest way to prevent rot around the ledger board and flashings?
Use a water-managed detail: correct flashing that sheds water over the housewrap/building paper, sealants applied only where the system calls for them, and a clear drainage path at the kick-out flashing. Also keep fasteners and connector hardware compatible with treated lumber and avoid trapping water at overlaps.
Do I need hurricane ties and rafter ties for every design, even a small lean-to?
Often yes, for the load direction your design must resist. Connectors are specific to uplift and lateral forces, so “small” does not mean “no connectors.” Confirm with your permit plan, connector manufacturer tables, and local requirements, because omission can cause failures under wind uplift.
Can I use leftover framing lumber instead of pressure-treated lumber?
You can sometimes use non-treated lumber for parts that never contact moisture pathways, but posts, beams, and rafters are commonly specified as treated because they’re exposed to outdoor wetting. Mixing materials without checking preservative compatibility and connector corrosion ratings can create premature decay or hardware issues.
How far apart can posts be before I’m out of DIY territory?
As a practical rule, keep spans conservative, because beam and rafter sizing changes quickly with load. Your article mentions pro help when the post span exceeds 12 feet, so if you’re approaching that, verify your span table or permit plan and consider engineered drawings for your exact roof area and climate loads.
What’s the most common mistake with being “level” versus “square” during installation?
People often set posts plumb but skip squaring the frame, which leads to uneven rafter bearing and poor roofing alignment. After you set posts and beams, check diagonal measurements across the rectangle and confirm the beam is level before you cut rafters or fasten roofing.
How should I space fasteners for metal or polycarbonate roofing?
Do not rely on a general rule of thumb, use the spacing and fastening type required for your specific panel and slope. Exposed-fastener metal roofing usually needs correct fastener placement at ribs with the specified washer, and polycarbonate needs fasteners that allow for thermal movement (over-tightening can cause cracking).
What do I do if my house wall is uneven where the ledger must mount?
You need a waterproof, structurally sound ledger plane. Options include shimming at approved points, adjusting the roof pitch using a consistent reference line, or reworking the beam height so the entire roof sits correctly. Avoid “gaps” that trap water, and make sure bolts still hit the underlying structural member.
How many inspections should I plan for, and can I cover work early?
Plan for at least one framing inspection before roof sheathing, and then a final after roofing and flashing are complete. Do not cover framing early, if you do, you may have to uncover later for corrections, which increases cost and delays.
When is it worth hiring an engineer for an attached patio cover?
Consider it if you’re in a high-wind or seismic area, your span between posts is large, you need a gable or complex framing, or your ledger connection will penetrate tricky wall assemblies like stucco or EIFS. Also request engineering if you’re near the limits of your chosen lumber sizes, because minor changes in roof area or pitch can shift structural requirements.