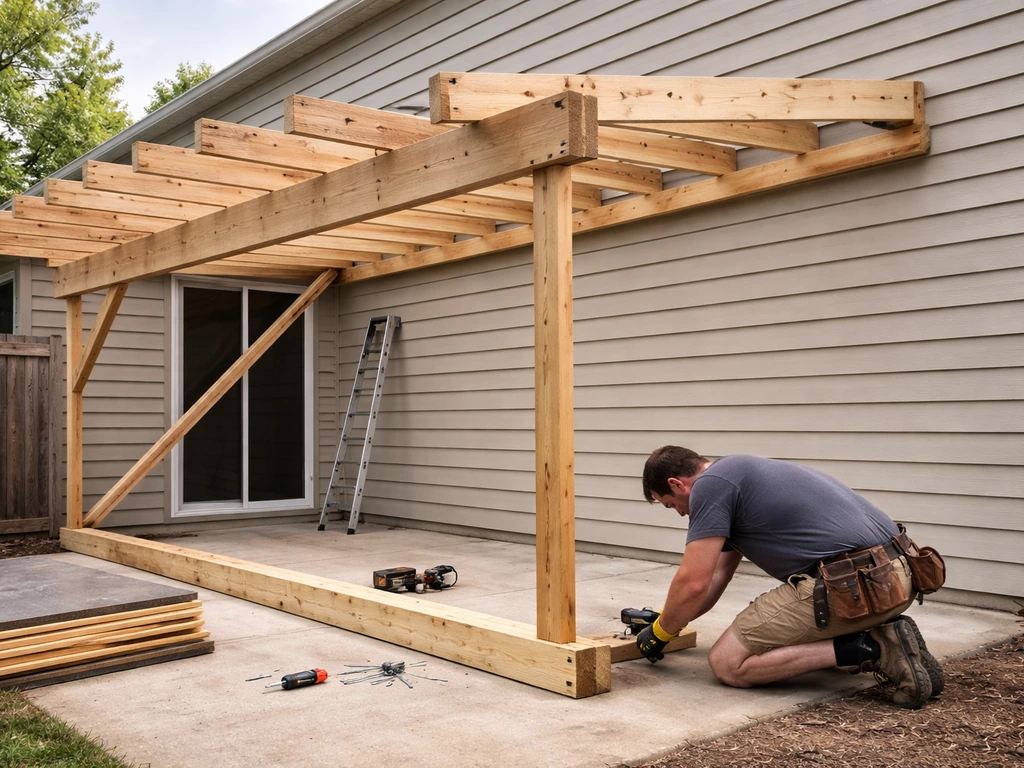
A lean-to patio cover is one of the most practical weekend builds a homeowner can tackle. You attach one end of a sloped roof to the house wall (or an existing structure) and support the outer edge with posts, or you go fully freestanding with posts on both sides. A fully freestanding patio cover follows the same core steps, but it relies on posts and beams on all sides instead of a ledger on the house.
How to Build a Lean to Patio Cover: DIY Guide

Celia Vaughn
19 May 2026
Either way, the basic sequence is: decide on your design, pull any required permits, set your posts or ledger, frame the rafters, install your roofing material, and seal everything so water goes where you want it to go. After you understand whether you are building an attached or freestanding lean-to, you can plan the rest of the steps for how to build a wood patio cover how to build wood patio cover.
Most motivated DIYers can get a straightforward 10x12 or 12x16 lean-to built over a long weekend or two. Once you have the measurements and the design picked, you can follow a full patio-cover build sequence to guide each step from ledger or posts to roof panels build patio cover. If you want a step-by-step walkthrough, follow the sections below on choosing the design, setting the ledger or posts, and framing the roof how to build patio cover.
Choosing Your Design and Layout First
Before you cut anything, settle on three things: attached or freestanding, roof slope, and overall size. Getting these right upfront saves you from rebuilding later.
Attached vs. freestanding
An attached lean-to connects directly to your house wall using a horizontal ledger board. It shares the house's structural support on one side, which makes it simpler and usually less expensive to build. A freestanding lean-to has posts on all four corners and stands entirely on its own, which is great when you want to place the cover away from the house, over a detached slab, or in a spot where attaching to the wall isn't practical. If you're comparing options, the attached version is the more common starting point for most backyard patio cover projects.
Slope, size, and clearance
For water drainage, aim for a minimum roof pitch of 1/4 inch per foot of run, though 1 inch per foot is more common and gives you visible slope without taking up too much wall height. A 10-foot-deep lean-to at 1 inch per foot means your ledger end is 10 inches higher than your outer beam. That difference matters for how high you mount the ledger on the wall. Plan your post heights so you still have comfortable headroom at the low end, typically 7 to 8 feet of clearance at the outer edge minimum. Sketch the side profile on paper before you finalize anything.
For size, measure the slab or area you want covered and add a few inches of overhang on exposed sides. Standard lumber and panel materials come in predictable widths (often 4-foot increments for panels, and 8 or 12-foot lengths for lumber), so designing to those dimensions reduces cutting waste significantly.
Materials and Tools: Wood vs. Aluminum/Metal
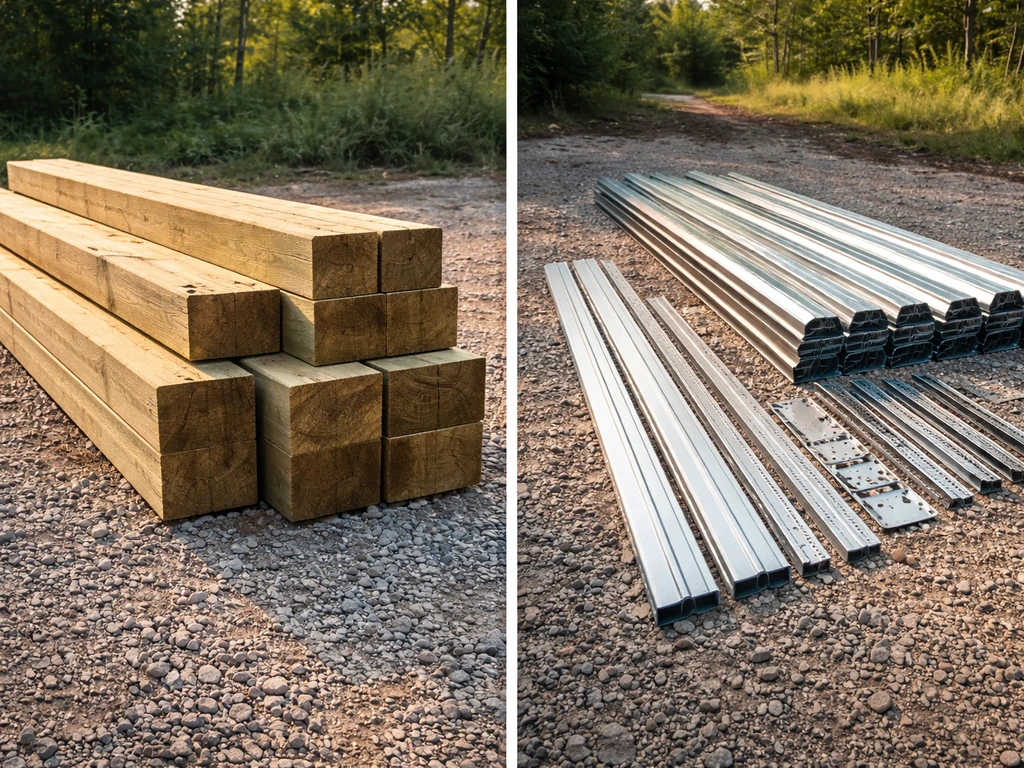
Your two main structural material choices are wood (typically pressure-treated lumber for posts and beams, with construction-grade framing for rafters) and aluminum or metal systems (either fabricated tube aluminum or steel framing). Both work well. The right pick depends on your budget, your comfort level building with each material, and how much long-term maintenance you're willing to do.
| Factor | Wood | Aluminum / Metal |
|---|---|---|
| Cost (materials) | Lower upfront, widely available | Higher upfront, but varies by system |
| Weight | Heavier, requires robust footings | Lighter, easier to handle solo |
| Durability | Good with pressure-treated; needs sealing/staining | Excellent; won't rot, resists rust (aluminum) |
| DIY friendliness | Easy to cut, drill, and fasten with standard tools | Requires metal saw or angle grinder; some systems snap together |
| Appearance | Natural, blends with wood siding and decks | Clean, modern look; powder-coat color options |
| Maintenance | Periodic painting/staining required | Minimal; occasional washing |
| Repairability | Any lumberyard carries replacement material | Replacement parts may need to be ordered |
For most first-time builders, pressure-treated wood framing with polycarbonate or corrugated metal roofing panels is the sweet spot. It's forgiving to work with, easy to source locally, and gives you a solid structure. If you want the lowest-maintenance option and don't mind spending a bit more, an aluminum framing system with aluminum roofing panels is hard to beat long-term.
Tools you'll need
- Circular saw or miter saw (for cutting lumber; a metal-cutting blade or angle grinder if working with metal)
- Cordless drill/driver with bits and screw tips
- Post-hole digger or power auger (for freestanding footings)
- Level (2-foot and 4-foot), plus a line level or laser level
- Tape measure, speed square, pencil
- Hammer and/or nail gun
- Ladder (a 6-foot step ladder for most builds; an 8-foot for taller structures)
- Safety glasses, work gloves, and hearing protection
- Chalk line for layout
- Caulk gun for sealants and flashing adhesive
Building the Support Frame: Attached vs. Freestanding
The attached lean-to: setting your ledger correctly
The ledger is the single most important structural element in an attached lean-to, and it's also the most common place things go wrong. The ledger must connect into the house's actual structural framing (the rim joist, wall studs, or a structural header) not just into siding or sheathing. Fastening through vinyl or wood siding without hitting real framing is a code violation and a safety hazard.
Here's how to do it right: snap a level chalk line at your target ledger height on the house wall. Remove any siding within that band (typically a strip as wide as your ledger board, plus a couple of inches above it). You want to fasten directly into the sheathing and framing behind it. Use structural screws or bolts (1/2-inch lag screws or through-bolts at 16-inch spacing is common) and drive them into studs or the rim joist. Common mistake: people try to avoid removing siding and just fasten through it. Don't. Moisture gets trapped behind the ledger and you end up with rot inside your wall within a few years.
After the ledger is fastened, install continuous metal flashing behind and over the top of the ledger, tucked under the remaining siding above and lapped over the face of the ledger. Trex also recommends installing back flashing between the ledger and the exterior wall as a moisture barrier install continuous metal flashing behind and over the top of the ledger, tucked under the remaining siding above and lapped over the face of the ledger. This flashing is what directs water away from the wall connection. Use self-adhering flashing tape at the top, and seal any gaps with a compatible exterior caulk. This step protects both your house and your ledger from moisture intrusion.
Once the ledger is set, install the outer posts. For an attached lean-to, you'll typically have two outer posts (or more for longer spans). Set your post locations by measuring out from the house to your desired depth. Mark the footing locations, dig to your local frost depth (check your local code, but 18 to 36 inches is typical in most of the U.S.), and pour concrete footings. Let them cure for at least 24 to 48 hours before setting posts. Use post bases anchored in the wet concrete, or use surface-mount post bases on an existing slab.
The freestanding lean-to: posts and footings on all sides
A freestanding lean-to replaces the ledger with a full beam on the high side, supported by its own posts. The process is the same for the outer posts, but you're now digging and setting four (or more) corner footings. Mark out your footprint with batter boards and string lines to keep everything square (the 3-4-5 triangle method works great here: measure 3 feet on one string, 4 feet on the adjacent string, and the diagonal should be exactly 5 feet if the corner is square). Set all posts in concrete footings, let them cure, then cut them to their final heights using a level line.
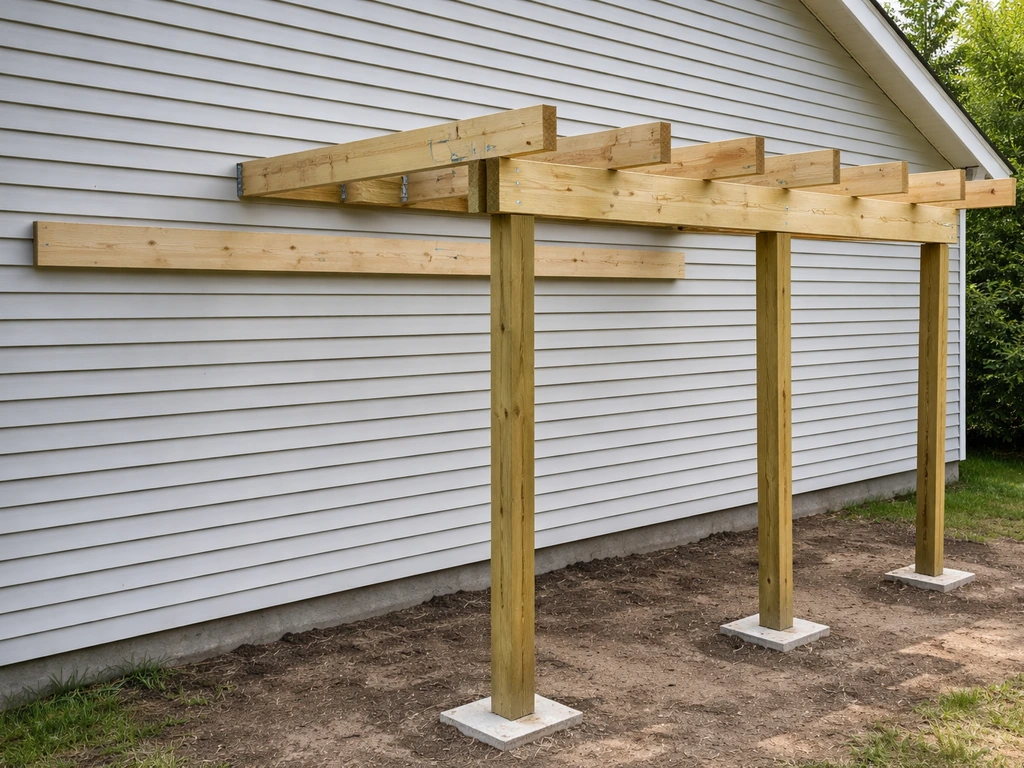
The high-side posts on a freestanding structure will be taller than the outer posts by the amount of your intended pitch. Once posts are set, bolt a double 2x8 or 2x10 beam across the top of each row of posts using post caps (metal connectors made for this purpose). The beams carry the rafters just like a ledger does on an attached build. If you're building a metal patio cover, the framing may use aluminum tube sections that bolt together instead of site-built lumber beams.
Framing the Roof, Installing Sheathing, and Putting on the Panels
Rafter layout and installation
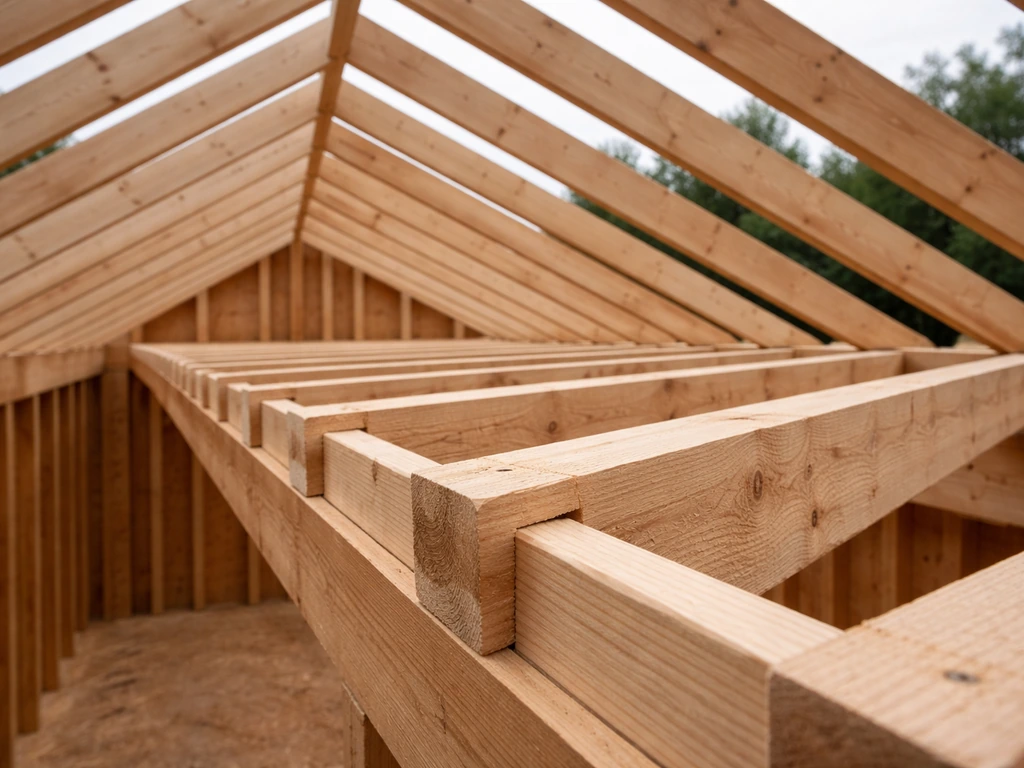
With your ledger (or high-side beam) and outer beam in place, it's time to run the rafters. Rafters typically sit on 24-inch centers for light roofing panels, or 16-inch centers if you're applying heavy roofing material or need to meet stricter load requirements. Lay out your rafter spacing by marking both the ledger/beam and the outer beam with a tape measure and pencil before you start installing.
Cut your rafters to length, then cut a small notch at each end called a bird's mouth (where the rafter sits on the beam) if you're using lumber rafters. Metal rafter systems typically use clips or brackets instead. Secure each rafter with hurricane ties or rafter ties at both ends. These metal connectors make a significant difference in wind resistance and are required by code in most jurisdictions. What often goes wrong here: people skip the metal connectors and just toe-nail. That works for light breezes but fails in real storm conditions.
Sheathing and panel installation
For most DIY lean-to patio covers, you have a few common roofing options:
- Corrugated metal or standing-seam metal panels: durable, sheds water fast, easy to install with screws and rubber-washer fasteners
- Polycarbonate panels (clear or tinted): lets light through, lightweight, available in corrugated or flat multi-wall versions
- Aluminum flat-panel systems: low-maintenance, often used with aluminum framing for a unified look
- Plywood sheathing with roofing felt and asphalt shingles: heavier but gives a look that matches the main house roof
For corrugated metal or polycarbonate panels, start at the low end of the roof and work toward the high end, overlapping each panel over the one below it by at least one full corrugation. Fasten through the high points of the corrugations (the peaks, not the valleys) using screws with rubber washers to create a watertight seal. Pre-drill polycarbonate panels to prevent cracking. Trim the final panel to fit at the edges with tin snips or a jigsaw with a fine-tooth blade.
If you're going with plywood sheathing and shingles, nail 5/8-inch CDX plywood across the rafters, stagger the seams, then roll out roofing felt (30-lb is standard for patio covers) from the bottom up with 6-inch overlaps. Install drip edge along the eaves first, then along the sides (rakes), and shingle from the bottom up using standard 3-tab or architectural shingles following manufacturer nailing patterns.
At the top edge where the roof meets the house wall, install a continuous metal flashing that runs up behind the siding and over the top of the last panel or shingle course. This is the most critical weather seal on the entire structure. Caulk the top edge of this flashing with a high-quality polyurethane or silicone sealant.
Anchoring, Weatherproofing, and What the Code Actually Requires
This is the part most DIY guides gloss over, and it's where real problems show up later. Here's what you actually need to think about.
Load requirements
Most building codes require patio covers to handle a minimum roof live load of 10 pounds per square foot (psf), which accounts for maintenance workers, accumulated debris, and light snow. If you're in a snow-heavy region, your local code will specify a higher snow load requirement, often 25 to 40 psf or more. Your beam and rafter sizes need to be sized for these loads, and a quick span table (available through the American Wood Council or your local building department) will tell you exactly what lumber sizes you need for your span and spacing. Don't guess on this.
Wind loading is equally important. The IBC and IRC require patio covers to resist wind loads based on your local design wind speed, which varies significantly by region (coastal areas, tornado zones, and mountain corridors have higher requirements). Your local building department can tell you your area's design wind speed. Using metal hurricane ties at every rafter connection and ensuring posts are properly embedded in or bolted to concrete footings are the two most effective things you can do for wind resistance.
Permits and inspections
Most jurisdictions require a building permit for a permanent patio cover, regardless of size. Permit requirements vary, but they commonly require a site plan (a simple sketch showing where the structure sits on your property), a framing plan, and footing details. The permit process also triggers an inspection, which is actually useful: an inspector will catch ledger issues, footing depth problems, and connection deficiencies before they become expensive repairs. Apply for your permit before you start digging. Building without one can result in a stop-work order, fines, or a requirement to tear the structure down.
Drainage and weatherproofing
Make sure your roof slope actually drains water away from the house and off the structure. The low edge of your lean-to should have a clear drainage path to the ground or a gutter. Installing a simple gutter along the outer beam edge is a good idea on any lean-to wider than 8 feet, because a lot of water can concentrate at that point during a heavy rain. Downspouts should direct water at least 4 feet away from your foundation.
At every panel overlap, every fastener hole, and every transition between materials, use the appropriate sealant or flashing. Butyl tape works great under metal panel laps. Self-adhesive flashing tape is ideal at wall transitions. Check all sealants annually and recaulk any that show cracking or separation.
Finishing Touches, Upkeep, and Knowing When to Call a Pro
Finishing the structure
Once the roof is on and waterproofed, wrap up the structure with these finishing details. Paint or stain exposed wood members with an exterior-grade product. Trim any exposed rafter tails to a consistent length and angle for a clean look. Install fascia boards along the outer beam and rafter ends to cover the framing and give the structure a finished appearance. If you have open sides, you can add lattice panels, shade screen, or leave them open depending on how much enclosure you want.
For electrical (ceiling fan, lighting), this is where you want to be honest about your skill level. Rough wiring for outdoor fixtures under a covered patio is a common add-on, but it typically requires its own permit and inspection in most areas. If you're not comfortable with electrical work, budget to have an electrician run the wiring as a separate phase of the project.
Ongoing maintenance
- Inspect all flashing and sealant at the ledger-to-wall connection every spring and after major storms
- Clean gutters and check that drainage paths are clear before rainy season
- Re-stain or repaint wood framing every 2 to 3 years, or as the finish shows wear
- Check all metal connectors (hurricane ties, post bases, joist hangers) for rust or movement annually
- Tighten any loose fasteners in metal roofing panels before wind season
When to stop and get professional help
Some situations call for a licensed contractor or structural engineer, and it's better to recognize them early. If your project involves attaching to a stucco, EIFS, or masonry wall, the ledger flashing and attachment details are more complex and the margin for error is smaller. If your area has a design wind speed above 120 mph or significant snow loads, a structural engineer should review your beam and footing sizes before you build. If your footings need to go deeper than 36 inches due to local frost requirements, or if you hit rock or poorly draining soil, a professional footing installation is worth the cost.
If the permit process in your municipality requires stamped engineering drawings, don't skip that step by building without a permit. The risk isn't just a fine: if an unpermitted structure damages a neighbor's property or injures someone, your homeowner's insurance may not cover it. A lean-to patio cover is genuinely a great DIY project, and thousands of homeowners build them successfully every year.
If you are working with wood framing, follow the same basic plan for a lean-to patio cover, and then size the lumber and fasteners for local loads and weather how to make a patio cover out of wood. But there's no shame in recognizing where your build requires a professional eye, and the savings from doing the rest yourself more than pay for the consultation.
If you're deciding between this style and others, a lean-to is simpler to frame than a gable or A-frame patio cover because you're only dealing with a single roof plane and one slope direction. It's also less complex structurally than a fully freestanding structure, since the attached version shares the house's support on one side. Start with a clear plan, pull your permit, and take it one phase at a time.
Next, you can frame the support the right way by following a step-by-step approach to how to frame a patio deck. Most people are surprised by how manageable it is once the ledger or freestanding posts are set and level. If you are specifically looking at an A-frame style, you can follow the same broad workflow, including planning the dimensions, framing the roof structure, and weatherproofing the seams how to build an a frame patio cover.
FAQ
Can I attach the ledger to siding or sheathing if I hit enough screws or bolts?
You should not. The ledger needs to fasten into real structural framing, like studs or the rim joist, not just siding. If you cannot confirm stud locations, remove the siding in the ledger band or use an inspection method that verifies where the framing is before you drill or lag anything.
How do I choose a workable roof slope without making the lean-to too tall?
Use the minimum pitch for drainage as your baseline, then check headroom at the low edge. If your math gives an uncomfortable low-side height, reduce the cover depth or adjust the slope target, rather than trying to force a shallower pitch that will trap water and shorten roofing life.
What’s the correct rafter spacing to use for my exact roofing material?
Start with code and manufacturer guidance for your specific panel weight, span, and fastener pattern. Then choose spacing based on load and attachment needs, common defaults being 24 inches for lighter panels and 16 inches for heavier materials, but you still want to verify with a span table for your lumber size and local live and snow loads.
Do I need hurricane ties even for a small DIY lean-to?
Yes, for practical wind safety. Even if the roof seems “light,” code often expects a specific rafter-to-support connection method. Use rated ties or clips at both ends of each rafter, and avoid toe-nailing as a substitute because nail-only connections are more likely to loosen under uplift.
How far should the structure sit from the house wall so water doesn’t splash back?
Keep the roof surface aligned to send runoff away from the wall, and rely on proper flashing where the roof meets the house. If you add gutters, place them to control overflow at the outer edge, because concentrated runoff can still splash back onto the side of the house even with a correct pitch.
Should I install a gutter on every lean-to, or only wide ones?
Only wide ones usually need a gutter, but the decision comes down to runoff concentration. If your cover is wider than about 8 feet, or if you notice water will fall near posts or walkways during heavy rain, a gutter plus downspout that discharges several feet away from the foundation is a safer setup.
What footer depth is acceptable if my local code is unclear?
Don’t guess. Dig to your local frost depth per code, and if you have poor drainage or reach rock, that can change the design. If you cannot determine frost depth or soil conditions, consider a one-time consult or footing review before pouring concrete, since footing mistakes are expensive to fix.
How do I keep wood from rotting at the ledger and post connections?
Use treated lumber where required, and add moisture control at every interface. For the ledger specifically, remove siding for structural attachment, install properly lapped metal flashing, and seal gaps with compatible exterior caulk. Then plan to inspect annually for cracked sealant or separated flashing edges.
Can I reuse existing posts, beams, or a beam from another project?
Generally no, unless the material is structurally verified and still meets the required grade and dimensions for your new span and loads. Old lumber may be warped, cracked, or degraded, and you can end up with weak members even if the hardware looks fine.
What sealant or tape should I use at overlaps, and where does each go?
Match the method to the material interface. Butyl tape is typically used under metal panel laps, while self-adhesive flashing tape is better for wall transitions and roof-to-wall sealing. Avoid random sealants because some don’t bond well to certain plastics or metals, and they can peel during temperature swings.
Is it safe to install ceiling fans or outdoor wiring under the patio cover myself?
If you are not comfortable with electrical work, budget for an electrician. Outdoor wiring commonly requires its own permit and inspection, and proper grounding and weather-rated boxes are essential. The roof being “covered” does not make it exempt from outdoor electrical rules.
When should I hire a structural engineer instead of using typical lumber spans?
Hire help if you face higher-than-average loads, like heavy snow regions, high design wind speeds, unusual spans, or complex attachment to stucco, EIFS, or masonry. Also consider professional review if your footing depth might exceed typical expectations, if soil is questionable, or if you need stamped engineering drawings for the permit.