To seal a patio roof properly, you need to find the actual entry point first, then clean and dry the surface, remove any old failing caulk, and apply the right sealant for your roof material in the correct order: seams and overlaps first, then flashing and wall connections, then corners and end caps, and finally fastener penetrations. Skipping the inspection step and just caulking everything you can see is the number-one reason patio roof sealing jobs fail within a season. If you are dealing with repeated leaks, you may also wonder if you need to vent a patio roof before sealing so moisture can escape do you need to vent a patio roof.
How to Seal a Patio Roof: Step-by-Step DIY Leak Fix

Celia Vaughn
29 Apr 2026
Find the Leak Before You Seal Anything
Before you grab a caulk gun, spend 20 to 30 minutes actually finding where water is getting in. This sounds obvious, but most failed DIY sealing jobs happen because someone applied sealant near the stain on the ceiling and called it done. Water travels. It can enter two feet to the left of where it drips down inside.
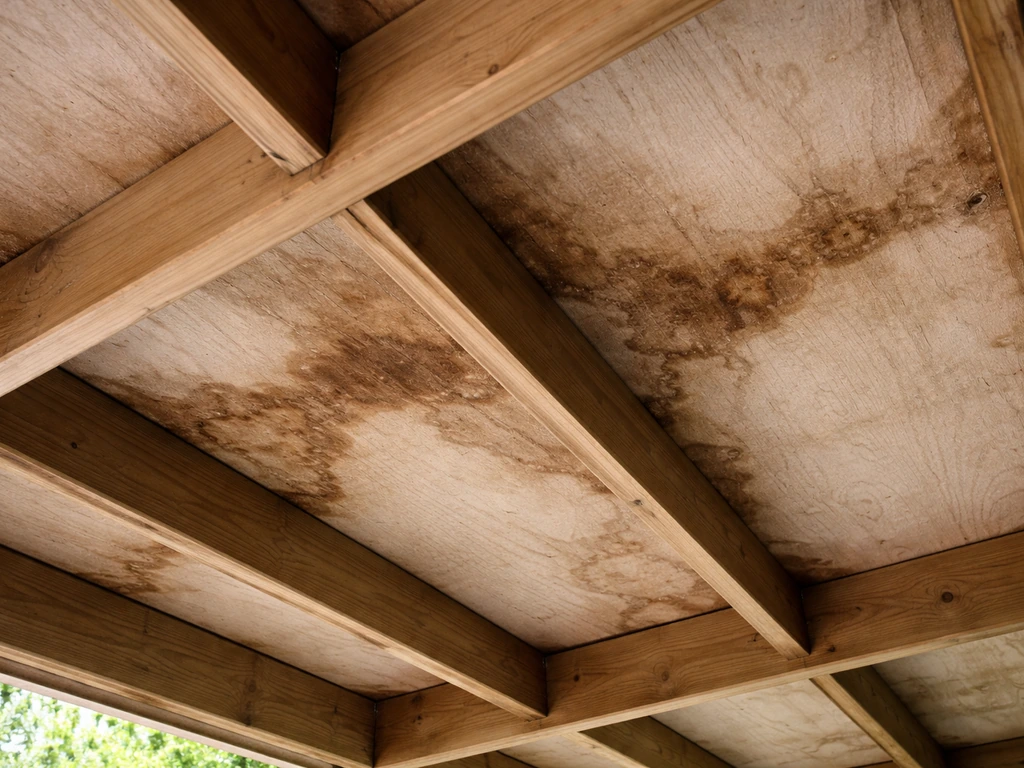
Start from the inside. Look at the underside of the roof deck or panels for staining, bubbling, or damp insulation. That interior stain marks roughly where water is reaching the deck, which gives you a starting point for your exterior search. The actual entry point is almost always uphill from that stain.
Once you know the rough area, go outside and run a focused hose test. Have a helper inside watching while you apply water gently to the exterior surface just above the suspected area. Hold the hose in one spot for at least 10 minutes before moving it. Move methodically uphill in sections. When your helper calls out that water appeared, you've found your zone. This approach saves you from sealing the wrong spot entirely.
The Most Common Failure Points
Most patio roof leaks come from a predictable set of locations. Understanding these helps you know exactly where to focus your inspection before you ever touch a tube of sealant.
- Roof-to-wall flashing and counterflashing: The point where your patio roof ties into the house wall is the single most common leak source on attached patio covers. When counterflashing is missing, incomplete, or has gaps, water dumps straight behind the siding or stucco and travels down into the structure.
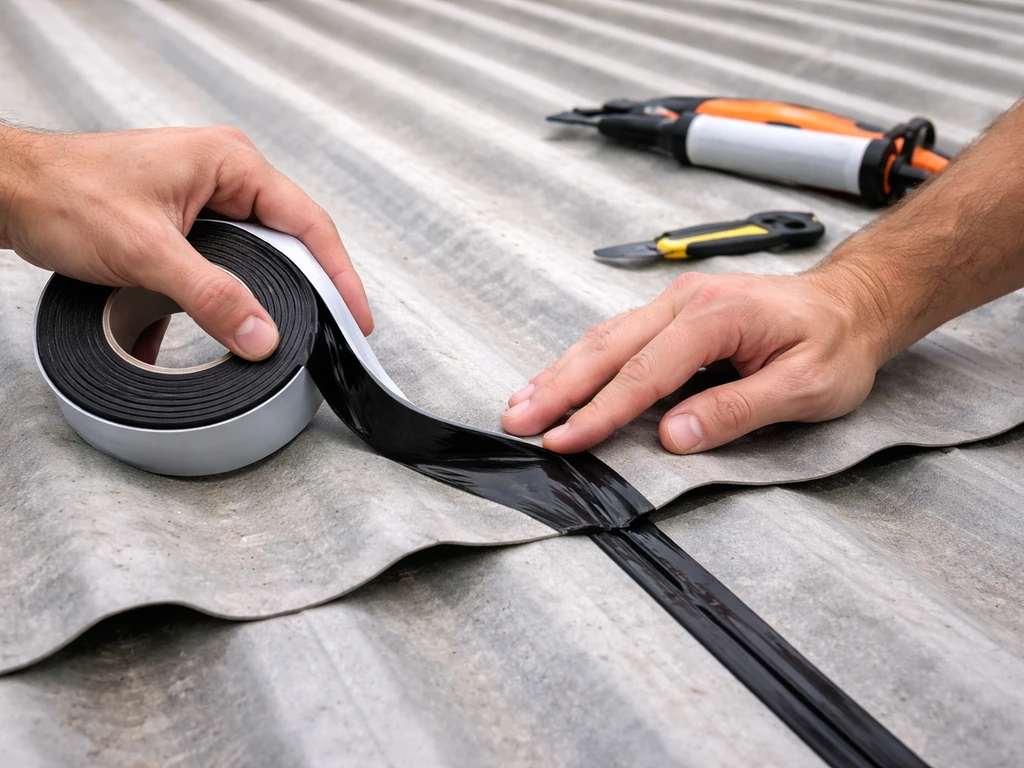
- Panel seams and overlaps: On metal roofing, polycarbonate, or corrugated panels, gaps or warping at seam overlaps let water slip underneath. Thermal expansion and contraction loosen sealant over time.
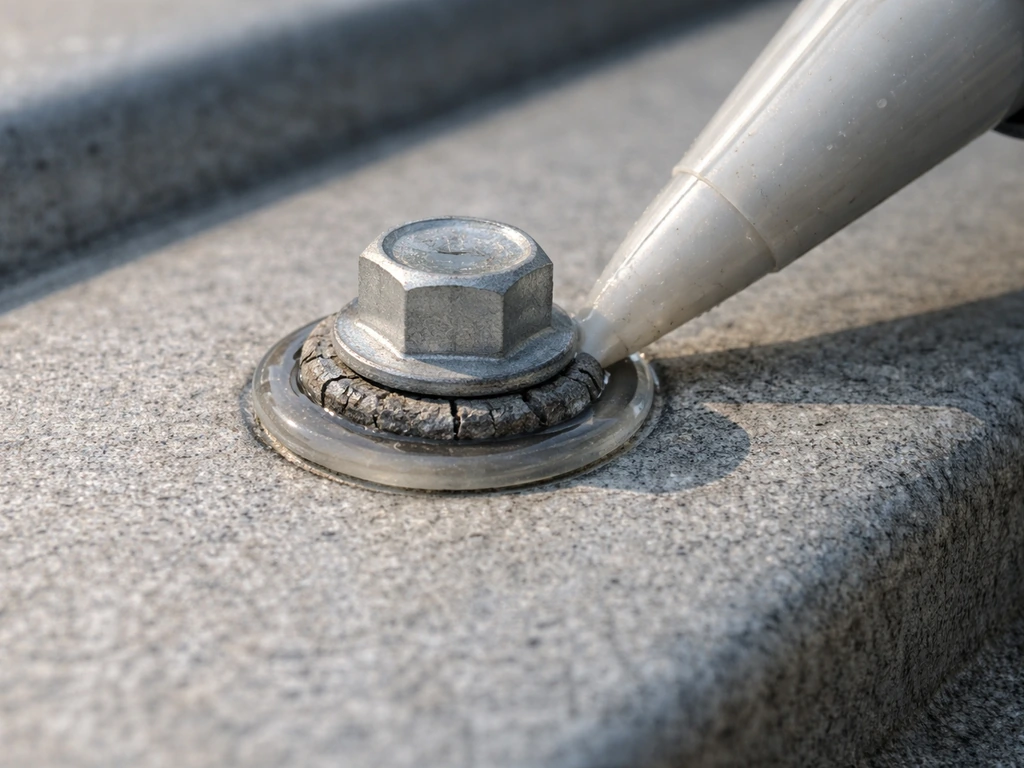
- Fastener penetrations: Every screw or bolt through the roof panel is a potential entry point. Neoprene or rubber washers under fastener heads degrade over years of UV and heat exposure and start to fail quietly.
- Corner joints and end caps: Where trim pieces meet at corners or terminate at end caps, caulk shrinks and cracks as the assembly moves seasonally.
- Flashing around penetrations: Any pipe, electrical conduit, or structural post penetrating the roof deck relies on flashing and sealant that ages and cracks.
- Drip edge and gutter connections: Where roofing material meets the gutter or drip edge, gaps allow wind-driven rain to get under panels.
If you have access to an infrared thermal camera (some tool rental shops carry them), it can reveal wet insulation or decking through temperature variation, which is helpful if visual inspection and the hose test haven't pinpointed the entry. It's a useful step before sealing when you're genuinely stumped.
What You'll Need: Materials and Tools
Having everything on hand before you start makes this job go smoothly. Nothing is worse than getting a surface prepped and finding out you're short on sealant. Here's a complete list based on a typical patio roof sealing job.
Tools
- Caulk gun (a quality ratchet or dripless gun makes application much cleaner)
- Utility knife and caulk removal tool (or oscillating tool for thick beads)
- Wire brush and stiff-bristle scrub brush
- Plastic scraper or putty knife
- Garden hose with adjustable nozzle (for testing and rinsing)
- Bucket, mild dish soap, and rags or shop towels
- Denatured alcohol or acetone (for final surface wipe before sealant application)
- Painter's tape (for clean sealant lines at visible joints)
- Ladder or scaffolding appropriate for your roof height
- Safety harness and anchor point if roof pitch or height warrants it
- Flashlight or headlamp for underside inspection
- Knee pads
Materials
- Appropriate sealant for your roof material (see the sealant selection section below)
- Backer rod foam (for any wide gaps over 1/4 inch before applying sealant)
- Butyl tape or seam tape (for metal panel seams before final sealant, if applicable)
- Replacement neoprene-washer fasteners (if existing screw washers are cracked or missing)
- Metal flashing pieces and roofing screws (if flashing needs to be repositioned or patched)
- Primer appropriate to your substrate (required for some sealants on wood or coated metal)
Pick the Right Sealant for Your Roof Material
Using the wrong sealant is just as bad as skipping the repair. Some products destroy polycarbonate panels. Others won't stick to aluminum. And applying fresh silicone over an incompatible existing silicone almost guarantees peeling within months. Here's how to choose correctly.
| Roof Material | Recommended Sealant Type | Key Notes |
|---|---|---|
| Aluminum panels or trim | Neutral-cure silicone or polyurethane (e.g., Dow DOWSIL 795 or Sikaflex TX 1) | Surfaces must be clean and dry; primer generally not required on clean bare aluminum but test if coated |
| Polycarbonate panels (e.g., SUNTUF) | Approved neutral-cure silicone only | Never use acidic-cure silicone or solvents not rated safe for polycarbonate; check manufacturer's compatibility list |
| Metal roofing (corrugated, standing seam) | Polyurethane sealant rated for metal, or metal-specific silicone | Confirm compatibility with any factory coatings on the panel; use butyl tape at seams before sealant |
| Wood fascia, trim, or decking components | Paintable polyurethane caulk or elastomeric sealant | Prime bare or weathered wood first; avoid 100% silicone on wood if you plan to paint over it |
| Roof-to-house wall joint (stucco, concrete, masonry) | Elastomeric polyurethane or silicone rated for masonry | Clean out all old caulk completely; use backer rod in gaps wider than 1/4 inch |
A few rules that apply regardless of material: never apply new sealant over old failing sealant without removing it first. DAP's own documentation for acrylic-based caulks explicitly states the product will not adhere over 100% silicone. When in doubt about what's already there, cut it out and start clean. For movement-prone joints (anywhere the roof expands and contracts seasonally), use a sealant rated to ASTM C920 standards, which means it's been tested for elasticity, adhesion, and weather resistance under real conditions.
One more thing on sealant: temperature and humidity matter. Most sealants cure slower in cold or humid weather, and some won't cure properly below 40 degrees Fahrenheit. Plan your sealing day for dry conditions with temperatures above 50 degrees if possible. Applying sealant over a damp surface is one of the most common reasons a repair fails within the first rain.
Step-by-Step: The Full Sealing Process
Once you've confirmed the leak source and have your materials ready, work through this process in order. If you want a simple checklist for how to stop a patio roof from leaking after you find the problem area, follow the steps in the full sealing process leak source. Don't jump to application before surface prep is done. Most sealant failures come down to poor adhesion from inadequate prep, not the product itself.
- Clear the work area: Remove any debris, leaves, or standing water from the roof surface. If there are gutters attached, clear those too so water can drain freely while you work.
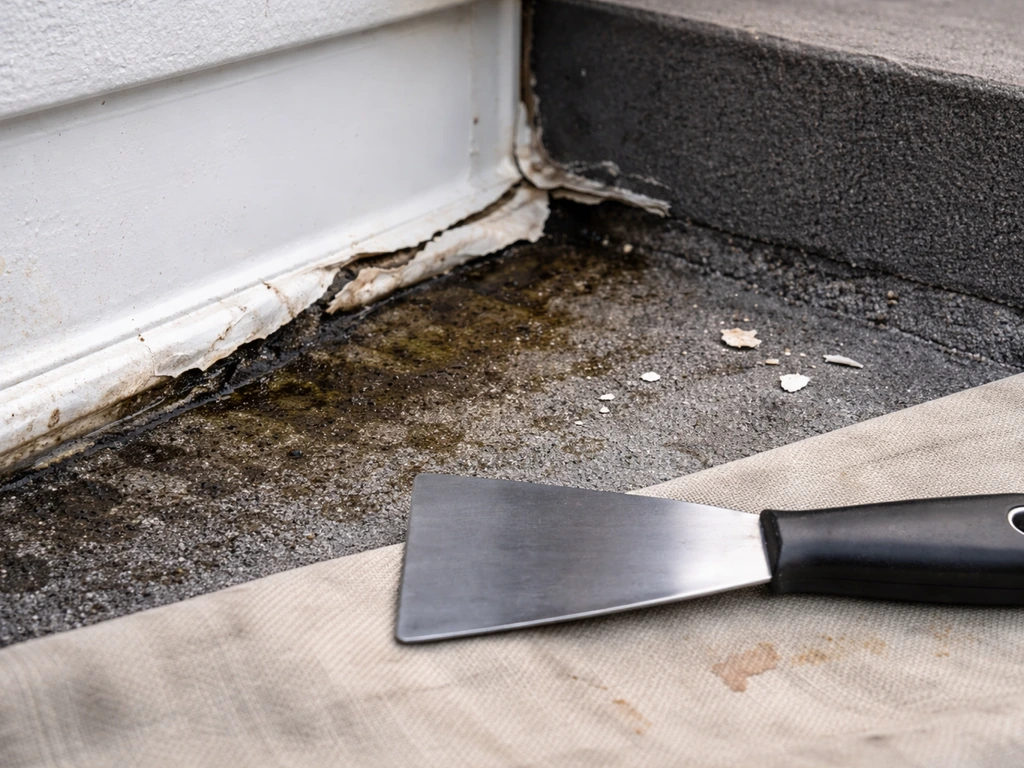
- Remove all failing sealant: Use a utility knife and caulk removal tool to cut out and pull away any old, cracked, peeling, or soft sealant. This is non-negotiable. Don't skim over this step to save time.
- Scrub the surface: Use a stiff brush with mild soap and water to scrub the repair area. On metal or aluminum, follow with a wipe-down using denatured alcohol or acetone on a clean rag. Let the surface dry completely, at minimum 30 minutes in normal weather, longer if it's humid.
- Inspect the substrate: Once the old sealant is off and the surface is clean, look at what's underneath. Check for rust on metal, rot on wood trim, or cracked flashing. If the flashing is bent out of position or has holes, fix those mechanically before applying any sealant.
- Apply primer if required: If your sealant product or substrate calls for primer (wood, certain coated metals, masonry), apply it now and allow the recommended dry time. Skipping primer when the product requires it causes adhesion failure.
- Install backer rod where needed: For any joint or gap wider than about 1/4 inch, press foam backer rod into the gap first. This gives the sealant something to bridge over and prevents it from being pulled too thin, which causes tearing.
- Apply tape for clean lines: On visible trim seams or joints where a clean bead matters aesthetically, run painter's tape on both sides of the joint before applying sealant.
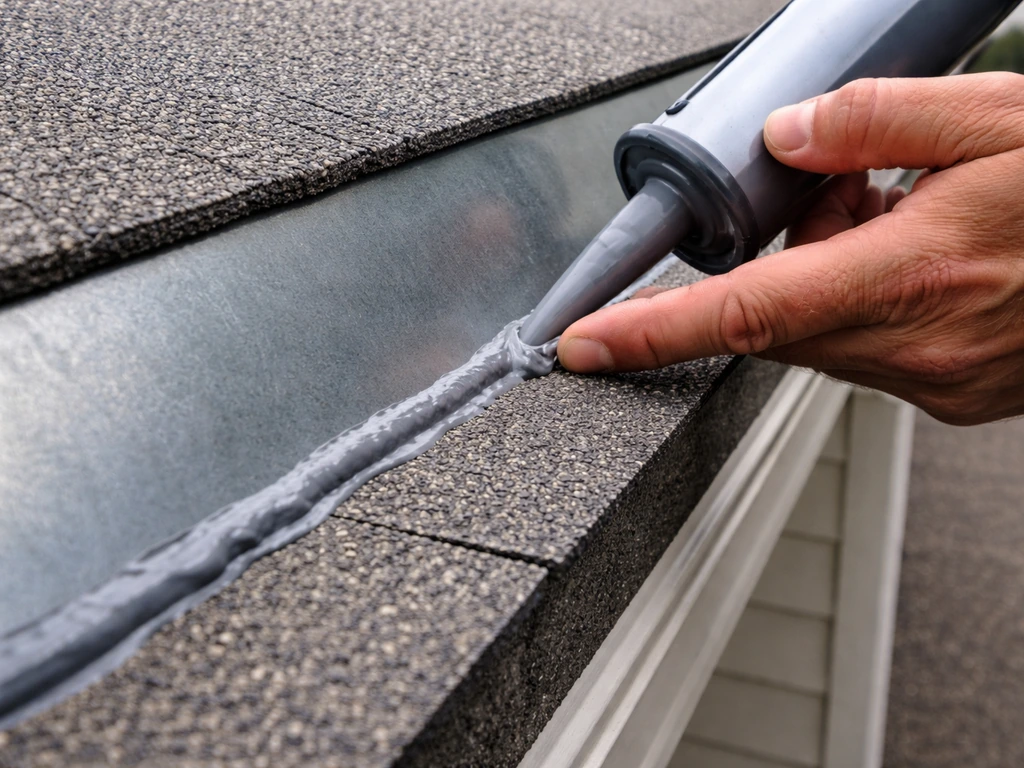
- Apply sealant in a continuous bead: Hold the caulk gun at a consistent 45-degree angle and apply steady pressure for an even bead. Work the sealant into the joint, don't just lay it on top of the surface.
- Tool the bead: Within a few minutes of application (before skinning starts), use a wet finger or caulk tool to press the sealant into the joint and create a slightly concave surface. This improves adhesion on both sides and sheds water correctly.
- Remove tape and allow to cure: Pull tape off while the sealant is still wet. Allow full cure time before the next rain, which can range from 24 hours for polyurethane to 48 to 72 hours for some silicones in cooler conditions. Check the product label.
- Retest with the hose: Once cured, run a focused hose test on the repaired areas again. Have your helper inside watching. Confirm the water no longer enters before considering the job done.
Sealing Each Specific Problem Area
Different parts of the roof need slightly different approaches. Here's how to handle each one correctly.
Seams and Panel Overlaps
For metal or corrugated panels, blank" rel="noopener noreferrer">apply butyl tape along the seam before the panels are overlapped, if you're doing a more involved repair where you can lift panels. If panels can't be lifted, work sealant into the seam edge using a thin nozzle tip and tool it flat so water sheds off the edge. JLC Online's blank" rel="noopener noreferrer">best-practice guidance for sealing metal roof seams and endlaps recommends using butyl tape in lap and seam applications. On polycarbonate panels like SUNTUF-style corrugated sheets, apply an approved silicone sealant directly at the overlap and around each fastener as specified in the panel manufacturer's installation guide.
Flashing and the Roof-to-Wall Connection
This is the highest-stakes area on any attached patio cover. Flashing is your primary water barrier here. Sealant is secondary. If the flashing is missing, installed backwards, or has gaps larger than what sealant can bridge reliably, fix the flashing first. Counterflashing at the wall should overlap the lower flashing by at least 2 inches. Once flashing is correctly positioned, run a continuous bead of appropriate sealant along the top edge where the flashing meets the wall, and along any seams in the flashing itself. Don't rely on sealant alone at this joint, especially where the patio roof meets stucco or siding, because water that gets behind the finish can cause rot and interior damage that's expensive to undo.
Corners and End Caps
At inside and outside corners where trim pieces meet, remove all old caulk and check whether the trim itself is still mechanically secure. If corner trim has pulled away from the surface, re-fasten it before sealing. Apply sealant into the corner joint and tool it into a fillet (a small concave curve) rather than a flat bead. A fillet sheds water better and is more durable under thermal movement. End caps on aluminum or metal patio covers should be sealed along their full perimeter after being pressed firmly into position.
Fastener Penetrations and Screws
Walk the entire roof surface and press on each fastener head. Any that move, spin, or show cracked rubber washers need to be addressed. For screws with deteriorated neoprene washers, remove the screw, replace the washer, apply a small dab of appropriate sealant under the head before re-driving, and snug it down without overtightening (overtightening crushes the washer and actually worsens the seal). For screws you can't access from above, apply a small bead of sealant around the base of the screw head on the exterior surface.
Gutters and Drip Edges
Where the roof panel meets the gutter or drip edge, check that the panel is still seated correctly over the drip edge, not under it. Water should flow from the panel onto the drip edge and into the gutter, never behind the gutter. If the panel edge has lifted, re-secure it with appropriate fasteners first. Then run a sealant bead along the seam between the panel edge and the drip edge on the top surface, not underneath, so water doesn't get trapped.
Water Management: Drainage, Slope, and Underlayment
Sealing is a repair, not a complete fix if your roof has drainage or slope problems. Standing water on a patio roof accelerates sealant deterioration, weakens seams, and eventually forces its way through even a fresh seal. If water pools on your roof after rain, that's a slope problem and it will keep defeating your repairs until you address it.
Most patio covers need a minimum slope of 1/4 inch per foot to drain reliably. If yours is flatter than that, improving drainage may mean adjusting the pitch of the structure or adding a scupper or additional gutter outlet to move water off faster. While that's a bigger project, it's worth noting here because no amount of sealant will permanently fix a roof that stays wet.
Underlayment matters more than most homeowners realize. If water gets under your roofing panels (which happens even on well-sealed roofs during extreme weather), a proper underlayment layer prevents it from reaching the deck. Water that gets under roofing can travel horizontally along the deck and appear as a leak feet away from the actual entry point. If you're doing a significant repair and find that underlayment is missing, damaged, or soaked, plan to replace it rather than sealant over the top of the problem. A repair that doesn't address failed underlayment will likely fail again.
Why Sealant Keeps Failing (Troubleshooting)
If you've sealed the same area more than once and the leak keeps coming back, something in the process is wrong. If you still don’t know how to fix leaking patio roof issues after sealing, use a systematic troubleshooting approach to find the true entry point leak keeps coming back. Here are the most common reasons a sealant repair fails repeatedly.
- Sealant applied over moisture: If the substrate wasn't completely dry when you applied sealant, it will lose adhesion. Concrete, stucco, and wood hold moisture for longer than they look dry. Always allow at least 24 hours of dry weather and wipe with a solvent before applying.
- Wrong product for the substrate: Acrylic latex over 100% silicone, or a sealant not rated for the roof material (especially polycarbonate), will peel or crack quickly under UV and thermal cycling.
- Flashing is the real problem: Sealant is secondary to flashing. If the leak is at the wall connection and there is no proper counterflashing, sealant alone will not hold against sustained water pressure from rain runoff. Fix the flashing.
- Joint is too wide without backer rod: Sealant spanning a wide gap unsupported gets pulled thin under thermal movement and tears. Always use backer rod in gaps over 1/4 inch.
- Overtightened fasteners: Re-driving screws too tight crushes the neoprene washer flat and eliminates its sealing function, leaving a gap around the screw shank.
- Thermal movement exceeding sealant capability: Patio roof materials expand and contract significantly in temperature swings. If you're using a low-grade, non-elastomeric caulk, it will crack. Use sealants rated for joint movement.
Safety, Code Limits, and When to Call a Pro
Working on a patio roof is a reasonable DIY project in most cases, but it does put you on a roof surface, and the safety basics are non-negotiable. Use a properly rated ladder positioned at the correct angle. If your patio roof is more than about 10 feet off the ground or has any slope, wear a safety harness anchored to a solid structural point. OSHA guidance for roof work generally requires fall protection at heights of 6 feet or more in residential settings, and a harness system is the most practical option for homeowners working alone.
Never work on a wet or frosty roof surface. Polycarbonate and metal panels both get extremely slippery when wet. Wait for dry conditions and wear rubber-soled shoes. Step on structural members (purlins, rafters) rather than on the panels themselves if possible, especially with polycarbonate which can crack under point loads.
On the structural side, sealant is not a fix for structural damage. If you notice sagging areas on the roof deck, soft or punky wood in the framing, large sections of missing or deteriorated underlayment, or if the hose test never produces a clear entry point after thorough testing, it's time to stop and get a professional assessment. If you’re planning to replace the patio roof instead of just resealing it, you’ll want to focus on structure, underlayment, and flashing as part of the tear-off and install plan how to replace patio roof. Sagging decking or soft framing means moisture has already been in the structure long enough to compromise it, and sealing the exterior without addressing that damage is at best temporary and at worst a safety risk.
If your patio cover is attached to the house and you're not confident the roof-to-wall connection was originally installed with proper flashing (especially common on older DIY or contractor-built covers), a brief consultation with a roofing contractor or building inspector before doing a major sealant repair is worth it. Improperly flashed wall connections can drive water into wall cavities silently for years before it appears as interior damage, and that's a much more expensive repair than getting it right now. Sealing over a flashing problem instead of fixing it is one of the scenarios where doing nothing and calling a pro is genuinely the better call.
For most patio roofs, though, a methodical inspection, correct sealant selection, and clean surface prep will get the job done. Take your time on the diagnostic step, don't skip the drying time, and retest before you call it finished. A leak that's properly sealed at the actual entry point, with the right product and a clean substrate, should hold for several years before needing attention again.
FAQ
Can I seal my patio roof without finding the exact leak entry point first?
Yes, but only if you’re able to identify the entry point and confirm the roof has enough drainage to prevent water pooling. If you have wet insulation or recurring leaks after resealing, treat it as a ventilation and moisture-migration issue, not just a sealant issue, and verify that vents or airflow paths do not create additional leak-prone penetrations.
What should I do if the surface is painted, chalky, or has oxidation before I seal?
Do a spot test of the sealant on a small hidden area and confirm bonding before you commit to the full seam. If the old coating is painted, chalky, oxidized, or contaminated, adhesion can fail even with the “right” sealant, so you may need mechanical cleaning or surface-specific prep (for example, removing loose paint) rather than just wiping.
What if my leak is near a wall flashing or the flashing looks wrong?
Avoid using sealant as a permanent substitute for missing or reversed flashing. If flashing is absent, incorrectly installed, or has gaps larger than the sealant’s ability to bridge reliably, fix the flashing first, then seal the wall and flashing interfaces to keep water from getting behind finishes like stucco or siding.
How dry does the roof surface need to be before sealing?
Don’t assume “looks dry” means ready. If there’s visible dampness, condensation, or a temperature swing that re-wets the surface overnight, most sealants will not cure or will bond poorly. Plan for a full cure window under dry, above-freezing conditions, and retest after the first heavy rain.
Can I apply new sealant over old sealant to save time?
In general, no. Removing failing sealant is important because old residues often prevent chemical bonding and create a weak layer that peels during thermal movement. If you find old silicone, cut it out and replace with a compatible system rather than trying to “overcoat” it.
My fasteners seem tight, but I still get leaks. Could fasteners be the problem?
If you press on fasteners and feel movement, replace deteriorated washers and ensure screws are snug but not over-crushed. Also check fastener spacing and whether the original fastener type matches the roof material, since mixing hardware can create leaks even when sealant is applied at each head.
What happens if water gets under the panels but the leak shows up somewhere else inside?
Yes, if water can get under the panels during extreme weather. If underlayment is missing, damaged, or soaked, sealing the top can still leave a path for horizontal deck travel, which shows up as a “mystery” leak away from the actual entry. Replace failed underlayment when doing a significant repair.
How do I run a hose test so I don’t seal the wrong area?
Use a targeted hose test in sections and hold the water in one spot for at least 10 minutes, then move uphill based on where your helper sees water. If you can’t reproduce the leak with a hose, try a different direction of water application (for example, from the seam direction) to match real rainfall runoff paths.
What are the most common reasons leaks come back after resealing?
If the leak returns after multiple attempts, look for repeat failure causes like incorrect product compatibility, poor substrate preparation, missing mechanical fasteners at trim/corners, or slope and drainage problems that keep the area wet. A key decision aid is whether the problem area is staying in contact with water after rain, since sealant alone will not fix pooling.
When should I stop DIY sealing and call a pro?
Stop and reassess. Sagging decking, soft framing, punky wood, or inability to identify the entry point after thorough testing suggests moisture damage beyond the surface. In those cases, professional inspection is safer and sealing can become a temporary patch rather than a durable fix.
My panel edge seems to sit under the drip edge, is that a sealing problem?
Don’t rely on sealant underneath the drip edge or gutter interface. If a panel edge is seated under the drip edge, water can be driven behind the gutter or trapped, worsening deterioration. Reseat and secure the panel properly first, then seal only the correct seam location on the top surface as part of the water-shedding path.
Will changing ventilation make my patio roof leaks worse?
If the roof is close to a structure and condensation is likely, focus on preventing moisture buildup and avoiding creating new penetration risks during ventilation upgrades. Also confirm that any additional vents do not bypass your flashing plan, since poorly flashed vent penetrations can become new leak points.