Replacing a patio roof comes down to four things done in the right order: figure out exactly what failed and why, pick materials that match your structure and climate, pull the old roof down safely, and put the new one up with proper framing, flashing, and slope so water actually runs off instead of sitting there waiting to cause trouble. Whether you're swapping out rotten wood, replacing warped polycarbonate panels, or rebuilding after a storm, the process is very doable for a prepared DIYer, but it does require honest assessment before you swing the first hammer.
How to Replace a Patio Roof: DIY Step by Step Guide

Celia Vaughn
29 Apr 2026
Assess what you're replacing and why
Before ordering a single panel or post, spend an hour doing a real inspection. You need to know whether you're just replacing surface roofing or whether the structure underneath has problems too. These are two very different jobs.
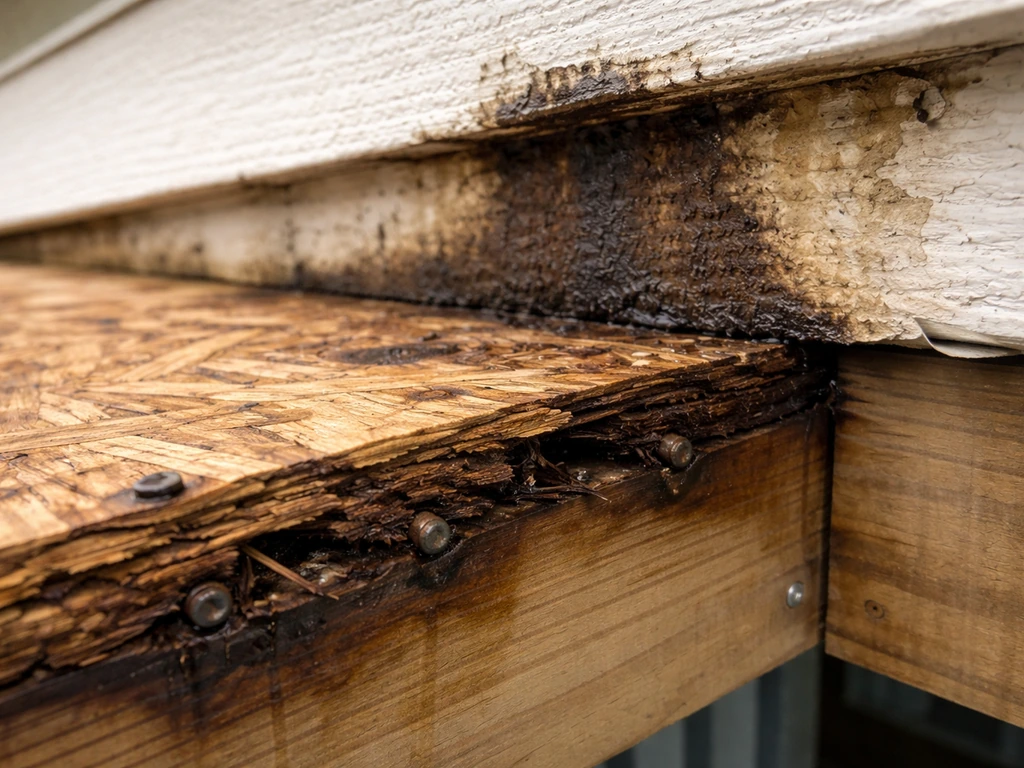
Start at the ledger board, the horizontal member bolted to your house wall that the patio roof hangs off. Push on it, look at the wall behind it, and check for soft wood, dark staining, or gaps where it has pulled away from the house. Ledger failure from improper attachment or missing flashing is one of the most common reasons a patio roof starts sagging. Water sneaks behind the ledger, soaks the band joist or wall framing, and rot does the rest over a few years.
Next check the beams and rafters for sagging. A noticeable dip in the middle of a span usually means the member is undersized for the load or the span is too long between supports. Check the posts or columns too, a leaning column is often a sign of frost heave, soil movement, or a footing that was never adequate. Any of these structural issues need to be fixed before new roofing goes on top, otherwise you're just covering the problem.
Then look at the roofing material itself. Common surface-level failures include corrosion at screw locations, cracked or discolored polycarbonate panels, buckled aluminum panels, and flashing that has lifted or separated at the house transition. Small drips that line up with screw locations are a classic sign of failed fastener seals, a repairable issue if caught early, but if the panels themselves are cracked or the frame is compromised, replacement is the right call.
One more thing to check if your patio roof is old: slope. A cover that's nearly flat, less than 1/4 inch of drop per foot of run, will pool water. In cold climates, pooled water freezes, expands, and can cause a structural collapse when the ice melts and the weight shifts. Even in warm climates, standing water accelerates deterioration of every material. If you suspect a patio roof leak, focus on the house-wall flashing and slope first, since those are the most common failure points. If your existing roof was installed too flat, plan to correct the slope when you rebuild.
- Ledger board: check for rot, gaps, and missing or failed flashing behind it
- Beams and rafters: look for visible sagging or deflection mid-span
- Posts and columns: check for lean, rot at the base, or movement
- Roofing panels: look for cracks, corrosion, lifted fasteners, or discoloration
- Flashing at the house wall: check for separation, caulk failure, or water staining inside
- Slope: measure — you want at least 1/4" per foot, ideally 3/8"–1/2" per foot
If your structure has significant rot, a leaning column, or a badly failing ledger, be honest about the scope. A full structural replacement is still a DIY-possible project, but it's a bigger commitment than just swapping panels.
Choose the right patio roof cover type and materials
The type of patio roof you're replacing largely determines what you're putting back. Attached lean-to designs are the most common, one edge mounts to the house via a ledger, the opposite side is supported by posts. Gable roofs add a peaked ridge for better drainage and headroom. Free-standing structures have posts on all four corners and don't connect to the house at all. Each has different framing demands, so match your replacement to what you already have unless you're intentionally upgrading the design.
Material options compared
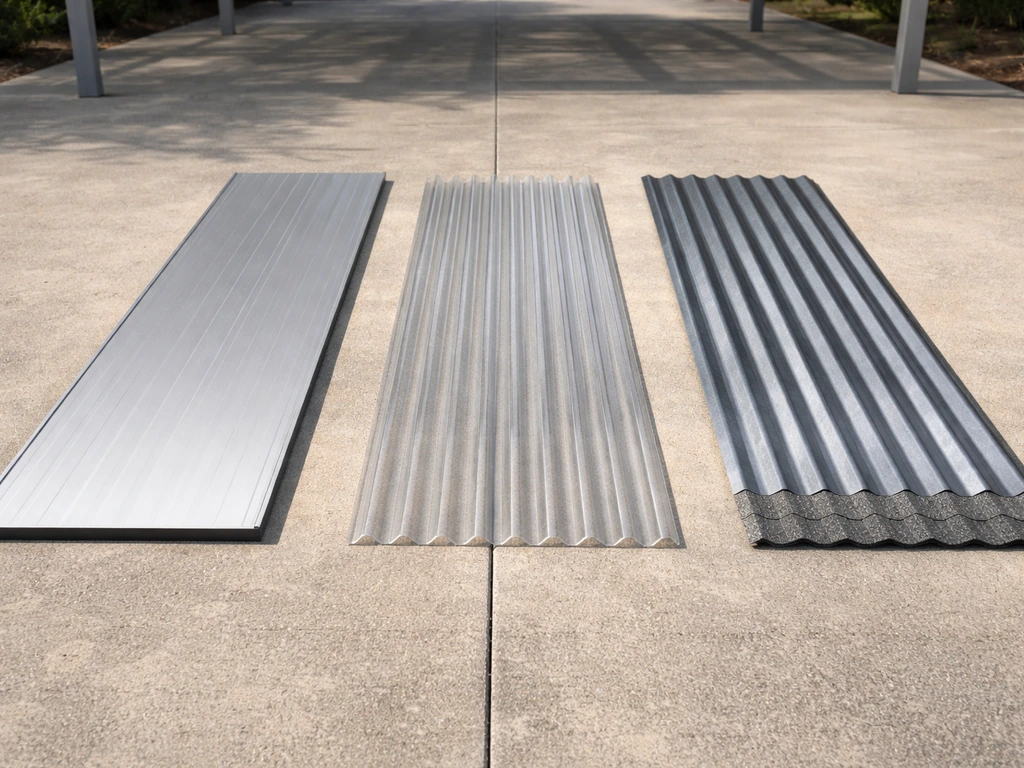
| Material | Best for | Typical lifespan | DIY difficulty | Notes |
|---|---|---|---|---|
| Aluminum panels (Alumawood-style) | Low-maintenance attached covers | 30+ years | Moderate | Engineered kits available; requires proper slope and engineering packet for permits |
| Corrugated polycarbonate | Light/translucent covers, pergola-style | 10–15 years | Easy to moderate | UV-protected side must face up; use neoprene washers; 6mm thickness common for patio use |
| Metal roofing (corrugated steel/tin) | Solid coverage, budget-friendly | 20–40 years | Moderate | Good for lean-to style; needs correct slope and closure strips at eaves |
| Pressure-treated wood framing + shingles | Traditional look, matches house roof | 20–30 years | Moderate to hard | Most code-familiar; requires waterproof underlayment and drip edge per IRC |
| Solid aluminum flat panels | Clean modern look | 25–35 years | Moderate | Often part of engineered kit systems; wind/load ratings are specified by manufacturer |
For most DIYers replacing an existing attached lean-to, aluminum panel kits or corrugated metal are the easiest path. They're lighter than wood, resistant to rot, and engineered to specific load ratings, for example, standard aluminum patio cover systems are typically rated for 10 lb live (snow) load and 110 mph wind. If you're in a high-wind or heavy-snow zone, confirm the manufacturer's load ratings match your local requirements before you buy.
Polycarbonate panels are a great choice if you want natural light. Use 6mm thickness or greater for patio spans, always install the UV-protected face up (it's usually marked), and never skip the neoprene or EPDM bonded washers at every fastener, direct metal-on-panel contact without a washer cracks panels and creates leak paths over time.
Measure, plan layout, and check code/permits
Measure your existing footprint carefully: width (along the house wall), projection (how far out from the house), and the height at the ledger versus at the outer beam. This gives you your existing slope. Write all of this down before you demo anything, it's easy to forget once the old structure is gone.
For slope planning, target a minimum of 1/4 inch drop per foot of projection, and aim for 3/8 to 1/2 inch per foot if you're in an area with regular rain or occasional snow. On a 12-foot projection, that means 3 to 6 inches of height difference from the ledger to the outer beam. If your existing slope was inadequate, now is the time to adjust the ledger height or post heights to fix it.
On permits: most jurisdictions require a permit for a patio cover replacement, especially if you're replacing structural members. IRC Appendix H governs patio cover design at the model-code level, requiring a minimum 10 psf live load design plus local snow or wind adjustments. Many cities, like San Diego, to cite one published example, have specific permit bulletins for patio covers that spell out exactly what drawings you need to submit. Some areas exempt very small detached structures under 200 square feet from permits, but that exemption almost never applies to an attached patio roof replacement. Call your local building department before you start demo. Getting caught mid-project without a permit is a headache you don't need.
Your permit submittal will typically need a simple plan view (top-down sketch of the footprint), a framing plan showing beam/rafter sizes and spans, post locations, ledger connection detail, and your material specs. If you're using an engineered aluminum kit system, the manufacturer's engineering packet often satisfies the structural calculation requirement, ask for it when you order.
Removal and demo safely
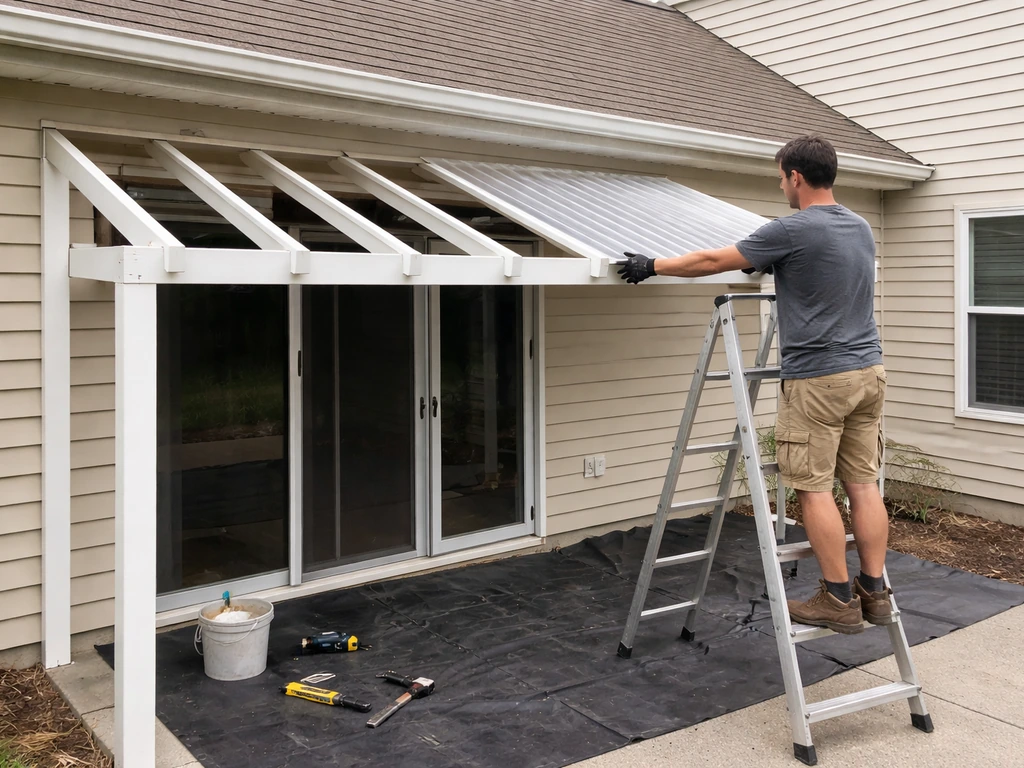
Demo is where people get hurt. Working overhead on a patio roof, even a low one, involves fall risk, awkward angles, and materials that can shift suddenly. Set up properly before you start.
- Set up scaffolding or a stable work platform if the roof is above comfortable arm's reach from the ground. Don't work off a single ladder while also handling panels.
- Wear safety glasses, gloves, and a hard hat — falling fasteners and panel edges are sharp.
- Have a helper on the ground to manage materials and call for help if needed.
- Work in dry, calm conditions. Wind can catch a panel like a sail. Wet surfaces are slippery.
- Start by removing fasteners from the outermost edge and work back toward the house — this prevents panels from becoming unsupported and falling inward.
- Stack removed panels flat on the ground immediately; don't lean them against the structure.
If the existing roof includes older materials like fiber cement siding or any roofing that was installed before the mid-1980s, stop and consider an asbestos test before disturbing anything. OSHA requires wet methods to control dust when removing suspect materials, and some states require a licensed contractor and permit for asbestos-containing roofing removal. OSHA provides [fall-protection safety guidance for residential construction activities like roofing](https://www. osha.
gov/residential-fall-protection/guidance), intended to help reduce fall-related injuries and fatalities. When removing suspect asbestos-containing roofing, the EPA describes using wet cleaning or wet-wiping to capture asbestos fibers and help reduce exposure wet cleaning or wet-wiping to pick up asbestos fibers.
When in doubt, a test kit from a certified lab runs about $30–50 and can save you from a serious problem.
Once the panels are off, remove the old ledger flashing carefully and inspect what's behind it. This is usually where you find the worst damage. If the wall sheathing or framing behind the ledger is soft or rotted, that needs to be repaired before the new ledger goes up, don't skip this step just because it wasn't on your original plan.
Frame and structure replacement, ledger, beams, and posts
If you're replacing just the roofing panels and the frame is solid, you can skip straight to installing new panels. But if you're replacing any structural members, here's the order that makes sense.
Ledger installation
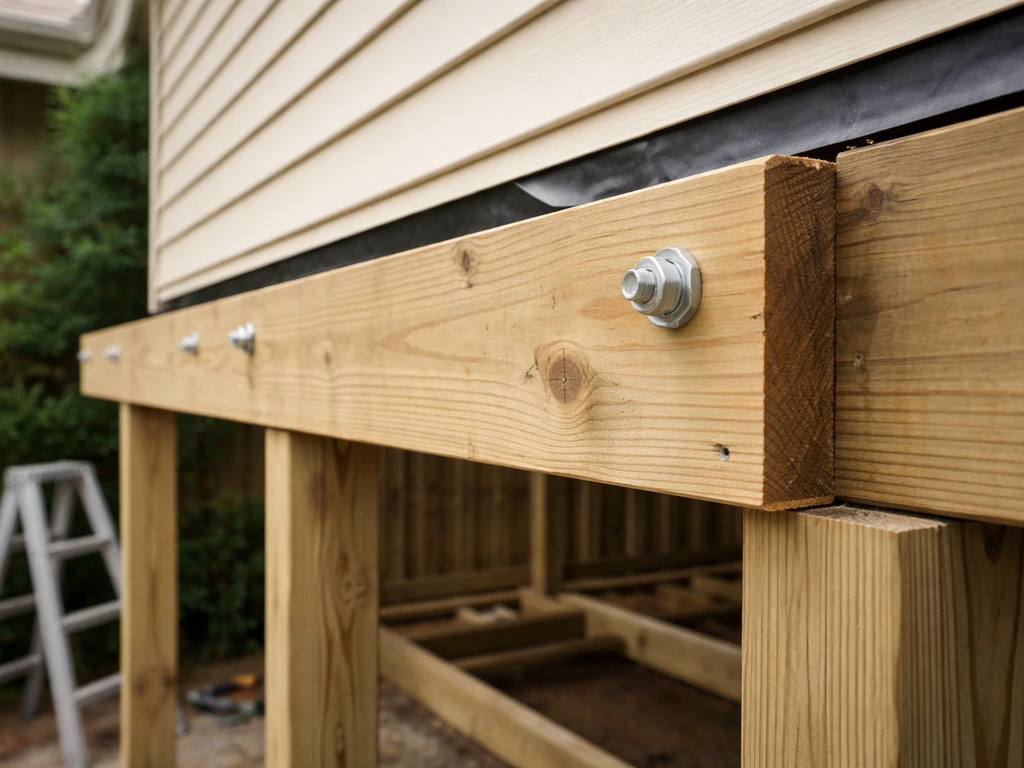
The ledger is the single most critical connection in an attached patio roof. It carries the roof load and transfers it to the house structure, so it has to be attached to something solid, not just siding or sheathing. Locate the rim joist or wall studs behind the siding, and fasten the ledger with structural lag screws or through-bolts at appropriate spacing. For most residential patio covers, 1/2-inch lag screws at 16 inches on center into studs is a common starting point, but check your local code or engineer's specs.
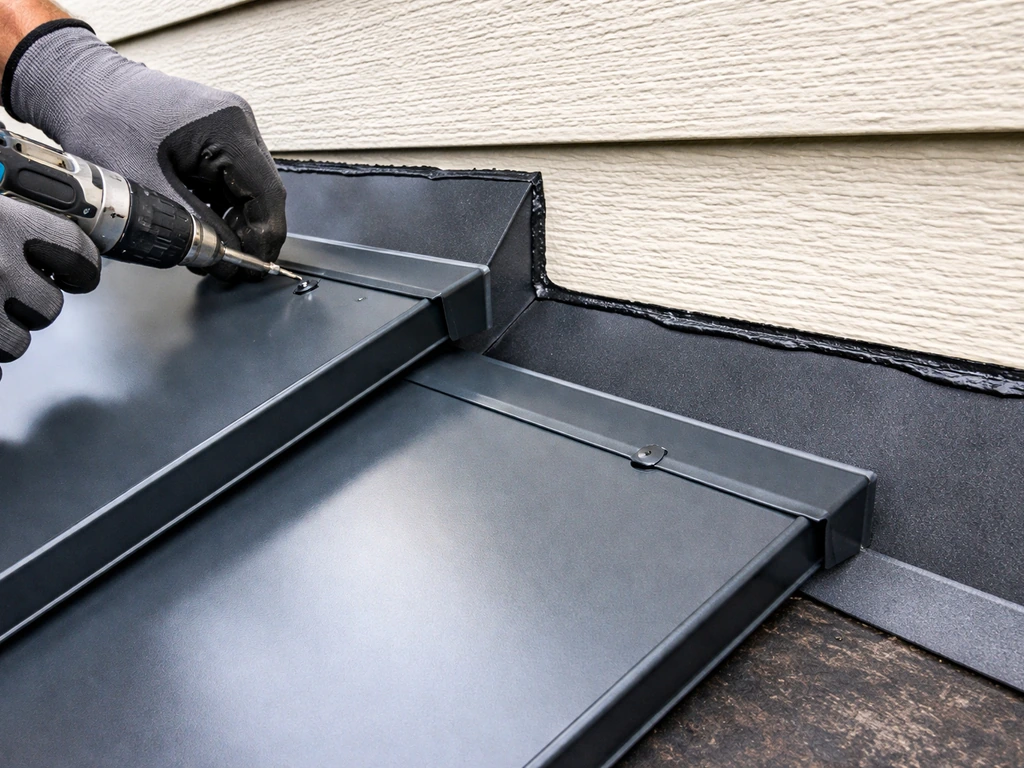
Before the ledger goes up, address the flashing. This is where many DIYers cut corners and pay for it later with leaks. The wall behind the ledger must be protected with a layered waterproofing approach: housewrap or building paper running behind the ledger area, a back flashing piece that tucks under the siding above and laps over the ledger, and then a Z-flashing or cap flashing over the top of the ledger. Every layer should shed water outward and down, not inward toward the wall. Use corrosion-resistant flashing material, galvanized or aluminum, and don't rely on caulk alone to seal the ledger-to-wall gap. Caulk is a backup, not the primary barrier.
Beams, rafters, and posts
Replace any member that shows rot, significant deflection, or fastener corrosion. Size matters here, undersized spans are a leading cause of patio roof sag. If you're not sure whether your replacement beam size is adequate, run it by your building department or a structural engineer. A quick consultation is usually free or very cheap, and it's worth it.
Posts need to land on solid footings. If existing footings are cracked, undersized, or show heave, this is your chance to fix them. Post bases should be raised metal standoffs so the wood post doesn't sit directly on concrete, direct contact wicks moisture and accelerates rot at the base, which is exactly the kind of gradual failure that leads to a leaning column a few years down the road.
Set your ledger height and post heights to achieve your target slope before anything else is fastened permanently. It's much easier to adjust now than after beams are in place.
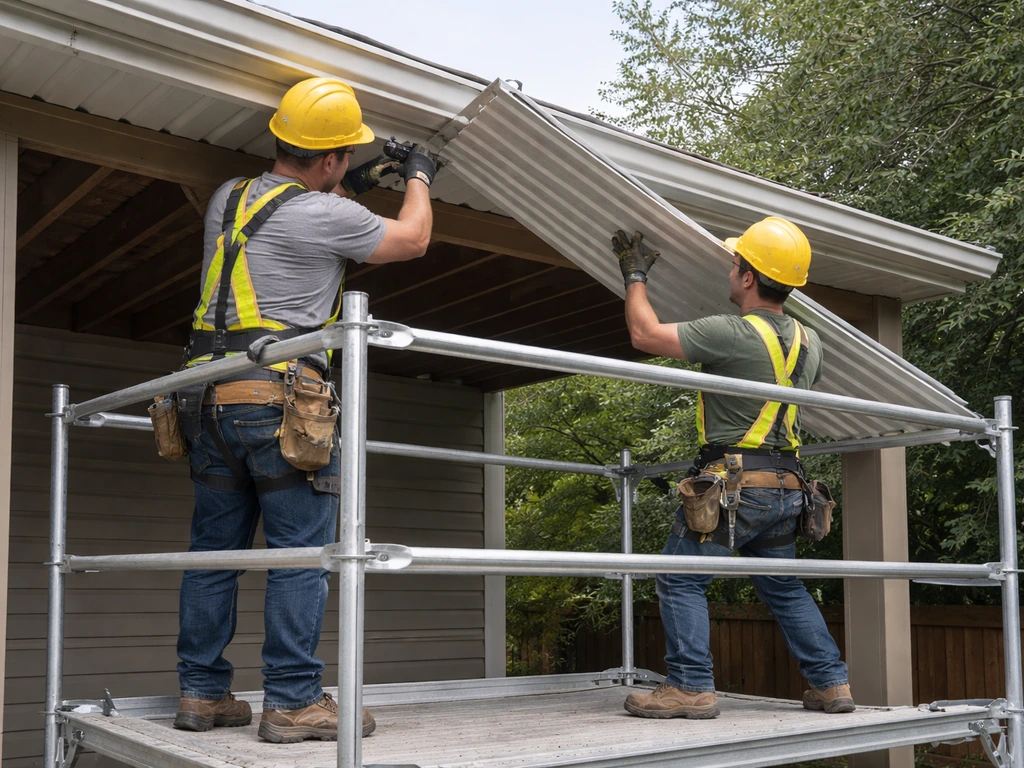
Install roofing panels, flashing, and waterproofing
With the frame solid and at the right slope, you're ready for panels. The exact installation process varies by material, but some rules apply across all of them.
Aluminum panel systems
Most aluminum patio cover kits include pre-formed flashing that runs along the house wall. Follow the manufacturer's sequence closely, typically you align the first panel with the edge beam (a common reference point is aligning the panel end flush with the outer face of the edge beam before fastening), then work panel by panel toward the house wall. At the house interface, the pre-formed flashing piece gets bedded with a line of sealant caulk under the flashing notch before it's fastened down through the flashing and into the panel. Don't skip the caulk, it's what keeps water from migrating back under the flashing when it lifts slightly in wind.
Corrugated polycarbonate panels
Install UV-protected side up, this is non-negotiable for longevity. Overlap panels by at least one full corrugation width at side laps; for end laps on longer spans, overlap a minimum of 4 inches. Don't drill within 1.5 inches of any panel edge, too close to the edge creates a stress crack that becomes a leak path. Use only neoprene or EPDM bonded washers on your screws; standard metal washers will crack panels and leak within a season or two. At the top (house-wall) edge, install a ridge cap or closure strip to block water and insects from entering the corrugation channels.
Metal roofing and shingle systems
Corrugated metal roofing installs with closure strips at the eave and ridge and overlaps of at least one rib. For shingle-style roofing over wood framing, the IRC requires drip edge flashing at the eaves, shingles lap over the drip edge so that water runs off the edge rather than wicking back under. Install a waterproof underlayment (synthetic or 30# felt) over the sheathing before shingles go down.
Flashing the house wall transition
Regardless of panel type, the transition where your roof meets the house wall is the highest-risk leak point. If your siding allows it, tuck flashing up under the lowest course of siding above the roofline and lap it down over the top edge of the roofing panel. Caulk the top edge of the flashing to the wall with a flexible, paintable exterior sealant. If you can't tuck under the siding, use a surface-mounted step flashing or counterflashing and seal the top edge thoroughly. This area deserves your most careful attention, most patio roof leaks trace back here.
Finishing details, drainage, and post-install inspection
Once all panels are fastened and flashing is in place, walk through a final checklist before calling it done.
Drainage check
Run a garden hose on the roof for a few minutes and watch where the water goes. It should flow smoothly to the outer eave and drip or drain off cleanly. If you see any water pooling or running sideways, find the low spot and address it, either by adjusting a fastener that's pulling a panel down, shimming a rafter, or adding a gutter to redirect flow. Any water sitting on the surface for more than 24–48 hours after rain is a problem that will shorten the life of any roofing material.
Fastener and seal inspection
Go over every fastener and look for gaps at the washer, missed screws, or overtightened fasteners that have pulled through the panel. Check all caulked seams at the ledger flashing and the wall transition while the surface is still accessible. Squeeze any suspicious seam gently, if it moves or gaps open, add more sealant.
Structural alignment
Step back and look at the roofline from the yard. It should be straight and consistent with no visible dips or high spots. Check that posts are plumb with a level. If anything looks off, find out why before the next rain puts load on the structure.
When to call a pro
If your inspection turned up significant rot in the house wall framing behind the ledger, undersized footings that need to be excavated and repoured, or you're in a high-seismic or high-wind zone where the engineering gets complex, bring in a licensed contractor or at minimum a structural engineer to review your plan. The panel installation part of this job is very DIY-accessible. The structural connection to your house is where mistakes have real consequences. If you’re dealing with a sagging or leaking patio roof, this guide on how to repair a patio roof can help you choose the right fixes before you start tearing anything out.
After your post-install water test passes and everything looks solid, keep an eye on the ledger flashing and fastener seals once or twice a year, especially after the first winter. If you are dealing with trapped heat or noise under the cover, you may also want to consider whether you need to vent a patio roof do you need to vent a patio roof. Catching a small seal failure early is a five-minute fix.
Ignoring it for two seasons turns into the kind of project that requires a full replacement again. If you're already thinking about long-term maintenance, topics like how to seal a patio roof and how to stop patio roof from leaking are worth reviewing to build out a simple annual maintenance routine once the new structure is in place.
If you need a more hands-on approach than sealing, use these steps for how to repair a patio roof at the specific leak or failure point. If you notice any new gaps or leaks, use the same sealing steps to target the fasteners and flashing joints on your aluminum roof how to seal aluminum patio roof. If you're working on an aluminum patio roof, follow these steps on how to seal aluminum patio roof to stop leaks at the joints and fasteners.
If you still notice water intrusion after the rebuild, use this guide on how to fix leaking patio roof to track the likely failure points and choose the right repair how to seal a patio roof. If you are still seeing water intrusion after the rebuild, go step by step through the most common failure points, then repair based on what you find how to fix leaking patio roof.
FAQ
Can I replace the patio roof panels without touching the ledger or framing?
Yes, but only if you confirm the ledger connection is sound and the members show no sag, rot, or significant fastener corrosion. If any screw or bolt areas show movement, dark staining, or softness around the ledger, treat it as a structural repair job, not a panel swap.
How do I choose the right slope if I do not know the existing projection length exactly?
Measure the projection from the ledger line to the outer edge along the full roof width, then base your slope math on that run. If the roof is not level right now, measure height at multiple points and correct to your target slope using the lowest reference point, otherwise you can end up with new low areas.
What is the safest way to deal with a roof that is sagging but the panels still look intact?
Do not rely on the roofing surface to gauge structural condition. Start by temporarily shoring the posts or beam line before removing any fasteners, then inspect for ledger/wall damage and member deflection. If sagging is more than minor, get an engineer to confirm load capacity and whether you need to replace beams or posts.
How can I tell whether a leak is from failed fasteners versus flashing?
Run water while watching from below (or use a hose with someone monitoring). If leaks line up with screw locations, suspect washer seal failure or overtightened fasteners. If leaks occur at the house transition or immediately above the ledger, flashing alignment or layered water control is the likely cause, not the panels themselves.
Do I need to remove all old caulk and sealant before installing new flashing?
You usually need to remove anything loose or contaminated so the new flashing sits flat and the sealant can bond. After scraping, clean the surface to remove dust, grit, and old silicone residue, then apply the sealant under flashing as a gasket, not as the primary waterproofing layer.
Can I reuse posts or wood members if they only have small areas of rot?
Sometimes, but usually not without an inspection that reaches the full depth of the member. Surface rot can hide deeper decay, especially near fasteners and at the post base. If rot has penetrated, if fibers feel soft with a screwdriver, or if there is bowing, replace rather than patch.
What should I do if the existing footings are cracked or settled but I cannot excavate extensively?
You may still be able to correct the support system by rebuilding footings or adding engineered base solutions, but it depends on soil and settlement extent. Plan for a permit or engineering review if you must adjust post height or load path, because patching aboveground without addressing footing movement often leads to renewed leaning.
Is it okay to caulk the ledger connection instead of relying on flashing layers?
Avoid relying on caulk as the main barrier. Sealant can back up gaps, but flashing layers and proper lap direction are what prevent water from getting behind the wall assembly when wind lifts the roof edge. If you must use sealant, treat it as supplementary to the flashing system.
How tight should I fasten panels to avoid leaks and cracking?
Use the manufacturer’s guidance and tighten only until the bonded washer compresses enough to seal. Overtightening can deform the panel and create cracks or new leak paths, undertightening can leave gaps under the washer. After installation, verify that each fastener head sits firmly without cutting into the panel.
What do I do if I am installing over a slightly uneven beam or rafter line?
Correct the framing plane before paneling by shimming or adjusting the beam, otherwise you create low spots where water pools. If you try to compensate by overdriving fasteners or forcing panels, you can create gaps at side laps and make flashing fail sooner.
How long after installation should I do the hose test and final inspection?
Do it immediately after flashing and panels are installed, while you can still access seams easily. Then repeat after the first rain to confirm drainage direction, especially at the roof-to-house transition where small mislaps can show up only once water volume increases.
Do I need to vent a patio roof in all climates?
Not always, but ventilation can matter if you have heat buildup, an enclosed style, or trapped moisture beneath the cover. If your design creates a semi-enclosed space or you notice condensation or odors after rainy weather, ask an installer or engineer whether your specific roof configuration needs venting rather than assuming it is optional.
What are common permit pitfalls that cause problems mid-project?
Expect requirements that vary by whether you are changing structural members, altering ledger height, changing roof geometry, or adding a new free-standing section. If the project touches structural connections to the house, you almost never want to start demo before confirmation, because inspections often require photos of exposed framing and signed-off framing plans.