Most patio roofs do not need formal ventilation the way an attic does, but some solid, enclosed, or insulated patio covers absolutely do. The answer depends almost entirely on what your patio roof is made of, how enclosed the space underneath is, and whether there is any insulation in the assembly. Open-lattice or slatted shade structures need no venting at all. A solid flat-panel aluminum roof attached to the house with open sides? Probably fine without dedicated vents. A wood-framed gable patio roof with a solid deck, insulation, and enclosed soffits? You need a ventilation plan, and skipping it will cause real problems over time.
Do You Need to Vent a Patio Roof? DIY Decision Guide

Celia Vaughn
29 Apr 2026
What people usually mean by "venting a patio roof"
The term gets used two different ways, and it helps to know which one applies to your situation before you go any further. The first meaning is attic-style ventilation: creating an intake/exhaust airflow path through a closed roof cavity so moisture and heat can escape. This is what building codes (specifically IRC Section R806) address when they require a minimum net free ventilation area of 1/150 of the ventilated space, or 1/300 under certain conditions. The second meaning is much simpler: just making sure there is enough open airflow under or around a patio cover so the space does not trap heat and humidity. For most backyard patio covers, it's the second meaning. But if you've built something with a fully enclosed roof cavity, insulated panels, or a sealed soffit system, the first meaning kicks in and the stakes are higher.
When venting is needed vs. when it's not
The clearest way to work this out is to look at your specific roof type. Here's how each common patio cover design stacks up:
| Patio Roof Type | Venting Needed? | Why |
|---|---|---|
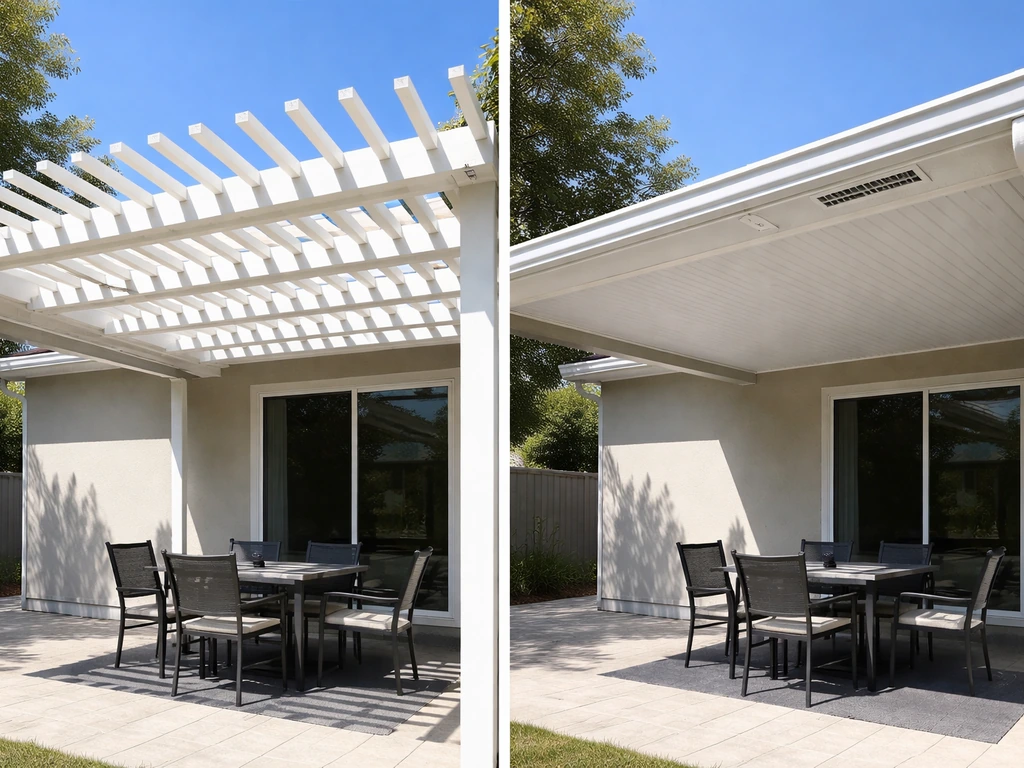
| Open lattice or pergola | No | Airflow is unrestricted by design; no cavity to trap moisture |
| Solid flat-panel aluminum (open sides) | Usually no | No enclosed cavity; heat and moisture escape freely at the edges |
| Solid wood or metal deck, open sides | Low risk, minor gaps help | Some moisture can collect on underside; a small air gap at the ridge edge helps |
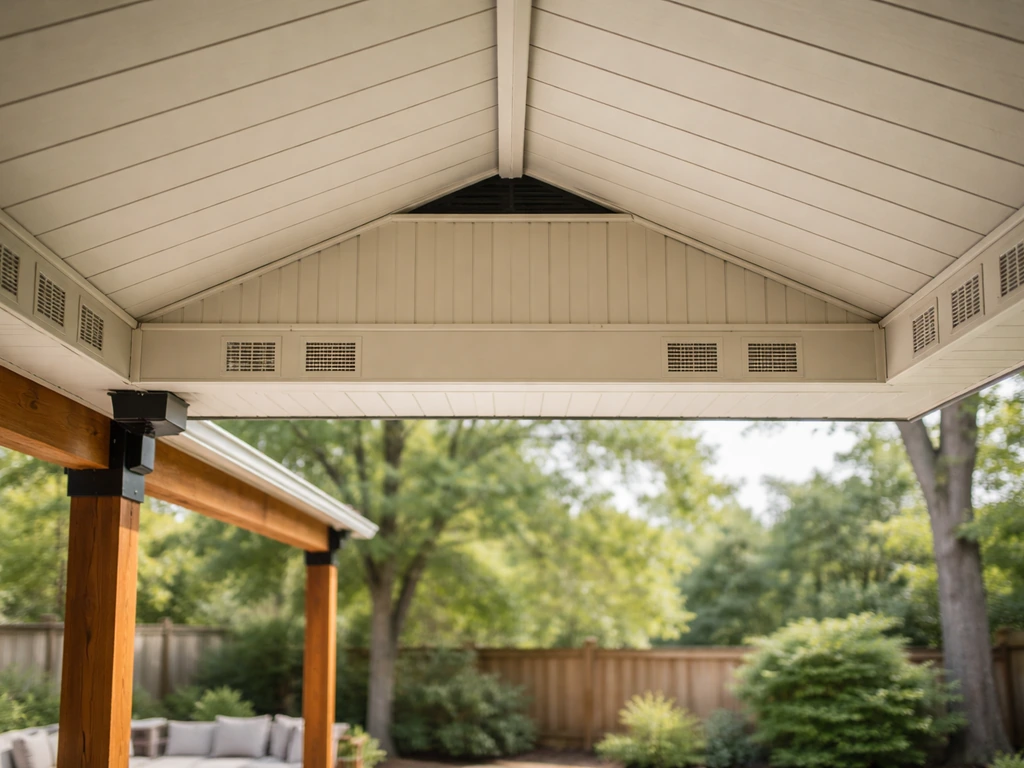
| Attached lean-to with solid deck and enclosed soffits | Yes | Enclosed cavity traps condensation and heat; needs intake/exhaust path |
| Gable patio roof, enclosed rafters, no insulation | Yes | Roof cavity needs cross-ventilation; standard soffit-to-ridge approach applies |
| Gable or lean-to with insulation added | Yes, or sealed unvented assembly | Code-regulated; either vent it properly or design it as a sealed/unvented assembly with vapor control |
| Freestanding structure, open sides | No | Natural airflow handles it as long as sides are not fully enclosed |
The dividing line is whether you have an enclosed roof cavity. If you can see the sky or feel a breeze moving through freely, venting is not your problem. Once you close off that cavity with a solid deck, enclosed fascia boards, and soffits, you have created a microenvironment that needs managed airflow or a deliberate unvented assembly strategy.
How moisture and heat build up, and what goes wrong without venting
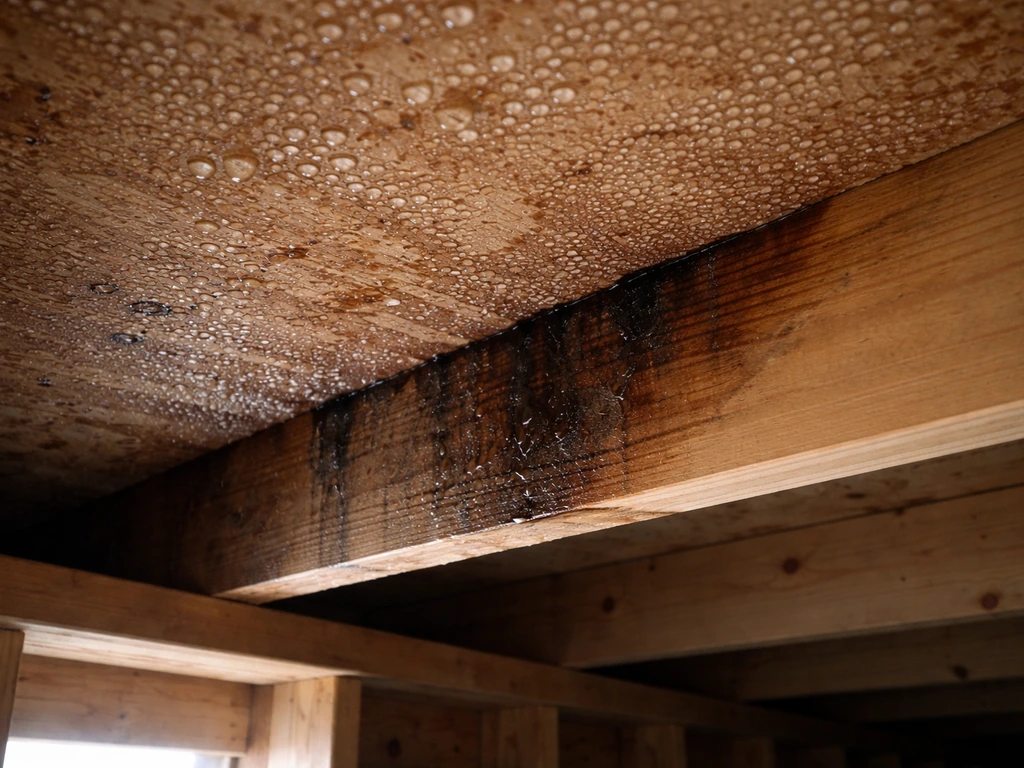
Here is what actually happens inside an unvented closed patio roof cavity. On a humid day or after rain, warm moist air gets trapped under the roof deck. As temperatures drop at night, that air hits the dew point and moisture condenses on the coldest surface it can find, which is usually the underside of the roof deck or the faces of your rafters. Condensation does not need to occur unless the dew point temperature of the interior air exceeds roughly 45°F and that air contacts the roof deck, but in most U.S. climates during shoulder seasons, that condition is met regularly.
Over time this causes a chain of problems. Wood framing and decking absorb moisture, which accelerates rot. Metal fasteners corrode faster when exposed to persistent moisture, and this is a documented failure mode in low-slope roof systems. Insulation, if present, gets wet and loses most of its thermal value. The underside of painted wood panels or stained tongue-and-groove ceilings starts to show mold and mildew streaks. And the space becomes noticeably less comfortable in spring and fall because trapped heat and humidity make it feel like sitting inside a greenhouse. None of these problems show up immediately. They show up two to four years later when you're pulling out rotten blocking or repainting for the third time.
DIY ventilation options that actually work
If you've determined your patio roof needs ventilation, the good news is that the solution is the same principle used in any residential attic: get air in low and out high. The air has to have a clear, unobstructed path from the intake to the exhaust. Here are the main options DIYers use on patio roof builds:
Soffit vents at the low point (intake)
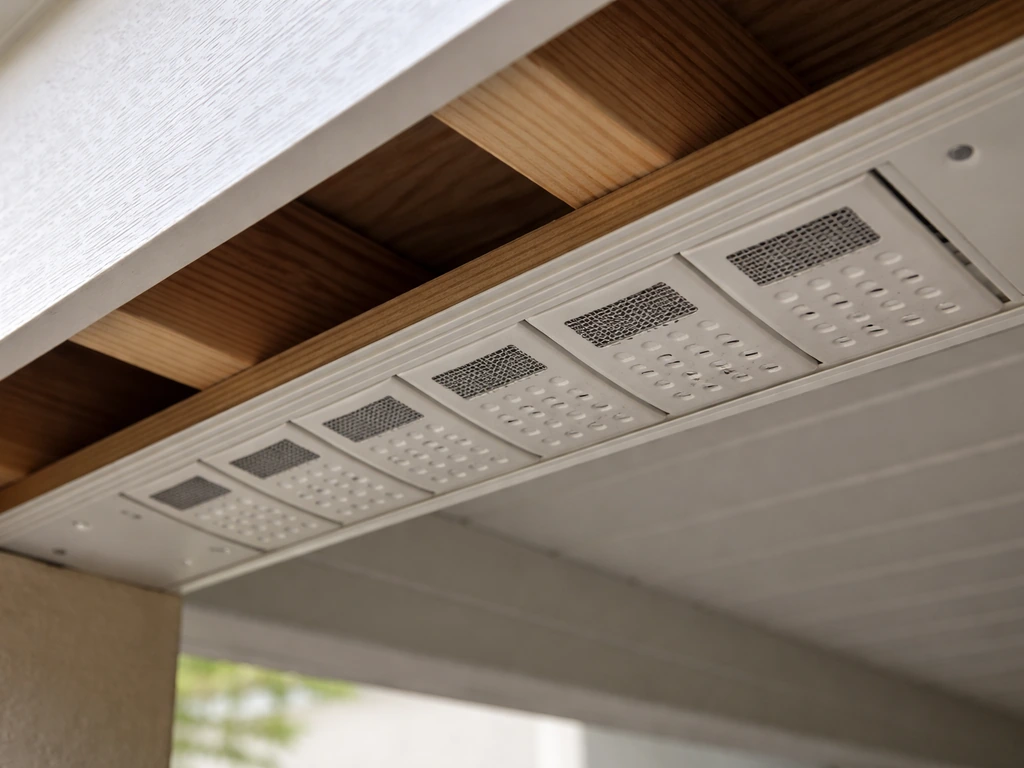
If your patio cover has an enclosed soffit at the eave or low edge, install continuous or individual soffit vents there. These act as the intake. The important thing most people get wrong is blocking these with insulation after the fact. If you're adding any insulation to the rafter bays, you need baffles (sometimes called rafter baffles or vent channels) installed between the top of the insulation and the underside of the roof deck to keep that airflow channel open all the way from the soffit vent to the ridge.
Ridge or high-point vents (exhaust)
Heat and moisture-laden air rise, so your exhaust vent needs to be at the highest point of the roof cavity. On a gable patio roof, a ridge vent runs the length of the peak and works very well. On a lean-to or shed-style roof, a continuous vent at the high end of the run near the house wall does the same job. The key is that the exhaust area should be roughly balanced with the intake area, and ideally equal to it. An unbalanced system where you have more exhaust than intake can actually pull warm house air down through gaps instead of drawing cool outside air up from the soffits.
Controlled gaps and open fascia details
On simpler builds, especially solid aluminum panel roofs, you can skip formal vents and just leave a deliberate air gap at one or both ends of the roof run. A 1 to 2 inch gap between the top of the fascia board and the underside of the panels lets air move in and out. Screen this gap with insect mesh so it doesn't become a wasp hotel. This approach works well for open-sided patio covers where the sides are not fully enclosed. It won't satisfy code for a regulated enclosed assembly, but for the typical backyard flat-panel cover it handles moisture and heat without any special hardware.
Louvered panels and adjustable vents
Louvered aluminum panel systems are a purpose-built solution for this exact problem. They let you dial in airflow by adjusting the louver angle. These work especially well for freestanding pergola-style patio covers. They cost more than fixed panel systems, but if you're in a hot, humid climate and want maximum airflow control, they're worth considering from the start rather than retrofitting vents later.
Making sure vents don't create leaks
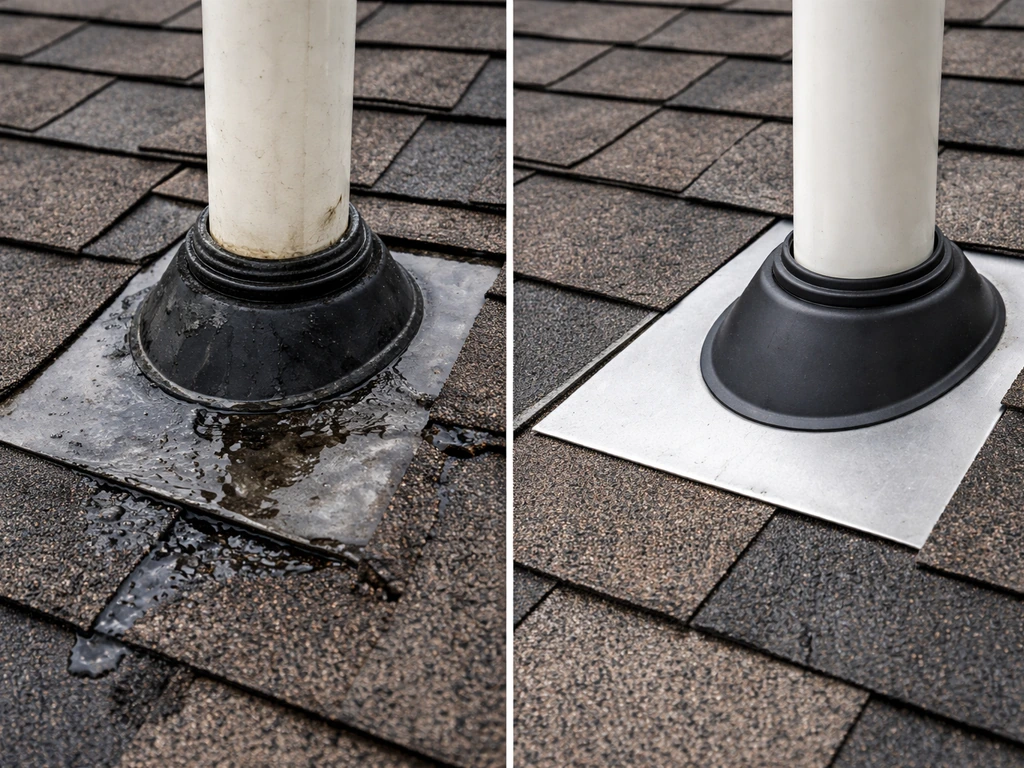
This is where most DIY vent installations go sideways. Adding a vent opening to a solid roof without thinking through water-shedding is a reliable way to create a new leak. If you're specifically trying to figure out how to stop patio roof from leaking, the flashing and sealing checks matter just as much as the venting plan. If you’re dealing with a leaking patio roof, double-check that any vent openings are properly flashed and sealed so water can’t get in around the penetration create a new leak. Most roof leaks happen at penetrations and transitions, not in the field of the roofing material itself. Every vent penetration needs to be treated as a potential water entry point.
The basic rule is: vent boots and flashing must work with the water-shedding plane, not against it. For a shingled patio roof, the shingles above any vent penetration need to overlap the top flange of the vent boot, and the sides and bottom flash under the shingles below. This is the same shingling sequence used on pipe penetrations. Factory vent boots with integral flanges (available from most roofing suppliers) make this much easier to get right. For metal panel roofs, use manufacturer-supplied ridge vent profiles that snap into the panel ribs rather than cutting holes and flashing around them freehand.
Ridge vents on lean-to roofs that terminate at a house wall need special attention. That wall-to-roof transition already needs careful flashing (a step flashing or counter-flashing detail), and adding exhaust venting nearby can complicate the water path. If your lean-to roof runs up to a stucco or siding wall, install the wall flashing first, make sure it's water-tight, and then design your high-point vent detail to exhaust outward toward the open face rather than toward the wall. Related problems with leaking at roof-to-wall transitions are worth reviewing carefully before you start, since a ventilation addition can make an existing marginal flashing detail worse in a hurry.
Quick safety and permit checks before you start
Ventilation additions to an existing patio roof are generally minor enough that many jurisdictions don't require a separate permit for them, but there are important exceptions. If your patio cover was originally permitted and the permit drawings show a specific roof assembly, modifying that assembly (adding vents, adding insulation) may require a revision or new permit. If you're planning to replace a patio roof, keep the ventilation strategy in mind before you close up the assembly replace patio roof ventilation. Adding insulation to create a regulated unvented assembly almost certainly requires permit compliance with your local energy code, and some states, like Florida, have specific statutory requirements for unvented enclosed rafter assemblies including minimum insulation R-values and air-sealing specifications. Florida’s Energy Technical Advisory Committee staff discussion links unvented or air-sealed attic and enclosed rafter assemblies to Energy Code compliance through references such as Section R402 in the Florida Building Code Energy Conservation context unvented enclosed rafter assemblies.
Before you cut any holes in your roof, do these five checks:
- Confirm with your local building department whether the planned change requires a permit or just an inspection. A quick phone call or online permit lookup takes 10 minutes.
- Check that your existing framing can handle any new loads if you're adding vents with blocking or curbs. For simple cuts through existing decking, this usually isn't a concern, but if your structure was already marginal, don't add complexity.
- Measure the total area of your roof cavity and calculate the minimum vent area you need. Using IRC R806's baseline of 1/150, a 200 sq ft roof cavity needs roughly 1.33 sq ft of net free vent area split between intake and exhaust.
- Inspect your existing roof for any signs of moisture damage, soft spots in the decking, or corroded fasteners before you add vents. Venting a roof that already has wet framing will not fix rot that's already started. The wood needs to be at less than 18% moisture content before you close it back up.
- Make sure your roof's water-shedding details (especially at the wall attachment point if it's a lean-to) are solid before you introduce any new penetrations.
When to stop and call a professional
Most of the ventilation work described here is genuinely DIY-friendly. Cutting in soffit vents, installing a ridge vent on a simple gable, and adding screened gaps to a flat-panel roof are all reasonable weekend projects for someone comfortable on a ladder with basic carpentry tools. Stop and call a licensed contractor or structural engineer if any of these apply:
- You've found soft, spongy, or visibly rotten decking or rafters when you start poking around
- Your patio roof is attached to the house and you're not confident the ledger attachment and flashing are correct, since that's a structural and water-intrusion issue that compound when you start modifying the roof
- You want to add insulation and create a sealed unvented assembly, because that design requires specific material choices and code compliance that vary by climate zone
- The roof has any low spots or improper slope that cause pooling water, since venting alone won't fix drainage problems
- You're in a jurisdiction that requires stamped drawings or an engineered solution for patio cover modifications
The honest bottom line: most people asking this question are working with a solid-panel or wood-deck patio cover that has some enclosure but is not a fully insulated assembly. For those situations, a simple intake/exhaust airflow path using soffit vents or screened gaps at the low end and a ridge or high-point vent at the top will solve the moisture and heat problem without needing a permit or an engineer. If you decide to build or modify your patio roof as an unvented, sealed assembly, you should also plan the air-sealing details so moisture cannot leak into the roof cavity how to seal a patio roof. If you decide to build or modify your aluminum patio roof as a sealed, unvented assembly, the adjacent steps for how to seal a patio roof will help you avoid moisture intrusion. Take the time to get the flashing right around any penetration you cut, confirm your airflow path is actually clear from one end to the other, and you'll have a noticeably more comfortable and longer-lasting patio cover. If you’re figuring out how to replace a patio roof, it helps to decide early whether your new structure should be vented or built as a deliberate unvented assembly patio cover.
FAQ
Do I need to vent a patio roof if it’s only partially enclosed (open on the sides)?
Usually no. If you can feel outdoor air movement under the roof and the cavity is not sealed with solid soffits and fascia, heat and moisture are typically able to escape through the open sides. Venting matters most once the underside is effectively enclosed, such as with solid ceilings, closed soffits, or sealed panel systems.
How can I tell whether I have a “closed roof cavity” that needs attic-style ventilation?
Look for an actual enclosure between the underside and the roof deck, like closed soffits/fascia, a solid deck under the roof panels, and an insulated ceiling system. A practical test is to temporarily use smoke from a small fan or incense near the soffit area and see whether air can travel to the high point; if airflow is blocked, you likely need an intake-to-exhaust path or a designed unvented assembly.
What happens if I add soffit vents but forget to install rafter baffles?
The vents may become ineffective or even counterproductive. Without baffles (vent channels), insulation can press tight against the underside of the roof deck and block the airflow path, so moisture still condenses on the deck. The fix is to ensure air can move from the soffit intake up to the ridge or high exhaust point.
Should my intake and exhaust areas be equal, and what if they are not?
They should be roughly balanced, with intake close to exhaust in net free area. If exhaust is significantly greater than intake, the system can pull warm indoor air downward through gaps, instead of drawing outdoor air upward through the soffit vents. If you cannot balance them, reduce exhaust size or add additional intake openings.
Can I vent a patio roof with a single vent near one end instead of a ridge vent?
Sometimes, especially on simpler flat-panel and lean-to covers where you create a continuous high-end exhaust gap rather than a true ridge cavity. However, if your roof has a fully enclosed cavity with insulated deck and closed soffits, a single small vent often fails to create an effective airflow path across the whole structure. In that case, spreading intake and using a high-point exhaust near the peak is safer.
Will ventilation prevent mold, or could it make condensation worse?
Ventilation helps reduce condensation by lowering the temperature and moisture level inside the cavity, but it will not solve condensation if the roof assembly is leaky to humid indoor air or poorly air-sealed. If warm, moist air is entering from the house, you can still get wet surfaces even with vents. Air-sealing at transitions and around any ducted penetrations is usually necessary.
Do I need insect screens on soffit vents and roof gaps?
Yes, especially in warm climates where wasps and bees target low openings. Use corrosion-resistant insect mesh rated for exterior use, and keep the mesh from restricting airflow more than intended. Also avoid covering vents with non-breathable materials that can block the intake airflow channel.
What’s the safest way to add a vent without causing leaks?
Plan the water-shedding sequence before cutting. For shingle systems, treat the vent like a roof penetration with proper vent boot flashing and shingle overlap (top shingles overlap the boot flange, sides and bottom are flashed under). For metal panel roofs, prefer manufacturer vent/ridge components that integrate with panel ribs, instead of improvising cuts that require custom flashing.
If my patio roof is already leaking, should I vent it anyway?
Only after you diagnose and correct the leak path. New vent penetrations can become additional leak points if flashing or sealing is not perfect. If you suspect existing leaks, verify that the leak is not already coming from a transition (roof-to-wall, fascia, or old penetrations) before adding new openings.
Will I need a permit to add patio roof vents or insulation?
Often DIY vent retrofits fall under minor work, but exceptions are common when the structure was originally permitted with specified assembly details. Any change that alters insulation levels or converts the roof to a regulated unvented assembly can trigger energy code compliance and, in some states, specific requirements. Check with your local building department if your project includes insulation changes, not just airflow openings.
Should I build an unvented sealed patio roof instead of ventilating it?
Unvented sealed assemblies can work, but they require careful air-sealing and insulation strategy so moisture stays in the safe zone. If you are not confident with sealing transitions around rafters, sheathing, and penetrations, venting is often more forgiving. If your design goal is a fully sealed, insulated cavity, consider having a local pro confirm the assembly approach.
What are the signs my patio roof needs ventilation and is currently trapping moisture?
Look for recurring condensation on the underside (especially after humid nights), damp wood smell, mold or mildew streaking on painted panels or ceilings, rusting fasteners, and blistering or staining that appears after a season and returns. If you see ceiling discoloration or softness in blocking after a couple of years, it is consistent with a long-term moisture accumulation problem.
When should I stop DIY and call a contractor?
Call a pro if the roof is structurally complex (large cantilevers, heavy snow load areas, or significant modifications to framing), if you must penetrate a metal roof near tricky transitions like roof-to-wall interfaces, or if the ceiling/soffit system is already fully built and you would need to disturb insulation and air barriers. Also stop if you suspect the patio roof ties into conditioned space air handling, since that changes the moisture source and remediation plan.