Most patio roof repairs come down to one of three things: a surface issue (a cracked panel, loose shingle, or failing sealant), a flashing or drainage problem at the edges or where the roof meets the house wall, or a structural problem like a sagging rafter or rotted post connection. Figure out which category you're dealing with first, and the repair path gets a lot clearer. This guide walks you through diagnosing the damage, making the fix yourself for each type of problem, and testing your work so you're not back up there in the next rainstorm.
How to Repair a Patio Roof: Step-by-Step DIY Guide

Celia Vaughn
29 Apr 2026

Quick diagnosis: figure out what's actually broken
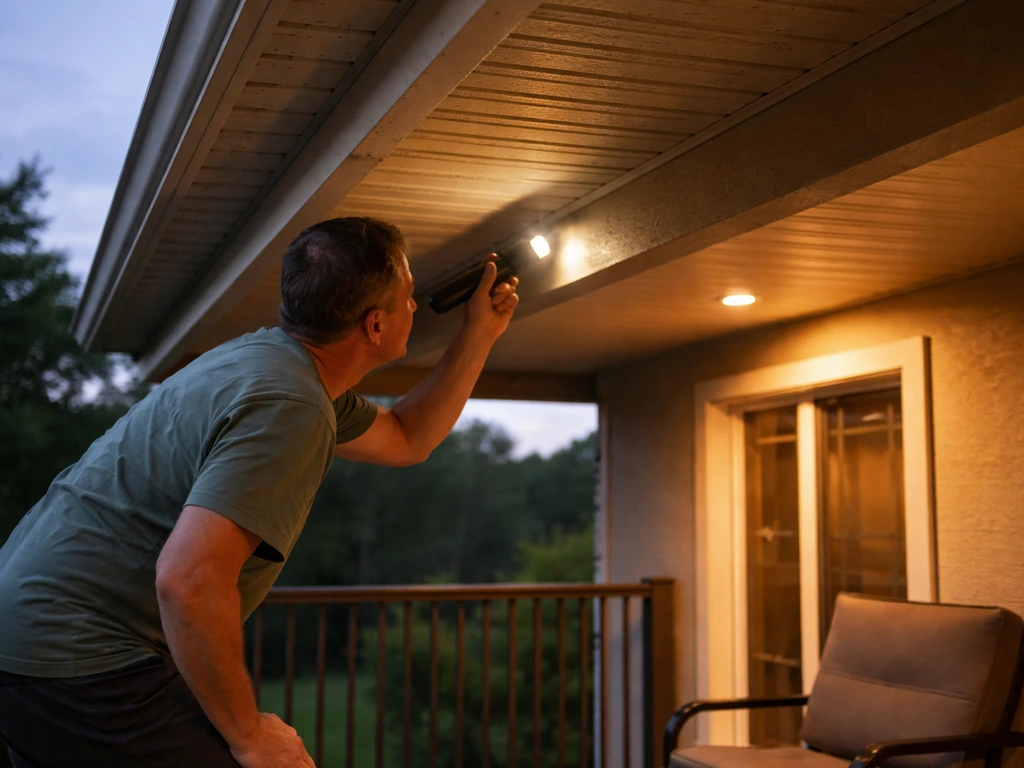
Before you grab a caulk gun or order parts, spend 15 minutes doing a real inspection. Guessing leads to patching the wrong spot and having the same leak two months later. The goal here is to trace the damage back to its source, not just where you see the water stain or wet spot.
Start from the ground. Walk the perimeter of the patio roof and look for obvious signs: panels that have shifted or cracked, visible gaps along the wall where the roof connects to the house, sagging sections, rust streaks, pooled debris in gutters or valleys, or any place where the roofing material looks buckled or lifted. Then, if it's safe to do so, get up for a closer look. Bring your phone and take photos of everything suspicious.
The most common leak entry points on patio roofs fall into predictable categories. On panelized aluminum or metal systems, leaks almost always start at the house connection flashing, along panel-to-panel seams, or at the eave edge where water is supposed to drip clear of the fascia. On wood-framed roofs with shingles or decking, look for cracked or missing shingles, exposed nail heads, lifted flashing at the wall transition, or soft/spongy decking that signals rot underneath. On low-slope or flat-roof patio covers, water pools and finds the weakest point, so check every seam, penetration, and edge termination carefully.
Categorize what you find into one of these three buckets before moving on:
- Surface damage: cracked, broken, or loose panels, shingles, or roofing material in the field (not at edges)
- Flashing and drainage damage: gaps or separation at the wall-to-roof transition, lifted drip edge, clogged or disconnected gutters, failed sealant at seams or penetrations
- Structural damage: sagging rafters or beams, cracked or rotted wood members, bent aluminum or metal framing, loose post-to-beam connections, or fasteners pulling out
If you're dealing with all three, tackle them in order: structure first, then flashing, then surface. Fixing a surface leak on top of a failing structure just delays the inevitable.
Safety first: what you need before you get up there
Working on a patio roof is low-slope work, which can feel deceptively safe. But even an 8- or 10-foot fall onto a concrete patio slab is serious. Set up your workspace correctly before you start, and don't skip this part.
Fall protection and ladder setup
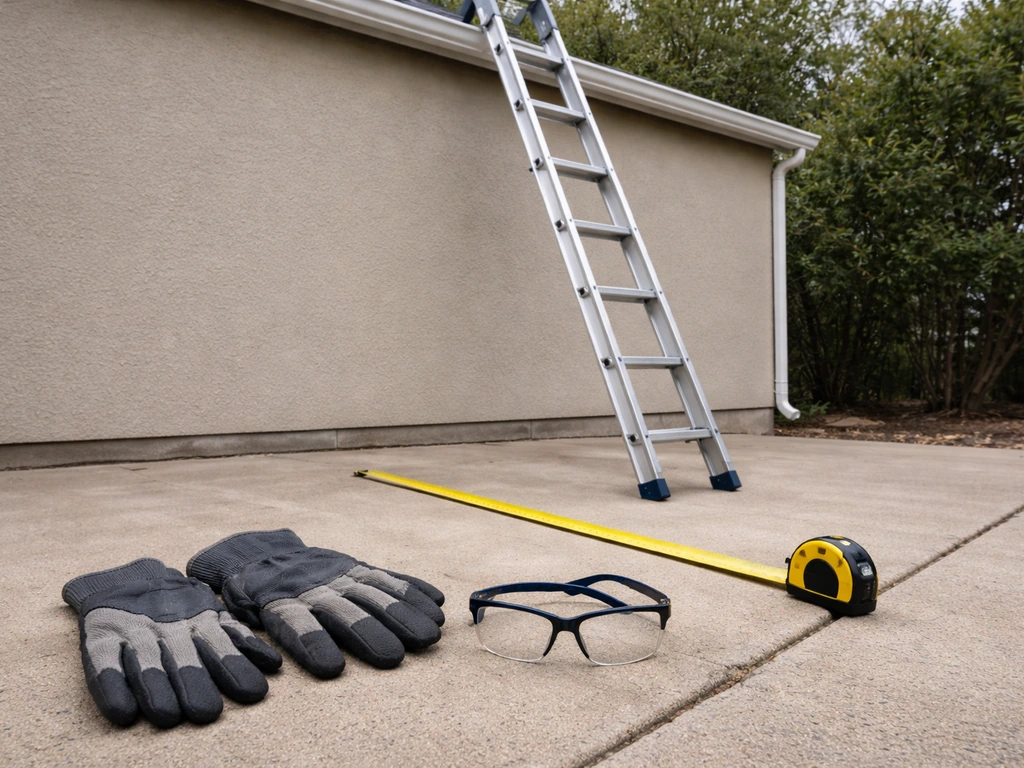
Use a properly rated extension ladder that extends at least 3 feet above the roof edge. Set it on firm, level ground at a 75-degree angle (roughly a 1-to-4 ratio: 1 foot out for every 4 feet of height). Have someone spot the base while you climb. On the roof itself, wear rubber-soled shoes for grip. If the pitch is steep enough that you feel unstable, use roof jacks or a chicken ladder (a hook-style roof bracket that locks over the ridge). For work on metal or aluminum panel roofs, be careful about stepping on panels directly; walk on the structural ribs or purlins underneath where possible to avoid denting or cracking the surface.
Tools and materials to have ready
- Safety glasses and work gloves (metal edges are sharp)
- Rubber-soled shoes or work boots
- Extension ladder, rated for your weight plus tools
- Pry bar and hammer (for removing damaged panels, shingles, or flashing)
- Cordless drill with bits and screws appropriate for your roof material
- Caulk gun with roofing-grade sealant or polyurethane sealant
- Metal snips (for trimming aluminum or sheet metal flashing)
- Replacement panels, shingles, flashing, or framing lumber as needed
- Roofing tape or butyl tape for temporary sealing
- Wire brush and rags for cleaning surfaces before sealing
- Measuring tape and pencil
Pick the right weather window
Don't work on a wet roof. Even a light dew makes aluminum and painted metal surfaces slippery. Aim for a dry day with no rain forecast for at least 24 to 48 hours after you finish so sealants and any adhesives have time to cure fully. If you have an active leak and can't get to a full repair immediately, cover the damaged area with a heavy-duty tarp and weigh down the edges to keep water out until conditions improve.
Repairing roof surface leaks, loose panels, and flashing
This is the most common repair category and often the most straightforward. The process varies a little depending on your roofing material, but the logic is the same: remove what's failing, clean the substrate, install the replacement or sealant correctly, and make sure water has a clear path off the roof.
Loose or cracked aluminum and metal panels
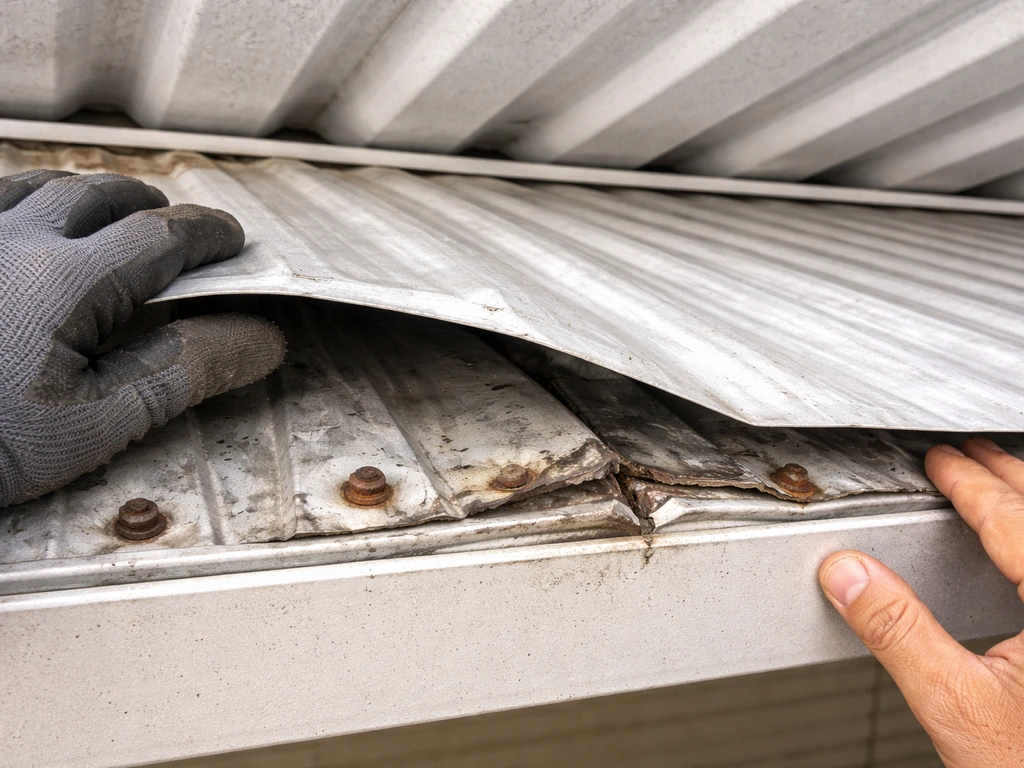
On panelized patio covers (the kind with interlocking aluminum or corrugated metal panels), loose panels are usually the result of fastener pullout, a missing screw, or a panel that has expanded and shifted over time. Start by re-securing loose panels with self-tapping hex-head screws designed for metal roofing. These should go through the panel and into the structural purlin or rafter below; driving them into nothing doesn't help.
Don't overtighten them or you'll crack the panel or strip the hole. If a panel is cracked or has a hole, your options are patching with a compatible metal patch and roofing sealant for small damage, or replacing the full panel for anything larger. Partial patches on aluminum are workable but are a temporary fix; full panel replacement lasts much longer.
Failed seams and sealant
Seam failures are extremely common on older patio roofs. Sealing a patio roof starts with identifying the exact leak entry point, then cleaning and applying the right blank" rel="noopener noreferrer">roofing-grade sealant for your material failed seam. Sealant dries out, cracks, and eventually lets water in. To fix a failed seam, start by cleaning out the old sealant completely using a wire brush and a rag with mineral spirits.
Applying new sealant over old, cracked material is a waste of time. Once the surface is clean and dry, apply a roofing-grade polyurethane or silicone sealant (check compatibility with your panel material, since some sealants stain or react with certain coatings). Dow’s DOWSIL™ 780 plumbers and roofing sealant is a neutral-cure silicone sealant designed for sealing aluminum or sheet metal roofing, flashing, gutters, and related rainwater accessories [roofing-grade polyurethane or silicone sealant](https://www. dow.
com/en-us/pdp. dowsil-780-plumbers-roofing-sealant. 02968835h). Smooth it into the seam with a gloved finger or a small putty knife so it fully fills the gap without voids.
Fixing flashing at the wall connection
The wall-to-roof connection is where lean-to patio roofs (and attached gable roofs) meet the house, and it's one of the most common leak sources on any attached patio cover. What you're looking for is a piece of metal flashing (called a headwall or apron flashing at the top, and step flashing along the sides if the roof runs along a wall) that creates a continuous water barrier at that transition.
If this flashing has pulled away from the wall, lost its sealant, or was never installed properly, water runs straight behind it and into the structure. To fix it, remove the existing sealant, re-bed the flashing tight against the wall, and run a continuous bead of polyurethane sealant along the top edge where the flashing meets the wall.
If the flashing itself is bent or corroded, cut a replacement piece from aluminum flashing stock using metal snips and overlap it at least 4 inches over the adjacent pieces.
Drip edge problems
Drip edge is a metal strip installed along the eave (lower edge) of the roof with a lip that directs water outward and into the gutter rather than letting it run back behind the fascia board. If yours is bent, missing, or installed without proper overlap into the gutter, water gets behind the fascia and eventually rots the structure. To repair it, slide a new section of drip edge under the roofing material at the edge, position the lip over the gutter (or gutter hanger), and fasten it with roofing nails or screws at 12-inch intervals. Overlap sections by at least 2 inches. This is an easy fix with a big payoff in preventing future fascia and rafter-end rot.
Shingle repairs on wood-framed patio roofs
If your patio roof is wood-framed with asphalt shingles, repair is similar to standard roof shingle work. Lift the edges of surrounding shingles, remove the damaged one by pulling the nails, slide the replacement into position so it overlaps the shingle below by the same amount as the others, and nail it in place at the top edge. Seal the nail heads and any exposed edges with roofing cement. Replace any step flashing along wall intersections at the same time if it looks corroded or if the shingles in that area show staining.
Fixing sagging or structural problems in rafters, beams, and connections
A visibly sagging patio roof is a warning sign you can't patch your way around. This usually means a rafter or beam has been weakened (by rot, moisture damage, insect damage, or overload from debris or snow) or that a connection point has failed. Address structural issues before doing any surface work, or you're wasting your time.
Loose fasteners and bracket connections
The most straightforward structural fix is re-tightening or replacing fasteners and hardware. Lag bolts that connect the ledger board to the house wall can loosen over time, especially if the framing behind the wall has shifted or if the original fasteners were undersized. Check every lag bolt and hurricane tie or post-cap bracket you can access. Tighten loose ones; replace stripped or corroded ones with the same or larger diameter hardware. If a bracket is pulling away from the wood and the wood itself looks soft or discolored, the wood needs to go (see the next section). Use structural screws or lag bolts rated for exterior use, not standard wood screws.
Sistering damaged rafters
If a rafter or joist is cracked, split, or deflecting more than it should but isn't completely rotted through, you can often sister it. Sistering means attaching a new piece of lumber of the same dimensions directly alongside the damaged one, running it the full span if possible, and fastening the two together with structural screws or nails every 12 inches in a staggered pattern. The new member carries the load while the old one stays in place. This works well for a single compromised rafter but is not a fix for widespread rot or multiple failing members.
Re-securing post and beam connections
On free-standing patio covers, posts connect to beams at the top and to footings or concrete at the bottom. If a post-to-beam connection is loose, add or replace the post cap hardware (a metal bracket that wraps the post top and receives the beam). If a post base has corroded or the post has rotted where it contacts the concrete footing, that section needs to be cut out and replaced. Never just wrap a rotted post base in caulk and call it done; it will continue to deteriorate and the post will eventually fail.
Replacing damaged framing or decking: wood vs. aluminum vs. steel
When damage is too extensive to repair in place, you need to replace the member. Which material you use for the replacement matters, and it's worth knowing your options before you make a trip to the lumber yard or home center.
| Material | Best for | Pros | Cons | Approximate cost signal |
|---|---|---|---|---|
| Pressure-treated lumber | Wood-framed patio roofs, ledger boards, posts | Widely available, easy to cut and fasten, affordable | Heavier, requires periodic sealing/painting, can rot if drainage is poor | Lowest upfront cost |
| Cedar or redwood | Exposed framing where appearance matters | Naturally rot-resistant, attractive, lightweight relative to PT | More expensive than PT, may be harder to source in some areas | Moderate cost |
| Aluminum framing members | Aluminum patio cover systems | Rust-proof, lightweight, no rot, matches existing systems | Requires specific fasteners and connectors, harder to cut without right tools | Moderate cost, varies by profile |
| Steel tubing or angle iron | Heavy-duty free-standing structures, beam replacement | Very strong, long-lasting | Heavy, requires welding or bolted connections, can rust if coating fails | Higher cost, may need professional fabrication |
For most homeowners with a wood-framed patio roof, pressure-treated lumber is the right default for any member that contacts concrete, sits close to grade, or is in a high-moisture area. Use cedar or a quality exterior-grade lumber for rafters that are well above the moisture zone and where you want a cleaner look. If your patio cover is an aluminum system, try to match the original framing profile as closely as possible; aluminum systems use specific connector hardware, and mixing in wood framing can create incompatibility problems at the brackets.
When replacing decking (the surface sheathing under shingles on a wood-framed patio roof), use exterior-rated plywood or OSB rated for your climate. Cut back the damaged section to the nearest rafter on each side so your patch has solid edges to fasten to. Seal the cut edges with a waterproofing membrane or paint before installing new roofing material over the top.
One practical note: if you're replacing more than one or two members, check whether a permit is required in your area. Structural framing replacement in attached structures often triggers a permit requirement, especially if the patio roof is within the permitted footprint of the house. A quick call to your local building department takes five minutes and can save you a much bigger headache later.
When to stop and call a professional
Most patio roof repairs are genuinely DIY-friendly, but there are real situations where calling a contractor is the right move. Knowing where that line is will save you money, protect your safety, and prevent making a manageable problem worse.
- The roof is visibly deflecting or has partially collapsed under its own weight: this is a structural failure, not a repair job, and needs an engineer or contractor assessment before anyone goes up there
- You find widespread rot across multiple rafters, beams, or the ledger board: spot repair won't work; the whole framing section needs to come out, and the scope of work usually warrants professional help or at minimum a thorough structural plan
- The patio roof connects to the house at a second-story wall or has a ridge height that puts you working at significant heights: at 15 to 20 feet up, fall risk becomes serious, and professional roofers have the rigging, anchor points, and insurance to work safely there
- You discover pest damage (termites, carpenter ants) in the framing: pest damage repair needs to start with treatment before any structural repair, and the extent of damage often isn't visible without opening up more of the structure
- The repair requires modifying or tying into the main house roof: any work at the intersection of your patio roof and the primary home roof involves flashing, underlayment, and structural details that are worth having a licensed roofer handle to avoid voiding warranties or creating new problems on the main roof
- You pulled a permit and the scope of work exceeds what a homeowner is allowed to self-perform in your jurisdiction: some municipalities restrict structural work on attached structures
Being honest about your skill level and the scope of the problem is just good project management. A contractor who spends two days fixing a problem properly is cheaper than a contractor who spends two weeks fixing what a DIY repair made worse.
Test for leaks, clean up, and keep it from happening again
After any repair, verify your work before you call it done. Don't just wait for the next rainstorm. Do a deliberate water test: use a garden hose to simulate rain, starting at the lowest point of the repair area and working upward. Have someone inside or under the patio roof watching for any drips or wet spots while you run water over the repair zone for three to five minutes.
If you see water, trace it back to the source and re-examine your sealant, panel overlaps, or flashing. If you still see signs of water, focus on how to stop patio roof from leaking by re-checking the sealant, seams, and flashing at the exact entry point.
Common mistakes at this stage include gaps at the ends of flashing pieces, sealant that didn't fully adhere because the surface was dusty or damp, and panels that look secured but still have a slight gap at a seam.
Once the repair passes the water test, do a quick cleanup of the work area. Remove any debris from gutters and downspouts since clogged drainage is one of the most common causes of repeat leaks on patio roofs. Clear leaves, seeds, and grit from panel seams and valleys where water is supposed to flow freely.
Simple maintenance that prevents most patio roof problems
The repairs in this guide are almost all preventable with a once-or-twice-a-year maintenance routine. It takes less than an hour and saves a lot of money over time.
- Clean gutters and downspouts every spring and fall, or more often if you have overhanging trees
- Inspect all sealant lines at the wall connection, panel seams, and penetrations annually; re-apply sealant anywhere you see cracking or separation
- Check all visible fasteners (screws, lag bolts, post cap hardware) for corrosion or looseness and tighten or replace as needed
- Look for debris accumulation in valleys and low points on the roof surface; standing water and decomposing leaves accelerate corrosion and sealant failure
- Check drip edge and fascia boards for paint failure or soft spots, which signal moisture is getting behind the edge detail
- After any major storm, do a quick visual inspection from the ground for shifted panels, lifted flashing, or new staining on the underside of the roof
If your patio roof is an aluminum panel system, sealing is a regular maintenance task worth doing every few years even when there are no visible leaks. If your patio roof has poor ventilation, you may need to vent it so heat and moisture do not build up under the cover do you need to vent a patio roof. The same goes for any wood-framed patio roof where exposed members benefit from a fresh coat of exterior paint or stain to block moisture infiltration. Staying ahead of small failures is always easier than dealing with a leak that's had time to cause rot or mold in the structure below.
For leaks that are specifically at seams or at the wall connection on an aluminum system, the fix process overlaps with broader topics like how to fix a leaking patio roof and how to seal an aluminum patio roof, which go deeper on those specific material types. And if the damage you found during your inspection is extensive enough that repair doesn't make sense, it may be worth evaluating a full replacement rather than patching a structure that's nearing the end of its useful life. If the damage is too extensive to repair, this guide on how to replace patio roof will help you plan the full replacement correctly.
FAQ
Can I repair the patio roof the same day I notice the leak?
Most repairs should start after you confirm the leak is active or at least the entry point is dry enough to work on. If the patio roof is leaking now, tarp coverage is the safest stopgap, and you should repair only after the area is fully dry so sealants and adhesives cure properly. If you are unsure whether the source is inside the visible stain area, do the hose test before you remove materials.
Will sealing cracks or seams fix the leak if the underlying structure is damaged?
Yes, but only if the underlying issue is also addressed. Patch only the failed surface when the structure and flashing are sound, and for metal panel seams use a compatible roofing-grade sealant after removing the old degraded sealant. If you find soft decking, pulled flashing, or a sagging member, surface-only sealing will likely fail quickly.
How do I choose the right sealant for an aluminum or metal patio roof?
Pick sealant based on the panel or roofing type and the coating system. For metal panel systems, use a roofing-grade polyurethane or silicone that is compatible with your specific panel material and finishes, since some products can stain or react with factory coatings. If you do not know the coating, test a small spot and confirm the manufacturer allows that sealant for that material.
Where should screws go when I re-secure loose metal patio roof panels?
For panelized metal roofs, you should drive screws into the structural member below the panel (purlin, rafter, or rib). If you fasten into the panel only, the screw can pull out and the leak can return along the same seam or at adjacent panels. Also, avoid overtightening because it can deform the panel and create new gaps.
What’s the most common mistake when repairing a patio roof drip edge?
If the drip edge is bent or missing, replace sections and ensure the overlap is correct (at least about 2 inches between pieces) and that the lip directs water into the gutter system. The biggest mistake is installing drip edge without integrating it with gutter hangers or leaving gaps that let water run behind the fascia, causing new rot.
How should I run a water test after repairing a patio roof?
A hose test should start at the lowest portion of the repair and move upward, because water travels to the entry point from below and can conceal the true source. Keep water on the area for several minutes while someone monitors inside or under the patio cover. If you see no leaks during the test, still re-check the exact seam or flashing joint you worked on.
What do I do if the leak continues after the repair and water test?
If you still see moisture, do not assume the leak is coming from where you applied sealant. Reinspect for end-to-end gaps at flashing overlaps, incomplete adhesion due to dust or dampness, or a small seam gap that appears tight from the top but opens when water is introduced. Trace the water path back to the earliest wet point.
Can I repair a sagging patio roof by just fixing the panels or shingles?
If the roof has a noticeable sag, treat it as structural first. Sistering can help for a single compromised rafter or joist if the member is cracked but not widely rotted or collapsing, but widespread rot or multiple failing members usually requires replacement. Continuing with surface fixes on a sagging structure often traps water in the wrong places and accelerates failure.
Is it okay to cover a rotted post base with caulk or patch material?
Not usually. Caulk is for sealing joints, not for replacing a failed or rotted wood connection. For post bases with rot at the footing, you typically need to cut out the affected section and replace it with properly compatible exterior materials and corrosion-resistant hardware, then make sure water drains away from the footing area.
Do I need a permit before replacing patio roof framing?
If you need to replace framing members in a patio cover, permits can apply especially for attached structures or work within the permitted footprint of the house. The best approach is to call your local building department before purchasing lumber so you do not end up redoing work to comply with structural code requirements.
What safety steps should I take before climbing a patio roof for DIY repairs?
Yes, but do it with a clear plan and safer access. Use a ladder setup that reaches above the roof edge, have someone spot the base, and walk on structural ribs or purlins when working on metal panel roofs to avoid denting. Do not work on dew-wet or recently wet surfaces, and if the slope feels unsafe even with correct ladder placement, switch to roof jacks or hire a pro.