You can absolutely put a roof over your patio yourself. The basic process is this: pick your roof style (lean-to attached to the house or freestanding), pull a permit if your jurisdiction requires one, set your posts and beams, attach a ledger board to the house if it's an attached build, frame your rafters with the right slope, add sheathing and your roofing material, and finish with flashing and gutters so it doesn't leak. That's the full arc. The rest of this guide walks you through every one of those steps with the detail you actually need to get it done right.
How to Put a Roof Over a Patio: DIY Step by Step Guide

Celia Vaughn
11 May 2026

Choosing the right patio cover type and materials
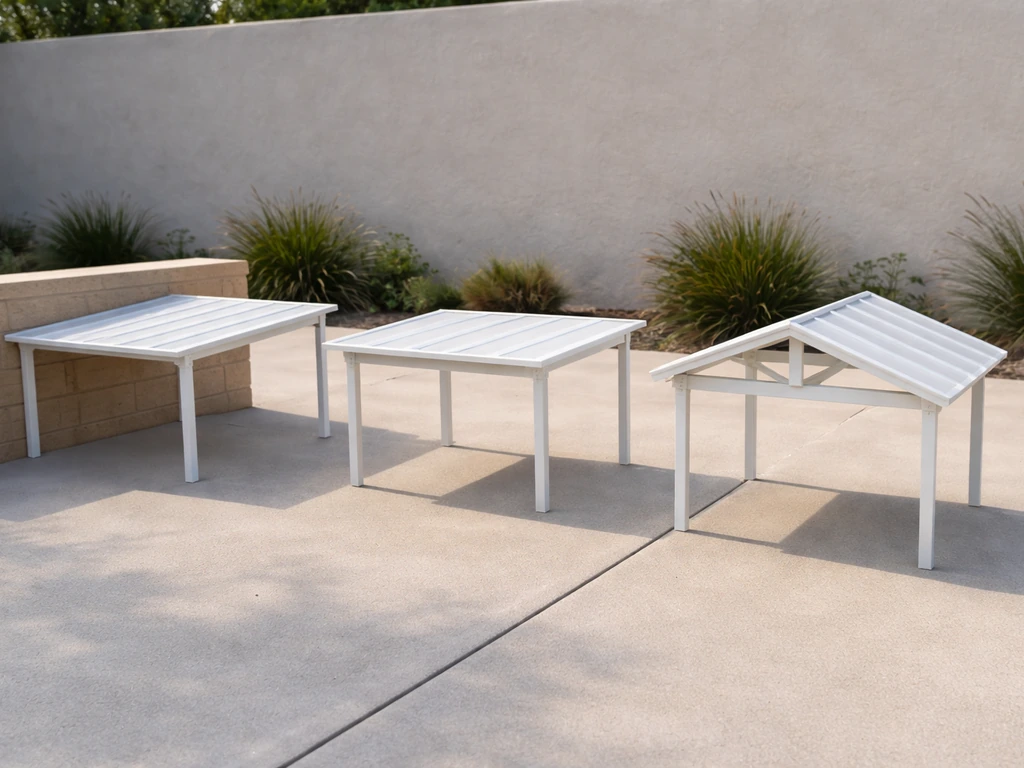
Before you buy a single board or post, decide what kind of structure you're building. The three most common DIY configurations are the attached lean-to (also called a shed roof), the attached or freestanding gable, and the freestanding column-supported structure. Each has real trade-offs in complexity, cost, and weather performance.
The attached lean-to is the most beginner-friendly option. One end ties to your house with a ledger board, the other end rests on posts. Water sheds in one direction. It's faster to build and usually the cheapest option. The gable roof is more visually impressive and handles rain from two sides, but it's also more complex to frame, especially if you're using trusses. Freestanding structures skip the ledger board attachment entirely, which removes some of the trickier flashing work, but they need to stand on their own with proper post anchoring and diagonal bracing to resist racking.
For materials, you're mainly choosing between wood, aluminum, and metal (steel or galvanized). Wood is the most accessible for DIYers, easy to cut and customize, and takes paint or stain well. Pressure-treated lumber for posts and beams, with regular dimensional lumber for rafters, is the most common approach. Aluminum kit systems like Alumawood are popular because the parts are lightweight, corrosion-proof, and designed for DIY assembly with pre-engineered components. Steel is stronger but heavier and harder to work with if you're not used to metal fabrication. For the roofing surface itself, common choices include asphalt shingles, corrugated metal or polycarbonate panels, aluminum roofing panels, and solid tongue-and-groove patio cover boards.
| Material | Best for | DIY difficulty | Durability | Rough cost driver |
|---|---|---|---|---|
| Pressure-treated wood | Framing, posts, beams | Beginner-friendly | 15-30 years with maintenance | Low materials cost, higher labor time |
| Aluminum kit (e.g., Alumawood) | Full patio cover systems | Easy with instructions | 25+ years, low maintenance | Mid-range; kit pricing by sq ft |
| Steel/metal framing | Large spans, commercial feel | Moderate to advanced | Very long-lasting | Higher material + welding costs |
| Asphalt shingles | Roofing surface on framed roof | Moderate | 20-30 years | Low cost per sq ft |
| Corrugated metal/polycarbonate panels | Simple lean-to roof surface | Easy | 15-25 years | Low to mid-range |
My honest recommendation for most homeowners doing their first patio roof: build a wood-framed lean-to with either asphalt shingles or corrugated metal panels on top. It's the most forgiving combination, the materials are available at any home center, and there's a huge amount of community experience around troubleshooting it. If you want a clean modern look with less upkeep, a prefab aluminum kit system is worth the extra money.
Planning the layout, measurements, and clearances
Get this step right and everything downstream gets easier. Get it wrong and you'll be re-cutting lumber or dealing with water pooling in the wrong spot. Start by measuring your patio slab or the area you want to cover, and decide on your finished roof dimensions. Standard patio covers run anywhere from 10x12 feet to 20x20 feet or more, but your specific size is driven by your patio, your house, and your budget.
The most important measurement in patio roof planning is your slope, or pitch. A flat roof is a leaking roof. The absolute minimum you want for any solid patio roof is 1/4 inch of drop per foot of horizontal run. NRCA guidance documents discuss minimum roof-slope considerations for roof systems, which aligns with using a minimum of 1/4 inch of drop per foot of horizontal run for certain patio roof applications minimum slope of 1/4 inch per foot. Most permit checklists actually specify this exact minimum, with a practical maximum of about 3/4 inch per foot for a lean-to style. So if your patio cover runs 12 feet out from the house, your outer beam needs to be at least 3 inches lower than your ledger board attachment point (12 feet x 1/4 inch = 3 inches of drop). Steeper is generally better for shedding water, so targeting 1/2 inch per foot is a solid choice for most climates. If you're in a heavy-rain or snow area, go to 3/4 inch per foot.
For clearance heights, your finished roof underside should be at least 7 feet above the patio surface, and ideally 8 feet for a comfortable feel. Your ledger board height on the house wall is set by working backward: take your desired height at the outer edge, add back your total drop based on the slope calculation, and that gives you where the ledger lands on the house. Mark it, check it's still below any windows or siding features you want to preserve, and you're good.
Post spacing should generally not exceed 8 to 10 feet on center for a typical wood-framed patio cover. Beams spanning longer distances need to be sized up accordingly. Sketch a simple top-down plan showing the house wall, ledger location, post locations, beam runs, and rafter direction. This doesn't need to be architect-quality, but you'll need it for your permit application.
Structural basics: posts, beams, rafters, and load considerations
A patio roof has to handle more load than people expect. It's not just the weight of the roofing materials (called dead load). It also has to handle snow accumulation if you're in a cold climate, wind uplift trying to peel the roof off, and the lateral racking forces that try to push the whole thing sideways in a storm. Undersizing any of these components is the most common structural mistake in DIY patio covers.
Posts
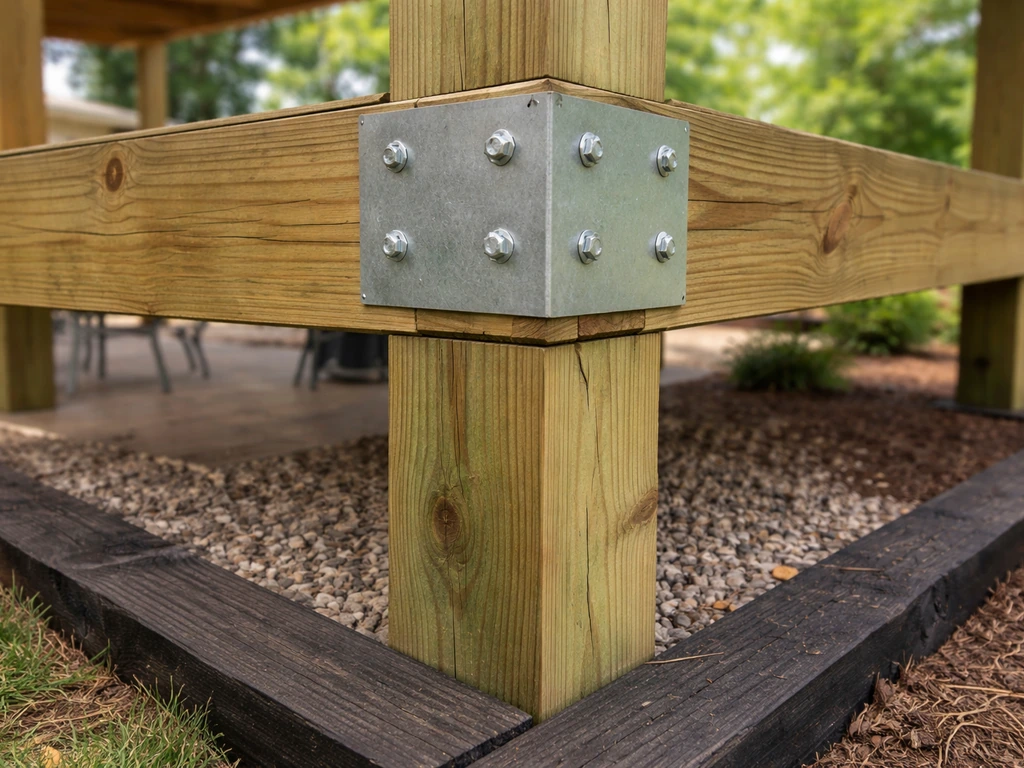
For most residential patio covers, 4x4 pressure-treated posts work fine for heights under 8 feet when post spacing is 8 feet or less. For anything taller or wider, step up to 6x6 posts. Posts must be anchored to the concrete slab with post base hardware (Simpson Strong-Tie post bases or equivalent), not just set in dirt or left sitting on the concrete. The post base gets bolted or epoxied into the slab and the post drops into it. This is non-negotiable for wind uplift resistance. If you're pouring new footings, check your local frost depth and make sure footings go below it.
Beams and rafters
Beams run along the top of the posts and carry the rafters. For a typical 10-foot span, a doubled 2x8 or 2x10 beam is usually adequate. Rafters typically run from the ledger board (on the house) to the beam, spaced 16 or 24 inches on center. Use a span table or a simple online rafter calculator to confirm your sizing based on your actual span and load conditions. Don't just guess. Rafter sizing is one of those things where being one size too small means visible sag within a couple of years.
Bracing for freestanding structures
If you're building freestanding, diagonal bracing is what keeps the structure from racking side to side in wind. This can be done with knee braces cut from 4x4 or 2x6 lumber running diagonally from the post to the beam at 45 degrees, or with engineered connector hardware designed for the purpose. Don't skip this. A patio cover without bracing may look solid on a calm day and come apart in the first serious storm. For attached structures, the ledger connection to the house provides most of the lateral stability, which is one reason attached builds feel more solid.
Permitting, site prep, and safety steps
Whether you need a permit depends on your jurisdiction, but the short version is: assume you do until you confirm otherwise. Most cities require a building permit for any attached patio cover or any freestanding structure over a certain size (Portland, for example, exempts freestanding covers 200 square feet and under but requires a permit above that threshold). Some jurisdictions, including many county building departments, require engineered drawings for trusses and will ask for elevation drawings showing the full construction. Cities like Boise have published formal residential patio cover construction policies that require project-specific structural engineering submissions.
Skipping a permit is a real risk. If you sell your house, an unpermitted structure can complicate or kill the sale. If there's a fire or structural failure, your insurance may not cover it. And if a building inspector notices it, you could be forced to tear it down or retrofit it at your expense. Pull the permit. It also gets you a free inspection, which is genuinely useful for catching mistakes.
For site prep, mark your post locations precisely using batter boards and string lines before you drill or pour anything. Check for underground utilities before digging (call 811 in the US, it's free). If your patio slab has cracks or is unlevel, address those before setting post bases. Make sure you have your ledger height marked on the house wall and that you've located the rim joist or structural framing behind the siding where the ledger will attach.
On safety: work with a partner when you're lifting beams or setting posts. Use proper scaffolding or a quality ladder, not a wobbly stepstool, when working at height. Wear safety glasses when cutting, and hearing protection when using a circular saw. Keep your cuts organized and your workspace clear of scrap lumber you can trip over. These aren't lectures, just the stuff that saves you an ER visit.
Step-by-step installation: attaching to the house and setting the roof frame
Here's the sequence that works for a standard attached lean-to, which is the most common DIY patio roof project. If you're building freestanding or a gable roof, the core steps are similar but the ledger and ridge steps change accordingly.
- Mark and install the ledger board. Remove siding where the ledger will sit so it mounts directly to the house sheathing or rim joist. Use structural lag screws (typically 1/2-inch diameter, 3.5 inches or longer) spaced per your local code, usually 16 inches on center. The ledger needs to land on solid framing, not just sheathing. This is the most structurally critical connection in an attached build.
- Flash the ledger immediately after installing it. This is covered in detail in the next section, but don't leave the ledger exposed while you work on other parts of the build. Water gets in fast.
- Set your post base hardware. Using your string lines, mark exact post center locations on the slab. Drill and epoxy anchor bolts, or use concrete screws into the slab for bolt-down bases. Double-check that all bases are square and aligned before the epoxy cures.
- Cut and set your posts. Posts should be plumb. Use a level on two adjacent faces. Brace them temporarily with 2x4 diagonal braces staked to the ground while you work.
- Install the beam. Lift the beam onto the post tops and secure with post cap hardware (again, Simpson or equivalent connectors). For longer beams, you'll want at least two people and possibly a temporary support mid-span while you work.
- Cut and install rafters. Rafters run from the ledger board (notched or supported with joist hanger hardware) to the top of the beam, spaced 16 or 24 inches on center. Each rafter gets a bird's mouth cut at the beam end if you want a clean seat, or use rafter ties/hangers. Make sure every rafter is at the same slope.
- Add blocking between rafters at the beam and ledger ends. This closes off the roof cavity, keeps pests out, and adds rigidity.
- Install fascia boards on the outer and side edges if you want a finished look and to support gutters.
- Brace freestanding structures now if applicable, before loading the roof with sheathing.
A common mistake at the ledger stage is attaching it through siding instead of removing the siding first. Siding behind the ledger traps water and causes rot within a few years. Always remove the siding, install the ledger on the sheathing, and then flash properly before reinstalling or trimming the siding around it.
If you're building a gable roof over the patio, you'll be adding a ridge beam at the peak and running rafters up from both the ledger and the outer beam to meet it. The framing is more involved, and for most DIYers, using pre-engineered trusses (ordered from a lumber yard) simplifies the work considerably. Note that many jurisdictions specifically require engineered drawings for any trusses used in this type of structure.
Roofing, flashing, drainage, and sealing details
This is where a lot of otherwise-solid DIY patio roofs fall apart. The framing looks great, but the roof leaks because the flashing was skipped or done wrong. Don't rush this phase.
Sheathing and underlayment
For asphalt shingles, you need solid sheathing, typically 7/16-inch or 1/2-inch OSB or plywood. Install it starting from the bottom edge and working up, with staggered joints. Cover the sheathing with roofing underlayment (15 lb or synthetic felt) before shingles go on, lapping each course over the one below by at least 2 inches. If you're using metal panels or polycarbonate, follow the manufacturer's instructions, as some systems run on purlins (horizontal framing members) rather than solid sheathing.
Drip edge
Install metal drip edge along the eaves and rakes before roofing material goes on. The drip edge should extend at least 1/4 inch below the roof sheathing edge so water drips free rather than running back under the roof. Shingles should overhang the drip edge by 1/4 to 3/4 inch. This sounds fiddly but it's the detail that keeps water out of your fascia and soffits.
Flashing where the roof meets the house wall
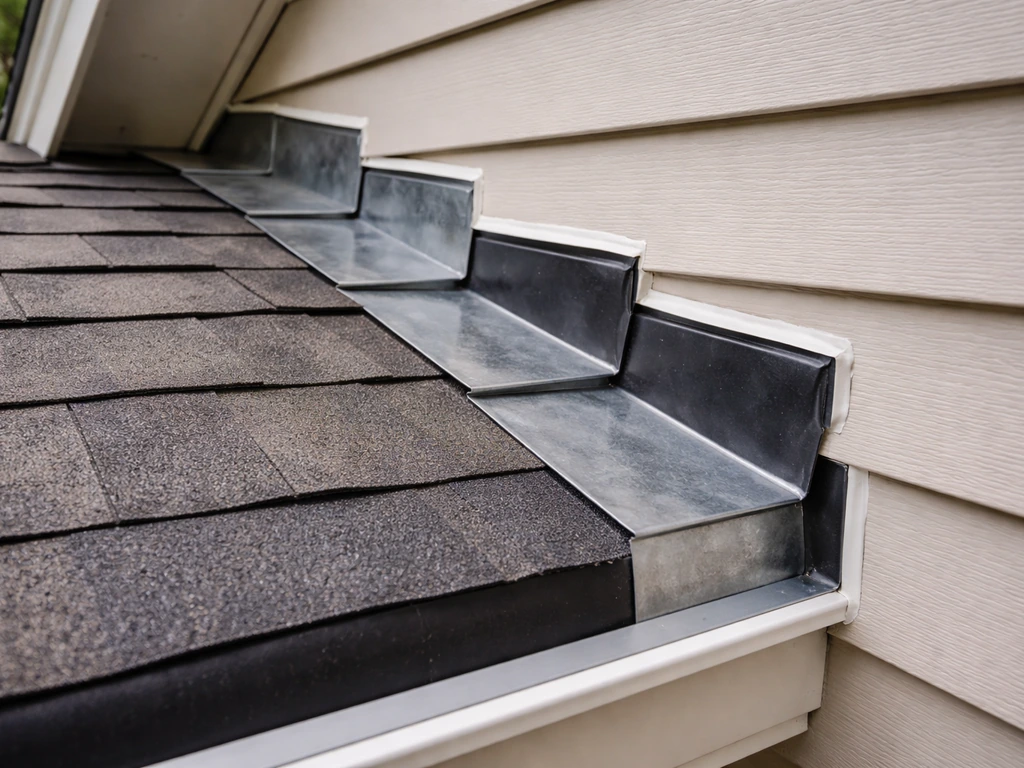
This is the single most leak-prone spot on any attached patio roof. Where your new roof surface meets the house wall, you need step flashing if there's a vertical surface running along the slope, or a continuous base flashing and counterflashing if it's a horizontal intersection. The correct approach is layered: base flashing goes under the roofing material and up the wall, and counterflashing (or a metal cap flashing tucked under the siding above) laps over it from above. The critical rule is that each layer sheds water onto the layer below it. The 2024 International Residential Code requires the water-resistive barrier to be lapped over the vertical leg of the ledger flashing or counterflashing extending up the wall by not less than 2 inches (or the vertical leg height, whichever is less) water drips onto the layer below it. Fastening flashing only to the wall and not the roof deck is a common mistake that leads to leaks when the flashing lifts. At a minimum, base flashing should be secured to both the roof deck and the wall, with the upper termination tucked behind or under the siding above.
Drainage and gutters
Your patio roof needs to drain to somewhere that won't damage your foundation, siding, or patio. Install a gutter along the low edge of the roof. Gutters on a patio cover are small jobs: a 10- or 20-foot run of K-style aluminum gutter with a single downspout directed away from the house is usually all you need. Slope the gutter slightly toward the downspout (about 1/2 inch per 10 feet of run) so water doesn't pool. If you're in a heavy rain area, size up the downspout to 3-inch diameter.
Sealing
Use roofing caulk or elastomeric sealant at any penetrations, at the top edge of flashing where it meets the wall, and at any panel joints if you're using metal or polycarbonate panels. Don't rely on caulk as the primary water barrier though. Caulk fails eventually. Good physical flashing geometry is your real protection. Caulk is the backup.
Finishing touches and DIY vs pro decision points
Once the roof is on and waterproofed, the finishing work is mostly cosmetic and functional. Paint or stain your wood framing to protect it from moisture. Install soffit if you want a clean look under the eave. Add outdoor lighting, ceiling fans, or a ceiling board if your design calls for it. Check that all post bases are tight, all rafter hangers are fully nailed, and that there's no exposed wood end grain that wasn't sealed or painted.
If you pulled a permit, you'll need a final inspection. Have your project drawings on hand, and walk the inspector through the ledger connection, post anchoring, flashing, and roofing. Most inspectors for straightforward patio covers are practical, and if something is flagged, it's usually a fixable detail rather than a teardown situation.
For ongoing maintenance, plan to check your flashing and sealant annually, clean your gutters every fall (and spring if you have trees nearby), and repaint wood every 3 to 5 years. A well-built wood patio cover can last 20 to 30 years with basic upkeep. Aluminum systems can go much longer with almost no maintenance.
When to call a pro
Most homeowners can handle a standard lean-to patio cover as a DIY project if they're comfortable with basic carpentry and following structural guidance. But there are situations where hiring a structural engineer or a licensed contractor is the smarter move, not a defeat.
- Your jurisdiction requires engineered drawings and you're not sure how to specify beam and post sizes for your snow or wind loads. Hire an engineer for the drawings. It usually costs a few hundred dollars and is well worth it.
- You're building a gable roof with trusses. Many areas require engineered trusses by code, and the framing is more complex than a lean-to.
- Your patio cover is large (over 400 square feet) or spans longer than 16 feet without intermediate posts.
- You're attaching to a house with an unusual wall construction (EIFS/stucco, stone, or older balloon-frame) where ledger attachment requires special engineering.
- You discover rotted rim joist or structural damage on the house where the ledger needs to go. Fix the house framing before adding load to it.
- You're in a high wind zone (coastal areas, mountain passes) or a heavy snow load area. The standard DIY sizing guides may not be adequate, and the consequences of underbuilding are serious.
If you want to go deeper on specific styles, covering how to extend an existing roofline out over a patio, how to frame a full gable roof, or how to build a simple lean-to shed roof with step-by-step detail, those are all distinct builds worth their own deep-dives. The slope and drainage math, along with how much fall to plan into your roof, is also worth understanding in more detail before you finalize your pitch calculation. The fundamentals in this guide apply to all of them, so you've got the foundation. Now go pull that permit and get started. If you want an accurate budget for how much to extend a roof over your patio, factor in length, materials, and whether you need permits and structural upgrades.
FAQ
Can I build a patio roof on an existing patio slab without fixing cracks or uneven spots first?
You should fix major cracks or slab movement before installing post bases. If the slab is out of level, you will end up with uneven beam lines and poor roof pitch, which can create pooling even when your math was correct. For small hairline cracks, you still need to ensure the post base hardware fully contacts solid concrete and that anchors can be installed where the concrete is sound.
What happens if my patio cover ends up too flat, even if it was built correctly otherwise?
If the roof pitch is under the minimums, water will pond, and fasteners, flashing edges, and sheathing seams will fail sooner. In practice, the fix is usually either re-leveling the structure before roofing, or rebuilding the slope by adjusting the ledger and beam elevations, because you cannot reliably “seal your way out” of low-slope drainage problems.
Do I need gutters if the patio roof drains away from the house?
For most patio covers, yes. Even if water drains off the edge, without a gutter you risk washing soil, staining siding, and oversaturating the patio perimeter, which can lead to rot and foundation-related moisture. A small, low-cost gutter system also helps keep eave flashing from being constantly hit by sheet runoff.
How do I decide between asphalt shingles, corrugated metal, and polycarbonate for a DIY roof?
Match the material to your framing and tolerance for detail. Shingles generally require solid sheathing and careful underlayment laps, they are forgiving in shape and easiest for beginners on a lean-to. Corrugated metal is more tolerant of minor workmanship but still needs correct drip edge and panel flashing. Polycarbonate often needs a specific support spacing and thermal expansion allowance, so you should follow the manufacturer’s purlin or support requirements closely.
Can I attach the ledger to any part of the house wall framing?
No, the ledger has to connect to structural sheathing and framing members, not only siding or trim. Many leaks and structural failures start when the ledger misses the underlying studs or structural members. If you are unsure, locate studs and rim joist or other approved structural elements before drilling, and plan for proper flashing so the ledger does not become a water path.
Is step flashing required on every attached roof-wall connection?
It depends on the intersection geometry. If you have a vertical wall surface running along the slope, step flashing is the typical best approach for the shingle-side conditions. If the roof meets a mainly horizontal interface, a different base and counterflashing arrangement is used. The goal is always the same, each layer must shed water onto the layer below, and the upper termination must be correctly integrated with siding or cladding.
What is the most common flashing mistake besides skipping it?
Fastening flashing only to the wall (or only to the roof deck) so water can work its way behind lifted edges. Another common issue is incorrect overlap direction, where the top piece does not lap over the piece beneath it. If you want a quick check, verify every flashing joint has a shingle-style overlap direction relative to the slope.
Do I need diagonal bracing if the roof is attached to the house?
Attached roofs still benefit from diagonal bracing, but the ledger connection provides much of the lateral stability. The key is whether you have enough resistance to racking for your specific span, post spacing, and roof size. If you are using long spans or wider patio covers, expect that bracing may still be required even on “attached” designs, especially for freestanding or semi-freestanding layouts.
How do I keep wood framing from staining, warping, or degrading early?
Use pressure-treated lumber for posts and beams, and seal or paint all cut ends and exposed end grain after assembly, not just after it is fully built. Pressure-treated wood still needs periodic repainting. Also ensure you do not trap wet wood behind flashing or siding, the ledger area should be properly flashed so water cannot soak the framing.
What spacing should I use for posts and rafters if my patio dimensions are not “standard”?
You should start with your planned span and then size posts, beams, and rafters from a span table or rafter calculator that includes local wind and snow loads. If your span is awkward and pushes beams longer than typical, you may need additional intermediate beams or posts rather than only upsizing lumber sizes. The “keep it at common spacing” rule is safer than trying to force an under-supported design.
Can I install roofing panels directly on the roof sheathing without purlins?
Sometimes, but it depends on the panel system. Many corrugated metal and polycarbonate products are designed to sit on purlins at specific spacing, which affects bending and long-term fastener performance. If you skip purlins when the manufacturer expects them, you can get flexing, leaks at joints, or premature fastener failure. When in doubt, follow the manufacturer support layout exactly.
How should I plan runoff so it does not damage my foundation or landscaping?
Direct downspouts and roof drainage away from the house, and avoid dumping water at the edge of the foundation slab or under soffits. If your patio sits in a low area, consider extending the downspout outlet farther or adding splash blocks or a small drain line to a suitable discharge point. Also confirm that gutter placement aligns with the roof low edge so you are not accidentally sending runoff behind the fascia.
If I already have an existing roof or porch overhang, can I extend it over a patio without a full rebuild?
Often yes, but extensions commonly require adding structure to support new loads, ensuring the new pitch works with existing drainage, and integrating flashing at the expansion point. The riskiest part is tying into existing framing without confirming where structural members are located. If your extension changes the roof slope or adds a new ledger line, re-check pitch and flashing interfaces before buying materials.
When should I stop DIY and hire a structural engineer or contractor?
If you need engineered drawings, if your patio cover is unusually large, if your span lengths force uncommon beam sizing, or if local code requires engineered trusses, it is smart to get help early. Also hire a pro if you cannot confidently locate structural wall members for the ledger attachment, because ledger connection errors are difficult to correct after roofing is installed.
What should I keep for the final inspection to make it go smoothly?
Bring a simple set of drawings and a checklist of key items you can point to in person: post base anchoring, ledger attachment location into framing, roof pitch, flashing overlap direction, and underlayment installation. Having photos during construction (especially before panels are covered) can speed up approval if the inspector wants verification behind visible surfaces.