For most patio roofs, you want a minimum fall of 1 inch per foot (which equals a 1:12 pitch), and many builders aim for 1.5 to 2 inches per foot just to be safe. That said, the exact number depends on your roofing material, how long your roof span is, whether you have gutters, and where you live. A corrugated metal or polycarbonate panel roof can get away with less fall than asphalt shingles. A flat-style roof with internal drains needs at least 1/4 inch per foot or ponding becomes a real problem. Get the fall right from the start and rainwater will take care of itself. Get it wrong and you'll be chasing leaks and rot for years.
How Much Fall on a Patio Roof: DIY Slope Guide

Celia Vaughn
29 Apr 2026
What 'roof fall' actually means for a patio cover
Roof fall, slope, and pitch all refer to the same thing: how much your roof surface tilts downward so water flows off instead of sitting on top. It's measured as rise over run, meaning how many inches the roof climbs (or drops) vertically for every 12 inches it travels horizontally. A 2:12 slope rises 2 inches for every foot of horizontal distance. A 1:12 slope rises just 1 inch per foot. The higher that first number, the steeper the roof, and the faster water moves off it.
For patio covers specifically, fall is the drainage slope built into the structure itself. On a lean-to or shed-style patio roof, you create fall by setting one side of the roof higher than the other. On a gable roof, fall happens on both sides as they angle down from the ridge. Even on a "flat" patio roof, you still need some fall built in or water just sits there, slowly working its way into every seam, screw hole, and gap it can find.
Recommended fall ranges (and what changes them)
There is no single number that works for every patio roof, but there are solid baseline targets depending on what you're building with.
| Roofing Material / System | Minimum Recommended Fall | Better Target Fall | Notes |
|---|---|---|---|
| Corrugated or ribbed metal panels | 1/2 in. per foot (1:24) | 1 in. per foot (1:12) | Ribs help channel water even on low slopes |
| Polycarbonate or clear panels | 1/2 in. per foot (1:24) | 1–1.5 in. per foot | Longer spans need more fall to prevent pooling at joints |
| Asphalt shingles | 2 in. per foot (2:12) | 3–4 in. per foot | Below 2:12 requires special underlayment; leaks likely below 1:12 |
| Aluminum patio cover systems (extruded) | 1/4 in. per foot | 1/2 in. per foot | Many systems have built-in drainage channels |
| Wood with membrane or roll roofing | 1/4 in. per foot absolute min. | 1/2–1 in. per foot | Below 1/4 in. per foot is IBC 'susceptible bay' for ponding |
| Flat roof with internal drains (rubber/TPO) | 1/4 in. per foot minimum | 1/4–1/2 in. per foot | Drains must be at the lowest point — no exceptions |
The blank" rel="noopener noreferrer">1/4 inch per foot threshold is worth knowing because it shows up in building codes. Roofs with less than 1/4 inch per foot of slope are considered susceptible bays for ponding water under the International Building Code. A roof surface with a slope of 1/4 inch per foot or greater toward points of free drainage is not considered a susceptible bay under IBC language less than 1/4 inch per foot of slope. That's not a problem unique to commercial buildings, it applies to any patio cover roof frame that relies on a very shallow pitch. If your structure can't shed water faster than it's collecting it, you get ponding, and ponding leads to deflection, rot, and eventually failure.
A few other factors push your required fall up or down. Longer spans need more fall because water has to travel farther before it reaches the edge or a gutter. Heavy rainfall areas and anywhere with snow or ice mean you want more slope, not less. If you're attaching the patio roof to an existing house, you're also constrained by the existing roofline and header height, which sometimes limits how much fall you can achieve, something to sort out before you build.
How to calculate fall and turn it into real measurements
The rise/run formula
Fall is calculated using the rise/run ratio. Rise is the vertical height difference between the high end and the low end of the roof. Run is the horizontal distance water has to travel across the roof surface. To find your required rise, multiply your run (in feet) by the fall rate you're targeting (in inches per foot).
Example: You're building a lean-to patio cover that's 12 feet deep (front to back), and you want 1 inch of fall per foot. Your required rise is 12 x 1 = 12 inches. That means the back edge (attached to the house) needs to be 12 inches higher than the front edge. If you want 1.5 inches per foot on that same 12-foot run, the rise becomes 18 inches.
Step-by-step: measuring and marking for fall

- Measure your horizontal run (the depth of your patio roof from house to outer edge, or from ridge to eave on a gable).
- Decide on your target fall rate in inches per foot based on your material (use the table above as a starting point).
- Multiply run in feet by fall rate to get your total rise in inches. Write this number down.
- Mark your ledger board or attachment point at the house. This is your high point.
- Measure straight down from that high point by your rise amount at the outer post location. That lower mark is where your beam or top plate sits.
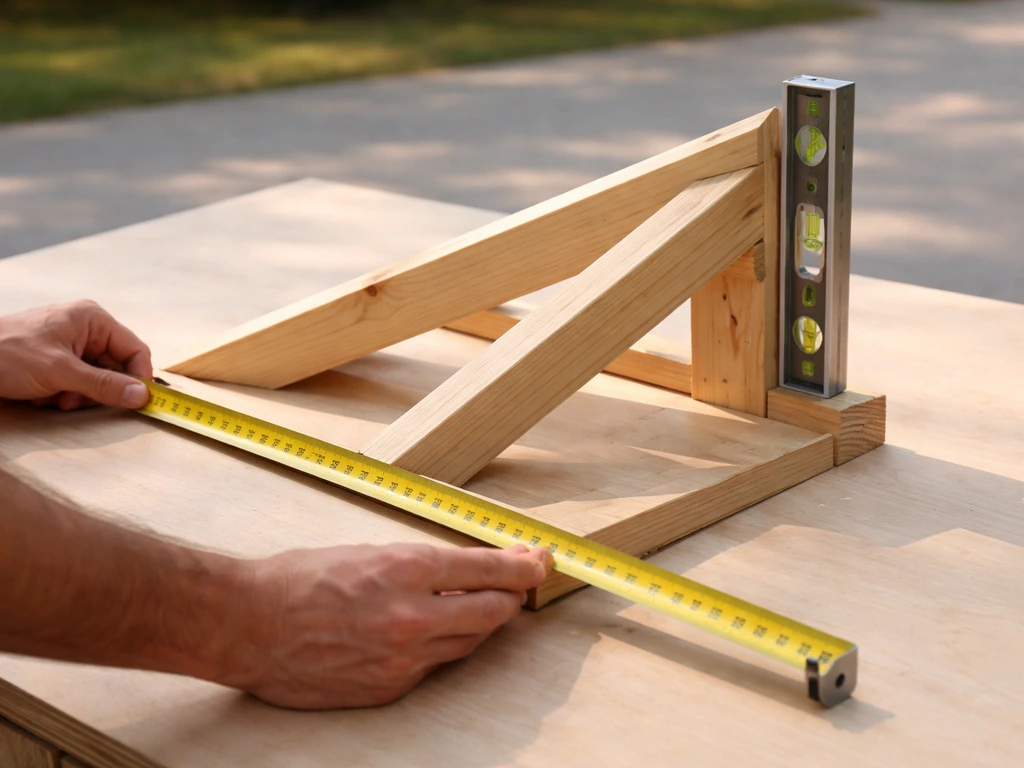
- Use a long level or laser level to confirm you've actually achieved the intended slope before you frame anything in. A 4-foot level and a tape measure work fine for short spans. For longer spans, a string line with a line level is more reliable.
- Double-check by measuring the actual rise with a tape and dividing by the run in feet. That gives you the fall rate you actually built.
One thing that trips people up: the fall measurement is horizontal run, not the actual surface length of the rafter. If your rafters are sloped, the surface length will be slightly longer than the horizontal run. For patio covers with shallow slopes, the difference is small and rarely matters. But if you're using a steeper slope (3:12 or more), use a framing square or speed square to calculate actual rafter length, not just the horizontal distance.
Building the right slope for different patio roof styles
Lean-to and shed roofs
A lean-to or shed roof is the most DIY-friendly patio roof to slope correctly because the fall runs in one direction only. If you want a step-by-step walkthrough tailored to your patio layout, this guide explains how to build a shed roof over a patio. The ledger board attaches high on the house wall, and the outer beam sits lower on the posts. The difference in height between the two is your rise.
Set your posts to the right height first, measure down from the ledger height mark on the house to find where the outer beam top sits, then frame rafters across between them. On a lean-to that attaches to the house, keep at least 4 inches of clearance below any house window or door opening above the ledger so you're not boxing anything in.
Common mistake here: people set their outer posts level with the ledger and plan to cut the rafters at an angle later. That works, but it's easier to get the beam height right first and use flat-cut rafters. It also means the structure itself carries the slope rather than relying on rafter cuts alone.
Gable roofs
A gable roof over a patio has two sloping sides that meet at a central ridge. If you want a step-by-step walkthrough of building one, focus on getting the slope and ridge framing correct before you start sheathing gable roof. Fall still matters on each side, and you calculate it the same way: rise divided by half the total roof width (each side's run).
If your patio is 16 feet wide and you want a 3:12 pitch, each side rises 4 inches for every foot of run. Half the width is 8 feet, so your ridge sits 24 inches above the eave height. Gable roofs handle rain very well because both sides shed water quickly, but they're more complex to frame. If you're going that route, building a shed roof first to understand how slope works is worth the experience.
Flat-style roofs with drains
If you genuinely need a near-flat patio roof, usually because of height restrictions or an unusual connection point on the house, you need to plan your drainage very deliberately. Slope the deck toward a specific drain point at minimum 1/4 inch per foot and position the drain at the absolute lowest spot. Taper insulation boards or sloped decking are the usual methods on flat-ish roofs. Do not assume flat roofing membrane alone will compensate for zero slope. It won't. Water will find every lap, every penetration, and every seam.
Drainage details that make your fall actually work
Getting the slope right is step one. Making sure water actually exits the roof cleanly is step two. A well-sloped roof can still cause problems if the drainage path dead-ends or if panels and sheets aren't overlapped in the right direction.
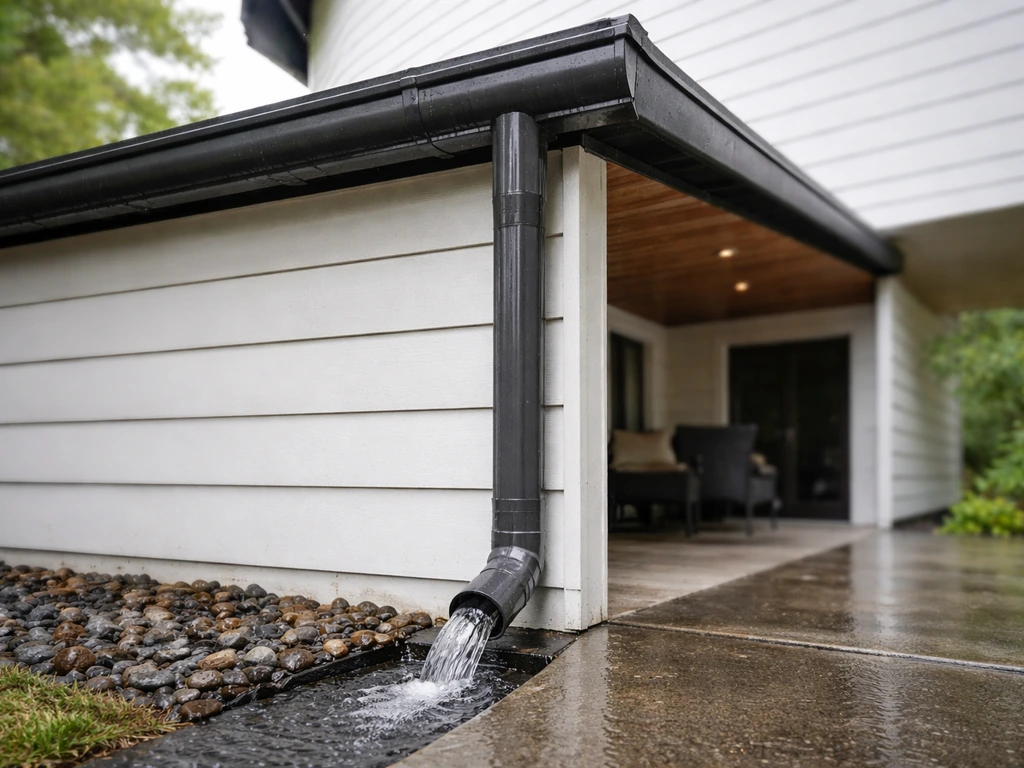
- Gutters: On lean-to and shed roofs, fit a gutter at the low edge. Size it to your roof area — a 4-inch gutter works for small covers under 200 sq ft, but a 5-inch K-style gutter handles more volume and is worth using on anything larger. Slope the gutter itself at least 1/4 inch per 10 feet toward the downspout.
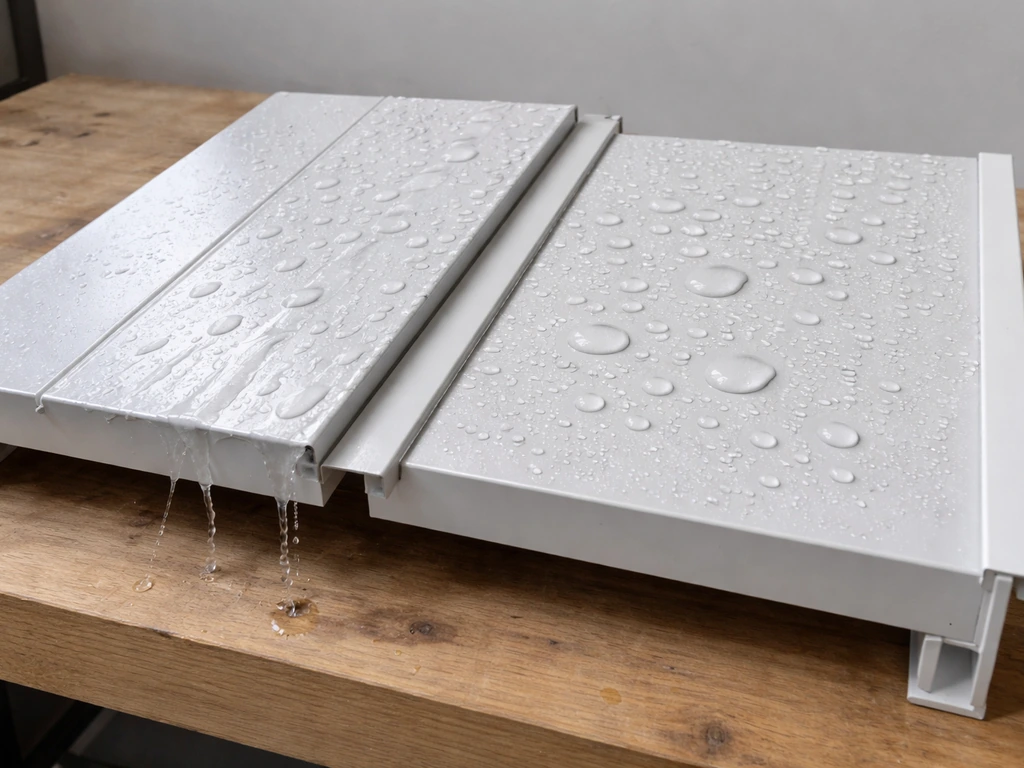
- Panel overlaps: Metal and polycarbonate panels must overlap in the direction of fall, not against it. The higher panel laps over the lower one so water can't wick under the joint. End laps (where one sheet ends and another starts along the run) need at least 6 inches of overlap on slopes under 1:12, and at least 4 inches on steeper slopes.
- Side laps: For corrugated or ribbed panels, overlap by at least one full rib (sometimes two on low slopes) and seal with butyl tape or a compatible sealant before fastening.
- Flashing at the house wall: Where the roof meets the house, you need step flashing or continuous L-flashing tucked under the house siding and over the top panel or roofing. This is the most common leak point on attached patio roofs. Run the flashing up the wall at least 4 inches.
- Fastener placement: Fasten through the high point of the rib on corrugated panels, not the valley. Fastening through the low point creates an immediate leak path. Use neoprene-washered screws and don't overtighten — crushing the washer removes the seal.
- Low spots: Walk the finished roof (carefully) and look for any spot where water could pool. Even a small deflection or twisted rafter can create a pocket. Shim or add blocking under the low point before putting roofing on.
- End caps and ridge caps: Seal open rib ends at the eave with foam closure strips shaped to match the panel profile. These block insects and wind-driven rain from entering under the panels from below.
What goes wrong when the slope is too flat
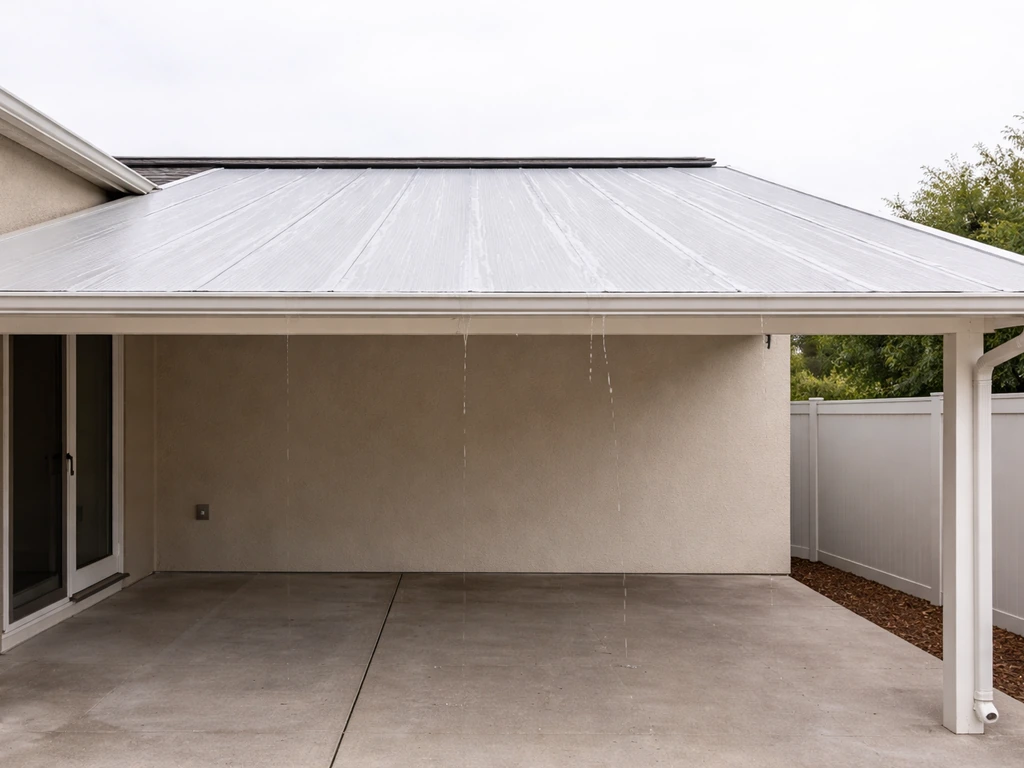
The most common problem is pooling water at laps and seams. On metal or polycarbonate roofing with less than the recommended fall, water slows down and backs up under panel overlaps instead of draining through them. Over time this causes rust at fasteners, algae growth, and eventually leaks at every lap. On wood-framed roofs, the same slow-moving water finds every nail hole and gap and starts rotting the decking from above.
Another frequent issue: people attach a lean-to patio cover to the house and inadvertently slope the roof back toward the house instead of away from it. This happens when the ledger is set too low relative to the outer beam, or when the ledger itself is attached level and the posts aren't adjusted. Water then runs straight to the house wall, gets behind the flashing, and can work its way into the wall cavity or under the siding. If you suspect this is happening, get a level out and check the actual slope direction before adding any roofing material.
Quick fixes for an under-sloped existing patio roof
- Add a tapered rip to the top of each rafter to create slope without moving the structural frame — works well if you're re-roofing anyway.
- Install a drain at the low point of a flat roof and re-slope the decking or insulation layer toward it using tapered rigid foam boards.
- Raise the outer beam by adding a post extender or replacing posts with taller ones, then re-pitch the rafters — more work but solves a severe under-slope problem.
- Add a secondary gutter or drip edge system that catches water before it reaches the house wall if reversing the slope isn't practical.
- For panel roofs with pooling at laps, re-seal lap joints with butyl lap tape or panel sealant as a short-term fix, then plan to re-roof with correct slope when possible.
When to call a pro instead of DIYing the slope yourself
Most fall calculations for a basic lean-to or shed-style patio cover are genuinely DIY-territory. You're doing simple arithmetic, setting posts to the right height, and checking your work with a level. But there are situations where the complexity or risk level goes up enough that getting a professional involved is the smarter call, not the cautious one.
- Large spans (over 20 feet): Once your rafter spans get long, deflection under load becomes a structural question, not just a slope question. A loaded rafter deflects at midspan, which can create a low point right in the middle of your roof even if both ends are at the right height. A structural engineer can spec the right rafter size to keep deflection under control.
- Snow and ice loads: If you're in a region with meaningful snowfall, your patio roof has to be designed to carry that weight. Snow load calculations are code-required in most cold climates and are not something to eyeball. This is a permit-and-engineer situation.
- Attachment to an existing roof structure: Connecting a new patio roof into the rafters or sheathing of your house's main roof is complex. Done wrong, it can compromise the house roof's waterproofing and structural integrity. Some jurisdictions require engineered drawings for this type of connection.
- Permits: Most municipalities require a permit for any permanent roofed structure, even a simple patio cover. Pulling the permit means your work gets inspected, which protects you at resale and confirms you're not violating setbacks or height limits. If you skip the permit and have a problem later, your homeowner's insurance may not cover it.
- Complex roof shapes: If your patio cover needs to match or tie into a hip roof, a complex valley, or a non-standard existing roofline, the geometry gets tricky fast. A roofer or framing contractor who does this regularly will save you a lot of rework.
The honest version: if you're building a straightforward lean-to patio cover with a clear span under 14 or 15 feet, no snow load, and a simple attachment to a house wall (not the roof itself), you can almost certainly handle the fall calculation and framing yourself. For most patios, extending a roof over the space is mainly about achieving the right roof fall so rain drains off instead of pooling extend a roof over a patio.
Building the right overhang over your patio is mainly about achieving the correct roof fall so rain drains off instead of pooling overhang over patio. If any of those conditions don't apply, invest a few hundred dollars in a consultation with a structural engineer or experienced contractor before you buy lumber. It's almost always cheaper than fixing a mistake after the fact.
For more on the overall process, see our guide on how to put a roof over a patio.
If you're still working out the broader plan for your structure, the specifics of how you frame and attach a shed or gable roof will shape which fall options are actually available to you. If you're trying to figure out how to extend a roof over a patio, these same slope and attachment choices determine how far you can safely push the cover and keep water draining away shed or gable roof. Getting the slope right is one piece of a larger puzzle that includes how the roof connects to the house, how far it extends, and what materials you're working with across the whole build. If you are trying to extend a roof over a patio, you can often get to the right drainage by matching the roof fall and slope to the added length, similar to how much to extend roof over patio considerations affect your setup.
FAQ
If I use 1 inch per foot fall, is that always enough for a patio roof?
Not always. 1 inch per foot is a common baseline for many pitched patio covers, but you may need more if you get frequent heavy rain, have long roof runs to the gutter edge, or are using materials that are more sensitive to standing water (for example, asphalt shingle systems). If you are unsure, design for 1.5 inches per foot when the roof length is more than roughly 12 feet to the drainage outlet.
How do I confirm my roof has the right fall once the frame is built?
Use a long level or a laser line and check the height difference between the high and low bearing points, not just the rafters. Measure the vertical rise between ends, then compare it to your run times the target inches per foot. Also verify that the low edge is truly the outlet direction, especially for lean-to roofs attached near the house flashing.
Does the gutters position change how much fall I need?
Yes. If your gutter is set close to the roof edge, you can sometimes stay nearer the minimum slope. If the water has to travel farther before it hits a gutter, downspout, or drip edge, you generally want additional fall so water does not slow down and linger at seams and fasteners.
What happens if my patio roof slope is slightly less than recommended, like 0.2 inches per foot?
You increase the risk of ponding, but the bigger issue is where water slows down. Even a small shortfall can make laps and panel overlaps hold water, which can lead to corrosion at screws or rot at decking fasteners. If you are near the 1/4 inch per foot threshold, double-check overlap direction, seal quality, and ensure you have an unblocked drainage path.
How do I account for the actual rafter length when calculating rise and run?
Fall calculations use horizontal run, not the sloped rafter length. If you are framing with a steep pitch and need precise layout, calculate rafter length separately with the rafter angle, but keep the rise/run math for slope and drainage decisions. In practice, the rise you set between endpoints is what matters most for water flow.
For flat or near-flat patio covers, is a waterproof membrane enough even if there is little slope?
No. Membranes can reduce leaks, but they do not stop pooling. With minimal slope, water will still collect at seams, laps, penetrations, and fastener lines, and that trapped moisture can degrade materials and compromise detailing over time. Plan for at least 1/4 inch per foot toward a defined drain or outlet.
Where should the low point be on a near-flat patio roof?
Put the low point directly over your drainage exit, such as a roof drain, scupper, or the exact drip location that can discharge freely. Avoid dead-ends where water has nowhere to go. If you have multiple panels or sheet sections, keep the built-in fall consistent so one area does not become a shallow basin.
Can I correct wrong fall after the structure is already framed?
Sometimes, but it depends on how far off you are and where the framing supports sit. Common fixes include resetting beam heights, adjusting post heights before sheathing is installed, using tapered deck boards or insulation on near-flat sections, or redoing sections that drain back toward the house. If the roof is already fully sheathed, corrections usually become more expensive because you may need to remove roofing to fix slope and detailing.
How much clearance should I leave near doors and windows on a lean-to patio roof?
A common safety practice is to keep at least several inches of vertical clearance under any house-opening area above the ledger so the roof structure and flashing do not interfere with trim, operation, or future repair access. Confirm your clearance against your specific door and window head heights and the way you plan to install flashing at the house-wall connection.
When should I involve a structural engineer or contractor for fall design?
If you have a long span, complex attachment to the house, snow/ice risk, a roof that must tie into the existing roof rather than just the wall, or a design that pushes beyond typical DIY limits (such as unusual geometries or multiple drainage strategies). If you cannot achieve the minimum slope due to constraints, get professional input before proceeding so the drainage method is engineered, not guessed.