You can absolutely build a gable roof over a patio yourself, but it's a project that rewards careful planning more than raw effort. A gable roof gives you that classic peaked shape with two sloping sides meeting at a center ridge, and over a patio it creates serious headroom, great drainage, and a finished look that's hard to beat.
How to Build a Gable Roof Over a Patio: Step-by-Step Guide

Celia Vaughn
29 Apr 2026

The full build involves setting a ledger against your house (or designing a freestanding version with a ridge beam on posts), framing rafters up to that ridge, sheathing the deck, and layering in your roofing material with proper flashing and drip edges. If you want the clean, weatherproof detail for that roof overhang, pay close attention to flashing and drip edge placement at the eaves and rakes flashing and drip edges.
Done right, it's a weekend-plus project for a competent DIYer with a helper. Done wrong, it leaks, sags, or gets red-tagged by your inspector. This guide walks you through the whole thing.
Is this the right roof style for your patio?
A gable patio roof works best when you want a full, enclosed overhead structure with a peaked ridge rather than a simple slope. If you're attaching to the house, the ridge runs parallel to the house wall and the two roof planes pitch away from each other, or more commonly one plane connects to the house and the ridge is at the peak directly over the patio.
If you're building freestanding, the ridge sits on a beam supported by posts at each end. Either way, this is a more involved build than a lean-to or shed-style roof (which has just one slope). If a full gable build feels too involved for your patio, a shed-style patio roof is a useful alternative to consider before you start framing shed-style roof (which has just one slope).
The payoff is better aesthetics, more usable ceiling height at the edges, and easier water management since both sides drain away from a central peak.
Before you commit, check your local permit requirements. In most US jurisdictions, a covered patio structure over a certain size (often 200 square feet, sometimes less) requires a building permit. The International Residential Code (IRC), which most US jurisdictions adopt, governs roof assemblies under Chapter 9 and roof framing under Chapter 6. Some areas also have specific wind-zone or snow-load requirements that affect your structural design. Pull the permit. Inspections protect you and add resale value. If you're in a high-wind or heavy-snow region, or if your span exceeds about 12 to 14 feet on each rafter run, you may need a stamped engineer's drawing. That's a normal part of the process, not a red flag.
Honest feasibility check: if your patio is a simple rectangle attached to the back of a house with standard 2x framing, this is a strong DIY candidate. If you're working on a multi-level deck, a tight urban lot with drainage complications, or attaching to a masonry wall, the complexity jumps significantly. In those cases, getting a contractor to handle the structural attachment and ledger work while you handle finishing work is a completely reasonable split.
Measuring, pitch, and layout planning
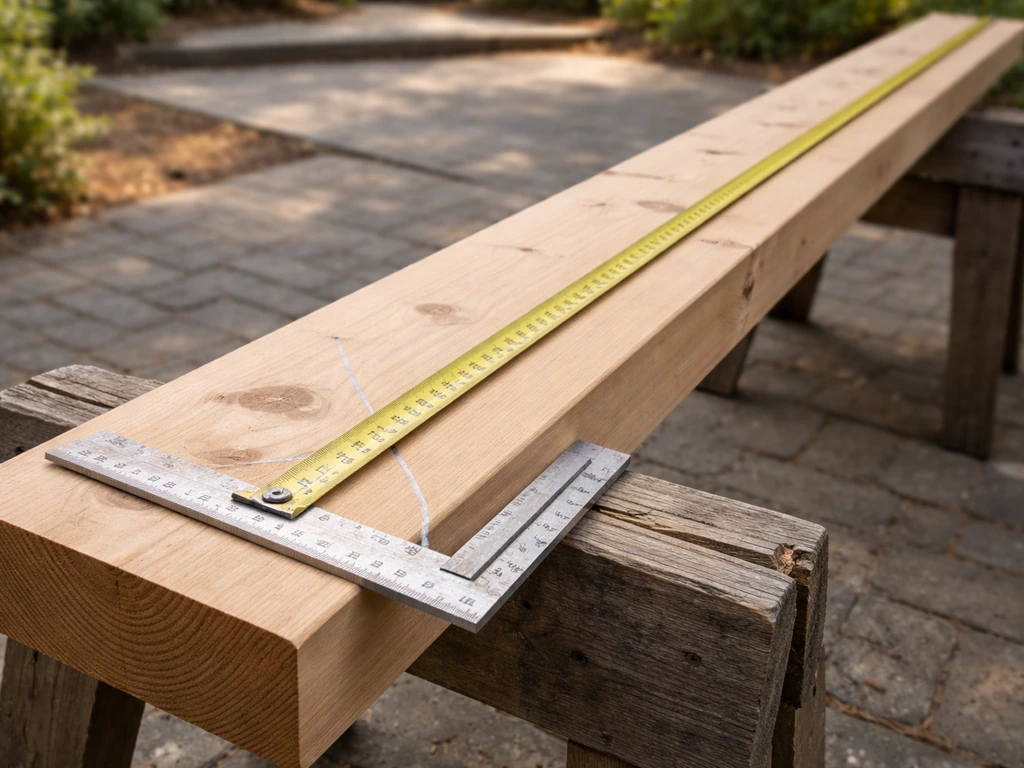
Start by measuring your patio's width and depth, then decide on your roof pitch. Pitch is expressed as rise over run, like 4:12 (4 inches of vertical rise for every 12 inches of horizontal run). For asphalt shingles, the IRC minimum is 2:12 (IRC R905. 2.
2), but 4:12 is the practical sweet spot for patio roofs: it sheds water well, looks proportional, and is straightforward to frame. If you are wondering how much fall a patio roof needs, the pitch you choose affects drainage, roof lifespan, and how the roof manages rainwater at the edges how much fall on a patio roof.
If you're using metal panels or corrugated roofing, you can go as low as 1:12, but check your product's specs and local code. Steeper pitches like 6:12 or 8:12 look great but add framing complexity and cost.
For a gable roof, the run is half your total patio width (since both roof planes slope from the outside edges up to the center ridge). So if your patio is 16 feet wide, each rafter run is 8 feet. At 4:12 pitch, the ridge sits 8 feet x (4/12) = 2.67 feet, or about 32 inches, above the top of the wall plates. Add your wall/post height to that to get total ridge height. Write all this down before you buy a single board.
Decide on overhang now, too. A 12- to 18-inch overhang on the rake ends (the triangular gable ends) and eaves protects your patio edges from wind-driven rain and adds polish. Your rafters extend past the wall plates to create the eave overhang. Rake overhangs are framed with fly rafters that hang off the ridge and a lookout system or outriggers from the last common rafter. Sketch this out on paper or use a free tool like SketchUp before you start cutting.
| Pitch | Rise per 12" run | Best for | Notes |
|---|---|---|---|
| 2:12 | 2 inches | Low-profile look, flat-ish appearance | IRC minimum for asphalt shingles; needs extra underlayment |
| 4:12 | 4 inches | Most patio gable roofs | Sweet spot: easy to frame, sheds water well |
| 6:12 | 6 inches | Steeper, cottage look | More material and labor; excellent drainage |
| 3:12 or lower with metal | 3 inches | Standing seam or corrugated metal only | Check product specs; not suitable for asphalt shingles without special detailing |
Choosing your materials and tools
Framing materials
For most DIYers, pressure-treated lumber for posts and any framing that contacts concrete or sits within 6 inches of the ground, and standard #2 SPF (spruce-pine-fir) or Douglas fir for the rest of the framing is the go-to. Rafters are typically 2x6 or 2x8 depending on your span. For a 12-foot rafter run at 16-inch on-center spacing, 2x6 is usually adequate, but run your span tables (the IRC includes them, or use the American Wood Council's free span calculator). Ridge boards for a patio gable are typically one size larger than your rafters: 2x8 ridge if you're using 2x6 rafters. If you're using pre-built trusses instead of stick-framing, the truss manufacturer handles the engineering, which simplifies the build considerably.
Metal framing (light-gauge steel) is another option, especially if you're going for a modern look or want rot resistance. It costs more and requires different fasteners and connectors, but it's dimensionally stable and won't warp. For most backyard patio roofs, wood is the practical and cost-effective choice.
Roofing surface options
Asphalt shingles are the most common choice because they're affordable, widely available, and straightforward to install. For a patio roof, 30-year architectural shingles are the minimum worth buying. Metal roofing (corrugated panels or standing seam) is increasingly popular for patios because of its longevity and clean look, and it tolerates lower pitches than shingles. Polycarbonate panels are an option if you want natural light transmission, but they scratch, expand and contract with temperature changes, and require careful fastening. Clear roofing also tends to overheat the space below in summer.
| Roofing Material | Min Pitch | Lifespan | Cost (installed) | DIY Friendly? |
|---|---|---|---|---|
| Asphalt shingles (architectural) | 2:12 | 25-30 years | $3-6/sq ft | Yes |
| Corrugated metal panels | 1:12 | 40+ years | $5-10/sq ft | Yes, with care |
| Standing seam metal | 1:12 | 50+ years | $10-16/sq ft | Moderate; requires special tools |
| Polycarbonate panels | 1:12 | 10-15 years | $4-8/sq ft | Yes, but detailed fastening required |
Tools you'll need
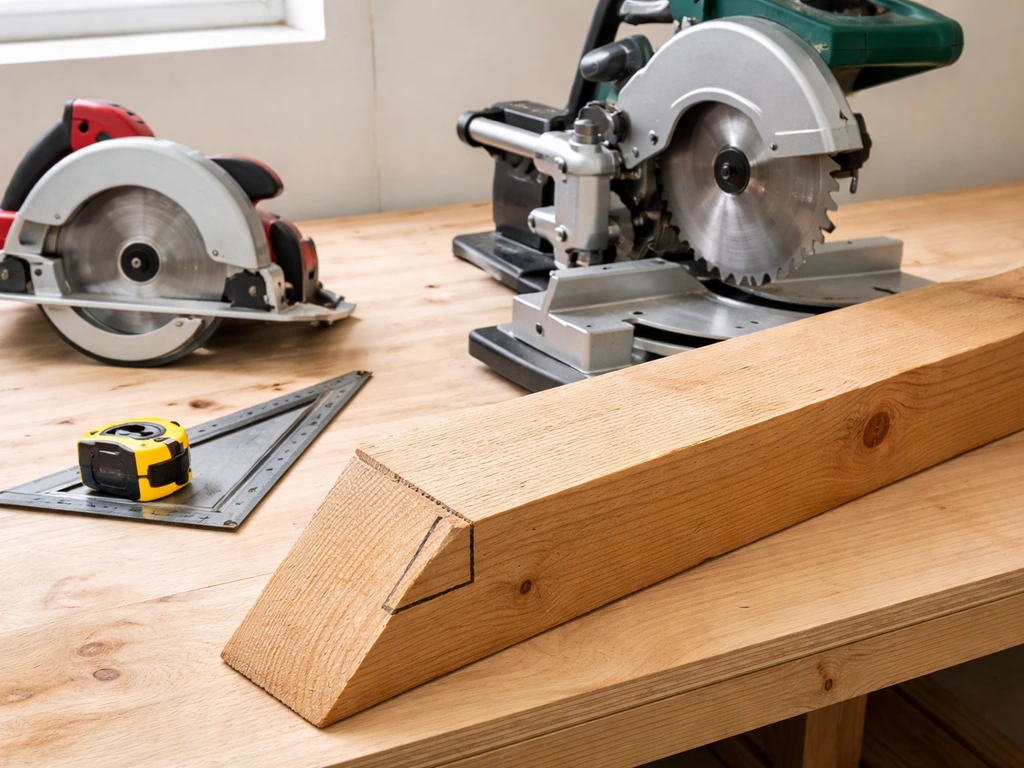
- Circular saw and miter saw (for rafter cuts and bird's mouth notches)
- Framing nailer and compressor (or hammer and 16d nails, but the nailer saves hours)
- Drill/driver with impact driver
- Speed square and rafter angle calculator (or a dedicated rafter square like a Swanson Speed Square)
- Level, 4-foot and 8-foot
- Chalk line and tape measure (25-foot minimum)
- Ladder (at minimum two 6-foot stepladders for low work; scaffolding for anything over 10 feet)
- Safety harness and roof jacks if you'll be working on the sheathed roof deck
- Pry bar and utility knife
- Caulk gun and roofing caulk
- Tin snips (for flashing and drip edge cuts)
Structural framing: the sequence that matters
Ledger board (for house-attached roofs)
If your gable patio roof ties into the house, the ledger is the single most critical connection in the whole project. It carries the load from half your roof back into the house framing. Get this wrong and the whole structure is compromised. The ledger (typically a 2x8 or 2x10 to match your rafter depth) fastens directly to the house rim joist or wall framing.
Use 1/2-inch hot-dipped galvanized or stainless lag bolts or through-bolts, staggered and spaced per IRC R507. 9 tables. Remove any siding at the ledger location so you're fastening through sheathing into solid framing, not into siding. IRC TAG significant changes materials for R507.
9. 1. 5 specify exterior deck ledger flashing details and require installing flashing above the ledger to help prevent water entry into the wall cavity behind it [R507. 9.
1. 5 exterior deck ledger flashing](https://sbcc. wa. gov/sites/default/files/2025-09/IRC%20TAG%20Significant%20Changes%20Report_Edited080212025.
pdf). [Critically, you must flash this connection: slip flashing behind the siding above the ledger and over the top of the ledger itself so water can't migrate into the wall. ](https://codes. iccsafe.
org/content/IRC2024P2/chapter-5-floors) This is one of the most common places patio roofs fail, not structurally, but by rotting the house wall behind them over years.
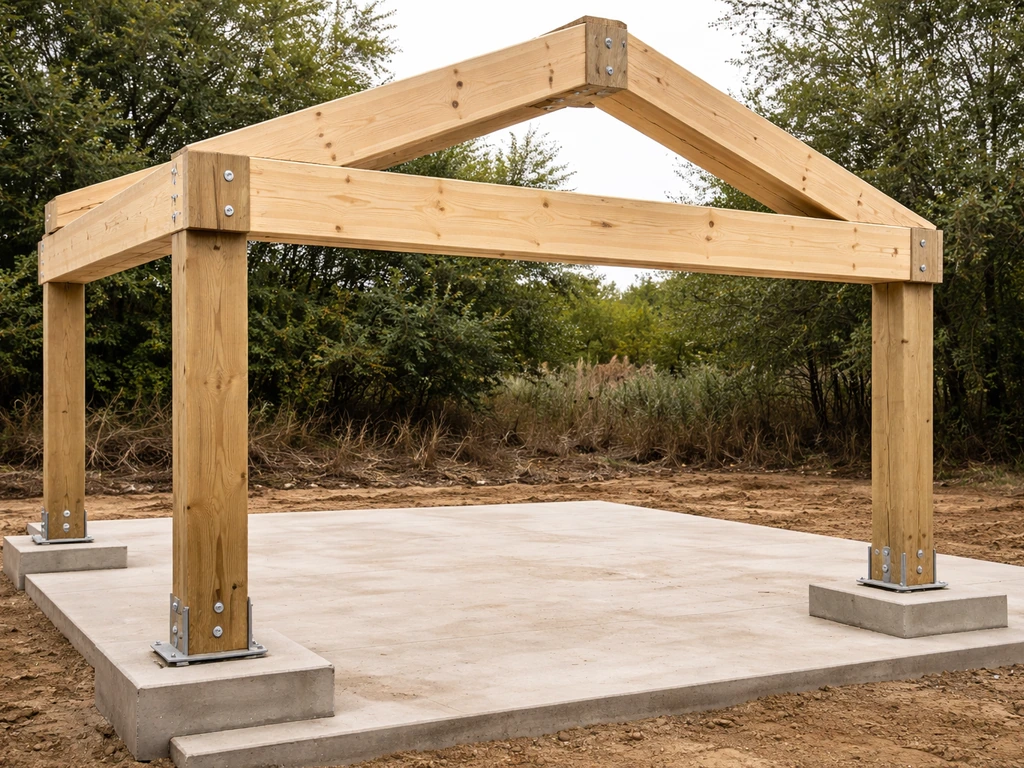
Posts and beams (for freestanding or hybrid roofs)
For a freestanding gable patio roof, or for the outer edge of a house-attached gable, you need posts set in or anchored to concrete footings. Footing depth depends on your frost line (below freezing depth in your area) and local code. 4x4 posts work for smaller spans; 6x6 is better for anything over 10 feet high or carrying significant load. Use approved post base hardware anchored into the footing while the concrete is still wet, or use post-to-concrete connectors. The beam that sits on top of these posts (the double 2x10 or built-up LVL, depending on span) carries the weight of the outer rafter tails and supports the end wall framing of the gable.
Ridge board or ridge beam
In a typical stick-framed gable roof, the ridge board is not actually a structural beam, it's a nailing surface that holds the opposing rafters in alignment. The rafters push against each other and the outward thrust is resisted by the ceiling joists or collar ties that connect opposite rafters. If you omit collar ties or ceiling joists, the walls will spread.
In a patio gable roof where there are no interior walls or ceiling to tie things together, you often need to use a true structural ridge beam instead, supported at each end by posts or by the house and an end post. This is an important design distinction. If you're not sure which applies to your design, ask a structural engineer or your building department before you frame.
Rafters and bracing
Common rafters run from the wall plate (or beam) up to the ridge at your chosen pitch. Each rafter needs a bird's mouth cut, which is a notch that sits flat on the wall plate and keeps the rafter from sliding. The bird's mouth should not cut more than one-third of the rafter depth or you weaken it significantly.
Cut one rafter, test its fit at both the ridge and the plate, then use it as a template for all the rest. Space rafters at 16 inches on center for most situations (24 inches on center is possible with heavier sheathing or lighter roofing loads, check your span tables).
At the ridge, opposing rafters should be nailed directly across from each other and into the ridge board with at least three 16d nails per rafter, or use approved metal rafter ties. Bracing (lateral restraint as described in IRC R802. 10. 3 for trusses, similar principles for stick framing) keeps rafters from rolling or buckling under load.
Install 1x4 or 2x4 lateral bracing running perpendicular to rafters, nailed to the underside of each rafter, to keep everything plumb and aligned once the sheathing goes on.
Using pre-built trusses instead
If your patio is wide (say, 20 feet or more), or you want to simplify engineering decisions, pre-built trusses from a local truss manufacturer are worth considering. You give them your span, pitch, and spacing, and they deliver engineered trusses with a stamp. Bracing requirements for trusses fall under IRC R802.10.3 and the truss manufacturer's installation documents, which should always be followed to the letter. Trusses are heavier and require two or more people to set, but they eliminate the ridge board, bird's mouth cuts, and most of the framing math.
Waterproofing: flashing, drip edge, and sealing done right
This is where a lot of DIY patio roofs eventually fail. The framing might be solid, but if the water-management details are sloppy, you'll be chasing leaks within a few years. The goal is simple: every edge and penetration must direct water outward and downward, never allowing it to travel sideways or backward into the structure.
Sheathing and underlayment
Once your rafters are up, sheath the roof deck with 7/16-inch or 1/2-inch OSB or plywood (CDX). Stagger the panels so joints don't align across adjacent rafters. Leave an 1/8-inch gap between panels to allow for expansion. Then install your underlayment. For a 4:12 pitch with asphalt shingles, a single layer of 30-pound felt or a synthetic underlayment is standard. In climates with freeze-thaw cycles or significant snow, IRC R905.2.7.1 requires an ice-and-water barrier membrane at the eaves extending at least 24 inches inside the interior wall line. Even in warmer climates, putting ice-and-water at the eaves is cheap insurance.
Drip edge sequence (this order matters)
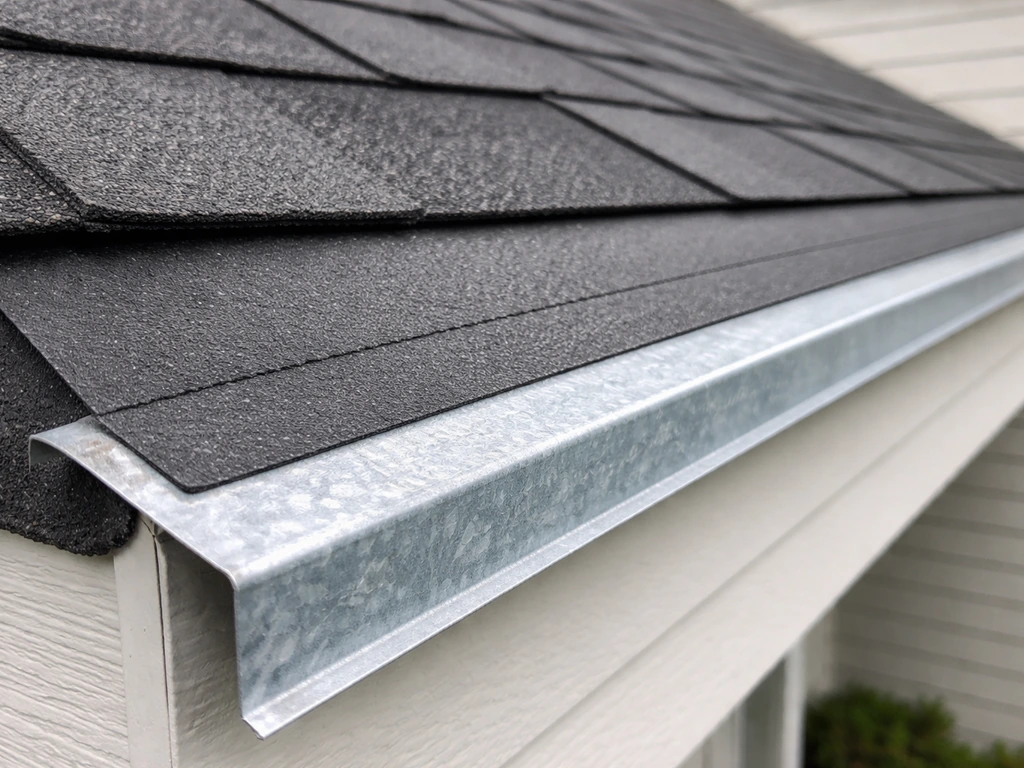
The IRC and NRCA are both specific about the layering sequence for drip edge and underlayment, and getting it wrong causes leaks at the most common failure point: the roof edge. At the eaves, install drip edge first, directly on the bare sheathing, then lap the underlayment or ice-and-water membrane over the top of the drip edge. This way, any water running down the underlayment sheds over the drip edge and into the gutter, not behind it.
At the rakes (the sloped edges at the gable ends), do the opposite: install underlayment first, then place the rake drip edge on top of the underlayment. This prevents wind-driven rain from going under the underlayment at the edge. Get this sequence backwards and you've created a water trap.
Flashing at the house wall
Where your roof meets the house wall is called a step-flashing zone if the wall runs parallel to the slope, or a wall flashing zone if the wall is at the high end (the rake end). For an attached gable patio roof, the most critical flashing is at the top of the roof where it meets the house. This means counter-flashing or Z-flashing tucked under the house siding and overlapping the top course of shingles or roofing. Seal the top edge of the flashing with roofing sealant, but don't rely on sealant alone. Metal does the work; sealant is backup.
Gutters and drainage
A gable patio roof sheds water off both eaves. Install gutters along each eave edge and route downspouts away from the patio and foundation. Gutters should slope toward downspouts at about 1/4 inch per 10 feet. Without gutters, the drip line erodes landscaping and can eventually undermine footings. For a patio you actually want to use in the rain, gutters aren't optional. Vinyl K-style gutters are inexpensive and manageable for one person with a helper; aluminum is more durable and only slightly harder to work with.
Ventilation (for enclosed roof assemblies)
If your gable patio roof has a finished ceiling below (drywall, T&G boards, etc.) and creates an enclosed attic space, you need ventilation per IRC R806. The common baseline is 1 square foot of net free ventilating area per 150 square feet of attic floor, or 1 per 300 if specific conditions are met (such as vapor barrier placement). Install soffit vents at the eave and a ridge vent or gable-end vents to create airflow. Skipping this causes moisture buildup, sheathing rot, and shingle failure from below. For open-framing patio roofs where you can see the rafters from below, this is less of an issue since the space isn't enclosed.
Step-by-step installation from start to finish
- Pull your permit and confirm setback requirements with your local building department before any work begins.
- Mark and dig footing locations for posts (if freestanding or hybrid design). Pour concrete and set post base anchors while wet. Let cure for 48 to 72 hours minimum.
- Install the ledger board against the house: strip siding at the ledger location, mark the ledger height, pre-drill your lag bolt pattern, and fasten into solid framing. Flash immediately with Z-flashing or step flashing behind the siding above.
- Set posts and let them run long (slightly above final height). Set posts plumb in two directions with a level, brace them temporarily with diagonal 2x4 braces to stakes in the ground.
- Install the top plate/beam on the outer posts, then cut posts to final height at the top of the beam or plate.
- Mark rafter layout (16 inches on center) on both the ledger/top plate and the ridge board location. Remember: opposing rafters align directly across from each other at the ridge.
- Cut a pair of test rafters with the correct plumb cuts at ridge and tail, and the bird's mouth at the plate. Test fit both in place simultaneously. Adjust and use as templates.
- Set temporary ridge support: a 2x4 post from the floor holds the ridge at correct height while you work. Set the ridge board at the correct height and nail or clamp temporarily.
- Install all common rafters in opposing pairs, working from one end to the other. Nail each rafter to the ridge with at least three 16d nails (or use approved metal rafter ties). Nail through the plate at the bird's mouth and toe-nail or use hurricane ties at the wall plate connection.
- Install collar ties or ceiling joists at the lower third of the rafter height (maximum) to resist outward thrust if you're using a ridge board rather than a structural ridge beam. Space at 48 inches on center maximum.
- Install lateral bracing runs (1x4 perpendicular to rafters) to keep everything plumb before sheathing goes on. This is your last chance to make adjustments.
- Frame the gable-end walls (the triangular areas at each end) with vertical studs from the top plate up to the underside of the end rafters.
- Sheath the roof deck with OSB or plywood, staggered, with 1/8-inch gaps. Nail at 6 inches on center at edges and 12 inches in the field.
- Install eave drip edge over bare sheathing at the eave edges first.
- Roll out ice-and-water barrier at eaves (if required by climate or code), then synthetic underlayment over the rest of the deck, lapping upper rows over lower by 6 inches minimum. At rakes, install rake drip edge on top of underlayment.
- Install roofing material (shingles, metal panels, etc.) starting from the eave and working up toward the ridge, per manufacturer instructions. Cap the ridge with ridge cap shingles or a ridge cap flashing for metal.
- Install wall flashing where the roof meets the house: tuck counter-flashing under siding and seal the top edge.
- Schedule your framing inspection before sheathing if your permit requires it, and a final inspection after roofing is complete.
- Install gutters along each eave with downspouts routing water away from the structure.
- Caulk any remaining penetrations, exposed nail heads, or trim gaps with appropriate roofing sealant.
Safety checkpoints throughout the build
Never work on a roof deck alone. Have a helper on the ground and use a safety harness anchored to a ridge anchor whenever you're on the sheathed roof surface. Set roof jacks (adjustable metal brackets that nail into rafters and support a 2x10 plank) to give yourself a flat standing surface while shingling. Scaffolding is worth renting for anything above 10 feet, especially for the ledger installation and ridge work. Don't rush the rafter-setting phase: working at height with long lumber while managing alignment is when most injuries happen. Take breaks and don't frame in high winds.
Common mistakes, troubleshooting, and when to call a pro
Mistakes that cause leaks
- Installing drip edge on top of underlayment at the eaves instead of under it (water runs behind the drip edge into the fascia joint).
- Skipping or incorrectly installing ledger flashing (leads to wall rot that may not show up for years).
- Not lapping underlayment courses correctly: lower courses must be covered by upper ones, never the reverse.
- Using sealant as the primary waterproofing instead of proper metal flashing (sealant cracks and fails; flashing is the real barrier).
- Not sealing gable-end rake edges properly, which leaves underlayment exposed to wind lifting.
Structural mistakes
- Treating a ridge board as a structural beam without intermediate support, causing the ridge to sag and rafters to spread.
- Omitting collar ties or ceiling joists on a non-structural ridge setup, which lets the walls spread outward under roof load.
- Bird's mouth cuts that are too deep (more than one-third of rafter depth), which weakens the rafter at its most stressed point.
- Fastening a ledger into siding or sheathing alone instead of into solid house framing, which is the classic failure mode identified by the National Deck Authority and others studying deck and patio roof collapses.
- Under-sizing footings for local frost depth, which causes post heaving in freeze-thaw climates.
When it's smarter to hire a pro
This is a strong DIY project within certain limits. Get a structural engineer or contractor involved if: your rafter span exceeds about 14 feet per side (28-foot total width), you're in a high-wind or heavy-snow zone and don't have experience reading ASCE 7 load tables, your house has masonry or ICF walls (ledger attachment is a whole different problem), your local code requires a stamped drawing and you can't get one, or your patio is on a second-story deck. Also, if you get to the framing phase and something isn't squaring up or the ridge height math isn't working out the way you planned, stopping to consult a framing contractor for a few hours is a lot cheaper than fixing a badly framed roof. Pride is expensive.
If a simpler approach better fits your budget or skill level, a shed-style patio roof (single slope, no ridge) is a meaningful step down in complexity and can still look clean and cover your space effectively. If you're considering extending an existing roof over your patio, you can estimate total cost based on the size of the overhang, materials, and whether new structural support or flashing is needed how much to extend roof over patio. Extending an existing roofline over the patio is another path worth exploring if the house geometry allows it, and that approach sometimes eliminates the need for a new ledger connection altogether since the existing roof structure does the work.
Your practical next steps right now
- Measure your patio dimensions and sketch your gable roof layout including pitch, overhang, and ridge height.
- Call or visit your local building department to find out permit requirements, setbacks, and whether a stamped drawing is required for your span and load zone.
- Determine your attachment strategy: house-attached with ledger, freestanding on posts, or hybrid.
- Run rafter size through an IRC span table or the American Wood Council's online calculator for your pitch and spacing.
- Price out materials at your local lumber yard and roofing supplier (get quotes for both asphalt shingles and metal panels to compare).
- Line up a helper for at minimum the ledger installation day and the rafter-setting day.
- Rent scaffolding if your finished roof height exceeds 10 feet. Don't improvise this.
FAQ
Do I need a ridge beam (structural) or is a ridge board enough for a patio gable roof?
For many stick-framed gable roofs, the ridge board mainly holds rafters aligned, while thrust is handled by ceiling joists or collar ties. Over a patio with no interior ceiling to tie rafters together, you may need a true structural ridge beam supported at the ends (often by posts or a house support). The decision is based on your exact framing layout, span, and tie system, so confirm with your building department or an engineer before framing.
What if my patio is not a perfect rectangle, or the house wall is not straight?
Small irregularities can throw off rafter lengths and ridge height, creating uneven overhangs and potential water-channeling at edges. Measure the roof framing lines from established reference points (often from the ledger or beam centerline), check diagonals for square, and snap chalk lines before cutting rafters. If the structure is meaningfully out of square, correct the layout before you build, do not rely on trimming shingles to “make it fit.”
Can I build the gable without gutters if I want to protect landscaping?
You can technically skip gutters, but you will usually pay for it later with eroded soil, damaged mulch, and potentially undermined footing areas where drip line runoff concentrates. If you do skip gutters, at minimum install an eave drip-to-splash plan (extended downspout equivalents or splash blocks) and verify surface drainage away from posts and the foundation line.
How do I choose overhang length so it looks right and performs well?
A 12 to 18 inch overhang is common for patio gable ends and eaves, but the right choice also depends on roof pitch, local wind-driven rain exposure, and whether you have close windows or doors below. Longer overhangs improve splash control but increase rafter cantilever load, so ensure your span and rafter sizing account for the added tail length, not just the main rafter run.
What’s the fastest way to avoid leaks at the house attachment on an attached patio gable?
Plan flashing first, then frame so you can follow the correct sequence. Remove siding where the ledger is installed, fasten into solid framing, and integrate the slip flashing and counter-flashing so water cannot migrate behind the wall assembly. Don’t trust roofing sealant as the primary barrier, sealant should be backup to properly lapped metal.
Do I need an ice-and-water barrier even in a warm climate?
In warm areas you may not have freeze-thaw, but ice-and-water membranes at the eaves still help where roof edges see heavy wind-driven rain or if temperatures swing enough to cause condensation. The key detail is placement and coverage, the membrane must extend properly and be layered correctly with drip edge and underlayment to prevent side-grip water traps.
Can I use polycarbonate panels instead of shingles, and what should I watch for?
Yes, polycarbonate can be used for light transmission, but it scratches easily and moves with temperature, so you need compatible fasteners and correct allowances for expansion. The panel type and thickness determine the minimum pitch and support spacing, so follow the manufacturer’s spec for slope, fastening pattern, and clearance. Underdriven drainage caused by too-low pitch or incorrect fastening is a common failure mode.
What ventilation approach is required if I finish the ceiling under the patio roof?
If the roof creates a mostly enclosed attic space (for example, you install drywall or T and G on the underside), you generally need soffit intake and exhaust, such as a ridge vent or gable-end vents, and the area must meet ventilation ratios. If you cannot add ridge venting, you may still meet requirements with gable vents and properly designed soffits, but you must calculate net free area and confirm with code guidance for your climate and vapor setup.
How do I decide between 2x6 and 2x8 rafters for my patio gable?
Rafter sizing depends on span length (your run), pitch, spacing, and the roof covering, not just aesthetics. Use span tables or an online span calculator with your exact assumptions (for example, 16 inches on-center and shingle type/weight). If your roof includes a long overhang or you expect additional loads (snow or wind), you may need heavier rafters or tighter spacing even if the main run seems small.
Is bracing still necessary if I use pre-built trusses?
Yes, trusses change the engineering of the roof but do not eliminate bracing and restraint requirements. You must follow the truss manufacturer’s installation instructions exactly, including temporary bracing during set and any permanent lateral restraint. Missing or “improvising” bracing can lead to racking or unstable geometry while roofing materials are installed.
What’s the biggest DIY framing mistake with gable patio roofs?
A very common issue is incorrect ridge height or cumulative measurement errors that only show up after multiple rafters are cut. To avoid it, cut one rafter as a test piece, confirm bird’s mouth seating on both the plate and ridge, then use it as the template. Also verify rafter spacing with consistent layout lines before you start sheathing, because sheathing locks in errors.
When should I stop and hire a contractor during the build?
Stop early if ledger attachment details are not clear, if the house framing behind the siding is uncertain, or if your ridge height and squaring checks keep failing. Also get help before snow or wind picks up once framing is partially complete. A few hours of pro time fixing layout and ledger strategy is usually cheaper than replacing misframed rafters and correcting sheathing and flashing later.