You can build a patio overhang yourself in a weekend or two if you plan it properly upfront. The core process is: choose a lean-to (attached to the house) or freestanding column-and-beam design, pull your measurements, size your lumber or aluminum framing to span the distance safely, set posts or a ledger board, frame the roof, cover it, and detail the edges so water runs away from the house. Do it in that order and you'll avoid most of the mistakes that turn a weekend project into a two-month headache.
How to Build an Overhang Over a Patio: DIY Steps

Celia Vaughn
29 Apr 2026
Pick your overhang type and nail down the measurements first
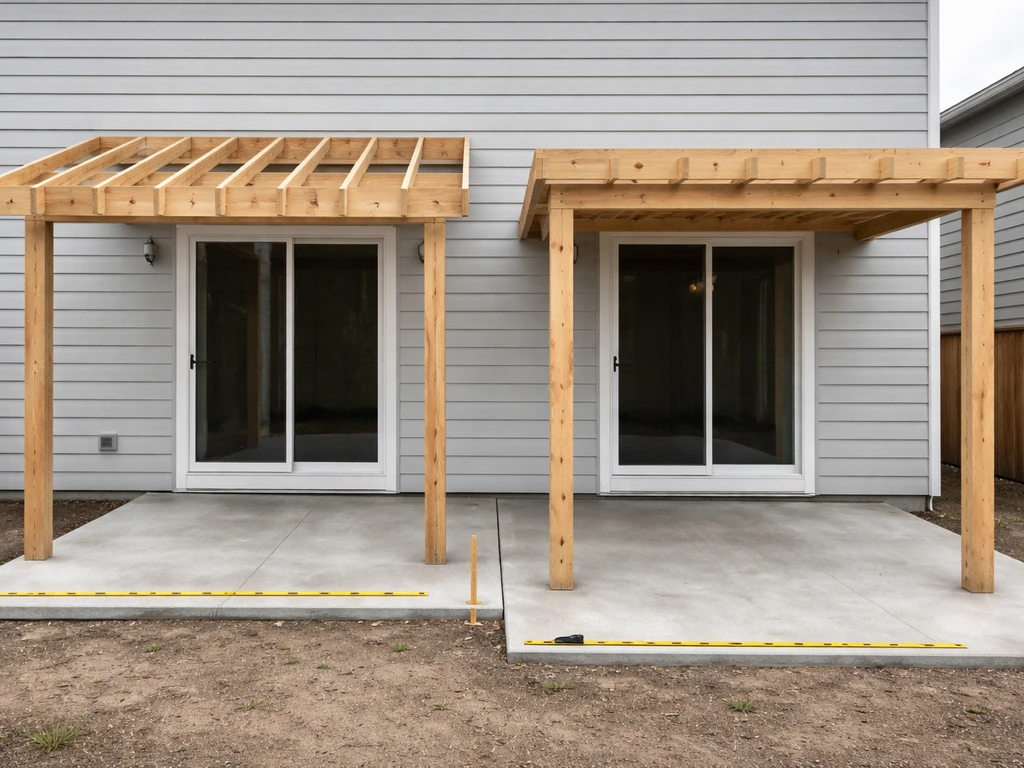
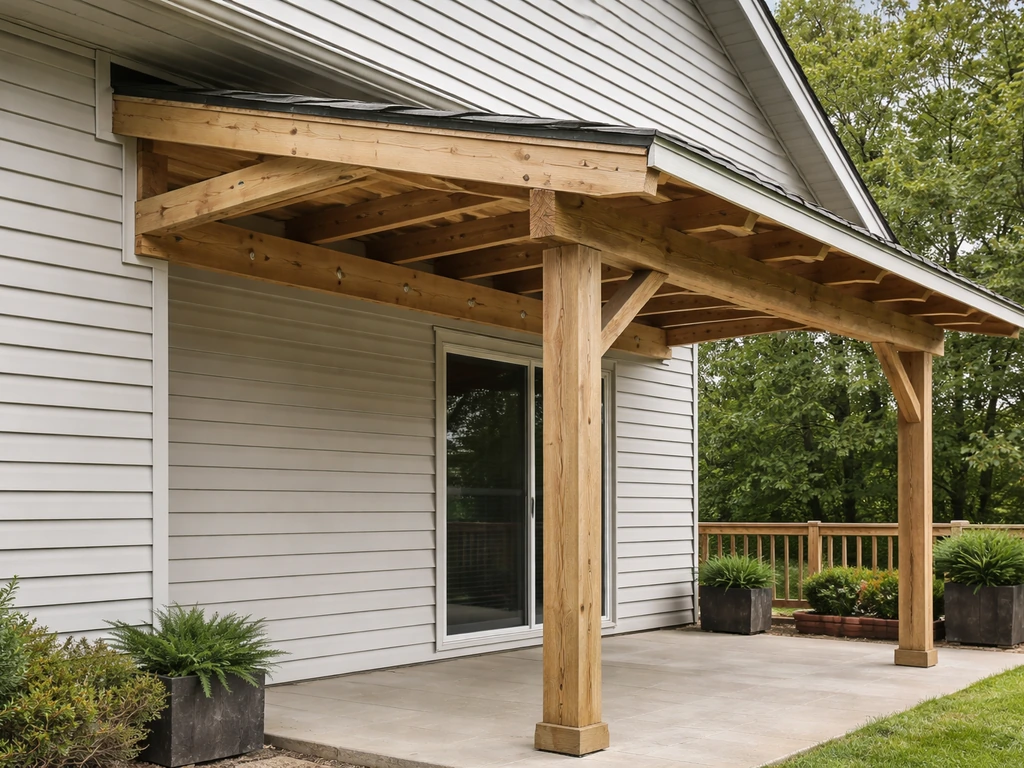
Before you buy a single board, decide which of the two main layouts fits your patio. The attached lean-to ties into the house wall with a ledger board and slopes down and away, this is the most common DIY patio cover and the simpler one to build. The freestanding canopy sits on its own posts and beams with no connection to the house at all, which is handy when you can't (or don't want to) penetrate the house wall or when the patio is away from the structure. Each type handles loads and drainage differently, so the choice shapes every decision that follows.
For measurements, start with the patio itself: width (side to side) and depth (how far it extends from the house or from the front posts). Then determine the overhang depth you want to add beyond the roofline edge, usually 12 to 18 inches past the outer beam is enough to shed rain without adding excessive wind load. Write down the finished roof height at the wall (typically 8 to 10 feet for a single-story house, enough headroom to not feel cramped) and the height at the outer edge after slope. Measure twice; framing materials are cheap but fixing a ledger that's 3 inches too low is not.
- Patio width and depth (tape measure on the slab or pavers, corner to corner)
- Desired roof height at the house wall (8 ft minimum clearance is comfortable for most people)
- Overhang projection beyond the outer beam (12 to 18 inches is typical)
- Slope drop across the roof depth (more on that in the structural section)
- Distance from house wall to outer post line (this drives your beam and rafter span)
Materials and design options: wood, metal, or aluminum
Each material has a real-world trade-off that matters more in some climates than others. Wood (typically pressure-treated pine or Douglas fir) is the easiest to cut, fasten, and find at any lumber yard, and it looks great stained or painted. The downside is maintenance, in wet or humid climates, untreated or poorly detailed wood rots at ledger connections and post bases within a few years if you're not careful. Metal (steel tube or cold-formed steel) gives you longer spans with smaller profiles but requires welding or specialized connectors and is harder to source and work with for most DIYers. Aluminum (extruded or patio cover kit panels) is the go-to in many Sun Belt and coastal markets: it doesn't rot, it's light, and pre-engineered kit systems with tested load ratings are widely available and DIY-friendly.
| Material | Best For | Typical Cost (materials) | DIY Difficulty | Maintenance |
|---|---|---|---|---|
| Pressure-treated wood | Most climates, classic look, easy cutting | $8–$18 per linear foot of framing | Low to moderate | Medium (seal/paint every few years) |
| Aluminum (kit system) | Sun Belt, coastal, low-maintenance priority | $15–$30 per sq ft installed materials | Low (pre-engineered) | Very low |
| Steel tube/metal | Long spans, modern look | $20–$40+ per sq ft materials | High (welding or fab required) | Low (powder-coated) |
| Cedar or redwood | Aesthetic priority, dry climates | $14–$25 per linear foot | Low to moderate | Medium (oil/stain yearly) |
For most homeowners doing a first patio overhang, pressure-treated lumber framing with corrugated polycarbonate or metal roofing panels is the sweet spot: affordable, available everywhere, and well within DIY skill range. If you're in a hot dry climate and want zero maintenance, look at aluminum patio cover kits, which ship with pre-sized beams, rafters, and pan-style or louvered panels that slot together without custom cutting. If you want a full shed-roof look with shingled roofing that matches the house, wood framing with plywood sheathing and asphalt shingles is the right path, and that build is closer to the shed roof patio cover process, which is a more involved project. If you want the shed roof style specifically, review the steps and framing details in how to build a shed roof over a patio before you start measuring full shed-roof look.
Structural planning: loads, spans, slope, and connections
This is the section most DIY guides skip over, and it's exactly where projects go wrong. A patio overhang is a real structure. It will hold snow if you're in the right climate, catch wind like a sail, and transfer all of that load into either your house wall or your footings. Getting this right is not optional. If you're wondering how to extend a roof over a patio without missing structural planning basics, start here and confirm loads, spans, slope, and connections before you frame.
Rafter sizing and spacing

Rafter spacing and size are driven by span (how far the rafter has to travel unsupported) and the design loads in your area. Common rafter spacings used in residential patio covers are 12 inches, 16 inches, 19.2 inches, and 24 inches on center, the tighter you space them, the lighter each rafter needs to be, but the more pieces you cut and install. For most spans up to 10 feet with a lightweight polycarbonate or metal panel roof, 2x6 rafters at 24 inches on center in Douglas fir or similar works well. Longer spans or heavier roofing (tile, shingles, heavy snow load) need 2x8 or 2x10 rafters, or you add an intermediate beam to break the span. Check your local span tables, most county building departments have them online, or your lumber yard will size for you in two minutes if you tell them the span and load.
Patio covers are evaluated against wind and snow load criteria under frameworks like ICC-ES AC340, which means your local building department is expecting engineered or code-compliant framing, not just something that looks sturdy. APPENDIX H of the 2018 IRC sets minimum vertical live load requirements for patio cover design, including a minimum 10 psf and use of snow loads when they exceed that minimum blank" rel="noopener noreferrer">wind and snow load criteria for patio covers. ICC-ES evaluation reports under AC340 are used to identify allowable roof live and snow loads and design wind and exposure parameters for specific patio cover systems blank" rel="noopener noreferrer">ICC-ES AC340. For simple small structures some jurisdictions have prescriptive tables you can use without hiring an engineer. For anything over about 12 feet wide, on marginal footings, or in a high-wind or heavy-snow area, pay the few hundred dollars for an engineer's stamp, it protects you, speeds the permit, and confirms your design is right.
Slope and drainage
Slope is non-negotiable for water to run off. The minimum for most solid patio roofs is 1/4 inch per foot (roughly 1:48 pitch), but in practice 1/2 to 1 inch per foot feels more secure and drains faster after heavy rain. If you’re trying to figure out how much fall you need on a patio roof, use the roof pitch or the “inches of drop per foot” approach so water drains reliably how much fall on a patio roof. On a lean-to attached to the house, the high point is at the house wall ledger and the low point is at the outer beam, so a 10-foot-deep roof with 1/2-inch-per-foot slope drops 5 inches from ledger to outer beam. Plan this before you set ledger height because that 5-inch drop has to go somewhere, and it can't be into your fence or neighbor's yard without a gutter.
Ledger attachment (attached lean-to)
The ledger is the single most critical connection in an attached patio cover. It's the board you bolt to the house wall that carries the inner ends of all your rafters. It must go into solid framing, wall studs or rim joist, not just siding or sheathing. Pull the siding back, find the rim joist or band joist, and lag bolt the ledger into that with 1/2-inch structural lag screws or through-bolts at 16 inches on center maximum. Flash the top of the ledger with metal ledger flashing tucked under the siding above so water can't track behind it and rot the house wall. This is the single most common failure point in DIY patio covers.
Post footings (freestanding or outer posts)
Posts need to sit on footings that go below your frost line, that depth varies from 0 inches in Phoenix to 48 inches in Minneapolis. Check your local frost depth before digging. A typical rule of thumb is a footing diameter of at least 12 inches and a depth to frost line plus 6 inches of gravel drainage at the bottom. Use post base hardware rather than embedding wood posts directly in concrete, embedded posts rot at the soil line within years. Bolt a steel post base into the concrete and set the post on top of it.
Step-by-step build process
Here's the sequence that works. Don't jump ahead, each step gives you a reference for the next one.
- Lay out the footprint. Use batterboards and string lines to establish the exact corners of your post locations. Check square with the 3-4-5 triangle method (measure 3 ft on one string and 4 ft on the adjacent string—if the diagonal is exactly 5 ft, you're square). Mark footing centers with stakes.
- Dig footings and pour concrete. Dig to your local frost depth, add 6 inches of compacted gravel, set your tube form, and pour. Set J-bolt anchors or post base hardware before the concrete cures. Let cure 48 to 72 hours minimum before loading.
- Install the ledger (attached builds). Mark the ledger height on the house wall accounting for your finished roof slope. Pull back siding, cut ledger to length from 2x stock matching your rafter depth, and lag bolt into the rim joist or studs. Install ledger flashing immediately—don't leave it bare overnight.
- Set and plumb posts. Cut posts to height (accounting for the beam sitting on top of them), set them on post bases, and brace them temporarily with diagonal 2x4 braces screwed to stakes in the ground. Check plumb on two faces with a level.
- Install the outer beam. Two-ply or three-ply beams (built from dimension lumber with structural screws and construction adhesive or engineered LVL for longer spans) sit on top of the posts in post caps. Check that the beam is level across its length and at the correct height to give you your target slope when the rafters connect to the ledger.
- Install rafters. Cut rafters to length with a bird's mouth notch over the outer beam and a plumb cut at the ledger end. Space at your design spacing (12, 16, 19.2, or 24 inches on center). Fasten at the ledger with joist hanger hardware—never just toe-nailed. Fasten at the outer beam with rafter ties or hurricane clips.
- Add blocking. Install solid blocking between the first and second rafter bay at the ledger end, and between the last rafter and the beam face at the outer end. Blocking prevents rotation, adds lateral stiffness, and gives you a nailer for fascia.
- Install roof sheathing or panels. For a sheathed roof, run 5/8-inch plywood or OSB perpendicular to the rafters, staggered, nailed at 6 inches on edge and 12 inches in field. For metal or polycarbonate panels, follow manufacturer's lap and fastener pattern—typically 12 to 18 inches on center with gasketed screws.
- Add roofing material. Felt underlayment and shingles for a fully shingled roof. Standing seam or corrugated metal over purlins for a metal roof. Polycarbonate panels screw directly to the rafter tops with pre-drilled gasketed fasteners. Overlap panels by the manufacturer's minimum (usually one full corrugation or 6 inches for flat panels).
- Install fascia. Rip fascia boards to cover rafter tails at the outer edge and the blocking face at the sides. Fascia hides the framing, gives you a gutter nailing surface, and finishes the look. Prime and paint or use composite fascia for longevity.
Water management and finishing details
Getting water off the roof and away from the house is where most DIY overhangs fail slowly and invisibly. A few details done right at the end save you from rot repairs in three years.
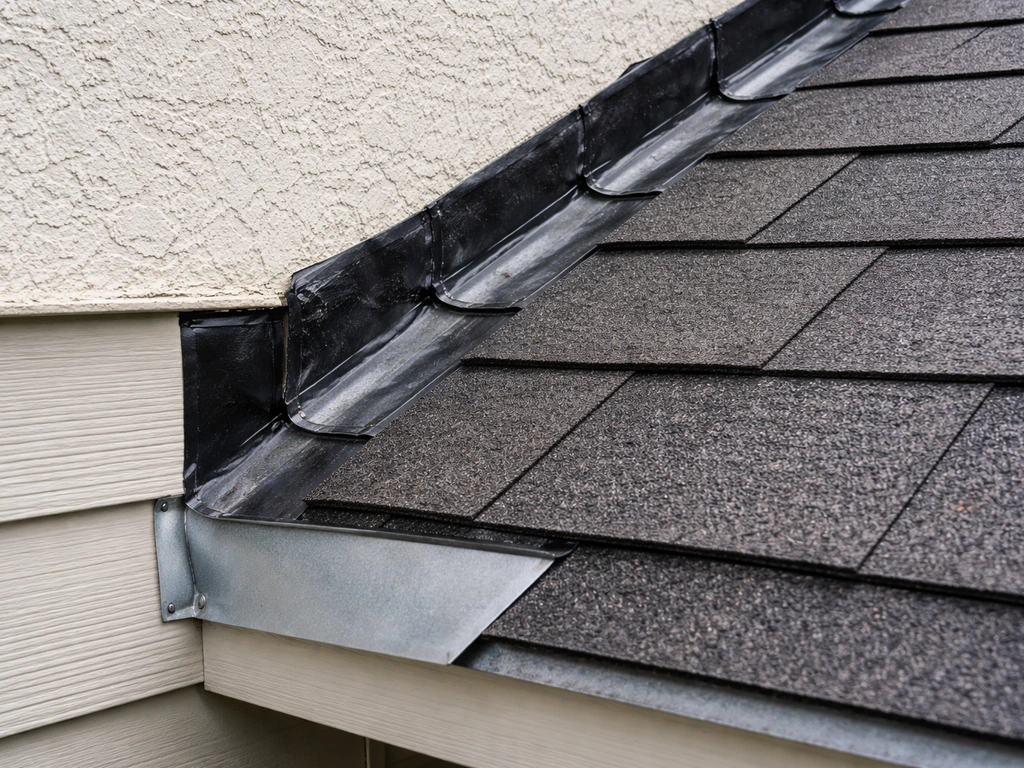
Flashing at the house wall
Where your roof panel or sheathing meets the house wall, you need step flashing or a continuous Z-flashing tucked at least 4 inches up under the siding above and lapped 2 inches over the top edge of the roofing below. On a metal or polycarbonate roof, use pre-bent metal flashing (aluminum or galvanized) bedded in caulk on the house side and screwed through into the panel below. Do not rely on caulk alone, caulk cracks and lets water in. Flashing is the mechanical barrier; caulk is just the secondary seal.
Gutters and downspouts
On any attached patio cover, install a gutter along the outer low edge of the roof and run at least one downspout to grade or a drain line. Without a gutter, rain pours off the outer edge right onto the patio pavers, splashes back onto the posts, and in heavy rain essentially negates the shelter the cover provides. K-style aluminum gutters are the easiest DIY install, 5-inch size handles most residential roof runs. Slope the gutter 1/16 inch per foot toward the downspout. If you're building a gable-roof style overhang, you'll need gutters on two sides. If you want a gable roof over a patio, plan the layout and guttering early so runoff is managed on both sides from the start how to build a gable roof over a patio.
Safety edges and trim
Cut edges of polycarbonate or metal panels are sharp. Cap all exposed panel edges with aluminum J-channel, U-channel end caps, or foam-backed closure strips designed for the panel profile, these seal out bugs and debris, protect people from cuts, and prevent water from wicking back up under the panels. Fascia trim should be caulked at all joints and painted or finished to match the house. Exposed post bases should be checked for gap between post bottom and base hardware, keep that gap clear so water drains and the post end doesn't sit in standing moisture.
Permits, code checks, and when a pro is the right call
Most jurisdictions require a permit for any permanent patio cover, period. The threshold is usually anything with a roof, even open lattice. Permits typically require a site plan showing the structure's location relative to property lines (setbacks matter), a framing plan with member sizes and spacing, and sometimes an engineering letter for larger spans. The permit fee is usually $100 to $400 for a residential patio cover, and the inspection catches issues before they become expensive or dangerous. Skipping a permit can create real problems when you sell the house or file an insurance claim.
Some cities publish prescriptive residential patio cover guidelines with pre-approved rafter sizing tables and connection details, if your jurisdiction has one of these, use it. It removes the need for custom engineering and speeds approval. Search for your city or county name plus 'residential patio cover guideline' or 'patio cover permit packet' to find it.
Be honest with yourself about when to hire a pro. The cases where it makes clear sense: your patio is large (over 20 feet in either direction), you have any doubt about the condition or capacity of the house wall where the ledger attaches, your soil conditions are unknown or expansive clay, you're in a high-wind or high-snow-load region, or your HOA requires stamped drawings. A structural engineer consult for a patio cover typically costs $300 to $700 and is worth every dollar in those situations. It's also a much better option than building something that fails in a windstorm or, worse, pulls your house wall apart at the ledger.
Tools, budget, and how to run the project without losing your mind
Tools you'll actually need
- Circular saw (for framing cuts) and a miter saw if you have access to one
- Drill/driver and a dedicated impact driver for structural screws and lag bolts
- Level (4-foot minimum) and a torpedo level
- Speed square and rafter square for cut angles
- Chalk line and tape measure (25 ft minimum)
- Post hole digger or rented power auger for footings
- Hammer drill and concrete anchors if bolting to an existing slab
- Safety glasses, hearing protection, work gloves—non-negotiable on all cuts
- Ladder rated for your roof height with someone to foot it
Budget reality check
A basic 10x12-foot attached lean-to with pressure-treated lumber framing and corrugated polycarbonate panels typically runs $800 to $1,800 in materials depending on your region and current lumber prices. Add $200 to $400 for hardware (joist hangers, post bases, lag screws, flashing, gutters). A pre-engineered aluminum kit for the same footprint starts around $1,500 to $3,000 for materials. If you're going full shed roof with sheathing and shingles to match the house, budget $2,500 to $5,000 in materials for a modest-sized cover, and the build complexity jumps significantly, closer to extending a roof over the patio than a simple overhang project. If you want a quick ballpark, plan your budget around materials, hardware, and permits for the specific roof style and span you’re building. The exact cost to extend a roof over a patio depends on the roof style, materials, and how far the overhang has to reach. Permit fees, concrete, and tool rentals add another $300 to $600 to any project.
Timeline and workflow tips
A straightforward attached lean-to with experienced helpers is realistically two full weekends: footings and ledger on day one, posts and beam on day two, rafters and blocking on day three, roofing and trim on day four. Solo it will take three to four weekends unless you're very comfortable with framing. The most common scheduling mistake is not letting concrete cure long enough before loading the posts, two full days minimum, three is better. The most common framing mistake is setting the ledger at the wrong height and then having the outer posts be the wrong length to achieve the target slope. Measure the ledger height and slope drop before you drill a single lag bolt.
One more thing that trips people up: order or source your roofing panels before you finalize rafter spacing. Polycarbonate and metal panels come in fixed widths, and you want your rafter layout to hit the panel seam locations cleanly. Check the panel width and work your rafter spacing backward from that number so you're not trimming panels at odd widths on every single rafter bay.
FAQ
Can I build an overhang over a patio without attaching the ledger to the house?
Yes, you can use a fully freestanding design (posts and beams), but you must still account for wind uplift, and you may need additional beams or closer rafter spacing to manage the longer unsupported spans. Also plan for where roof runoff will go, since you lose the advantage of directing water along the house-side drainage path.
What if my patio roof needs to clear gutters, downspouts, or soffits on the house wall?
Before setting the ledger height, check that the overhang does not interfere with existing gutter line, downspouts, or soffit vents. If it does, you may need to reroute downspouts or adjust fascia and flashing strategy so water still drains away from the ledger connection.
How do I choose a slope when I’m using polycarbonate or metal panels?
Use the same slope planning approach as for any patio roof, but remember that narrower slope means slower drainage and more water contact time on panel seams. If you are in a snowy or freeze-thaw area, aim toward the higher practical end of the recommended drop so meltwater does not pool at the outer edge.
Do I really need step flashing and Z-flashing if I caulk everything?
Caulk is not a primary waterproofing method, it can shrink and crack. Flashing provides the mechanical barrier and should be lapped so water always sheds over the next layer. The most critical area is where the inner roof edge meets the house-side wall, not the rest of the roof field.
How far below the frost line should my footings go in areas with variable frost depth?
Use your local frost-depth requirement, then add a margin based on typical soil conditions in your area. If you hit expansive clay, poor drainage, or fill dirt, consider deeper or modified footings, because the ledger and post system can be stressed by ground movement even if the depth is technically correct.
What happens if my ledger ends up slightly too low or too high after I drill it?
If the ledger height is off, it can cascade into incorrect post lengths, and it can also create a slope that forces water toward the wrong edge. The practical fix is usually to adjust the rafter layout and outer beam elevation only if you can keep connections in proper ranges, otherwise you may need to reposition the ledger before moving on.
Can I put a patio overhang on brick or stucco instead of finding studs or a rim joist?
Do not rely on brick veneer, stucco, or exterior sheathing for the ledger connection. The ledger must go into solid structure, typically studs or rim/band joist, with appropriate structural fasteners. If you cannot locate solid backing, switch to a freestanding design or have a pro verify the wall structure.
How should I handle expansion or movement on long overhangs (temperature changes)?
Long runs can shift slightly with temperature, so plan for connection details that tolerate minor movement, especially at panel edges and at flashing interfaces. Avoid rigidly “locking in” flashing where it would prevent natural thermal movement, and follow the manufacturer’s panel fastening spacing and methods.
What’s the best way to order roofing panels so I don’t end up with awkward rafter spacing?
Finalize your rafter spacing by working backward from the panel width and seam placement, then lay out rafters so seams land cleanly at the intended structural members. If the layout forces frequent trimming or off-size seams, change the overhang width or rafter spacing before installing more framing.
Can I build a patio overhang over pavers or do I need a specific base under it?
Your roof structure needs footings that are independent of the paver base. Pavers and surface-level slabs are not structural support for post loads, you still have to dig and set proper footings below the frost line and then build up from there.
Do I need gutters even if the overhang is small and only covers part of the patio?
Usually yes, because splashing at the outer edge can still wet posts, rails, and the patio surface, defeating the shelter during heavy rain. If you are building a gable or two-sided roof style, plan for gutters on both sides so runoff does not dump toward one area of the patio.
When should I switch from DIY framing to hiring an engineer?
If your design is near the edge of prescriptive limits, involves heavy snow or high wind, spans more than your typical DIY backyard range, or you are unsure about the structural condition of the house where the ledger mounts, it is safer to get engineered framing details. This is especially important if permits will require stamped drawings or if soils are expansive.
How much should I expect for cure time before loading posts and framing?
Concrete should cure at least two full days before you apply construction loads, three is better if conditions are cool or damp. Rushing this step is a common cause of minor post alignment issues that later show up as poor roof slope or awkward rafter fit.