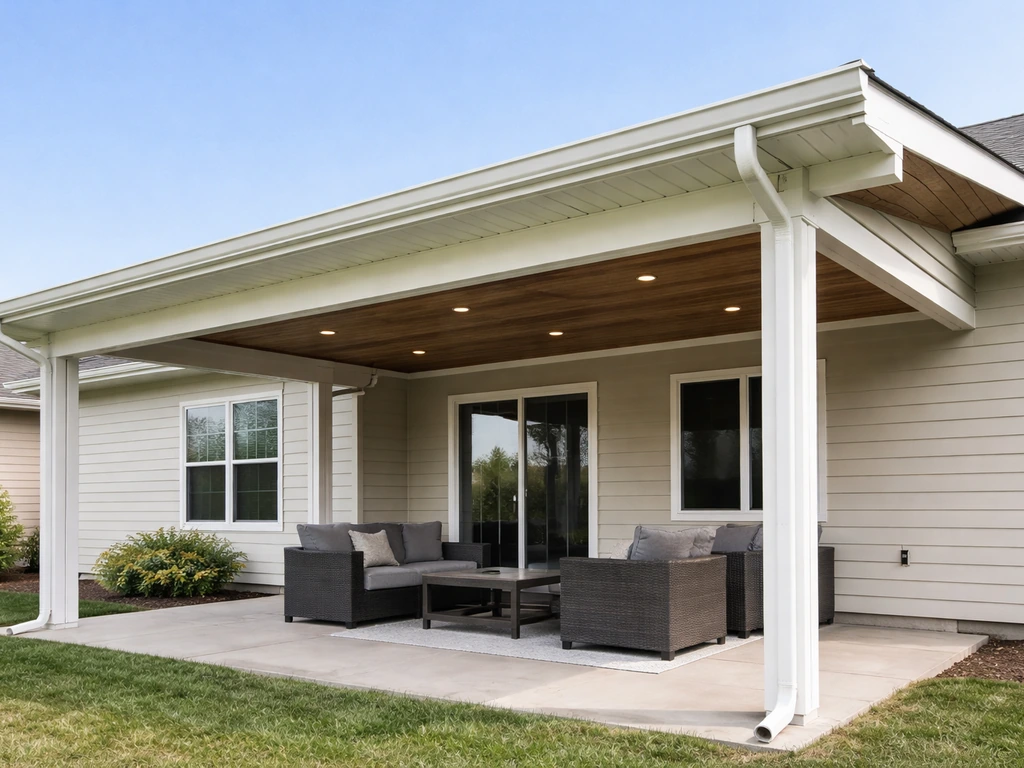
Extending a patio roof comes down to four things done right: keeping the slope correct so water drains away, tying the new framing solidly into the existing structure, flashing every joint where roof meets wall, and sizing your lumber or aluminum to handle whatever load your climate throws at it. When you’re planning an overhang for a patio cover, focus on the roof slope, ledger attachment, and flashing details so the extra projection sheds water correctly.
How to Extend a Roof Over a Patio: DIY Guide

Celia Vaughn
29 Apr 2026
Get those four things right and you'll have a dry, solid patio cover that lasts decades. Miss any one of them and you're chasing leaks or worse. Here's exactly how to do it. If you want a real-world path to follow, the steps below show how to build a patio overhang that sheds water correctly and stays securely tied in.
Planning the roof extension: coverage, slope, and size
Start on paper before you touch a single board. If you already know roughly what you want your coverage to look like, you can also use this as a starting point for how to put a roof over a patio Start on paper before you touch a single board.. Measure your patio slab or area you want covered, then decide how far out you're pushing the roof.
Before you finalize your extension size, it helps to know how much to extend roof over patio for comfortable coverage, which ties back to the slope and clearance planning in this section. The extension needs a minimum slope of 1/4 inch of rise per 12 inches of run (roughly a 2% grade) to drain properly. That's the practical floor for most patio cover materials. Go lower than that and water sits, panels bow, and shingles fail prematurely.
For a 12-foot extension, that means the outer edge of your new roof sits at least 3 inches lower than where it attaches to the house.
Sketch out your dimensions with those numbers in mind. If your existing patio roof already has a ledger board attached to the house, measure its current height at the wall. Then calculate where the new outer beam needs to land to hit that 1/4:12 minimum across the full extended span. A lot of people underestimate this step and end up with a ledger that's too low to give them enough clearance at the posts. Aim for at least 8 feet of clearance at the outer beam for comfortable headroom.
Also think about what you're connecting to. Is your existing patio roof a simple lean-to attached to the house fascia? A freestanding structure? Or does it already have a gable? Each scenario changes how you extend it. For a basic lean-to, you're usually adding more rafters, pushing the outer beam further out, and adding posts. For a gable, it's more involved because you may need to extend the ridge beam itself.
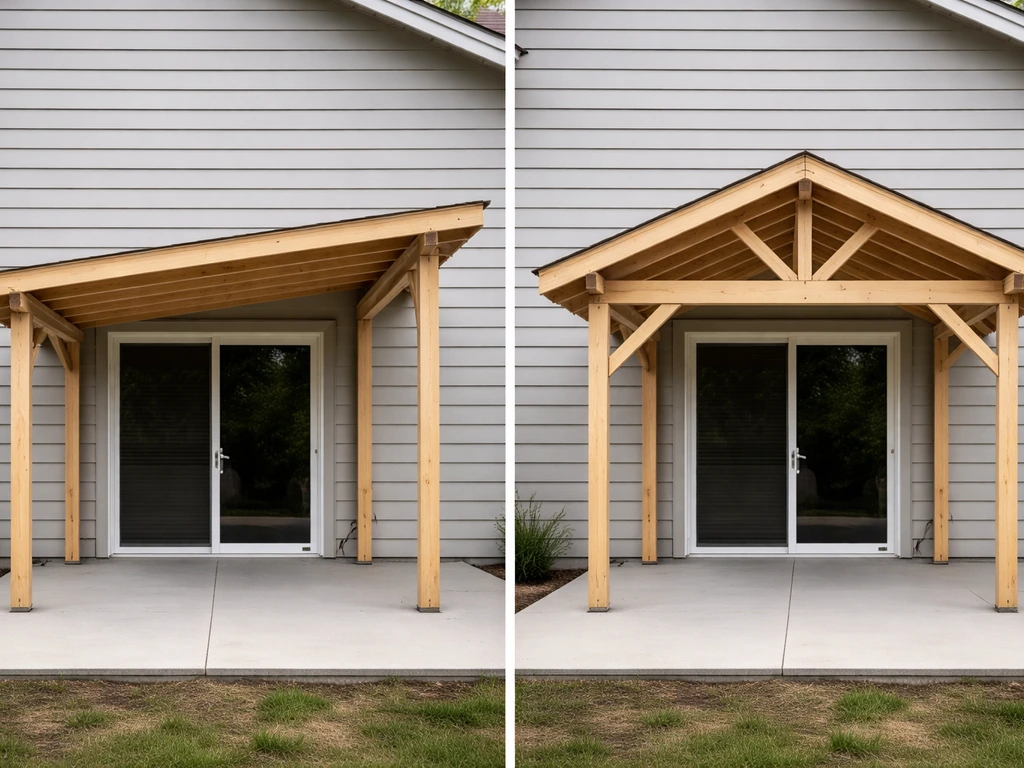
Choosing between a lean-to extension and a gable extension
Most patio roof extensions fall into one of two styles, and picking the right one before you build saves you a lot of rework.
Lean-to (shed roof) extension
This is the simplest and most DIY-friendly approach. The roof slopes in a single direction, pitching away from the house. Extending a lean-to just means moving your outer beam and posts further out, adding rafters, and extending the roofing material. If your existing patio cover is already a lean-to, this is almost always the cleanest way to gain more coverage. If you want the most straightforward shed-style option, use the same approach as in how to build a shed roof over a patio, then adapt the span and connections to your existing cover. It's also the most forgiving for DIYers because the framing is straightforward and the water drainage path is obvious.
Gable roof extension
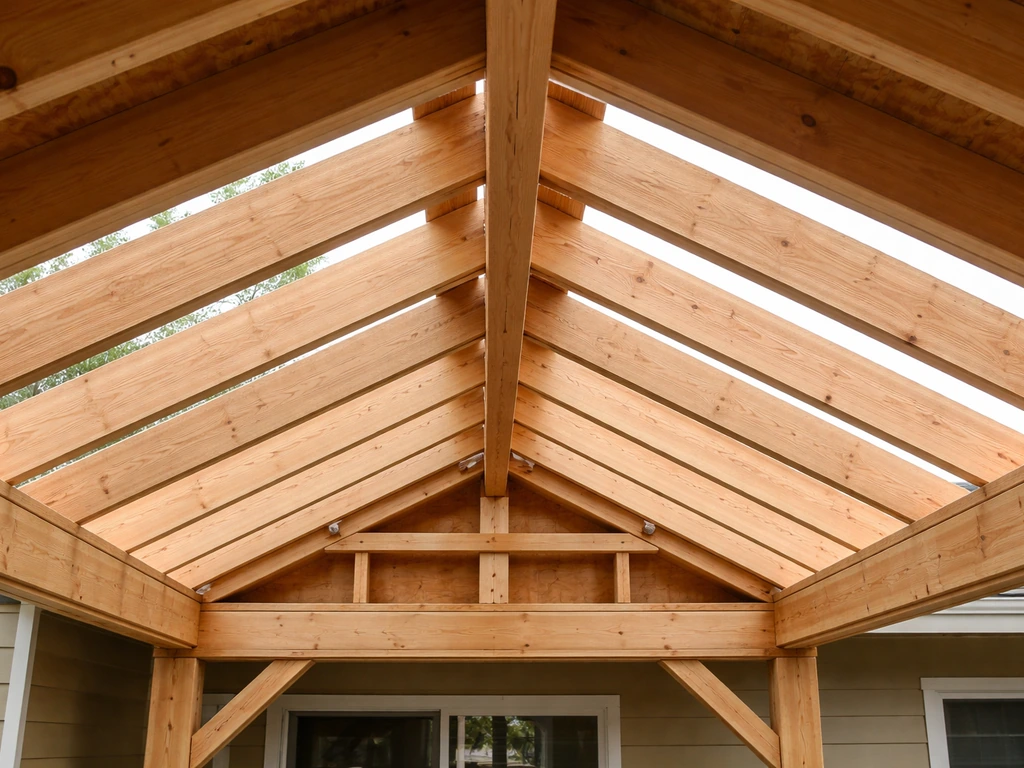
A gable extension is more complex but looks far more architectural. If your existing patio has a gable roof with a central ridge beam, extending it means lengthening that ridge, adding more rafters on both sides, and extending the side walls. For a full guide on how to build a gable roof over a patio, follow the same planning, framing, and flashing steps, but account for the longer ridge and extra connections.
The appeal is that a gable sheds water symmetrically and can handle heavier snow and rain loads. The trade-off is more framing work, more precise cuts, and more connection points to get right. If you're starting from a lean-to and want to convert it to a gable, treat that as essentially a new build rather than an extension. Trying to retrofit a gable onto an existing lean-to usually costs more time and money than starting fresh.
| Feature | Lean-To Extension | Gable Extension |
|---|---|---|
| Framing complexity | Low | Medium to high |
| DIY friendliness | High | Moderate |
| Water drainage | One direction, simple | Two directions, ridge-dependent |
| Snow load handling | Adequate for most climates | Better for heavy snow areas |
| Looks/curb appeal | Functional, simple | More architectural |
| Cost | Lower | Higher |
| Best for | Extending an existing lean-to | Matching a gabled home roofline |
If you're choosing from scratch, go lean-to unless you have a specific reason for a gable (matching your home's roofline, heavy snow loads, or aesthetics you care about). Lean-tos are faster, cheaper, and easier to flash correctly.
Material options: wood, metal, and aluminum
You have three realistic material paths for a DIY patio roof extension, and each has a different cost profile, skill requirement, and long-term maintenance load.
Pressure-treated wood
Wood is the most familiar material for most DIYers and the easiest to source at any lumber yard. Use pressure-treated lumber for all members that could contact moisture: posts, beams, and ledger boards. For rafters in a covered patio (not directly exposed to rain), standard dimensional lumber like 2x6 or 2x8 Douglas fir works well. Wood lets you customize dimensions easily, accepts standard connectors from Simpson Strong-Tie or equivalent brands, and can be finished to match your house. The downside is ongoing maintenance: painting or sealing every few years, and the risk of rot or pest damage if the build isn't detailed correctly.
Steel or metal framing
Steel gives you the best strength-to-size ratio and is ideal in high-wind or high-snow zones where span tables push you toward larger lumber sizes. It doesn't rot and doesn't attract termites. The trade-off is that it requires more specialized tools (a metal chop saw at minimum, welding for some connections), and it's heavier to work with. For most residential DIY extensions, steel is overkill unless you're in a coastal or high-snowfall area where a structural engineer has pointed you in that direction.
Aluminum systems (DIY kits)
Aluminum patio cover kits are an underrated option for extensions. Companies sell complete attachment systems with pre-engineered panels, ledger channels, beam extrusions, and optional gutter components. You order to size, the parts ship cut or you cut them on site with a miter saw and fine-tooth blade, and assembly is largely a matter of following the manufacturer's instructions. Alumawood-style kits, for example, attach to a house fascia or ledger and can be configured as lean-tos or louvered systems. They're low maintenance, don't rot, and often come with drainage built into the panel profile. The constraint is that you're working within the kit's design parameters, so very long spans or unusual shapes may not fit neatly.
| Material | Approx. cost (materials only) | DIY skill level | Maintenance | Best use case |
|---|---|---|---|---|
| Pressure-treated wood | $15–$35/sq ft | Beginner–Intermediate | Moderate (paint/seal periodically) | Custom shapes, matching existing wood structure |
| Steel/metal | $25–$50/sq ft | Intermediate–Advanced | Low (paint for rust prevention) | Heavy load zones, long spans |
| Aluminum kit system | $20–$40/sq ft | Beginner–Intermediate | Very low | Clean look, fast install, built-in drainage |
Structural considerations that actually matter
This is where a lot of DIY patio roof extensions go sideways. The framing and connections aren't complicated, but they require some thought before you start cutting.
Load calculations: snow, wind, and live loads
Your roof has to carry its own weight (dead load) plus whatever snow, rain, and wind your area produces (live loads). In low-snow areas, a simple 10 psf dead load plus 20 psf live load design is often sufficient. In areas with significant snowfall, you need to account for drift loads, which can concentrate snow at twice or more the uniform ground snow load right where your new roof meets the house wall.
FEMA’s roof snowdrift design guide explains that drift-related drift loads and snow concentrations can differ substantially from uniform ground snow loads drift loads can concentrate snow at twice or more the uniform ground snow load.
ASCE 7 governs this in most jurisdictions. If you're in a heavy-snow zone and you're extending more than 10 feet, it's worth a quick conversation with a local engineer or your building department to confirm your rafter sizing is adequate for drift loads.
Rafter sizing and spacing
For a standard single-slope lean-to extension with spans up to 10 feet and 16-inch on-center spacing, 2x6 rafters typically work in most low-to-moderate load areas. Push to 12 feet and you're often looking at 2x8. These numbers change with your load zone, so pull the IRC span tables for your jurisdiction or ask your lumber yard. Don't guess on this one.
Connecting to the existing roof or wall
The ledger board is everything. If you're attaching to the house wall, the ledger needs to go into the framing (rim joist or wall studs), not just into sheathing or siding. Use lag screws or through-bolts at 16-inch intervals staggered vertically. If you're extending an existing patio roof by lengthening its outer beam and adding posts, your connection is at the existing beam end: you're sistering the beam extension or using a structural post cap connector to add a new column of support.
For wind uplift, use hurricane ties (Simpson H2.5A or equivalent) at every rafter-to-beam connection. These aren't optional in most jurisdictions and they're cheap insurance. The tie creates a positive mechanical load path from roof to wall so wind can't peel your new roof off.
Flashing: the part most people get wrong
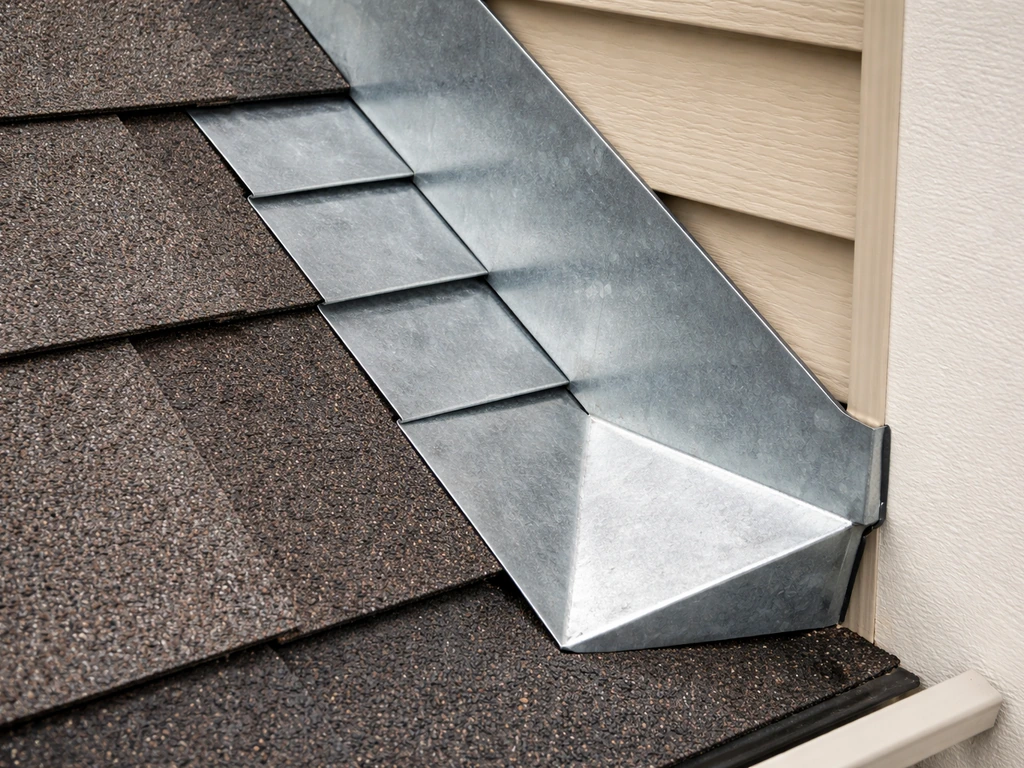
Where your new roof meets the house wall, you need step flashing and a kickout (diverter) flashing at the bottom end. Step flashing is an L-shaped metal piece that goes between each course of roofing and laps up the wall behind the siding. The kickout at the bottom redirects water that would otherwise run down the wall behind the siding and cause rot.
Kick-out flashing is installed at the end of a roof-wall intersection to divert water away from the wall and into gutters, helping meet IRC flashing requirements kickout at the bottom redirects water. The IRC (R903.
2. 1) requires metal flashing at all roof-wall intersections, and it needs to be corrosion-resistant metal sized to match your sidewall flashing height. For existing homes, you'll need to pull back siding enough to integrate the new step flashing with the existing housewrap or building paper behind it, then re-lap everything so water always sheds outward and downward. This is the number-one leak source on DIY patio roof additions.
Take your time here.
How to actually extend an existing patio roof: step by step
This sequence assumes you're extending an existing attached lean-to patio roof outward (adding more span) using wood framing. Adjust as needed for aluminum kit systems or gable configurations.
- Confirm your permit status and get approval before starting (more on this below).
- Mark your post locations on the ground, accounting for your new outer beam position. Check for level and square using the 3-4-5 triangle method or a laser level.
- Dig footings at each post location to your local frost depth. Pour concrete and set post bases (adjustable standoffs keep wood off the concrete and away from moisture). Let concrete cure at least 48 hours.
- Set your posts plumb and brace them temporarily. If you're extending an existing beam, add a new post under the existing beam end first to support it while you work.
- Install the new outer beam, connecting it to the existing beam using a structural splice connector or by extending and sistering. Use post caps rated for your load at each column.
- Cut and install new rafters from the existing ledger (or house wall ledger) to the new outer beam, maintaining your target slope. Use hurricane ties at every rafter-to-beam connection.
- Install blocking between rafters at the ledger end to resist lateral movement and provide solid nailing surface for fascia.
- If you're adding sheathing and shingles: install OSB sheathing, then self-adhering ice-and-water underlayment at the eave area and any low-slope zones, then roofing felt, then shingles. Minimum workable slope for shingles is 2:12 with proper underlayment.
- Flash where the new roof meets the house wall: pull back siding, install step flashing integrated with the existing housewrap, and install kickout flashing at the lower end. Re-lap siding over the flashing.
- Install fascia board on the outer beam, then add gutters and downspouts to route water away from the foundation.
- For aluminum kit systems: follow manufacturer's instructions for ledger channel installation, panel insertion, and end cap/gutter integration. Sequence matters with kits, so read the whole instruction set before cutting anything.
- Final check: pour water along the ridge line and watch it drain. Look for any pooling, any gap in flashing, and any fastener heads that need caulking with appropriate sealant.
Common mistake at step 8: people skip the ice-and-water underlayment on low-slope sections because it's an extra cost. On a 1/4:12 or 1:12 slope, that membrane is doing a lot of heavy lifting to prevent water from wicking back under shingles. Don't skip it.
What often goes wrong at step 9 is rushing the flashing integration. People peel back just enough siding to slip in the kickout but don't properly integrate with the existing housewrap layers. Water finds that gap within the first rainy season. Take the time to do it right, and if the existing housewrap is damaged behind the siding, patch or replace it before you close everything back up.
Permits, safety, and knowing when to call a pro
Do you need a permit?
Almost certainly yes, unless your extension is very small. Most jurisdictions follow the IRC and its Appendix H for patio covers, which governs structural requirements for attached and freestanding covers. Some states (Oregon is a well-documented example) have exemptions for structures under 200 square feet with a roof height under 12 feet that are set back at least 3 feet from property lines, but those exemptions are jurisdiction-specific and aren't universal.
When you apply for a permit, expect to submit a plot plan showing the addition relative to property lines, plus a scaled framing plan with member sizes, spacing, and spans. Some jurisdictions reference the 2021 IRC; others may be on older editions. Check with your local building department directly before starting. Building without a permit can complicate home sales and void your homeowner's insurance claim if something goes wrong.
Safety basics on the job
- Use fall protection (harness or roof brackets) any time you're on the existing roof slope installing flashing or roofing material.
- Have a second person on site when setting beams and posts. Beam sections can be heavy and awkward, and temporary bracing can fail.
- Use GFCI protection on all power tools near concrete or wet conditions.
- Never work on the roof during wet or windy conditions.
- Brace posts and beams as you go. Don't leave unsupported framing overnight if weather is incoming.
Honest checklist: DIY or call a pro?
This project is genuinely within reach for a competent DIYer on a straightforward lean-to extension. Here's where the line is:
| Situation | DIY or hire out? |
|---|---|
| Simple lean-to extension under 12 ft span, low snow zone | DIY-friendly |
| Aluminum kit system install on flat or simple site | DIY-friendly |
| Gable roof extension with ridge beam over 16 ft | Consider hiring a framer for the structural work |
| Heavy snow or high-wind zone requiring engineered drawings | Hire a structural engineer for design; you can still build |
| Complex flashing at multiple roof-wall intersections | DIY if careful; hire if you're not confident with siding work |
| Permit requires stamped engineering drawings | Hire an engineer; you may still be able to build yourself |
| Any work that requires modifying the home's main roof structure | Hire a licensed contractor |
If you're unsure about your load zone or framing design, a one-hour consultation with a local structural engineer typically costs $150 to $300 and can save you from an expensive mistake or a failed inspection. That's money well spent before you pour footings.
Once you've got this extension planned and permitted, you'll also want to think through the specific roof style in detail before finalizing your design. Whether you're committing to a shed roof or working through the framing for a full gable configuration, the slope, drainage path, and framing method all feed back into the planning decisions covered above. Get the plan right first, then build with confidence.
FAQ
Can I extend the roof and tie into the existing wall without removing siding and replacing housewrap?
In most patio roof extensions you can reuse existing wall waterproofing and just add new flashing correctly, but only if the old layers are still intact. Before closing anything, confirm the housewrap or building paper is not torn where you will integrate step flashing, then make sure the new WRB layers lap so water sheds outward (new metal and WRB should always overlap the course above). If the existing WRB is degraded or missing, replacing or patching that section before siding back up is usually the safest move.
What if my patio extension needs to change the roof drainage direction or create a more complex shape?
Yes, you can still build a safe extension if you need to change direction, but you should not try to create a “hybrid slope” by guessing. Plan the drainage so every roof surface drains to a single, predictable low edge, then design the framing and guttering around that flow path. If you introduce valleys, multiple slope directions, or complex step transitions, flashing becomes much harder and often pushes the project out of typical DIY territory.
How do I avoid pooling water at the outer edge or between posts when extending outward?
For a lean-to roof attached to a house, the outer edge is usually the lowest line of water. That means the posts and beams at that edge will see higher loads, so make sure your post footing layout matches the structural plan and is not just “where it looks right.” Also, keep the slope consistent across the entire run, because a local low spot even a small one can trap water at panel seams or around fasteners.
If my new patio roof leaks, where should I look first and what are the most common leak points?
Most leaks on patio covers come from incorrect roof-to-wall integration, fasteners, and low-slope water management. When diagnosing an issue after a storm, start by checking the step flashing and kickout first, then look for signs of lifted underlayment or damaged WRB behind the siding. If you use metal roofing or panels, inspect around screw lines for improper fastener placement or missing washers (leaks often appear to come from a seam but originate at a fastener or lap).
Do I need to worry about drift loads and snow buildup patterns for my roof extension, or just the local average snowfall?
Snow load problems are not just about how much snow you get, but how it drifts and where it lands against the new roof. If your extension is long or near corners, expect drifting near the house wall, and consider heat tracing or snow guards only after the structure is correctly sized. For framing decisions, confirm that your beam and rafter sizing accounts for drift load effects rather than only the general ground snow load.
When do patio roof extensions typically require a permit, and what info does the building department usually ask for?
If your extension is under the jurisdiction’s permitting thresholds, you still need to comply with safety and workmanship, but approval requirements can vary widely. When unsure, call the building department and ask whether your project fits any exemption by square footage, roof height, and setback from property lines. If an exemption does not apply, plan for a permit submission that often includes a plot plan and stamped or detailed framing member specs, depending on the municipality.
Can I reuse the existing ledger and connectors from the original patio cover, or do I need to upgrade them?
Do not assume the existing ledger or attachment points are adequate for the added weight and uplift from wind. Even if the original roof was built to code, the new extension changes the structural load path and can create mismatch at connectors. Before you connect new framing, inspect the existing attachment hardware, ledger condition, and the rim joist or studs behind it, then upgrade attachment methods if the existing connection points are not solid.
If my patio cover is low-slope, is ice-and-water underlayment always necessary and where should it be installed?
For roofing membranes and low-slope systems, underlayment choice matters. If your design is at or near the minimum slope, treat ice-and-water membrane as an anti-wick layer at the wall end and along the entire low-slope run, not just as a “belt and suspenders” piece. Also confirm compatibility with your roofing type (shingles versus metal panels versus louvers), because some systems require specific underlayment and seam procedures to perform correctly.
How can I tell early whether an aluminum patio cover kit will fit my dimensions and slope requirements?
If you use a kit, the fastest way to avoid problems is to inventory your kit’s rated components before you start layout. Confirm span limits, required fastener sizes, approved attachment points, and drainage assumptions. If you discover your patio width or your roof height does not match the kit’s design parameters, resizing the foundation or changing the extension style (or switching materials) is usually cheaper than trying to improvise framing beyond the kit’s engineering.
What’s the best “first check” to do if I am unsure about structural sizing and uplift, and should I hire an engineer?
If your extension is large or your local code is strict, getting a structural review is often worth it, especially for ledger sizing, rafter spacing, and uplift connection design. A good engineer or plan reviewer can also check footing sizing and post spacing, which are easy to get wrong when you focus only on the roof geometry. If the project is near property lines, requires special permits, or your climate has high wind or snow, plan for a review before ordering materials.