Building a shed roof over a patio means framing a single-sloped structure that either attaches to your house with a ledger board or stands free on its own posts. If you want a practical walkthrough, start by deciding whether you’re building an attached or freestanding patio cover, then work through measurements, permits, framing, and waterproof flashing how to put a roof over a patio.
How to Build a Shed Roof Over a Patio Step by Step

Celia Vaughn
29 Apr 2026
Done right, it gives you a dry, shaded outdoor space that handles rain, wind, and even modest snow loads without leaking or shifting. The core steps are: choose your layout and materials, plan the slope and drainage direction, pull any required permits, set your posts and footings or ledger, frame the roof with beams and rafters, install your roofing material with proper flashing, and finish with gutters and drainage details.
Each of those steps has a few specific things that can go wrong, so I'll walk you through all of them with the gotchas called out clearly.
Decide the shed-roof layout and materials first
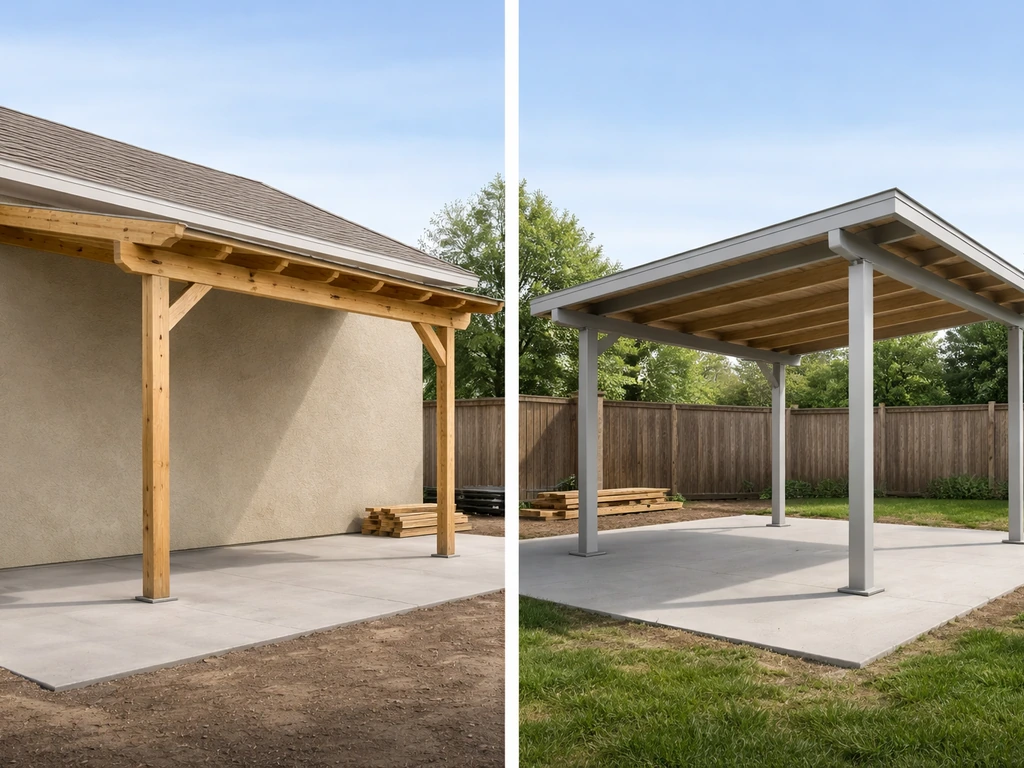
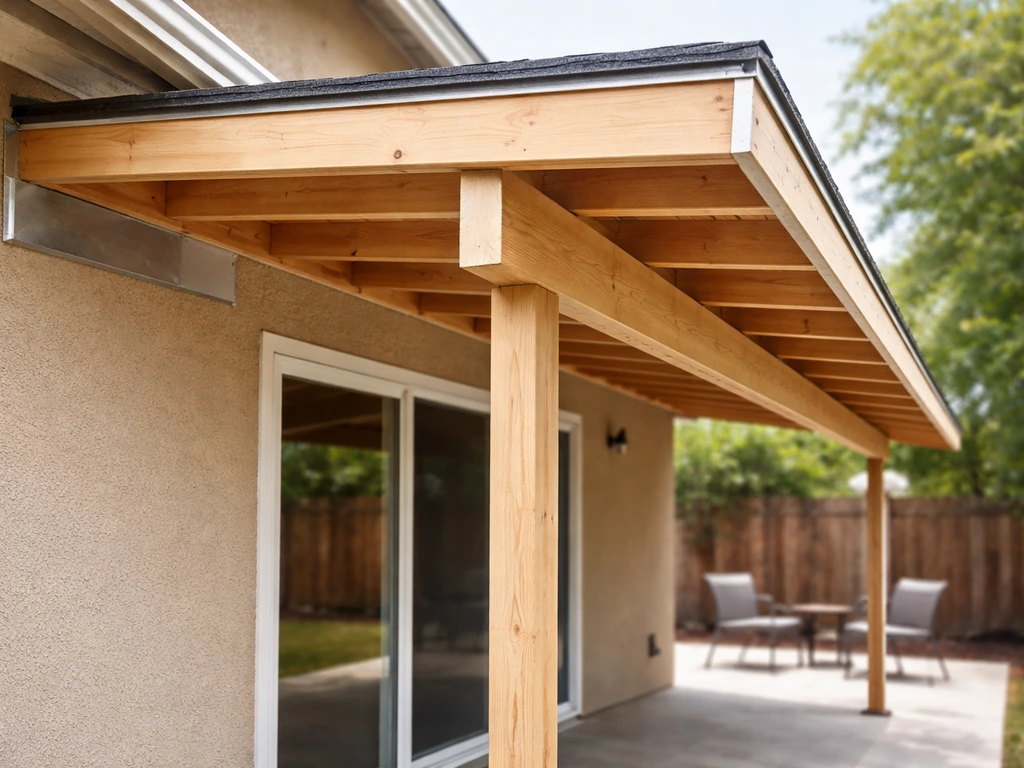
A shed roof is a single slope, high on one side and low on the other. On a patio, you have two main configurations: an attached lean-to where the high side bolts to your house wall, and a freestanding structure that carries all its load on its own posts. Attached designs are more common because they're simpler to build and feel more integrated, but they demand a proper ledger connection and careful flashing so water doesn't sneak behind the board and rot your wall. Freestanding designs give you more flexibility in placement and avoid the house-connection waterproofing problem, but they need footings at every corner post.
For framing material, wood, aluminum, and steel are all workable options, each with real trade-offs.
| Material | Cost | DIY Friendliness | Durability | Best For |
|---|---|---|---|---|
| Pressure-treated lumber | Low to moderate | Very high — standard tools | Good if maintained; use PT for all exterior members | Most DIY builds; easiest to source and modify |
| Engineered wood (LVL/PSL) | Moderate | High — same tools, heavier pieces | Excellent dimensional stability; PT versions rated for exterior use | Longer spans without mid-span posts |
| Aluminum (extruded systems) | Moderate to high | Moderate — kit systems simplify it | Excellent; no rot, no paint | Low-maintenance builds; kit-based installs |
| Steel/metal framing | Moderate | Lower — welding or bolted connections needed | Very high | Commercial-feel builds; high wind/snow zones |
For roofing surface material, corrugated metal panels and standing-seam metal are the most popular choices for patio covers because they're lightweight, relatively cheap, and shed water well. Polycarbonate panels let in light if that's a priority. Asphalt shingles work too, but they need a steeper slope and more structural depth. For most DIY patio covers, exposed-fastener metal panels are the practical default: they're easy to cut, widely available, and install with standard tools. Just know that exposed-fastener panels are more fastener-maintenance-dependent than standing seam, so don't skip the sealing washers and don't over-drive the screws.
Plan the measurements, slope, drainage, and overhangs
Before you order a single board, sketch your patio dimensions and think about where water needs to go. The slope of a shed roof determines both drainage performance and how dramatic the structure looks. To get the right overhang length for a patio extension, you'll need to size the roof pitch and overhang together so rain drips far enough from the seating area.
For patio covers, the common baseline is about 1/4 inch of rise per 12 inches of run, which is roughly a 2% slope. That's the absolute minimum for any kind of reliable runoff. Most metal panel systems require at least a 1:12 pitch (just under 5 degrees), and many manufacturers specify 3:12 as the minimum for exposed-fastener panels to reliably shed water at seams and fasteners.
Star Building Systems’ PBU metal panel product page specifies a minimum slope of 1:12 for that system minimum slope of at least a 1:12 pitch. If your roof pitch is under the system minimum, water can pond and seep, especially at fastener holes.
When in doubt, go steeper than you think you need.
To calculate rise: multiply the roof run (horizontal distance from the house to the outer edge) by your desired pitch ratio. For a 12-foot deep patio at 3:12, you need 3 inches of rise per foot, so 36 inches total height difference between the high and low sides. That affects how tall your posts need to be on the low end. Decide where water drains (usually away from the house, toward the yard or a gutter at the low edge), and plan your post heights accordingly.
Overhang on the sides (rakes) and the low end (eave) matters too. A 12-inch overhang on the eave side keeps rain off the patio edge and gives you somewhere to mount a gutter. A 6- to 12-inch rake overhang keeps wind-driven rain off the sides. Factor overhangs into your total roof footprint when sizing rafters and calculating material quantities.
- Measure the patio length and depth precisely, including any existing concrete slab edges
- Decide slope direction: toward the yard is standard, away from the house
- Calculate total rise based on run x pitch ratio (e.g., 12 ft run x 3: 12 = 36 inches of rise)
- Determine high-side and low-side beam heights to set post lengths
- Plan eave overhang (minimum 12 inches recommended) and rake overhangs (6–12 inches)
- Mark post locations on your sketch, typically every 8–10 feet along the outer edge
Permits, code checks, and structural safety basics
This is the step most DIYers want to skip. Don't. Even if you're in a jurisdiction that exempts detached accessory structures under 200 square feet from permits, an attached patio cover almost always triggers a permit requirement because it connects to your house and affects the load path of your existing structure. The IRC exemption for small detached structures gets amended locally all the time, and your area may have stricter rules based on snow load, wind exposure, or zoning setbacks. A quick call to your local building department takes 15 minutes and tells you exactly what's required. It also protects you at resale and keeps your homeowner's insurance valid.
Structurally, the two biggest concerns on a shed roof are wind uplift and the load path. Wind uplift is the tendency for wind to get under a roof and lift it off the structure. The IRC's wind-resistant provisions require a continuous load path: forces from the roof deck have to transfer through rafters, then beams, then posts, all the way down to the footings. Every connection in that chain needs to be engineered or at least match code-table requirements. Post bases, rafter ties, and hurricane clips are the hardware pieces that make this work in practice. Don't rely on toenails alone at critical connections.
If you're in a high-wind or significant snow-load area, you may need an engineered design. Most permit offices can tell you whether your roof meets prescriptive code tables or needs engineer stamp. In areas with heavy snow, your rafter sizing and post/footing design has to account for the combined dead load plus snow load, not just the weight of the roofing panels. A common mistake is undersizing footings for patio covers in snowy climates, which leads to post settlement and racking over time.
If your project is borderline complex (long spans, heavy materials, high wind zone, or unusual attachment point), calling a structural engineer for a one-time review is a smart $300–$500 investment that can catch problems before they're built in.
Prepare the site: footings, posts, and the ledger
Footings and post bases
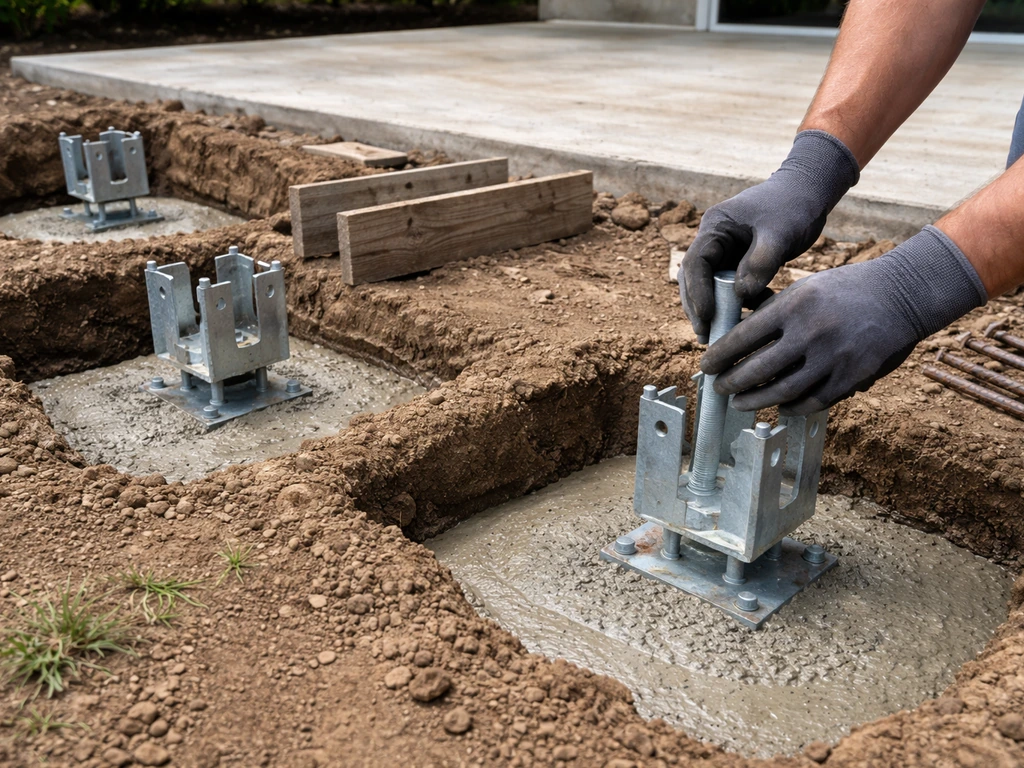
For an attached shed roof, you'll have posts along the outer (low) edge of the patio and a ledger on the house wall at the high side. Posts need concrete footings that go below your local frost depth. This is non-negotiable in freeze-thaw climates: a footing above frost depth will heave in winter, and the whole roof will rack and crack over a few seasons. Your building department can tell you the required frost depth.
Typical footing diameter for a patio cover post is 10–12 inches minimum, but calculate based on your tributary area and load. Dig the holes with a power auger if you can, set a form tube, pour concrete, and embed a post base bracket rather than setting the post directly in concrete.
Post bases that hold the post above the concrete surface prevent the direct wood-to-concrete contact that causes rot, and they provide engineered uplift resistance that a toenailed post in wet concrete simply doesn't.
Let concrete cure for at least 48 hours (72 is better) before loading the post bases. Set your posts plumb, brace them temporarily with diagonal 2x4 braces staked into the ground, and don't remove the braces until the beams are in and connected.
Attaching the ledger to the house
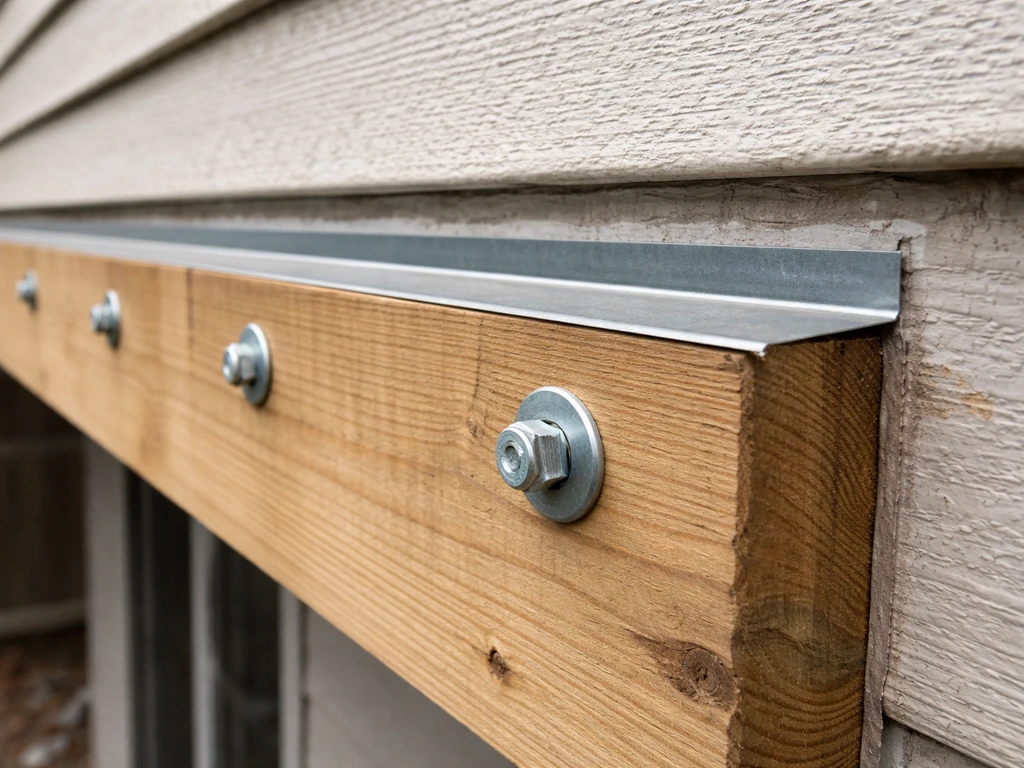
The ledger board is a horizontal framing member bolted to your house's rim joist or wall framing. It carries the high side of every rafter, so the connection has to be solid. Use 1/2-inch lag screws or through-bolts at engineered spacing (typically 16 inches on center in a staggered pattern, but check your code tables for your specific loads). Before attaching anything, remove siding from the ledger area so the board sits against the sheathing or directly against the framing, not floating on top of vinyl or lap siding. A ledger mounted on top of siding will not transfer loads correctly and will trap moisture.
Flashing at the ledger is where many patio covers develop their first leak. Install blank" rel="noopener noreferrer">metal Z-flashing above the ledger board, slipping it under the siding course above so water that runs down the wall sheds over the top of the ledger, not behind it. Some builders also run a bead of sealant, but flashing is the structural solution and sealant is only backup.
This detail is similar to what you'd do when extending a roof over a patio from the house roofline, just applied at wall height instead. This detail is similar to what you'd do when extending a roof over a patio from the house roofline, just applied at wall height instead how to extend a roof over a patio.
Frame the shed roof: beams, rafters, and bracing
With posts set and ledger installed, the framing sequence goes: beam on top of the outer posts, then rafters spanning from the ledger to the beam. The beam size depends on the span between posts and the tributary load it carries. For a single-bay patio cover up to about 10 feet wide with posts at 8-foot spacing, a doubled 2x8 or 2x10 beam in pressure-treated lumber is a common starting point, but verify with a span table or your permit reviewer. Larger spans or heavy roofing material require deeper lumber or engineered beams (LVL or PSL), which are available in pressure-treated versions rated for exterior above-ground use.
Rafters typically run perpendicular to the ledger and beam, at 16 or 24 inches on center depending on your roofing material and span. Metal panels generally allow 24-inch spacing. Asphalt shingles require sheathing, which means rafter spacing matters less but sheathing weight increases your load. Cut all your rafters to the same length with a consistent bird's mouth notch at the beam end so they sit flat. At the ledger end, use rafter hangers rather than toenails; they're stronger and much faster to install. At the beam end, use hurricane ties or rafter ties to resist uplift. This is the hardware that forms the continuous load path required by code.
Diagonal bracing between posts and the beam prevents the structure from racking side-to-side in wind. For a simple attached patio cover, the house connection provides a lot of lateral stability, but add knee braces at each post anyway: a 2x6 or 4x4 angled at 45 degrees from mid-post to beam, bolted with structural screws or carriage bolts at both ends. For freestanding designs, diagonal bracing is even more critical because there's no house wall to lean against.
- Set and level the beam on top of posts, secure with post cap hardware
- Snap a chalk line to mark rafter layout at 16 or 24 inches on center across both the ledger and beam
- Cut rafters to length with the correct plumb cut at the ledger end and seat cut at the beam end
- Install rafter hangers on the ledger before placing rafters
- Drop each rafter into its hanger, nail off per hanger manufacturer specs, then secure to beam with hurricane ties
- Add blocking between rafters at the ledger and beam for lateral stability and to close the rafter bays against pests
- Install knee braces at each post-to-beam connection
- Double-check everything is plumb and square before moving to roofing
Install roofing, flashing, and waterproofing
Sheathing and underlayment (if using shingles)
If you're roofing with asphalt shingles, you need solid sheathing (typically 7/16-inch or 1/2-inch OSB or plywood) over the rafters, then underlayment, then shingles. In areas where ice dams are a risk, the IRC requires an ice barrier extending at least 24 inches inside the interior wall line from the eave. That's ice-and-water shield peel-and-stick membrane, not just felt paper. Install it first at the eave, then layer regular 15 or 30-lb felt paper over it and up the roof. The goal is a shingle-style overlap: each layer laps over the layer below it.
Metal panel installation
For metal panels on open framing (no sheathing), panels run perpendicular to the rafters and are screwed directly to them. Start at the lower edge (eave) and work up toward the high end so each panel overlaps the one below. Follow the panel manufacturer's fastener spacing requirements exactly: improper fastener spacing is the primary cause of wind-uplift failure on metal roofing. Use the screws the manufacturer specifies with neoprene-washered heads, drive them until the washer compresses but not so far it dimples the panel (a stripped or over-driven hole loses its seal and its pull-out strength). Side laps between panels need to align with a rib and be fastened through both panels per the system instructions.
Remember the pitch minimums: most exposed-fastener corrugated panels need at least 3:12, and some low-profile systems can go down to 1:12 with sealed laps. Check your specific panel profile against the manufacturer's minimum before you frame, not after.
Drip edge and flashing details
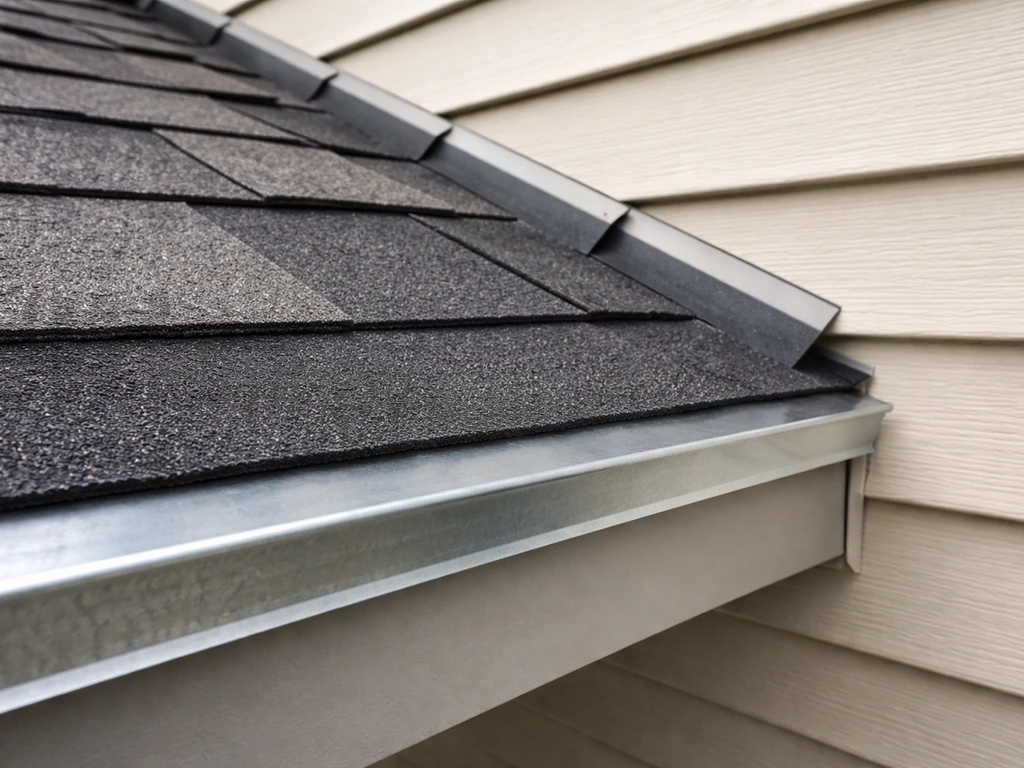
Drip edge is the L-shaped metal flashing that goes along the eave and rake edges. For eaves, install drip edge first, then lay underlayment over it so water draining off the underlayment goes over the drip edge into the gutter. For rakes (sides), the drip edge goes on top of the underlayment. This order is specifically required by the IRC and gets reversed by DIYers more than almost any other detail. The drip edge should extend at least 2 inches back onto the roof deck to properly direct water.
At the high side where the roof meets the house wall, you need step flashing or a continuous piece of base flashing integrated into the wall, plus counter-flashing or Z-flashing over it. The goal is that any water running down the house wall above the roof surface gets directed onto the roof, not behind it. Seal the top of the counter-flashing to the wall with a flexible polyurethane caulk (not silicone alone, which doesn't adhere as well to masonry or OSB sheathing long-term). Check and re-apply sealant every few years at this joint.
Finish with gutters and drainage, and avoid the common mistakes
Gutters and drainage
A gutter at the eave (low edge) of your shed roof is strongly recommended. Without one, water cascades off the roof edge directly onto your patio surface or against your foundation. K-style aluminum gutters are the most common and DIY-friendly option. Slope them toward a downspout at a rate of about 1/4 inch per 10 feet of run. The downspout needs to direct water at least 4–6 feet away from the house foundation, ideally via a downspout extension or underground drain. If you skip the gutter and rely on the slope alone to throw water clear, you'll get erosion, splash-back, and eventually moisture problems at the patio slab or foundation.
Common mistakes to avoid
After seeing a lot of DIY patio cover projects go wrong, these are the failure points that come up over and over:
- Ledger mounted on top of siding instead of against the sheathing: looks fine, performs terribly for load transfer and moisture management
- Footings above frost depth: the roof will rack in the first winter in a freeze-thaw climate
- Posts set directly in concrete without post base hardware: they rot from the base up, often invisibly, and lose uplift resistance
- Pitch too low for the roofing material: check manufacturer minimums before you frame, not after panels leak
- Drip edge installed in the wrong order: underlayment over drip edge at eaves, drip edge over underlayment at rakes — get this backwards and water wicks under
- Skipping hurricane ties or rafter ties at beam and ledger connections: the roof can lift off in a storm even if the rafters feel solid by hand
- Over-driving metal panel screws: dimpled panels with compressed washers will leak at every fastener within a few seasons
- No blocking between rafters at eave and ridge: pests (wasps, birds) will colonize the open rafter bays quickly
- Ignoring the permit process: unpermitted attached structures can create issues with home insurance, appraisals, and future sales
Dealing with uneven surfaces
Existing patios are often not level or not square. Before framing, check your slab for level and square using a long level and batter boards. If posts are going on an existing slab, you can use surface-mount post base anchors bolted into the concrete with wedge anchors rather than digging through the slab for footings, but verify with your local building department whether surface mounts are acceptable under your code for the loads involved. If the slab has significant slope (for drainage), account for that in your post height calculations so your beam ends up level even if the footing surface isn't.
Your materials and tool checklist to get started today
| Category | What You Need |
|---|---|
| Framing lumber | Pressure-treated 4x4 or 6x6 posts, PT beams (doubled 2x8 or 2x10 minimum), PT 2x6 or 2x8 rafters |
| Ledger | PT 2x8 or 2x10 matching rafter depth, Z-flashing, 1/2" lag screws or structural bolts |
| Hardware | Post base brackets, post cap hardware, rafter hangers, hurricane ties, carriage bolts, structural screws |
| Roofing | Metal panels or sheathing + shingles, drip edge (eave and rake), roofing screws with neoprene washers, ice-and-water shield (if required) |
| Flashing/waterproofing | Step flashing or continuous base flashing, counter-flashing/Z-flashing, polyurethane caulk |
| Drainage | K-style aluminum gutter, gutter hangers, downspout, downspout extension or underground drain |
| Concrete/footings | Concrete mix or ready-mix, form tubes, post base anchors, gravel for drainage base |
| Tools | Circular saw, drill/driver, level (4 ft and torpedo), tape measure, chalk line, post hole digger or power auger, ladder, safety glasses, hearing protection |
The next step today is to sketch your patio dimensions, identify whether you're building attached or freestanding, and call your local building department to ask two questions: do I need a permit for an attached patio cover of this size, and what's the required frost depth for footings? When you plan the shed roof, also estimate how much fall (roof slope) you need so rain runs off the patio roof reliably. Those two answers will shape the rest of your planning and keep you from building something you'll have to redo. Everything else in this guide flows from that foundation.
FAQ
Do I need a permit if I’m building a small shed roof over a patio?
Possibly, especially for attached covers. Even if detached accessory structures are sometimes exempt under a local square-foot threshold, attachment to the house usually triggers review because the ledger changes the load path and creates roof-to-wall weatherproofing requirements. Call your building department with your exact patio dimensions, roof height, and whether it attaches to the house.
What’s the safest way to decide the shed roof slope for runoff?
Use the roofing system minimum from the panel or shingle manufacturer, then add margin if fasteners or seams will be exposed to heavy wind or rain. A practical approach is to confirm your intended pitch meets the metal panel’s stated minimum (often 3:12 for exposed-fastener profiles) and then verify your overhang length still keeps discharge away from seating.
Can I build the freestanding posts directly on my existing concrete patio slab?
Only in limited cases and often not for typical shed roof loads. Surface-mount anchors may be allowed, but you still must satisfy frost depth requirements, post uplift resistance, and local code rules for anchor design. If your slab is above frost line or can heave, you may need true footings or engineered alternatives.
How do I handle a patio that is not level, or not square?
Measure level and square before you frame. If the slab has slope for drainage, adjust post heights so the beam stays level and the rafters produce the planned roof pitch. If the patio is out of square, set the frame to your planned rafter layout and re-check diagonal measurements so your roof won’t twist, which can cause uneven flashing lines.
What’s the most common flashing mistake on attached shed roofs?
Mounting the ledger on top of siding or skipping proper wall integration. The ledger should seat against sheathing or framing, and wall flashing (Z or step flashing with counter-flashing) must be layered so water running down the house wall above the roof is directed over the top edge of the flashing, not behind it.
Do I need gutters on the low edge if my roof drains away from the patio?
A gutter is strongly recommended for most patios, even when the roof slopes away. Without one, runoff concentrated at the drip edge can cause splash-back, soil erosion, and moisture problems at the slab or foundation. If you add a gutter, plan downspout routing to keep discharge several feet away and prevent undermining soil near footings.
How do I prevent metal roof leaks at fasteners?
Use the exact screws and sealing washers specified for your panel system, and do not over-drive. Over-driven holes can lose pull-out strength and compromise the seal, which shows up later as leaks or rust. Also ensure you follow the required fastener spacing and side-lap fastening pattern for the specific rib profile.
For asphalt shingles, where does the ice-and-water membrane need to start?
In ice-dam risk areas, install an ice-and-water shield membrane at the eave first and extend it at least 24 inches inside the interior wall line, per code requirements. It should be peel-and-stick membrane, not felt paper, and you still layer underlayment above it to maintain shingle-style overlaps.
What should I use to resist wind uplift and keep the structure from racking?
Rely on a continuous load path and specific hardware, not toenails. This usually means rated post bases, rafter hangers at the ledger connection, and hurricane ties or rafter ties at the rafter-to-beam or rafter-to-framing connections. Add diagonal bracing or knee braces to prevent side-to-side movement, especially on freestanding designs.
When should I hire an engineer for a shed roof patio cover?
Consider it if you have long spans, high wind exposure, significant snow load, unusual attachment conditions, or material choices like heavier roofing. A one-time structural review can confirm post footing sizes, beam depth, and connection hardware so you avoid undersizing that leads to settlement, sagging, or connection failures.