
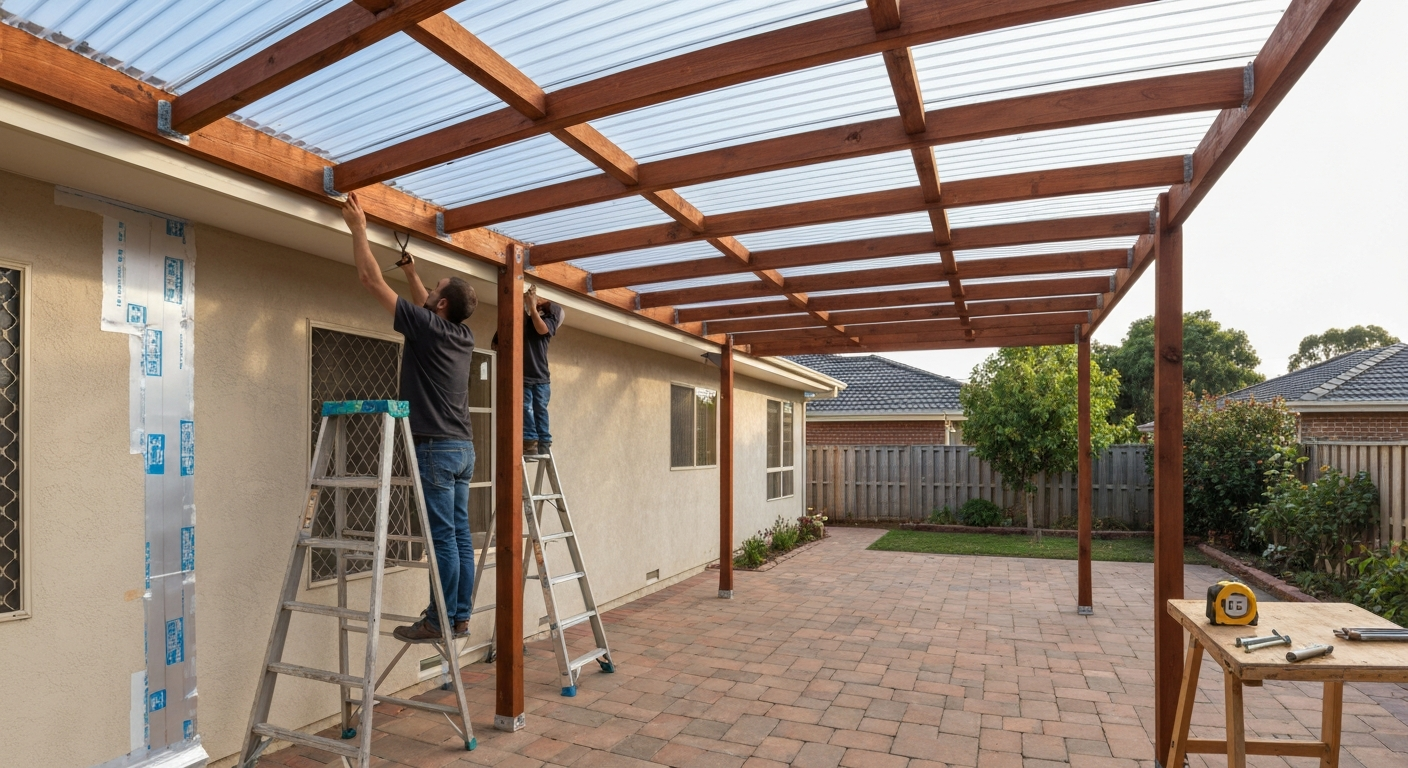
You can cover an existing lattice patio cover using corrugated metal or polycarbonate panels, solid sheathing with shingles, shade fabric, or by replacing the whole structure with a new cover type. The right path depends on three things: whether you want shade only, partial rain protection, or a fully waterproof roof; whether the existing framing can carry the added load; and what your local building department requires. Most of these projects are genuinely DIY-friendly, but a few key steps, structural checks, flashing at the house wall, and permit sign-off, can make or break the result. This guide walks you through all of them.
How to Cover a Lattice Patio Cover: Shade, Waterproofing Options & Steps

Celia Vaughn
24 Jul 2026
Who this guide is for and what you can actually achieve
This article is written for homeowners who already have a lattice patio cover in place and want to upgrade it without necessarily tearing it down. Maybe you want to block more sun, stop the afternoon drizzle, or finally make the space genuinely weatherproof. You don't need any roofing experience to follow along, but you should be comfortable on a ladder, know how to drive screws accurately, and be willing to spend a weekend afternoon at the permit counter before you swing a hammer. Realistically, a shade-cloth upgrade takes a single day; polycarbonate or corrugated metal panels take a weekend; converting to a fully decked and shingled roof is a multi-weekend project that almost certainly needs a permit. If you are also looking at building a new structure rather than retrofitting, related guides on building a lattice cover, cedar cover, vinyl cover, or cantilever patio cover cover the build-from-scratch path in detail.
First, define exactly what you want from this cover
Before you price a single panel, be specific about the goal. Shade only means you want to block UV and direct sun but you're fine with rain passing through, shade cloth and open-weave fabric handle this perfectly with almost no structural impact. Partial rain protection means panels that shed most rainfall but may let wind-driven water through at joints, corrugated metal and polycarbonate panels at proper slope (minimum 1:12, ideally 1:8 or more) fit here and still feel open. A fully waterproof roof means zero water entry, which requires a solid deck, underlayment, and either shingles or standing-seam metal, plus a much more serious structural review of your existing framing. Choosing the wrong category is the most common and most expensive mistake homeowners make. A polycarbonate panel roof installed flat will leak. A shade sail used to replace a waterproof roof will leave you disappointed. Settle the goal first, then read the relevant sections below.
Inspect your existing lattice and supporting structure before you buy anything
Your lattice is only as good as what's holding it up. Spend 30 minutes doing a real inspection before you commit to any material. I usually bring a flashlight, a scratch awl for probing wood, and a camera to document what I find.
Inspection checklist
- Check the ledger board (the board bolted to your house wall): look for rot, loose lag screws, and gaps in any existing flashing. This is the highest-risk attachment point on the whole structure.
- Probe all wood members with a scratch awl at joints and near the ground. If the awl sinks more than 1/4 inch with light pressure, the wood is rotting and needs to be replaced before any cover goes on.
- Measure the existing rafter or beam span and spacing. Write them down — you'll need these numbers for load checks.
- Check post bases and footings. Posts sitting directly on concrete slabs without post bases are a common red flag; they often rot from the bottom up.
- Look at the existing slope. Most lattice covers have minimal pitch. If yours is less than 1:12, you'll need to add pitch to run any panel or solid roof without pooling water.
- Count connection hardware. Are beams bolted to posts with proper hardware, or just toe-nailed? Toe-nailed connections alone are generally not adequate for the added load of a solid cover.
- Look for existing permits or inspection stickers. In many jurisdictions the current structure may itself be unpermitted, which complicates adding to it.
- Photograph everything: ledger, posts, beam-to-post connections, and any existing flashing or caulk that's cracked or missing.
Red flags that stop the project until fixed
- Soft, punky, or visibly rotted wood anywhere in the primary structure — rafters, beams, posts, or ledger.
- Posts that are heaving, leaning more than 1 inch out of plumb, or rocking at the base.
- Ledger attached with only nails or undersized screws, or with no flashing at all.
- Beam-to-post connections that rely only on face nails with no metal hardware.
- Any footing that is cracked, heaved, or clearly undersized for a larger roof load.
- Evidence of previous water intrusion at the house wall — stained sheathing, bubbled paint, or soft siding directly above or beside the ledger.
Permits, local codes, and load limits, when you need an engineer
Most jurisdictions require a building permit when you convert an open lattice cover to a solid or semi-solid roof, because you are adding load to the structure and (if it's attached to the house) affecting the building envelope. Cities like Phoenix explicitly require construction drawings, a plot plan, cross-sections showing member sizes and spacing, and note that non-conventional framing may require review by a licensed engineer. Los Angeles County focuses permit review on ledger attachment, flashing details, footing adequacy, and structural calculations. Even if your city is more relaxed, skipping the permit on an attached solid roof is a real liability, both for insurance claims and resale.
Load math matters here. The International Residential Code requires structural members to be sized to safely carry dead load, live load, snow load, and wind load. The American Wood Council's span tables use a typical design of 30 psf live load plus 10 psf dead load as a baseline. A lattice cover originally designed to carry only its own weight (maybe 3-5 psf) may not support corrugated metal (2-4 psf), polycarbonate (0.5-1 psf), or shingles over plywood (10-15+ psf) without new or reinforced framing. Wind is the other variable: ASCE 7 maps set basic design wind speeds by location, and canopies and small roofs have specific uplift coefficients that can be surprisingly high. FEMA, ASCE 7-22 Wind Highlights (fact sheet) summarizes that ASCE 7 maps and the standard’s provisions are the reference for determining basic design wind speeds and related factors (exposure, topography, importance) when calculating wind loads on canopies and small roof structures blank" rel="noopener noreferrer">FEMA — ASCE 7-22 Wind Highlights (fact sheet). If you're in a high-wind zone, hurricane zone, or heavy-snow region, get an engineer to check the numbers before you add any solid cover. The fee is typically $300-$800 for a simple patio roof review and is money well spent.
Retrofit the lattice or replace it entirely? How to decide
The core decision: keep the existing lattice frame as the skeleton and add a covering on top, or remove it and build a proper new cover. Retrofitting is faster and cheaper when the structure is sound, the slope is adequate, and your goal is shade or light rain protection with panels. Replacing makes more sense when the existing framing is undersized, rotted, or poorly attached, when you want a fully waterproof gable or lean-to roof, or when a permit review flags the current structure as non-compliant. If your existing structure checks out on all the inspection points above, retrofitting with polycarbonate, corrugated metal, or shade cloth is absolutely the right first option. If two or more red flags came up during your inspection, price a rebuild, you'll spend the repair money anyway, and a new structure gives you a fresh permit, proper engineering, and a longer lifespan.
A few middle-ground options exist. You can reinforce a structurally marginal lattice cover by sistering new rafters alongside existing ones and adding proper post-to-beam hardware, then proceed with a panel roof. This is worth doing when the posts and footings are solid but the rafter sizing is borderline. It adds a day of work but saves the cost of a full rebuild. If you're leaning toward a full replacement, the related guides on building a cantilever patio cover or a cedar patio cover are good next reads for planning that path.
Materials compared: which cover works best for your goal
Every material has a realistic best use case. The table below summarizes the key trade-offs so you can make a fast shortlist before reading the detailed install steps.
| Material | Best For | Pros | Cons | Approx. Material Cost (per sq ft) | Typical DIY Time (200 sq ft project) |
|---|---|---|---|---|---|
| Corrugated metal (Galvalume or painted steel) | Waterproof or semi-waterproof cover, low-maintenance | Durable 30+ years, low cost, good over simple framing, fast install | Noisy in rain, gets hot, needs correct slope and sealing | $1.50–$3.50 | 1–2 days |
| Polycarbonate panels (corrugated or multiwall) | Light-transmitting waterproof or semi-waterproof cover | Lets in light, lightweight (0.5–1 psf), UV-coated options, DIY-friendly | Yellows over time (10–15 yr), thermal expansion must be managed, more expensive than metal | $3–$7 | 1–2 days |
| Shade fabric / shade cloth (HDPE knit) | Shade-only, UV reduction, breezy feel | Easiest install, cheapest, 50%–95% UV block options (e.g., Coolaroo), minimal load | Not waterproof, degrades in 5–10 yr, can sag if not tensioned | $0.50–$2.00 | Half day |
| Shade sails | Shade-only, decorative, large open spans | Dramatic look, adjustable, good airflow | Requires engineered anchors (500–900 mm depth typical), not waterproof, complex tensioning | $1.50–$5 | 1 day (plus anchor curing time) |
| Vinyl / aluminum pan covers (e.g., Alumawood) | Clean, low-maintenance waterproof cover | Paintable aluminum look, built-in drainage channels, long-lasting | Higher material cost, requires specific attachment hardware, less DIY-friendly than panels | $8–$18 installed (kit) | 2–3 days |
| Cedar or pressure-treated wood solid deck + shingles | Full waterproof roof, traditional look | Strong, attractive, adds real value | Highest structural demand, needs permit/engineer review, most complex install | $5–$12 (materials only) | 3–5 days |
| OSB/plywood deck + metal roofing panels | Full waterproof roof, lighter than shingles | Lighter than shingles, fast panel install, long life | Deck adds cost and structural load, needs proper underlayment and flashing | $4–$9 (materials only) | 3–4 days |
My recommendation for most homeowners retrofitting a sound lattice cover: corrugated polycarbonate panels if you want light transmission, or corrugated Galvalume metal if you want maximum durability and don't mind a darker space underneath. Both install over existing lattice framing with minimal reinforcement, both handle water well at proper slope, and both are genuinely one-weekend projects.
Attachment methods, flashing, and waterproofing by material type
How you attach the cover to the house and to the existing framing determines whether it sheds water for 20 years or leaks at the first real storm. This is where most DIY errors happen, and the details are worth reading even if they feel tedious.
Ledger attachment and wall flashing
The ledger is the board bolted to your house wall that the rafters or beams hang from. For any cover that sheds water back toward the house wall, you need continuous step flashing and a kick-out flashing piece at the low end where the roof meets the siding. Install a continuous piece of 26-gauge galvanized or aluminum flashing that tucks under the siding above and laps over the top surface of the panel or roofing below. Use an approved sealant (polyurethane or butyl-rubber based) at the top edge only, do not seal the bottom edge of flashing, which needs to drain. Lag screws into the house ledger should hit studs or rim joist and be sized to carry the connection loads specified in your permit drawings.
Corrugated metal and polycarbonate panels
Both materials attach with hex-head self-drilling screws through the high rib of the panel (never through the low flat area, that's where water sits). Use screws with EPDM rubber washers that compress to seal the hole. For polycarbonate panels, Palram and SABIC/LEXAN Thermoclear installation guides are explicit: use pre-drilled oversized holes or the manufacturer's clip system to allow thermal expansion, and torque screws to finger-tight plus a quarter turn only. Over-tightening causes cracking and pulls through the panel. Side laps require a minimum one-rib overlap sealed with butyl tape. End laps need 6 inches minimum with sealant tape. Both manufacturers specify maximum fastener spacing, typically 24 inches on-center along purlins, and require following those specs to maintain warranty and prevent wind uplift.
Solid deck (plywood/OSB) + roofing
A solid deck requires the NRCA minimum: code-thickness plywood or OSB sheathing (typically 7/16 inch for 24-inch rafter spacing), a self-adhering ice-and-water shield at the eave and any valley (minimum 24 inches up the slope from the eave), then synthetic or felt underlayment over the field, then drip edge, then your roofing. Step flashing at the house wall is not optional, it is the single most leak-prone detail on any attached patio roof and must be done correctly: individual L-shaped step flashing pieces interleaved with each shingle course, topped by counter flashing or a reglet tucked into the wall. Kick-out flashing at the bottom where the roof meets the siding is also required; without it, water runs behind the siding and rots the wall framing.
Shade cloth and shade sails
Shade cloth attached flat to existing lattice simply wraps over and is zip-tied or stapled with UV-stable hardware, minimal load, minimal engineering. Shade sails are different. They are tensioned structures that impose sustained lateral loads at every anchor point. Installation guides recommend post footings or concrete anchors typically 500–900 mm deep depending on soil type and local wind speed. Never attach a shade sail solely to trim boards, fascia, or fence boards, those members are not sized for the continuous tension loads. Use rated D-ring anchors, stainless shackles, and stainless turnbuckles, and follow the manufacturer's load ratings on every hardware component.
Step-by-step: Installing corrugated metal or polycarbonate panels over existing lattice
This is the most popular retrofit path and the one I'd recommend for most homeowners with a structurally sound lattice. Allow one to two days for a 200-square-foot cover.
- Confirm slope: measure the existing pitch. You need at least 1:12 (1 inch of rise per 12 inches of run) for corrugated metal or polycarbonate. If the existing lattice is flatter than that, you'll need to shim the rafter tops or add a ridge board to create slope before panels go on.
- Add purlins if needed: existing lattice strips are not structural purlins. Add 2x4 or 2x6 members across the rafters at 24-inch centers (or per your panel manufacturer's span table) to give panels a solid bearing surface. Attach with structural screws or joist hanger hardware.
- Install ridge or peak flashing first: at the high end where the cover meets the house wall, cut and fit your continuous wall flashing so it laps under the siding above and will lap over the top of your first panel row by at least 4 inches.
- Lay panels starting at the low end: run panels parallel to the slope (ribs running downhill), starting at one side and working across. Maintain a minimum one-rib side lap sealed with butyl tape between each panel.
- Fasten with self-drilling hex-head screws with EPDM washers: drive through the high rib only, every 24 inches along each purlin. For polycarbonate, pre-drill oversized holes (5/16 inch for a #14 screw) and torque to manufacturer spec.
- Seal all end laps: where panels overlap end-to-end, ensure a minimum 6-inch lap running downhill. Apply butyl tape sealant to the overlap before fastening.
- Install ridge cap and eave trim: most panel systems include a ridge cap (for the top of the slope) and a closure strip or eave trim at the bottom to block insects and debris while allowing drainage. Seal the ridge cap with butyl tape before screwing down.
- Check all wall flashing: press the top edge of the flashing under the siding, seal with polyurethane caulk at the top edge only, and confirm the bottom edge of the flashing is free to drain over the panel surface.
- Run a hose test before calling it done: spray from the wall outward and watch for any drips at laps, the wall junction, or fastener holes.
Step-by-step: Converting lattice to a solid decked roof
This is the most structurally demanding path. Get your permit before starting. This guide assumes existing beams and posts have been verified as structurally adequate for the added load.
- Sister new rafters alongside existing ones if needed: if span-table checks show existing rafters are undersized for the dead load of sheathing plus roofing, nail or screw a new same-dimension rafter tight against each existing one. Use construction adhesive and 3-inch structural screws at 12-inch spacing.
- Install blocking at eaves and ridge: solid blocking between rafter ends at the eave and at the ridge gives the deck edge a surface to fasten to and prevents deflection at panel edges.
- Lay plywood or OSB deck: use minimum 7/16-inch OSB or 1/2-inch CDX plywood for 24-inch rafter spacing, 3/8-inch for 16-inch spacing. Stagger joints, leave a 1/8-inch gap between panels for expansion, and fasten with 8d ring-shank nails or 2-inch screws at 6 inches on-center at edges and 12 inches in the field.
- Install drip edge at eaves first: metal drip edge goes on before underlayment at the eave, and after underlayment at the rake edges.
- Apply ice-and-water shield at eave: a minimum 24-inch wide self-adhering membrane at the eave (or wider if required by code in snow/ice zones), lapping over the drip edge.
- Cover the field with underlayment: 15-lb or synthetic underlayment in horizontal courses, lapping 6 inches at horizontal seams and 12 inches at end laps, running from eave to ridge.
- Install step and kick-out flashing at the wall: this is the detail that matters most. Individual L-shaped galvanized step flashings (at least 4x4 inch legs) interleaved with each shingle course up the wall. Top with counter flashing cut into or lapped over the wall surface. Kick-out flashing at the bottom.
- Install roofing: for shingles, follow manufacturer nailing pattern and starter strip requirements. For metal panels, follow manufacturer fastener spacing and end-lap sealing specs.
- Install gutters: attached patio roofs should always have gutters on the eave that drain water away from the house foundation.
Step-by-step: Mounting shade fabric or shade sails over a lattice cover
The easiest and most affordable upgrade. Shade cloth in 50%–95% UV block ratings is available in HDPE knit (Coolaroo and similar brands are the standard reference), choose a higher percentage for intense afternoon sun and a lower percentage if you want airflow and softer light.
- Measure and order fabric: add 6 inches to each dimension for edge attachment. Most shade cloth comes in rolls or cut-to-length panels up to 12 feet wide.
- Install attachment hardware first: for a flat shade cloth over lattice, use stainless steel eye screws or heavy-duty staples with UV-stable zip ties along the perimeter lattice frame members. Space attachment points every 12–18 inches to prevent sagging.
- Lay the fabric over the lattice: pull it taut as you attach, working from one corner diagonally to the opposite corner to avoid wrinkles. Some sag in the center is unavoidable and actually useful for drainage.
- For shade sails specifically: pour or drill concrete anchors or set post footings to the depth your local wind speed requires (typically 500–900 mm). Allow concrete to cure fully (minimum 48 hours, ideally 7 days) before applying tension.
- Install D-ring anchors, rated shackles, and stainless turnbuckles at each sail corner. Tension gradually — one to two full turns per corner in rotation — until the sail is taut with no visible wrinkles along the edges.
- Include wind-relief design: position sail corners so the sail has some twist or angle rather than hanging flat. A twisted geometry sheds wind rather than catching it, dramatically reducing load on anchors.
- Check hardware torque after the first week: fabric and hardware both settle under initial tension. Re-tighten turnbuckles to spec and recheck anchor bolts.
Step-by-step: Replacing the lattice with a new cover type
If the inspection or permit review points to replacement, here are the key planning decisions for each cover type. The detailed build steps for each are covered in the individual build guides, but here's what shapes the decision at the planning stage.
Lean-to (attached shed roof)
The simplest replacement. Single slope, rafters running from a ledger at the house to a beam at the outer posts. Easiest to permit, easiest to flash, and the most common upgrade from a failing lattice cover. Works well for spans up to about 12 feet without special engineering. Slope should be 3:12 minimum for shingles, 1:12 minimum for metal or polycarbonate.
Gable roof
Two slopes meeting at a ridge, typically freestanding or with one end attached to the house. More complex to frame and flash, but sheds water in both directions and looks more like a permanent structure. Requires proper ridge board sizing, collar ties, and careful wall attachment if one gable end meets the house. Budget an extra day for framing compared to a lean-to.
Cantilever cover
Posts are set back from the edge, and rafters extend beyond them to create an overhang without an outer beam. Great for a clean, modern look and for avoiding posts in traffic areas, but requires careful sizing because the cantilevered section adds bending stress to every rafter. This one almost always warrants an engineer review for spans over 4 feet of cantilever. The guide on how to build a cantilever patio cover goes deep on the structural planning.
Freestanding structure
No attachment to the house at all. This removes the ledger flashing problem entirely but requires footings sized for the full wind and gravity load with no help from the house wall. Freestanding covers need four or more posts with properly engineered footings. The permit process is usually simpler because there's no impact on the house structure or envelope.
Tools and materials checklists by build path
Corrugated metal or polycarbonate panel install
- Circular saw with metal-cutting or fine-tooth blade (or tin snips for metal, jigsaw with fine blade for polycarbonate)
- Cordless drill/driver with hex bit for self-drilling screws
- Chalk line and tape measure
- Self-drilling hex-head screws with EPDM washers (1-1/2 inch or 2 inch)
- Butyl tape sealant rolls
- Polyurethane caulk and gun
- Continuous wall flashing (26-gauge galvanized or aluminum, 8-inch wide minimum)
- Safety glasses, work gloves (metal edges are sharp), and non-slip footwear
- Extension ladder rated for your weight plus tools
- 2x4 or 2x6 lumber for purlins if needed
Solid deck + shingles or metal roofing
- Circular saw, framing nailer, and roofing nailer (or hammer)
- Speed square and framing square
- Chalk line, tape measure
- Plywood or OSB sheathing (7/16 inch minimum)
- 8d ring-shank nails or 2-inch structural screws
- Drip edge (eave and rake)
- Self-adhering ice-and-water shield
- 15-lb or synthetic underlayment
- Step flashing and kick-out flashing (pre-bent or cut on site)
- Roofing material of choice (shingles, standing seam panels)
- Ridge cap material
- Fall arrest harness and roof anchor rated for roofing work
- Roof jacks and plank for working on slope
Shade cloth or shade sail install
- HDPE knit shade cloth (50%–95% UV block, cut to size with 6-inch allowance)
- Stainless steel eye screws or heavy-duty staple gun with UV-stable staples
- UV-stable zip ties (200 mm, 50-pound rated)
- For sails: stainless D-ring anchors, shackles, and turnbuckles rated to manufacturer spec
- Post-hole digger or rented power auger for shade sail footings
- Concrete mix (80-lb bags, quantity per engineer's anchor spec)
- Level, tape measure
- Drill with masonry bit if attaching to concrete or block
Cost and time estimates for the most common solutions
| Solution | DIY Material Cost (200 sq ft) | Typical Labor Cost if Hired | DIY Time Estimate | Difficulty |
|---|---|---|---|---|
| Shade cloth over lattice | $100–$400 | $300–$600 | 4–8 hours | Easy |
| Shade sails (2 sails) | $300–$1,000 | $800–$2,000 (incl. footings) | 1–2 days + cure time | Moderate |
| Corrugated metal panels over lattice | $300–$700 | $900–$1,800 | 1–2 days | Easy–Moderate |
| Polycarbonate panels over lattice | $600–$1,400 | $1,200–$2,400 | 1–2 days | Easy–Moderate |
| Vinyl/aluminum pan cover (Alumawood-style) | $1,600–$3,600 (kit) | $2,500–$5,500 installed | 2–3 days | Moderate |
| Full deck + shingles conversion | $1,000–$2,400 | $3,500–$7,000+ | 3–5 days | Hard — permit required |
| Full deck + metal roofing conversion | $900–$1,800 | $3,000–$6,000+ | 3–4 days | Hard — permit required |
| Replace lattice with new lean-to cover | $1,200–$3,000 | $4,000–$9,000+ | 3–6 days | Hard — permit required |
These ranges assume a standard 200-square-foot cover in a mid-cost U.S. region. Costs rise significantly in coastal markets (California, Pacific Northwest) and in areas with strict permit and inspection requirements. Always get at least two contractor quotes if hiring, and confirm permit fees with your local building department before finalizing a budget, they typically range from $150 to $600 for patio cover projects.
Finishing details that matter: gutters, trim, paint, and drainage
A cover that sheds water correctly from the roof surface but dumps it against your house foundation or into a neighbor's yard is an unfinished job. Any attached cover that collects rainwater should have a gutter on the eave side, sloped at least 1/4 inch per foot toward a downspout that directs water at least 3 feet from the foundation. For polycarbonate and metal panel roofs, snap-on K-style gutters attach directly to the fascia with standard gutter hangers at 24-inch spacing. Use gutter sealant at all end caps and downspout connections.
Trim and fascia boards protect the rafter ends from weathering and give the cover a finished look. For wood structures, prime all cut ends before installation and use a solid-color exterior paint or a penetrating oil stain rated for exterior use. Cedar and pressure-treated wood both accept stain well; cedar is especially good at taking semi-transparent stains that preserve the wood grain. For metal or vinyl covers, color-matched trim pieces are usually available from the panel manufacturer, use them rather than improvising with caulk, which cracks and looks bad within two seasons.
Safety best practices, not optional
Working on a patio roof means working at height on a surface that may be sloped, wet, or uneven. Falls are the leading cause of DIY construction injuries. Here's what I consider non-negotiable on every patio roof project:
- Use an ANSI-rated extension ladder positioned at the correct 4: 1 angle (1 foot out for every 4 feet of height) and secured at the top or held by a helper at the base.
- For any work on a sloped deck surface, use a fall arrest harness anchored to a ridge anchor rated for roofing work. This is not optional for slopes over 4:12.
- Roof jacks (adjustable metal brackets nailed to the deck) with a plank give you a flat standing surface on slope — use them.
- Wear non-slip soled footwear. Sneakers and dress shoes are slippery on plywood and metal panels.
- Cut metal panels on the ground, not overhead. Metal cutting creates sharp shavings that embed in skin and eyes.
- Brace temporary structures: any partially built frame should be cross-braced before you leave the jobsite at the end of the day. Wind can collapse an unbraced frame overnight.
- Check your local wind speed before working on windy days. Large panels act as sails and can be ripped from your hands or pull you off a ladder.
- Keep the area below the work zone clear. A dropped 2x4 from 10 feet is a serious hazard to anyone underneath.
When to hire a contractor or structural engineer
Be honest with yourself about the limits of DIY. Hire a licensed structural engineer when: your inspection found structural deficiencies and you're not sure how to size the repairs; your municipality's permit process requires stamped engineering drawings; your project is in a high-wind, seismic, or heavy-snow zone; or the framing you're working with is non-conventional (engineered lumber, steel, or existing members whose species and grade you can't identify). Engineer fees for a patio roof review are typically $300–$800 and are required by some jurisdictions anyway.
Hire a licensed general contractor or roofing contractor when: the project involves full roof replacement or significant structural work beyond your comfort level; your jurisdiction requires licensed contractor permits; or the flashing and wall integration details feel genuinely over your head. When vetting contractors, ask specifically for references on attached patio cover projects (not just roofing or decking), verify their license and insurance with your state licensing board, and confirm they will pull the permit themselves, a contractor who suggests skipping the permit is a red flag.
Maintenance and troubleshooting after the install
Leaks
Most leaks on panel roofs trace to one of three places: fastener holes where the EPDM washer has compressed and failed (solution: back out the screw, apply butyl tape, and re-drive a slightly larger screw), lap seams where butyl tape was not applied (solution: carefully lift the panel edge and retrofit tape), or the wall flashing junction (solution: check that the flashing top edge is fully sealed with polyurethane caulk and that counter flashing is properly lapped over step flashing). For solid roofs, a leak at the house wall almost always means a step flashing or kick-out flashing failure.
Fastener corrosion
Self-drilling steel screws with zinc coating will rust within 5–10 years in humid or coastal environments. When you see rust streaks running down panels, replace affected screws with stainless steel or hot-dip galvanized equivalents. Do not mix metals (stainless screws in aluminum panels, for example) without a zinc-chromate or butyl washer barrier between them to prevent galvanic corrosion.
Panel replacement
Polycarbonate panels typically last 10–15 years before UV yellowing becomes significant enough to warrant replacement. Keep records of the panel brand and profile so replacement panels match the rib pattern and side-lap geometry. Metal panels last 30+ years if the coating is not mechanically damaged. Spot-prime any scratches through the paint coat with a zinc-chromate primer to prevent rust initiation.
Fabric sagging and seasonal care
Shade cloth and shade sails relax under sustained tension. Re-tension turnbuckles each spring and inspect UV-degraded edges for fraying, a fraying hemline will tear under the next wind event. In regions with heavy snow, remove shade sails for the winter; they are not designed to carry snow load and the anchor forces under a loaded sail can be enormous. Store fabric panels in a cool, dry place folded loosely (not tightly rolled) to prevent crease damage.
Diagrams and illustrations to reference as you plan
As you work through this project, a few visual references are worth keeping on hand. An inspection photo set of your own cover, shot at the ledger, all four post bases, and each beam-to-post connection, gives you a baseline to compare against after work is done. A panel overlap diagram showing the rib profile, side-lap direction, and fastener position relative to the rib crown is essential for corrugated installs; most panel manufacturers include one in their installation guide PDF, which is worth downloading before you start. For the solid deck path, an attachment detail diagram showing the layered sequence of step flashing, counter flashing, underlayment, and shingles is the single most useful illustration you can study, the NRCA publishes these in their roofing manuals. Before-and-after photos of your progress at the end of each stage are also useful for permit inspections, which often require photographic documentation of work before it's covered up.
Related build guides worth reading alongside this one
If you're still deciding whether to retrofit or replace, the guide on how to build a lattice patio cover explains the original structure in detail and helps you assess whether yours was built to a standard that supports a retrofit. See the how to build a lattice patio cover guide for detailed framing dimensions and assembly steps. For step-by-step retrofit options specific to slatted or lattice covers, see how to cover a slatted patio cover. If you're leaning toward a full rebuild in wood, the cedar patio cover guide covers species selection, joinery, and finishing in depth. For a low-maintenance alternative, the vinyl patio cover guide walks through aluminum and vinyl panel system options end to end. See the guide on how to build a vinyl patio cover for step-by-step instructions and materials lists. And if a clean modern look with no outer posts is your goal, the cantilever patio cover guide covers the structural planning and footing design for that approach.
Planning checklist and your next steps
Before you order a single panel or schedule a contractor, run through this checklist. It covers the decisions and tasks that, if missed, cause the most project delays and rework.
- Define your goal: shade only, partial rain protection, or fully waterproof roof.
- Complete the inspection checklist and document all findings with photos.
- Address any red-flag structural deficiencies before proceeding.
- Contact your local building department and confirm whether a permit is required for your specific cover type and goal.
- Run a basic load check: find your existing rafter size and span, look up the appropriate span table, and confirm adequacy for your chosen roofing material's dead load.
- If in doubt about loads, consult a structural engineer before buying materials.
- Choose your material based on the comparison table and your specific goal, slope, and budget.
- Download the manufacturer's installation guide for your chosen panel or material and read it before you start.
- Order materials with a 10% overage allowance for cuts and mistakes.
- Plan the flashing and wall integration detail before the first panel goes up — this is not something to figure out mid-install.
- Set up fall protection before stepping onto any sloped surface.
- Schedule the permit inspection at the right stage (many require inspection before sheathing is covered).
- After install, do a water test and a visual inspection of all fastener points and laps before calling it done.
Covering a lattice patio cover is one of the more satisfying outdoor projects you can tackle in a weekend, because the result is immediate and visible every time you step outside. Do the structural homework upfront, follow the flashing details carefully, pull the permit if it's required, and you'll have a cover that lasts as long as the house.
FAQ
What are the main goals to choose from before covering a lattice patio cover?
Decide whether you want shade (reduce sun/UV), partial rain protection (divert splash/light rain), or a fully waterproof roof (shed heavy rain/snow). Goals affect material choice, weight added to framing, permit need and cost: shade fabrics and slats are light and often permit‑free; polycarbonate, metal or sheathed roofs are heavier and frequently trigger permits and structural review.
How do I inspect the existing lattice and supporting structure?
Check ledger attachment to the house, beam and rafter size/spacing, post footing condition, signs of rot/corrosion, and overall deflection. Measure member sizes and span lengths, note fastener types, and photograph connections. Compare member sizes/spans to AWC span tables or consult an engineer if framing looks undersized, cracked or overly deflected.
When is a building permit or engineer review required?
Many jurisdictions require permits for attached solid covers or when added loads exceed local thresholds. If you attach sheathing/roofing, add significant dead load, change drainage at the house, or live in a wind/snow zone, expect a permit. Non‑conventional framing, complex attachments or uncertain capacity usually require an engineer. Check local building department rules (city guides often list required drawings and details).
How do I choose between retrofitting the lattice versus replacing the cover?
Retrofit if lattice and framing are in good condition and your goal is light shade or adding lightweight panels/fabric. Replace when the existing framing is undersized, rotted, or when you need a different roof geometry (gable, lean‑to, cantilever) or full waterproofing that requires a solid deck. Replacement lets you design to code and simplifies flashing and drainage.
What materials are best for each goal and their pros/cons?
Shade cloth/fabric: light, low cost, good UV control (50–95%), limited rain protection, wind tension anchors required. Polycarbonate (multiwall): good light transmission, decent rainproof, lightweight, requires clip/fastener spacing and thermal expansion details. Corrugated metal: durable, fully waterproof, needs proper flashing and slope, heavier and noisier. Solid decking + shingles/metal: best watertight solution, heavier and usually requires permitting/engineer. Aluminum 'wood‑look' systems: factory panels with integrated flashing, moderate cost, professional installation recommended. Vinyl: low maintenance but can flex in wind. Costs vary by region — shade cloth $1–5/ft2, polycarbonate $6–15/ft2 installed, metal panels $8–20/ft2, full sheathed roof with shingles $15–40/ft2 (very rough ranges).
How should I attach polycarbonate or corrugated panels over lattice?
Follow the panel manufacturer's details (Palram, SABIC, MCA): ensure continuous support at panel ends, provide clips or oversized fastener holes for thermal movement, use foam closure strips at eaves, and install top and side flashing with appropriate sealants. Fasteners should sit on flat areas per instructions and include neoprene washers. Maintain recommended screw spacing and slope for drainage.