
Building a lattice patio cover is one of the most satisfying weekend-to-weekend projects a homeowner can tackle. You get real shade, a defined outdoor space, and a structure that adds visible value to your home, all without the complexity of a fully enclosed roof. A standard attached 12x16-foot wood lattice cover using pressure-treated lumber typically runs $800 to $2,000 in materials and takes one experienced DIYer (with a helper) about two to three weekends from footing to finish. The process is straightforward if you plan it in the right order: site assessment and permits first, structure second, lattice panels last. This guide walks through every step in that sequence.
How to Build a Lattice Patio Cover: Complete DIY Guide

Celia Vaughn
22 Jul 2026
What This Guide Covers and Who It's For
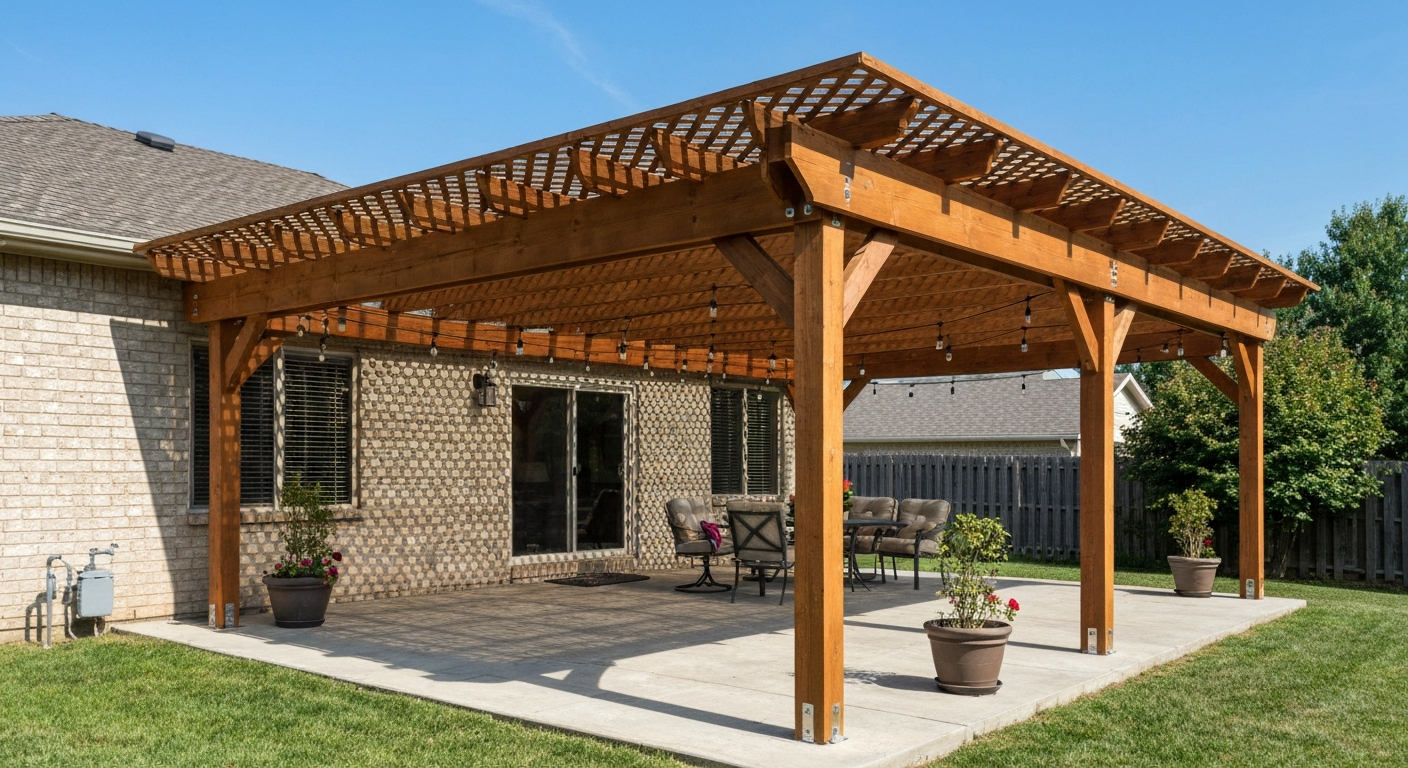
This is a complete planning and build guide for DIY homeowners who want to construct a lattice patio cover, whether attached to the house as a lean-to or built as a freestanding structure. It covers wood (pressure-treated and cedar), vinyl, and aluminum/metal options, structural basics like footings, posts, beams, and ledger attachment, covering options including shade cloth and polycarbonate panels, finishing and maintenance, and permit requirements. If you've built a deck, hung a door, or run through basic framing, you have enough background to follow this guide. If this is your first structural project, plan to read through it fully before you pick up a shovel, and flag the sections where I recommend pausing to consult a pro.
This guide focuses primarily on wood lattice construction, since that's the most common DIY approach, but I'll call out the differences for cedar, vinyl, and aluminum builds throughout. If you're already leaning toward a full cedar build, that topic gets deeper treatment in its own guide. For step-by-step plans specific to cedar, see how to build a cedar patio cover (442f3003-0a34-497f-abc9-15b8bd6b960c). Same goes for vinyl and for covering an existing lattice or slatted cover with polycarbonate or shade panels.
Decision Checkpoint 1: Attached, Freestanding, or Cantilevered?
The first real decision you need to make is how the structure relates to your house. Each configuration has a different permit path, different footing requirements, and a different skill ceiling.
Attached (Lean-To)
An attached lean-to cover connects to the house at a ledger board, pitches away from the wall, and is supported at the outer edge by posts. It's the most common configuration for good reason: you use the house wall for one structural connection, which reduces the number of posts and footings. The tradeoff is that the ledger attachment must be done correctly, because a failed ledger connection is one of the most common causes of patio cover collapses. You also have to deal with flashing, wall penetrations, and the potential for water intrusion, all of which I cover in detail below.
Freestanding
A freestanding structure stands on its own four (or more) posts with no connection to the house. It's structurally simpler in some ways because you avoid the ledger attachment complexity, but you'll need more posts, more footings, and more diagonal bracing to resist lateral wind loads. If your patio is on a hillside, if your house has a masonry or stucco exterior that makes ledger attachment complicated, or if you just want the structure further from the house, freestanding is the right call.
Cantilevered
A cantilevered cover extends beyond its supporting posts with no outer support. It looks clean and modern but the structural math gets complicated quickly. The IRC provides prescriptive cantilever limits tied to joist depth, and anything beyond the prescriptive tables requires an engineered design. If you're considering a cantilever for visual reasons, I'd honestly encourage you to look at a freestanding cover with slim posts first. If you're committed to a cantilever, the structural complexity is flagged in the beam and rafter section below, and a registered design professional should review your plan. For a deeper look at the cantilever approach, the guide on how to build a cantilever patio cover covers it specifically.
| Type | Pros | Cons | Best For |
|---|---|---|---|
| Attached lean-to | Fewer posts, lower material cost, sheltered entry | Ledger flashing critical, wall penetration required, permit almost always required | Most suburban homes with accessible rim joist or wood-framed wall |
| Freestanding | No house connection, works on masonry walls, more flexible placement | More posts and footings, needs lateral bracing | Hillside lots, masonry homes, or structures set away from house |
| Cantilevered | Clean look, no outer posts | Engineering often required, complex connections | When aesthetics demand it and a structural engineer is involved |
Decision Checkpoint 2: Material and Lattice Style
The material you choose affects everything downstream: cost, fastener type, maintenance schedule, and how you handle cut ends and connections. Here's an honest comparison.
Pressure-Treated Lumber (Most Common)
Pressure-treated (PT) lumber is the default for most DIY lattice covers, and for good reason. It's widely available, competitively priced, and rated for ground contact and above-ground exterior exposure. The current treatment chemistry in most PT lumber (ACQ and CA treatments) is corrosive to standard zinc-plated fasteners. You must use hot-dip galvanized (ASTM A153), stainless steel, or ZMAX fasteners and connectors throughout. Simpson Strong-Tie specifically recommends 300-series stainless steel when the treatment retention level is unknown. This is not optional, and it's a common mistake I see on first builds: people use standard zinc screws from the bulk bin and the fasteners start corroding within two years.
Cedar
Cedar is naturally rot-resistant, lighter than pressure-treated pine, and takes stain beautifully. It's the premium wood choice for a lattice cover. The downside is cost, typically 30 to 60 percent more than PT lumber, and availability varies by region. Cedar is less dense than PT lumber, so you need to pay attention to span tables for your specific species grade. A dedicated cedar patio cover build has its own planning considerations worth reviewing if that's your direction.
Vinyl
Vinyl lattice patio covers require zero painting or staining and resist rot and insects. The structural members are typically vinyl-clad aluminum or steel, which means the finished look is vinyl but the load-carrying is done by metal. True all-vinyl structural members are limited to short spans and light loads. For most DIYers, vinyl systems come as kits with manufacturer-specified post spacing and hardware, which simplifies the engineering but reduces flexibility. Vinyl systems are very sensitive to thermal expansion, so follow manufacturer gap and fastener guidance exactly.
Aluminum and Metal
Aluminum lattice covers are common in warm climates and are available in kit form or as custom-fabricated systems. They don't rot, don't require painting (powder coat is durable), and handle UV exposure well. The limiting factor for DIYers is that welded or custom-fabricated aluminum requires specialized tools, so most homeowners use bolt-together aluminum kits. These are genuinely DIY-friendly but lock you into the manufacturer's span and load specs.
Open Lattice vs. Covered
An open lattice panel (standard 2x2 or 1x2 diagonal or square grid) provides partial shade, airflow, and a traditional aesthetic. If you want more coverage, you have options: attach shade cloth to the top of the lattice, add polycarbonate corrugated panels over the frame, or build a partial solid section for a rain-protected zone. Each covering method has its own structural implications because you're adding load and potentially changing how wind acts on the structure. The guide on how to cover a lattice patio cover covers those options in detail.
| Material | Typical Cost (12x16 ft) | Maintenance | DIY Complexity | Best Use Case |
|---|---|---|---|---|
| Pressure-treated pine | $800–$1,800 materials | Stain/seal every 2–3 years | Low to moderate | Budget-conscious builds, most climates |
| Cedar | $1,400–$2,800 materials | Seal every 2–3 years | Low to moderate | Premium look, naturally rot-resistant |
| Vinyl kit | $1,200–$3,000 materials | Wash occasionally | Low (kit-based) | Low-maintenance, warm or humid climates |
| Aluminum kit | $1,500–$4,000 materials | Almost none | Low to moderate (kit-based) | Hot climates, modern aesthetic |
Site Assessment, Layout, and Permit Checklist
Before you order a single board, spend an afternoon doing your site assessment. This is where most DIY projects go wrong early. Skipping this step leads to footings in the wrong place, a structure that violates a setback, or a permit stop-work order.
Measuring and Layout
Measure the patio area you want to cover and sketch it to scale on graph paper. Note the existing house wall, any doors or windows, the direction of house eaves, and any existing downspouts or utility penetrations on the wall. Mark where your outer posts will land, keeping in mind that standard post spacing for a wood lattice cover is typically 8 to 10 feet on center. Confirm the ground is reasonably level. More than a 6-inch elevation change across the footing area may require stepped footings or a different post height on one side.
Setbacks, Easements, and Utilities
Check your local zoning code for rear and side yard setback requirements before you finalize placement. Patio covers are typically classified as accessory structures and may have different setback rules than the main house. Call 811 (in the US) at least three business days before any digging to have underground utilities located and marked. This is not optional and is free. Hitting a buried gas line while digging a footing hole is a worst-case scenario that's completely preventable.
Slope and Drainage
Your lattice cover needs a minimum slope for water to shed off it, even with an open lattice design. A 1:12 pitch (1 inch of rise per 12 inches of run) is a minimum for water drainage. For open lattice this is less critical than for a covered structure, but it still affects aesthetics and long-term wood performance. Make sure the slope directs water away from the house foundation and not toward neighboring property.
Permit Checklist
Most jurisdictions require a building permit for a patio cover attached to the house, and many require one for freestanding structures over a certain size (commonly 200 square feet). The permit process typically requires a site plan showing placement relative to property lines, a structural plan showing post, beam, and rafter sizes, and sometimes a footing detail. Some jurisdictions have a simplified permit path for patio covers that follow prescriptive standards. Check with your local building department early. Getting caught building without a required permit can result in fines, required demolition, and problems when you sell the house.
- Contact your local building department and ask specifically about patio cover permit requirements
- Check zoning for setback distances from property lines and any HOA restrictions
- Call 811 at least three business days before digging any footing holes
- Confirm your soil type if in doubt — some soils (fill, expansive clay) require a geotechnical assessment
- Verify your local frost line depth from the building department or your state's extension service
- Check whether your utility provider has overhead line clearance requirements that affect roof height
Thinking Like a Builder: Loads, Spacing, and Sizing Basics
You don't need to be a structural engineer to build a safe lattice patio cover, but you do need to understand the basic load concepts that drive every sizing decision. Here's the practical version.
Roof Loads
Structural loads for a patio cover come from three main sources: dead load (the weight of the structure itself), live load (people, maintenance workers on the roof), and environmental loads (wind and snow). For an open lattice, dead loads are very light, typically 5 to 10 pounds per square foot (psf). Snow load varies dramatically by location: a flat roof in Denver must handle 30 psf or more of ground snow load, while a roof in Houston has essentially zero design snow load. Wind load is the most commonly underestimated factor for open lattice structures. Uplift forces from wind can exceed the downward gravity loads on a lattice cover, which is why positive connection at every joint matters. ASCE 7 is the authoritative standard for design wind and snow loads and most jurisdictions adopt it. If you're in a high-wind or significant-snow zone, look up your site's design values using a zip-code-based ASCE 7 map tool before finalizing member sizes.
Rafter and Joist Spacing
For a wood lattice cover, rafters are typically spaced 24 inches on center (o.c.) for spans up to about 12 feet using 2x6 or 2x8 lumber, depending on species and load. The American Wood Council's DCA-6 guide provides prescriptive span tables that are the standard reference for this type of work. Don't size your rafters by eyeballing what looks right. Look up your species, your spacing, your span, and your design load in the span tables. Common mistake: using 2x4 rafters at 24 inches o.c. across a 12-foot span because they feel solid when you grab them. They may pass a bounce test but fail under actual load.
When to Consult an Engineer
For standard attached or freestanding lattice covers in moderate wind and snow zones, prescriptive tables from DCA-6 and IRC are usually sufficient. You should consult a structural engineer or registered design professional if: your structure exceeds typical prescriptive limits (spans over 14 feet between supports, for example), you're in a high-wind or high-snow area, you're planning a cantilever, you're attaching to an unusual host structure, or your building department specifically requires engineered drawings. An engineer's plan review for a simple patio cover typically costs $300 to $800 and is genuinely worth it in complex cases.
Foundations and Posts: Getting the Base Right
The footing is the most consequential part of this build. A structure with undersized or improperly placed footings will settle, shift, or fail over time, and the problem usually doesn't show up until it's expensive to fix.
Footing Depth and Frost Line
The IRC requires exterior footings to extend below the local frost line (IRC R403.1.4). This is the depth at which the ground freezes in winter. In northern states this can be 42 to 60 inches deep. In the deep South, frost depth may be 6 inches or zero. Get your local frost line depth from your building department, it's not optional in cold climates. A footing that doesn't reach frost depth will heave in freeze-thaw cycles, cracking the concrete and shifting your posts.
Footing Size and Type
For most residential lattice patio cover posts, a tube-form concrete footing 10 to 12 inches in diameter is the standard approach. IRC Table R507.3.1 provides prescriptive footing sizes based on tributary area and presumed soil-bearing capacity. The IRC assumes a conservative soil-bearing value of 1,500 psf where no geotechnical report is available. For a standard 8x10 foot post bay supporting a light lattice roof, a 10-inch diameter footing at frost depth is typically adequate, but verify with your local authority. Wet, fill, or expansive clay soils require a geotechnical evaluation before you pour concrete.
Post Sizes and Anchoring
4x4 posts are the minimum for a lattice cover. For spans over 8 feet between posts or for any structure in a moderate-to-high wind zone, 4x6 or 6x6 posts are more appropriate. Posts should never be embedded directly in concrete in a buried configuration (this traps moisture and accelerates rot even with pressure-treated lumber). The correct method is to set an anchor bolt in the wet concrete, let the footing cure fully (at least 3 days, ideally 7), then attach a manufactured post base connector. Simpson Strong-Tie's ABA, ABU, and ABW series post bases are the standard solution, and their ICC-ES evaluation reports (ESR-1622 and related reports) provide allowable loads and installation details. The post base lifts the post off the footing surface, preventing moisture accumulation at the base, and it provides a positive mechanical connection for uplift resistance.
Lateral Bracing
Posts alone are not inherently stable against lateral (sideways) loads from wind. For an attached cover, the ledger connection provides lateral restraint on one side. For freestanding structures, you need diagonal knee braces (typically 2x4 or 2x6 at 45 degrees from post to beam), a rigid knee wall section, or a beam-to-post connection that provides moment resistance. Don't skip this. An unbraced freestanding lattice cover in a windstorm is a safety hazard.
Ledger Attachment and the House Interface
For an attached cover, the ledger board is the connection between your new structure and your house. It's also the number one source of water damage complaints on patio covers, and if the connection fails, the whole structure can come away from the house. Do this part carefully.
What You Can Attach To
A ledger should be attached to a structural rim joist or band joist on the house. Wood-framed walls with accessible rim joists are the standard case. Attachment to masonry, stucco-clad walls, or cantilevered floor systems requires special detailing or is not permitted under IRC prescriptive rules. The IRC and DCA-6 explicitly prohibit attaching a ledger to cantilevered floor framing without an engineered design. If your house has a cantilevered bay or you can't locate the rim joist, stop and consult a professional before proceeding.
Fastener Selection and Spacing
DCA-6 from the American Wood Council provides prescriptive ledger fastener schedules. Fastening Deck Ledger to an I‑Joist Floor, JLC Online (references AWC/DCA‑6) notes that AWC/DCA‑6 prescriptive ledger guidance includes typical ledger‑to‑rim joist fastener schedules, commonly 1/2" through‑bolts at 12" o.c. or 1/2" lag screws at 18" o.c., with exact fastener type and spacing tied to rim/ledger sizes and joist span blank" rel="noopener noreferrer">Fastening Deck Ledger to an I‑Joist Floor — JLC Online (references AWC/DCA‑6). Common code-accepted options include 1/2-inch through-bolts at 12 inches o.c. or 1/2-inch lag screws at 18 inches o.c. for many standard configurations. Proprietary structural ledger screws (such as LedgerLOK or SDWH screws) are also code-accepted under their own ICC-ES evaluation reports and are often easier to install correctly than through-bolts. Use the DCA-6 table for the exact fastener type, diameter, length, and spacing that matches your joist span and ledger/rim size. Use hot-dip galvanized or stainless steel fasteners throughout when attaching to pressure-treated lumber.
Flashing: The Step Most DIYers Skip
Flashing the ledger is not optional. Water that gets behind a ledger sits against the house sheathing and rim joist and causes rot, sometimes for years before it's visible. The industry best practice, as documented by Fine Homebuilding and JLC, is a layered approach: self-adhering membrane (such as Grace Ice and Water Shield) applied to the wall behind where the ledger will sit, the ledger installed over that membrane with correct fasteners, then cap flashing bent over the top of the ledger and integrated with the house's water-resistive barrier (WRB) above. How to Install and Flash a Deck Ledger, Fine Homebuilding documents the layered flashing method: self‑adhering membrane under the ledger, cap flashing over the ledger integrated with the WRB, and a top membrane layer How to Install and Flash a Deck Ledger — Fine Homebuilding. The IRC requires ledgers to be flashed to prevent water contact with the band joist, but doesn't mandate a single detail, so follow this layered approach. Do not caulk as a substitute for flashing. Caulk fails; flashing doesn't.
Common Mistakes at the Ledger
- Installing the ledger directly against siding without removing the siding first to expose the rim joist
- Using standard zinc-plated lag screws into pressure-treated lumber
- Relying on caulk alone instead of metal cap flashing integrated with the WRB
- Attaching into a cantilevered floor section without engineering review
- Not pre-drilling pilot holes, which splits the rim joist and reduces connection strength
Beam, Header, and Rafter Sizing: Making the Right Choices
Once your posts are set and your ledger is attached, you're building the roof frame: beam, then rafters, then the lattice panels on top. Get the sizing right before you start cutting.
Beam Sizing
The beam spans between posts and carries the outer ends of all the rafters. For most standard lattice cover configurations, the beam is either a single built-up member (two 2x8s or two 2x10s nailed together) or a solid 4x8 or 4x10. The size depends on the span between posts and the tributary load the beam carries. For an 8-foot post spacing with 2x6 rafters at 24 inches o.c. on a 10-foot run, a double 2x8 beam is typically adequate for a light lattice load in most regions. Increase to double 2x10 or 4x10 for 10-foot post spans or heavier expected loads (covering panels, snow, etc.). Verify against your local span tables or DCA-6 for your specific lumber species and load conditions.
Rafter Layout and Common Member Sizes
Rafters run from the ledger to the outer beam. For open lattice covers with light loads, a 2x6 at 24 inches o.c. handles spans up to about 10 to 12 feet in typical pressure-treated southern yellow pine or Douglas fir. For spans up to 14 feet, step up to 2x8. Bird's-mouth cuts at the ledger and beam improve bearing area and keep the rafter seated properly. Use metal rafter ties (hurricane ties) at both the ledger end and the beam end to provide positive uplift resistance. This is where you capture back the load resistance you'd otherwise lose in a light-roof structure.
Blocking
Solid blocking between rafters at the beam line prevents rafter rotation under load and is required at bearing points in most prescriptive framing systems. Add blocking at the first and last rafter bay and at any intermediate supports. For a lattice cover, blocking also provides a solid nailer for attaching the ends of lattice panels.
Sample Cut List for a 12x16-Foot Attached Lattice Cover
| Member | Size | Length | Quantity | Notes |
|---|---|---|---|---|
| Ledger board | 2x8 PT | 16 ft | 1 | Lag-screwed to house rim joist with flashing |
| Outer beam | Double 2x8 PT | 16 ft each | 2 | Built up on-site; ganged with 16d HDG nails |
| Posts | 4x4 or 4x6 PT | Per height (typ. 8–10 ft) | 2–4 | Set on post bases after footing cure |
| Rafters | 2x6 PT | 12 ft | 9 | 24 in. o.c., 8 rafters + 1 for blocking |
| Blocking | 2x6 PT | ~22.5 in. each | 8–10 pieces | Between rafters at beam and ledger |
| Lattice panels | 4x8 prefab or custom | 8 ft | 6 panels | Standard 4x8 diagonal PT lattice |
| Fascia boards | 2x6 or 1x6 PT/cedar | 16 ft | 2 | Outer face of beam and rafter tails |
| Ledger cap flashing | Galvanized metal | 16 ft | 1 pc | Integrate with WRB above ledger |
Cantilever and Overhang Considerations
A small overhang beyond the outer beam (12 to 18 inches) is reasonable for a lattice cover and simply requires rafter tails to extend past the beam. If you want a true cantilevered design where the posts are inset from the outer edge and the roof extends significantly beyond, you're into structural engineering territory. The IRC prescribes that floor joist cantilevers shall not exceed the nominal depth of the joist, and similar thinking applies to roof members. Any cantilever beyond what prescriptive tables cover requires an engineered design. Don't assume a bigger rafter size will make it safe without running the numbers. If a dramatic cantilever is your goal, the cantilever patio cover guide is the right starting point, and budget for a structural engineer review.
Step-by-Step Build: Attached Lean-To Lattice Cover
Here's the actual build sequence for the most common configuration. Follow this order strictly. Skipping ahead or doing steps out of sequence is how mistakes compound.
- Finalize your design, pull your permit (if required), and have underground utilities marked by 811.
- Lay out footing locations using batterboards and string lines. Confirm square using the 3-4-5 method (a 3-foot measurement and a 4-foot measurement at right angles should produce a 5-foot diagonal). Double-check all dimensions before digging.
- Dig footing holes to below local frost depth. Minimum 10-inch diameter. Add 4 inches of gravel at the bottom for drainage.
- Mix and pour concrete (80-lb bags of fast-setting concrete work well for residential footings). Set anchor bolts centered and plumb in the wet concrete. Let cure a minimum of 3 days before loading.
- Prepare the ledger attachment wall: remove or cut back siding, expose the rim joist, apply self-adhering membrane to the wall surface, and set the ledger board at the correct height to achieve your desired roof pitch. Attach with code-compliant fasteners per your DCA-6 table.
- Install metal cap flashing over the ledger, integrate with the WRB above, and re-install or trim siding above the flashing. Do not re-install siding below the ledger — leave a gap for drainage.
- Attach post bases to the anchor bolts. Install posts plumb and brace them temporarily with 2x4 diagonal braces staked to the ground.
- Assemble and install the outer beam on top of the posts, ganged with hot-dip galvanized fasteners. Use post caps (Simpson Strong-Tie or equivalent) for the post-to-beam connection.
- Cut and install rafters at 24 inches o.c. from ledger to outer beam, using bird's-mouth cuts at each bearing point. Install hurricane ties at both ends of every rafter.
- Install solid blocking between rafters at the beam line and at the ledger.
- Install lattice panels. For 4x8 panels, you'll need a nailer grid or framing to support the panel edges. Secure with hot-dip galvanized screws or ring-shank nails. Leave 1/8-inch gaps at panel edges for expansion.
- Install fascia boards on the outer beam face and rafter tails.
- Schedule your inspection if required, and don't proceed to finish work until the inspector has signed off.
- Apply stain and sealer after the wood has dried (pressure-treated lumber should dry for at least 30 days before staining).
Step-by-Step Build: Freestanding Lattice Cover
A freestanding build follows the same general sequence with these key differences. You'll have four or more posts and four footings minimum. Your post layout needs to be square and level independently, without using the house as a reference. Install diagonal knee braces (2x4 or 2x6 at 45 degrees from post to beam on at least two adjacent sides) to provide lateral wind resistance. The beam runs on all four sides of the structure, either as a perimeter beam on top of the posts or as a double beam on two opposing sides with rafters spanning between them. Rafters connect beam-to-beam and use the same 24-inch o.c. spacing and hurricane tie requirements as the attached version. Post-to-beam connections use the same post cap hardware.
Tools and Materials Checklist
- Post hole digger or rented power auger (for frost-depth footings)
- 80-lb bags of fast-setting concrete (typically 3–4 bags per 10-inch diameter x 36-inch deep footing)
- Level (4-foot and torpedo), plumb bob or laser level
- Batterboards and mason's line for layout
- Circular saw with a carbide blade rated for PT lumber
- Miter saw for rafter cuts (especially bird's-mouth cuts)
- Drill/driver with impact driver for fastener installation
- Framing square
- Hot-dip galvanized or stainless structural screws, lag screws, through-bolts, and framing connectors (post bases, post caps, hurricane ties)
- Self-adhering membrane (for ledger flashing) and metal cap flashing stock
- Safety glasses, hearing protection, work gloves
- Ladder rated for your working height
Covering Options: Adding More Shade or Rain Protection
Once your lattice frame is up, you have several options for adding more coverage without rebuilding the structure. Each one changes the load on your structure, so confirm your frame can handle it before you add anything heavy.
Shade Cloth
Shade cloth (typically 50 to 90 percent density) is the lightest option, adds minimal dead load, and is easy to attach with zip ties or grommets to the lattice grid. It reduces UV exposure meaningfully and is reversible. It does not provide rain protection.
Polycarbonate Corrugated Panels
Polycarbonate corrugated panels (products like Palram SUNTUF or DynaGlas) provide rain protection and light transmission in one product. Palram's installation guides specify fastening at corrugation crowns using neoprene/EPDM-sealed washers, with typical purlin spacing in the 12 to 24-inch range for edge zones and up to 24 to 48 inches in field zones depending on panel profile and load. Always check the product's span/load table for your specific wind and snow conditions. Allow for thermal expansion gaps at panel ends and sides, as polycarbonate expands and contracts significantly with temperature change. The UV-protected face of the panel must face up, as marked by the manufacturer.
Metal Corrugated Panels
Corrugated metal panels (from manufacturers like Fabral and Metal Sales) are a durable, rain-proof option. Purlin spacing for most residential profiles is 24 inches o.c., with some profiles allowing up to 36 inches under light loads per their span tables. Metal panels require sealant tape at laps and self-sealing fasteners, and they add more dead load than polycarbonate, so confirm your rafter sizing accounts for it. Metal roofing also transmits sound from rain, which can be a plus or minus depending on your preference.
Partial Solid Section
If you want a rain-sheltered zone near the house but want to keep the open lattice feel at the outer edge, you can run solid decking or panels over the inner one-third of the structure and leave the outer section as open lattice. Frame a separate nailer system for the solid section and integrate the flashing carefully at the transition. For a detailed breakdown of all these covering approaches, the guide on how to cover a lattice patio cover or how to cover a slatted patio cover is a useful companion read.
Special Notes for Cedar and Vinyl Builds
Cedar builds follow the same structural sequence but use cedar-specific span tables since cedar has different modulus of elasticity and bending values than pressure-treated southern yellow pine. Cedar is also lighter, which is a structural advantage. Use stainless steel or hot-dip galvanized fasteners. Standard zinc-plated fasteners stain cedar and can corrode. Don't use carbon-steel post bases with cedar either, use hot-dip galvanized or stainless versions of your connector hardware.
Vinyl kit builds are fundamentally different in sequence because you're assembling a manufactured system, not sizing individual members from scratch. For step-by-step instructions specific to vinyl systems, see the guide on how to build a vinyl patio cover. Follow the manufacturer's installation manual exactly for post spacing, beam connections, and any load limits. Vinyl is sensitive to thermal expansion, so the gap allowances in the manual are functional, not suggestions. Over-torquing fasteners in vinyl causes cracking at connection points, which is a common mistake on first vinyl builds.
Finishing, Staining, and Long-Term Maintenance
For pressure-treated wood, let the lumber dry fully before applying any stain or sealer. Fresh PT lumber is typically still wet from the treatment process and will reject most finishes. Wait at least 30 days, or do the water droplet test: sprinkle water on the surface. If it beads, the wood is still too wet to stain. When it absorbs, you're ready. Use a penetrating stain-and-sealer product rated for exterior exposed wood. Solid color stains hide the wood grain but last longer. Semi-transparent stains show the grain but need more frequent reapplication (every 2 to 3 years on horizontal surfaces that catch weather).
Annual maintenance tasks for a wood lattice cover include clearing debris from the lattice grid (especially in fall), checking fascia boards and lattice panel edges for signs of splitting or checking, inspecting the ledger flashing for any gaps or sealant failures, and tightening any connectors that have worked loose. Check the post bases every few years for rust, especially in coastal environments. Replace any galvanized post bases that are actively rusting before they lose their load-carrying capacity.
Winter Care
In heavy snow regions, an open lattice cover generally sheds snow well due to the open gaps. If you've added covering panels, check the accumulated snow load after significant storms. Most residential polycarbonate panels are rated for moderate snow loads, but if you're in a zone with 30+ psf ground snow load, confirm your panel and rafter sizing account for that before the first winter. Remove snow accumulation with a soft roof rake rather than a metal shovel to avoid scratching or cracking panels.
Realistic Cost and Time Expectations
A 12x16-foot attached pressure-treated lattice cover in materials runs roughly $800 to $1,800 depending on your local lumber market, hardware choices, and whether you're adding covering panels. Add $200 to $400 for permit fees in most jurisdictions. Tool rental (post hole auger) adds another $50 to $100 per day. If you use cedar or a kit system, budget toward the higher end of the ranges in the comparison table above.
Time-wise, plan for three to four full working days minimum for a solo DIYer, or two weekends with a helper. Day one is typically layout, footing digging, and concrete pour, with nothing else to do until the concrete cures. Day two is ledger, flashing, and post installation. Day three is beam and rafter framing. Day four is lattice panels, fascia, and cleanup. Finish work (staining) adds another half-day after the wood dries. If you hit complications at the permit stage or need to wait for an inspection, add time accordingly.
Safety Practices That Aren't Optional
Working at height on a ladder while handling long lumber is the most common injury scenario on this type of project. Always have a second person present when setting posts, lifting beams, or working from a ladder. Use a ladder rated for your combined weight plus tools, and never stand on the top two rungs. Wear safety glasses when cutting PT lumber: the preservative treatment creates dust that you do not want in your eyes. If you're using a circular saw to cut lattice panels, the thin wood can kick back, use a sharp blade, a zero-clearance guide, and keep your body to the side of the blade path.
Treated lumber sawdust is a health concern. Cut PT lumber outdoors, wear an N95 respirator, and wash hands before eating or touching your face. Dispose of PT lumber scraps as solid waste, not burned, since the treatment chemicals are toxic when combusted.
When to Call a Pro
Most competent DIYers can handle a standard attached or freestanding lattice cover without professional help beyond the permit and inspection process. Call a structural engineer or licensed contractor if: your building department requires engineered drawings and you can't produce them, your soil conditions are unusual (fill, expansive clay, poor drainage), your site has a significant slope that affects footing design, you're attaching to a masonry or stucco wall, you want a cantilever beyond the prescriptive limits, or your structure exceeds about 14 feet in any span dimension. The inspection process exists to catch problems before they become dangerous. Treating the inspector as an adversary is the wrong mindset. Treat them as the free structural review they are.
FAQ
What building codes and standards must be checked before writing a DIY lattice patio cover how‑to?
Specify the local adopted codes (usually the International Residential Code for one‑ and two‑family dwellings) and reference sections for footings/foundations, attachments and guards. Use ASCE/SEI 7 (or locally adopted wind/snow maps) for design wind and snow loads. Note that jurisdictions may amend codes; always instruct readers to check local building department requirements, permit triggers, and inspection schedules.
What site‑specific technical data do readers need to plan foundations and structural members?
Require ground‑snow load and design wind speed (ASCE 7 maps), soil‑bearing capacity or use IRC prescriptive values, and local frost depth for minimum footing embedment. These values control footing size, post spacing, beam/rafter sizing and connector loads.
Which prescriptive tables and manufacturer resources should be cited for member sizing and fastener schedules?
Cite American Wood Council span tables and DCA‑6 for prescriptive ledger, joist and rafter spans and fastener schedules. Use Simpson Strong‑Tie (or similar) product data for post bases, anchors and connector allowable loads. For proprietary ledger screws or connectors, reference ICC‑ES reports and manufacturer installation tables.
What footing and post‑attachment details must be included?
Include IRC prescriptive footing sizing tied to tributary area and soil bearing (or an engineer’s design). Specify frost‑depth minimum embedment per local code. Detail concrete footing diameter/thickness, post‑sleeve or anchor type (Simpson post base models), anchor bolt embedment, and required standoff heights to prevent wood‑to‑concrete contact and provide drainage.
What ledger attachment guidance is required for attached/lean‑to covers?
Provide DCA‑6/IRC‑based ledger fastening options: 1/2" through‑bolts, 1/2" lag screws, or ICC‑ES‑rated structural ledger screws with spacing per manufacturer/DCA tables. Emphasize ledger flashing best practice (self‑adhering membrane under ledger, cap flashing over ledger, WRB tie‑in) to prevent water intrusion. Flag ledger attachment to cantilevered floor systems as not permitted without an RDP.
What structural load considerations must the article address?
Explain how to determine tributary area per rafter/beam, apply snow and wind loads (ASCE 7), and combine with live/dead loads for member sizing. For prescriptive builds within code tables, provide span limits; for conditions outside those tables (long spans, cantilevers, heavy snow or glass/panel roofs), require a structural engineer.