
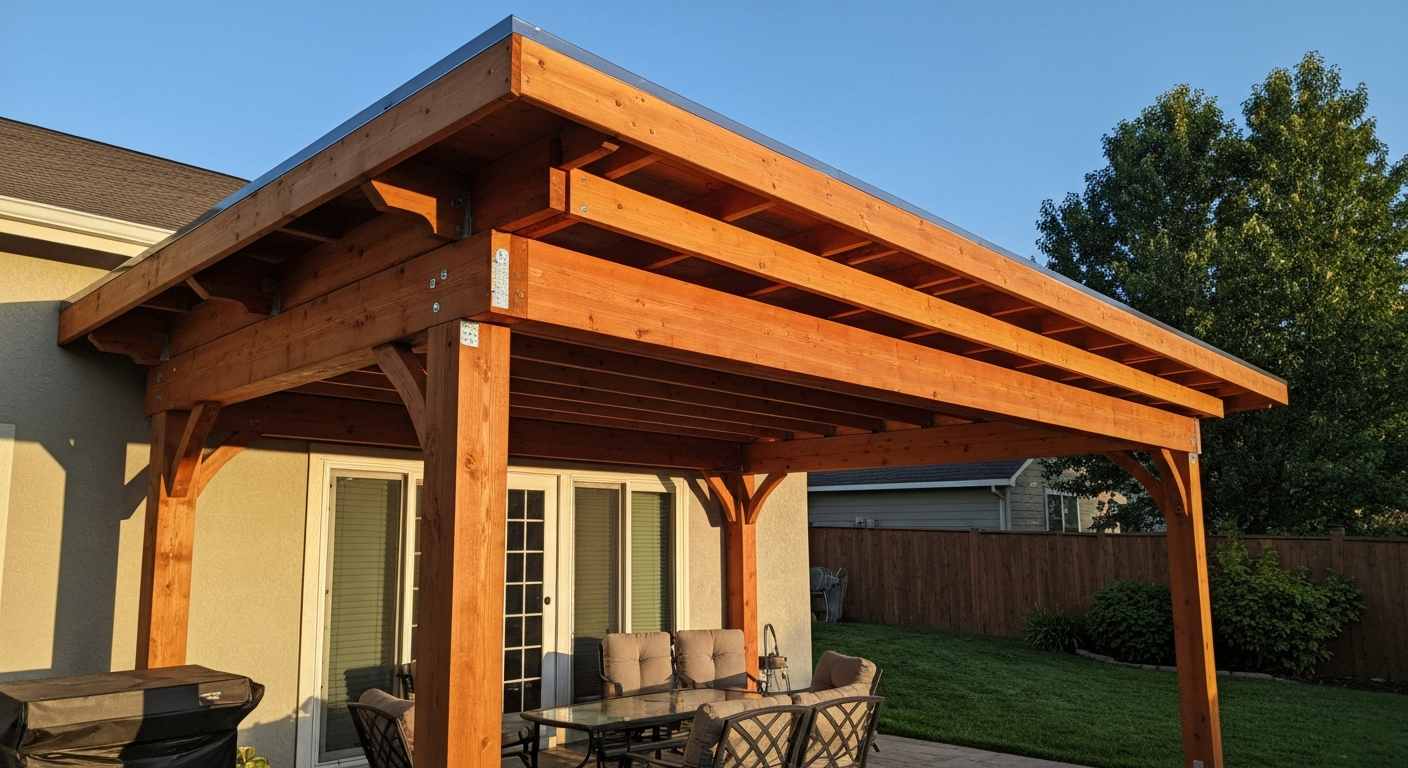
You can build a cedar patio cover yourself in a weekend or two if you plan the structure carefully, pull the right permits, and size your lumber correctly for your load zone. Cedar is one of the best wood choices for this job: Western red cedar and Northern white cedar are naturally resistant to decay and insects, they hold fasteners well, and they look great with just a coat of oil or stain. This guide walks you through every decision you need to make, from choosing your design and reading the permit requirements to pouring footings, hanging rafters, and applying a finish coat.
How to Build a Cedar Patio Cover: Plans, Sizing & Steps

Celia Vaughn
18 Jul 2026
What this guide covers and who it's for
This is a complete build guide aimed at homeowners who are comfortable using a circular saw, a drill, and a level, and who want to tackle a patio cover without paying a contractor to do every step. I'll cover attached (lean-to) structures and freestanding designs, and I'll touch on cantilever, lattice, and slatted variations along the way. You don't need to be an engineer to follow this, but you do need to be willing to check your local code, pull a permit when required, and call a structural engineer or contractor if your situation goes outside the prescriptive tables. Realistically, a 12x16 ft attached lean-to with straightforward footing conditions is a strong candidate for a confident DIYer. A complex freestanding gable roof over a large span, or any structure in a high-wind or heavy-snow zone, deserves a professional review before you start.
Quick decision guide: which design fits your situation
Before you price materials, nail down which type of structure you're building. Each design has a different cost, complexity level, and permit footprint.
| Design type | Best for | Typical complexity | Key consideration |
|---|---|---|---|
| Attached lean-to (shed roof) | Most suburban backyards, budget builds | Low to moderate | Requires solid ledger attachment to house; permit almost always required |
| Freestanding gable | Larger spaces, pools, detached seating areas | Moderate to high | Needs footings, posts, and beam sizing for full wind/gravity loads |
| Cantilever | Clean sightlines, no front posts desired | High | Beam sizing increases 10–25%; needs engineer review near limits |
| Lattice | Shade with airflow, climbing plants | Low to moderate | Open structure; can often use lighter rafters; easy to cover later |
| Slatted | Partial shade, modern aesthetic | Low to moderate | Slat spacing is a design choice; drainage is built-in |
For most first-time builders, the attached lean-to is the right starting point. It uses your house wall as one structural side, which reduces the post and beam count significantly. If you want something farther from the house or need the structure to stand on its own, go freestanding. Cantilever designs, where the roof overhangs without a front post, are genuinely more complex because the beams carry higher bending moments. If you're drawn to a cantilever style, the structural considerations deserve their own deep dive. See our guide on how to build a cantilever patio cover for detailed structural guidance, step‑by‑step plans, and sizing considerations specific to cantilevered roofs. Lattice and slatted covers are simpler in framing terms but still need proper post sizing and connections, and if you're planning to add a solid roof covering to a lattice structure later, that's a different load case entirely. For step-by-step methods on shading, spacing, and finishing a slatted patio cover, see how to cover a slatted patio cover. For materials and techniques on finishing a lattice-style roof, see a short how to cover a lattice patio cover guide that outlines options and installation tips. If you want step-by-step plans for a lattice option, see our guide on how to build a lattice patio cover for materials, spacing, and fastening details.
Permits, codes, and property constraints checklist
I'll be direct: most covered patio structures require a permit. The International Residential Code (IRC Section R105.1) requires permits for any work that constructs, enlarges, alters, or moves a structure. Some jurisdictions exempt one-story detached accessory structures under 200 square feet, but once you attach a cover to your house or put a solid roof on it, that exemption usually evaporates. An attached patio cover is treated structurally as part of your home and almost always needs a permit. Check with your local building department before you buy a single board.
- Contact your local building department and ask specifically whether a covered attached patio structure or freestanding covered structure requires a permit in your jurisdiction
- Ask what drawings are required: a simple site plan and framing plan are typically the minimum; some jurisdictions want stamped engineering for spans over 10–12 ft
- Check your property setback rules: most municipalities require patio covers to sit a minimum distance (often 5–10 ft) from property lines; HOA rules may be stricter
- Check for easements on your property survey; utility easements can eliminate your chosen build location entirely
- Confirm your homeowner's insurance: some carriers require notification before adding a permanent structure
- If you live in a flood zone (FEMA zones A or V), additional elevation and anchoring requirements apply
- Verify that the exterior wall you plan to attach a ledger to has accessible band joist framing; some stucco or brick veneer walls require special ledger details
- Check HOA covenants for material, color, and height restrictions on accessory structures
When you pull a permit, you also get a set of inspections that protect you. The footing inspection (before concrete is poured) and the framing inspection are the two critical ones. Don't skip them. A failed inspection is far better than a collapsed structure or a problem discovered when you sell the house.
Site planning and layout: orientation, drainage, setbacks, and roof slope
Spend time on layout before you ever dig a hole. The most common mistake I see on first builds is starting with a rough idea of 'about 12 feet out from the house' and ending up with a post that lands directly over a buried downspout or a roof slope that drains straight into the foundation.
Orientation and sun
A south-facing patio in a hot climate benefits from an east-west running roof with enough pitch to block the high summer sun but let in lower winter light if you want it. A north-facing patio rarely needs shade management as a priority. Think about your primary use: morning coffee means the east side matters most; afternoon entertaining means western shade is critical. This sounds obvious but it genuinely affects whether a simple lean-to serves you or whether you need a higher structure to block the sun angle.
Roof slope and drainage
A minimum slope of 1/4 inch per foot (about 1.2 degrees) is the absolute floor for drainage on any patio cover with a solid roof covering. Most builders use 1:12 to 3:12 pitch for a lean-to, which gives you visible slope without pushing the outer posts uncomfortably high. For polycarbonate panels, most panel manufacturers require a minimum 5-degree slope (roughly 1:12). For metal roofing, a 1:12 minimum is common. For shingles, you need at least a 2:12 to 3:12 slope depending on the shingle type. Set your ledger height at the house and your outer beam height to achieve your target slope, then check that the water sheds away from the structure and the house foundation, not toward either.
Setbacks and post placement
Measure your required setbacks first and mark them with stakes. Then lay out your post locations using batter boards (horizontal boards set back about 2 ft beyond each corner) and string lines. This lets you pull strings, check square using the 3-4-5 triangle method (multiples work fine: 6-8-10 or 9-12-15 for larger layouts), and mark footing center points before you disturb the soil. Mark footing centers with a nail and a spray paint dot. Check diagonal measurements corner to corner: if they match, you're square.
How cedar compares to other patio cover materials
Cedar is my personal recommendation for most wood patio covers, but it's not automatically the right choice for everyone. Here's an honest comparison of the four materials you're most likely to weigh.
| Material | Durability | Upfront cost (relative) | Maintenance | Best use case | Watch out for |
|---|---|---|---|---|---|
| Western red cedar | Excellent (natural decay resistance in heartwood) | Moderate ($$) | Oil or stain every 2–3 years; no painting needed | Traditional look, humid or coastal climates, exposed structure | Sapwood is not decay-resistant; check board grade and heartwood content |
| Pressure-treated lumber (PT) | Very good (chemical preservative) | Low ($) | Paint or stain recommended; end-cuts need field treatment | Budget builds, ground-contact posts, high-moisture areas | Requires hot-dip galvanized or stainless fasteners; greenish tint initially |
| Vinyl (PVC) | Excellent (no rot, insects irrelevant) | Moderate-high ($$$) | Wash down once a year; no staining or sealing | Low-maintenance priority, modern aesthetic | Limited structural spans; hollow extrusions need internal steel in some applications |
| Aluminum | Excellent (no rot, no rust in standard grades) | High ($$$$) | Near-zero; powder coat lasts 15–20 years | Maximum longevity, commercial-style look, minimal upkeep | Higher fabrication cost; not a true DIY cut-and-fasten material for most homeowners |
Cedar wins for the DIYer who wants a structure that looks natural, is straightforward to cut and fasten with standard tools, and will last decades with moderate care. Pressure-treated lumber is fine for posts in the ground and for hidden framing members, and many builders combine the two: PT for posts and beams, cedar for visible rafters and fascia. Vinyl makes sense if you genuinely can't commit to periodic maintenance, but be aware that vinyl patio covers are often pre-engineered kits with span limits, and structural vinyl is a different animal from wood framing. If you prefer vinyl, see our concise how-to on how to build a vinyl patio cover for step-by-step guidance tailored to pre-engineered vinyl systems. Aluminum is excellent but the installed cost is typically 30–50% higher than a comparable cedar build, and most aluminum cover systems are fabricated products rather than something you size and cut in your driveway.
Tools, fasteners, and hardware checklist
Tools you'll need
- Circular saw (or miter saw for accurate rafter cuts)
- Cordless drill/driver (18V minimum) with impact driver for structural screws
- Hammer drill for anchor bolts into concrete
- Post hole digger or rented power auger (strongly recommended for multiple footings)
- Level (4 ft torpedo level and a long 6 ft or 8 ft level)
- Speed square for rafter layout and checking plumb
- Tape measure (25 ft minimum)
- String line and line level or laser level
- Chalk line
- Batter boards (scrap 1x4 or 2x4 and stakes)
- Concrete mixing tub or rented mixer for footings
- Safety glasses, hearing protection, and work gloves
Fasteners and hardware
Cedar and pressure-treated lumber both require corrosion-resistant fasteners. Simpson Strong-Tie and other connector manufacturers specify hot-dip galvanized (ASTM A653 G185, also called ZMAX in Simpson's line) or stainless steel for use with PT lumber and in corrosive exposures. In coastal or saltwater environments, stainless steel is the right call throughout. Don't use standard bright zinc-plated screws or nails with PT lumber or cedar in wet conditions: the preservative chemicals accelerate corrosion and the connection weakens over time.
- Structural screws (3 in and 3.5 in): SDWH, LedgerLOK, or equivalent structural screws rated for PT/cedar
- Lag screws (1/2 in diameter) with washers for ledger attachment to house band joist
- Galvanized or stainless joist hanger hardware (Simpson LUS or equivalent for rafter size)
- Post bases: Simpson AB/ABA adjustable post base or equivalent for surface mount; cast-in-place anchors for embedded applications
- Post cap connectors (Simpson BC or equivalent) for beam-to-post connections
- Rafter ties or hurricane ties where required by code or high-wind zones
- Hot-dip galvanized carriage bolts (1/2 in) with nuts and washers for beam-to-post through-bolting
- Concrete anchor bolts (1/2 in wedge or sleeve anchors) for post bases anchored into existing concrete slabs
- Corrosion-resistant flashing: minimum 0.019 in nominal thickness (IRC R507.2.4) at the ledger-to-house connection
Structural basics: loads, spans, and decisions you must make before you build
This is the section most DIY guides gloss over, and it's the one that determines whether your structure is safe or not. You don't need to do full engineering calculations for a simple structure in a low-load zone, because the IRC and AWC publish prescriptive span tables that cover common situations. But you do need to understand what loads your structure needs to carry, and you need to confirm that your design falls within the prescriptive limits.
The loads your roof must handle
There are three load types that matter for a patio cover. Dead load is the weight of the structure itself: the lumber, roofing material, and hardware, typically in the range of 10–15 psf (pounds per square foot) for a wood-framed roof with a light covering. Live load for a patio cover roof is typically 20 psf in many jurisdictions (compared to 40 psf for a deck floor), though some codes require 30 psf or more for accessible roof areas. Snow load is the big variable: your ground snow load comes from ASCE 7 maps, and the actual roof snow load is derived from that ground value using a roof slope factor. In high snow areas (ground snow loads above 25–30 psf), you must design specifically for snow, and a simple prescriptive table approach may not be sufficient. Wind load matters most in coastal, mountain, or tornado-prone areas. Look up your jurisdiction's basic wind speed on the ASCE 7 wind speed maps. If your area has a design wind speed above 115 mph, you need to verify that your connection hardware and structure are sized specifically for that wind environment.
When to call an engineer
Call a structural engineer (or ask your building department to require one) in any of these situations: spans over 14 feet for beams, ground snow loads above 30 psf at your site, design wind speeds above 115 mph, a cantilever design where the overhang is more than about one-quarter of the back-span, any structure attached to a masonry or unusual wall assembly, or any situation where your local building department asks for stamped drawings. A one-time engineering consultation typically runs $200–$600 for a simple patio cover review. That is money very well spent compared to a structure failure.
Rafter, beam, and post sizing reference table
The values below are representative reference ranges based on AWC span table guidance and common IRC prescriptive tables for Douglas Fir-Larch and comparable species groups, using a 20 psf live load plus 10 psf dead load, and rafters at 24 inches on center. Cedar spans slightly shorter than Douglas Fir-Larch for a given size because cedar has lower design values, so treat these as a starting point and verify against the AWC Span Tables for Joists and Rafters using the actual species and grade you purchase. A municipal reproduction of IRC span tables (City of Philadelphia, reproduction of IRC R507.6 deck joist span/cantilever table) lists typical values, for example, Southern Pine 2×8 at 16 in OC has an allowable joist span of 11 ft‑10 in (40 psf live + 10 psf dead) with a maximum cantilever of about 2 ft‑3 in blank" rel="noopener noreferrer">City of Philadelphia — reproduction of IRC R507.6 deck joist span/cantilever table (municipal code document). A 2x8 joist in a species with E = 1,600,000 psi and Fb = 1,255 psi (such as #2 Douglas Fir) has an allowable single-span of approximately 12 ft-10 in under 40 psf live plus 10 psf dead per AWC span table examples. See American Wood Council, Span Tables for Joists and Rafters (example calculations and worked examples) for the AWC worked example showing a 2×8 with E = 1,600,000 psi and Fb = 1255 psi having an allowable single‑span of 12 ft‑10 in under 40 psf live + 10 psf dead blank" rel="noopener noreferrer">American Wood Council — Span Tables for Joists and Rafters (example calculations and worked examples). For a 20 psf live load (patio roof), allowable spans are longer. Always confirm with the actual table for your species and grade.
| Member | Size | Max span (approx, 20 psf LL + 10 psf DL, 24 in OC) | Notes |
|---|---|---|---|
| Rafter/joist | 2x6 | Up to ~9 ft | Adequate for short spans; verify cedar design values |
| Rafter/joist | 2x8 | Up to ~12 ft | Most common size for 10–12 ft patio depths |
| Rafter/joist | 2x10 | Up to ~15 ft | Use for longer spans; check actual species grade |
| Beam (doubled) | 2x8 (doubled) | Up to ~8 ft between posts | Span depends heavily on tributary load width |
| Beam (doubled) | 2x10 (doubled) | Up to ~10–11 ft between posts | Verify with beam span tables for actual load |
| Beam (doubled) | 2x12 (doubled) | Up to ~12–13 ft between posts | Approach engineer review territory for cedar at this span |
| Post (4x4) | 4x4 | Up to 8 ft height, light loads | Check post buckling; 6x6 preferred for freestanding structures |
| Post (6x6) | 6x6 | Up to 10–12 ft height | Standard recommendation for freestanding patio cover posts |
A few practical notes on using these ranges: beam span is not the same as rafter span. The beam carries the ends of all rafters and transfers that load to posts. A deeper beam (or a triple 2x instead of a double) is always the conservative and safer choice when you are near the limit of a table. Post height also affects post sizing because taller posts are more vulnerable to buckling under load, especially if they are not braced laterally. For most residential patio covers under 10 ft in post height, a 6x6 post is the standard recommendation for freestanding structures. For attached lean-tos with posts only on the outer side, 4x4 posts are common at heights under 8 ft in light-load zones, but 6x6 is better practice.
Footings and post anchoring
Footings are the foundation of the whole structure and the most common place DIYers undersize things. Per the IRC (R403.1.4), exterior footings must extend below the frost line and must be placed no less than 12 inches below undisturbed ground surface. The frost line depth varies dramatically by location: it's essentially zero in coastal Southern California or Florida, and it can be 48 inches or more in Minnesota or northern New England. Your local building department will tell you the required footing depth. Concrete for footings must have a minimum compressive strength of 2,500 psi (f'c) in most conditions, and 3,000 psi in higher seismic design categories. Bags of Quikrete 4000 (4,000 psi) or Quikrete Fast Setting are both fine choices for post footings.
For post sizing, calculate the footing diameter based on the load it carries and the bearing capacity of your soil. A simple rule of thumb used in many prescriptive guides: for a lightly loaded residential patio cover, a 12-inch diameter footing in good soil is a minimum, and 16-inch diameter footings are better for freestanding posts in standard residential soil. If you're on expansive clay or soft fill, get a soils assessment or use a conservative larger footing. After the concrete cures (minimum 24–48 hours for fast-set, 7 days for standard mix before loading), set your post bases. Simpson Strong-Tie AB/ABA adjustable post bases are the standard choice: they keep the post end off the concrete surface, reducing moisture contact, and they allow minor position adjustment before final fastening. Cast-in-place anchor bolts are another option if you can accurately locate them before the pour.
Ledger attachment for an attached cover
For an attached lean-to, the ledger is the most structurally critical connection in the entire build. The ledger transfers the roof load directly to your house framing, so it must be positively attached to the band joist (the rim joist) of your house floor or roof framing, not just to sheathing or siding. IRC R507 and the associated ledger fastener tables (Table R507.9.1.3(1) and related tables) specify the fastener type, size, and spacing. Typically, 1/2-inch lag screws or through-bolts staggered into the band joist at specific intervals are required. Remove the siding behind where the ledger will sit, and install corrosion-resistant flashing (minimum 0.019 inch nominal thickness per IRC R507.2.4) behind and over the top of the ledger before fastening. This is non-negotiable: a ledger without proper flashing will cause water infiltration into your house wall, leading to rot in the band joist that may not be visible for years.
What often goes wrong here: people fasten the ledger through lap siding without removing the siding first, leaving gaps that channel water directly into the wall. Others skip the flashing entirely because it looks fussy. A common mistake is also setting the ledger at the wrong height so that the finished roof slope ends up too low at the house wall, which causes water to pond or flow back under the flashing. Set ledger height so your finished roof surface at the house is a minimum of 1 inch below the door threshold or bottom of any windows that are adjacent.
Step-by-step build sequence
Attached lean-to cedar cover
- Pull your permit and gather approved drawings; schedule footing inspection before pour
- Set up batter boards and string lines; verify layout is square using the 3-4-5 method
- Dig footing holes to required frost depth and diameter; call for footing inspection if required
- Pour concrete and set post base hardware (or cast-in anchor bolts) at each post location; let cure
- Remove siding at ledger location; mark ledger height accounting for target roof slope
- Install ledger flashing behind the wall sheathing; seal top edge with approved flashing tape
- Cut and fasten ledger board using the fastener schedule from your permit drawings or IRC Table R507.9.1.3
- Set posts in post bases; plumb each post in two directions and brace temporarily with 2x4 kickers
- Cut the outer beam to length and hoist it into post cap connectors; through-bolt to posts with 1/2 in galvanized carriage bolts
- Lay out rafter spacing (typically 16 or 24 inches on center) on both ledger and beam; mark with a pencil and square
- Cut bird's mouth notch at rafter heel if required for level bearing; cut rafter tails at consistent length for fascia alignment
- Install rafters using code-listed joist hangers at the ledger end and rafter ties or hurricane ties at the beam end
- Install blocking between rafters at both ends and at midspan for long spans
- Install roof sheathing (if using shingles or solid roofing), or purlins for metal roofing, or direct-mount panels for polycarbonate
- Install fascia boards on rafter tails; install soffit if desired
- Apply roof covering per manufacturer instructions; ensure drip edge at eaves and rake edges
- Call for framing inspection before closing up any work
- Apply cedar finish: oil-based penetrating stain or clear water repellent; apply to all exposed surfaces including end grain
Freestanding cedar cover (additional steps)
A freestanding structure follows the same footing, post, and beam sequence but both long sides use posts and beams rather than one ledger wall. The critical difference is that a freestanding structure must resist lateral loads (wind trying to rack the frame sideways) entirely through its own connections and any diagonal bracing. For a freestanding structure, plan for knee braces (diagonal 4x4 or 2x6 braces cut at 45 degrees between post and beam) or structural shear panels at the posts unless the post-to-base and post-to-beam connections are specifically rated for full moment transfer. Simpson BC post caps and solid through-bolted connections help significantly, but knee bracing is the most reliable and visible approach for a wood structure.
Roof covering options for cedar patio covers
The roof covering you choose changes both the structural requirements and the maintenance schedule. Here are the most common options for cedar-framed patio covers.
- Asphalt shingles: familiar, affordable, requires solid sheathing (OSB or plywood), minimum 2:12 pitch with IWS underlayment or 3:12 for standard 3-tab; matches most house roofs well
- Metal roofing (corrugated or standing seam): excellent durability, works at 1:12 slope, can be installed on purlins (no solid sheathing required), noisier in rain but very low maintenance
- Polycarbonate panels: lets light through, great for plants and bright spaces, requires a minimum 5-degree slope, needs UV-stabilized panels to avoid yellowing; translucent or tinted options available
- Open lattice or slatted (no waterproof layer): simplest and least expensive; shade structure only; cedar 2x4 or 2x6 slats at 3–6 in spacing create filtered shade and a clean look
- Cedar shakes or shingles: beautiful and natural match to the structure material, but labor-intensive; requires 3:12 minimum pitch and proper felt underlayment
Finishing, staining, and maintaining cedar
Cedar is naturally durable, but unfinished cedar will grey out within one to two seasons and surface checks (small cracks along the grain) will develop as the wood weathers. That's not structurally serious, but it does allow moisture intrusion that speeds surface degradation. For structural longevity, apply a penetrating oil-based stain or a clear water-repellent preservative (one that contains a UV inhibitor) before the structure is assembled if possible, and then again as a finish coat after assembly. Pay particular attention to end grain cuts: end grain absorbs moisture many times faster than face grain, and an unsealed rafter tail end will begin to check and split within a year or two in wet climates. A generous brush application of finish to every cut end during assembly takes five minutes and makes a real difference over time. Plan to reapply finish every two to three years depending on your climate and sun exposure. Power washing before reapplication is fine; just let the wood dry fully (three to five days minimum) before applying new finish.
Realistic cost estimates
Material costs vary by region and lumber market conditions, but these ranges are a reasonable planning baseline for a DIY build in the mid-2020s. A basic attached lean-to in the 12x16 ft range using cedar lumber, standard hardware, and a metal or polycarbonate roof can come in between $2,500 and $5,000 in materials depending on your choices. Add concrete, post bases, flashing materials, and finish products and a realistic material budget for that size is $3,000–$5,500. A freestanding structure of similar size costs more because you need posts and beams on all sides, pushing material costs to roughly $4,000–$7,000 for cedar. Labor, if you hire out any portion, runs $40–$90 per hour for a skilled carpenter in most markets, and total installed contractor prices for a comparable structure typically run $8,000–$18,000 depending on complexity, region, and finish level. The DIY savings are real, but only if you build it right the first time.
Troubleshooting common problems
- Rafters crown up, not flat: Cedar and most lumber has a natural bow (crown). Always install rafters crown-side up so live load straightens them rather than exaggerating the bow. Mark the crown with an arrow before you set them
- Ledger not level after installation: Check the house wall for plumb and flat before assuming the ledger is wrong. A shimmed ledger on an out-of-plumb wall is fine structurally; mark shim locations and use full-length fasteners that reach through shims into the band joist
- Post bases out of position after pour: If you used cast-in anchors and they're slightly off, don't force the post. If the error is small (under 1/2 inch), adjustable post bases like the Simpson ABA handle minor correction. More than that and you may need to re-pour
- Water pools at the house end of the roof: Slope is insufficient or flashing is not directing water out and away. Even 1/8 inch per foot net slope improvement at the ledger end can fix this; recheck your ledger height relative to outer beam height
- Cedar checking and splitting at rafter tails: Likely unsealed end grain, as described above. Apply two coats of end-grain sealer or oil-based finish and the checking should stabilize
- Roof covering lifts at corners in wind: Insufficient fastening at panel or shingle edges. Follow manufacturer fastener schedules exactly; this is where skipping spec sheets causes problems
When to hire a pro (and what to ask them)
This is a genuinely doable DIY project for a motivated homeowner with basic carpentry skills, but there are clear situations where bringing in a professional is the right call, not a defeat. If your building department requires stamped structural drawings, hire a structural engineer to review or create them; trying to fake it or skip this step is a real legal and safety risk. If your site has unusual soil conditions, a slope, or poor drainage, a contractor with foundation experience is worth consulting before you dig. If your spans exceed the prescriptive table limits, or if your structure is large enough that a failure would put people at serious risk, get an engineer. And if you get to the ledger attachment step and discover that your band joist is rotted, sistered, or missing, stop and call a carpenter: that's a house repair job before it's a patio cover job. For the majority of straightforward attached lean-to builds on a level lot with normal soil, though, this is absolutely within reach for a weekend DIYer with the right tools and a willingness to read the permit requirements carefully.
FAQ
What are the first steps a DIY homeowner should take to plan a cedar patio cover project?
Start by defining function (shade, rain cover, outdoor living), location (attached vs free‑standing), footprint and basic style (lean‑to, gable, slatted, lattice, cantilever). Check property lines, easements and HOA rules. Determine local building‑permit requirements by contacting your city or county building department and review applicable code triggers (attached covers, structural framing, and any work that alters foundations or rooflines commonly require permits). Do a site survey for existing grade, drainage, utilities and roof/wall connection points. Sketch a dimensioned plan, list materials, and estimate loads (snow/wind) for your local area using ASCE/municipal maps. If uncertain about loads, ledger details, or footings, consult a structural engineer.
When do I need a permit for a cedar patio cover?
Permits are typically required for attached covers, covers that alter the supporting structure, or structures exceeding local area exemptions. The IRC (R105) requires permits for construction or alterations; many jurisdictions exempt one‑story detached accessory structures under ~200 sq ft but treat attached patio covers and decks as permit‑required. Always confirm with your local building department for local thresholds and required submittals.
How do I determine loads (snow and wind) for sizing rafters, beams and footings?
Use ASCE 7 maps or your jurisdiction’s adopted code to get ground‑snow load and basic wind speed for your site. Apply the applicable load combinations in your code. For prescriptive wood sizing, use AWC span tables (or IRC/municipal span tables) selecting the lumber species/grade, member spacing and the design live/dead loads (common prescriptive loads are 40 psf live + 10 psf dead for roof/deck covers). If your site has high snow or wind, or the cover has large cantilevers, consult an engineer.
How do I size rafters, joists and beams for a typical cedar patio cover?
Use AWC span tables or IRC prescriptive tables. As a compact example (assumes 40 psf live + 10 psf dead, common species-grade assumptions): - 2×6 @ 16" OC: span ≈ 8'–10' (varies by species/grade) - 2×8 @ 16" OC: span ≈ 11'–13' - 2×10 @ 16" OC: span ≈ 15'–17' For beams supporting rafters/joists, double or triple members are common (e.g., two 2×10s), with spans and required posts determined from tributary width and loads. Use the exact AWC or IRC tables for your species, spacing and load — the above are examples only. Increase member sizes for cantilevers or higher loads, and verify deflection limits (L/240 or as required).
What are typical footing and post anchoring requirements?
Footings must reach below frost depth per IRC (R403.1.4) and be on undisturbed soil. Minimum embedment for exterior footings is commonly 12" below undisturbed surface and to the frost line. Concrete strength should meet local code (often ≥2,500–3,000 psi). Size footings by load and soil bearing capacity; a common small patio cover might use 12–24" diameter x 12–24" deep concrete pier footings or spread footings sized to support post loads. Use engineered post bases (Simpson or similar) to secure posts to cured concrete — choose hot‑dip galvanized or stainless fasteners in coastal/corrosive exposure. For retrofit attached covers, ensure ledger and post loads transfer properly through anchors or cast‑in anchors per manufacturer guidance.
How should I attach a ledger to an existing house?
Follow IRC/ledger rules: attach ledger to solid band joist or rim joist using code‑listed fasteners (through‑bolts or lag screws per R507 and manufacturer tables) and spacing per code. Provide corrosion‑resistant flashing under the ledger (minimum 0.019" metal) and proper house‑wrap integration to prevent water intrusion. Never rely solely on nails; use specified bolts/lag screws and verify the band joist/backing is sound. If the house has a brick veneer or irregular substrate, consult an engineer or use an independent freestanding design.