
Building a stucco patio cover is a serious but very doable DIY project if you're comfortable with carpentry, patient with concrete work, and willing to pull permits. The finished result is a solid, permanent structure, whether attached to your house or free-standing, with a hard stucco exterior that blends right into your home's existing finish. Plan on two to four weekends of active work for a typical 12x16-foot attached lean-to, a materials budget of roughly $3,500 to $7,500 depending on region and design, and at least one inspection visit before you close up any framing. This guide walks you through every phase: design, permits, site prep, framing, roofing, and the stucco finish system itself. For a detailed walkthrough, consult our step by step patio cover instructions. For step-by-step build a patio cover instructions, see the detailed patio cover construction guide (internal resource). For a detailed walkthrough on how to build a patio cover step by step, consult a focused guide that covers each task in sequence from permits to finish coats.
How to Build a Stucco Patio Cover: DIY Step-by-Step & Plans

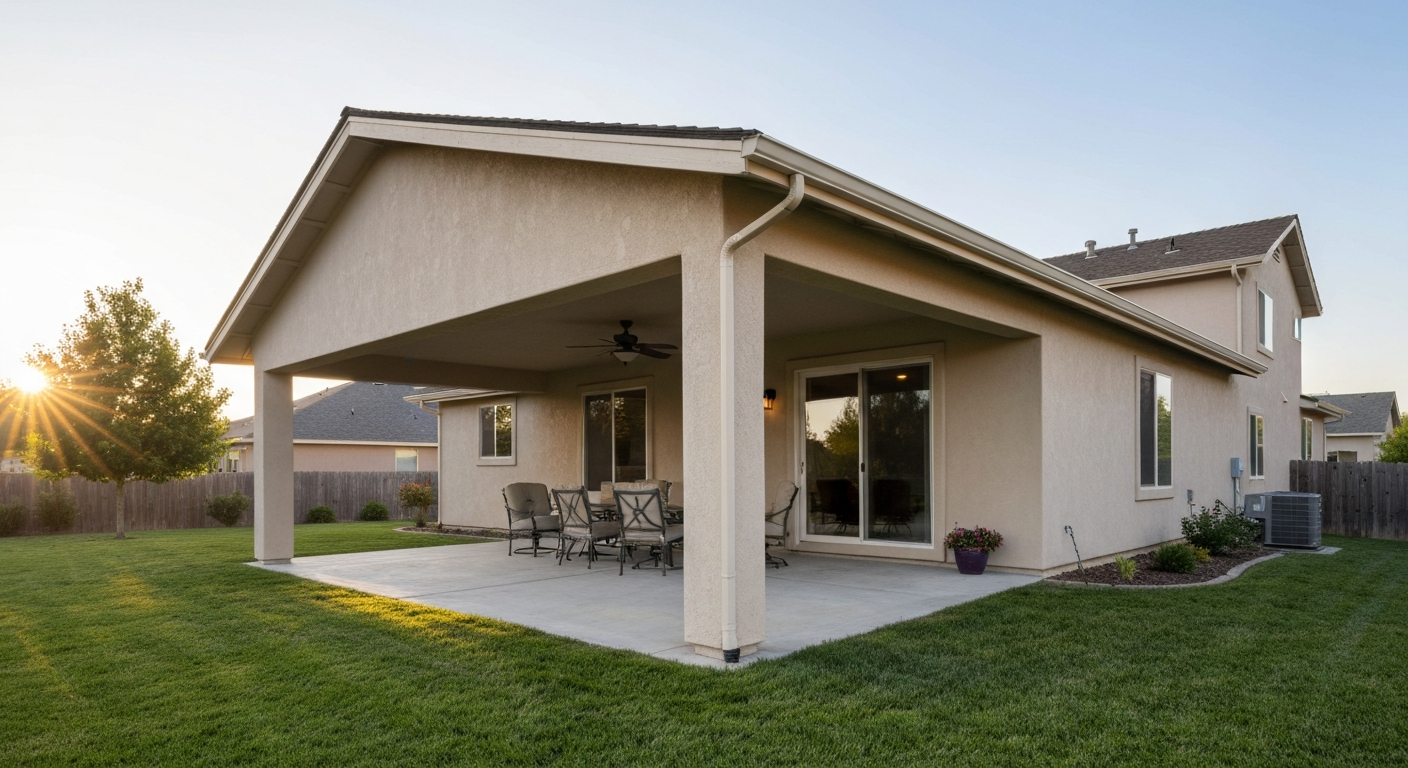
What this project involves and who it's built for
A stucco patio cover combines a wood-framed (or occasionally steel-framed) structural shell with a Portland cement plaster finish applied over metal lath. That combination makes it heavier and more labor-intensive than a simple aluminum pergola kit, but it also makes it genuinely permanent, virtually maintenance-free once cured, and visually indistinguishable from your stucco house walls. This guide is written for homeowners who have already done framing work, are comfortable reading a tape measure and a simple load table, and can follow a permit process. If you have never set a post in concrete or cut a rafter, work through a simpler patio cover build first to get your footing.
You will be choosing between an attached cover, which ties into your home's existing structure at a ledger board bolted to the house rim or wall framing, and a free-standing cover, which carries all its own loads on posts and beams without touching the house. Attached covers are more common in residential backyards because they cost less (you only need posts along one side) and they connect your indoor and outdoor spaces naturally. Free-standing covers give you more placement flexibility and avoid any risk of disturbing the house's water barrier or structure, which makes them popular in situations where the house exterior is tricky to flash properly.
Choosing your design and style
The three most common residential patio cover designs are the lean-to (a single-slope shed roof), the gable (a peaked roof with two slopes meeting at a ridge), and the hip (four slopes meeting at a central peak). For stucco applications, the lean-to is the easiest starting point: fewer framing members, a straightforward ledger attachment, and a predictable drainage path. A gable cover looks more architectural and adds headroom at the center, but it requires a ridge beam, opposing rafter pairs, and collar ties or rafter ties per IRC Section R802, which adds both material cost and structural complexity. Hip roofs are the most finished-looking, but the compound rafter cuts and hip-valley framing genuinely push this into contractor territory for most first-timers.
For functional choices, think about where the sun hits your patio at the hours you actually use it. A lean-to sloped away from the house sheds water cleanly into the yard, but if your south-facing patio gets afternoon sun, a wider gable with enough pitch to allow a ceiling fan mount might serve you better. Free-standing gable covers are especially popular as outdoor kitchen or lounge structures because they feel like a room of their own. Sketch two or three options on graph paper with your rough dimensions before committing, and consider whether you want a fully enclosed soffit and fascia (which stucco requires for a clean look) versus an open-rafter aesthetic.
Site assessment before you design anything
Measure the space twice. Mark out the footprint with stakes and string, and record the exact distance from the house wall to the outer post line, plus the length of the wall you are attaching to. Check the slope of your patio slab or ground: a long patio can drop three or four inches over 16 feet, and that slope affects your post heights and final roof elevation. If you have an existing concrete slab, check whether it is thick enough (at least 3.5 inches, ideally 4 inches with reinforcing) to accept post-base anchor bolts. Thin unreinforced slabs often cannot safely carry post anchors without core drilling and epoxy dowels into a new concrete pad beneath.
Before digging anything, call 811 (the U.S. national dig-safe number) to have underground utilities marked. This is not optional; buried gas, electrical, and irrigation lines appear in patio areas constantly. Also look at drainage: water needs to move away from your house foundation. If the patio sits in a low spot, your cover could funnel roof runoff into a problem zone. Plan gutter placement and downspout routing now, not after the concrete is poured. Finally, observe sun angles at different times of day and note any existing trees that might shade your solar access or drop debris onto the roof.
Permits, codes, and what inspectors look for
Most jurisdictions require a building permit for any attached patio cover and for free-standing structures over a certain square footage (often 200 square feet, but this varies widely). A stucco finish almost always triggers a permit because it involves a multi-coat cementitious system over lath, which codes treat as plastering work subject to inspection. Some cities, like Elk Grove, California, publish specific patio-cover handouts with prescriptive plan checklists that tell you exactly what drawings to submit. Check your local building department website first: search for your city name plus 'patio cover permit handout' or 'conventionally built patio cover.' The permit fee typically runs $150 to $500 for a residential patio structure.
For a wood-framed cover, your plans will need to show footing sizes and depth (meeting IRC R403.1.4 frost protection requirements for your region), post sizes and spacing, beam and rafter sizes (derived from AWC span tables or IRC Chapter 8 for the roof), and the ledger attachment detail including fastener type and spacing from IRC Table R507.9.1.3. Inspectors will typically make two visits: a framing inspection before sheathing goes on (to check all connections, hardware, and member sizes), and a final inspection after stucco is complete. In some jurisdictions there is also a lath inspection before plaster goes on, which is worth confirming because missing it means tearing off finished stucco.
Your roof design needs to account for site-specific wind and snow loads. The IRC directs you to use the ASCE 7 Hazard Tool (available at asce7hazardtool. The 2021 International Residential Code (IRC), Chapter 3 (Section R301: Climatic & Geographic Design Criteria) requires using the IRC prescriptive tables or ASCE 7 methods to determine site-specific wind, snow, and seismic loads for roof and attachment design 2021 International Residential Code (IRC) — Chapter 3 (Section R301: Climatic & Geographic Design Criteria). online) to look up your address and get your basic wind speed and ground snow load. These numbers feed directly into your rafter and connector sizing. In high-wind or high-snow zones, the prescriptive IRC tables may not be sufficient and your plan reviewer may require a licensed engineer's stamp. If your jurisdiction is in a high-wind or seismic area, build that professional consultation into your budget early.
Materials: wood-framed stucco versus aluminum and corrugated options
For a stucco finish, your primary structural option is wood framing. Pressure-treated lumber (PT) is required anywhere framing contacts concrete or is within 6 inches of grade; above that, standard Douglas fir or Southern Yellow Pine works fine. The stucco finish system goes over solid sheathing or over metal lath applied to wood framing, depending on whether you are enclosing soffits and fascias or leaving them open. Aluminum and steel-framed patio cover kits exist and work well, but they do not accept a traditional three-coat Portland cement stucco because there is no lath substrate. If you want a stucco look on a metal frame, you would use a cement board substrate with a thin-coat finish, which is a different system entirely.
| Material System | Best For | Stucco Compatible | Approx. Cost (12x16 ft) | Durability | DIY Difficulty |
|---|---|---|---|---|---|
| Wood framing + 3-coat stucco | Attached covers, matching stucco homes | Yes (native) | $4,000–$7,500 | Excellent if properly waterproofed | Moderate-High |
| Wood framing + corrugated metal roof | Lean-to covers, sheds, utility areas | Partial (fascia only) | $2,500–$4,500 | Good (panel longevity 30+ years) | Moderate |
| Aluminum kit frame | Quick installs, no permit zones | No (not traditional) | $1,500–$3,500 | Good (no rot/rust) | Low-Moderate |
| Steel stud framing + cement board | Modern/contemporary stucco look | Yes (thin-coat) | $4,500–$8,000 | Excellent | High |
| Wood framing + OSB + TPO/torch-down roof | Flat/low-slope gable covers with living roof feel | Yes | $5,000–$9,000 | Excellent with maintenance | High |
For most homeowners building an attached stucco patio cover to match their house exterior, wood framing with a three-coat Portland cement stucco finish is the right choice. It matches existing stucco walls visually, it is what most local inspectors know how to evaluate, and the materials are available at any lumberyard. Corrugated metal roofing is a solid option when you want a clean, fast roof install and are fine with the industrial aesthetic; it requires a minimum slope of 1:12 per most manufacturer specs (McElroy Metal and similar brands specify this), gasket-headed fasteners at manufacturer-specified spacing, and proper underlayment. For a full how-to on installing corrugated metal roofing panels and related details, see how to build a corrugated patio cover. If you are interested in a corrugated roof build, that approach deserves its own deep dive.
Tools and materials checklist
Planning and layout
- 100-foot tape measure and 25-foot tape measure
- Line level and string line (for establishing level and grade)
- Laser level (optional but saves significant time on post heights)
- Stakes and marking paint or chalk for layout
- Graph paper or free CAD tool (SketchUp Free works well) for plan drawings
- Printed permit application and local patio cover handout from your building department
Demolition and site prep
- Sledgehammer and cold chisel (for breaking existing concrete if needed)
- Rotary hammer drill with SDS bits (for anchor bolt holes in existing slab)
- Concrete saw (rental) if cutting an existing slab for new pier footings
- Shovel, digging bar, and post-hole digger or towable auger (rental for deep clay soils)
- Wheelbarrow
- Safety glasses, hearing protection, and work gloves
Framing
- Circular saw with a framing blade
- Miter saw (10-inch sliding compound miter for rafter cuts)
- Speed square and framing square
- Framing nailer with 3-inch and 3.5-inch framing nails (or structural screws as alternative)
- Cordless drill/driver with hex-head bits for structural screws and post-base hardware
- Impact driver
- Adjustable post-base connectors (Simpson Strong-Tie CBQ or CBSQ series) and post caps
- Rafter ties, hurricane ties (Simpson H2.5A or equivalent), and joist hangers as specified
- Pressure-treated lumber: posts (4x4 or 6x6 per span), doubled beam stock (2x8, 2x10, or 2x12 per span table), rafter stock (2x6 or 2x8), ledger board
- Structural screws: Simpson SDS or SDW ledger screws per IRC Table R507.9.1.3 spacing
- Structural column anchors (for free-standing: Sonotube forms, concrete mix, and rebar)
Roofing and sheathing
- 7/16-inch OSB or 1/2-inch CDX plywood for roof sheathing
- 30-pound felt or synthetic underlayment (for solid-sheathed roofs)
- Self-adhered waterproof membrane (peel-and-stick, minimum 36-inch wide) for eaves and ledger flashing
- Corrugated metal panels or standing-seam panels if using metal roofing
- Gasketed metal roofing screws at manufacturer-specified spacing
- Ridge cap, eave trim, and Z-flashing as applicable
- Step flashing and counter flashing (for roof-to-wall intersections)
- Gutters, downspout elbows, and hangers
- Tin snips (straight and offset) for metal work
Stucco application
- 18-gauge expanded metal lath (2.5 lb per square yard minimum per ASTM C1063)
- Lath staples or 1.5-inch roofing nails for lath attachment
- Building paper (Grade D 60-minute) or self-adhered WRB behind lath on all vertical surfaces
- Control joint screed (plastic or zinc, at maximum 144 sq ft intervals per ASTM C926)
- Corner beads (galvanized or PVC) at all outside corners
- Casing beads at all terminations
- Portland cement stucco base coat (scratch coat) mix: Type S masonry cement or purpose-mixed bag product
- Portland cement brown coat mix
- Finish coat (acrylic or Portland cement texture coat in your chosen color)
- Stucco mixer attachment for drill, or rented paddle mixer
- Hawk and pool trowel (for application), darby (for leveling brown coat), texture sponge or brush
- Scratch rake (a notched screed tool for scratching the scratch coat)
- Spray bottle or garden hose for misting during cure
Structural basics: loads, pitch, and sizing your members
The roof structure has to carry three load types: the dead load (the weight of the roof materials themselves, typically 10 to 15 psf for a sheathed stucco-soffit cover), the live load (IRC Table R301.6 sets the roof live load at 20 psf for most residential roofs), and environmental loads (wind uplift and, in applicable regions, snow). Your stucco soffit and fascia system adds meaningful dead load compared to an open-rafter aluminum cover, so do not undersize members by pulling numbers from a light-duty pergola guide.
Roof pitch affects both drainage and structural load path. A minimum pitch of 2:12 (2 inches of rise per 12 inches of run) is the practical minimum for most roofing materials on a patio cover; corrugated metal can work at 1:12 per most manufacturers. A 3:12 or 4:12 pitch works well for lean-to covers and gives good drainage. The AWC Span Tables for Joists and Rafters, which you can download free from the American Wood Council website, give you maximum allowable rafter spans for different lumber species and sizes at given spacings and loads. For example, a #2 Douglas Fir 2x6 rafter at 24 inches on center carries a 20 psf live load plus 10 psf dead load over a roughly 9-foot clear span, but that drops quickly if you are in a 70-psf ground snow zone or a 130-mph wind zone. Look up your numbers; do not guess.
Beams (the doubled or tripled members spanning between posts) are sized by span and tributary load. For a 12-foot-wide cover with rafters framing into a beam at 8-foot post spacing, your beam is carrying load from a 6-foot-wide tributary area over an 8-foot span, which typically calls for a doubled 2x10 or 2x12 in most Fir/SYP combinations at typical residential loads. Use the DCA-6 Prescriptive Residential Wood Deck Construction Guide (free PDF from the American Wood Council) as your beam sizing reference; it includes the most accessible prescriptive tables for this kind of work. If your spans exceed the prescriptive table maximums, or if you are in a high-seismic, high-wind, or high-snow zone, hire a structural engineer for member sizing. A plan-review consultation typically costs $200 to $500 and is worth every dollar for keeping your permit moving.
Post sizing is usually straightforward for residential patio covers: 4x4 posts work for heights up to about 8 feet at standard tributary loads; 6x6 posts are required at greater heights or at beam splices. Post-to-beam connections need proper post caps (Simpson BC or AC series), and post-to-footing connections need code-rated post bases (Simpson CBQ or CBSQ series) with published allowable loads that meet or exceed your calculated loads.
Ledger installation: the most critical step in an attached cover
The ledger is the horizontal board you bolt to your house that carries the inboard end of every rafter. Getting it wrong is the most common cause of patio cover failures and the most common permit rejection. There are three things that absolutely must be right: the ledger must be bolted into the house's structural framing (rim joist, band joist, or wall studs), not just the sheathing or stucco; the fasteners must be sized and spaced per IRC Table R507. See the 2021 International Residential Code (IRC), Chapter 5 (Section R507), Deck Footings / Ledger Attachment for the prescriptive fastener sizes and spacing tables 2021 International Residential Code (IRC) — Chapter 5 (Section R507) — Deck Footings / Ledger Attachment. 9.1.3 or a manufacturer engineering letter; and the flashing must positively prevent water from migrating behind the ledger and into the wall.
Selecting your ledger board
The ledger board is typically the same depth as your rafters (2x6 or 2x8) and must be pressure-treated lumber because it is in contact with the house and exposed to weather. Use PT lumber rated for ground contact (UC4B) if it will be against concrete or masonry; standard above-ground PT (UC3B) is acceptable against wood framing. The ledger length should match the full width of your cover, and it should be installed perfectly level since every rafter height depends on it.
Fasteners and anchors
For ledger attachment, Simpson Strong-Tie SDS or SDW structural screws (1/4 inch diameter, in lengths appropriate to your ledger thickness plus wall framing embedment) are the most commonly used fasteners in current construction. IRC Table R507.9.1.3 provides the required fastener spacing pattern based on joist span and spacing; for a 12-foot joist span at 16-inch on-center spacing, for example, the table calls for a specific bolt or screw diameter and row spacing that you need to confirm for your exact project parameters. Stagger fasteners in two rows to avoid splitting the rim joist. Do not use standard lag screws without verifying they match the withdrawal values assumed in the IRC table; the table is calibrated for specific hardware. Lateral load at the ledger connection (resistance to the cover pulling away from the house under wind uplift) is handled by Simpson DTT1Z or DTT2Z tension ties installed at each end of the ledger and at intermediate points per the manufacturer's tension-tie guide.
Ledger flashing and waterproofing
Flashing the ledger correctly is the single most important waterproofing detail in an attached cover build. IRC Section R703.4 requires flashing at all exterior wall penetrations, and the ledger creates a significant penetration. The industry best-practice method used by most inspectors and building scientists involves a layered approach: first, install a self-adhered peel-and-stick membrane (like Grace Vycor or equivalent) over the top of the ledger and up the wall behind any cladding, lapping over the face of the ledger to seal all fastener penetrations. Second, add a metal Z-flashing or cap flashing that directs any water running down the wall face out over the ledger's top surface. Third, leave a 1/4-inch gap between the bottom of the ledger and any surface below it so moisture can drain and the wood can dry.
When your house has a stucco exterior, the ledger flashing situation gets more complex. You need to cut back or carefully remove a strip of stucco above the ledger location wide enough to tuck flashing behind the stucco's building paper layer. Do not simply flash over the face of the stucco. Water will find its way behind the stucco at the cut line and migrate sideways. The correct approach is to cut the stucco back with an angle grinder or oscillating tool, expose the building paper, lap the new self-adhered flashing membrane under the building paper above and over the ledger face, and then either reinstall a backer rod and sealant at the cut line or install a new drip-edge flashing that terminates cleanly at the ledger top. This is fussy work, but it is what keeps your house wall dry for the next 30 years.
Stucco integration at the wall interface
Where your new patio cover's stucco finish meets the existing house stucco wall, plan the transition carefully. You cannot simply butt new stucco against old. The correct detail involves installing a casing bead (a J-shaped termination screed) at the perimeter of all new stucco surfaces that terminate against existing walls or dissimilar materials. The gap between the casing bead and the existing stucco wall is then tooled with a paintable polyurethane or elastomeric sealant that is color-matched after painting. This expansion joint is intentional: the new structure will experience slight seasonal movement and the sealant accommodates it without cracking. If you hard-coat to the existing wall without a control joint, you will almost certainly see a crack along that line within one freeze-thaw cycle or hot summer.
Step-by-step build: attached lean-to stucco cover
Step 1: Layout and footing excavation
Establish your post-line location with batter boards and string lines, keeping the string perfectly square to the house wall using the 3-4-5 triangle method. For a visual, step-by-step walkthrough, see YouTube: how to build a patio cover for practical demonstrations of the techniques described here. Mark footing centers and dig to below your local frost depth (check your jurisdiction's frost depth map or permit handout: in the Deep South this may be 12 inches, in the northern U.S. it could be 42 inches or more per IRC R403.1.4). Footing diameter should be sized per your structural design, but 12 inches round is common for 4x4 posts at residential loads on typical soil. Use a tube form (Sonotube) to keep the hole clean and pour concrete at least 4 to 6 inches above grade so water sheds away from the post base.
Step 2: Pour footings and set post bases
Mix and pour concrete into the tube forms, place J-bolts or anchor bolt assemblies for your post bases while the concrete is wet, and use your string line to confirm each anchor is in exactly the right position before the concrete sets. Concrete reaches full strength at 28 days but is workable enough for next steps after 48 to 72 hours in warm weather. Level each post base as you set it. A post base that is 1/4 inch out of level over a 3.5-inch base will translate to a visible lean in your finished post.
Step 3: Install the ledger
Establish the correct ledger height on the house wall. The top of the ledger sets the height at which rafters will sit, so work backward from your desired finished roof height at the outer eave, accounting for rafter depth and any fascia thickness. Snap a level chalk line on the house wall, cut back the stucco if needed, install all flashing layers as described above, then fasten the ledger with your engineered screw or bolt pattern per the IRC table. Double-check level before driving the last fasteners.
Step 4: Set posts, beams, and rafters
Cut posts to height based on your measured slope from ledger to outer beam. Set each post in its base, brace it plumb with temporary diagonal 2x4 braces staked to the ground, then install post caps and set the beam. For a doubled-lumber beam, nail the two members together with 16d nails at 16 inches on center (staggered top and bottom) before hoisting into position. With the beam level and posts plumb, install all rafter ties and post caps per manufacturer specs. Then lay out rafter positions on the ledger and beam (typically 16 or 24 inches on center per your span table), cut bird's-mouth notches at the outer beam if needed for bearing, and nail each rafter with hurricane ties (Simpson H2.5A or equivalent) at both ends. Do not skip the hurricane ties; they resist uplift and are inspected.
Step 5: Sheathing and roofing
Once framing passes inspection, install OSB or plywood sheathing with the long axis perpendicular to rafters, staggering end joints and leaving a 1/8-inch expansion gap at all edges. Install self-adhered peel-and-stick membrane at the eave (the first 36 inches from the eave edge) before laying felt underlayment over the rest of the roof. Install step flashing at the house wall intersection (alternating with roofing courses) and counter flashing embedded in the house wall above. For corrugated metal panels, install them per the manufacturer's instructions: start at the low (eave) end, overlap panels by at least 1.5 corrugations at side laps and 6 inches minimum at end laps, and use gasketed screws at the manufacturer's specified pattern (field zone versus perimeter/edge zone fastener spacing differ). Install the ridge cap and all trim pieces before calling for inspection.
Step 6: Soffit and fascia framing for stucco
A stucco patio cover typically has a fully enclosed soffit (the underside of the roof overhang) and a fascia (the vertical face at the eave). Build a simple nailer-and-blocking system to create a flat surface for the soffit, maintaining consistent depth from the rafter tails. Install exterior-grade blocking between rafters at the wall line and at the outer fascia. This framing gives you a continuous, stable substrate for lath attachment. Common mistake here: using interior-grade blocking or OSB without a moisture barrier. Every piece of wood that backs lath in an exterior stucco system should have a layer of Grade D building paper behind it.
Step 7: Building paper and lath installation
Install Grade D 60-minute building paper over all framing surfaces to receive stucco, lapping horizontal courses at least 2 inches and vertical seams at least 4 inches. Paper goes on before lath. Next, install 2.5-lb expanded metal lath per ASTM C1063: fasten it horizontally with 1.5-inch roofing nails or staples at every stud or framing member, with fasteners at 7-inch on-center maximum. Lap lath sheets 1/2 inch at side laps and 1 inch at end laps. Install corner beads at all outside corners and casing beads at all termination edges. If your soffit is wider than 12 feet in any direction or the stucco area exceeds 144 square feet, install control joints per ASTM C926 to limit crack potential. This is the inspection point in many jurisdictions: get the lath inspection signed off before mixing any plaster.
Step 8: Scratch coat (first coat)
Mix your scratch coat to a thick, peanut-butter consistency using a Type S masonry cement or a purpose-mixed bagged stucco base (follow the bag ratio exactly). Dampen the lath surface lightly so it does not pull moisture from the mix too fast. Apply the scratch coat to a nominal 3/8-inch thickness, pressing firmly to embed the plaster into the lath mesh. While still plastic (before it sets), drag a scratch rake across the entire surface in horizontal lines to create a mechanical key for the brown coat. Cure the scratch coat by misting it lightly two to three times per day for two days minimum. In hot or windy conditions, cover it with damp burlap. Rushing the cure is one of the most common causes of delamination.
Step 9: Brown coat (second coat)
Wait at least 48 hours (72 hours is better) before applying the brown coat. The scratch coat should be firm and slightly damp, not green-wet. Apply the brown coat to approximately 3/8-inch thickness as well, bringing the total plaster thickness to roughly 7/8 inch as specified by ASTM C926 for a three-coat system. Screed the brown coat flat with a darby (a long aluminum straightedge tool) and float it smooth. This is the layer that sets your final plane and straightness, so take your time to get it flat. Cure the brown coat for at least seven days before the finish coat, misting daily.
Step 10: Finish coat and texture
Choose a finish coat that matches your existing house texture: sand finish, smooth trowel, dash, or skip trowel. Lightly dampen the brown coat before applying the finish coat to avoid suction. Apply the finish coat at 1/8 inch thickness. Work in manageable sections (about 4 to 6 linear feet at a time in warm weather) so you can achieve a consistent texture before the coat begins to set. Blend wet edges carefully. After the finish coat is applied and cured for at least 28 days, paint with a high-quality 100% acrylic exterior paint or elastomeric coating in a color that matches or complements your house. The elastomeric option adds a small amount of crack-bridging ability and is worth the price premium in hot or high-UV climates.
Free-standing cover: what changes
A free-standing stucco patio cover follows the same framing, roofing, and stucco sequence but skips the ledger entirely. Instead, you have posts along both the house-side edge and the outer edge, and your beam system runs the full perimeter or along both sides of the ridge for a gable. The footing design becomes more important because all lateral loads (wind, seismic) must be resisted entirely by the footing-and-post system; there is no house connection to provide lateral resistance along one axis. In most cases this means larger diameter footings, deeper embedment, and post bases with higher allowable lateral loads. For free-standing gable covers over about 10 by 16 feet, a quick engineer review of the footing and post sizing is a smart investment.
Troubleshooting common problems
- Stucco cracking at lath overlaps: caused by insufficiently lapping or poorly fastened lath. Always lap per ASTM C1063 specs and fasten at every framing member.
- Brown coat delaminating from scratch coat: scratch coat was too smooth or too dry. Always scratch while the coat is still plastic, and mist before applying the next coat.
- Water infiltrating behind ledger: flashing not lapped correctly under the existing building paper. The fix is expensive after the fact — do it right the first time.
- Posts out of plumb: temporary bracing removed before beam and rafter system locked everything in place. Keep bracing in until all structural connections are fastened.
- Rafter creak or bounce: undersized members or inadequate bearing at the beam. Verify your spans against the AWC tables before framing.
- Stucco finish coat texture doesn't match existing house: practice your texture on a piece of cement board before touching the structure. Matching stucco texture takes several practice passes.
- Gutters holding water: inadequate slope in the gutter run. Gutters need a minimum 1/4 inch of drop per 10 feet of run toward the downspout.
- Permit failed at framing inspection: missing hurricane ties, wrong fastener spacing at ledger, or post bases not matching submitted specs. Always re-read the inspector's comment sheet and ask for clarification before re-inspecting.
Maintenance, costs, and long-term care
A properly built stucco patio cover is one of the lower-maintenance outdoor structures you can add to your home. The main tasks are repainting every 7 to 12 years (sooner in high-UV or coastal areas), checking and resealing the expansion joint at the house wall interface every 3 to 5 years with fresh elastomeric caulk, and cleaning gutters twice a year. Watch for any hairline cracks at control joints or corners; shallow surface cracks under 1/16 inch wide are cosmetic and seal with elastomeric paint. Wider cracks or cracks that grow should be investigated because they can indicate movement in the framing below. Probe the stucco around any crack with a screwdriver: if the stucco sounds hollow or flexes, the coat has delaminated and that section needs to be cut out and repaired.
| Cost Category | Typical Range (12x16 ft Attached Cover) | Notes |
|---|---|---|
| Permit fees | $150–$500 | Varies significantly by jurisdiction |
| Concrete and footings | $200–$500 | More for deep frost zones or large-diameter piers |
| Lumber (framing, ledger, blocking) | $800–$1,800 | SYP/DF pricing varies by region; PT premium ~15–20% |
| Hardware (post bases, caps, ties, fasteners) | $300–$600 | Do not cut corners here; use rated connectors |
| Roofing (sheathing, underlayment, metal panels or shingles) | $600–$1,400 | Metal panels at high end; asphalt shingles at low end |
| Stucco materials (lath, paper, base coat, finish coat) | $400–$900 | Bagged pre-mixed systems are faster but more expensive per bag |
| Gutters and downspouts | $100–$300 | DIY aluminum sectional gutter kits are cost-effective |
| Paint/elastomeric finish coat | $100–$250 | Elastomeric adds ~$50–$80 but is worth it in sun-exposed areas |
| Tool rental (auger, mixer, concrete saw) | $150–$400 | One-time rental costs for tools you won't need again |
| Total estimated range | $2,800–$6,650 | Does not include engineer fees or unexpected site conditions |
Safety throughout the build
Working at roof height on a ladder while handling long lumber is where most DIY injuries happen on patio cover projects. Use a sturdy extension ladder rated for your weight plus tools, keep three points of contact at all times, and never stand on the top two rungs. When cutting stucco or mixing Portland cement, wear an N95 respirator rated for silica dust; Portland cement and old stucco contain crystalline silica, which causes serious lung disease with repeated exposure. Eye protection is non-negotiable during any cutting, nailing, or mixing work. When working alone (which happens), tell someone your work schedule and do not attempt to lift heavy beams or set long rafters solo; get a helper for any lift over about 40 pounds at height.
When to call a professional
Be honest with yourself about these specific situations: if your plan reviewer requires an engineer's stamp and your local engineer quotes you $400 to $600, pay it and move on; it keeps the permit moving and gives you sizing confidence. If the house wall you need to ledger into is unusually complex (masonry, ICF block, or a wall with a history of water damage), hire a contractor or waterproofing specialist to handle the ledger and flashing detail. If your soil is expansive clay or has fill under it, have a geotech or structural engineer check your footing design. And if the stucco finish coat texture needs to precisely match a custom texture on your existing home, consider hiring a stucco subcontractor for just that final coat: their experience with texture matching will save you from a visible mismatch that will bother you every time you look at it.
FAQ
What primary code and standard documents must I research to create a code‑aware DIY guide for stucco patio covers?
Consult the International Residential Code (IRC) — especially Chapter 3 (R301 climatic/geographic design criteria), Chapter 5 Section R507 (deck/patio‑cover framing, footings, ledger attachment), and Chapter 8 Section R802 (roof/ceiling framing). Use ASCE 7 for site wind, snow and seismic loads. Review ASTM standards for stucco: C926 (application of cement‑based plaster) and C1063 (lathing). Reference these exact documents when specifying loads, fasteners, footing depth and stucco installation.
Which authoritative engineering resources provide prescriptive wood framing spans and member sizing?
Use American Wood Council (AWC) resources: WFCM (Wood Frame Construction Manual), Span Tables for Joists and Rafters, and DCA‑6 (Prescriptive Residential Wood Deck Construction Guide). These supply prescriptive rafter/joist/beam spans and design values referenced by the IRC.
How do I determine site‑specific wind, snow, and seismic design values for structural calculations?
Query the ASCE 7 geodatabases (ASCE 7 Hazard Tool) or equivalent to obtain basic wind speed, ground snow load and seismic parameters for the project address. The IRC requires using either the prescriptive IRC tables or ASCE 7 methods tied to these site values (see IRC R301 and 2024 notes referencing ASCE 7). Include example queries in the guide.
What authoritative sources cover ledger attachment details, fastener capacities and lateral load requirements?
Use IRC R507.9 ledger attachment tables and footnotes as the code basis. Cross‑reference Simpson Strong‑Tie technical bulletins (e.g., Deck Lateral Load Connection T‑C‑DECKLAT) and Simpson product engineering letters for tested ledger screws/fasteners (SDW/SDS) and holdowns. Manufacturer fastener datasheets provide allowable loads and spacing patterns that inspectors accept.
Which resources define ledger flashing and roof‑to‑wall waterproofing best practices?
Refer to IRC requirements for flashing (R703.4 and R507 footnotes) for code obligations, and supplement with building‑science and trade sources (Journal of Light Construction, Fine Homebuilding) for practical multi‑layer flashing details (self‑adhered membrane + cap flashing). Manufacturer flashing product data and local jurisdiction handouts are also important.
What standards and guidance govern stucco materials, lath, and application methods?
Follow ASTM C926 (application of Portland cement‑based plaster) and ASTM C1063 (installation of lathing and furring) as the industry standards. Use AWCI, IIBEC and NWCB technical resources for practical system guidance, control joint spacing, curing, and inspection checklists. Include manufacturer instructions for any proprietary one‑coat systems or additives.