You can build a corrugated patio cover yourself in a weekend or two. The basic process is this: set posts or attach a ledger board to your house, build a simple rectangular frame, fasten corrugated metal or polycarbonate panels to the frame with the right screws and closures, then seal every edge with flashing, drip edge, and caulk. The biggest variables that determine how hard the project is are whether you're attaching to the house or going freestanding, how big the cover is, and which panel material you choose. Get those decisions right up front and the rest falls into place.
How to Build a Corrugated Patio Cover Step by Step

Celia Vaughn
22 Jun 2026
What exactly is a corrugated patio cover (and which style fits your space)
A corrugated patio cover is simply a roof structure built over a patio or deck using corrugated panels, most commonly 7/8-inch corrugated metal (galvanized, Galvalume, or painted steel) or corrugated polycarbonate. The corrugated profile gives the panels rigidity without extra thickness, which is why they work so well on open structures with widely spaced framing members.
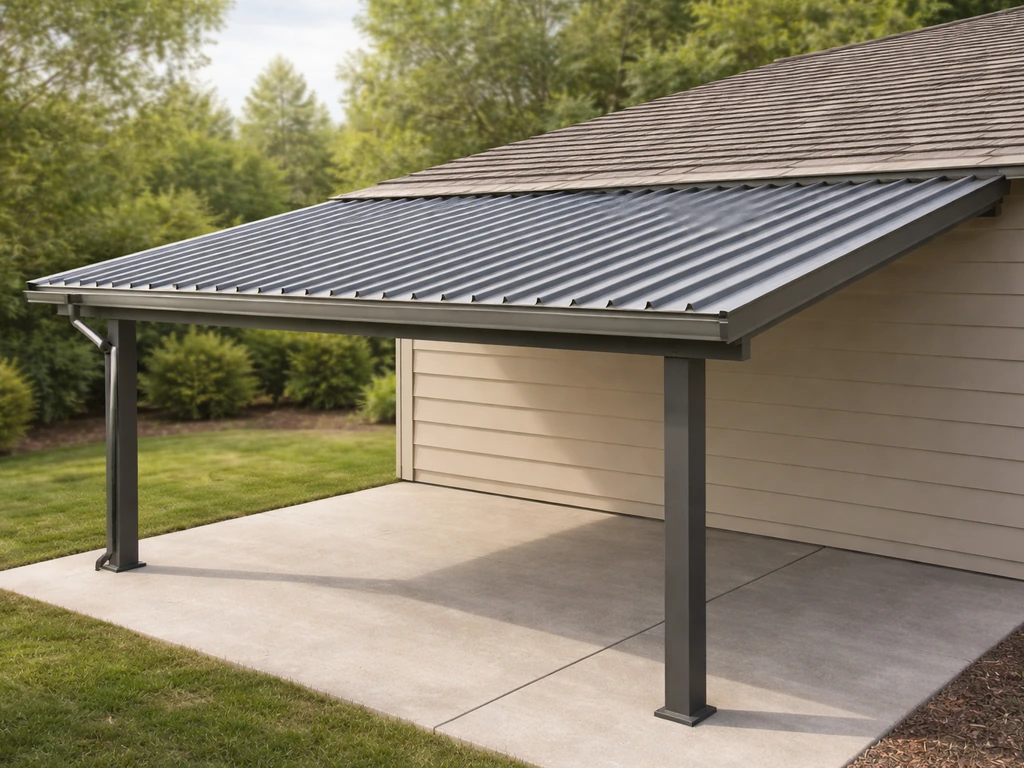
There are three common configurations. The attached lean-to (also called a shed-roof style) is by far the most popular for DIYers: one edge of the roof ties to the house via a ledger board, the opposite edge is held up by posts, and the roof slopes in one direction to shed water away from the house. The freestanding version works the same way structurally but relies on posts and beams on all sides, so it can sit anywhere in your yard. The gable style adds a ridge at the center and two sloping sides, which looks more architectural but is a significantly more involved build. If this is your first corrugated roof build, start with an attached lean-to. If you want a full materials list and a detailed walkthrough beyond the planning and framing sections here, follow the build a patio cover instructions guide next. You can get into gable builds once you understand the basics, and the framing principles covered here apply to both.
Planning: measure carefully before you buy anything

Good planning saves you money and prevents headaches. Start with your footprint: measure the width of your patio and how far out from the house you want the cover to extend. Standard panels come in lengths from 8 to 16 feet, so it's worth designing around those lengths to minimize cuts and waste. For most residential lean-tos, a 10 or 12-foot run is common.
Slope
Slope is the most important planning decision you'll make. For corrugated metal panels, the minimum recommended pitch is 1:12 (meaning 1 inch of rise for every 12 inches of horizontal run), but 3:12 or steeper performs significantly better because it sheds water faster and reduces the chance of water sitting at panel laps. For corrugated polycarbonate, manufacturers typically require a minimum of 5 degrees, which works out to roughly 1:12, but steeper is always better. Polycarbonate canopy design guidance also ties drainage needs to panel and joint design, including gutter and downspout sizing to match the canopy catchment area drainage requirements tied to panel/joint design. A real-world mistake I see often is people setting up a near-flat corrugated roof and then being surprised when it leaks at every overlap. Don't do it. Build in at least 3:12 if you have any flexibility.
For a 10-foot-deep lean-to at 3:12, your ledger board (at the house) needs to be 30 inches higher than the outer beam. For 1:12, it's only 10 inches of height difference. Work backward from your desired clearance at the outer edge (you want at least 7 feet of head clearance at the low side) to figure out where the ledger needs to land on the house wall.
Layout and clearances
Mark your post locations before you dig. Posts for a lean-to typically land just inside the outer edge of your patio slab. Keep posts at least 6 to 8 feet apart for a typical residential build, but always check your local code because maximum post spacing depends on beam size and load. Clearance from the house: make sure your ledger attachment point is below any existing roofline flashing and above any windows or doors you want to preserve access to. Leave at least 18 inches between the top of your ledger and the roof eave above it so you have room to work and flash correctly.
Wind and rain loads
The IRC requires patio covers to handle a minimum vertical live load of 10 psf (pounds per square foot), and that's just the floor, not the ceiling. Your area's wind speed determines the real structural demand, and this is where local code matters. High-wind zones (coastal areas, the Southeast, or anywhere that sees regular storms) require engineered connections, especially at post bases and beam-to-post joints. An engineering discussion I've seen repeatedly confirms that post-to-footing and beam-to-post uplift connections are the most common failure points on patio covers. Size your footings and hardware for your actual wind zone, not the minimum.
Materials and hardware: what to buy and why
Your two main decisions are panel material and framing material. Here's a straightforward comparison:
| Material | Pros | Cons | Best For |
|---|---|---|---|
| Corrugated metal (galvanized/Galvalume/painted steel) | Durable, low maintenance, widely available, affordable ($1.50–$3.50/sq ft) | Noisy in rain, heats up, needs closures/sealant at every penetration | Most residential lean-tos and freestanding covers |
| Corrugated polycarbonate (clear or tinted) | Lets in light, lighter weight, easier to cut | Yellows over time if UV layer is damaged, more flexible so needs tighter purlin spacing | Covered patios where natural light matters |
| Wood framing (2x6 or 2x8 lumber) | Easy to work with, cheap, good for one-off builds | Needs regular maintenance, susceptible to rot at post bases | Budget builds in dry climates |
| Steel tube/channel framing | Stronger, thinner profile, better for longer spans | Harder to cut and connect without experience | Larger covers, high-wind areas, or when aesthetics matter |
For most DIYers doing an attached lean-to, I'd go with 7/8-inch corrugated metal panels on a wood frame of 4x4 or 6x6 posts, doubled 2x8 or 2x10 beams, and 2x4 purlins spaced 24 inches on center. That combination is easy to source at any lumber yard, straightforward to assemble with basic carpentry skills, and holds up for years with minimal upkeep.
Fasteners and closures
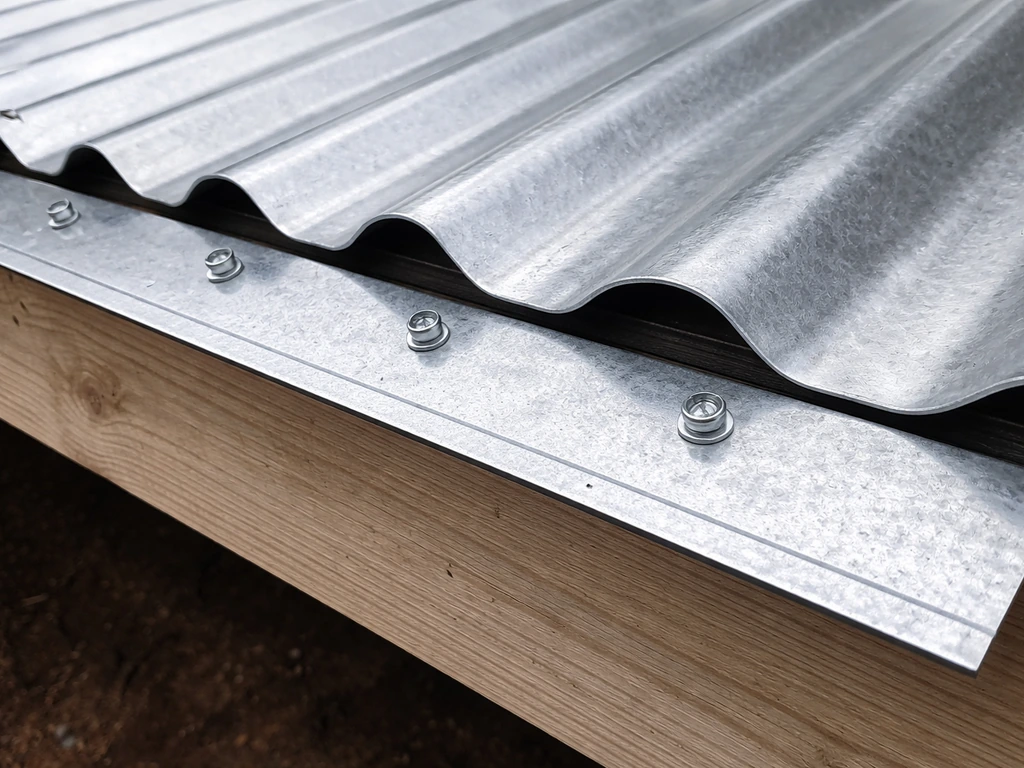
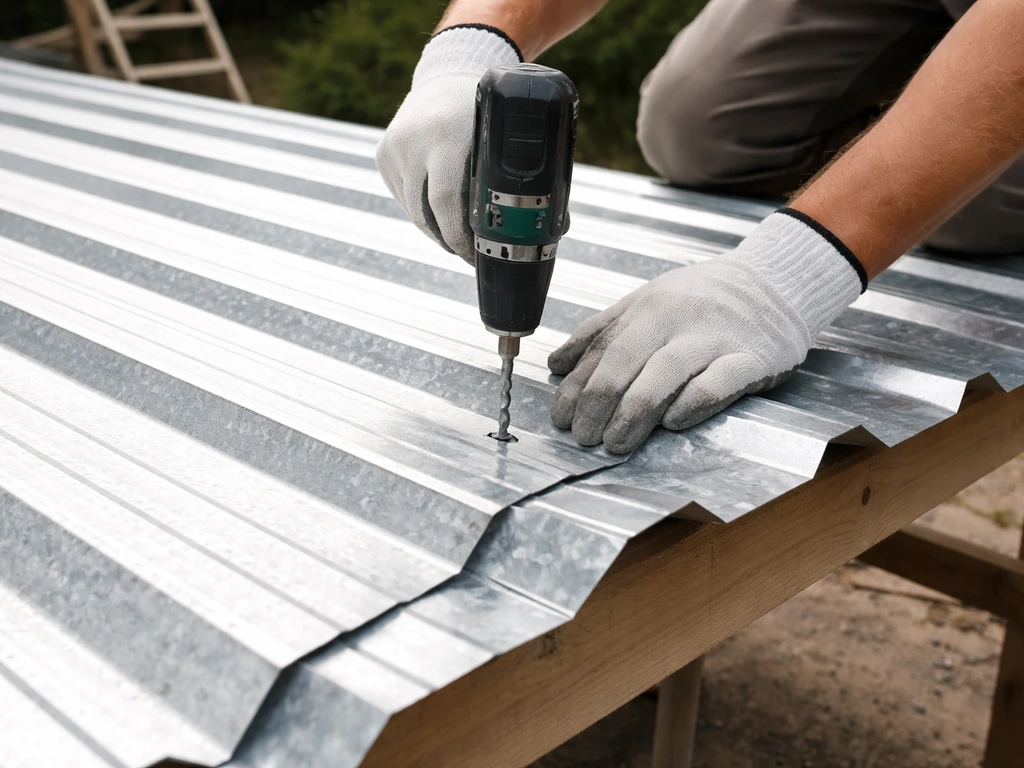
Do not use regular wood screws. You need hex-head screws with neoprene washers, specifically designed for metal roofing. These are sometimes called roofing screws or lap screws. The neoprene washer compresses against the panel to create a watertight seal. Use screws long enough to fully penetrate your purlin by at least an inch. For 7/8-inch corrugated panels over a 1.5-inch thick purlin, a 1.5-inch to 2-inch screw is typical. Drive them straight, not at an angle, because an angled screw won't compress the washer evenly and will eventually leak.
Closure strips are equally important and often overlooked. These are foam or rubber strips pre-shaped to match your panel's corrugated profile. You install them at the eave (bottom edge) and ridge (top edge) to seal the gap between the panel and the framing or flashing. Use inside closures (flat side up, shaped side down) at the eave and outside closures (shaped side up) under the ridge cap. Without them, bugs, water, and debris get into your roof.
Step-by-step build process
Step 1: Footings and posts (or ledger for attached builds)
For an attached lean-to, start at the house. If you want step by step patio cover results, keep that lean-to plan as your first build and follow the rest of the process in order attached lean-to. Find the rim joist or wall studs and lag-bolt your ledger board directly into them, not just into siding or sheathing. Use 1/2-inch lag screws, minimum 3 inches of penetration into solid framing, spaced 16 inches on center. Set the ledger at the correct height based on your slope calculation. Seal all lag penetrations with flashing and exterior caulk before moving on.
For posts, dig footings below your frost line (check local code, but 18 to 24 inches is common in most of the country, deeper in northern climates). Pour concrete and set post anchors while the concrete is wet, or use tube-form pours and attach post bases after curing. Let footings cure at least 48 hours before loading them. Set posts plumb and brace them temporarily before attaching beams.
Step 2: Beam and purlin framing
The outer beam spans between your posts and carries the low end of the roof. Double your beams for any span over 8 feet; it's cheap insurance against sag. Use structural post caps and beam hangers rated for your load, not just toe-nails. Once your beam is level and secured, run purlins from ledger to beam at 24 inches on center (or tighter if your panel manufacturer specifies it, especially for polycarbonate). Purlins are the members the panels actually attach to. Check that everything is square by measuring diagonals before you lock anything in.
Step 3: Installing corrugated panels
Start at the end away from the prevailing wind direction so that panel laps shed water away from the wind. For 7/8-inch corrugated metal, lap panels by at least one full corrugation at side laps. End laps (where one panel overlaps the next along the slope) should be a minimum of 6 inches with sealant or butyl tape between the overlapping surfaces to keep water out. Some references cite a 4-inch minimum for end laps, but 6 inches with sealant gives you a meaningful margin and is worth the extra material.
Fasten panels at every purlin. At side laps, drive a screw through both panels at the overlap point. At intermediate purlins, follow the manufacturer's spacing, typically no more than 36 inches on center along the panel length. For polycarbonate panels, install with the UV-protected side facing the sun. This side is usually labeled; if you get it wrong, the panel will yellow and become brittle within a few years. Drive fasteners snug, not torqued down hard, because over-tightening crushes the neoprene washer and defeats its purpose.
Sealing, flashing, and keeping water out for good
This is where most DIY corrugated roofs succeed or fail. The panels themselves rarely leak. The edges, penetrations, and transitions do.
Drip edge and eave
Install a metal drip edge at the eave (low end of the roof) so water sheds cleanly off the panel edge into your gutter or off the structure. The drip edge tucks under the panels and overhangs the fascia board. Fasten it with roofing nails or short screws at roughly 12-inch intervals. Put your inside closure strips on top of the outer beam, then lay your panels over them, then install the drip edge over the panel ends. This order matters.
Wall flashing at the ledger
Where the high end of your roof meets the house wall, you need step flashing or a continuous Z-flashing that directs water from the wall out onto the panel surface and then off the roof. This is the single most common leak point on attached patio covers. The flashing needs to go behind the siding above and over the panels below, sealed at the top edge with exterior-grade caulk. If you have stucco or brick, cut a reglet (a small groove) into the wall and tuck the flashing in, then seal it. Do not skip this step or just caulk the gap between panel and wall.
Ridge cap (for gable or ridge details)
On a gable-style build, install a ridge cap over the peak. Use outside closure strips under the cap on both sides to seal the corrugation profile, then fasten the cap with roofing screws. On lean-to builds that terminate at the house wall, the Z-flashing described above serves the same function.
Condensation on polycarbonate roofs
If you're using multiwall polycarbonate panels in an enclosed or semi-enclosed patio, condensation forming on the underside is common and normal. The fix is ventilation, not sealing everything tighter. Install ridge vents or leave soffit gaps to allow air circulation across the underside of the roof. Use breathable tape at the open (top and bottom) edges of multiwall polycarbonate sheets rather than solid tape that traps moisture inside the cells. Trapping moisture inside multiwall panels causes algae growth and eventually destroys the panel.
Safety, permits, and knowing when to hire a pro
Most municipalities require a building permit for a permanent patio cover, and many require an inspection before you close in any structural connections. If you want a visual walkthrough, search for YouTube how to build a patio cover and follow a step-by-step video that matches an attached lean-to design patio cover build. Skipping a permit isn't just a legal risk, it's a practical one: if your unpermitted cover damages your home or injures someone, your homeowner's insurance may not cover it. Pull the permit. It usually costs $100 to $300 and the inspection process actually helps you catch problems before they become expensive.
Load and structural requirements
Under the IRC, patio covers must be designed to handle a minimum vertical live load of 10 psf, plus dead load (the weight of the structure itself), plus your local wind and snow demands. In high-wind zones, uplift forces at post bases and beam connections are the most common structural failure mode. If you're in a hurricane zone, coastal area, or anywhere with design wind speeds above 115 mph, get an engineer to review your connection details before you build. This is not optional and it's not expensive relative to the cost of rebuilding a blown-off structure.
Roof fall protection
Corrugated roofs are slippery, especially when wet or when you're leaning over them to fasten panels. Set up proper scaffolding or use a roof bracket system rather than just leaning a ladder against the panels. Never walk directly on corrugated panels without using crawl boards to spread your weight across multiple purlins.
When to call a pro
- Your cover will be larger than roughly 200 square feet and you're not sure about beam sizing or footing depth
- You're in a high-wind or seismic zone and your jurisdiction requires engineered drawings
- The ledger attachment point is unclear (e.g., the house has no accessible rim joist or there's a concrete or masonry wall)
- You discover that your existing patio slab isn't thick enough to support post anchors without new footings
- The roof pitch is constrained by existing architecture in a way that forces you below 1:12
Tools, budget, and mistakes to avoid
Tool list
- Circular saw with a fine-tooth blade (for cutting panels and lumber; use a metal-cutting blade for steel panels)
- Drill/driver and a dedicated hex-head driver bit for roofing screws
- Post hole digger or rented power auger for footings
- Level (4-foot minimum) and a string line for layout
- Chalk line for panel alignment
- Tape measure and square
- Tin snips for trimming metal panels and flashing
- Caulking gun and exterior-grade sealant
- Safety glasses and gloves (metal panel edges are sharp)
Rough budget
For a typical 12x16-foot attached lean-to with corrugated metal panels and a wood frame, expect to spend $800 to $1,800 in materials depending on your region and whether you go with basic galvanized panels or coated/painted steel. Polycarbonate panels run higher, often $2 to $5 per square foot for the panels alone. Add $100 to $300 for a permit, $50 to $100 for concrete and post hardware, and $50 to $150 for flashing, closures, and fasteners. Renting a post hole auger saves an hour of hard work for about $60. The most common budget mistake is underestimating fastener and flashing costs, so add 15 to 20 percent to your panel/lumber estimate as a buffer.
Common mistakes to avoid
- Not enough slope: anything below 1:12 on corrugated panels will pool water at laps and eventually leak, no matter how well you seal it
- Skipping closure strips: the gap between the corrugated profile and the framing is a direct path for water and pests
- Over-driving roofing screws: this crushes the neoprene washer and creates a leak point instead of sealing one
- Attaching the ledger to siding or sheathing instead of the structural framing behind it
- Not accounting for thermal movement: metal panels expand and contract significantly with temperature swings, so don't over-tighten fasteners or caulk rigid connections at panel ends
- Installing polycarbonate UV side down: the UV-protected layer is usually on one specific face, and reversing it means the panel degrades within a few years
- Skipping the permit: beyond legal risk, unpermitted structures can complicate home sales and insurance claims
Building a corrugated patio cover is genuinely one of the more approachable structural DIY projects out there. The materials are forgiving, the skills are straightforward carpentry and basic roofing, and the payoff (a covered outdoor space you built yourself) is immediate. If you want to go deeper on the general build sequence before diving into the corrugated-specific details, working through a broader step-by-step patio cover guide first can help you get the framing logic locked in before you tackle panel installation and flashing. After you’ve chosen the style and slope, follow this step-by-step patio cover approach to plan, build, and seal everything correctly.
FAQ
Can I build a corrugated patio cover over an existing slab that is not level?
Yes, but you will need to correct for elevation changes before framing. If the slab slopes or is uneven, set the ledger and adjust beam heights so the roof stays consistent in pitch, otherwise panel end laps and closures may not seal evenly along the run.
How do I calculate panel layout to reduce cutting?
Start by laying out panel rows so the side laps land over purlins, then choose a length that matches common panel sizes (8 to 16 feet). Plan for the 6-inch end-lap minimum at the slope direction, and shift the layout so you do not end up with a narrow offcut at a critical edge.
What screw length should I use for different purlin thicknesses?
Use screws that fully penetrate the purlin by at least about 1 inch after passing through the panel. If your purlin is thicker than the typical 1.5 inches, reassess total screw length so you are not short (poor bite and pullout risk) or so long that you interfere with flashing and closure fit.
Do side laps always need sealant, or only end laps?
Side laps need watertight fastener placement and proper overlap, but the sealing requirement depends on the panel system and whether it is designed for one-side lap sealing versus full sealing. When in doubt, follow the panel manufacturer guidance and avoid relying on caulk alone at fasteners and laps.
Can I use the wrong screw type and just seal the heads with caulk?
You should not. The neoprene washer and screw type are what create the seal under compression. Caulk can mask a poor seal temporarily, but movement and UV exposure usually lead to leaks at the washer seal rather than at the caulk line.
How tight should I drive the roofing screws into corrugated metal?
Drive fasteners snugly until the neoprene washer compresses enough to seal, then stop. If you over-tighten, you can deform the corrugation and crush the washer, which increases the chance of water entry and can reduce panel lifespan.
What is the best way to prevent leaks at the house-wall flashing?
Make sure the flashing sits behind the siding above and directs water outward over the panel below, then seal the top edge where it meets the wall. For stucco, a reglet cut helps the flashing seat cleanly, and skipping it often leads to capillary water intrusion behind the wall finish.
If my roof pitch is slightly less than recommended, what is the safest workaround?
Increasing slope is the real fix, but if you cannot, you must increase water management quality by using additional sealant at laps and paying extra attention to closures, drip edge detail, and alignment. Even then, a near-flat setup is much more prone to pooling and leaks, so it is not a reliable DIY compromise.
How can I reduce condensation issues with multiwall polycarbonate?
Provide ventilation along the underside by using ridge vents or soffit openings so air can move across the roof deck. Also install breathable tape on open edges rather than solid tape that traps moisture in the cells, which accelerates algae and long-term panel degradation.
Do I need to install gutters under a drip edge on a patio cover?
Not always, but you should plan where runoff will go so it does not splash back under the panels or pool near the posts. A drip edge that discharges into a gutter or controlled drain is the safest approach if your patio is close to footings, doorways, or walkway edges.
Are post spacing and footing depth fixed by code?
No, they vary with beam size, design loads, and your local requirements. Use local code for maximum spacing and frost depth, and remember wind uplift governs many patio cover failures, so sized footings and uplift-rated hardware matter as much as depth.
What are the most common structural failure points to double-check?
Re-check uplift connections at post bases and where beams meet posts. Also verify that your ledger attachment is bolted into solid framing and not only siding or sheathing, because ledger pullout or joint separation is a frequent failure mode in strong wind events.
Should I brace the frame before the panels go on?
Yes. Corrugated roofs can act like sails once partially covered, especially in windy conditions. Temporarily brace posts and beams after plumb setup, then only proceed to panel installation when the frame is square and stable.
Is it safe to walk on corrugated metal panels during installation?
Only with proper support. Use crawl boards or another method that spans multiple purlins so you do not concentrate weight on a single corrugation, and avoid stepping directly on panels while fastening.
How can I tell which side of polycarbonate faces the sun?
Look for the UV-protected side label or protective film marking before mounting. If you install the panel rotated the wrong way, UV exposure can yellow and embrittle the material within a few years.
Do I need a ridge cap on a lean-to that ends at the house wall?
If the roof terminates into a wall with proper Z-flashing, you do not use a ridge cap at the house end, but you still need the correct high-end closure system where panels meet the top flashing. The key is completing the transition from panel tops into the wall water path with closure strips and flashing, not just adding caulk.