For most residential patio covers, a 4x4 post works for spans up to about 8 feet and light roof loads, but a 6x6 is the smarter default for anything larger, heavier, or freestanding. If you're using steel or aluminum square tube, 3x3 (11-gauge) handles light loads and 4x4 tube handles heavier spans. The right answer depends on four things: your span, your post spacing, your roof material's weight, and your local wind or snow load. This guide walks you through all of it so you can land on a specific size with confidence. To get the full picture, follow the rest of this guide on how to install a patio cover, from post and footing choices through anchoring and load design.
What Size Post for Patio Cover: DIY Guide by Span and Loads

Celia Vaughn
18 Jun 2026
What 'post size' actually means (wood vs. metal)
This is worth clarifying upfront because the terminology trips people up constantly. For wood posts, sizes are listed in nominal dimensions, meaning a '4x4' actually measures 3.5 inches by 3.5 inches, and a '6x6' is 5.5 by 5.5 inches. That gap matters when you're sizing post caps, hardware, and brackets. For steel or aluminum square tube, the dimensions are actual (outside), so a 4x4 steel tube really is 4 inches on each side. Aluminum patio cover systems (the kind sold as kits) use proprietary extruded posts that are engineered to specific load ratings, and those are sized differently from standard lumber or tube stock. When shopping for hardware, always confirm whether a measurement is nominal or actual.
Wood posts are graded lumber, typically Douglas Fir-Larch or Southern Yellow Pine, and their strength depends on the species, grade, and moisture content. A 6x6 #2 Doug Fir post has significantly more compressive capacity than a 4x4 of the same grade. Steel tube has much higher strength per square inch than wood, which is why a 3x3 steel tube can often replace a 4x4 wood post in the same application. Aluminum extrusions fall somewhere in between and are typically rated by the manufacturer for specific span tables, not general engineering.
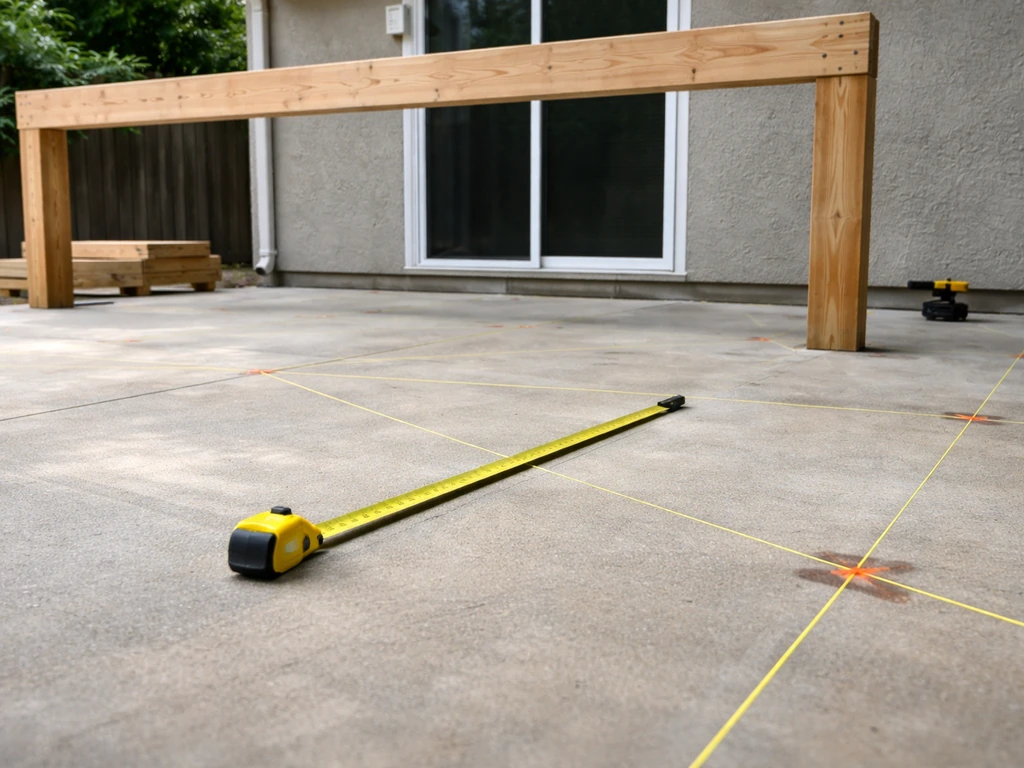
Measure your layout before you pick a size

Grab a tape measure and write down four numbers before you look at any sizing chart. These are the inputs that drive every decision downstream.
- Span: The distance the roof travels from the house (or ledger) to the outer beam, measured horizontally. This is your primary structural number.
- Post spacing: How far apart your posts will be along the outer beam. Common spacings are 6, 8, 10, and 12 feet.
- Post height: The clear height from the footing or deck surface to the underside of the beam. Taller posts are more susceptible to buckling under load.
- Roof slope: Even a low-slope patio cover (1/4 inch per foot) affects how snow and rain loads distribute. A steeper gable roof changes the math more significantly.
Once you have those numbers, you can calculate your tributary area for each post, which is the roof area that each post is 'responsible for' holding up. Tributary area equals roughly half the span multiplied by the post spacing. For example, a 12-foot-deep cover with posts spaced 10 feet apart means each post supports about 60 square feet of roof. That number feeds directly into the load calculation in the next section.
Weather loads: what you actually need to design for
The 2018 IRC (Appendix H) and IBC (Appendix I) both require patio covers to be designed for dead loads plus a minimum roof live load of 10 pounds per square foot (psf). If you're also trying to estimate how much weight an aluminum patio cover can hold, make sure you start with the dead load and local live loads from the code section on weather loads. If your local ground snow load exceeds that minimum, snow load governs instead. Wind loads are also required per code, and in hurricane or high-wind zones they often control the post size and anchoring design more than gravity does. ASCE 7-22 is the standard reference for both ground snow loads and wind design if you need the technical backup.
For practical purposes, here's how to think about load categories for a typical homeowner project. A lightweight aluminum or polycarbonate roof in a low-wind, no-snow zone is the easiest case. A wood-framed roof with shingles in a climate with 30 psf or more of ground snow load is the hardest case and almost certainly needs an engineer. Most DIY patio covers fall somewhere in the middle, and sizing for 20 to 25 psf total load (dead plus live) covers the majority of situations in moderate climates. That same total load is the starting point for figuring out how much weight a patio roof can safely hold sizing for 20 to 25 psf total load.
| Roof Type | Approx. Dead Load (psf) | Total Design Load (psf, moderate climate) |
|---|---|---|
| Aluminum panels (kit system) | 2–4 | 12–14 |
| Polycarbonate panels | 1–3 | 11–13 |
| Wood framing + metal roofing | 8–12 | 18–22 |
| Wood framing + asphalt shingles | 12–15 | 22–25 |
| Solid wood beams + wood decking (pergola-style) | 10–18 | 20–28 |
If you're in a snow country, look up your ground snow load on your county's building department website or the ASCE 7 ground snow load map. A 30 psf ground snow load translates to roughly 21 psf on a roof (using a typical 0.7 conversion factor for a flat or low-slope roof). Add that to your dead load and you'll have a realistic design load per square foot.
How to size your posts: rule of thumb and the real calculation
Rule-of-thumb starting points

These guidelines cover the vast majority of residential patio covers in moderate climates with standard post heights (8 to 10 feet). Use them as your starting point, then verify with the calculation below if you're near the upper end of any range.
| Post Size | Material | Max Tributary Area (moderate load) | Typical Use Case |
|---|---|---|---|
| 4x4 nominal (3.5"x3.5") | Wood (DF-L #2) | Up to ~50 sq ft | Light aluminum cover, short spans, 8-ft post height max |
| 6x6 nominal (5.5"x5.5") | Wood (DF-L #2) | Up to ~100 sq ft | Most wood-framed covers, gable roofs, freestanding structures |
| 3x3 x 11-ga square tube | Steel (A500) | Up to ~60 sq ft | Aluminum kit systems, light roof loads |
| 4x4 x 11-ga square tube | Steel (A500) | Up to ~120 sq ft | Heavier spans, commercial-grade aluminum systems |
| 3x3 or 4x4 extruded | Aluminum (manufacturer-rated) | Per manufacturer span table | Aluminum patio cover kits only |
The tributary load calculation
To verify your post size, multiply your tributary area by your design load (in psf) to get the total load on each post in pounds. If you’re trying to figure out how many posts for a patio cover, start by calculating tributary area and then match the post loads to the allowable capacity for the post size you plan to use how many posts for patio cover. Then compare that number to the allowable column load for your chosen post size. Here's the formula in plain terms: Total Post Load (lbs) = Tributary Area (sq ft) x Design Load (psf). For example: a 12-foot-deep cover with posts 10 feet apart and a 20 psf design load puts 1,200 lbs on each post. A 6x6 #2 Douglas Fir post at 8 feet tall has an allowable compressive load of roughly 22,000 to 30,000 lbs depending on grade and bracing, so it's very comfortable. A 4x4 at the same height handles around 8,000 to 11,000 lbs, which also passes easily. The 4x4 fails when post heights get taller (12+ feet) or loads get heavy (heavier roof plus snow), because slenderness (the ratio of height to width) starts to reduce the allowable load significantly.
The practical takeaway: for most standard patio covers under 12 feet deep, 10-foot post spacing, and moderate loads, a 4x4 is technically adequate but a 6x6 gives you a meaningful safety margin and looks proportionally better on a larger structure. Freestanding structures with no lateral support from a house wall lean on the 6x6 even harder because there's no wall helping resist side loads.
Footings, anchoring, and post bases
Getting the post size right and then setting it badly is one of the most common mistakes on DIY patio cover builds. If you're also trying to figure out the installation steps, this is a good point to cross-check how to install patio cover posts so the footing and post connections stay correctly aligned. The post is only as strong as the connection at the bottom, and the footing is only as reliable as the soil and depth below it.
Footing size and depth
A general industry minimum for an aluminum patio cover footing is 18 inches by 18 inches in plan, and typically 12 to 18 inches deep in non-frost areas. In frost-prone climates, the bottom of the footing must go below the local frost line, which can be anywhere from 12 inches in the Southeast to 48 inches or more in northern states. Undercutting the frost depth is a guaranteed path to heaving and cracked concrete over time. Look up your local frost depth through your county building department or the IRC climate zone map.
For heavier freestanding structures or high-wind zones, increase the footing to 24 by 24 inches and go deeper. If you're in a zone with significant uplift loads (hurricane straps are required on the house, for example), the footing needs to be sized to resist uplift, not just gravity, and that's where a structural engineer's input becomes worth the cost.
Post bases vs. embedded posts
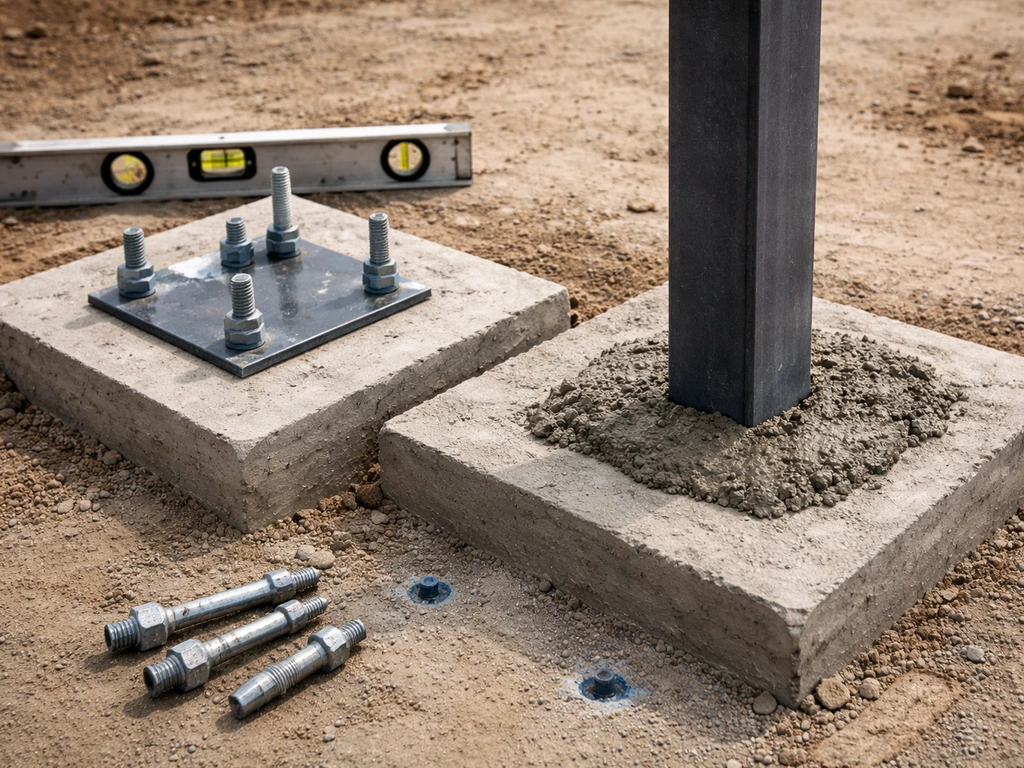
You have two basic options for connecting a post to its footing: a surface-mounted post base bolted to the concrete, or an embedded post set directly into the concrete. Each has real trade-offs.
| Method | Pros | Cons | Best For |
|---|---|---|---|
| Surface-mounted post base (e.g., Simpson ABA or ABU series) | Post stays dry, replaceable, adjustable position before concrete sets, easier inspection | Slightly lower lateral resistance than embedded; requires anchor bolt placement accuracy | Most covered patio structures, aluminum kit systems, anywhere rot is a concern |
| Embedded post in concrete | Higher lateral (shear) resistance, simpler to set | Post end exposed to moisture accelerates rot in wood; hard to replace; steel posts need corrosion protection | Freestanding pergolas with no other lateral bracing, steel post systems |
For wood posts, surface-mounted bases are almost always the better call. Even pressure-treated lumber will eventually rot when the end grain sits in or near concrete. A Simpson Strong-Tie post base elevates the post above the slab or footing surface, keeps it dry, and makes future replacement straightforward. For steel tube posts set into footings, use a post that extends at least 18 to 24 inches into the concrete and coat the embedded portion with a bituminous or epoxy coating to slow corrosion. Engineered aluminum patio cover systems typically specify their own post base hardware, and you should stick with that system rather than substituting generic hardware.
Anchor bolt placement matters more than most people expect
If you're using a post base, the anchor bolt has to be exactly positioned before the concrete sets. Being even half an inch off can put the post base out of plumb or require slotted holes that reduce the connection's rated load. The trick is to set the anchor bolts using a template (most post base manufacturers sell these, or you can make one from plywood) before the pour. Alternatively, use a wet-set anchor that you push into fresh concrete and position precisely while it cures. Either way, double-check your layout dimensions with a string line and a plumb bob before the truck arrives.
How patio cover type changes the post requirements
Lean-to (attached) covers
A lean-to cover attaches to the house at one end via a ledger board and is supported by posts at the outer edge only. This means each outer post carries a larger tributary area than a freestanding design with posts on both sides. The house wall provides lateral (side-to-side) stability, which reduces the lateral load demand on the posts themselves, but the posts still need to handle the full gravity load of the outer half of the roof. For a standard 10 to 12 foot span lean-to in a moderate climate, a 6x6 post is the right default. A 4x4 can work on very short spans (8 feet or less) with lightweight roofing. The ledger attachment to the house is its own critical detail and is worth reviewing carefully.
Gable roofs
A gable patio cover (peaked in the middle, sloping down both sides) typically has posts on both the house side and the outer side, or it's freestanding with posts on all four corners. The ridge beam or center support carries the apex load, and that load transfers into the posts supporting the ridge. Gable roofs almost always require 6x6 posts at the corners and at any intermediate support points, especially when the structure is freestanding. The roof's lateral thrust (the outward push created by the sloped rafters) also needs to be handled by collar ties or ceiling joists, and any failure there translates to outward force on the posts.
Freestanding covers and pergolas
Freestanding structures are the most demanding for post sizing because there's no house wall providing lateral bracing. Posts must resist both vertical gravity loads and horizontal wind loads acting on the roof and posts themselves. In practice, this means: go up one post size from what you'd use on a lean-to, use deeper footings, and consider diagonal knee bracing or moment-resisting connections at the post-to-beam joint if wind uplift or racking is a concern. For freestanding structures wider than 16 feet or taller than 10 feet, I'd strongly recommend getting an engineer's review of the post and footing design before you pour concrete. The cost of that review is far cheaper than rebuilding a collapsed structure.
Post spacing is a related variable that directly connects to all three cover types. In general, how far apart posts should be depends on your roof load and the span they support post spacing. Tighter spacing (6 to 8 feet) reduces the load per post and lets you use smaller posts. Wider spacing (10 to 14 feet) requires bigger posts and beams. How far apart posts should be is a separate sizing exercise from post dimensions, but they're interlinked: if you want wider post spacing for a cleaner look, you may need to step up your post size.
When to DIY and when to call a pro (plus mistakes to avoid)
The honest line for DIY feasibility on post sizing is this: if your patio cover is a standard lean-to or small freestanding structure, uses a recognized post size (4x4 or 6x6 wood, or manufacturer-specified aluminum tube), has spans under 12 feet, and sits in a moderate climate with no special wind or seismic designation, you can size the posts yourself using the guidelines in this article and pull a standard residential permit. Most building departments will accept a plan that references IRC Appendix H and uses common lumber sizes within normal span limits.
You should involve a structural engineer or at minimum a licensed contractor for review if any of these apply to your project.
- Your location is in a high-wind zone (ASCE 7 Wind Zone C or D, or a hurricane-prone coastal area)
- Your ground snow load exceeds 25 to 30 psf
- Your structure is freestanding, taller than 10 feet, or spans more than 16 feet
- You're building on a hillside, uneven ground, or expansive soils
- Your permit application requires stamped engineering drawings (many jurisdictions require this for any freestanding covered structure)
Common mistakes to avoid: undersizing the footing depth in frost country (posts heave and tilt within two winters), skipping post bases and setting wood directly into concrete (rot in 5 to 10 years), using 4x4 posts on freestanding structures with wide spacing (visible sag and potential failure under heavy snow), and not accounting for roof weight when switching from a lightweight aluminum kit to a heavier wood-framed design partway through planning. Also watch out for misreading nominal vs. actual post dimensions when ordering hardware, since a 6x6 post base is sized for a 5. If you have an Integra patio cover kit, the next step is to follow the manufacturer guidance on how to install integra patio cover so the posts, roof panels, and anchors line up correctly. 5-inch actual post, not a true 6-inch one.
One more thing worth flagging: even if your jurisdiction doesn't require a permit for patio covers under a certain square footage, that doesn't mean the structure doesn't need to be built to code. Homeowner's insurance claims after storm damage can be denied if an unpermitted structure caused damage or injury. Build it right regardless of what the permit threshold is.
Your next steps: a practical checklist
- Measure your span, post spacing, and post height and write them down.
- Identify your roof material and estimate the dead load in psf using the table above.
- Look up your local ground snow load and design wind speed (county building department or ASCE 7 maps).
- Calculate the tributary area per post (half the span times the post spacing) and multiply by your total design load to get load per post in pounds.
- Match that load to a post size using the rule-of-thumb table, then verify with the compressive capacity of your chosen lumber species and grade.
- Determine your footing size and depth based on load and local frost depth.
- Decide between surface-mounted post base and embedded post, then order the appropriate hardware.
- Check with your local building department about permit requirements before you break ground.
FAQ
If my patio cover is “only” 8 feet deep, can I always use 4x4 posts?
Not always. Depth is only one part of tributary area, you also need your post spacing and roof load. A 4x4 can be adequate for short spans and light roofs, but if you have wide post spacing, heavy roofing, or higher wind and snow loads, a 6x6 (or smaller post spacing) may still be required.
How do I choose between nominal 4x4 lumber and a steel 4x4 tube for the same design?
Don’t assume they’re interchangeable. Wood “4x4” is 3.5 inches actual, while steel “4x4” tube is an actual 4 inches. Also, steel strength per area is much higher than wood, so a tube that fits visually may still change the allowable load and connection hardware you need.
Do I have to size posts for snow even if my roof slope sheds snow easily?
Yes, you still start with the code ground snow load and convert it to roof load. Roof slope and factors may reduce effective snow load, but you should not ignore it. If you’re in a snow-prone county, treat snow as a governing case for post sizing until your calculations show otherwise.
What changes if my patio cover is freestanding versus a lean-to attached to the house?
Freestanding designs need to resist lateral loads and racking without help from a wall. Even if the vertical load looks similar, you typically must use larger posts, deeper footings, and bracing. A lean-to can often rely on the ledger and house framing for lateral stability, but the outer posts still carry the full gravity load on their side.
Can I use a 4x4 post if I add more knee braces or diagonal supports?
Often you can improve lateral stability and reduce sway, but it does not automatically fix vertical bearing and compression capacity. Post size must still be checked for axial load and height-to-width slenderness. Bracing helps with wind and racking, not replace compressive design.
What post height counts for the slenderness problem, the exposed height or total height?
Use the clear height between points of fixity for slenderness checks, typically from the top of the footing/pedestal to the underside of the beam connection, or as defined in your design method. If your beam connection point shifts with a base plate, the effective height can change, which is why post base type and anchorage details matter.
If I’m using post bases, can I shim after the anchors are set?
Small adjustments are possible, but shimming that leaves gaps or misaligns the base can create eccentric loading and reduce connection performance. The cleaner approach is to set anchors using a template, verify plumb before the pour, and use a base rated for your bolt pattern. If you must adjust, consult the base manufacturer’s instructions for allowed tolerances.
What footing depth should I use in a frost zone, even if my local frost line is deep?
Go to the depth required by your local frost line and soil conditions. If you can’t practically reach that depth, you typically need a different strategy such as engineering review for alternative foundation methods. Under-depth footings are a common cause of post tilting within a couple winters.
How do I know if I need an engineer, even for a small patio cover?
You should get a review if you have high wind exposure, unusual roof shapes, significant snow loading, posts taller than typical residential ranges, wide freestanding spans, or if your design relies on connections with limited documentation. If any part of the design is beyond standard tables, an engineer can also confirm that uplift and lateral forces are handled, not just compression.
Does post spacing affect post size as much as span does?
Yes. Post spacing changes tributary area directly, so it often matters as much as span. Closer spacing can allow smaller posts or lower design loads per post, while wider spacing increases load per post and can push you from 4x4 to 6x6 even if the overall roof width looks similar.
Is “design load 20 to 25 psf” enough for every patio cover in moderate climates?
It’s a reasonable starting point for many typical DIY projects, but you should still verify dead load and local weather design values. If your roofing is heavier than typical, or your local live load factors are higher, the total can exceed that range and change the required post size and footing.