Installing an attached patio cover (a lean-to style that ties into your house) is a solid weekend-to-two-weekend project for most DIYers. You mount a ledger board to your house wall, set posts along the outer edge, run beams and rafters between them, then lay your roof panels or sheathing and seal the wall connection. Done right, it gives you a covered outdoor space that can handle rain, moderate wind, and years of use. Done wrong, the cover peels off in the first windstorm or leaks every time it rains. This guide walks you through the whole process so you end up with a structure that's solid, weathertight, and built to code. To learn the exact steps for a lean-to installation, follow the walkthrough for an attached patio cover from start to finish.
How to Install a Patio Cover: DIY Step-by-Step Guide

Pick the Right Style Before You Buy Anything
The style you choose determines how complicated the build gets. For most homeowners doing their first patio cover, an attached lean-to is the right call. It's the simplest framing geometry (everything slopes in one direction, away from the house), it borrows structural support from the house wall, and it's the most cost-effective option. A gable roof cover is more attractive and sheds water in both directions, but it adds a ridge beam, doubled rafters at the peak, and more complex framing at the house connection. A freestanding pergola or shade structure skips the ledger attachment entirely but requires footings and posts on all four corners and doesn't give you the same weather protection. If you want a real roof over your head, not just filtered shade, start with an attached lean-to.
Within the lean-to category, you're choosing between a solid roof (patio cover) and an open lattice or pergola-style cover. A solid roof keeps rain out completely. Lattice looks nice but doesn't actually keep you dry. For the purposes of this guide, we're building a solid attached lean-to patio cover, which is what most people mean when they search this topic.
Plan and Measure Before You Touch a Tool
Bad planning is the number one reason patio cover projects stall or fail. Spend a solid hour on this before you order anything.
Check your permit requirements first
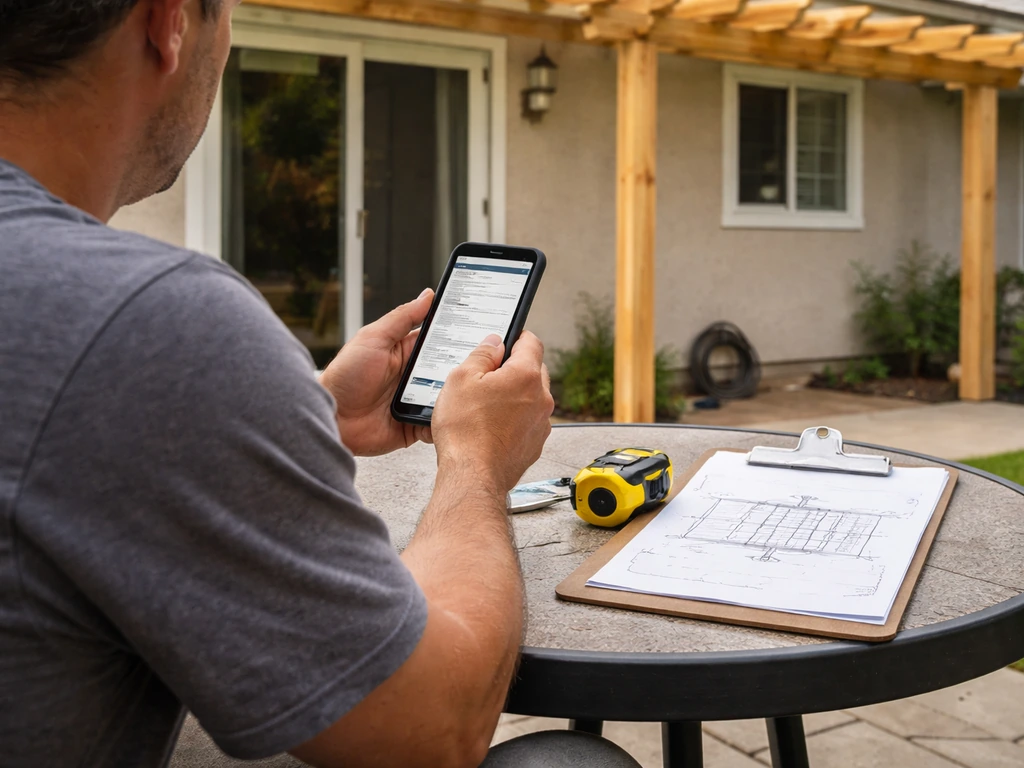
In most jurisdictions, an attached patio cover requires a building permit regardless of size. Cities like Moses Lake, WA state this explicitly: all attached porch and patio covers require a permit, no exceptions. When a structure attaches to your house via a ledger, inspectors treat it as part of the house structure, not a small accessory building. Some plan-check offices want a framing plan showing footing size, post dimensions, beam and rafter sizes and spacing, ledger attachment detail, and roof covering type. Pull the permit. The inspection process actually protects you because an inspector will catch ledger attachment problems before they become a collapse or a home insurance denial.
Lay out your dimensions
Measure the width of the wall you're attaching to and decide how far out you want the cover to project. Common residential patio covers project 10 to 16 feet from the house. The projection determines your rafter span, which drives post spacing and beam sizing. Installing patio cover posts starts with measuring your projection and spacing posts so the beams can safely support the roof install patio cover posts. A good rule of thumb for post spacing: space posts no more than 8 to 10 feet apart along the outer beam for typical residential spans. As a quick check, knowing how many posts you need also depends on your patio cover projection and the maximum post spacing of about 8 to 10 feet. Because post sizing and spacing depend on the span your patio cover projects, the right approach for most homes is to follow a span table or permit plan for your specific post spacing and beam size. For a 12-foot-wide patio, two posts are usually sufficient. For 20 feet or wider, plan for a third post near the center or use a heavier beam. Post sizing and spacing deserve their own careful attention since those decisions affect the whole structure's integrity.
Calculate slope and clearance
Your roof needs to drain away from the house. A common practical guideline is about 1/4 inch of drop per foot of run, meaning a 12-foot cover should drop roughly 3 inches from the ledger height to the outer beam. Some builders go slightly steeper (1/2 inch per foot) for aluminum panel systems that can pond water in low spots. The slope difference between ledger and beam is what creates pitch, so set your ledger height with that math in mind. For clearance, you want at least 7 feet of headroom at the lowest point (the outer beam) for comfortable use. If you're attaching the ledger below the eaves of the house, check that there's enough vertical space between the ledger and the wall top plate to get adequate headroom at the outer edge. Sometimes you have to drop the ledger lower or raise the post height to make it work.
Choose Your Materials and Gather Your Tools
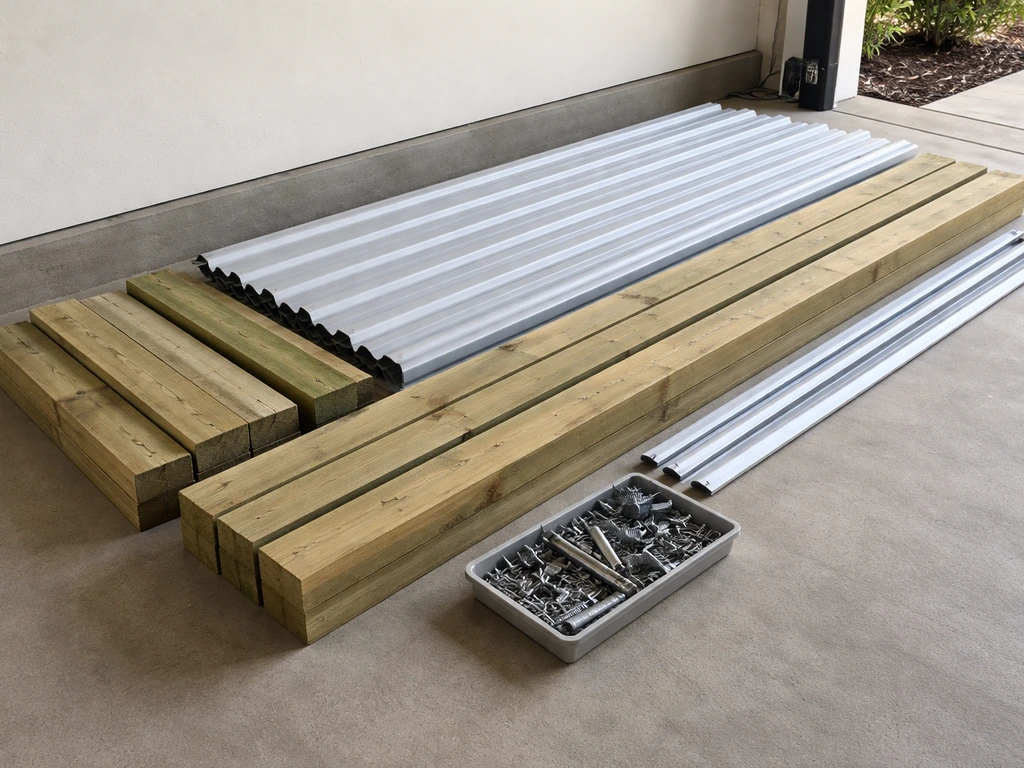
The three common material choices for a DIY patio cover are wood framing with a roof covering, aluminum system kits, and metal panel systems. Each has real trade-offs.
| Material | Pros | Cons | Best For |
|---|---|---|---|
| Wood (pressure-treated framing + plywood/shingles) | Widely available, easy to cut and modify, familiar to most DIYers, paintable | Needs regular maintenance, can rot if flashing fails, heavier | Builders comfortable with basic carpentry, matching house aesthetics |
| Aluminum patio cover system (kit) | Low maintenance, lightweight, corrosion-resistant, DIY-friendly kit instructions, faster install | Less structural flexibility, limited spans without engineering upgrades, cost varies | Homeowners who want low-maintenance and don't need custom dimensions |
| Metal roof panels (corrugated or standing seam) | Durable, good water shedding, long lifespan, works with wood framing | Requires sealing washers and correct fastener technique, can be noisy in rain | Builders using wood framing who want a long-lasting roof surface |
For most first-time builders, a wood-framed cover with metal roofing panels or an aluminum kit is the easiest path. Wood framing is forgiving when dimensions aren't perfect. Aluminum kit systems come with manufacturer instructions and pre-cut components, which reduces measuring errors. If you go with a kit system, follow the manufacturer's engineering packet closely because post spacing, beam sizing, and fastener schedules are all pre-calculated for specific load assumptions. Before choosing an aluminum patio cover, verify the rated structural capacity for your specific span, wind, and roof area load assumptions.
Tools you'll need
- Circular saw or miter saw (for cutting framing lumber or metal extrusions)
- Drill and impact driver with bits
- Level (4-foot level minimum, longer is better for posts)
- Chalk line and tape measure
- Post hole digger or power auger (for footings)
- Concrete mix and a bucket or mixer
- Socket set and wrenches (for structural hardware)
- Caulk gun and exterior-grade sealant
- Ladder (at least one, ideally two for working at height)
- Safety glasses, gloves, and hearing protection
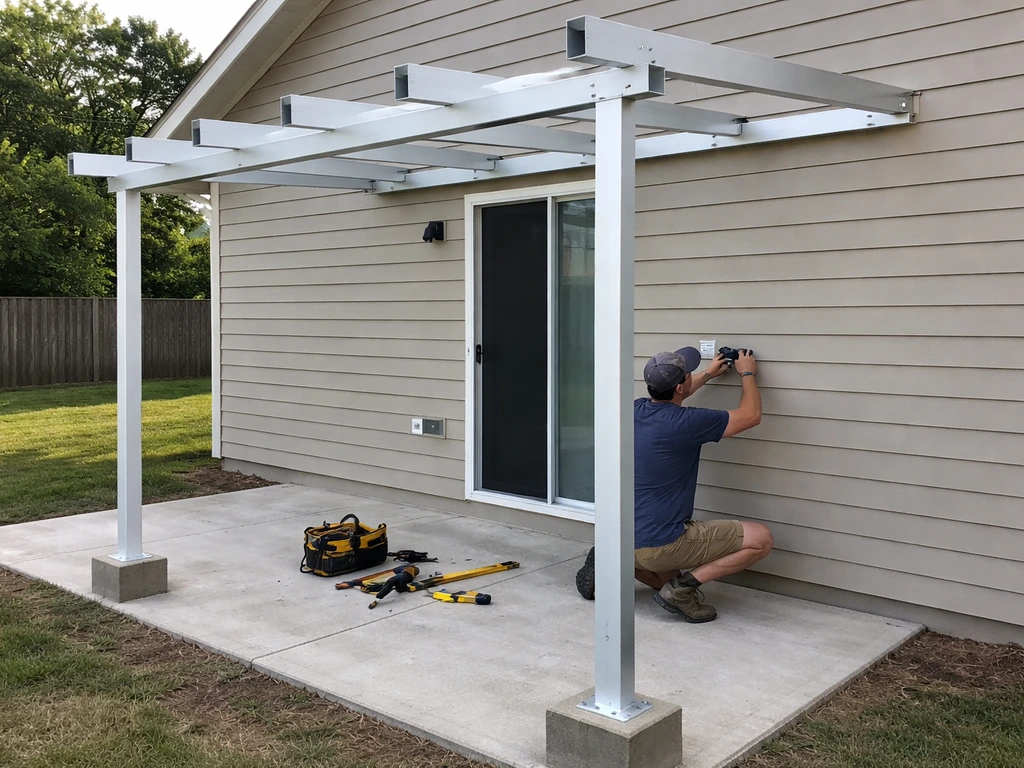
Step-by-Step Installation: Attached Lean-To Patio Cover
Here's the sequence that works. Don't skip steps or reverse the order because each step depends on the one before it being level, plumb, and secure.
- Mark your layout. Snap a chalk line on the house wall at your ledger height. Use a level to confirm it's perfectly horizontal. Mark post locations on the ground using stakes and string lines to confirm your outer edge is straight and square to the house.
- Dig footings and set post hardware. Dig footing holes at each post location. Depth depends on your local frost line and soil conditions, but 18 to 24 inches is typical in moderate climates (your permit may specify depth). Pour concrete and set post-base hardware (J-bolts or post anchors) while the concrete is wet. Use a level and your string line to confirm each anchor is in the right position. Let concrete cure fully, typically 24 to 48 hours minimum before loading.
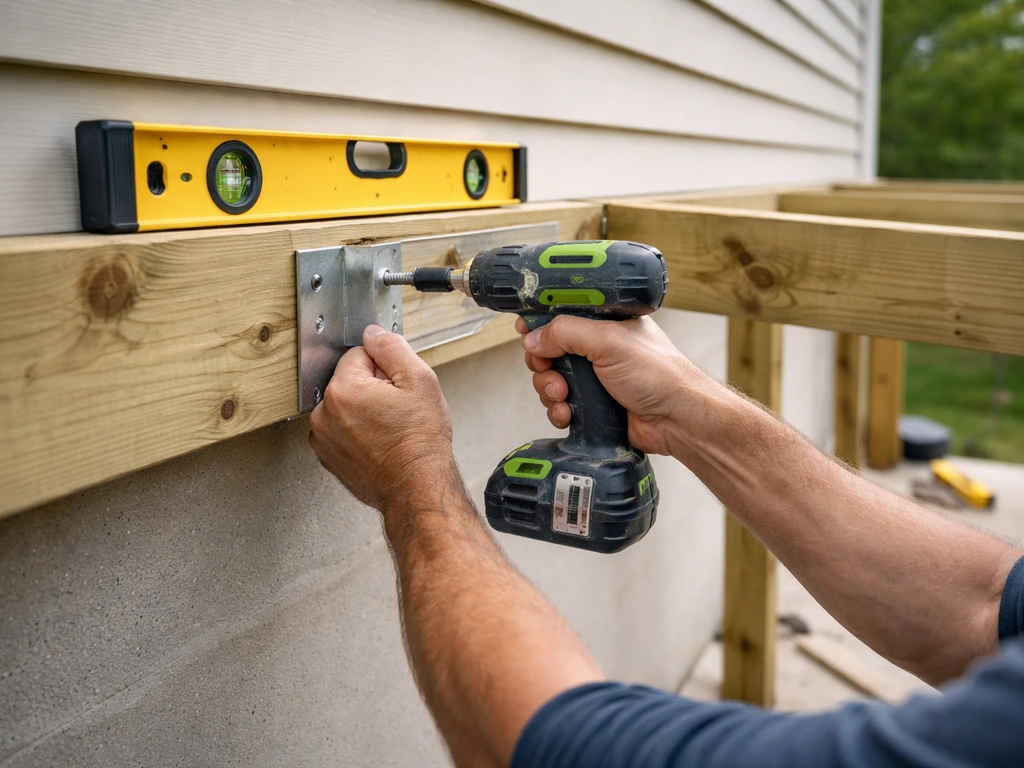
- Install the ledger board. Cut your ledger to the correct length. Before attaching it, cut a piece of metal drip-cap flashing to sit over the top of the ledger once it's in place. Position the ledger at your marked height and fasten it to the house framing (rim joist, wall studs, or double top plate) with structural lag screws or through-bolts. This is not a job for deck screws. Use 1/2-inch diameter lag screws at a minimum, staggered top and bottom, typically 16 inches on center or per your permit specs. Leave a small gap or use standoff hardware to allow drainage behind the ledger, then tuck the drip-cap flashing over the top edge and seal the top of the flashing to the house sheathing or siding with flashing tape and caulk.
- Set posts. Lift each post into its base hardware and plumb it in both directions using your level. Brace posts temporarily with 2x4 braces nailed to stakes in the ground so they stay plumb while you work. Fasten posts to their base hardware with the specified bolts or nails.
- Install the outer beam. The beam spans across the tops of your posts and carries the outer ends of the rafters. For a 10 to 14-foot span with posts 8 to 10 feet apart, a doubled 2x8 or 2x10 beam is common for wood framing, but verify with your plan or a span table. Lift the beam into place and secure it to the posts using post caps rated for the load. Do not just toenail the beam to the posts. Use listed structural connectors.
- Install rafters. Rafters run from the ledger to the outer beam, spaced typically 24 inches on center for most residential patio covers. At the ledger end, hang rafters in joist hanger hardware. At the beam end, use rafter ties or hurricane clips. These metal connectors are the critical link that keeps the roof from lifting in a windstorm. Space rafters consistently and confirm each one is level side to side (even though the roof slopes front to back).
- Install roof decking or panels. For wood framing with metal panels, install roof sheathing (1/2-inch plywood or OSB) over the rafters with appropriate nailing, then add an underlayment (felt paper or synthetic), and install your metal roof panels per the manufacturer's instructions. Drive screws through the panel ribs into the sheathing or rafters using screws with neoprene sealing washers. Drive them straight so the washer seats evenly and compresses to form a seal. For an aluminum kit system, lay panels per the manufacturer sequence, usually starting from one end and working to the other, securing panels at each rafter with the specified fasteners. Anchor panel ends per the system's wind uplift requirements.
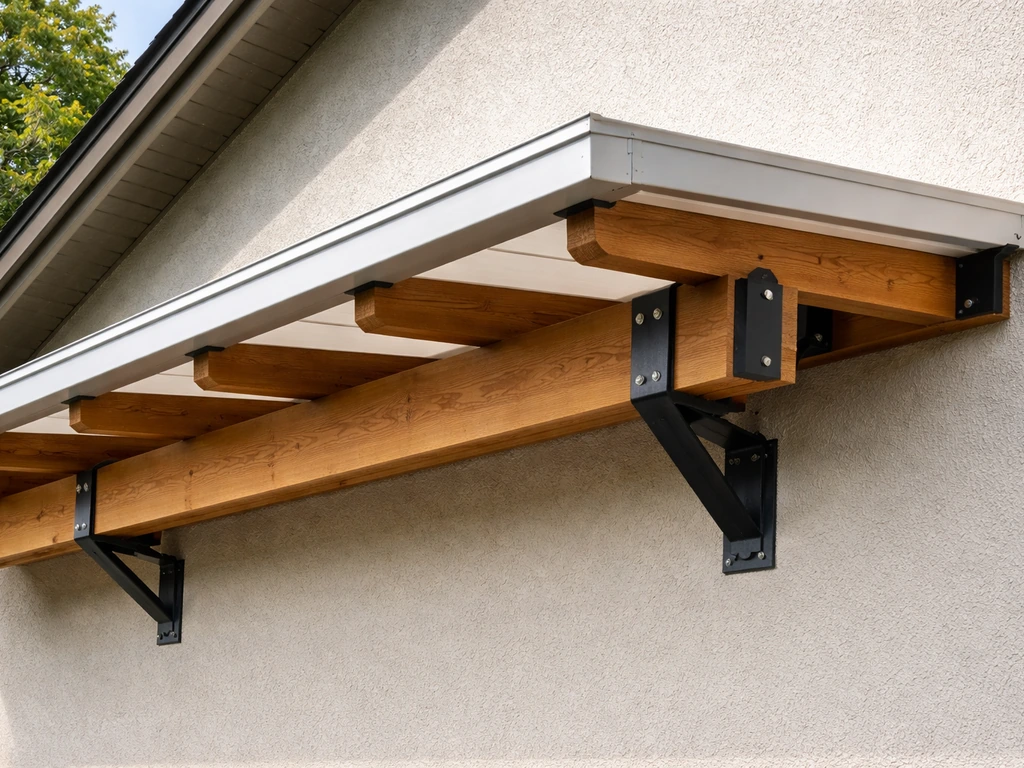
Structural Safety: The Details That Actually Keep It Standing
The most common failure point for patio covers in wind events isn't the roof panels. It's the connections. The Insurance Institute for Business and Home Safety (IBHS) specifically identifies fascia and eave attachments to non-structural elements as a leading cause of patio covers being stripped off the house. IBHS’s high-wind research report also discusses how attached-structure components can be vulnerable to wind uplift and describes failure mechanisms seen in testing. If your ledger is bolted to actual structural framing in the house wall, and your rafters are clipped to that ledger with hurricane ties, the cover has a complete load path from the roof surface down into the foundation. If any link in that chain is just a screw into fascia board or a toenail into a top plate, that's where it will fail.
Here's what a complete load path looks like for a lean-to cover: wind uplift pushes up on the roof panels, the panels transfer that load to the rafters through their fasteners, the rafters transfer the load to the ledger through hurricane clips, the ledger transfers the load to the house structural framing through lag bolts into the rim joist or wall studs, and the outer edge transfers load through rafter ties into the beam and down through post caps into the posts and into the footings. Every one of those connections needs to be made with rated hardware, not guesswork.
On post sizing and footing depth: these are driven by your specific span, roof area, local wind speed, and whether you're in a snow load zone. Most residential DIY covers with 10 to 12-foot spans use 4x4 or 4x6 posts for shorter heights, but taller posts or heavier spans often need 6x6 lumber. Your permit plan or a span table will give you the correct answer for your situation. The amount of weight a patio roof can hold depends on your roof area, span, local snow and wind loads, and the engineered sizing of the posts, beams, and connections how much weight a patio roof can hold. Don't guess on post size since an undersized post that kicks out sideways takes the whole roof with it.
If you're in an area with significant wind (coastal regions, plains states, high-fire-risk zones with regular wind events), treat the structural connections as non-negotiable. The IRC Appendix H covers patio covers specifically, and the wind design provisions in the IBC address the uplift and lateral loads your cover needs to resist. Your permit inspector is checking exactly these details.
Seal It, Drain It, and Keep It That Way
Waterproofing at the ledger-to-house connection is where a lot of DIY patio covers develop long-term problems. Water that gets behind a ledger will rot the house sheathing and framing before you ever see the damage from the outside. The correct approach is to install a metal drip-cap flashing over the top of the ledger before you attach siding or caulk, then seal the top edge of that flashing to the house with a self-adhering flashing membrane or high-quality exterior caulk. If your ledger is going against existing siding, you need to either cut back the siding by about an inch at the ledger location and install a flashing seal, or use a z-flashing that tucks under the siding course above the ledger. Don't just run a bead of caulk along the top edge of the ledger and call it done. Caulk alone fails within a few years.
At the outer edge of the roof, install a drip edge or gravel stop so water runs off cleanly rather than wicking back under the roofing material. For aluminum panel systems, the manufacturer's end cap and gutter attachment points handle this, but make sure end caps are fully seated and sealed. If you're running a gutter, attach it to the outer beam or a fascia board nailed to the rafter ends, not to the roof panels directly.
Ongoing maintenance
Once the cover is up, maintenance is straightforward if you used the right materials. Once or twice a year, clear debris from the roof surface and check that your flashing seals at the house connection haven't cracked or pulled away. For wood-framed covers, check the ledger flashing each spring and reseal any gaps with exterior caulk. For aluminum systems, inspect fastener heads to confirm the sealing washers haven't compressed or cracked. Check that gutter and drainage outlets aren't blocked. Tighten any post base hardware that has loosened due to seasonal movement. The earlier you catch a small leak or a slightly loose connection, the cheaper the fix.
When to Call a Pro Instead of DIYing It
Most straightforward attached lean-to covers on a single-story house are realistic DIY projects if you're comfortable with basic framing and following a plan. But there are situations where hiring a structural engineer or a licensed contractor is the smarter move. If your house has an unusual wall construction (steel framing, ICF block, brick veneer), figuring out a safe ledger attachment requires engineering knowledge, not YouTube research. If you're in a high-wind or high-seismic zone, the design loads can exceed what standard residential span tables cover, and you'll likely need an engineered plan anyway to get the permit. If your project is larger than about 400 square feet or involves a complex roof shape like a gable or hip, the structural complexity goes up significantly. In those cases, paying for a plan review or a structural engineer's stamp is cheap insurance compared to the cost of a failure or a permit denial after the work is done.
FAQ
Do I need a building permit even if the patio cover is small and looks like a minor accessory?
In many jurisdictions, an attached ledger-based patio cover is treated like part of the house structure, so permits are commonly required regardless of size. If your plan set is vague, call your local building department before buying materials and ask what documentation they expect (often a footing detail and ledger attachment detail).
Where should the ledger board be placed if my wall has siding, trim, or an existing roof overhang?
You need enough vertical clearance to hit your minimum headroom at the low edge, plus room for proper flashing. If the ledger lands behind trim or tightens clearance near the eaves, you may have to lower the ledger or adjust post heights, then recheck slope and gutter/drip edge placement so water still drains away from the house.
What’s the most common cause of leaks at the house connection?
Caulk-only sealing at the top of the ledger usually fails over time because water works under sealant through freeze-thaw and wind-driven rain. Use a proper drip-cap style flashing that sheds water, then seal the flashing top edge with a compatible method (flashings membrane or exterior caulk designed for that application).
How steep should the patio cover slope be, and what if my site limits how much drop I can get?
A typical target is about 1/4 inch per foot of run, steeper if your roof system can trap water. If the site constraints reduce pitch, you should plan for more aggressive drainage detailing (for example, ensuring end devices and low spots are managed by the product design), otherwise ponding can accelerate corrosion and leaks.
Can I attach the ledger into non-structural parts of the house, like fascia board or exterior sheathing?
No, ledger loads and wind uplift must transfer into structural framing, such as wall studs and rim joist framing, using rated lag bolts and the correct hold-down hardware. If you cannot locate solid framing for the ledger bolt pattern, you need blocking or engineering guidance before proceeding.
Should gutters be installed on a patio cover roof, and where do I attach them?
You can, but only if the system is detailed to keep water from running under roofing edges. Attach gutters to the outer beam or a fascia member at the rafter ends, not directly to roof panels, and confirm the end caps or gutter attachment points are sealed and fully seated for your specific panel kit.
What’s the difference between “roof panels won’t leak” and “the cover won’t blow off,” in practical terms?
Wind failures usually come from connection details, especially how roof framing ties into the ledger and how the ledger ties into the house structure. Even strong roof panels can be peeled back if hurricane clips, tie-down hardware, or ledger bolts are missing, undersized, or fastened into non-structural material.
How do I choose post size and footing depth if my measurements are slightly off?
Use the permitted plan, span table, or kit engineering packet for the span, roof area, and local loads, then only adjust within the allowable tolerances. If your actual post spacing differs from the plan, recheck beam span capability and connection requirements, because undersized posts or different spacing can change the entire load path and cause lateral kick-out.
What should I do about drainage at the outer edge so water does not wick back under roofing?
Install a drip edge or gravel stop at the outer perimeter so runoff lands away from the structure. If you use aluminum panel systems, verify end caps are seated and sealed per manufacturer instructions, and confirm any drainage devices are not blocked or misaligned during installation.
What maintenance steps should I prioritize after installation?
Twice per year, clear roof debris and inspect the ledger flashing area for separation or cracks. For aluminum systems, check fastener sealing washers for compression loss or cracking, and tighten any post base hardware that loosens due to seasonal movement, especially after high-wind storms.
When is it better to hire a structural engineer or contractor instead of DIY?
Choose professional help if your house structure is unusual (steel framing, ICF, brick veneer), if you are in a high-wind or high-seismic region, or if your project is larger than typical small covers (for example, around 400 square feet) or includes complex roof geometry. Also get guidance if you cannot clearly confirm ledger fastening into structural framing.