
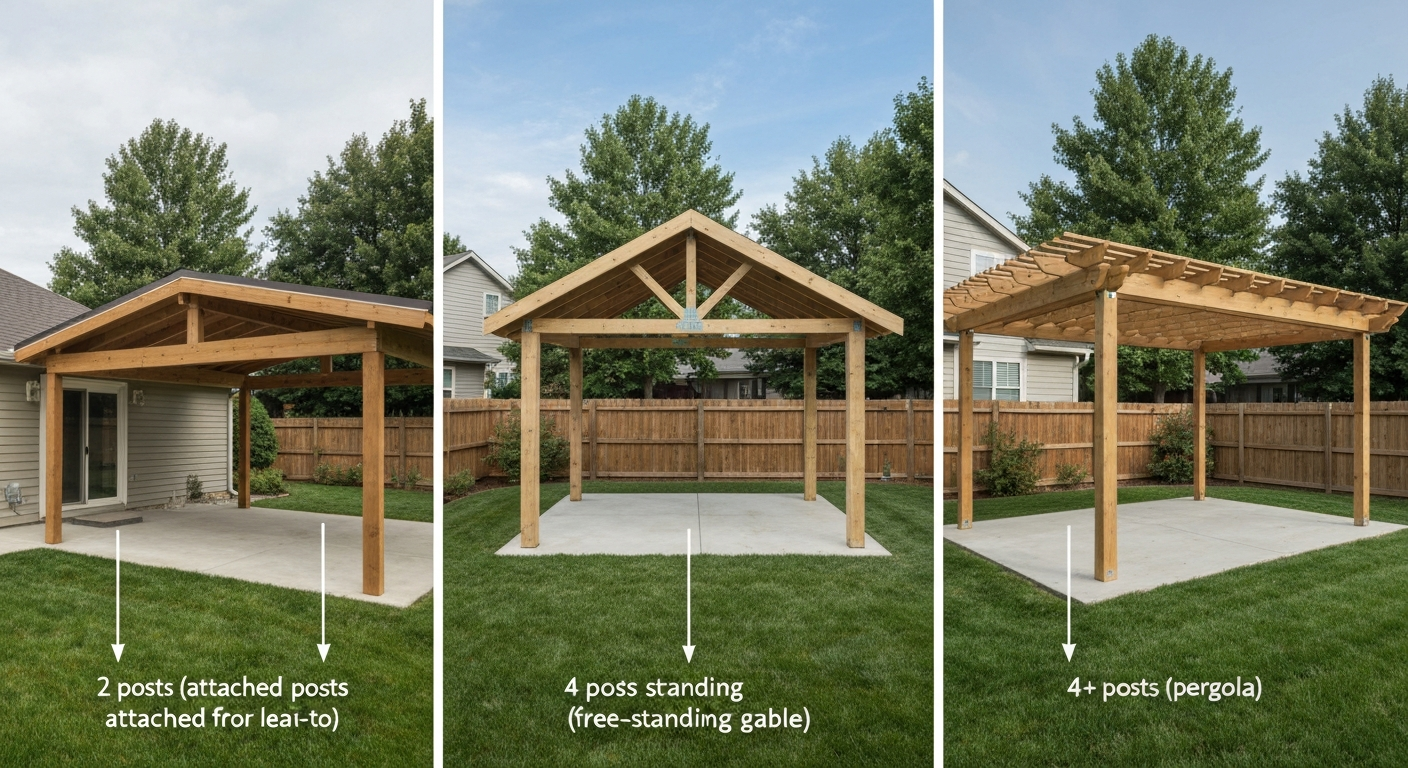
For most residential patio covers, you'll need a minimum of 2 posts for a simple attached lean-to and 4 posts for a free-standing structure. Beyond that starting point, the real number depends on how wide and deep your patio is, what material you're building with, and how far your beams can span without sagging or failing. A 10-foot-wide aluminum kit cover might only ever need 2 posts along the outer edge, while a 20-foot-wide wood-framed gable roof could need 4 to 6 depending on beam size and local snow load. Nail down your dimensions and material first, and the post count follows logically. For specific spacing recommendations, see how far apart should posts be for a patio cover.
How Many Posts for Patio Cover: Rules, Spacing & Sizes

Celia Vaughn
29 Jul 2026
The quick rule of thumb by cover type
Before you dig a single hole, here's a practical starting framework based on the three most common patio cover configurations. These numbers assume typical residential spans and standard load conditions. If your situation involves heavy snow, high wind, or long spans, treat these as a floor, not a ceiling.
| Cover Type | Minimum Posts | Typical Posts | Notes |
|---|---|---|---|
| Attached lean-to (up to 12 ft wide) | 2 | 2–4 | House wall acts as one support; outer beam carries the load |
| Attached lean-to (12–20 ft wide) | 2 | 4–6 | Wider spans need an intermediate post or larger beam |
| Free-standing gable (up to 12 ft wide) | 4 | 4 | One post at each corner; beam spans full width |
| Free-standing gable (12–20 ft wide) | 4 | 4–6 | May need center posts if beam size is limited |
| Free-standing pergola/shade (any width) | 4+ | 4–8 | Open structure; post spacing matches rafter layout |
Attached covers get a significant structural advantage from the ledger or header bolted to the house wall. That attachment point essentially acts as a continuous support along one entire side, so you only need to provide posts along the outer edge. Free-standing structures have no such help and must carry all loads on their own four (or more) corners.
How post count is actually determined
Post count isn't arbitrary. It flows from three connected decisions: how far your beam can span between supports (the span), how much roof area each post is responsible for carrying (the tributary area), and what load that area must support (dead load from the roof material plus live load from snow, rain pooling, or maintenance workers). For more on calculating roof loads and capacities, see how much weight can a patio roof hold. The International Residential Code requires that all roof structures be designed to handle the greater of the roof live load or the ground snow load for your region, and those values vary enormously across the country. A patio cover in Phoenix is engineered very differently from the same-sized structure in Minnesota.
Think of it this way: every post carries a chunk of the roof's total weight. That chunk is its tributary area, which is roughly half the beam span on each side of the post multiplied by the rafter span. If a post sits at the corner of a 10x12 structure, its tributary area might be 5x6 ft (30 sq ft). If that post is in the middle of a long beam, it might be responsible for 60 or 80 square feet. The larger the tributary area, the bigger the post and footing need to be. This is exactly why adding a post in the middle of a long beam doesn't just help aesthetically, it cuts each post's load roughly in half and lets you use lighter lumber or smaller footings throughout.
Span limits drive the spacing decision
Every beam has a maximum allowable span between supports before it deflects too much or risks failure. Exceed that span and you either need to add a post or upgrade to a larger beam. This is the core trade-off in patio cover design: fewer posts means bigger beams; more posts means you can get away with smaller framing. For a DIYer, posts are usually cheaper and easier to add than sizing up from a 4x8 beam to a built-up 3-ply 2x10, so when in doubt, add the post.
Lean-to, gable, and free-standing: post counts in practice
Attached lean-to
This is the most common DIY patio cover and the most forgiving when it comes to post count. One side attaches to the house via a ledger board or a structural header bolted directly into the rim joist or wall framing. That attachment runs the full width of the cover, so all you're sizing is the outer beam and how many posts support it. For a standard 10x12 ft lean-to, two posts at the outer corners handle the job comfortably with most beam materials. Once you push past 14 feet in width or start dealing with significant snow loads, a center post on the outer beam becomes worth the small extra effort.
Gable and hip roof covers
A gable cover attached to the house still uses the ledger connection on the house side, but now you have a ridge beam and rafters pitching up to a peak. The outer wall of the gable has posts and a beam just like a lean-to, but you also need to deal with the gable end walls, which typically become framed knee walls rather than individual posts. Free-standing gable covers need four corner posts minimum, and the beam spans between those corners govern whether you can stay at four or need to add intermediate support. A 16-foot free-standing gable with a 4x8 beam is right at the edge of what most lumber species will handle; bump the beam to a 4x10 or go to a doubled 2x10 and you can hold the four-post layout cleanly.
Free-standing structures and pergolas
Free-standing covers must resist all lateral loads (wind racking) on their own, which makes post sizing and anchoring more critical than in attached structures. Four corner posts with well-anchored footings and a proper beam-to-post connection handle most residential sizes up to about 14x14 ft. Larger structures, say, a 20x20 pergola or a free-standing aluminum kit cover with a 20-foot span, typically introduce intermediate posts or require a much more robust post size (think 6x6 at minimum) to keep the structure from racking in high wind. If you're building with aluminum kit panels, the manufacturer's manual will specify maximum post spacing, and that number governs regardless of what a wood beam table says.
How material choice changes your post needs
This is one of the most practical decisions a DIY builder makes, and it directly affects how many posts end up in the ground. Wood, aluminum, and steel all have different allowable spans, weight penalties, and failure modes.
Wood (dimensional lumber and heavy timber)
Wood is the most flexible material to work with on-site because you can cut, notch, and sister pieces together to solve almost any span problem. The downside is that wood is heavy, a built-up beam is a two-person job at minimum, and it deflects more than steel or engineered lumber at equivalent sizes. Douglas Fir and Southern Yellow Pine are the workhorses for patio cover framing. Pressure-treated lumber is required for any posts in contact with concrete or within 6 inches of grade. The American Wood Council's DCA-6 guide provides prescriptive post height and footing size tables, and one thing you'll notice quickly is that 4x4 posts are listed as "not permitted" for many load/height combinations. Taller posts and higher tributary areas push you to 4x6 or 6x6 quickly.
Aluminum kit covers
Pre-engineered aluminum patio cover kits (like Integra and similar products sold through home improvement stores) are designed to specific wind and snow load ratings, and the manufacturer's manual defines exactly how far apart posts can be. You don't recalculate this yourself, you follow the manual. Typical aluminum kit systems allow post spacings of 8 to 12 feet on center, and the rated load capacity (often listed in pounds per square foot on the product page) tells you whether the kit is suitable for your climate. For specifics on how much weight an aluminum patio cover can hold, check the kit's rated pounds-per-square-foot capacity in the manufacturer's manual how much weight can an aluminum patio cover hold. The benefit of aluminum is that the panels are light, the posts are smaller, and there's no rot concern. The constraint is that you cannot deviate from the manufacturer's layout without voiding the rating.
Steel and heavy metal framing
Steel allows significantly longer spans with smaller section sizes compared to wood, which is why you sometimes see commercial-style patio covers with only 4 posts spanning 20+ feet. For residential DIY projects, steel is less common because it requires welding or bolted steel connections, specialized cutting tools, and significantly heavier handling. If you're considering a steel-framed cover, you're almost certainly working from engineered drawings, and the post count, size, and anchor design will be specified for you. Don't improvise with structural steel, the consequences of a connection failure are severe.
Post sizes and when to use each one
Post size selection isn't just about aesthetics. It's a structural decision driven by post height, tributary area, and the loads being transferred. Here's how to think through the three most common options for wood patio cover posts. For guidance on choosing the right post dimensions, see our detailed guide on what size post for patio cover.
- 4x4 posts: Appropriate for low, lightly loaded structures — typically posts under 8 feet tall carrying a tributary area under 36 sq ft in low-snow, low-wind areas. The AWC DCA-6 tables show 4x4s becoming 'not permitted' relatively quickly as post height or tributary area increases. Use these only on small lean-tos in mild climates.
- 4x6 posts: A practical step up that handles more height (up to 10 feet) and moderate tributary areas. Good for attached lean-to corners where the house wall is already taking much of the load. Check your specific species and grade against published tables.
- 6x6 posts: The standard choice for most free-standing patio covers and any structure over 10 feet tall. Six-by-sixes resist both compressive load and lateral (racking) forces much better than 4x4s and are what most building inspectors expect to see on a permitted patio cover in typical load conditions.
- Aluminum posts (from kit systems): Sized by the manufacturer — follow the product manual. Typically hollow rectangular or square extrusions ranging from 3x3 to 4x4 inches.
Post spacing and size reference table
The table below gives common span and post-size combinations for wood-framed patio covers using standard construction lumber (Douglas Fir-Larch #2 or better) in a moderate load environment (roof live load 20 psf, ground snow load under 30 psf). These are planning-level starting points, your local code and specific species/grade tables govern final design. For higher snow loads or wind exposures above ASCE 7 Exposure B, consult the full AWC tables or a structural engineer.
| Post Size | Max Post Height | Max Tributary Area | Typical Use Case | Notes |
|---|---|---|---|---|
| 4x4 | 8 ft | ~36 sq ft | Small attached lean-to, mild climate | Not permitted in many high-load or tall applications per DCA-6 |
| 4x6 | 10 ft | ~48 sq ft | Medium attached lean-to corners | Better lateral resistance than 4x4; check species tables |
| 6x6 | 12 ft | ~80 sq ft | Free-standing covers, taller posts | Preferred by most inspectors; handles most DIY patio sizes |
| 6x6 | 14 ft | ~60 sq ft | Tall free-standing or pergola posts | Tributary area shrinks as post height increases |
| Aluminum kit post | Per manual | Per manual | Kit-system covers | Never substitute; follow manufacturer specs exactly |
A common mistake I see on first builds is starting with 4x4s to save money and then discovering mid-project (or worse, at inspection) that they're undersized for the post height. Size up early, the cost difference between a 4x4 and a 6x6 post is modest compared to the cost of pulling and replacing posts after the beam is already sitting on top of them.
How to calculate the posts you need, with worked examples
You don't need engineering software to estimate post count. The process comes down to three steps: figure out your beam span limits, determine how many beam spans fit across your patio width, then confirm each post's tributary area is within the allowable limit for your post size and height.
- Determine your cover's outer dimensions (width x depth in feet).
- Choose your beam material and size. Look up the maximum allowable span for that beam in your load conditions (AWC span tables or manufacturer specs). This tells you the maximum distance allowed between posts.
- Divide your patio width by the maximum beam span. Round up to get the number of beam spans needed. Number of spans = number of post spacings; number of posts = spans + 1 for each beam line.
- For an attached cover, the house side is fully supported, so you only need posts on the outer beam. For a free-standing cover, you need posts on both the inner and outer beams.
- Calculate tributary area for each post: (half the beam span on each side) x (half the rafter span on each side). Confirm this is within the allowable limit for your post size and height.
Worked example 1: 12x16 ft attached lean-to
Patio is 16 ft wide (parallel to house) and 12 ft deep. You choose a double 2x10 outer beam, which spans up to 14 feet in Douglas Fir #2 at 20 psf live load. Since 16 ft exceeds 14 ft, you need 2 spans, meaning 3 posts on the outer beam (left corner, center, right corner). The house ledger handles the inner side. Total posts: 3. Each corner post has a tributary area of roughly 8 ft (half-span on each side) x 6 ft (half the rafter depth) = 48 sq ft. The center post has roughly 8 ft x 6 ft = 48 sq ft. All three are within 6x6 post capacity at 10-foot height for a moderate snow load region.
Worked example 2: 14x14 ft free-standing gable
Patio is 14 ft wide and 14 ft deep. You choose a 4x10 beam on both sides, which can span 14 ft at moderate loads without an intermediate post. Result: 2 posts per beam line, 2 beam lines = 4 posts total. Each post carries a tributary area of 7 ft x 7 ft = 49 sq ft. At a post height of 9 feet, 6x6 posts handle this load in most regions with ground snow loads under 40 psf. This is the classic four-post free-standing layout.
Worked example 3: 20x12 ft aluminum kit cover
For a pre-engineered aluminum kit rated for a maximum 10 ft post spacing, a 20-foot-wide cover requires posts at 0, 10, and 20 feet, 3 posts on the outer edge. The house wall anchors the inner side via a ledger channel. Total posts: 3. Do not attempt to stretch to 12-foot spacing because it feels close enough, the manufacturer's 10 ft limit is the structural rating, and exceeding it voids the product's load certification.
Beam, rafter, and header decisions that move your posts around
Your post layout isn't finalized until you've thought through the full framing system, because beam configuration changes where posts must sit.
Single beam vs. double beam
A single solid timber beam (like a 6x10 or 4x12) can span farther than two 2x10s nailed together, which can span farther than a single 2x10. When you upgrade beam size, you can space posts farther apart, which reduces post count. When you downsize or use dimensional lumber instead of heavy timber, you may need to add a post to stay within the span limit. This is a direct cost trade-off: a larger beam costs more in material but saves on post count, footing excavation, and concrete.
Cantilevers
Beams can extend past the last post by a limited amount, typically no more than one-quarter of the beam's back span for wood framing. A cantilever lets you keep posts set back from the outer edge of your patio, which some homeowners prefer for aesthetics or to avoid post placement in a tight walkway. But there's a catch: a cantilevered beam end actually lifts up under load unless it's properly connected at the post, and that uplift force must be handled with the right post-to-beam connector. Never cantilever without confirming the connection hardware (such as a Simpson Strong-Tie post cap rated for uplift) is installed and fastened per the manufacturer's load tables.
Headers at the house attachment
For attached covers, the header or ledger bolted to the house wall acts as a continuous beam. It must be bolted into the structural framing of the house, through the rim joist, into wall studs, or through a dedicated structural connection, not just into siding or sheathing. The spacing of those lag bolts or through-bolts follows the same tributary area logic as post spacing. What often goes wrong here is installers undersize the ledger fasteners or bolt into the wrong layer of the wall assembly, which can cause the entire ledger to pull away from the house under load.
Rafter layout and its effect on post placement
Rafters run from the house header (or ridge) to the outer beam. They don't directly determine post count, but they determine beam loading. Closer rafter spacing (16 inches on center vs. 24 inches) creates more uniform load distribution along the beam, which is structural good practice but doesn't change how many posts you need unless your beam is already at its span limit and you're adding roof weight (like tile instead of polycarbonate panels) that pushes the beam over capacity.
Footings, anchors, and what holds the posts in place
Post count is only half the foundation story. Each post needs a footing that's sized for the load it carries and deep enough to get below the frost line in your climate. The IRC's frost-protection provisions (R403. IRC R403.3 and Table R403.3(1) specify minimum footing depths or insulation options for frost protection blank" rel="noopener noreferrer">IRC R403.3 and Table R403.3(1) specify minimum footing depths or insulation options for frost protection.. 3) require footings to be protected from frost heave, in cold climates that typically means 24 to 48 inches deep, while frost-free climates may only need 12 inches. Skipping this is one of the most common DIY mistakes. For step-by-step instructions on setting and anchoring posts, see our guide on how to install patio cover posts. A post that heaves up two inches in winter will rack the entire structure.
Footing diameter is determined by the tributary area each post carries and the bearing capacity of your soil. As a rough starting point, most jurisdictions assume a conservative soil bearing capacity of 1500 psf for prescriptive sizing. IRC Table R507.3.1 lets you cross-reference tributary area against soil bearing capacity to get a minimum footing size, for example, a 100 sq ft tributary area on 1500 psf soil typically requires a footing around 18 to 21 inches in diameter. For anything larger or on soft/expansive soil, get a soil assessment.
For post-to-footing connections, Simpson Strong-Tie post bases (and similar connectors from other manufacturers) are the standard solution. They keep the post elevated off the concrete (preventing rot), transfer both downward load and uplift load to the footing, and are rated for specific allowable forces per their ICC-ES evaluation reports. Select a post base rated for the uplift your structure will see in your wind zone, this isn't optional in high-wind areas or for free-standing structures that lack lateral bracing from a house wall.
Code checks, permits, and when to bring in a pro
Most jurisdictions require a permit for any permanent patio cover that is attached to the house or exceeds a certain size (commonly 200 sq ft, though this varies). A permit triggers an inspection, which means a set of eyes confirming your post sizes, footing depths, beam connections, and ledger fasteners are correct before you close everything up. For a step-by-step guide on planning and building, see how to install a patio cover. This is actually a benefit to the DIYer, not a hassle, catching a footing that's too shallow before you pour concrete is infinitely better than catching it after the slab is cured.
The IRC requires roof structures to be designed for the greater of the roof live load (from IRC Table R301.6) or ground snow load (IRC Table R301.2), and wind loads per ASCE 7. If your area has a ground snow load above 30 psf or is in a high-wind zone (hurricane-prone region or above 115 mph basic wind speed), the standard DIY prescriptive tables may not be sufficient and you should consult a structural engineer. The same applies to free-standing covers over about 400 sq ft, any cover with a ridge height above 12 feet, or any project where soil conditions are unknown or problematic.
- Pull a permit if your jurisdiction requires one — it protects your home's resale value and your homeowner's insurance coverage.
- Use the ASCE Hazard Tool or your local building department to get the design ground snow load and basic wind speed for your specific address before finalizing post sizes.
- Follow aluminum kit manufacturer manuals exactly — don't interpolate or exceed stated post spacing limits.
- Use pressure-treated lumber for all posts in contact with concrete or within 6 inches of grade.
- Select post base connectors with published uplift ratings (ICC-ES evaluated products) and install them per the manufacturer's fastener schedule.
- If your ground snow load exceeds 30 psf, your post height exceeds 12 feet, or your structure is free-standing and over 400 sq ft, bring in a licensed structural engineer to stamp the drawings.
- Take photos of every footing, anchor, and connection before covering them — you'll want that documentation if you ever sell the house or need to file an insurance claim.
FAQ
Quick rule‑of‑thumb: how many posts do I need for a DIY patio cover?
A quick rule: for attached lean‑to covers, plan on posts at the free edge every 6–10 ft; for gable/hip roof attachments expect posts every 6–8 ft; for free‑standing pergolas/roof structures expect posts every 6–10 ft depending on beam/rafter spans and material. Use heavier materials or larger beams to span wider distances and reduce post count, but always verify with product manuals and local code.
How does patio‑cover type affect post count?
Lean‑to (attached to house): shorter tributary spans on the house side let you use fewer posts, typically one row of posts at the free edge. Gable or dual‑sloped: may need two rows of posts (ridge beam or interior support) and closer spacing. Free‑standing: requires perimeter posts and often interior posts for long spans. Pergolas (open roofs) can span more between posts than fully loaded roofs, but snow/wind loads for roofed structures tighten spacing requirements.
How do span and beam/rafter layout determine post spacing and count?
Post spacing equals the beam span between supports divided by the number of spans. For a simple one‑beam free edge supported by posts, beam design determines maximum unsupported length. Typical practical spacings: 6–8 ft for wood beams carrying roof loads; 8–10 ft possible with engineered lumber or aluminum manufacturers’ rated beams. Use beam span tables or manufacturer tables: if a beam can safely span 16 ft between supports, you need posts at each end only; if it can’t, add intermediate posts to meet the beam’s allowable span.
What post sizes should I consider (4x4, 4x6, 6x6) and when is each appropriate?
4x4: acceptable only for short, lightly loaded covers with low post heights and small tributary areas; many prescriptive guides mark 4x4 as 'not permitted' for taller/heavily loaded cases. 4x6: stronger alternative where 4x4 is marginal; often used for moderate spans. 6x6: preferred for taller posts, longer spans, higher wind/snow loads, or where the post is a primary support. When in doubt, use 6x6 or consult span tables/manufacturer guidance.
Sample post‑spacing guidance table (practical DIY ranges)
Typical DIY spacing ranges by material and roof load: - Basic wood framed roof (common rafters, residential snow loads): 6–8 ft centers - Engineered wood beam or larger lumber (LVL, glulam): 8–12 ft centers (per beam rating) - Aluminum patio covers (manufacturer rated): follow manual; common: 8–10 ft centers for single spans - Pergola/open slats (no solid roof): 6–10 ft centers Note: these are practical ranges. Use manufacturer or span tables for exact allowable spans and always check local load requirements.
How do materials (wood, aluminum, metal) change post count and sizing?
Wood: requires larger posts/closer spacing for the same spans as engineered products unless using LVL/glulam. Engineered wood beams increase span and reduce post count. Aluminum/metal systems are often engineered with published span tables and can allow wider spacings, but the product’s wind/snow rating and attachment details control allowable spans. Metal framed covers often use smaller‑section posts but rely strictly on manufacturer limits and anchors.