
You can turn a carport into a patio, pergola, enclosed patio cover, or even a sunroom, and most of the structural work is DIY-friendly if you go in with a plan. The key decisions are whether to keep the existing roof and freshen the space, strip it down to a pergola, frame a proper lean-to or gable cover, or fully enclose it as a conditioned room. Each path has a different permit load, cost range, and skill ceiling, and picking the right one for your situation saves a lot of backtracking.
How to Turn a Carport into a Patio: DIY Plans & Safety Guide

Celia Vaughn
30 Jul 2026
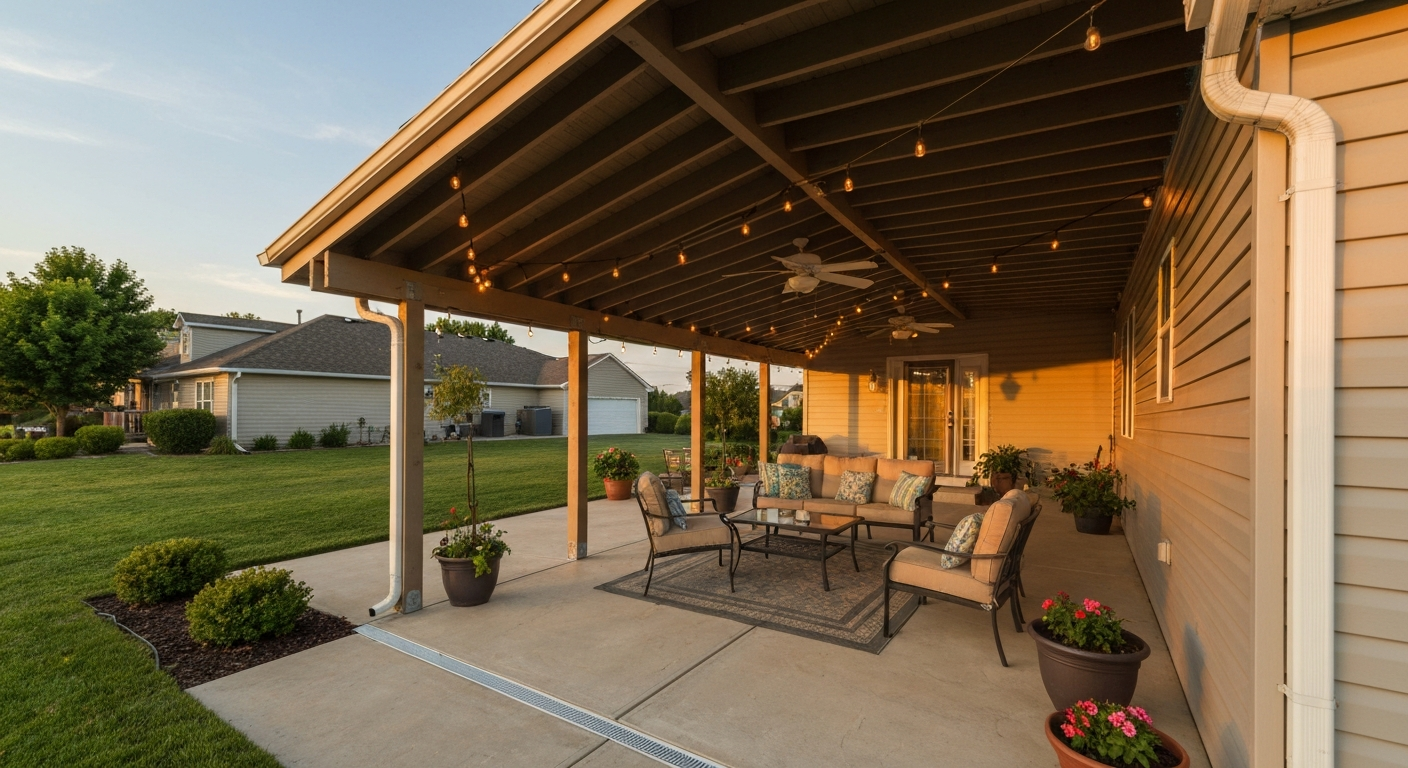
What are your real conversion options?
Before you swing a hammer, it helps to understand the four realistic conversion paths. They are not equally complex or equally expensive, and the right choice depends on your existing structure, your climate, your budget, and how you plan to use the space.
- Minimal retrofit: keep the carport roof and slab, upgrade flooring, add lighting, fans, and outdoor furniture. Lowest cost, fewest permits, fastest timeline.
- Pergola conversion: remove the existing roof material or the entire roof assembly, rebuild open rafter bays or install a new pergola frame. Adds a dramatic architectural feel and partial shade.
- Lean-to or gable patio cover: replace or rebuild the roof with a proper pitched, waterproof assembly attached to the house wall via a ledger. Best for wet climates.
- Sunroom enclosure: add framed walls, windows, doors, insulation, and HVAC to create a conditioned or semi-conditioned room. Highest cost and most permit-intensive path.
Choosing the right conversion for your space
Think through a few practical questions before you commit. How is the existing carport framed? Steel post-and-beam with corrugated metal panels and a flat or low-pitched roof is the most common setup. Is it attached to the house or freestanding? Does the slab drain well, or does water pool near the foundation? How much time and money are you realistically prepared to spend?
If the roof is in decent shape and the slab drains, the minimal retrofit is genuinely the easiest win. A fresh coat of deck paint on the slab, some string lights, a ceiling fan rated for damp locations, and a few weather-resistant pieces of furniture can transform the feel of the space in a weekend without triggering a permit in most jurisdictions. If the roof leaks, looks rough, or is structurally questionable, you are better off addressing it as part of a deliberate upgrade rather than patching around it.
The pergola path works well when you want dappled shade, an open-air feel, and visual interest. You remove the solid roof covering (and sometimes the entire roof frame), then build or install a new open rafter grid. This is also a good choice when the existing roof framing is corrugated metal on a simple frame with no structural value worth keeping. The lean-to or gable cover is the right call in rainy or snowy climates where you need waterproof protection. The sunroom path is a big lift, but if you are in a cold climate and want year-round use, it is the only option that actually delivers that. It also adds the most assessed value to your home.
Structural assessment and safety checklist
Do not skip this step. I have seen homeowners pour money into finish work on a carport only to discover the posts are rotted at the base or the roof framing is undersized. BCSI / SBCA guidance: Handling, Installing, Restraining & Bracing of Trusses (BCSI booklet) warns never to cut or alter truss members or to attach a deck/ledger to a truss top chord without approval from the truss designer or a licensed engineer, a critical point when converting carport roofs that use factory trusses. A solid two-hour inspection before you start will save you from expensive surprises.
- Check every post at grade level. Probe wood posts with a screwdriver — if it sinks in more than 1/4 inch, you have rot. Steel posts should have no visible rust through their wall thickness. Any compromised post needs to be replaced before you add load.
- Inspect the roof framing. For steel carports, look at the main beams and purlins for rust, deflection, or loose connections. For wood framing, check for sagging rafters, splits, and rot near any valley or eave where water collects.
- Identify whether the roof uses factory trusses. If it does, do not cut or notch any truss member under any circumstances. The SBCA guidance is unambiguous: altering a truss without approval from the original truss designer or a licensed engineer voids its engineered capacity and can cause sudden collapse.
- Assess load capacity. The 2024 IRC requires a continuous load path from roof to foundation to resist uplift. If you plan to add load (heavier roofing material, walls, a ceiling) you need to confirm the existing posts, beams, and footings can handle it. When in doubt, hire a structural engineer for a one-time review.
- Examine the slab for drainage slope. Ideally, the slab pitches away from the house at 1/8 inch per foot minimum. Standing water near the foundation is a grading problem you need to fix regardless of the conversion.
- Look for termite or pest evidence. Mud tubes on concrete block, frass near wood members, or hollow-sounding posts all warrant a licensed pest inspection before you enclose anything.
- Check existing anchor points. If the carport is already bolted to a concrete slab, inspect those anchor locations for cracking, spalling, or corrosion around the hardware.
Permits, local codes, and what triggers an inspection
Most U.S. municipalities treat a carport conversion as a building alteration requiring a permit and a set of scaled plans. This is not optional, and it is not bureaucratic overkill. Permits exist to make sure your structure can handle its loads and will not hurt anyone. They also protect your home's resale value, because unpermitted work is a red flag in any home inspection.
A minimal retrofit (new flooring, lighting, fans, furniture) in an existing open carport typically does not require a permit, but adding a new roof structure, framing walls, adding electrical circuits, or changing the footprint almost always does. Municipal permit guides from jurisdictions like Mercer Island, Maple Ridge, and Litchfield Park list carport enclosure specifically as permit-required work, and they commonly require a completed application, scaled floor plan, foundation detail, elevations, and structural details for any new footings or posts. If you are adding HVAC or plumbing for a sunroom, separate mechanical and plumbing permits are typically required on top of the building permit.
The simplest way to check your specific requirements: call or visit your local building department and describe what you plan to do in plain language. Most counter staff are helpful and will tell you exactly what they need. Ask specifically whether your project requires engineered plans. Under IRC R106.1, jurisdictions can require construction documents prepared by a registered design professional (licensed engineer or architect) when special conditions exist or when structural alterations exceed what the prescriptive IRC tables cover. IRC R106.1 makes construction documents prepared by a registered design professional mandatory when special conditions exist or when structural alterations exceed what the prescriptive IRC tables cover See INTERNATIONAL RESIDENTIAL CODE — R106.1 (Submittal documents) for the rule about when jurisdictions require construction documents prepared by a registered design professional.. Significant changes to roof spans, adding walls that create new load paths, or removing structural members often cross that threshold.
Footings, anchors, and how to attach everything properly
This is where most DIY carport conversions either succeed or quietly fail over time. The attachment details at the foundation, the ledger, and the post bases are the structural heart of the project.
Footing depth and size
Any new posts or walls you add need footings that go below the local frost line and bear on undisturbed soil. IRC R403 sets the minimum at 12 inches below undisturbed ground, but your local frost depth may be much deeper. In northern climates, 36 to 48 inches is common. IRC Table R403.1(1) gives minimum footing widths based on soil load capacity and the load being carried. For a typical patio cover post, a 12-inch-diameter concrete pier is usually sufficient in good soil, but check the table or consult your building department. For a full sunroom, you are dealing with wall loads and will likely need continuous footings.
Post anchors and concrete anchors
If you are installing new posts on an existing slab, you have two main options: cast-in-place anchors (set in wet concrete before the slab cures, which is not an option if the slab already exists) or post-installed mechanical or adhesive anchors. For post-installed anchors in an existing slab, use products with ICC-ES evaluation reports (ESRs). Simpson Strong-Tie and Hilti both publish tested anchor data. For a wedge anchor like the Hilti HST3 series, the technical data sheet specifies the exact embedment depth, hole depth, and required installation torque. Do not guess at these values. The embedment depth and torque requirement are tested values, and under-torquing or shallow installation reduces the listed load capacity significantly. For cracked concrete or seismic zones, your jurisdiction may specifically require ICC-ES-approved anchors tested to ACI 355.2 (expansion anchors) or ACI 355.4/AC308 (adhesive anchors).
Ledger board attachment
If your conversion involves attaching a new patio cover or roof to the house wall, you will need a ledger board. IRC R507.2.4 requires flashing at every ledger attachment to prevent water infiltration and rot. The correct sequence is: install back flashing against the house sheathing, fasten the ledger with listed fasteners, then install Z-flashing over the top of the ledger and under the house's weather-resistant barrier or siding. Do not skip the flashing step. A rotted ledger is one of the most expensive and dangerous failure modes in residential decks and patio covers.
For the fasteners themselves, Simpson Strong-Tie's DCA6 guide is the best practical reference. Use listed ledger screws (like Simpson SDW or LedgerLOK series), structural ledger bolts, or the prescriptive bolting patterns in the DCA6 tables. Do not use ordinary lag screws without the manufacturer's tested load values and spacing tables. Common mistake: driving lags too close together or too close to the edge of the ledger, which splits the wood and reduces the connection capacity to near zero.
Material options: wood, aluminum, steel, and composite
Each material has a real use case, and the right answer usually comes down to your climate, your budget, and how much maintenance you are willing to do long-term.
| Material | Pros | Cons | Typical Cost Range (installed) | Best For |
|---|---|---|---|---|
| Pressure-treated wood | Widely available, easy to cut and fasten, good load capacity, natural look | Requires periodic sealing/staining, can rot or warp if not maintained, heavier | $15–$30 per linear ft for framing members | Pergolas, patio covers, any project where you want a natural wood appearance |
| Aluminum (extruded) | Rust-proof, lightweight, low maintenance, pre-finished options available | Limited span without steel reinforcement, can dent, harder to modify on-site | $20–$45 per linear ft for structural extrusions | Coastal climates, low-maintenance covers, attached or freestanding kits |
| Galvanized/painted steel | High strength-to-size ratio, excellent for long spans, durable | Heavy, must be cut with grinder or saw, must be primed and painted to prevent rust | $18–$40 per linear ft for tube steel | Long-span carport frames, commercial-grade conversions |
| Composite (wood-polymer) | Rot-resistant, consistent appearance, low maintenance | More expensive upfront, limited structural use (mostly decking/trim), heavier than wood | $30–$60 per linear ft for decking | Flooring/decking surfaces, fascia, trim boards |
For most DIY carport conversions in temperate climates, pressure-treated lumber is the easiest material to work with. It is available at every home center, it cuts with standard tools, and fastening systems for it are well-documented. In coastal or humid climates where long-term moisture is the main enemy, aluminum extrusions or galvanized steel framing are worth the extra cost. Composite decking is excellent for flooring over an existing slab or a wood subframe, but it is not a structural framing material.
Minimal retrofit: the fastest path to a finished patio
If the carport roof and structure are sound, you can create a genuinely comfortable outdoor living space without any structural changes. Here is a practical step-by-step for this path.
- Clean and prep the slab. Pressure-wash the concrete, fill any cracks with concrete crack filler, and let it cure fully (at least 48 hours). This is the foundation of every finish decision that follows.
- Apply a concrete floor coating. Epoxy floor kits (two-part, garage-grade) or exterior concrete stain give the slab a finished look and make it easier to clean. Follow the manufacturer's prep requirements exactly — most failures happen because the surface was not etched or the moisture content was too high.
- Add overhead lighting. Install a weatherproof junction box at the ceiling or beam, run GFCI-protected wiring (or use a plug-in solution for no-permit applications), and mount damp-rated or wet-rated LED fixtures. A ceiling fan rated for damp or wet locations (check the UL listing on the box) adds comfort in summer.
- Install privacy screening or shade sails if the carport is open on multiple sides. Outdoor shade sail hardware mounts to existing posts with stainless eye bolts. Privacy screen fabric on a tension cable system between posts takes an afternoon.
- Add outdoor rugs, weather-resistant seating, and container plants. This is the step that actually makes it feel like a room.
What often goes wrong here: people install indoor-rated fans or fixtures in an outdoor space and wonder why they fail within a season. Always check the UL wet or damp location rating. Damp-rated is for covered areas; wet-rated is for exposed areas. A covered carport qualifies for damp-rated at minimum.
Turning a carport into a pergola
A pergola conversion is one of the most satisfying DIY projects you can do on an existing carport. You are essentially using the existing post layout as your starting point and rebuilding the overhead structure as an open, decorative grid instead of a solid roof. For step-by-step plans, material lists, and detailed diagrams on how to build pergola patio, see our dedicated guide titled “how to build pergola patio.”.
Design choices before you start
Decide whether you want to keep the existing posts or replace them. If the existing steel or wood posts are sound and at a good spacing (typically 8 to 12 feet on center), you can often work with them. For a pergola, your main beam runs between the posts, and then rafters (often 2x6 or 2x8 pressure-treated lumber) run across the main beam at 12 to 24 inch spacing. A second layer of smaller purlins (1x4 or 2x4) laid perpendicular at 12-inch spacing adds the classic pergola shadow pattern.
- Remove the existing roof covering. For metal panels, use a circular saw with a metal-cutting blade or tin snips for smaller sections. Work from the top down, keep panels controlled (they have sharp edges), and wear gloves and eye protection.
- Remove or cut back the existing roof framing to the post/beam level, leaving the structural posts and primary beam in place. If the beam is steel and in good condition, clean and repaint it. If it is wood and deteriorated, replace it at the same height.
- Install your main beams. For a pergola on an existing carport, a doubled 2x10 or 2x12 beam (pressure-treated) bolted together with 1/2-inch carriage bolts at 16-inch spacing gives you a strong, flat top surface for the rafters to land on.
- Set your rafter layout. Mark 16-inch or 24-inch on-center spacing along the top of the main beams. Use a rafter tail profile cut (a notch or bird's mouth profile) if you want overhanging rafter ends for a decorative finish.
- Install the rafters using hurricane ties or structural rafter hangers at each connection point. Uplift resistance matters here. Per FEMA's review of IRC wind provisions, roof-to-wall and roof-to-post connections must maintain a continuous load path to resist uplift. Metal connector hardware is the correct solution.
- Add purlins across the top of the rafters if desired for the classic shadow grid look. Face-nail or toe-screw them at each rafter crossing.
- Sand and apply an exterior stain or sealant to all exposed wood within 30 days of installation, before it weathers and the wood grain closes.
Common mistake: people build a beautiful pergola and skip the metal connector ties at every rafter-to-beam joint, relying on toe nails alone. In a windstorm, that roof can lift. Use Simpson H2.5A or equivalent hurricane ties at every rafter. They are inexpensive and they make the structure orders of magnitude stronger against uplift.
Building a lean-to or gable patio cover from an existing carport
If you want real weather protection, a lean-to (single-slope) or gable (two-slope) patio cover is the upgrade. This path involves replacing or rebuilding the roof framing with a properly pitched, waterproofed assembly.
Pitch, drainage, and attachment to the house
For a lean-to cover, minimum pitch for most roofing materials is 2:12 (2 inches of rise per 12 inches of run) for asphalt shingles, and 1/4:12 for standing seam metal with appropriate underlayment. The high side of the lean-to attaches to the house via a ledger board; the low side sits on your existing or new posts. Make sure the low side directs water away from the house and the slab. If the carport is freestanding, a gable design gives you a ridge in the center and water drains to both sides.
- Determine your desired roof pitch and calculate the height at the ledger. For a 12-foot-span lean-to at 3:12 pitch, the ledger sits 3 inches higher than the outside beam (3 inches of rise over 12 inches of run = 36 inches of rise over 12 feet of run, so 36 inches / 12 = 3 inches per foot of span, giving you 3 feet of total rise). Double-check your math before cutting.
- Install the ledger on the house wall. Strip the siding at the ledger location down to the sheathing. Install back flashing, then fasten the ledger with listed ledger fasteners per Simpson DCA6 spacing tables. Install Z-flashing over the top of the ledger, then reinstall or patch the siding above.
- Remove the existing carport roof covering and as much of the old roof framing as needed. If the existing main beam and posts are sound, you may be able to keep them as your outside bearing wall.
- Cut and install new rafters from the ledger to the outside beam. Use a rafter calculator (available as free apps) to get your seat cut and ridge cut angles right. A bird's mouth (notch) at the seat makes the rafter sit flat on the beam.
- Install roof sheathing (typically 7/16-inch OSB or 1/2-inch plywood) over the rafters. Stagger panel joints and leave 1/8-inch expansion gaps.
- Apply roofing underlayment (30-lb felt or a synthetic equivalent) starting at the low edge and working upward, overlapping each course by at least 6 inches.
- Install your finish roofing material. For asphalt shingles, start at the eave with a starter strip. For metal panels, follow the manufacturer's panel overlap and fastener spacing requirements.
- Install gutters at the low eave and direct downspouts to drain at least 6 feet from the foundation.
Enclosing a carport as a sunroom
A sunroom conversion is a substantial project. You are essentially building a new room, and in most jurisdictions, converting to conditioned space triggers energy code compliance, which means insulated walls, windows with minimum U-value and SHGC ratings, and sometimes whole-house energy modeling. For step-by-step guidance specific to converting a patio into a conditioned sunroom, see our guide on how to build a sunroom on an existing patio. Plan for this being a multi-weekend project over a month or more, and budget accordingly.
- Confirm permit requirements and get your plans approved before ordering materials. For a conditioned sunroom, you will almost certainly need engineered plans for the new footings, wall framing, and roof-to-wall connections.
- Install new footings and sill plates. New wall framing must bear on footings that extend below the frost line per IRC R403. Pressure-treated sill plates must be bolted to the foundation per code.
- Frame the walls with 2x4 or 2x6 lumber at 16-inch on center. 2x6 framing allows for R-19 batt insulation in the wall cavities, which is worth the extra material cost if you plan to heat or cool the space.
- Frame window and door rough openings per your window manufacturer's rough opening specifications. Headers above openings must be sized to carry the roof load above.
- Install windows and exterior doors. In most climates, double-pane low-E glass is the minimum worth installing for energy performance.
- Install a vapor barrier and insulation in the walls and roof/ceiling. In cold climates, the vapor barrier goes on the warm side of the insulation (interior face of the wall). In hot/humid climates, consult your local building department, as vapor barrier placement is reversed in some cases.
- Rough in electrical circuits and bring them to inspection before closing up the walls. This step is often done by an electrician, and most jurisdictions require a licensed electrician for new circuits.
- Install drywall or an interior panel system, and finish with paint or an exterior-compatible siding product on the outside.
- For HVAC in a conditioned sunroom, a ductless mini-split is the most practical DIY-compatible option for most carport conversions. A licensed HVAC contractor is strongly recommended for final installation and any gas or refrigerant work.
Roofing, flashing, and waterproofing
Regardless of which conversion path you choose, the roof-to-wall connection and the flashing details are where leaks are born. Get these right the first time.
At the ledger, use step flashing integrated with your roofing material where the roof plane meets a vertical wall. Step flashing pieces are individual L-shaped metal pieces, typically 4x4 inches on each leg, installed one per shingle course. Counter-flashing (a second layer of metal set into a reglet or mortar joint in masonry walls) laps over the top of step flashing to close the joint. At a valley where two roof planes meet, use a valley metal (W-valley or open valley with roofing material held back 2 inches from the centerline). At the eave, an eave drip edge metal set under the first layer of underlayment directs water off the fascia. Through-wall flashing is required anywhere a roof penetrates a wall assembly, including at any pipe, vent, or post that passes through the roofing plane. Seal all flashing laps with compatible roofing caulk or roofing cement, but do not rely on caulk alone, it is a secondary seal, not a primary one.
Drainage, gutters, and grading
Water management is the long game in any carport conversion. Every roof you build sheds water somewhere, and that somewhere needs to be planned, not improvised.
At the eave, size your gutters for the roof area they serve. A standard 5-inch K-style aluminum gutter handles most residential patio cover roof areas. Slope gutters at 1/16 inch per foot minimum toward the downspout. Install downspouts with splash blocks or underground extension pipes that direct runoff at least 6 feet from your foundation. If your existing slab has a drain, make sure it is clear and flows to daylight or to a proper drainage system. For ponding on a slab with no drain and poor pitch, a scupper through the perimeter edge beam is a simple fix: cut a 3-inch opening at the low edge, frame it with metal flashing, and direct the scupper to drain away from the structure. Common mistake: people install long sections of gutter without enough downspouts, especially on an enclosed sunroom conversion. One downspout per 35 linear feet of gutter is a reasonable rule of thumb.
Insulation, interior finishes, and weatherproofing
For a minimal retrofit or pergola, interior finishing is optional. For a lean-to or gable cover, a finished ceiling under the rafters (tongue-and-groove wood, beadboard, or exterior-rated soffit material) elevates the look and hides the framing. For a sunroom, full thermal performance depends on getting the insulation assembly right.
In a lean-to or gable cover without conditioned space: install a 5/4-inch tongue-and-groove pine or cedar ceiling between the rafters for a clean look. Stain and seal it before installing. For the roof deck itself, a self-adhering ice-and-water shield membrane at the eaves (24 inches minimum past the interior warm wall line in cold climates) prevents ice dam infiltration. For a sunroom: use batt insulation (R-19 minimum in walls with 2x6 framing, R-30 in the ceiling/roof) and cover wall cavities with a house wrap or rigid foam sheathing on the exterior before siding. Rigid foam board (polyisocyanurate or EPS) used as continuous exterior insulation over the sheathing also eliminates thermal bridging at the studs. Finish the exterior with fiber cement siding, cementitious board, or stucco for the best moisture resistance.
Tools, fasteners, and consumables checklist
Here is what you actually need for each conversion path. You do not need all of this for a minimal retrofit, but you will want most of it for a full structural conversion.
| Tool / Item | Minimal Retrofit | Pergola | Lean-to/Gable Cover | Sunroom Enclosure |
|---|---|---|---|---|
| Cordless drill/driver (18V+) | Yes | Yes | Yes | Yes |
| Circular saw with wood and metal blades | No | Yes | Yes | Yes |
| Speed square and framing square | No | Yes | Yes | Yes |
| Post level (magnetic) | No | Yes | Yes | Yes |
| Chalk line | No | Yes | Yes | Yes |
| Tape measure (25 ft) | Yes | Yes | Yes | Yes |
| Hammer and nail set | Yes | Yes | Yes | Yes |
| Rafter angle calculator (app or book) | No | Optional | Yes | Yes |
| Joist hanger pliers / structural nailer | No | Yes | Yes | Yes |
| Concrete drill and hammer drill bits (1/2 in.) | No | Optional | Yes | Yes |
| Torque wrench (for anchor bolts) | No | No | Yes | Yes |
| Caulk gun and roofing caulk | No | No | Yes | Yes |
| Roofing nail gun (or hand nailing) | No | No | Yes | Yes |
| Insulation knife and straightedge | No | No | No | Yes |
| Drywall tools (knife, corner bead, mud) | No | No | No | Yes |
| Hurricane ties (Simpson H2.5A or equiv.) | No | Yes | Yes | Yes |
| Listed ledger fasteners (LedgerLOK or equiv.) | No | No | Yes | Yes |
| ICC-ES-approved anchor bolts (for slab posts) | No | Optional | Yes | Yes |
| Self-adhering flashing tape (4 in.) | No | No | Yes | Yes |
| Z-flashing (aluminum or galvanized) | No | No | Yes | Yes |
| Roofing underlayment (30-lb felt or synthetic) | No | No | Yes | Yes |
Cost and timeline estimates by conversion type
These ranges reflect DIY labor (your time is free in the cost column, but plan for significant weekend hours) and retail material pricing as of mid-2026. Professional labor would add roughly 40 to 100 percent to the material cost depending on your region.
| Conversion Type | Low-End Cost (DIY materials) | Mid-Range Cost | High-End Cost | Typical Timeline | Main Cost Drivers |
|---|---|---|---|---|---|
| Minimal retrofit (flooring, lighting, furnishing) | $500 – $1,500 | $1,500 – $3,500 | $3,500 – $6,000 | 1–2 weekends | Flooring finish, furniture quality, lighting fixtures |
| Pergola conversion | $1,200 – $2,500 | $2,500 – $5,000 | $5,000 – $9,000 | 2–4 weekends | Lumber size, span, decorative hardware, finish quality |
| Lean-to or gable patio cover | $2,500 – $5,000 | $5,000 – $10,000 | $10,000 – $18,000 | 3–6 weekends | Roofing material, span, ledger complexity, permit fees |
| Sunroom enclosure (semi-conditioned) | $8,000 – $15,000 | $15,000 – $28,000 | $28,000 – $50,000+ | 6–12+ weekends over 4–8 weeks | Window costs, insulation, HVAC, electrical, permit fees |
Permit fees vary widely by jurisdiction: a simple patio cover permit may be $100 to $300, while a sunroom enclosure permit with plan check can run $500 to $2,000 or more in higher-cost municipalities. Build permit fees into your budget upfront.
When to hire a pro: the honest criteria
I am a strong believer in DIY, but there are specific situations in a carport conversion where getting a professional involved is the right call, not because the work is necessarily beyond a skilled homeowner, but because the consequences of getting it wrong are serious and in some cases irreversible.
- Structural alterations beyond prescriptive IRC tables: If your jurisdiction requires engineered plans, hire a structural engineer to review and stamp the drawings. This is typically a few hundred to a couple thousand dollars and is money well spent.
- Any truss modification: The SBCA and BCSI guidance is absolute here. Do not cut, notch, or add load to a factory truss without a licensed engineer's approval. Full stop.
- Electrical work beyond simple fixture swaps: New circuits, panel work, or subpanel installation should be done by a licensed electrician or inspected as part of your permit. GFCI protection in outdoor spaces is not optional.
- HVAC and refrigerant work for a sunroom: Refrigerant handling requires an EPA 608 certification. A ductless mini-split installation is often DIY-friendly for the indoor and outdoor unit mounting, but the refrigerant connection and startup should be done by a licensed HVAC technician.
- Complex flashing situations: Where your new roof ties into an existing house roof at a valley or hip, or where you are cutting through existing roofing to create a new connection, a roofing contractor's second opinion is worth it. Flashing errors in these locations are not obvious until water damage appears inside the house.
- Discovered structural problems: If your inspection reveals undersized posts, footings that do not meet code, or significant rot in the existing structure, get a structural engineer's assessment before proceeding. Pouring money into finishes on a compromised structure is always a losing proposition.
Testing, maintenance, and seasonal checks
Once the conversion is complete, spend an hour doing a basic functional check before you call it done. Run a hose across the roof for 15 minutes and look for any water infiltration at the ledger, at the eave edges, and at any penetrations. Check that gutters flow freely to the downspout and that water exits at least 6 feet from the foundation. Tug on each post anchor to confirm there is no visible movement. Check that all hurricane ties are nailed with the specified fasteners (every hole in the tie should be filled with the manufacturer-specified nail, not a random screw).
For ongoing maintenance: re-inspect all anchor and fastener connections once a year, especially after a storm. Seal any end-grain wood exposure (especially rafter tails) annually with a penetrating exterior wood sealer. Clear gutters every fall before leaf season and after any major storm. In regions with snow loads, confirm the roof structure was designed for the local ground snow load per IRC R301 before the first heavy snow season. Touch up any painted or stained surfaces before moisture can penetrate the wood grain. These small annual tasks are the difference between a structure that lasts 30 years and one that starts showing rot and fastener failure in 10.
Related DIY projects to consider next
A carport conversion and a pergola build share a lot of the same structural logic, and if you enjoyed this project, building a freestanding pergola on an existing patio is a natural next step that uses many of the same skills, the same post anchor techniques, and the same rafter framing decisions. Similarly, if you want to add a pergola on top of an existing patio slab as a shade structure rather than fully enclosing the space, the attachment and anchoring considerations are closely related to what you have already done here. For step-by-step guidance on building and anchoring a shade structure, see our guide on how to put a pergola on a patio. And if you converted to a sunroom and found the experience manageable, building a full sunroom addition on an existing patio takes those same framing, insulation, and mechanical skills a step further. The post anchor and lateral load concepts from this project also apply directly when thinking about how to secure a pergola to an existing patio slab, which is one of the most common structural questions that comes up once you start exploring overhead shade structures.
Quick decision checklist to start your project
Run through this before you do anything else. It will take 30 minutes and save you from making a decision you will regret later.
- Inspect the existing structure: posts, beam, footings, slab drainage. Note any rot, rust, or structural deficiencies.
- Decide on your conversion path: minimal retrofit, pergola, lean-to/gable cover, or sunroom. Be honest about your budget and time.
- Call your local building department. Describe the project and ask what permits, plans, and inspections are required.
- Determine whether engineered plans are required. If yes, budget for a structural engineer review before you start.
- Identify your materials and source them locally. Get quotes on pressure-treated lumber, aluminum extrusions, or whatever your chosen material is.
- Build your tools list from the checklist above and rent or borrow what you do not own.
- Set a realistic budget with a 15 percent contingency for surprises. Unexpected rot, undersized footings, and permit fees above your estimate are the most common budget busters.
- Schedule the project across specific weekends and mark permit inspection hold points in your plan so you do not cover work before it is inspected.
FAQ
What are the viable options for converting an existing carport into a patio space?
Common, practical conversion paths: 1) Leave as-is and retrofit — keep existing posts/roof but add flooring, lighting, furniture, and weatherproofing. 2) Convert to a pergola — remove or alter roof sheathing to create an open-lattice roof for shade. 3) Build a new lean-to or gable patio cover — reuse some posts but install a new roof assembly tied to the house or free-standing. 4) Enclose as an unconditioned or conditioned sunroom — add walls, windows/doors, insulation and new footings as required. Which path is best depends on existing framing, roof type, local code, budget and intended use.
How do I decide which conversion path to choose?
Make the choice by checking: current structural condition (are posts, beams, roof trusses in good shape?), roof type (single-slope carports often suit lean-to conversions), whether you need conditioned space (sunroom) or open shade (pergola), your budget and timeline, and permit complexity you’re willing to handle. If the roof framing is factory trusses or the ledger would attach to the house, plan for code checks or engineering. If you want the simplest, low-permit route, retrofit/finish the existing carport as a covered patio without altering primary structure.
What structural assessments and safety checks are required before starting work?
Inspect for rot, insect damage, proper bearing of posts, condition of connections and roof members. Verify whether roof framing includes trusses and whether any members are load-bearing for the house. Check roof load capacity (dead/live/snow/wind per IRC R301 and R802) and that a continuous load path to foundation exists. If you plan to attach to the house, confirm the house wall framing can accept a ledger or new loads. If any work changes primary members, spans, or load paths, a registered design professional (engineer/architect) is typically required (IRC R106.1). When in doubt, get an engineer’s inspection.
When is a building permit or engineered plans required?
Most jurisdictions require a permit for carport conversions, especially if you add walls, condition the space, change foundations, alter roof framing, or attach to the house. Engineered plans are typically required when alterations exceed the IRC prescriptive limits (e.g., modifying trusses, changing spans, or adding significant loads to the house) or when local code requires them. Always check your local building department before starting.
What footing, anchor and attachment methods are appropriate?
Options depend on conversion type: - New posts: concrete pier footings sized and placed per IRC R403/R507 and local frost depth; use post bases/anchors (Simpson or equivalent) embedded or anchored to the concrete. - Ledger attachment to house: use tested ledger screws/bolts or engineered bolting patterns per Simpson Strong‑Tie guidance; provide continuous flashing per IRC/R507.2.4. - Concrete attachments: use ICC‑ES‑approved mechanical or adhesive anchors following manufacturer embedment, hole depth, and torque specs (Hilti/Simpson tech data). - Free‑standing covers: use post anchors or cast‑in anchors; ensure lateral bracing. Always follow manufacturer data and local code; avoid ad‑hoc lag screw patterns without tested values.
What are common material choices and pros/cons (wood, aluminum, metal)?
- Wood: affordable, easy to modify, good for pergolas and traditional patio covers; needs proper flashing and decay-resistant species or pressure‑treated lumber; requires maintenance (stain/paint). - Aluminum: low maintenance, good for prefabricated patio covers, lightweight, resists rot; may require special fasteners and flashing considerations. - Steel/metal: strong and slim profiles, good for long spans; needs corrosion protection and welding/fabrication skills. Choose materials that match aesthetics, budget and local durability requirements; for attachments to existing framing, confirm compatibility and corrosion resistance of fasteners.