You can absolutely build a sunroom on an existing patio yourself, but the success of the whole project comes down to decisions you make before you buy a single piece of lumber or aluminum. The existing slab has to be structurally sound, properly drained, and level enough to build on. You need to know whether you're enclosing with screens, glass panels, or a solid insulated system, because that choice drives everything from your permit requirements to your framing material. Get those decisions right first, and the actual build sequence is very manageable for a motivated DIYer.
How to Build a Sunroom on an Existing Patio Step by Step

Celia Vaughn
23 May 2026
Is your patio actually ready to build on?
This is where most people skip ahead and regret it. Before you design anything, spend an afternoon doing a real assessment of your patio slab. You're looking at three things: structural condition, drainage, and measurements.
Slab condition
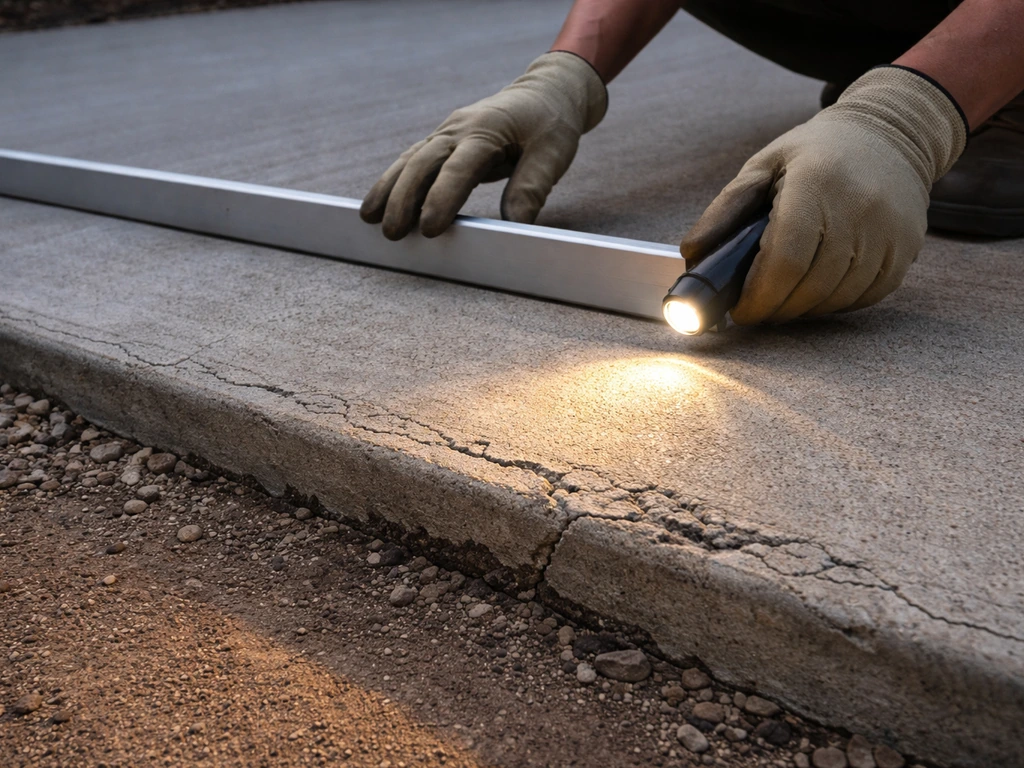
Walk the entire slab and look for cracks, spalling (where the surface is flaking or pitting), and settlement. Minor hairline cracks are usually cosmetic. But if you've got moderate spalling covering more than 10 to 25 percent of the surface area, or if any section has settled more than half an inch relative to the surrounding slab, you're looking at repairs before you can build. A settled or heaved slab creates problems with wall plumb, door clearances, and water intrusion that only get worse once the structure is enclosed. For anything more than cosmetic surface issues, get a concrete contractor to look at it before you commit to a design.
Also check for moisture coming up through the slab. Press a piece of plastic sheeting flat against the concrete, tape the edges, and leave it for 24 to 48 hours. If you see condensation under the plastic, the slab is wicking ground moisture. That matters a lot if you plan on any interior flooring finish or wall insulation, because a slab without a proper vapor barrier can cause mold and finish failures inside an enclosed sunroom. You may need to apply a penetrating concrete sealer or vapor-control membrane before enclosing.
Drainage slope

Lay a long level on the slab and measure how much it drops away from the house. The general IRC-aligned guidance is at least 1/4 inch of drop per foot across the slab or for the first 10 feet.
Quikrete's own concrete guidance calls for about 1/8 inch per foot minimum. Either way, you need some positive slope away from the house.
If your slab is flat or slopes back toward the foundation, rainwater will pool at the base of your new walls every time it rains, and that's a waterproofing and rot problem waiting to happen. You can sometimes fix a flat slab by building a slightly sloped curb or channel at the perimeter, but if the slope runs toward the house, you may need to address it with a french drain or slab resurfacing before you start framing.
Measurements you need before anything else
Measure the slab in both directions, then check for square using the 3-4-5 triangle method (measure 3 feet along one edge, 4 feet along the adjacent edge, and the diagonal between those two points should be exactly 5 feet if the corner is square). Out-of-square slabs are common and manageable, but you need to know before you design the frame. Also measure the height of the existing eave or soffit above the slab, and the distance from the slab edge to the house wall. These numbers determine what roof pitch is even possible for your tie-in.
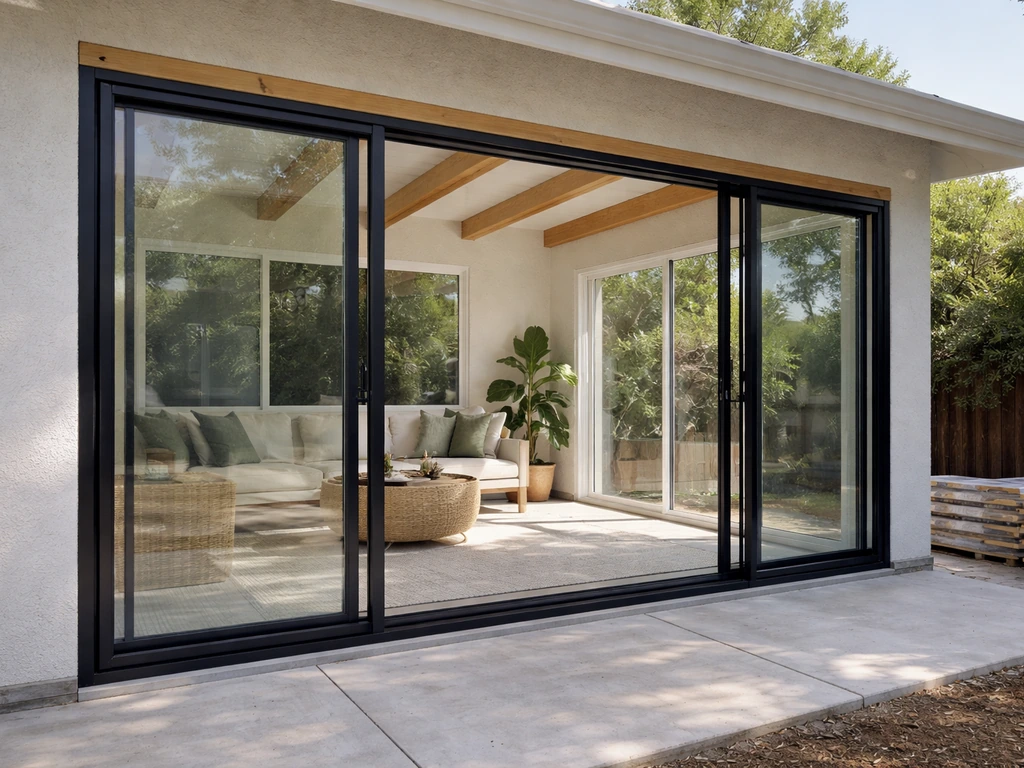
Picking the right sunroom type and materials
There's a big spectrum between a screened porch and a fully insulated four-season sunroom, and where you land on that spectrum affects your budget, your permit process, and how much skill the build actually requires.
| Sunroom Type | Best For | Framing Material | Approx. Cost Range (per sq ft) | DIY Difficulty |
|---|---|---|---|---|
| Screened enclosure | Bug-free outdoor living, mild climates | Aluminum or pressure-treated wood | $20–$60 | Moderate |
| Three-season (no HVAC) | Spring/fall use, temperate climates | Wood or aluminum, single-pane glass or polycarbonate | $50–$120 | Moderate–Hard |
| Four-season (conditioned) | Year-round living space, heating/cooling | Insulated aluminum or wood with thermal break | $150–$350+ | Hard / Pro recommended |
Aluminum vs. wood vs. steel framing
Aluminum is the most popular choice for DIYers and for good reason. It doesn't rot, doesn't need painting, and kit systems from companies like Patio Enclosures or Sunroom kits ship with pre-cut pieces and instructions. The trade-off is thermal bridging: aluminum conducts cold very efficiently, so in winter you'll see condensation along the frame members if you're not using a system designed with a thermal break built in.
Wood framing gives you more flexibility to customize, is easier to attach to with standard tools, and insulates better naturally, but it needs proper sealing and finishing to survive years of moisture exposure. Steel or structural tubing is an option for larger spans but is harder to work with and typically needs welding or specialized connectors.
For most DIYers building a three-season room on a standard patio, aluminum kit systems or pressure-treated wood framing are the practical choices. If you're going four-season with real HVAC, I'd lean toward a professional aluminum sunroom system with thermal-break framing, or hire a contractor for at least the envelope and glazing portion.
Glazing options
For screens, you have fiberglass mesh (cheapest, easiest to work with) or aluminum screen (more durable, slightly harder to cut). For glass or solid panel systems, your main options are tempered single-pane glass (affordable, not insulating), double-pane insulated glass units (good thermal performance, heavier and more expensive), and polycarbonate twin-wall panels (lightweight, decent insulation, easier DIY install, but they scratch and yellow over time). If you're in a climate with real winters, double-pane low-E glass is worth the cost.
Permits, code, and the checklist you can't skip
Almost every jurisdiction treats a sunroom as a permanent structure addition to the home, which means a building permit is required. Some areas also require a separate electrical permit if you're adding outlets, lighting, or HVAC. Don't skip this step. Unpermitted additions can cause serious problems when you sell, and if something goes wrong structurally or with wiring, homeowner's insurance may not cover it.
Go to your local building department or their website before you finalize any design. What you're asking for: the permit application for a room addition or patio enclosure, the setback requirements for your lot (minimum distance from property lines), the maximum lot coverage rules, and the structural load requirements for your climate zone (snow load, wind load, and seismic zone if applicable). Some jurisdictions will also ask about energy code compliance for four-season spaces.
- Pull a building permit (and electrical/HVAC permits if applicable) before breaking ground
- Verify property setbacks and confirm the existing patio footprint doesn't violate them
- Check HOA rules if applicable — some HOAs restrict enclosure materials, colors, or roof styles
- Confirm your slab's load capacity if you're adding heavy glazing or a solid roof system
- Identify whether the project triggers energy code compliance (common for conditioned four-season rooms)
- Schedule inspections at framing, rough electrical (if applicable), and final completion stages
- Check if your homeowner's insurance requires notification for additions over a certain square footage
If you're in a snow country, the roof structure is where code gets most demanding. Your local code will specify a ground snow load (measured in pounds per square foot), and your roof framing has to be engineered to handle it. This is one area where a structural engineer's stamp on your drawings may be required, and it's genuinely worth the cost even if it's not technically required, because undersized rafters under a snow load are a real safety hazard.
Designing the frame and tying into the existing house
How your new sunroom connects to the house is the single most critical structural decision in this project. Get it wrong and you get water intrusion, structural movement, or a roof that fails in a wind event. Get it right and the structure is solid for decades.
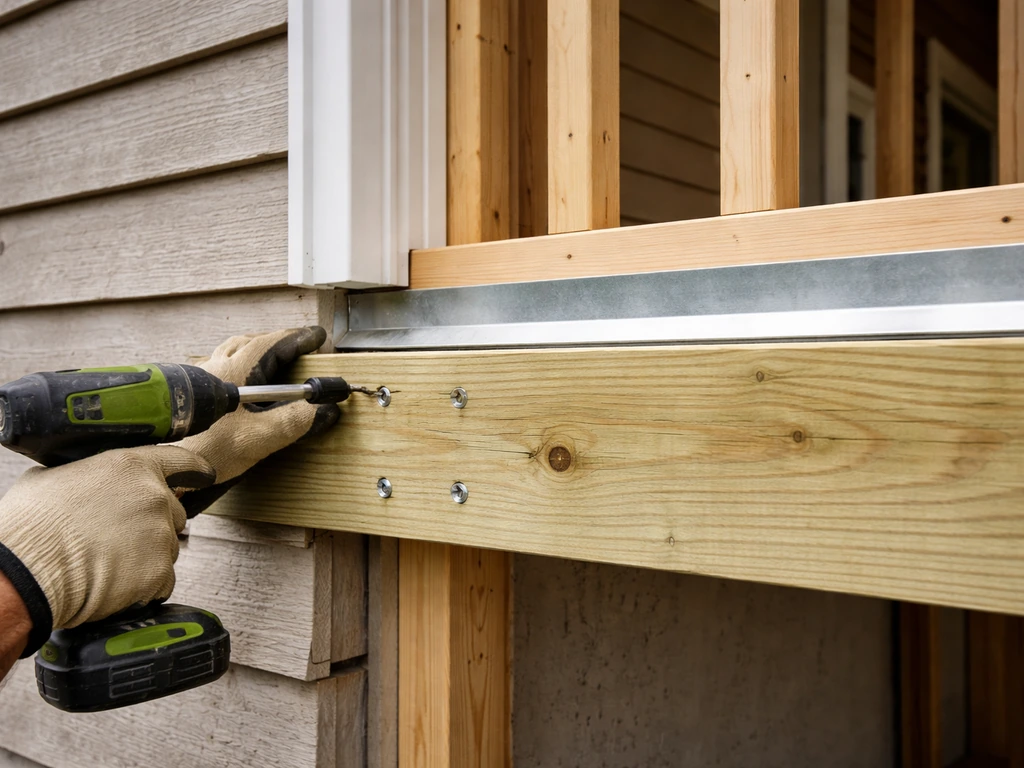
The ledger board attachment
If your sunroom will attach to the house with a lean-to style roof (one slope running away from the house), you'll be fastening a ledger board to the house rim joist or wall framing. This ledger carries the load from every roof rafter, so it has to be bolted directly into structural framing, not just into siding or sheathing. Strip the siding back, install flashing behind the ledger, and use structural lag bolts or through-bolts into the rim joist at staggered spacing (typically every 16 inches for standard loads, but verify with your local code). A common and expensive mistake is fastening the ledger through vinyl siding without removing it first, which leaves a gap that funnels water right into the wall cavity.
Roof style and pitch
A lean-to (shed) roof is the most practical and most common for patio sunroom conversions because it ties directly to the house wall or eave and slopes away. The minimum pitch for a solid or glazed roof panel system is typically 1:12 (about 5 degrees) to allow water to run off. For polycarbonate panels, manufacturers often recommend a minimum of 3:12. Steeper is generally better for drainage, but you're limited by how high the ledger can go on the house wall without running into eave soffits or second-floor windows. Gable roofs are possible and look great, but they require more complex framing and a ridge beam, which raises the difficulty level significantly.
Wall framing on the slab
Your perimeter wall frames sit on the slab and get anchored down with concrete anchor bolts or powder-actuated fasteners. For wood framing, the bottom plate must be pressure-treated lumber (PT lumber) because it's in direct contact with concrete. Space your anchor bolts no more than 6 feet apart and within 12 inches of each end of every plate section. For aluminum kit systems, you'll typically use a base track that's sealed and anchored to the slab perimeter. Either way, run a bead of polyurethane or silicone caulk under the base plate before fastening to prevent water from wicking under the framing.
Structural posts and spans
If your patio is large (over 12 feet wide), you'll likely need intermediate posts to support the roof load. Standard 4x4 posts work for most single-story sunroom loads, but if you're in a high snow load area, 6x6 posts are a smarter choice. Set posts on post base hardware anchored into the slab rather than embedding them in concrete, because embedded wood posts rot. For spans over 16 feet, get a beam and post layout reviewed before you build.
Weatherproofing, flashing, sealing, and insulation
This is the part of the build that separates a sunroom that lasts 30 years from one that starts leaking and rotting within five. Water always finds the path of least resistance, and every transition point in your build is a potential entry point.
Flashing details
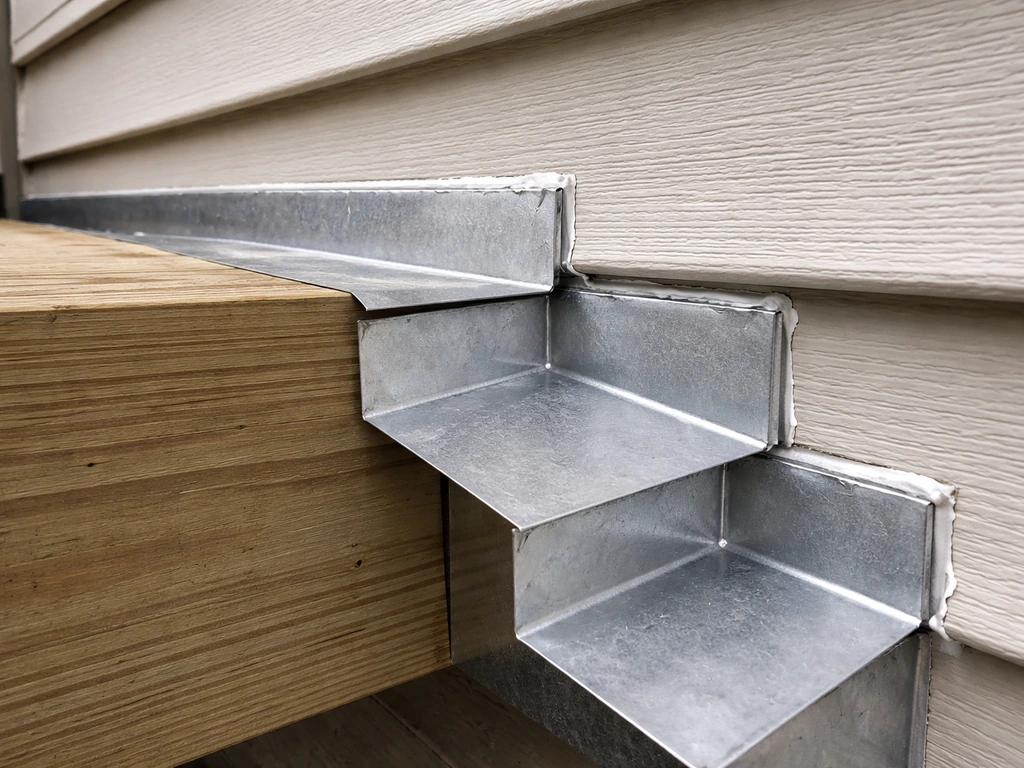
The ledger-to-house connection needs continuous step flashing or a custom-bent piece of aluminum or galvanized flashing that tucks behind the house siding and over the top of the ledger. The goal is to direct any water that gets behind the siding out over the top of your new roof, not into the wall. At the sides where the sunroom meets the house wall, use corner flashing or a flexible membrane (like Grace Ice and Water Shield) wrapped from the house sheathing onto your framing. At the roof-to-glass or roof-to-panel transitions, follow the glazing manufacturer's recommendations exactly, because different systems have specific flashing details. Don't improvise here.
Sealing and caulking
Use a high-quality silicone or polyurethane sealant rated for exterior use on every joint where two different materials meet: slab to base plate, frame to glazing, flashing laps, and anywhere the structure meets the house. Don't use standard latex painter's caulk outdoors, it cracks within a season. For glass or polycarbonate panel systems, the glazing tape or gasket supplied with the system is your primary seal, with sealant as a secondary backup. After every rain during construction, check for water intrusion and address it before moving on.
Insulation for three-season and four-season rooms
For a screened porch or basic three-season room with open or single-pane glazing, insulation isn't usually relevant since the space isn't conditioned. But if you're building anything meant to hold heat in winter or stay cool in summer, you need to insulate the knee walls, any solid roof or ceiling sections, and address the slab. Rigid foam board (polyisocyanurate or XPS) is the go-to for slab insulation because it doesn't absorb moisture. For walls, 2-inch closed-cell spray foam or rigid foam between studs handles the thermal bridging issue better than fiberglass batts in a narrow wall cavity. For the roof, a minimum of R-30 is a reasonable target for a conditioned sunroom in most climates.
Thermal bridging at aluminum framing is a real issue. If you're using aluminum and want genuine four-season performance, the framing system needs a thermal break built in. This is a layer of low-conductivity material (usually a rigid polymer) between the interior and exterior faces of the aluminum extrusion. Systems without thermal breaks will sweat in cold weather, dripping condensation onto your floor and promoting mold on adjacent surfaces.
Ventilation, comfort, and glazing choices
Sunrooms overheat. It's almost a law of physics. A glass or polycarbonate enclosure facing south or west in summer can hit 120 to 130 degrees Fahrenheit on a hot afternoon, which makes the space unusable without some strategy for ventilation and shading.
Natural ventilation first
Plan operable windows or vents into at least 10 percent of your floor area as a baseline. Casement windows on the prevailing breeze side and a ridge vent or high wall vent on the opposite side create cross-ventilation that can drop the temperature 10 to 15 degrees without any mechanical help. If you're in a hot climate, consider a roof with an operable skylight or ridge vent, because hot air rises and escaping through the top is far more effective than side ventilation alone.
Mechanical ventilation and HVAC
For a four-season room, you'll need heating and cooling. The easiest and most cost-effective option for a DIYer is a mini-split heat pump: one outdoor unit and one wall-mounted indoor head, no ductwork required. A single 9,000 or 12,000 BTU mini-split covers most sunrooms up to 300 to 400 square feet depending on insulation quality and climate. Extending existing HVAC ductwork is possible but requires a load calculation to confirm the existing system has capacity, and it usually needs a licensed HVAC contractor. For a three-season room, a ceiling fan plus a portable or window AC unit is often enough.
Glass and glazing performance
If heat gain is your main concern, look for double-pane glass with a low solar heat gain coefficient (SHGC). A low-E coating with an SHGC of 0.25 or lower blocks most solar heat while still allowing daylight. For polycarbonate panels, bronze or opal tints reduce heat gain compared to clear. Whatever you choose, avoid clear single-pane glass on south or west facing walls in warm climates because you'll be fighting the sun all summer. On north-facing walls it matters less.
Screens for three-season rooms
If you're building a screened enclosure rather than a glazed room, the ventilation problem mostly solves itself. Solar screen mesh (with a tight weave, typically 80 to 90 percent shade rating) blocks most direct sun while still letting a breeze through, and it dramatically reduces glare. Standard fiberglass screen mesh is cheaper and fine for bug control but does little for heat. Plan for a ceiling fan regardless, it makes a huge difference in perceived comfort on still, hot days.
The build sequence: how to actually do it
Here's the practical order of operations. Following this sequence keeps you from having to undo work, and it's the same logic professionals use.
- Assess and repair the slab: Fix cracks, address drainage issues, apply vapor sealer if needed. Do this first, while you still have full open access.
- Finalize the design and pull permits: Submit your drawings to the building department and wait for permit approval before buying materials or starting framing.
- Mark and anchor the ledger board: Strip siding, install flashing, bolt the ledger to the house framing. This is your structural anchor point for everything else.
- Install perimeter base plates or track on the slab: Seal underneath, anchor with concrete bolts, and confirm everything is level and square before going vertical.
- Frame or install perimeter walls: Plumb and brace each wall section as you go. For kit systems, follow the manufacturer's assembly sequence exactly.
- Set posts and install the roof beam (if applicable): Check plumb, attach with hardware, and brace temporarily until the roof structure locks everything together.
- Install roof rafters and sheathing (or glazing system): Work from the house outward. Install step flashing at the ledger as you go, not after.
- Install roofing or glazing panels: Follow manufacturer specs for panel laps and fastener patterns. Seal all penetrations and perimeter edges.
- Install windows, doors, and screen panels: Shim for level and plumb, seal the rough openings, and test operation before moving to finishes.
- Rough-in electrical if needed: Run conduit and wire to your panel box, have it inspected before closing up walls.
- Install insulation (if applicable): Rigid foam on slab, spray foam or rigid in walls, batt or rigid in ceiling.
- Install interior finishes, flooring, and HVAC: Paint or stain, lay flooring, mount the mini-split or other heating and cooling.
- Final inspection: Schedule with the building department and address any punch list items before the permit closes out.
Realistic cost and time expectations
A basic screened enclosure on an existing patio runs roughly $20 to $60 per square foot in materials if you're doing the work yourself, so a 200-square-foot patio screened room might cost $4,000 to $12,000 in materials. A three-season room with polycarbonate or single-pane glazing is typically $50 to $120 per square foot in materials. A full four-season conditioned room with double-pane glass and mini-split runs $150 to $350 per square foot or more, and at that price point the labor savings from DIY are significant but the complexity is also much higher. Plan on two to four weekends for a screened enclosure, four to eight weekends for a three-season room, and realistically three to six months of part-time work for a full four-season build.
When to hire a pro instead of DIYing
Be honest with yourself about a few decision points. If your local code requires engineer-stamped drawings, hire an engineer and strongly consider having a contractor do the structural work so you're not interpreting engineering specs yourself. If your project requires HVAC ductwork or a new electrical subpanel, hire licensed trades for those portions even if you self-perform the rest.
If your slab has significant structural issues, like deep settlement or active heaving, hire a foundation contractor before building anything on top of it. And if you're planning a full four-season room with real glazing systems, a semi-custom kit installed by the manufacturer's crew is often the smartest value because the system is engineered, warrantied, and inspected as a unit. The DIY sweet spot is screened enclosures and three-season rooms with straightforward shed roofs, standard materials, and no complex HVAC.
If you're on the fence between a fully enclosed sunroom and a more open structure, it's worth considering what a pergola on the same patio footprint could offer as an intermediate step. A pergola with a weatherproof roof panel system gives you shade and partial rain protection with significantly less permit complexity and structural work.
It's a completely different project scope, but for some patios and some budgets it's actually the smarter starting point before committing to full enclosure. If you're weighing options, the same site-prep checks and structural anchoring principles you use before full enclosure also apply when you plan how to secure pergola to patio.
If you’re starting with a carport instead of an existing patio, the same site checks and framing decisions apply, but you’ll need to plan for converting the roof support and enclosure layout.
FAQ
Can I build the sunroom directly on my existing concrete patio slab even if there are cracks?
Yes, but only if you treat it as a moisture and load issue, not just a cosmetic one. If the slab has active heaving, deep settlement, or significant spalling beyond minor surface cracks, you need repairs (and sometimes re-leveling or engineered solutions) before framing. Building over a moving slab can break seals, misalign doors, and create leaks at the perimeter flashing even if the rest of the build is perfect.
How do I know if moisture coming through the slab will ruin insulation or flooring?
Don’t assume a slab will be automatically “dry enough” just because it looks clean or isn’t wet. The plastic-sheet test helps confirm vapor transmission, but if you plan for any interior insulation or finished flooring, you should also plan a complete vapor strategy, including sealing the slab surface and using insulation types that tolerate moisture (rigid foam is safer than fiberglass in direct slab contact).
What’s the real difference between an aluminum sunroom that’s “four-season rated” and one that isn’t?
Plan for a dedicated thermal break strategy at the frame level, not just better glass. For aluminum, choose a kit or system specifically designed with thermal break components. If you rely on “good sealing” alone, condensation on the aluminum members can lead to moldy corners and slippery floors during cold weather, even when the room otherwise seems sealed.
Can I attach a sunroom roof to the house with a shed (lean-to) design if my soffit blocks the usual ledger placement?
Yes, but only when the roof and wall assembly allow proper weatherproofing. Adding a lean-to shed roof is often the easiest, but the ledger attachment must hit structural framing, and the flashing needs to create a continuous water path over the top of the ledger and behind the house siding. If your eave line or soffit forces an unusual tie-in height, you may need to rethink roof pitch or the framing layout to maintain code drainage.
What should I do if my patio is out of square or my slab isn’t level?
Measure for plumb and clearance twice before ordering glazing or building doors. An out-of-square patio can be corrected in the frame layout, but it changes opening sizes and hardware alignment. If you will use pre-built doors and panels, you may need to adjust your frame-to-slab layout so the final rough openings land within the manufacturer’s tolerances.
Do I need a licensed electrician for outlets, lighting, or HVAC in a patio sunroom?
For electrical, the key edge case is whether you’re adding anything beyond lighting you already have, such as HVAC, receptacles, ceiling fans, or wired window controls. Many jurisdictions require inspections and permit-specific work, and some also require GFCI protection and specific outdoor-rated conduit or cable types. Even if your build is otherwise DIY, you should plan to hire a licensed electrician when the scope triggers these code requirements.
If I install double-pane low-E glass, will I still get condensation inside a sunroom?
Yes, condensation can still happen even with good glazing if the ventilation and humidity strategy is wrong. A four-season room needs either controlled fresh air or staged mechanical ventilation, especially in shoulder seasons when warm humid outdoor air meets a cooler interior. If you only plan operable vents but never manage humidity, windows and corners can still accumulate moisture.
Is polycarbonate a good long-term choice, or will it discolor and become cloudy?
Budget for it as “maintenance risk,” not as an optional upgrade. Polycarbonate can scratch and yellow over time, which reduces both appearance and solar performance. If you choose polycarbonate, plan for compatible sealants, care methods, and expect earlier replacement compared with double-pane insulated glass, especially in climates with frequent hail, sand, or harsh cleaning.
Where do sunroom leaks most often start, and what joints should I inspect first?
Your highest risk point is where flashing meets dissimilar materials, especially house siding to ledger, and roof transitions to glazing. Use system-specific flashing details where required, and don’t rely on caulk alone. After every rain during construction, inspect the same joints methodically (ledger line, corners, and side transitions) so you catch and correct a leak path before the next layer makes it harder to access.
What’s the correct way to plan ventilation so a sunroom doesn’t overheat?
Many people miss this detail: you can’t treat ventilation “as a number” and ignore placement. If you plan cross-ventilation, operable openings should be arranged to take advantage of prevailing breezes, and hot-air exhaust should be located high (ridge or high-wall vent) to work with buoyancy. Also include screens or insect controls that don’t block airflow so you get comfort without turning the room into a stagnant box.
How do I prevent doors and operable windows from not fitting if the patio slab is slightly out of level?
Test-fit the floor plan against door swing and glazing module sizes before framing, especially with kit systems. If your slab is slightly out of plane or if you correct for slope, rough openings can drift and doors may not latch properly. Confirm the system’s required clearances at the base, track, and glazing edges so you don’t end up trying to force misaligned assemblies.
If my slab slopes the wrong way, what are my options to fix drainage before framing?
If you have to cross a lawn edge drain line or an existing grading pattern, you may create new water behavior. Before you build the perimeter curb or add drainage fixes, verify where runoff goes during the heaviest storms and how it interacts with the house foundation. A french drain or perimeter channel is helpful only when it has an outlet path; otherwise you just move the water problem.