
To securely install a patio canopy, you need to match your anchoring method to the structure type: attach a ledger board to the house framing with properly spaced lag bolts or through-bolts, set freestanding posts on concrete footings that reach below the local frost line, or weight and strap a temporary canopy at every corner and midpoint. The right approach depends on whether your canopy is permanent or seasonal, attached to the house or freestanding, and what your local building department requires. This guide walks you through every decision and installation step, from choosing your structure type to passing inspection.
How to Secure a Patio Canopy: Anchoring, Materials & Steps

Celia Vaughn
20 Jul 2026
What this guide covers (and the honest DIY limits)
A patio canopy can mean a lot of things: a permanent attached lean-to, a freestanding gable pergola, a simple post-and-beam shade structure, or a fabric tarp rigged between poles. The anchoring challenge is different for each one. This guide covers all four, with step-by-step instructions, hardware callouts, and structural checkpoints. It also covers material choices, footings, flashing, local permits, and maintenance.
Honest limits first. Most homeowners can handle a freestanding pergola or a fabric canopy without professional help. An attached permanent structure that involves cutting into your roof line, fastening a ledger to a stucco or masonry wall, or navigating a complex permit process is a different story. Throughout this article I flag the moments where calling in a structural engineer or licensed contractor is the safer call, not because the work is impossible but because getting it wrong quietly (hidden ledger rot, undersized footings, missed flashing) creates problems you won't see until something fails.
Quick decision guide: attached, freestanding, or temporary?
Before you buy a single fastener, answer these three questions. First: does your canopy connect to the house? Second: is it permanent or seasonal? Third: what's your local permit threshold? Your answers determine which installation path applies and how much structural work is actually involved.
- Connects to the house AND is permanent: You need a ledger board, proper flashing, and footings for any outer posts. A permit is almost certainly required. Go to the attached structure sections below.
- Does NOT connect to the house AND is permanent: Freestanding post-and-beam or pergola. Footings required, permit likely required depending on size. Go to the freestanding sections.
- Connects to the house AND is seasonal/temporary: A fabric canopy with wall brackets or a tarp solution. Lower risk but still needs solid wall anchors. Check your wall material before drilling.
- Does NOT connect to the house AND is seasonal/temporary: Pop-up canopy or tensioned tarp on poles. No permit needed in most jurisdictions. Weighting and staking are your main concerns.
- Not sure about permits: Stop here, call your local building department, and ask what the permit trigger is for your project size. In most U.S. jurisdictions, any attached patio cover requires a permit regardless of size. An over-the-phone conversation takes five minutes and can save you a costly stop-work order.
Patio canopy types and your attachment options
Each canopy type has a natural anchoring approach. Understanding the differences before you plan prevents you from choosing a method that won't hold under load or that your wall type won't support.
House-attached (lean-to) canopies
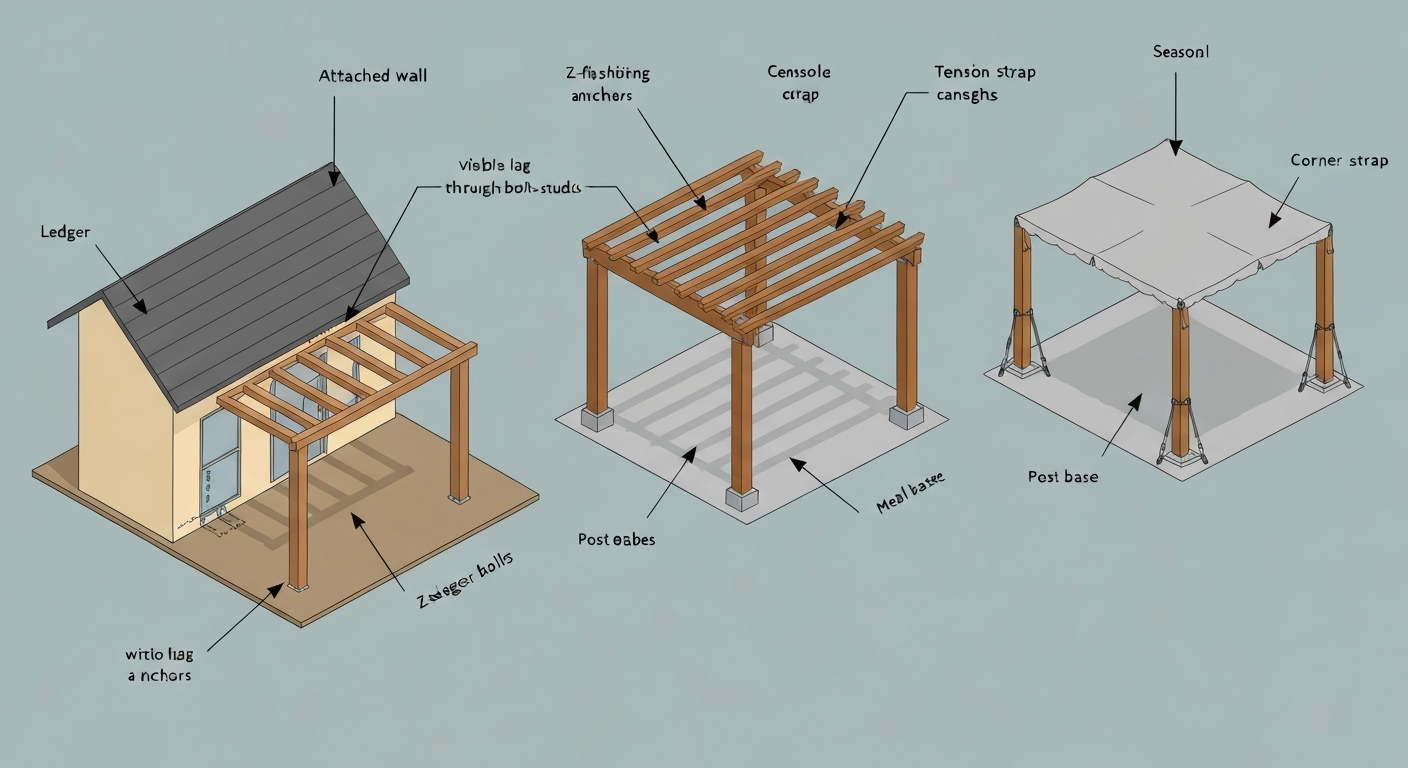
A lean-to is the most common permanent patio canopy. One side attaches to the house wall or fascia via a ledger board; the other side rests on posts set in footings. The ledger carries roughly half the roof load, so the connection must be made into actual wall framing, not just sheathing or cladding. For wood-framed walls with vinyl or fiber-cement siding, this is a manageable DIY task. For stucco walls, you need to cut back the stucco to the water-resistant barrier (WRB), install Z-flashing behind the ledger, and fasten into the studs or rim joist beneath. Attaching only through the stucco surface is not a durable structural connection. Brick veneer is even more restrictive: attaching a loaded ledger to brick veneer alone is not accepted prescriptively in most jurisdictions and typically requires an engineered design. Masonry veneer usually requires mechanical or adhesive anchors sized and spaced per manufacturer data or an engineered design rather than prescriptive ledger-threaded fasteners into veneer alone [Permit plan review notes (example jurisdiction) state that 'attachment of deck ledgers to masonry veneer is not [allowed prescriptively]'.](https://arvadapermits.org/eTRAKiT3/viewAttachment.aspx?ActivityNo=RES23-01372&Group=PERMIT&key=KFL%3A2402020841370160).
Freestanding post-and-beam canopies
Freestanding structures carry all their load on four or more posts set into the ground or anchored to an existing slab. Because nothing attaches to the house, there's no ledger flashing concern, and the structure can often be placed anywhere in the yard. The trade-off is that all uplift resistance depends entirely on the footings and post base hardware. In high-wind areas, this matters a lot: a freestanding canopy with shallow footings or loose post bases is a sail waiting to become a projectile.
Roof-to-post hybrid (pergola style)
A pergola-style canopy uses open rafters or beams rather than a solid roof, which reduces wind load but doesn't eliminate it. Posts typically anchor to a concrete footing or directly to an existing slab using mechanical post bases. If you're adding a fabric or polycarbonate cover to an existing pergola, you're retrofitting an open structure for additional load, and you need to verify the original posts and footings can handle the new weight plus wind uplift.
Fabric and tarp canopy solutions
Fabric canopies and tarps are the most accessible option for renters, temporary coverage, or anyone not ready for a full permit process. The critical word here is tension: a loose tarp flaps, tears, and fails. A properly tensioned tarp with adequate anchor points can handle moderate wind. If you're planning a tarp-based solution, the hanging and tensioning methods covered in a dedicated tarp guide are worth reviewing alongside the hardware notes in this article.
Materials and design choices
Your material choice affects weight, required fastener size, maintenance schedule, and cost. Here's a practical comparison of the main options.
| Material | Typical Weight | Durability | Maintenance | Relative Cost | Best For |
|---|---|---|---|---|---|
| Pressure-treated wood | Heavy | 15–30 years with maintenance | Annual sealing/staining | Low–Medium | DIY builds, classic look, easy to cut on site |
| Cedar / redwood | Medium | 20+ years | Occasional oiling | Medium | Decorative pergolas, natural resistance to rot |
| Aluminum (powder-coated) | Light | 25+ years | Minimal (rinse occasionally) | Medium–High | Low-maintenance, coastal/humid climates |
| Galvanized steel | Heavy | 25+ years | Check for rust at cuts/holes | Medium | High-load spans, commercial-grade builds |
| Composite (PVC/wood blend) | Medium | 20+ years | Very low | High | Decorative fascia and trim, not structural |
| Polycarbonate panels | Light | 10–15 years | Low (clean annually) | Medium | Translucent roof covers, lean-tos |
| Woven fabric / shade cloth | Very light | 3–7 years depending on UV rating | Wash annually, store in winter | Low | Seasonal shade, pergola toppers |
| Heavy-duty polyethylene tarp | Very light | 1–3 seasons | Inspect before each use | Very Low | Temporary or budget coverage |
For a permanent attached canopy, pressure-treated lumber (minimum #2 grade, ground-contact rated for any member within 6 inches of the ground) is the most cost-effective structural choice for most homeowners. Aluminum is worth the price premium if you're in a coastal climate or want to avoid any painting or staining forever. Steel makes sense for long spans above about 14 feet where wood would require very large beam dimensions. For outdoor ceiling finishes on the underside of the canopy, options range from painted tongue-and-groove wood to vinyl soffit panels to aluminum beadboard, all of which add visual polish and protect the structural members from UV. If you're exploring ceiling finish options specifically, that topic gets its own treatment elsewhere on this site.
Structural planning: slope, loads, wind, and drainage
This is the section most DIYers skip, and it's the one that causes the most failures. You don't need to be an engineer to think through these factors, but you do need to understand them before you finalize your design.
Slope and drainage
A solid roof panel (polycarbonate, metal, or built-up shingles) needs a minimum slope of 1/4 inch per foot to shed water. Most builders aim for at least 2 inches per foot (about a 2:12 pitch) for shingles or corrugated metal, and at least 1:12 for polycarbonate. A flat canopy WILL pond water, which adds dead load and accelerates membrane failure. Slope the low end away from the house, not toward it, and plan a drip edge or gutter at the outer edge to manage runoff.
Wind uplift
Wind is the force most likely to destroy a canopy. For open or partially open structures like pergolas with fabric tops, wind doesn't just push horizontally, it creates upward pressure (uplift) that tries to peel the roof off. The technical calculation uses velocity pressure (qh) and a net pressure coefficient (CN) from ASCE 7, giving you a design pressure in pounds per square foot. You don't need to run the full calculation yourself, but you do need to know your design wind speed. ASCE publishes a free online Hazard Tool where you enter your address and get the site-specific wind speed for use in your jurisdiction's code. In coastal areas of Florida or the Gulf Coast, design wind speeds can exceed 150 mph, requiring significantly heavier hardware and connections than a typical Midwestern suburb.
Snow load
If you're in a snow climate, your canopy structure needs to handle the ground snow load (Pg) for your area. ASCE 7-22 introduced updated risk-targeted ground snow maps and a national database for site-specific lookups. See ASCE 7-22 Snow Load Changes: What's Different from 7-16 | Prose for the national ground-snow database and details on the risk-targeted map updates. A common mistake is building a lightweight aluminum pergola cover in a mountain climate and ignoring snow: even 20 psf of snow on a 10x14 foot canopy is nearly 2,800 pounds on your structure. Size your rafters and posts accordingly, and use the load combination rules (dead load plus snow plus applicable wind) to check connections.
Rafter spacing and span
Rafter spacing is typically 16 or 24 inches on center for a solid roof, or 24 to 48 inches for open pergola-style beams. Wider spacing means each rafter carries more load, which means you need a larger rafter size or a shorter span. Span tables in the IRC give prescriptive allowable spans for common lumber sizes and species at standard spacings. A 2x6 Douglas fir rafter at 16 inches on center can span about 11 to 12 feet for a light residential roof load. Push past that and you need a larger member or an intermediate beam.
Footings, foundations, and ground anchoring options
Every freestanding post needs a footing that extends below the local frost depth. The IRC sets a minimum exterior footing depth of 12 inches, but actual frost depths vary enormously: 6 inches in coastal South Carolina, 48 inches or more in northern Minnesota. Your local building department will have the required frost depth for your county. Getting this wrong means your posts heave every winter and your canopy slowly goes out of plumb.
Concrete piers and sonotubes
The standard DIY approach is a tube form (Sonotube or equivalent) filled with concrete. Dig a hole to the required frost depth plus 6 inches, set the tube, pour concrete, and embed a J-bolt or post base hardware while the concrete is wet. For a typical 4x4 or 6x6 post, a 10- to 12-inch diameter tube is common. Let the concrete cure fully (at least 3 days before loading, 7 days before full load) before setting posts. A post base set in the wet concrete is far easier than trying to drill and anchor after the fact.
Anchoring to an existing concrete slab
If you're setting posts on an existing patio slab, you need a mechanical post base anchored to the concrete. Simpson Strong-Tie's ABU post base series is a common choice: you drill into the slab, install expansion or epoxy anchors, bolt the base down, and drop the post in. The base provides uplift resistance, lateral resistance, and keeps the post end up off the wet concrete so it doesn't rot. Always verify the slab thickness before drilling; most residential slabs are 3.5 to 4 inches thick, and your anchor embedment cannot exceed the slab depth. For a 6x6 post base under a canopy in a moderate wind area, you typically need anchors with 1,500 to 2,500 lb allowable tension capacity, verified against the manufacturer's published load table for your anchor size and embedment.
Ground screws (helical piers)
Ground screws are a newer alternative to concrete piers. They thread into the ground with a torque driver and can carry a post base on top, eliminating the concrete pour entirely and allowing immediate loading. Some products carry ICC-ES certification (verified by independent testing reports), which helps with permit acceptance. The catch: load capacity depends heavily on soil type and density. Sandy, loose, or fill soil gives poor results. If your soil is dense native material, ground screws work well for freestanding canopies. Verify the product has an ICC-ES report and check with your local building department on acceptance before committing.
Embedded posts (direct burial)
Direct-burial posts (set in concrete below grade) are structurally efficient because the post-in-concrete acts as a fixed column base, resisting both lateral load and uplift simultaneously. Use only ground-contact-rated pressure-treated lumber (UC4B or UC4C for high-decay-hazard applications). The downside is that when the post eventually rots at the ground line (and it will, eventually), replacing it means digging out the footing. For most homeowners building a long-term permanent structure, above-grade post bases on concrete piers are easier to inspect and replace over the life of the structure.
Local codes, permits, and what inspectors actually check
Most U.S. jurisdictions require a building permit for a patio cover or attached patio roof. The permit trigger varies, but a common threshold is any structure over 200 square feet or any structure that attaches to the house (regardless of size). Some cities require permits for any permanent structure. The safest move is always to call your local building department before you design anything, not after.
When you apply for a permit you'll typically submit: a site plan showing the canopy location and setbacks from property lines, a framing plan with member sizes and spacing, a footing/foundation plan with depth and dimensions, and (sometimes) a structural calculation or reference to the prescriptive IRC tables you're using. Inspectors typically check: footing depth before the concrete pour (so they need to see the holes before you fill them), ledger attachment and flashing on attached structures, post base hardware and anchor installation, and final framing before any roof covering goes on. Missing an inspection and covering work can result in a stop-work order and required demolition to expose what was covered.
- Call your local building department before designing — ask for the permit threshold and required submittal documents
- Schedule a footing inspection before pouring concrete; this is the most commonly missed step
- For attached structures, ask specifically whether a ledger inspection is required before sheathing
- Keep the approved permit and plans on site during construction
- Final inspection is typically required before using the space
Hardware and anchors: what to use and when
Choosing the right fastener for the substrate is the single most important technical decision in canopy installation. The wrong anchor in the wrong material fails silently under load.
Lag bolts and through-bolts for ledger attachment
For attaching a ledger board to a wood-framed wall, you'll use either 1/2-inch diameter lag screws or 1/2-inch through-bolts (carriage bolts or hex bolts with a nut and washer on the back). The IRC prescribes the fastener type, size, spacing, and edge-distance placement depending on joist span and sheathing thickness. A common prescriptive pattern is 1/2-inch lag screws at 16-inch on-center staggered vertically, placed at least 2 inches from the top and 3/4 inch from the bottom of the ledger. Simpson Strong-Tie also publishes tested fastener tables for structural screws (like the SDW series) that can substitute for lag screws with specific torque and spacing requirements. Through-bolts are stronger and preferred where access to the interior allows installation of a nut and washer.
Common mistake: people drill the pilot hole too close to the ledger edge, split the ledger, and then try to fill the gap with caulk. Follow the edge-distance rules in the IRC tables and you won't have this problem. Also: always pre-drill for lag screws with a pilot hole sized at 70% of the lag shank diameter to avoid splitting the ledger or the rim joist.
Expansion anchors and sleeve anchors for concrete and masonry
When fastening a post base, ledger, or hardware to solid concrete, you use either expansion anchors (wedge anchors, sleeve anchors) or chemical (epoxy) anchors. Wedge anchors are the fastest: drill a hole with a hammer drill, blow out the dust, drive in the anchor, and torque the nut to the manufacturer's specified value. Sleeve anchors work similarly and are slightly more forgiving in marginal concrete. Epoxy anchors (such as Hilti HIT-RE or Simpson SET-XP) involve injecting adhesive into a cleaned hole, inserting a threaded rod, and waiting for the cure time before loading. Epoxy gives higher capacities, especially in cracked concrete or near edges, but you cannot load them early.
Critical: anchor performance depends on embedment depth, edge distance (distance from the anchor to the edge of the slab), and spacing between adjacent anchors. Hilti and Simpson both publish allowable tension and shear values in their technical data. If your edge distance is less than the minimum listed, the allowable load drops significantly because of concrete breakout failure. For a slab-anchored post base, always check the edge distance before buying the anchor size. A 1/2-inch wedge anchor at 3-1/4-inch embedment in normal-weight concrete typically has an allowable tension load around 2,600 to 3,500 lb, but that drops by 50% or more if the anchor is within 3 inches of the slab edge.
Image suggestion: close-up photograph of a correctly installed wedge anchor in a concrete slab, showing the nut and washer torqued flush, with the post base plate visible above.
Post bases and post caps
Post bases (like the Simpson ABU, ABA, or PBS series) sit between the concrete footing and the post bottom, providing a standoff that keeps the post end out of direct moisture contact. They also provide rated uplift and lateral resistance. Select a post base rated for at least the calculated uplift force at your site, with a margin. For most residential canopies in moderate wind zones, a post base with 1,200 to 2,000 lb uplift allowable is adequate for a 4x4 post; larger spans or high-wind zones need more. Post caps connect the top of the post to the beam above and transfer load in both compression and uplift.
Image suggestion: side-by-side photo of a Simpson ABU post base installed on a concrete pier (showing the anchor bolts below and the post seat above) next to a post cap connecting a 4x4 post to a double 2x8 beam.
Anchor straps and hurricane ties
Hurricane ties (like the Simpson H2.5A or H10) connect rafters to the top plate or beam below them, resisting uplift at every rafter-to-beam connection. This is the joint most likely to let go in high wind, and it's the one most often skipped on DIY builds. In wind zones above about 90 mph design speed, rafter ties are not optional. Install one at every rafter-to-beam connection on both sides if possible. Nail them with the listed joist hanger nails (not general common nails) to achieve the rated load.
Weights and ballast for temporary canopies
Pop-up and freestanding fabric canopies rely on ballast when staking isn't possible (pavers, decks, concrete surfaces). Commercial canopy weight bags filled with sand typically hold 10 to 30 lb each and clip to the leg. For a 10x10 canopy in mild conditions, 40 lb per leg (four legs, 160 lb total) is a reasonable minimum. In any wind above about 20 mph, take the canopy down or stake it securely. No amount of ballast substitutes for proper staking in serious wind. Ratchet straps running from the canopy frame to a fixed structure (fence post, deck railing) add meaningful lateral resistance.
Hardware quick-reference guide
| Hardware Type | Use Case | Typical Size | Key Installation Note |
|---|---|---|---|
| Lag screw | Ledger to wood framing | 1/2" x 3–4" | Pre-drill pilot hole; stagger vertically per IRC table |
| Through-bolt (carriage or hex) | Ledger to rim joist (through) | 1/2" diameter | Nut and washer required on back; higher capacity than lag |
| Wedge anchor | Post base or hardware to solid concrete | 1/2" x 3–3/4" or longer | Torque to manufacturer spec; check edge distance |
| Epoxy/chemical anchor (threaded rod) | Post base near slab edge or cracked concrete | 1/2" or 5/8" rod | Full cure time required before loading; clean hole with brush and blow-out |
| Sleeve anchor | Post base or ledger to block/CMU | 1/2" x 3–4" | Do not use in hollow block without backing |
| Post base (Simpson ABU/PBS) | Freestanding post to concrete | 4x4 or 6x6 models | Anchor with listed fasteners only; provides standoff above slab |
| Hurricane tie / rafter tie | Rafter to beam uplift resistance | H2.5A, H10, or equivalent | Install at every rafter; use listed joist hanger nails |
| Ratchet strap | Temporary canopy to fixed structure | 1" or 2" width | Loop around structural member, not siding or trim |
| Weight bags / ballast | Temporary canopy on hard surface | 10–30 lb each | Minimum 4 bags (one per leg); inadequate in high wind |
Step-by-step installation: attached lean-to canopy
This is the most common permanent DIY canopy. Expect one to two weekends for a straightforward 10x12 build on a wood-framed house with standard siding. For a complete step-by-step tutorial on how to make a patio canopy, see our detailed build guide covering tools, materials, and timing.
- Confirm permit requirements and get approval before starting any work.
- Locate the attachment height on the house wall. Mark the ledger position so the finished roof has the slope you calculated (minimum 1/4 inch per foot away from the house). Use a level and chalk line.
- Remove siding in the ledger zone. For wood or vinyl siding, pull back one course above and below the ledger. For stucco, use an angle grinder to score and remove a strip 2 inches taller than the ledger board. Never skip this step.
- Install Z-flashing or ledger flashing behind the ledger position, integrated with the building's water-resistant barrier (WRB). The top leg of the flashing goes behind the WRB; the bottom leg laps over the face of the ledger. This is the step that prevents hidden wall rot, and improper ledger flashing is a leading cause of structural failure in attached patio covers.
- Fasten the ledger board to the house rim joist or band joist using 1/2-inch lag screws or through-bolts at the spacing from the applicable IRC table. A common pattern: 1/2-inch lag screws at 16 inches on center, staggered 1.5 inches high and low, pre-drilled with a 5/16-inch pilot hole. Verify framing location with a stud finder or by measuring from a known reference point.
- Set your outer post footing locations. Use batter boards and string lines to align posts precisely. Dig footing holes to the local frost depth plus 6 inches. Schedule the footing inspection before pouring.
- Pour concrete footings using tube forms. Set J-bolts or post base hardware while concrete is wet, positioned precisely for your post layout. Let cure for at least 3 to 7 days before loading.
- Set posts on post bases and plumb them in both directions. Use temporary bracing (2x4 diagonal braces nailed to stakes) to hold posts plumb until beams are installed.
- Install the beam across the post tops using post caps. For a 10-foot span, a double 2x8 or 2x10 is typical for a standard roof load; verify with IRC span tables for your species and load.
- Cut and install rafters from the ledger to the beam. Space at 16 or 24 inches on center. Toenail to the ledger with structural screws or use rafter hangers. Install hurricane ties at every rafter-to-beam connection.
- Install roof decking and roofing material (sheathing and shingles, corrugated metal, or polycarbonate panels depending on your design). Start the drip edge and flashing at the house end.
- Install guttering at the low (outer) edge to manage runoff. Slope gutters 1/16 inch per foot toward the downspout.
- Schedule final inspection.
Step-by-step installation: freestanding post-and-beam canopy
- Confirm permit requirements and setback rules for your property.
- Lay out the post locations with stakes and string lines. Measure diagonals to confirm square (diagonals should be equal for a rectangular layout).
- Dig footing holes to the required frost depth. For a 10x14 canopy, 10- to 12-inch diameter Sonotube piers are typically adequate.
- Pour concrete footings with tube forms, embedding post bases (J-bolts) while wet. Schedule footing inspection if required.
- After cure, install post bases with the specified anchor hardware per the manufacturer's load table.
- Set posts plumb and brace temporarily. Double-check plumb in both directions before proceeding.
- Install header beams across post tops using post caps. For a 14-foot span under a light roof, a 4x10 or double 2x10 beam is a reasonable starting point — verify with IRC tables.
- Install rafters or purlins. Add blocking at the ends.
- Install hurricane ties at each rafter-to-beam connection.
- Add the roof covering or shade structure of your choice, ensuring proper slope for drainage.
- Final inspection if required.
Hanging and tensioning a tarp or fabric canopy
A tarp that sags in the middle pools water and eventually tears. The goal is to create either a consistent slope (water always runs off one end) or a peaked tent shape (water runs off all sides). For a slope setup, one attachment row needs to be 12 to 18 inches higher than the other. Attach at every grommet, not just the corners: every 2 to 3 feet is ideal. Use UV-resistant poly rope, bungee loops, or ratchet straps depending on load. Bungee allows some give in wind, which actually reduces tearing; a tarp rigged with zero flexibility absorbs wind as shock load and fails at the grommets.
For a tarp canopy guide with more detail on attachment to walls, posts, and overhead structures, the hanging tarp over patio topic on this site goes deeper on rigging options. If you're building a more permanent tarp-based cover, the tarp patio cover guide walks through pole and frame construction.
- Determine your drainage direction and set the high-end attachment points first.
- Unfold the tarp and attach the high end to wall anchors, a beam, or an overhead structure at every grommet using bungee tarp hooks or carabiner clips.
- Stretch the tarp to the low end, maintaining consistent tension. Attach the low end with ratchet straps or rope to posts, a fence, or ground stakes.
- Attach all intermediate grommets along the sides to reduce flutter.
- Pull the tarp taut but not drum-tight: some flex prevents grommet blowouts in wind.
- Check the slope: pour a small amount of water in the center and confirm it runs toward the intended drain edge.
- Inspect grommets and attachment points after the first heavy rain or windstorm. Retension as needed.
Wind and waterproofing: the details that matter most
Flashing is the single most overlooked detail in attached canopy installation. The IRC requires ledger flashing that integrates with the building WRB and covers the full width of the ledger. The most common failure mode is water running behind the ledger and rotting the rim joist over 5 to 10 years without any visible sign until the structure begins to sag. Use either aluminum Z-flashing or a purpose-made product like Cor-A-Vent ledger flashing tape. Seal all fastener penetrations through the sheathing with a compatible sealant or flashing tape on the back side before fastening the ledger.
At the roof-to-wall junction, install a step flashing system (individual L-shaped pieces woven with each course of roofing) plus counter flashing embedded in the wall above. Continuous caulk beads at this junction are not a substitute for proper flashing; caulk cracks and fails within a few years.
- Minimum roof slope: 1/4 inch per foot for solid panels; 2:12 or steeper for shingles
- Install a drip edge at the outer (low) edge of the roof
- Gutter at the low edge directs water away from the foundation and patio surface
- Caulk all through-penetrations (fasteners, conduit, lighting) with a high-quality exterior sealant
- Hurricane ties at every rafter-to-beam connection are non-negotiable in any wind zone above 90 mph design speed
- Inspect flashing, sealants, and fastener heads annually; retighten any loose hardware
Safety, inspection, and maintenance schedule
A patio canopy is a structural element. It deserves the same annual inspection you'd give a deck. Set a reminder every spring to run through these checks before the first heavy-use season.
| Frequency | What to Check | What to Look For |
|---|---|---|
| After every major storm | All anchor points, post bases, rafter ties | Loosened fasteners, displaced post bases, lifted flashing |
| Annually (spring) | Ledger-to-wall connection and flashing | Soft wood, rust streaks, separation from wall, cracked caulk |
| Annually (spring) | Footing and post base condition | Heaving, tilting, rust on post base hardware |
| Annually (spring) | Roof covering and drainage | Ponding areas, cracked panels, blocked gutters, algae growth |
| Every 2–3 years | All structural fasteners | Re-torque lag bolts and anchor bolts to manufacturer spec |
| Every 3–5 years (wood structures) | Post bottoms and beam ends | Soft spots indicating rot; treat or replace affected members |
| Annually (fabric/tarp canopies) | Grommets, attachment points, fabric integrity | Torn grommets, UV degradation, mold; replace if significantly degraded |
When to call a pro
This is not a list of things you definitely can't do. It's a list of situations where the cost of getting it wrong is high enough that a professional review is worth every dollar.
- Attaching to a stucco or masonry wall: ledger attachment to these substrates requires specific techniques and often an engineered connection design
- Any structure in a high-wind or high-seismic zone: design wind speeds above about 115 mph should get a structural engineer's review of connections and footings
- Spans over 14 to 16 feet: beam and post sizing at these spans benefits from a professional calculation to avoid undersizing
- Any canopy over a habitable space (a room below, not just a patio): building official may require stamped engineering drawings
- Soil conditions that are soft, fill, saturated, or expansive: footing design in marginal soils is not a guessing game
- Your jurisdiction requires stamped drawings for permit: this is the engineer's job, not the building department's
- Any retrofit that involves cutting into an existing roof: this requires careful flashing and structural evaluation of the existing roof system
Tools and materials checklist
- Post hole digger or rented power auger (for footing holes deeper than 24 inches)
- Hammer drill with SDS bits (for anchoring into concrete or masonry)
- Circular saw and miter saw (framing cuts)
- Drill/driver with impact driver (fastener installation)
- Chalk line, speed square, and framing square
- 4-foot level and string line level
- Tape measure (25-foot minimum)
- Safety glasses, work gloves, and hearing protection
- Stud finder (for locating framing behind wall cladding)
- Concrete tube forms (Sonotube), concrete mix, mixing bucket or mixer rental
- Structural lumber (pressure-treated 4x4 or 6x6 posts, 2x8 or 2x10 rafters and beams)
- Post bases, post caps, hurricane ties (sized for your lumber dimensions)
- 1/2-inch lag screws or through-bolts, joist hanger nails
- Ledger flashing tape or Z-flashing
- Roofing material of choice, drip edge, guttering
- Exterior sealant (polyurethane or silicone-based)
Quick troubleshooting: common problems and fixes
| Problem | Likely Cause | Fix |
|---|---|---|
| Canopy rocks or sways | Insufficient post base anchor capacity or loose fasteners | Re-torque anchor bolts; upgrade to larger anchor if slab edge distance allows |
| Water pools on roof | Insufficient slope or sagging rafter | Add intermediate support or sister a new rafter alongside the sagging one; increase slope at next rebuild |
| Ledger pulls away from house | Lag screws in sheathing only (missed framing) or fastener corrosion | Locate framing and refasten with new through-bolts; inspect for rot before closing up |
| Post base rusting through | Moisture trapped under base (no standoff) or inadequate coating | Replace base with a standoff model; keep base area clear of debris |
| Tarp tears at grommets | Too much tension or zero give in attachment | Switch to bungee attachment; reinforce grommets with grommet tape |
| Canopy lifted partially in storm | Missing rafter ties or undersized connections | Install hurricane ties at every rafter-to-beam connection; add diagonal knee braces at posts |
| Footing heaves in winter | Footing above frost depth | Excavate and reset footings below the local frost line; consult building department for required depth |
FAQ
What is the simplest overview of how to secure a patio canopy so it’s safe and code‑compliant?
Secure a patio canopy by choosing an appropriate attachment method (attached ledger, free‑standing posts, or temporary anchors), sizing and spacing structural members for local loads (wind, snow), using proper connectors and foundations (ledger bolts, through‑bolts, post bases, concrete piers or ground screws), providing waterproofing/flashing for any house attachments, and following local building codes and permit requirements. For wind resistance, design anchors and connections to resist uplift and overturning per published load tables or an engineer’s calculations. If you’re unsure about load calculations, ledger attachments to masonry, or complex roof connections, consult a licensed pro.
What are the practical anchoring and attachment options and when to use each?
House‑attach (lean‑to/attached): best when you want a low‑cost, space‑efficient cover. Requires a properly flashed ledger fastened to framing or engineered attachment to masonry/CMU. Free‑standing posts: used where house attachment isn’t possible or desired; requires properly sized posts, post‑bases and footings. Roof‑to‑post (gable/pergola): combines house attachments with posts—use where partial attachment reduces span but posts carry end loads. Temporary tarp solutions: use straps, ratchets, weighted anchors or ground stakes; suitable for seasonal shade or emergency covers but not for permanent occupancy loads. Choose based on permanence, wind exposure, and whether the wall can take loads.
How do material and design choices affect durability and DIY difficulty?
Wood (pressure‑treated or cedar): cost‑effective and easy to work with; susceptible to rot at ledger if flashing/WRB not handled. Aluminum/metal: durable, low maintenance, lighter but may require metalworking skills and correct fasteners. Fabric/tarp: cheapest and flexible for temporary use; low wind capacity and shorter life. Solid roofing (metal, polycarbonate, shingles): best for waterproofing and longevity; heavier and often requires structural framing and more skill. Outdoor ceilings (tongue‑and‑groove, PVC panels): improve aesthetics but add weight and complexity. For DIY, wood pergolas and simple attached lean‑tos are attainable; complex gables or heavy roof systems may need pros.
What structural considerations must I evaluate before installing a canopy?
Slope and drainage to avoid ponding; roof rafter spacing and span to size members; live loads (snow) and wind uplift per ASCE/IRC for your site; footing depth (below frost line) and foundation type; lateral bracing for wind; load paths from roof down to anchors/footings; attachment substrate (sheathing/framing, stucco, masonry) and corrosion protection for fasteners. Check local building codes and obtain required permits. When in doubt about loads or unusual site conditions, get an engineered design.
Which specific hardware and anchor methods should I consider and for what use‑cases?
Lag bolts/structural screws: ledger-to-framing in wood sheathed walls when installed per IRC/ manufacturer spacing. Through‑bolts/bolted connections: stronger, recommended where possible for ledger-to-rim joist attachments. Expansion/wedge anchors or sleeve anchors: for solid concrete/CMU attachments (use manufacturer embedment/spacings). Chemical/epoxy anchors: for higher capacities or cracked concrete. Post brackets (Simpson ABU, B, etc.): connect posts to concrete piers or slabs. Concrete piers: traditional footings sized/placed per frost depth. Ground screws/helical piles: fast, avoid concrete; verify ICC‑ES acceptance for your area. Straps and ratchet tie‑downs: for temporary tarps and to reduce uplift on light structures. Weights/ballasts: for very temporary freestanding covers.
What are step‑by‑step instructions for an attached (lean‑to) patio canopy?
1) Check permits and locate studs/ledger bearing framing; remove siding or cut back stucco until WRB/framing is exposed. 2) Determine roof slope and plan flashing integration. 3) Install continuous ledger of appropriate material and thickness. 4) Flash ledger per IRC guidance (install Z‑flashing and integrate with WRB). 5) Fasten ledger with approved fasteners (structural screws or through‑bolts) into rim/joist at code/manufacturer spacing. 6) Frame rafters or purlins to the ledger and to the house top connection; provide hurricane ties or rafter straps at rafter ends. 7) Install breathable underlayment and roofing material (metal, polycarbonate, shingles) with slope for drainage. 8) Install gutters/drainage as needed. 9) Inspect fasteners and flashing; apply sealant where appropriate.