You can absolutely build a patio canopy yourself. The most common DIY version is a lean-to attached to the house, built with a pressure-treated or aluminum frame, covered with polycarbonate panels or metal roofing, and properly flashed where it meets the wall. A project like that runs roughly a weekend of framing plus another day for roofing and finishing. Free-standing versions take a bit more planning but follow the same logic. What separates a canopy that lasts from one that leaks or blows off is the planning phase, not the build itself.
How to Make a Patio Canopy DIY Step-by-Step Guide

Celia Vaughn
28 Jun 2026
Choosing the right canopy style and materials

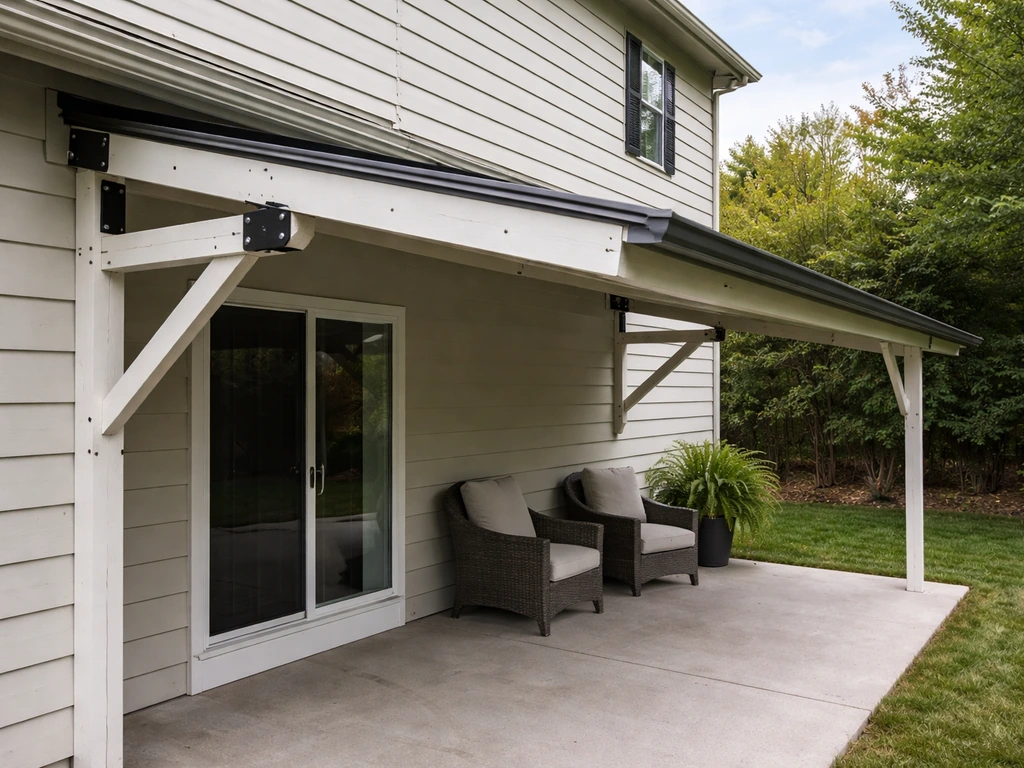
There are three practical styles to choose from: an attached lean-to (one side ties into the house, the other rests on posts), a free-standing pergola-style structure (posts on all four corners), or a gable-style roof (two slopes, more like a small house roof). For most homeowners doing this for the first time, the attached lean-to is the right call. It uses the house wall for support on one side, which means fewer posts and simpler framing.
On materials, you have three realistic choices: pressure-treated wood, aluminum, and steel. Wood is the most forgiving to cut and fasten, costs the least upfront, and looks great painted or stained. The downside is maintenance: it needs sealing every few years and will rot if water sits on joints. Aluminum (usually sold as pre-cut kit systems or hollow extrusions) is lightweight, corrosion-proof, and nearly maintenance-free, but it costs more and requires specific hardware. Steel is strong and affordable but rusts fast in humid or coastal climates unless you use galvanized or powder-coated members. For most backyard canopies, pressure-treated lumber for the frame and polycarbonate or corrugated metal for the roof is the sweet spot between cost and durability.
| Material | Upfront Cost | Maintenance | Best For | Watch Out For |
|---|---|---|---|---|
| Pressure-Treated Wood | Low | Every 2-3 years (seal/paint) | First-time builders, budget builds | Rot at joints if water pools |
| Aluminum | Medium-High | Minimal (wipe down) | Long-term, low-maintenance installs | Requires specific connectors, harder to cut |
| Steel (Galvanized) | Low-Medium | Low if coated | Larger spans, heavy-duty builds | Rusts if coating is damaged; avoid coastal areas |
| Vinyl/PVC | Medium | Very low | Decorative pergola covers | Not structural; not for heavy loads |
For roofing panels, twin-wall polycarbonate (6mm or 10mm thick) is the most popular DIY choice. It lets light through, handles moderate snow and rain, and cuts with a circular saw. Corrugated metal roofing (galvanized or painted steel) is cheaper and more durable but heavier and noisier in rain. Shade cloth or mesh fabric works well in dry, hot climates where you want airflow over weather protection. If you want a fully weatherproof ceiling look, check out what options exist for outdoor patio ceilings before you commit to a roofing material.
Planning: size, slope, drainage, and local requirements
Start with a tape measure, not a shopping cart. Measure your patio slab or deck footprint, then decide how much of it you want covered. Typical attached canopies run 10 to 16 feet deep from the house and 12 to 20 feet wide. Write those numbers down because they drive every material quantity calculation.
Slope matters more than most beginners expect. You need at least a 1-in-12 pitch (1 inch of drop for every 12 inches of horizontal run) for water to drain off polycarbonate or metal roofing. Many builders use 2-in-12 to be safe. On a 12-foot-deep lean-to, a 2-in-12 pitch means the outer edge of the roof sits 24 inches lower than where it attaches to the house. Factor that into your height planning so you don't end up with a 6-foot clearance on the outside.
Check with your local building department before you buy anything. Some jurisdictions, like Garland, TX, require a permit for any attached or free-standing patio cover regardless of size. Others, like San Diego, offer a permit exemption for structures under 300 square feet, but that exemption doesn't apply everywhere and doesn't eliminate all requirements. If your HOA has CC&Rs, those add another layer of approval. Pull the permit if it's required. Getting caught building without one means tearing it down or paying fines, neither of which is worth saving a permit fee.
If you're in a region with freezing winters, your post footings need to go below the local frost line. That depth varies from 12 inches in mild climates to 48 inches or more in northern states. Pouring footings above the frost line leads to heaving, which cracks your structure. Your local building department will tell you the required depth.
Tools and materials checklist

Here's what you'll realistically need for a standard attached lean-to canopy build. Scale quantities to your specific dimensions.
- Tape measure (25 ft), speed square, chalk line, and level (4 ft minimum)
- Post-hole digger or rented power auger (for footings)
- Circular saw and reciprocating saw
- Drill/driver with bits, and a hammer drill if attaching to masonry
- Socket set and adjustable wrench for lag screws and bolts
- Safety glasses, work gloves, and fall protection if working above 6 feet
- Pressure-treated 4x4 or 6x6 posts (quantity depends on span)
- Pressure-treated 2x8 or 2x10 ledger board (full width of canopy)
- Pressure-treated 2x6 or 2x8 rafters (spaced 16 or 24 inches on center)
- Structural-grade beam lumber or LVL for the outer beam
- Post bases (Simpson Strong-Tie or equivalent) and concrete for footings
- 3/8-inch x 5-inch lag screws with washers (for ledger, spaced 16 inches max on center)
- Joist hangers, hurricane ties, and appropriate structural connectors
- Roofing panels (polycarbonate or corrugated metal) plus closure strips and panel screws
- Ledger flashing (step flashing, kick-out flashing, and sealant)
- Exterior wood sealer or paint, or aluminum touch-up paint if using aluminum
Attaching to the house and waterproofing it right
This is the part that most DIY canopies get wrong, and it's the most important. If your goal is a canopy that stays tight against wind and water, also review how to secure a patio canopy for uplift and fitment tips. When you attach a ledger board to your house, you're penetrating the house's weather barrier. Do it without proper flashing and you'll have water running behind your siding within a year, rotting the sheathing and framing inside the wall.
First, locate the wall studs behind the siding. Your ledger needs to fasten into studs, not just sheathing. Use a stud finder and confirm with a small test hole before cutting anything. The fastener standard for an attached patio cover ledger is 3/8-inch x 5-inch lag screws with washers, driven into each stud at no more than 16 inches on center. Predrill to avoid splitting and torque the screws snug, not stripped.
Before the ledger goes on, install a metal Z-flashing or a continuous piece of ledger flashing behind the siding, so it tucks up under the siding above the ledger and laps over the top face of the ledger. Then, at the lower end of the roof where it meets the wall, install step flashing at each rafter bay and a kick-out flashing at the bottom corner.
Kick-out flashing is a small bent piece of metal that redirects water away from the wall and into a gutter. Skipping it is the single most common cause of wall rot on attached patio covers. If your roofing is a tarp or fabric rather than rigid panels, look at guidance specific to tarp installations, since the flashing details differ.
If you are aiming to build a patio cover with a tarp, use the same waterproofing and anchoring mindset, but plan for tarp-specific attachment and wind management.
Seal all penetrations including lag screw holes with a high-quality polyurethane or silicone caulk rated for exterior use. Don't rely on caulk alone for water management; flashing does the structural water work, and caulk fills the gaps.
Building the frame: posts, beams, and rafters
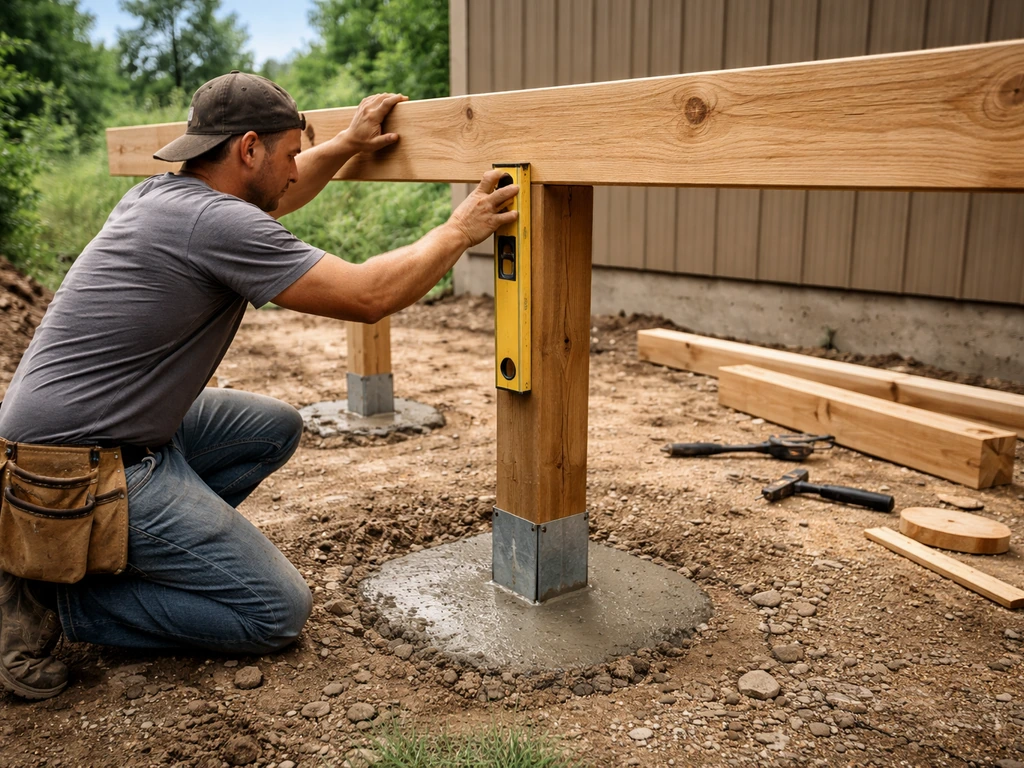
Start with the footings. Dig your holes to the required depth (below frost line), pour concrete, and set your post bases while the concrete is wet. Let the concrete cure at least 48 hours before loading the posts. Don't rush this. Setting posts directly in concrete without a post base traps moisture at the bottom of the post and causes rot within a few years, even with pressure-treated lumber.
Set your posts in the bases, plumb them with a level on two adjacent faces, and brace them temporarily with 2x4 stakes driven into the ground. The post height determines your finished roof height at the outer edge, so calculate this carefully: outer post height equals the height of the ledger attachment point minus the total drop from your chosen pitch. For a 2-in-12 pitch on a 12-foot-deep canopy, that's a 24-inch drop.
The outer beam sits on top of the posts and spans the full width of the canopy. Beam sizing depends on span and load. For spans up to 10 feet, a doubled 2x10 is typically sufficient for a lightweight canopy. For spans of 12 to 16 feet, move up to a doubled 2x12 or an engineered LVL beam.
Secure the beam to the posts with structural post caps, not just toenails. Rafters run from the ledger to the outer beam, spaced 16 or 24 inches on center depending on your roofing panel requirements. Most polycarbonate panel systems specify 24-inch rafter spacing. Use hurricane ties or rafter ties at both ends to resist wind uplift, which is a real and code-required consideration: the IRC requires patio cover roof structures to be analyzed for both upward and downward pressure.
A Spectrum/Concordia University repository item titled “Wind-induced Pressures on Patio Covers” documents wind-pressure research for patio covers attached to low-rise buildings, supporting the need to account for wind uplift and pressure when designing these structures resist wind uplift.
Installing roofing panels and finishing the weatherproofing
Polycarbonate panels go on with pre-drilled holes and self-sealing panel screws. If you also plan to use a tarp for extra shade, hang it with proper tension and secure tie-downs so it can't flap in wind. Always drill oversized holes (about 1/8 inch larger than the screw shank) because polycarbonate expands and contracts significantly with temperature. If you drill tight holes, the panels will buckle or crack within a season. Seal the top open edges of the channels with aluminum tape or manufacturer-supplied closure strips to block insects and debris, and leave the bottom edges open with a small gap or vented closure so condensation can drain out.
For corrugated metal roofing, use closure strips (foam or rubber profiled to match the corrugation pattern) at both the high side (against the ledger or house wall) and the low end (at the outer beam). Drive metal roofing screws through the high points of the corrugations, not the valleys. Screws in the valleys collect water and leak. Overlap panels by at least one corrugation width side to side, and lap the upper panel over the lower panel by a minimum of 6 inches at end laps.
Once the roof is on, trim out the exposed rafter ends and beam faces with fascia boards if you want a finished look. Paint or seal all exposed wood surfaces, paying extra attention to end grain, which absorbs water fastest. If you used aluminum, wipe everything down and touch up any scratched powder coating with matching paint to prevent corrosion from spreading.
Step-by-step build sequence
- Check permit requirements and get approval before starting.
- Mark the canopy footprint on the ground using batter boards and string lines. Verify square by measuring diagonals.
- Dig footing holes to required depth and pour concrete. Set post bases and let cure for 48 hours.
- Locate wall studs and snap a chalk line for the ledger position on the house wall.
- Install ledger flashing behind the siding above the ledger line.
- Cut and attach the ledger board with 3/8 x 5-inch lag screws into each stud at 16 inches max on center.
- Install kick-out flashing and step flashing at the ledger-to-wall joint.
- Set and plumb posts in post bases. Temporarily brace.
- Install the outer beam on top of posts using structural post caps.
- Cut rafters to length at the correct angle for your pitch. Install with joist hangers at the ledger end and rafter ties at the beam end.
- Install blocking or bracing as needed for lateral stability.
- Install roofing panels from the low end (outer beam) up toward the house, with appropriate closure strips and sealing.
- Install fascia and any trim boards.
- Caulk all penetrations and gaps in flashing.
- Paint or seal all exposed wood. Final inspection if permit was pulled.
Maintenance after the build
A well-built canopy needs minimal upkeep if you did the waterproofing right. Every spring, walk the structure and check the flashing at the house wall for any separation or lifted edges. Clear debris from gutters and the valley between the canopy roof and the house wall because that's where leaves pile up and hold moisture. Re-caulk any cracked joints every two to three years.
For wood frames, check for soft spots near post bases and at the ledger connection, which are the first places rot shows up. Sand and re-seal any areas where the finish has worn through. Polycarbonate panels may yellow over 10 to 15 years depending on UV exposure; that's cosmetic, not structural, but you can replace individual panels when it bothers you.
When to hire a pro instead of DIYing
There are situations where hiring a structural engineer or licensed contractor is the right call, not a failure of DIY spirit. Know where those lines are before you start.
- Your jurisdiction requires stamped engineering drawings and you don't have the background to produce them. Some permit offices in high-wind or high-snow zones require a licensed engineer to sign off on the design.
- You're in a region with heavy snow loads (above 20 psf ground snow load). The IRC minimum live load of 10 psf for patio covers may not be enough, and undersizing the structure is a collapse risk.
- The attachment point on the house involves complex rooflines, masonry walls, or the existing framing is in poor condition. Fastening a ledger to rotted or undersized framing is dangerous.
- You need to run electrical or plumbing to or through the canopy. That work requires licensed trade contractors in most jurisdictions.
- Your canopy will be over 300 square feet or involves a second story. The structural loads and attachment complexity increase significantly.
- You're in a high-wind zone (coastal hurricane zones, tornado-prone areas) where uplift calculations are complex and failure consequences are serious.
- Your HOA requires an architect's or contractor's sign-off as part of the approval process.
If any of those apply to your project, get a consultation before you build, not after. A structural engineer consultation for a simple patio cover often costs $200 to $500 and can save you from a dangerous or unpermitted structure. The goal is a canopy that stays up, stays dry, and doesn't create liability. Most standard DIY builds don't need professional engineering, but the ones that do really do.
FAQ
What roof height and clearance should I plan for when I’m figuring out how to make a patio canopy?
Choose clearance based on how you will actually use the space. Measure the tallest door or grill you need to fit under, then add a safety buffer (commonly 2 to 4 inches). Also remember that sag and snow load can reduce effective clearance over time, especially on wider spans.
Can I make my canopy wider or deeper than typical DIY dimensions and still use the same rafter spacing?
If you want to cover more of the patio depth, increase rafter length and consider increasing rafter size or spacing only if your span and load still match the panel system. A simple rule is to avoid “stretching” a design beyond its specified rafter spacing for your chosen polycarbonate panel kit.
How do I handle flashing if my house siding type or siding thickness is different than expected?
Yes, but treat the soffit and wall transition as critical water paths. If the canopy attaches above a siding layer, you may need extended flashing and possibly replace or integrate house wrap details. If you are unsure what is behind the siding, confirm by test probing or removing a small section rather than guessing.
What’s the correct way to set posts so pressure-treated lumber does not rot near the footings?
Use a dedicated post base designed for treated lumber, and keep the bottom of the post from sitting directly in concrete. Confirm there is drainage path around the base, and do not skip the bracing during cure. After curing, recheck plumb, because slight movement early on can make the roof line uneven.
How can I prevent polycarbonate from cracking when I’m learning how to make a patio canopy?
For polycarbonate, you generally need to account for temperature movement by using the manufacturer’s recommended screw type and hole size, then avoid over-tightening. A practical check is to verify panels can slide slightly in the oversized holes after mounting.
What should I do differently if my patio canopy is near trees or gets heavy leaf fall?
If you have trees, you need to manage leaves and debris buildup near the wall transition, that is where moisture holds. Make sure gutters are sized if you add one, and consider adding a drip edge and regularly clearing the seam line where the roof meets the house.
How do I make sure wind uplift protection is strong enough when building an attached patio canopy?
When using a lean-to, tie-down and uplift resistance matter most in wind-prone areas. Confirm you are using the correct hurricane ties for your rafter size and ledger condition, and ensure the ledger fastening is into studs as required. If you live where hurricanes are possible, do not assume “standard” fastening is enough.
Is caulk enough to make the wall connection watertight for how to make a patio canopy?
Not always. Caulk is a gap filler, not a flashing system. A common mistake is caulking a ledger edge where water should be directed by flashing layers. If you see caulk-only transitions, rework them so water sheds outward and into the roof system.
Can I use a tarp roof instead of rigid panels, and what are the key differences?
Yes, but the decision changes your fastening and detailing. Tarp roofs typically need tighter tensioning, different anchoring points, and a wind plan to prevent flutter. You also need to handle water pooling, because tarps can sag if the run or tensioning is wrong.
Should I add gutters, and where does the runoff need to go on a DIY patio canopy?
You can, but plan the gutters to match your roof slope and end drains. Without a plan, water can spill off the low end onto steps or landscaping. Measure where runoff will go, then add downspouts or a splash block area if runoff could undermine soil or concrete.
If my city has a permit exemption for small patio covers, do I still need to worry about other approvals?
A permit decision often depends on both area and whether it’s attached. Even if your city offers exemptions under a certain square footage, HOA rules can still require approval, and structural load requirements may still apply in flood and wind zones. Always check zoning and HOA CC&Rs before you order materials.
How does the safety and permitting risk change if I build a free-standing patio canopy instead of a lean-to?
For some locations, a free-standing canopy may need different engineering than an attached one because it relies entirely on its own stability. If you have uneven soil or you plan a larger free-standing span, consult local requirements and consider soil conditions and lateral bracing before building.