You can build a solid, rain-shedding tarp cover for your patio in an afternoon using basic hardware, a few posts or an existing wall, and a heavy-duty tarp. If you are wondering how to hang a tarp over a patio that stays tight and drains properly, follow the steps below for slope, clearance, and anchoring hang a tarp cover.
How to Make a Patio Cover With a Tarp Step by Step

Celia Vaughn
23 May 2026
The key moves are: choosing the right tarp thickness (12 mil poly minimum, 18–20 mil vinyl for real weather), building a simple lean-to frame or using existing anchor points, pitching the tarp at least 20% slope so water runs off the edge instead of pooling in the middle, and securing every grommet every 18–24 inches so the whole thing doesn't turn into a sail in the wind.
For grommeted tarp covers, a grommet applications guide recommends typical spacing of 12, 24 in (about 30, 60 cm), depending on grommet size, wind exposure, and load typical spacing 12–24 in (about 30–60 cm) depending on grommet size, wind exposure, and load. Here's how to do it right.
First, decide exactly what you're covering
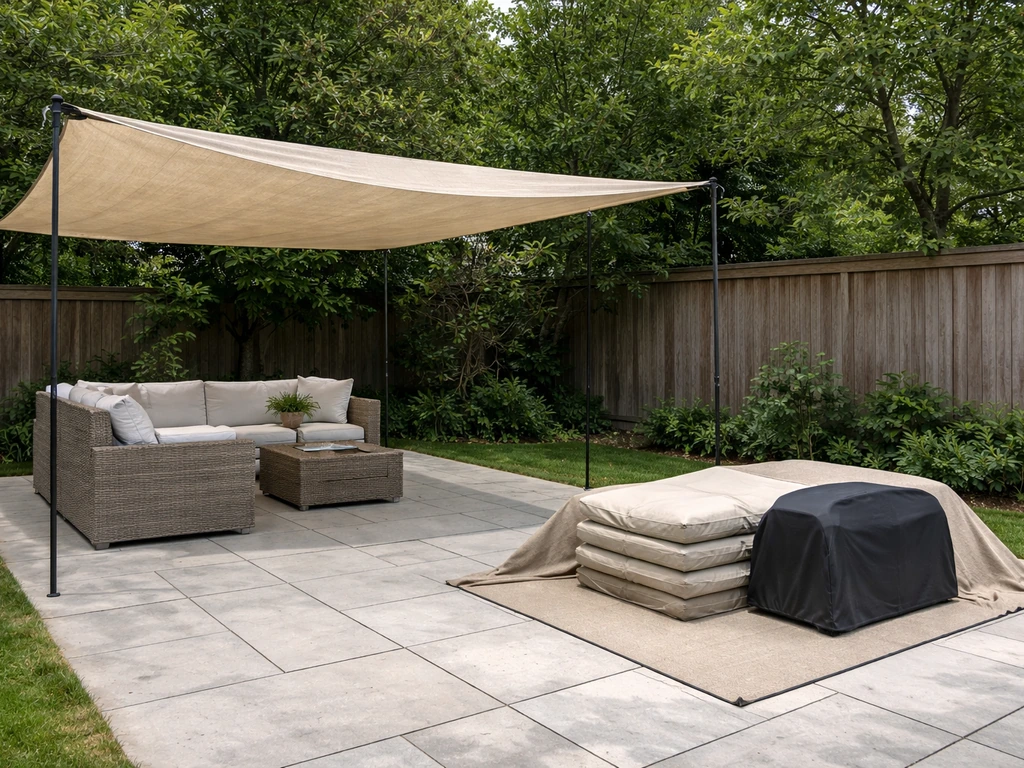
There are two different jobs here, and mixing them up leads to a bad setup. The first job is covering the patio space itself, meaning you want a roof-like structure overhead that you can sit under in the rain. The second job is covering patio furniture, meaning you just need a fitted or draped tarp over chairs, tables, and cushions when you're not using them. Both are valid, but they need different approaches.
If you want to cover the patio area so you can actually use it in the rain, you need a real overhead structure: posts, a ridge line or rafter, and a tarp stretched taut with proper slope. That's the main focus of this guide. If you just need to protect furniture, you can use a lighter tarp draped directly over the items, secured at the base with ties or bungee cords through the grommets. Furniture covers are simpler, but the anchoring rules still apply because wind will lift an unsecured tarp and shred it against the corner of your table within a few storms.
If your goal is a more polished overhead structure, the approach here overlaps with building a proper patio canopy. But a tarp-based lean-to is a perfectly legitimate starting point, especially if you want to test the coverage layout before committing to a permanent build with aluminum or wood rafters. If you want a more permanent structure than a tarp, learn the general steps for how to make a patio canopy with proper framing, slope, and drainage.
Pick the right tarp: thickness, material, and size
Tarp thickness matters more than most people think

Tarp thickness is measured in mils (thousandths of an inch), and the number tells you how much punishment the material can take. A standard blue poly tarp from a hardware store is typically 5–6 mil. That's fine for throwing over a woodpile, but it won't survive a season as a permanent overhead patio cover. For a patio cover you actually sit under in wind and rain, you want at minimum a 10–12 mil UV-treated poly tarp, and ideally a 14–20 mil vinyl tarp if you're expecting real weather.
| Tarp Type | Thickness | Best For | Lifespan Estimate |
|---|---|---|---|
| Standard poly (blue) | 5–6 mil | Temporary, dry-climate furniture cover | 1 season |
| Heavy-duty poly | 10–12 mil, UV-treated | Seasonal patio overhead cover | 2–3 seasons |
| Heavy-duty vinyl | 14–20 mil, 100% waterproof | Year-round patio cover, rain/wind exposure | 4–6+ seasons |
| Vinyl-coated polyester | 18–20 mil, 18 oz/sq yd | Permanent-style overhead cover with heavy anchoring | 5–8+ seasons |
For a rain-shedding patio cover you plan to leave up through the season, I'd go straight to 14 mil vinyl minimum. The 18–20 mil vinyl-coated polyester tarps with solid brass grommets spaced every 18–24 inches are what serious DIYers use. They cost more upfront (expect $80–$200 for a 12x20 ft tarp depending on grade), but you won't be replacing them every year.
Sizing: always go bigger than the patio
Measure your patio and add at least 2 feet on each side you want coverage on. Tarps shrink slightly when tensioned, and you need overhang at the drip edge so rain doesn't run down your posts and back onto the patio. If your patio is 10x16 ft, buy a 12x20 ft tarp. Also check grommet spacing on the spec sheet before you buy. Grommets every 18 inches give you more tie points and better load distribution than grommets every 3 feet. On a quality tarp, end grommets should sit about 1 inch from the edge of the material.
Hardware you'll need
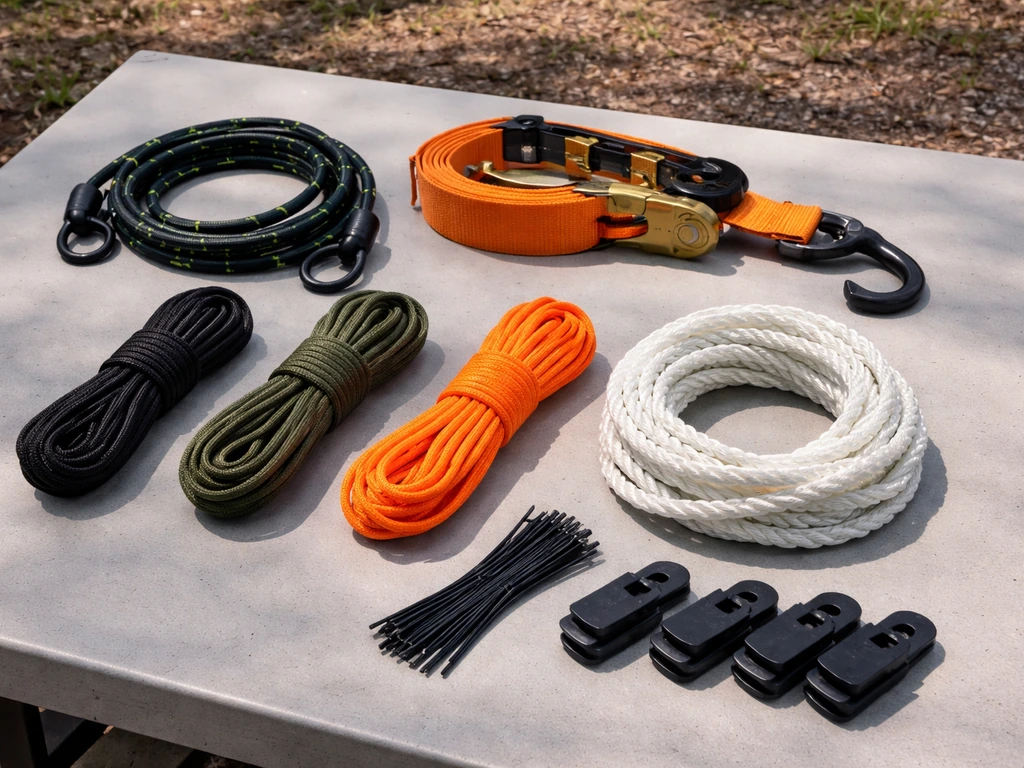
- Bungee cords or heavy-duty ratchet straps (for initial positioning)
- Paracord or 3/8-inch poly rope (for tie-downs through grommets)
- Zip ties or tarp clips (for mid-panel tightening between grommets)
- Eye bolts or screw hooks rated for outdoor use (for attaching to posts or fascia)
- Carabiners or S-hooks (for adjustable corner attachments)
- Ground stakes or concrete anchors if running guide lines to the ground
Plan the slope, clearance, and coverage layout before you build anything
This step is where most DIY tarp covers fail. People hang the tarp roughly level, rain hits it, and within an hour there's 30 pounds of water sitting in a sagging belly in the middle of the tarp. That weight pulls every anchor point toward the center, and eventually something tears or a grommet rips out. The fix is slope, and you need more of it than feels intuitive.
The minimum effective slope for rain runoff is 20%, which works out to a 1:5 ratio. In plain terms: for every 5 feet of horizontal run, the tarp should drop 1 foot in height from high side to low side. So a tarp spanning 10 feet horizontally needs at least 2 feet of height difference between the high attachment point and the low (drip) edge. A 1-foot drop per 10 feet of span is an absolute minimum and really only works in light rain. In a real downpour, aim for 20–30 degrees of pitch or the 1:5 rule.
Also think about clearance. The high side of a lean-to cover attached to your house should be at least 7.5–8 feet above the patio surface so you're not ducking every time you walk under it. The low (outer) edge can drop to 6.5–7 feet and still be comfortable. Mark those heights on your posts or wall before you start drilling anything.
Sketch out the coverage area on paper and note where the water will flow. The low edge of the tarp is your drip line, and you want it draining away from the house, not toward the foundation. If your patio is against the house wall, the natural lean-to pitch (high point at the wall, low point at the outer posts) handles this automatically.
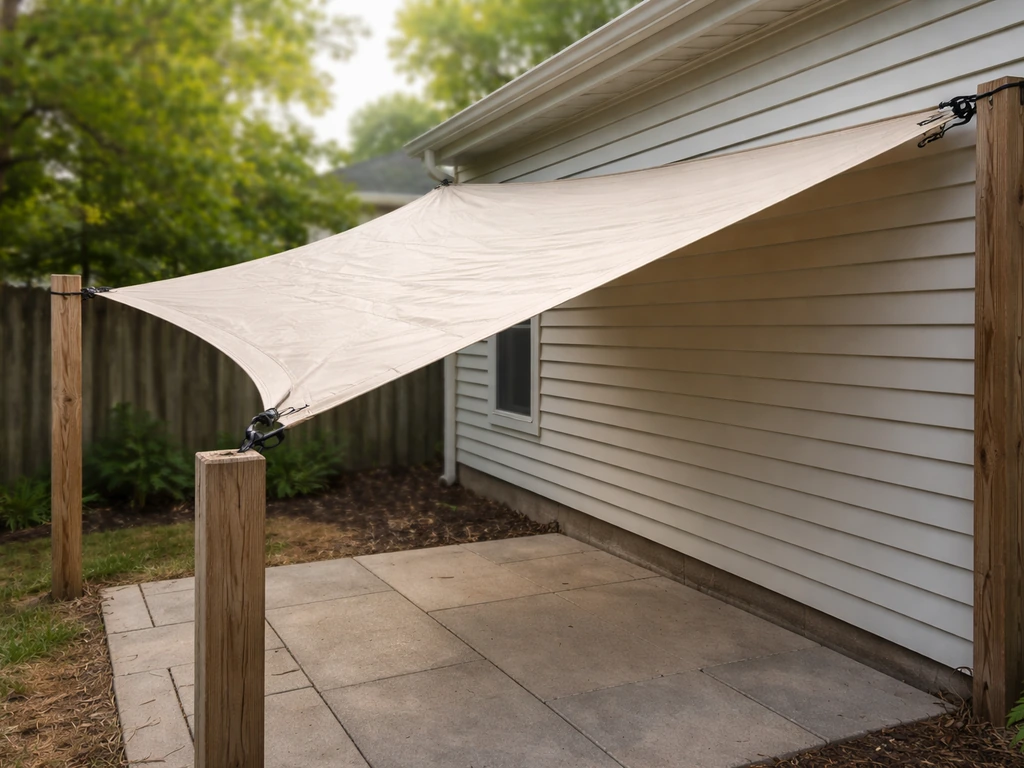
Build a simple tarp support structure

For most covered patios, a lean-to setup is the fastest and most practical approach. You're attaching the high side of the tarp to the house (or a beam already on the house) and supporting the low side on posts you set yourself. This is the same basic logic as a lean-to patio cover built from wood or aluminum, just with a tarp as the roofing material instead of polycarbonate panels or metal roofing.
Option 1: Attach to the house wall or fascia
If your patio is adjacent to the house, screw a 2x4 or 2x6 ledger board horizontally to the wall at the high-point height you planned. This ledger acts as the anchor rail for the tarp's high edge. Use lag screws into studs, not just drywall anchors. Space eye bolts or screw hooks along the ledger every 18–24 inches to match your tarp's grommet spacing. This is the same attachment logic used when hanging outdoor curtains or permanent patio cover rafters from the house.
Option 2: Freestanding posts
If the patio isn't against the house, or if you want a fully freestanding structure, you'll set posts at each corner. 4x4 pressure-treated lumber works fine for a tarp cover. Set them in concrete footings at least 18–24 inches deep, or use surface-mount post bases if you're on a concrete slab. For a 10x16 ft tarp cover, four posts at the corners is the minimum. For a larger span, add intermediate posts every 8–10 feet along each side. Connect the tops of the posts on each side with a horizontal 2x4 or 2x6 rail, then run the tarp over the rails and tie it down through the grommets.
Option 3: Use existing structures
Fence posts, pergola beams, or existing deck framing can all serve as anchor points. Just make sure whatever you're attaching to is structurally solid. A tarp in a 20-mph wind generates real lateral force on every anchor point, and a rotten fence post or loose deck ledger will fail under that load. Push on the post before you trust it.
For the ridge line, you can run a taught rope or cable from the high attachment point to a point 12–18 inches higher on a center post to create a peak. This peak-and-slope geometry helps water shed to both sides instead of pooling in the middle. The Instructables rain tarp method does this by running a tight support rope under the tarp between opposite corners, which controls the shape and forces drainage outward. It's a clever trick that works well on rectangular tarps.
Secure and anchor the tarp so it won't move in wind
Getting the tarp up is the easy part. Keeping it there through a windstorm is where the work is. A tarp that's only tied at the four corners will flap, stretch, and eventually tear at the grommets. You need to tie every grommet, not just the corners.
- Start at the high side: Tie the top-edge grommets to your ledger hooks or rail, working from the center outward. Use a trucker's hitch or taut-line hitch knot so you can adjust tension as you go.
- Move to the corners: Attach corner grommets to your post tops or eye bolts with carabiners or fixed loops. These are your primary anchor points and take the most load.
- Tie the low edge: Attach every grommet along the drip edge to the lower rail or posts. Pull this edge taut and slightly downward to reinforce the slope you planned.
- Tie the side edges: Attach each grommet along the two side edges. For a lean-to, run these down to stakes in the ground or to mid-post anchors to close in the sides and reduce wind flutter.
- Add mid-panel tarp clips between grommets: On spans wider than 8 feet, clip additional tarp clips midway between grommets and run short cords to the support structure. This keeps the tarp from ballooning upward in wind.
- For high-wind areas, add ground stakes: Run guy lines from the outer corner grommets down to ground stakes at a 45-degree angle. This dramatically reduces the force transferred to your post tops in a gust.
Common mistake: people tie the corners tight and leave the middle loose, then wonder why the tarp is flapping like a flag three days later. Every tie point you skip becomes a weak point. On a quality heavy-duty tarp with grommets every 18 inches, you might have 20 or more grommets to secure on a 12x20 ft tarp. Tie all of them.
If you're using a tarp to cover furniture rather than the whole patio, the anchoring principle is the same but simpler. Drape the tarp over the furniture, then run cords through the grommets and tie them to the furniture legs or use ground stakes pushed through the loops at the base of the tarp. A tarp that isn't anchored at the bottom will act like a kite the first time a storm rolls through, and it'll take your chair cushions with it.
Tensioning, drainage, and stopping the sag
Once everything is tied down, you need to tension the tarp properly. A loose tarp sags, and a sagging tarp pools water. Pooled water is heavy (about 8 pounds per gallon), and that weight pulls every anchor point inward, creating more sag. Eventually the tarp tears, a grommet rips out, or the whole structure collapses. This cascading failure mode is totally preventable if you tension correctly from the start.
How to tension a tarp cover correctly
Work from the center outward. Tighten the center ties first so the tarp sits smoothly on the support structure, then pull the edges progressively tighter. You're looking for a surface that's taut but not so tight it's pulling grommets toward the center. The surface should feel firm if you push on it, with no visible belly or dip in the middle.
If you see a low spot forming in the center, you have two options. First, add a center ridge line: a rope running under the tarp from the high attachment point to an intermediate support that pushes the center of the tarp upward. Second, recheck your slope. If the tarp is close to level, even a small amount of stretch will create a pond. Raise one side 6–12 inches and retension.
Signs that your tarp needs re-tensioning: visible center sag, water pooling after rain, increased flapping or flutter in wind, or new wrinkles that weren't there after the initial install. After the first heavy rain, plan on going out and checking tension again. Tarps stretch slightly when they're first loaded with water weight, and you'll almost always need to re-tighten.
Managing drainage at the drip edge

Make sure the drip edge (your low side) has nothing blocking the flow. Water should sheet off the low edge cleanly and fall away from the patio and house foundation. If the low edge is against a wall or fence, consider adding a gutter clip and running a short section of gutter to direct the runoff to a drain or planting area. A drip cord tied along the bottom edge helps water release cleanly instead of running back under the tarp edge onto the patio below.
How long will it last, and when should you upgrade?
A 14–20 mil vinyl tarp set up correctly will realistically last 4–6 seasons before UV degradation and repeated stress at the grommet points take a serious toll. Even UV-treated tarps fade and become brittle over time, especially in climates with intense sun. Inspect the tarp at the start of each season: look for cracks or chalking in the material, fraying at grommets, and any spots where the waterproof coating has cracked or peeled. If you can see light through the material or feel stiff, brittle spots, it's time to replace it.
The other honest reality is that a tarp cover, even a great one, has limits that a real patio cover doesn't. It can't handle sustained heavy snow load. It's more vulnerable to wind damage than a framed structure with polycarbonate, metal roofing, or aluminum panels. And after a few years of replacing tarps, the cumulative cost often approaches what a simple wood or aluminum lean-to patio cover would have cost upfront, with better performance and no annual maintenance.
A tarp cover is a smart move if you need coverage this season while you plan a permanent structure, if you're renting and can't build permanently, or if you're testing a layout before committing to the real build. But if you're dealing with real weather, have a budget to work with, and plan to stay in the home for a few more years, it's worth reading up on framed patio cover options using wood or aluminum.
If you decide to move from a tarp solution to a true permanent roof, these same anchoring and pitch principles are the foundation of how to secure a patio canopy. If you’re deciding what to use for an outdoor patio ceiling, comparing framed patio cover options like wood or aluminum can help you pick something that looks better and lasts longer than a tarp framed patio cover options using wood or aluminum.
A properly built lean-to patio cover attached to the house with a permit and correct flashing will outlast a dozen tarps.
If you're not sure whether your anchor points, post footings, or ledger attachment is structurally sound, that's a case where getting a second opinion from a contractor or building inspector is genuinely worth it. Not because the tarp cover itself is dangerous, but because the attachment to your house can cause real damage (water infiltration, structural stress) if done incorrectly. A 30-minute consult is cheap compared to a rotted ledger board.
Seasonal maintenance checklist
- Start of season: inspect all grommets for cracking or tearing, check every tie point for fraying rope or corroded hardware, re-tension if you see any sag
- After the first major storm: check for pooling spots, re-tighten any loosened ties, inspect posts and anchors for movement
- Mid-season: brush off any debris accumulation, check that the slope hasn't shifted due to post settling
- End of season: if you're in a snow climate, take the tarp down before first snowfall — no tarp is designed for snow load, and a heavy wet snow will collapse even a well-built tarp structure
- Storage: clean the tarp with mild soap and water, dry completely before folding, store away from UV exposure to extend its life
FAQ
Can I use a tarp patio cover in winter, including snow and freeze-thaw?
Yes, but only if the tarp is roof-grade and the slope is aggressive. A tarp cover with a sagging “belly” will trap meltwater, and repeating freeze-thaw can crack coatings faster at the grommet line. If you must use it in snowy regions, plan for lighter snow loads and schedule removal or at least allow easy access to pull it down after storms, because tarps are not designed for sustained snow weight.
What’s the safest way to attach the tarp cover to my house wall (ledger, hooks, eye bolts)?
Avoid drywall anchors entirely for the ledger or any high-side attachment to the house. Use lag screws into studs (or an engineered ledger attachment into approved framing), and confirm the attachment point is on solid backing, not just sheathing or trim. If you cannot locate studs reliably, add proper structural blocking before mounting any hardware.
If I increase the pitch, do I need to re-measure or re-position grommets and anchors?
Don’t assume “more slope” means “shorter tarp.” A steeper pitch can pull the tarp edges tighter and change how the grommets line up with your hooks, especially if you sized for a nearly level run. Before drilling or installing hook locations, stretch the tarp on the frame layout and re-check that each grommet lands on a planned tie point with no tension twisting the tarp.
What should I troubleshoot if water still pools in the middle even after I pitched the tarp?
If you see water pooling after a rain, first confirm the bottom edge is actually the lowest line across its entire length, not just at one end. Then recheck that intermediate rails are level and not creating a low spot, because rails and top beams can sag independently of the slope. If the tarp still forms a center dip, add a ridge line or center support and retension from the center outward.
How do I prevent a freestanding tarp cover from twisting or sagging in wind?
For freestanding covers, footing depth and post spacing matter more than with a wall-lean-to. Use concrete footings (or approved surface-mount bases on slab) and add intermediate posts for larger spans so the rails do not bow. Also tie the top frame tightly and make sure the posts are braced well enough that wind loads do not rack the structure.
What type of rope, cord, or ties should I use to secure each grommet?
Use a tarp cord or tie material rated for outdoor exposure, UV, and moisture, and avoid plain string. In wind, rope and knots can loosen, so tying every grommet to a solid anchor point is critical, not just corner tension. If you use bungee cords, keep them as a secondary measure, because elastic can degrade and increase flapping over time.
How do I manage runoff so the tarp doesn’t send water into the foundation or onto walkways?
Plan for runoff direction before you install anything. If your low edge drains toward the foundation, you may need a gutter clip or a short gutter section at the drip line to direct water to a safe discharge area (drain, slope away from the house, or a designed collection point). Even a correctly sloped tarp can cause damage if the water outlet is unmanaged.
Will a tarp cover tear faster if it touches rough wood rails or pergola beams?
It can, but only if you prevent abrasion. Where the tarp touches wood, straps can rub under wind vibration, wearing holes at the same spot repeatedly. Add a buffer like a smooth sleeve or edge protection on rails, and tension the tarp so it is taut enough to reduce flapping, which is the main driver of wear.
How often should I check tension and re-tie the tarp?
You generally don’t need to remove a tarp cover after every storm, but you should inspect shortly after severe wind or heavy rain. Look specifically at grommet tears, stretched ties, new wrinkles indicating loss of tension, and any pooling that returns after retreating. After the first heavy rain season, retension is commonly required because the tarp settles when fully loaded.
How should I maintain or store the tarp when I take it down, and when should I replace it?
Yes, sun and heat can loosen and deform some materials, even if the tarp seems fine. Store the tarp dry if you can, avoid leaving it folded under tension, and periodically check that grommets are not pulling out of the coating. If you routinely park under it or use it in intense UV areas, shorten replacement expectations and do seasonal inspections earlier.