You can hang a tarp over a patio in a single afternoon using basic hardware and a few anchor points, as long as you build in a proper slope so water sheds off instead of pooling, and tension it tightly enough that wind can't get underneath and flap it apart. You can hang a tarp over a patio in a single afternoon using basic hardware and a few anchor points, as long as you build in a proper slope so water sheds off instead of pooling, and tension it tightly enough that wind can't get underneath and flap it apart. The two most common setups are a lean-to style (one side attached high to the house wall, the other end supported by posts or poles) and a free-standing frame when you have nothing solid to attach to. Get those two fundamentals right, and a tarp cover can give you real weather protection for a season or longer.
How to Hang a Tarp Over a Patio: Secure, Sloped Setup

Shade vs. waterproof: choosing the right tarp before you buy
This is the decision most people skip, and it costs them later. There are two jobs a tarp can do over a patio: block sun and light drizzle, or actually keep you and your stuff dry in hard rain. Those two goals require different materials.
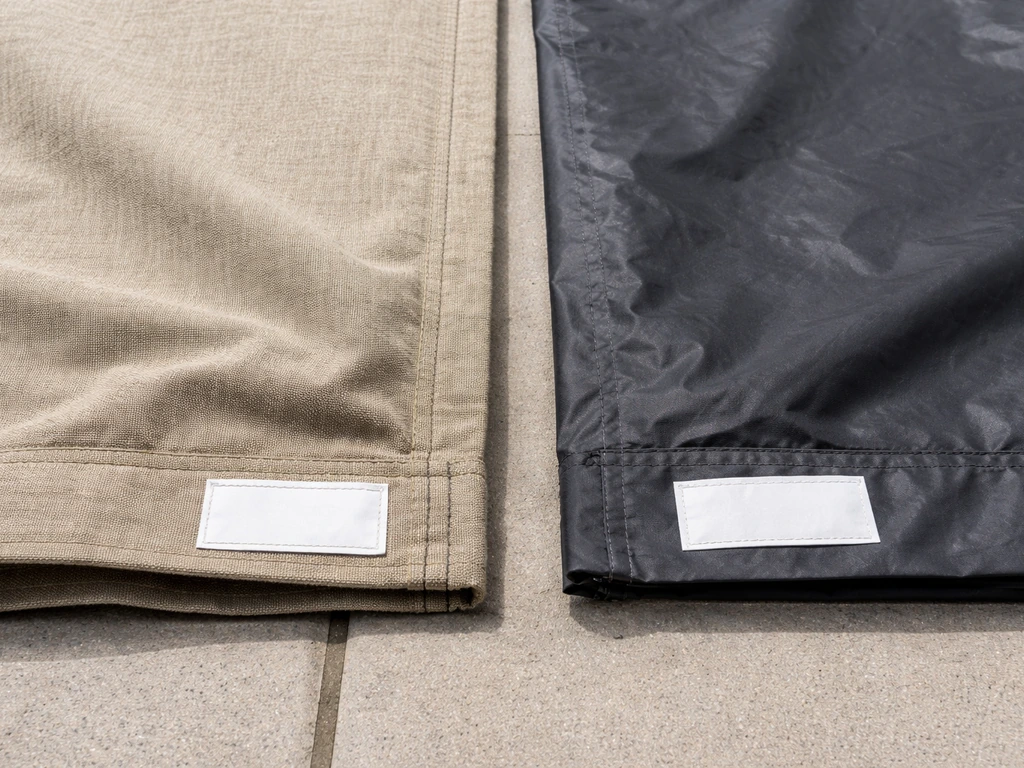
Canvas tarps look great and breathe well, but they're water-resistant at best. Treated canvas uses a hydrophobic or paraffin-type coating that handles light to moderate rain fine. Push it with sustained heavy rain or standing water on top, and moisture eventually works through, especially at seams. If your main goal is shade with some casual weather coverage, canvas works. If you want genuine rain protection, go with a vinyl or polyethylene tarp instead. Vinyl and poly use a non-porous laminated barrier with sealed seams that creates a true moisture barrier regardless of rain intensity or duration.
For thickness, look for tarps rated at 16 mil or heavier for any long-term outdoor installation. Thicker material resists puncture and tears better at grommet points, which is where most tarps fail first. Also check the denier rating: higher denier means heavier yarn and more tear resistance. A UV-stabilized tarp is non-negotiable if it's going to sit in direct sun for months. Non-UV-treated material breaks down fast under sunlight, losing both water resistance and structural strength.
| Tarp Type | Best For | Waterproof? | UV Resistance | Lifespan (outdoor) |
|---|---|---|---|---|
| Canvas (treated) | Shade, light rain, aesthetics | Water-resistant only | Moderate (check rating) | 2–5 years |
| Polyethylene (poly) | Rain protection, budget builds | Yes (fully) | Good (UV-stabilized versions) | 2–4 years |
| Vinyl (PVC-coated) | Heavy-duty rain and sun protection | Yes (fully, sealed seams) | Excellent | 5–10+ years |
For most patio covers, a heavy-duty UV-stabilized poly or vinyl tarp is the right call. If you want a more finished look similar to an outdoor patio ceiling, consider a rigid panel or slatted cover that still sheds water properly heavy-duty UV-stabilized poly or vinyl tarp. Save canvas for purely decorative or shade-only situations where pooling water is never going to be an issue.
Tools and materials you'll need
Have everything on this list before you start. Running to the hardware store mid-install while a tarp flaps on your roof wastes a lot of time.
- Heavy-duty tarp (16 mil or thicker, UV-stabilized vinyl or poly), sized to your patio plus 6–12 inches of overhang on each side
- Ratchet straps (preferred over bungee cords for anything permanent or semi-permanent)
- Bungee cords as supplemental tensioners only, not primary anchors
- Rope or nylon strap (3/8-inch or thicker, UV-resistant)
- Stainless steel eye bolts or screw hooks (3/8-inch diameter minimum)
- Masonry anchors if attaching to concrete or brick walls (wedge-style anchors rated for solid concrete; use appropriate anchor types for grouted masonry or brick per manufacturer specs)
- Lag screws (1/2-inch diameter) or through-bolts for wood ledger attachment
- Ledger board (2x6 or 2x8 pressure-treated lumber) if building a wall-mount rail
- 4x4 or 4x6 posts, or 2-inch square aluminum tubing for support posts
- Post bases or concrete-ready anchor sleeves if setting posts in ground
- Grommet repair kit or tarp clips (for adding attachment points mid-field)
- Cordless drill with hammer setting, masonry bits, and standard drill bits
- Level, tape measure, chalk line
- Ladder (rated for your height plus working overhead load)
- Safety glasses and gloves
A word on anchor hardware: if you're attaching to a concrete wall or slab, use stainless steel wedge anchors designed for solid concrete. Do not use concrete wedge anchors in brick or ungrouted block. For brick or grouted masonry, look for anchors rated explicitly for those base materials, such as certain DeWALT or similar mechanical anchors rated for brick masonry. For wood framing, 1/2-inch lag screws are workable but through-bolts with backing washers are stronger when you have access to the back face.
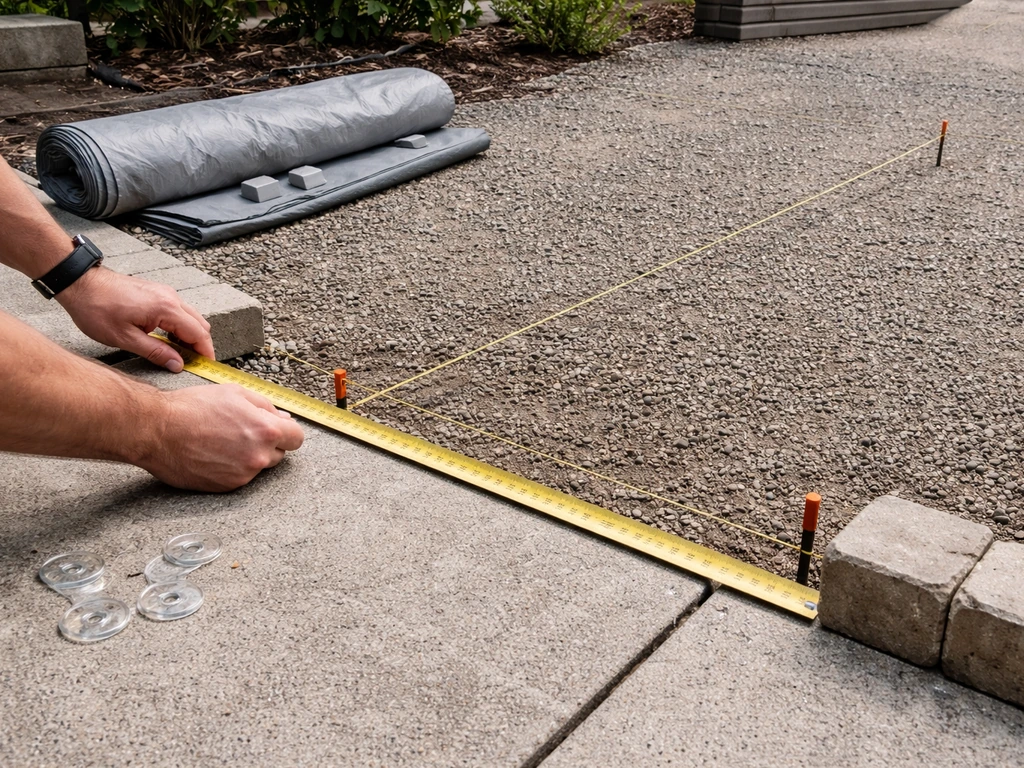
Planning your layout before you touch anything
Slope is the most important thing you'll plan
A tarp hung flat is a disaster waiting to happen. Water pools, weight builds up, and eventually the tarp sags or tears through a grommet. The minimum slope you want is 1/4 inch per foot of horizontal run. That means for a 12-foot-deep tarp, the low edge needs to sit at least 3 inches lower than the high edge. For faster drainage and better wind performance, 1/2 inch per foot is even better. Mark your high and low attachment heights on the wall before you drill anything. Use a level and a tape measure, not eyeballing.
Clearance around doors and walkways
Your low edge (the drip edge) needs to clear any door frames, walkways, or head-height zones. Plan for at least 7 feet of clearance at the low end for comfortable passage underneath. If you're hanging the low end at the outer edge of your patio, you have more flexibility. If it's over a walkway or side door, that 7-foot minimum is non-negotiable.
Mapping your anchor points
Walk around your patio and identify every solid surface you could attach to: the house wall (wood framing, masonry, or stucco), an existing fence post, a concrete slab edge, or the ground for staked guy-lines. Sketch a rough plan showing where the high-side anchors go, where the low-side support will land, and which corners need diagonal guy-lines to prevent the tarp from shifting side to side. For a standard 10x12 patio, you typically need 4 corner anchors, 1–2 mid-span anchors along the long edges, and sometimes a center anchor if the span is over 10 feet wide. Mid-span tensioning is key. A tarp left unsupported at the center of a long span will belly inward, concentrate load on the grommets, and eventually tear.
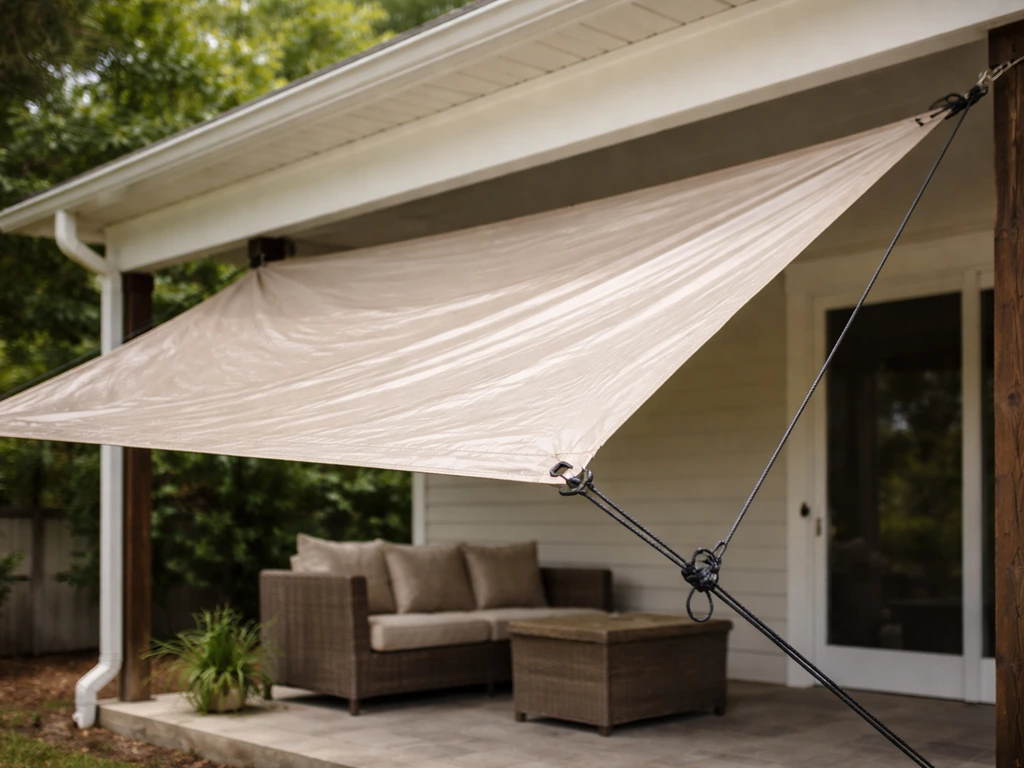
Step-by-step: lean-to tarp hang (sloped, wall-attached)
This is the setup most homeowners want. If you're wondering how to make a patio canopy that drains well and holds up to wind, this lean-to approach is a strong place to start This is the setup most homeowners want. One side mounts high on the house wall, the other end is lower and supported by posts or poles. It looks clean, drains well, and is the most wind-stable option when done right.
- Mark your high-side attachment line on the house wall. Use a level and chalk line to mark a straight horizontal line at your desired height. For a 12-foot-deep cover sloped at 1/2 inch per foot, your low edge will be 6 inches lower than this line.
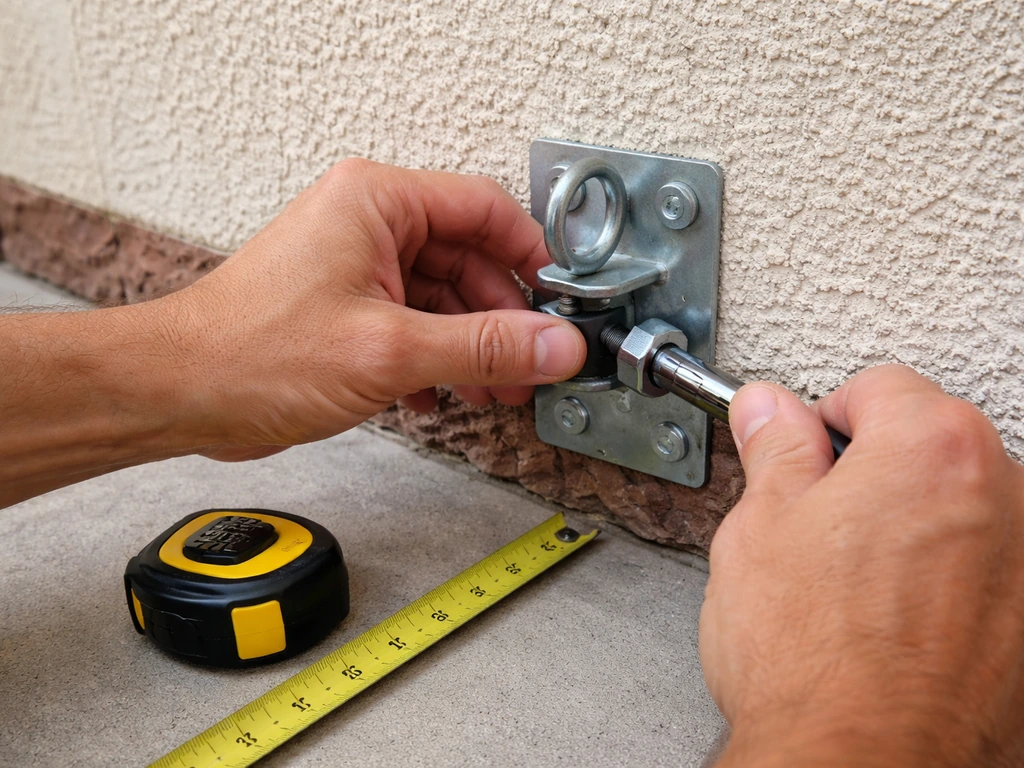
- Install your high-side anchor points. If attaching to a wood-framed wall, drive 1/2-inch lag screws with eye-bolt heads into wall studs (not just sheathing). Space them every 2–3 feet along your chalk line. For masonry, drill with a hammer drill and install wedge anchors appropriate for your wall material, following the anchor manufacturer's embedment depth specs. This is where corners fail most often. Do not skip studs or underdrive anchors.
- Set your support posts at the outer (low) edge. For a lean-to, you typically need one post at each corner of the low end and sometimes one in the middle for wider spans. Dig post holes at least 18–24 inches deep, or use surface-mount post bases bolted to an existing concrete slab. Set posts plumb and let concrete cure before loading them if you're digging holes.
- Attach a horizontal header board or top rail across the top of the posts at the low end. A 2x6 pressure-treated board lag-screwed through the posts works well. This gives you a continuous rail to tie the tarp's low edge to, which distributes load far better than individual grommet points.
- Lay the tarp out flat on the ground and check grommet spacing against your anchor spacing. If grommets don't line up with anchors, use tarp clips to add attachment points rather than overstressing misaligned grommets.
- Attach the high edge first. Run rope or ratchet strap loops through each grommet and clip or tie to the eye bolts along the wall. Leave them slightly loose for now.
- Drape the tarp over to the low end and attach the low edge to your header board using ratchet straps, hooks, or rope ties through the grommets.
- Tension the whole thing progressively. Start at the corners and work inward, tightening each attachment point gradually rather than pulling one end tight before the others. You want the surface drummed tight, not just draped. A loose tarp flaps in wind, and flapping causes tearing.
- Add mid-span guy-lines if your tarp spans more than 8–10 feet side to side. Run a strap from a mid-edge grommet down to an anchor in the ground or post to eliminate the belly in the long edges.
- Check slope by pouring a bucket of water on the high end and watching it drain to the low edge without pooling. If water pools anywhere, adjust tension or add a mid-span support.
Step-by-step: free-standing or frame-supported tarp
When you have no solid wall to attach to, or your patio is free-standing in the yard, you need a complete frame. This takes more material but gives you full control over placement and height.
- Plan your frame footprint. For a tarp cover, a simple rectangular frame with four corner posts is all you need. Decide which two posts will be tall (high side) and which two will be short (low side) to create your drainage slope.
- Set your corner posts. Use 4x4 pressure-treated lumber or 2-inch square aluminum posts. Your high-side posts should be at least 8–9 feet above finished grade (so after the slope, the low end still clears 7 feet). Set them in the ground with concrete, or use heavy-duty surface-mount post bases bolted to a concrete slab with appropriate masonry anchors.
- Install top rails connecting the posts on each side. A 2x6 pressure-treated board on the high side and another on the low side gives you continuous anchor rails. Use structural lag screws or through-bolts at each post-to-rail connection.
- Add a center ridgepole or mid-span support if the cover is wider than 8 feet. Even a single 4x4 post in the middle with a rail running down the peak will prevent the tarp from sagging badly under rain load or snow.
- Attach the tarp to the high-side rail first, using grommet tie-downs every 2–3 feet. Then pull the tarp toward the low end and attach to the low rail. Apply tension progressively as with the lean-to method.
- Stake or anchor the base of each post. Even if posts are set in concrete, add diagonal bracing (a simple 2x4 kicker brace at each corner works) to resist the lateral load from wind pushing against the tarp.
- Manage the sides. An open-sided frame with tarp on top only is fine for shade, but if you want wind/rain protection, add a second tarp panel on the prevailing-wind side. Overlap the top tarp over the side panel by at least 6 inches in shingle fashion so rain runs off the top and over the side, not into the gap.
- Check all connections before walking away. Shake each post by hand. If anything moves, add bracing or deeper anchoring before you load the structure with a tarp in wind.
Tensioning, water management, and edge control

Getting the tarp tight is not just about aesthetics. A loose tarp in a 20 mph gust acts like a sail. The wind gets under it, lifts it, and the load transfers entirely to the grommets, which punch through or the rope tears out. Tight means the surface doesn't flutter when you push on it with your hand.
Ratchet straps are better than rope for main tension lines because you can crank them tighter over time as the tarp stretches slightly. Use rope or bungee cords only for supplemental mid-span control, not for corner anchors carrying the full load.
Water management at the low (drip) edge is critical. If the low edge just ends in open air over your patio furniture, every rainstorm throws a waterfall off the edge. Add a drip edge by running a rope or batten through the low-end grommets to create a slight lip that throws water away from the patio, not straight down into it. If you want a cleaner solution, a shallow aluminum gutter clipped to the low edge rail works surprisingly well and drains to a downspout at the corner.
At the side edges, fold the tarp over the rope or rail rather than just letting it hang loose. A folded edge is stiffer and less likely to whip. For side panels, overlap them under the top tarp in shingle fashion so the upper layer always sheds onto the lower, not into an open seam.
Common mistake: leaving the center unsupported on a wide tarp. Even with a good slope, a span over 8 feet will sag at the middle under rain load, and that belly becomes a bucket. A single center support post, a ridgeline rope pulled tight from peak to peak, or a few tarp clips tied to an overhead wire or rope run across the middle will eliminate the sag.
Safety, structural limits, and when to call a pro
Wind loads are bigger than most people expect
A tarp stretched tight over a patio creates real wind uplift loads. Most tarp covers are subject to the same wind design concepts as permanent awnings. Many states, including California, require awning structures (even the framing parts, not just the fabric) to meet minimum design wind pressure standards through the residential building code. Even if you're not permitted for a temporary cover, use that as a benchmark: if your anchors and posts can't resist meaningful wind uplift, they will fail in a storm.
Don't overload railings or light-duty walls
Deck railings are not engineered to carry roof loads. Attaching a tarp to a deck railing as your primary anchor is a mistake that can pull the railing off the deck. Ledger connections to house walls are the single most common failure point in deck and patio structures, and they fail when the fasteners are undersized, spaced wrong, or driven into non-structural sheathing instead of framing. A Simpson Strong-Tie deck connection and fastening guide discusses ledger attachment options for code-compliant deck framing, including using lag screws versus through-bolts and related fastening considerations. Use lag screws into studs, and use enough of them: a 1/2-inch lag into a wood stud carries meaningful load, but you need multiple fasteners spaced along the ledger to share the load across the whole run.
Tarp limitations you need to accept
No matter how well you install it, a tarp cover is not a permanent roof. Even the best heavy vinyl tarp degrades in UV over years. Grommets fatigue. Ratchet straps stretch. Plan to inspect the whole setup at the start and end of each season, re-tension where needed, and replace grommets or tarp panels before they fail under load. A tarp cover that's properly maintained can serve you for several seasons. One that's ignored will fail in the first major storm.
When to hire a professional instead
Some situations are genuinely beyond the scope of a DIY tarp install, and it's worth being honest about them. Hire a pro, or at minimum get an engineer's assessment, if any of these apply to your project:
- You need to attach to a masonry or concrete wall and aren't sure what's inside it (hollow block, reinforced concrete, old brick with unknown mortar condition)
- Your patio is on a second floor or elevated deck where a structural failure means a serious fall
- You're in a high-wind or snow-load climate and want coverage through winter
- Local code in your area requires a permit for any shade or awning structure (check before you build, not after)
- The wall or ledger you plan to attach to is visibly damaged, cracked, or of unknown structural condition
- Your span is wider than 16 feet or requires posts taller than 12 feet, where column buckling and lateral stability become real engineering questions
If you want something more permanent than a tarp and are willing to invest more time and money, a proper patio cover with aluminum or wood framing is the next step up. Those builds involve the same planning fundamentals covered here, just with durable framing materials instead of tarp and rope. A tarp cover done right is a genuinely useful DIY project. If you want more details on making the cover itself, use this as a starting point for how to make a patio cover with a tarp. Done wrong, it's a liability in the first windstorm. Take the planning seriously and the installation is straightforward.
FAQ
Can I hang a tarp over my patio for winter snow, or is it only for rain and sun?
Yes, but only if you address two things: proper ventilation and condensation control. If the tarp traps warm, moist air underneath, it can drip or grow mildew. Plan for airflow by keeping the low edge clear, avoiding fully sealed sides, and using a breathable option only when you are not relying on it for hard rain. For real rain protection, prioritize UV-stabilized poly or vinyl and keep the tarp tight so warm moisture does not pool on the surface.
What if it snows where I live, will my tarp setup still hold?
Snow loads are different from rain, and DIY tarps often fail under heavy accumulation because the sagging increases stress at grommets. If you expect snow, plan to add a design that can be relieved of weight, such as removing the tarp during snow season or adding additional structural supports across the span. Even with a good slope, the tarp can still belly when snow becomes wet and heavy.
What kind of hardware should I use to prevent corrosion and tearing at the tarp grommets?
Use stainless components for the parts that see moisture and contact the tarp, and avoid mixed metals where possible. Corrosion can loosen hardware over time, especially at the grommets and ratchet strap points. Also, check that your tarp’s grommets are compatible with the cord or strap hardware you plan to use, since a larger knot or clip can concentrate stress and tear the fabric.
Do I need to prep the tarp or attachment points before installing?
If you can see dust, sand, or grit on the tarp surface, it can act like sandpaper at contact points and speed up wear on folded edges and rope seams. Before installing, wipe the contact areas where the tarp will rub against rails, boards, or battens. If the tarp gets dirty quickly, re-check tension after cleaning, because washed tarps can stretch slightly as they dry.
How do I choose the drip edge location so the runoff does not cause new problems?
Not exactly. The article recommends sloping the surface for drainage and keeping it tight for wind, but the final placement should consider where water will land. If you have plants, foot traffic, or a walkway near the drip edge, aim the drip edge so runoff clears those areas. A “perfect” slope that causes runoff to strike a door threshold or stain a wall can be a practical failure even if the tarp drains.
How often should I re-tension and inspect my tarp cover?
Yes, and it prevents loosening and flapping. After the first day, then after the first heavy rain, and again at the start of each season, re-tension the ratchets so the surface stays wrinkle-free. If your tarp stretches and you ignore re-tension, you can end up with a shallow belly that defeats drainage and increases grommet stress.
Is there a maximum tightness limit for ratchet straps on a tarp cover?
Over-tightening can damage tarps too. If you crank straps until the fabric is “golf-ball tight” at one point, you may stretch the tarp unevenly and tear near grommets or along folded seams. Tight enough that the tarp does not flutter when you press it by hand, but you should still be able to see that the load is distributed across corners and mid-span lines.
What should I do if my patio layout limits how low the tarp can hang on the drip edge?
If you have a short run that still needs drainage, the slope requirement may conflict with low-edge clearance like the 7-foot passage guidance. In that case, you can raise the high-side and add a drip edge lip, or use an intermediate support to improve the effective slope without lowering the low edge too far. If you cannot meet both clearance and slope, prioritize slope for water management and consider a different design or professional assessment.
How do I prevent center sag on wider tarps beyond adding corner anchors?
For long spans, mid-span support matters because a bellying tarp concentrates load at corners and grommets. You can add support by using a center post, a ridgeline rope between peaks, or tarp clips tied to a properly tensioned overhead wire or rope run. The key is that support prevents the center from sinking, not just that the center looks flat when dry.
My tarp says “waterproof,” but it leaks. What common leak points should I check first?
A true waterproof tarp system depends on seam integrity, not just tarp material. Even with a non-porous vinyl or poly barrier, damage at corners, seam overlaps, or holes around grommets can create leaks. Inspect overlap directions (shingle style at side panels) and check that the low edge has a drip edge lip so water sheets off instead of finding an entry path into seams.
What are the quickest fixes if my tarp starts flapping in wind?
If the tarp flaps, first reduce slack and then check wind pathways. Flapping usually means the tarp is not tight enough at corners or the side edges are hanging freely, letting gusts get underneath. Fix it by tightening the main tension lines, folding over side edges onto rope or rail, and adding supplemental mid-span control if the panel still ripples.
Can I anchor the tarp to a deck railing or fence for extra support?
Do not use deck railings or non-structural posts as primary anchors. Railings flex and can fail, and the load transfer can happen slowly until the fasteners pull out. If you must use posts, confirm they are anchored into adequate structural elements, and distribute load with additional anchors along the ledger run or with a frame solution when a solid wall is unavailable.