The most reliable way to secure a gazebo to a concrete patio is to bolt each post through a structural post base that is fastened to the slab with wedge anchors or concrete screws. Done correctly, this holds against serious wind uplift, keeps the posts plumb, and can be undone later if needed. You do not need to embed posts directly in the concrete or pour new footings. A standard concrete patio slab, typically 3.
How to Secure a Gazebo to a Concrete Patio: DIY Guide

Celia Vaughn
31 May 2026
5 to 4 inches thick, is usually enough to work with, as long as you choose the right anchor diameter, hit the minimum embedment depth, and keep proper edge distance from every slab edge or crack. ICC-ES ESR-3930 provides concrete post-installed anchor qualification constraints, including [minimum anchor spacing (smin) and minimum edge distance (cmin)](https://www. icc-es. org/reports/pdf_files/ESR-3930.
pdf) tables.
Choosing the Right Anchoring Method
Before you buy anything, you need to know what you are attaching and what your slab can handle. Most residential gazebos have four to six posts. Each post transfers both downward load (the weight of the structure) and uplift load (wind trying to lift or overturn the whole thing). That second force, uplift, is what causes failures, and it is the one most DIYers underestimate. Your anchoring method has to be rated for uplift, not just compression.
There are three practical methods worth considering for a concrete patio: mechanical wedge anchors with a post base, concrete screws (also called Tapcon-style screws) through a base plate, and chemical anchors with threaded rod. Each has a place depending on your slab condition, post size, and local wind exposure.
| Method | Best For | Slab Thickness Needed | Removable? | Relative Cost |
|---|---|---|---|---|
| Wedge anchor + post base | Most gazebo installs, high wind zones | 3.5 in minimum | No (destructive removal) | Moderate |
| Concrete screws (Tapcon) + base plate | Lighter structures, low-wind areas | 3 in minimum | Yes | Low |
| Chemical anchor (epoxy) + post base | Cracked slabs, thin slabs, close to edges | 3 in minimum | No | Higher |
For most homeowners installing a standard freestanding gazebo on a patio, wedge anchors paired with a rated structural post base (like a Simpson Strong-Tie ABA or ABU series) is the go-to. It is strong, code-familiar, and straightforward to install with basic tools. For a complete build plan, start by confirming your gazebo layout and post size, then match the anchoring approach to your patio slab thickness and wind exposure build a patio gazebo.
If your slab has visible cracks, is thinner than 3. 5 inches, or you need to anchor close to a slab edge, chemical anchors give you better capacity in compromised conditions. Concrete screws alone are fine for a lightweight pergola-style canopy in a sheltered yard, but if you are in a windy region or your gazebo has significant roof area, upgrade to wedge anchors.
Tools and Materials Checklist
Getting your list right before you start saves two trips to the hardware store. Here is what you will actually need, broken into tools and materials.
Tools
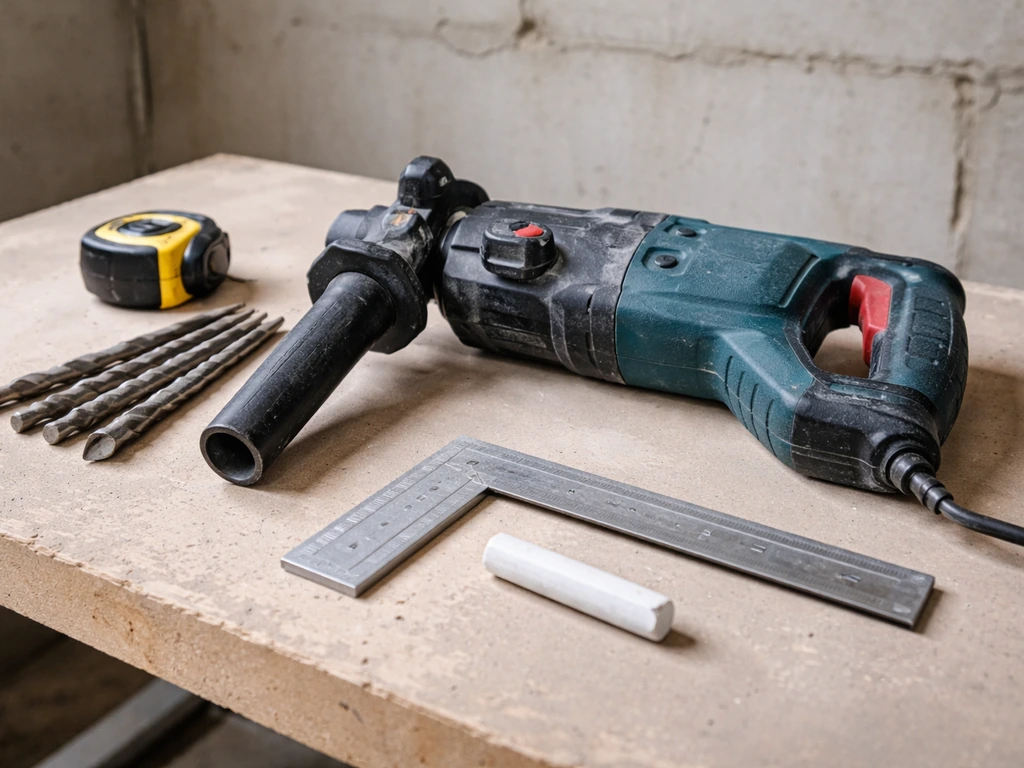
- Hammer drill (rotary hammer preferred for 3/8 in or larger anchors — a standard cordless drill will not cut it in concrete)
- Carbide-tipped masonry drill bits matched to your anchor diameter (e.g., a 3/8 in anchor needs a 3/8 in carbide bit — always match exactly)
- Tape measure and pencil or marking chalk
- 4-foot level and torpedo level
- Rebar/conduit scanner (AC voltage detector or rebar locator — rent one for under $30)
- Blow-out bulb or compressed air (to clean holes before setting anchors)
- Wire brush sized for your hole diameter
- Torque wrench (critical — do not skip this)
- Socket set and wrench
- Safety glasses and hearing protection
- Shop vacuum
Materials
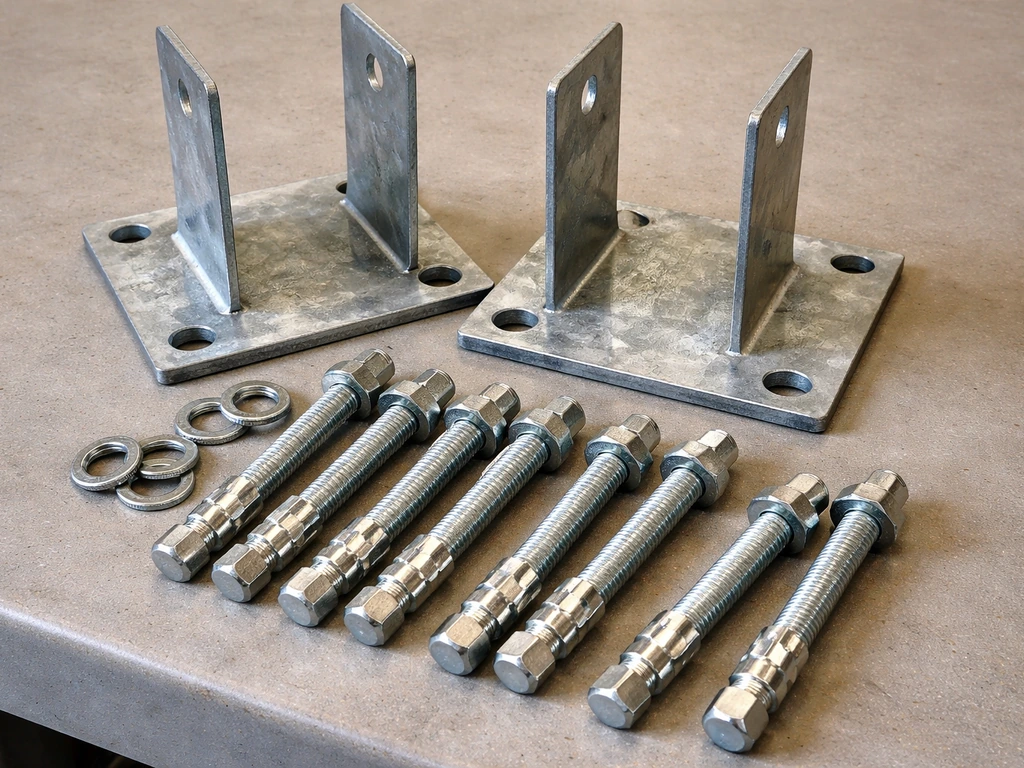
- Structural post bases rated for uplift loads — one per post (Simpson Strong-Tie ABA44 or ABU44 for 4x4 posts, or equivalent from another manufacturer)
- Wedge anchors: 3/8 in diameter minimum for a light gazebo; 1/2 in for heavier structures or high-wind zones — length must provide at least 1.5 in of embedment beyond the base plate thickness (aim for 2 in embedment minimum)
- Washers and nuts for the anchors (often included with post base hardware)
- Concrete screws if using that method instead (1/4 in x 1-3/4 in minimum for base plates)
- Post base hardware screws or through-bolts for connecting the post to the base (included with most post bases)
- Shims (plastic or stainless steel) for leveling base plates on a sloped slab
- Construction adhesive or silicone caulk to seal around base plates after install (optional but good practice)
- Marking tape or chalk line for layout
Step-by-Step: Measure, Mark, Drill, Anchor, Level
Work through this in order. Skipping steps, especially the hole-cleaning step, is the most common reason anchors fail below their rated load.
- Lay out your post positions. Use your tape measure, a square, and chalk lines to mark the exact center of each post base location. Confirm the layout is square by measuring diagonally corner to corner — both diagonals should match within 1/4 inch.
- Check for embedded items. Before drilling anywhere, run your rebar scanner slowly over each anchor location. Concrete patios frequently have wire mesh or rebar in them, and hitting rebar with a hammer drill bit ruins the bit and potentially cracks the slab. Move your anchor location at least 2 inches away from any embedded metal.
- Check edge distances. Every anchor must sit at least 5 to 6 anchor-diameters away from any slab edge, control joint, or visible crack. For a 1/2 in anchor, that means no closer than 3 inches from any edge. Getting too close to an edge causes the concrete to split or spall, and the anchor loses most of its capacity.
- Set your drill depth. Mark your carbide bit with tape at the required depth — the hole needs to be slightly deeper than the minimum embedment to leave room for drilling dust at the bottom. If you are targeting 2 inches of embedment and your base plate is 1/4 inch thick, mark the bit at 2.5 inches total hole depth.
- Drill perpendicular. Attach the base plate loosely over the mark, or use it as a guide, and drill straight down — perpendicular to the slab surface. An angled hole reduces the anchor's holding capacity significantly and causes the nut to seat crooked.
- Clean the hole completely. This step is non-negotiable. Use a blow-out bulb or compressed air to blast debris from the hole at least three times, then brush with a wire brush, then blow again. Anchor manufacturers are explicit about this: a dusty hole prevents the wedge from fully expanding and cuts the anchor's rated load substantially.
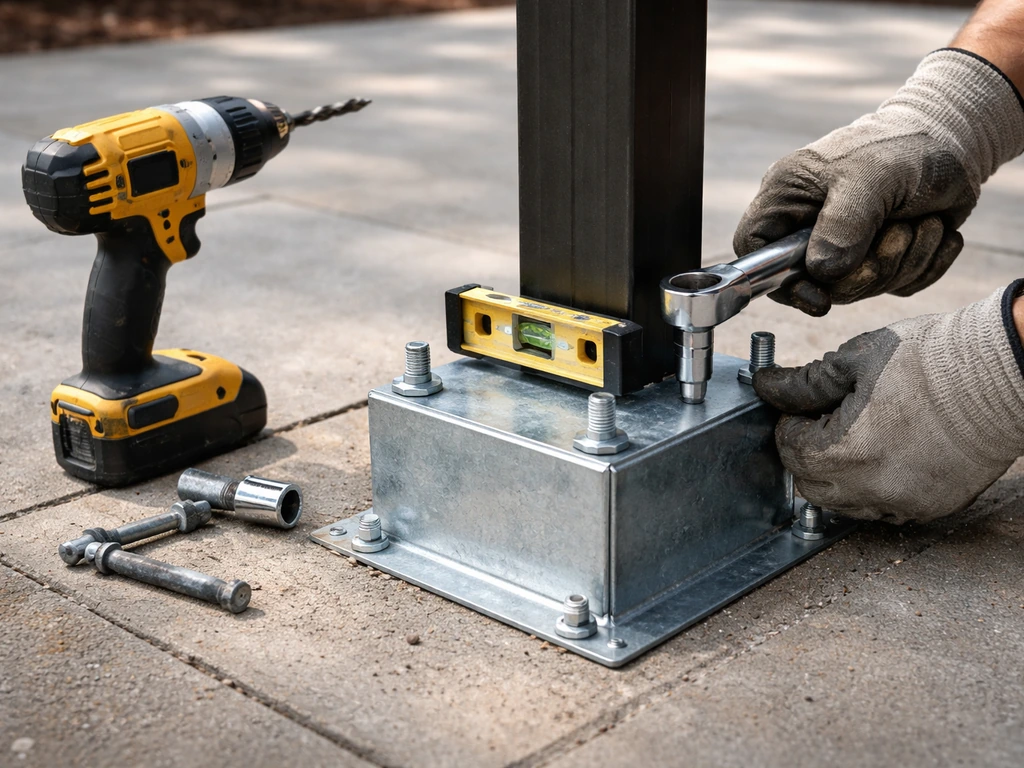
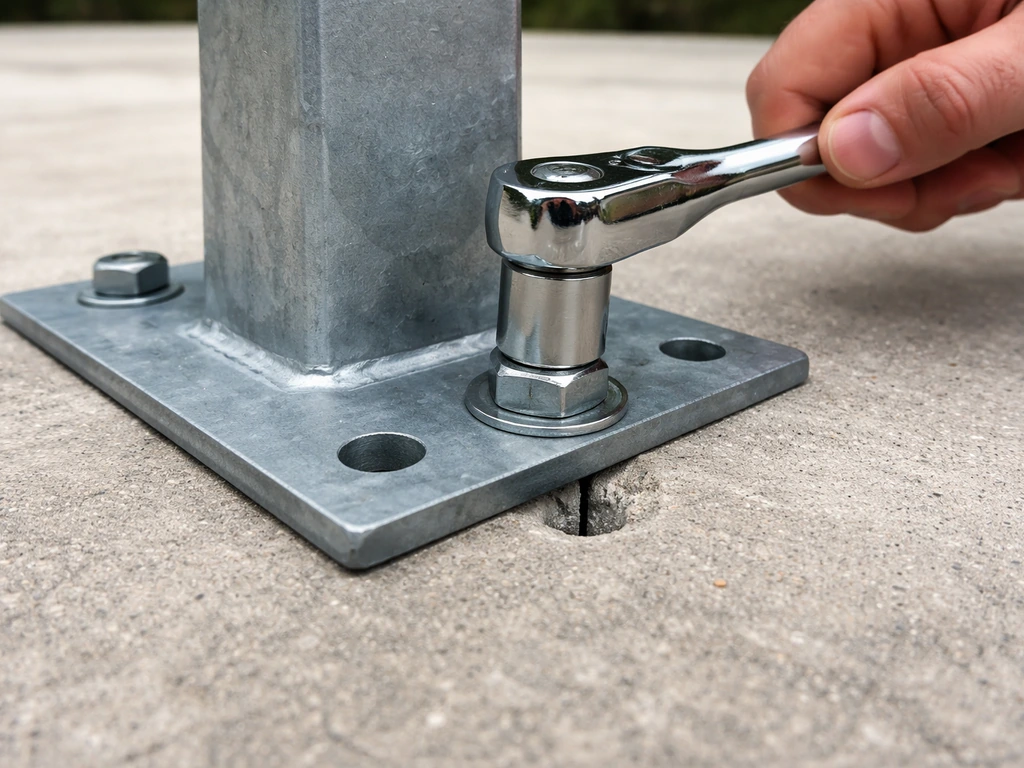
- Insert and set the wedge anchor. Drop the anchor into the hole (with the washer and nut threaded on). It should slide in with light hammer taps. Strike the top of the anchor with a hammer until the nut/washer seats against the base plate or fixture.
- Tighten to the manufacturer's specified torque. This is not finger-tight plus a little more. Each anchor diameter has a published installation torque value — for example, a 3/8 in wedge anchor typically requires around 25 to 30 ft-lbf, while a 1/2 in anchor may need 40 to 60 ft-lbf depending on the product. Use a torque wrench. Under-torquing means the wedge does not fully expand against the concrete. Over-torquing can strip the threads or crack a thin slab.
- Level each post base. Before the final tightening, check the base plate with a level in two directions. On a sloped patio, slide stainless steel or plastic shims under the low side. Once level, confirm and finish tightening.
- Set the posts and fasten through the base. Drop each post into its base, check plumb on two faces, and drive the included hardware through the base plate into the post. Most structural post bases use structural screws or through-bolts, not standard wood screws.
Bolt vs. Lag Screw vs. Post Base: When Each Makes Sense
You will see different terms tossed around, and they are not interchangeable. Here is what each actually means in a patio gazebo context and when to reach for each one.
Wedge Anchors (the standard for this job)
Wedge anchors are the best all-around choice for securing a post base to a poured concrete patio. You drill a hole, drop the anchor in, and tighten the nut, which drives a wedge that expands against the concrete walls. They carry both downward and uplift loads well and are ICC-qualified for structural use. Use 3/8 in diameter anchors for lighter gazebos or 1/2 in for anything over 12x12 feet or in a high-wind area. Minimum embedment is typically 1.5 in for 3/8 in anchors and 2 in for 1/2 in anchors, but always check your specific product's data sheet for the correct torque value.
Concrete Screws (Tapcons) Through a Base Plate
Concrete screws cut their own threads into pre-drilled holes and are removable, which makes them appealing. The downside is lower uplift capacity compared to wedge anchors. Using the right anchors for uplift is key to how to hold a gazebo down on a patio, especially in windy conditions. They work fine for lightweight pavilion kits in sheltered locations, but most product specs for structural post bases specify wedge anchors for good reason. If you use concrete screws, use 1/4 in diameter minimum and install at least four per base plate. Do not use them in cracked concrete.
Chemical Anchors with Threaded Rod
Chemical anchors (epoxy or polyester resin systems like the Hilti HIT-RE 500 or equivalent) are the right call when wedge anchors cannot work: thin slabs, anchoring close to edges, or in cracked concrete. You drill the hole, clean it meticulously (cleaning is even more critical here than with mechanical anchors because the bond depends on bare concrete surface contact), inject the resin, set the threaded rod, and then wait for the specified cure time before applying any load. Do not rush the cure. Depending on temperature, cure time can be 30 minutes or several hours. Once cured, the rod acts like a cast-in-place anchor and the post base threads onto it. This method has excellent uplift capacity in compromised conditions.
Lag Screws Into Concrete
Lag screws belong in wood, not concrete. You will occasionally see lag-to-concrete adapters, but for a gazebo post where uplift is a real concern, avoid this approach. Stick to purpose-built concrete anchors.
Dealing with Common Patio Complications

Real patios are rarely perfect. Here is how to handle the most common problems you will run into.
Thin Slabs (Under 3.5 Inches)
If your slab is thinner than 3.5 inches, standard wedge anchors cannot achieve the embedment they need. Your options are to use chemical anchors, which can work in thinner concrete because the resin distributes load across the full bond length rather than relying purely on mechanical wedging, or to pour a thickened pad at each post location before anchoring. A 12x12 inch square pad poured at least 6 inches deep at each post gives you solid material to anchor into and is a weekend-morning project on its own.
Cracks in the Slab
Hairline control-joint cracks are normal and usually cosmetic. Structural cracks that run through the full slab depth or that have offset edges (one side higher than the other) are a different story. Do not anchor a post base directly over a structural crack, and keep anchor locations at least 6 inches away from any crack. For cracked slabs in general, switch to chemical anchors, which are specifically rated for cracked concrete conditions, and use a product with an ICC-ES Evaluation Report confirming cracked-concrete performance.
Rebar and Wire Mesh
Use your rebar locator before every hole. If you drill into rebar, stop immediately. Shift your base plate position 2 to 3 inches in any direction and re-scan. You have some flexibility in base plate placement because most post bases have slotted or oversized bolt holes. If you are completely boxed in by rebar at every location, chemical anchors with smaller-diameter threaded rod may let you thread between embedded items more easily.
Sloped Patios
Patios are intentionally sloped for drainage, typically 1/8 to 1/4 inch per foot away from the house. Over a 10-foot run, that is up to 2.5 inches of drop. You have two ways to handle this. First, use adjustable post bases that allow for some angle compensation. Second, use stainless steel shim plates under each base to bring it level before final tightening. Never just tighten a base down at an angle and call it done, an unlevel base means an unlevel post, and a leaning post transfers load unevenly into the anchor.
Unknown Embedded Items
Older patios sometimes have embedded conduit, pipes, or even old post stubs from prior structures. If your rebar locator shows a large or oddly shaped obstruction, do not assume it is just mesh. Stop, use a small-diameter bit to carefully explore, and if you hit something unexpected, step back and evaluate. Drilling into an electrical conduit is a serious safety hazard. If the slab origin is unknown, call a local contractor for a quick assessment before continuing.
Wind Load, Safety Standards, and What to Inspect After Install
Wind is what turns a poorly anchored gazebo from an inconvenience into a hazard. Building codes reference wind speed maps from FEMA and the International Building Code to set design requirements, and even in areas with relatively mild wind exposure, a 12x16 foot gazebo roof can generate hundreds of pounds of uplift force in a storm.
Confirming Your Anchors Are Rated for the Load
The simplest check: look up your specific post base model's load tables. Simpson Strong-Tie publishes allowable uplift values for each base model at each anchor size and concrete strength. For example, an ABU44 post base with 1/2 in wedge anchors in 2500 psi concrete carries meaningful uplift loads that exceed most residential gazebo requirements in moderate wind zones. If your gazebo manufacturer specifies anchor requirements, use those, and if they do not, treat the minimum as a starting point and size up.
Spacing and Bracing

Post bases alone handle vertical uplift and some lateral load, but a tall, open gazebo can also rack side to side in wind. Add diagonal knee braces between the beams and posts if your design allows, or use manufactured aluminum angle bracing. Knee braces at roughly 45 degrees, attached with structural screws, dramatically improve lateral stiffness and reduce the shear demand on the anchors. If you are building from a kit, check whether the kit includes bracing hardware and do not leave it out.
Permits and Engineering
In many jurisdictions, a permanent attached or freestanding gazebo over a certain size (commonly 200 square feet) requires a building permit. A permit means an inspector will verify your anchor type, spacing, and embedment, which is actually a good thing. If you are unsure about your local requirements, call your building department before you start. Getting caught with an unpermitted structure means potential teardown orders and insurance complications.
Post-Installation Inspection Checklist
After the install is complete and again after the first significant windstorm, go through these checks:
- Confirm all anchor nuts are still at proper torque — use your torque wrench, not just a feel check
- Look for any cracking or spalling in the concrete around anchor locations
- Check each post for plumb — a post that has shifted indicates anchor movement
- Inspect post base hardware (the screws or bolts connecting the post to the base) for looseness
- Look for any gaps opening between base plates and the slab surface
- Check all bracing connections for loose fasteners
- After a winter season or freeze-thaw cycle, repeat the full inspection
When to Call a Pro
This is a DIY-friendly project in most situations, but there are real red flags to watch for. Call a structural engineer or experienced contractor if your slab shows major cracking or differential settlement, if you cannot confirm the slab thickness or concrete strength, if your local wind zone is severe (120 mph design wind speed or higher), if the gazebo will be attached to the house structure rather than freestanding, or if your permit process requires engineered drawings. Paying for a two-hour engineering consultation upfront is far cheaper than fixing a failed structure after a storm.
If you are still deciding whether to anchor to concrete specifically or working through whether a brick patio requires a different approach, those scenarios involve different anchoring logic and are worth reviewing separately. If you are working with a brick patio, the anchoring details change because brick is less forgiving than a poured slab and the hardware must match the masonry anchor gazebo to brick patio. Likewise, if you are planning to build the gazebo itself from scratch before anchoring it, the foundation and post placement decisions happen earlier in that process and affect what anchoring method makes the most sense here.
FAQ
Can I secure a gazebo to a concrete patio without a structural post base, like drilling straight into the slab for the post?
You can, but it is usually a higher-risk approach. A structural post base spreads the load and helps keep the post plumb, while most anchor designs assume a base plate and specific bolt pattern. If you drill directly for posts, you also complicate uplift resistance and lateral racking, and you lose the easy ability to align and shim the post before final torque.
How do I know my gazebo anchors are rated for uplift, not just holding power?
Look for uplift or pull-out load values on the post base and anchor product data, and confirm the rating is for the concrete strength and anchor diameter you plan to use. If the product only lists compression or “holding” strength, assume it is not suitable for wind uplift unless the manufacturer explicitly provides an uplift capacity.
What if my gazebo layout forces anchors near a slab edge or a visible crack?
Reposition the base plate if you have any slotting or extra hole positions available, and keep at least a few inches of edge distance. If you cannot meet safe edge distance or you are near a structural crack, switch to chemical anchors designed for edge or cracked concrete conditions, and verify the product includes an evaluation for the situation you have (especially cracked concrete performance).
Is it okay to reuse holes from a previous gazebo installation?
Usually no. Old holes can reduce concrete integrity and can mix contaminants or damaged concrete with your new anchors. Unless the hole was made with the exact same anchor system, fully cleaned, and is still within the allowable diameter and depth tolerances, it is safer to relocate the post base or fill and re-drill using the proper method for anchor installation.
How important is hole cleaning, and what is the correct way to do it?
It is critical, especially for chemical anchors where bond depends on clean concrete contact. Use a consistent cleaning sequence with a proper brush and air blow, and repeat until no dust remains in the hole. Skipping the cleaning step or only “blowing quickly” is one of the most common reasons anchors underperform.
Can I install wedge anchors and then adjust the post placement later?
Not reliably. Wedge anchors and tightened post bases should be treated as fixed after torque, because changing alignment after tightening can loosen or misload the base. If you need micro-adjustment, do it with shims and an adjustable base before final tightening, and keep the anchor pattern consistent.
What is the safest way to shim an unlevel patio under a post base?
Use stainless steel shim plates under the base so you can level without compressing or damaging the concrete surface. Shim only at intended base contact points, keep the post base fully supported, and re-check level after tightening. Avoid uneven tightening because it can transfer bending and shear into the anchors.
Do I need to account for patio slope when choosing anchor type and post base height?
Yes. A sloped slab can create a bending moment at the anchor even if the anchors are rated. Use adjustable post bases to compensate, or shim to level before final torque. Do not just leave the base tilted, because a leaning post increases uneven loading into the anchor bolts.
How far apart should post base anchors be from rebar or embedded mesh?
If you hit rebar while drilling, stop and relocate. As a general practice, scan and shift the base a few inches to get clear of embedded steel, because even partial interference can reduce capacity and prevent the wedge from expanding properly. When relocation is impossible, chemical anchoring with smaller-diameter threaded rod may offer more routing flexibility, but you still must confirm the product’s installation allowances.
Can concrete screws be a good option if I have a smaller gazebo footprint?
They can work for lighter, lower-wind-load structures, but the uplift limitation is the key constraint. If the gazebo has meaningful roof area or you expect higher winds, wedge anchors are the safer default. If you use concrete screws anyway, confirm uplift capacity in the specs and install multiple screws per base plate, and do not use them in cracked concrete.
How long should I wait after installing chemical anchors before loading the gazebo?
Follow the cure time stated for your resin system and installation temperature, and do not rush. Cure can range from tens of minutes to several hours. If you need to stage the build, set all bases, allow full cure, then tighten and apply structural load only after the specified cure window.
What torque should I use on the anchor nuts or base bolts?
Use the torque specified by the anchor and post base manufacturer for that bolt size and embedment. Over-torque can reduce anchor performance or strip components, and under-torque can leave the base vulnerable in uplift. If you are unsure, use a calibrated torque wrench and stop once you reach the required torque for the system you installed.
After a windstorm, what signs mean the gazebo anchors or bases are failing?
Look for loosening at the base bolts, visible gaps between the base and shims, cracked or spalled concrete around the anchors, and post leaning or uneven roof alignment. If you see any of these, do not just tighten again, inspect anchor holes and the base plate, and consider having the connection evaluated before the next storm.
When is it worth hiring an engineer for gazebo anchoring to a patio slab?
Get help if slab thickness or concrete strength cannot be confirmed, if the wind zone is severe, if you cannot meet edge distance or crack separation, if the gazebo is attached to the house structure, or if permits require engineered drawings. Major cracking, differential settlement, or repeated anchor conflicts with rebar also justify professional review.