The right anchoring method depends on two things: what your patio is made of and what kind of gazebo you have. On a solid concrete patio, you'll use concrete anchor bolts or expansion anchors through the gazebo's base plates directly into the slab. On pavers or brick, you either pull up a few units and set anchors into the compacted base or concrete substrate below, or you use a surface-mount bracket system.
How to Hold a Gazebo Down on a Patio: Step-by-Step

Celia Vaughn
30 Jun 2026
On a wood deck, you lag-bolt through the decking and into the structural joists or added blocking underneath. A pop-up canopy on any surface uses weighted bags or ground stakes fed under the frame. Whatever the combo, the goal is the same: the gazebo's base needs to be mechanically connected to something structural, not just sitting on top of a surface.
Assess your patio and gazebo type first
Before you buy a single bolt, spend five minutes figuring out exactly what you're working with. Getting this wrong means buying the wrong hardware or, worse, drilling into a surface that can't hold what you're asking it to hold.
What's your patio surface?
- Poured concrete: The best surface for anchoring. You can drill directly into it and install expansion anchors or epoxy anchors with high confidence, provided the slab is at least 3.5 inches thick and not cracked or spalled at the anchor point.
- Concrete pavers: Surface looks solid but the units themselves aren't anchored structurally. You'll need to remove pavers at each leg location and anchor into the compacted gravel base or, better, a concrete footer below.
- Brick patio: Similar to pavers. Anchoring into the brick units themselves is unreliable. Look for the mortar bed or the concrete substrate underneath.
- Natural stone or tile: Fragile under drilling. Anchor into the substrate below, not the tile itself.
- Wood deck: Good anchoring potential, but only if you connect to the framing, not just the decking boards.
What kind of gazebo do you have?
- Pop-up canopy or soft-top tent: Lightweight frame, no permanent base plates. Use weighted leg bags (40+ lbs per leg) and, if the surface allows, ground stakes through any available tie-down loops.
- Hardtop freestanding gazebo (metal or aluminum frame): Typically has pre-drilled base plates at each leg. This is the most straightforward to anchor permanently.
- Wood-framed or timber gazebo: Usually has post bases or notched feet. These anchor best with heavy-duty post base hardware like a Simpson Strong-Tie ABA or ABU series bracket set in concrete.
- Vinyl or composite kit gazebo: Similar to metal hardtop. Check the base plate design before buying fasteners since some kit gazebos have narrow flanges that limit bolt diameter options.
Check the manufacturer's instructions before doing anything else. Many kit gazebos specify a minimum anchor bolt diameter and embedment depth. If yours does, follow that spec. If there's no guidance, the recommendations in this article are based on common freestanding gazebo sizes in the 10x10 to 12x14 range and standard residential wind load requirements.
Choose the right anchoring method
There are three main hardware approaches: anchor bolts (expansion or epoxy), surface-mount base plate brackets, and lag screws into structural framing. Each one fits a different situation. Here's how to match them.
| Method | Best surface | Pros | Watch out for |
|---|---|---|---|
| Expansion anchor bolts (wedge or sleeve anchors) | Solid poured concrete | Strong, permanent, good shear and uplift resistance | Requires correct installation torque; don't overtorque or undertorque |
| Epoxy/adhesive anchors (e.g., Hilti HIT-RE 500 V3) | Concrete, especially near edges or in thinner slabs | Higher edge-distance performance than mechanical anchors | Hole cleaning is critical; reduced strength if done wrong |
| Surface-mount U-brackets or base plate brackets | Pavers, tile, brick (surface-mounted with through-bolts into substrate) | No drilling into fragile surface material | Needs a solid substrate below; brackets must be rated for uplift |
| Lag screws into structural framing | Wood deck | Very strong when landed in a joist or beam | Never into decking boards alone; may need blocking added |
| Weighted base bags / ballast plates | Any surface, temporary or soft-top gazebos | No drilling, completely reversible | Must be very heavy (40+ lbs per leg) to be useful in wind |
On concrete: expansion anchors vs. epoxy
For most homeowners anchoring a hardtop gazebo to a solid concrete patio, 1/2-inch diameter wedge anchors or sleeve anchors are the go-to choice. They're available at any hardware store, they're rated for both shear load (horizontal wind force) and tension/uplift, and they install with a hammer drill and a socket wrench.
Simpson Strong-Tie also cautions that for expansion anchors, not applying the required installation torque can cause excessive anchor displacement under load or premature failure required installation torque for expansion anchors. Go with a minimum 3.
5-inch embedment depth for 1/2-inch anchors in a standard residential slab. Epoxy anchors are worth considering if your slab is on the thin side, if you're anchoring close to an edge (within about 4 to 5 inches), or if you want maximum holding power with a smaller drill hole. The tradeoff is more prep work: epoxy systems require meticulous hole cleaning or the bond strength drops significantly.
On pavers or brick: go below the surface
The paver or brick unit itself is not your anchor point. The compacted base or concrete below is. At each leg location, remove the pavers, dig down to the base, and either pour a small concrete collar (a coffee-can sized pour is plenty) with a J-bolt set in position, or use a surface-mount post base bracket that spans across adjacent pavers and bolts into the substrate. For a more detailed breakdown of brick-specific approaches, the process for brick patios has some unique considerations worth reviewing separately. For the exact step-by-step method for how to anchor gazebo to brick patio, follow the approach of going below the brick units and anchoring into the compacted base or concrete substrate.
On a wood deck: into the framing, not the boards
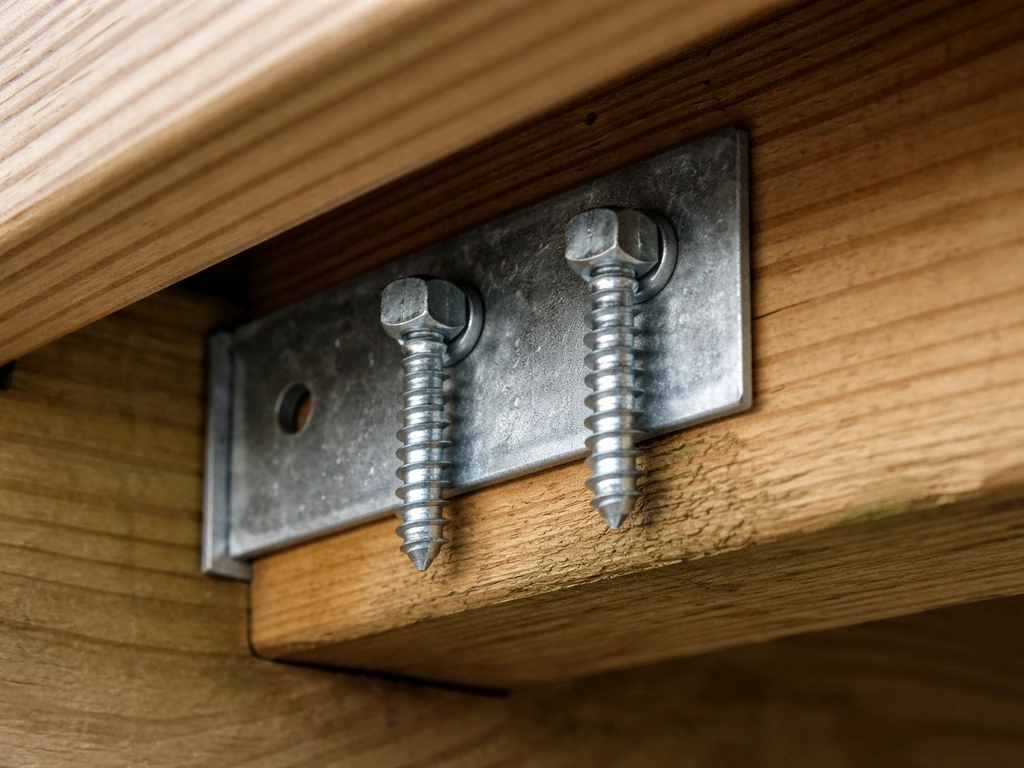
This one is non-negotiable: never anchor only to deck boards. Deck boards have almost no resistance to wind uplift and can pull free of their fasteners under load. Your lag screws need to land in a joist, beam, or rim joist below. If the gazebo leg falls between joists, add blocking (a short piece of 2x8 or 2x10 cut to fit between joists and face-nailed or screwed in place) so you have something solid to hit. Use 1/2-inch lag screws, at minimum 3 inches of penetration into the framing after passing through the decking.
Prep the patio surface before you drill
Good surface prep is the difference between anchors that hold for a decade and anchors that work loose in their first season. This step doesn't take long, but skipping it is one of the most common mistakes.
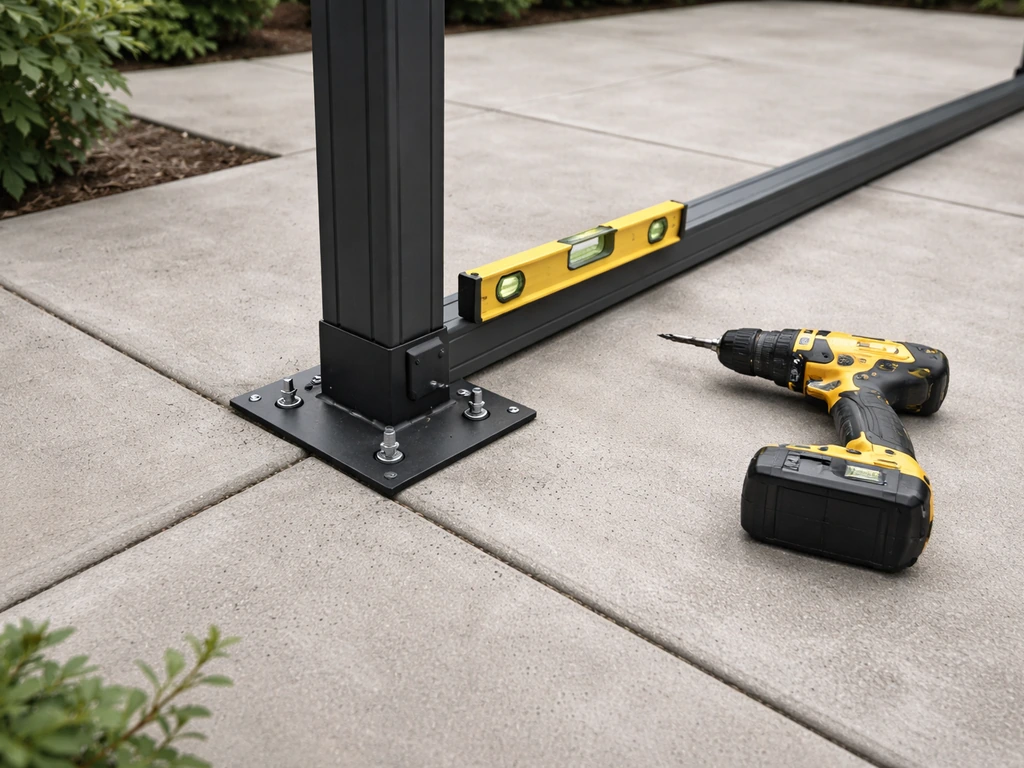
- Mark your anchor locations precisely. Place the gazebo frame where you want it permanently, level it, and mark the center of each base plate hole on the surface below using a marker or masking tape. Don't skip the leveling step here: if you bolt down a frame that's out of plumb, you're locking in a problem.
- Inspect each anchor location for cracks, spalling, or hollow spots. On concrete, tap the surface with a hammer. A hollow sound means delamination underneath. Avoid anchoring within 2 inches of any visible crack. On pavers, look for settled or rocking units, and remove and re-bed them before reinstalling.
- Clean the surface. Remove any debris, standing water, or moss at the drill locations. On dirty concrete, a wire brush takes 30 seconds and matters more than you'd think.
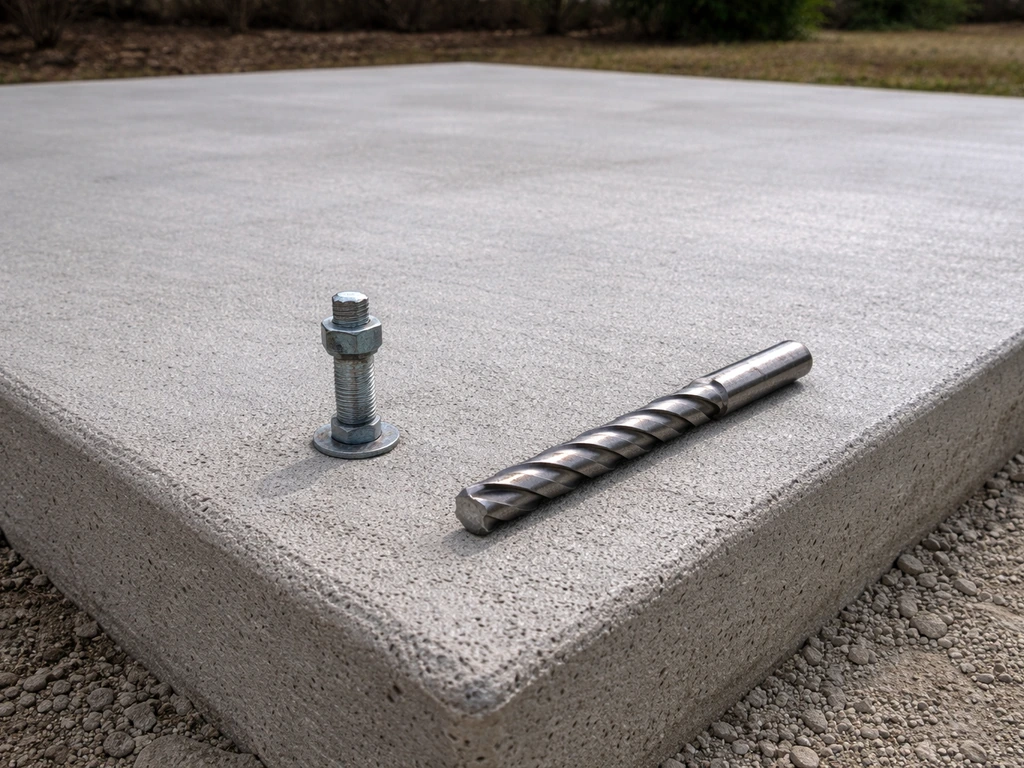
- Choose the right drill bit. For concrete, use a carbide-tipped masonry bit matched to your anchor diameter (typically 1/2 inch for 1/2-inch wedge anchors). For wood decks, a standard twist bit works fine.
- Drill to the correct depth. Drill at least 1/2 inch deeper than your anchor's embedment requirement to give the anchor room to seat properly. For concrete, use the depth stop on your hammer drill or wrap tape around the bit as a depth marker.
- Clean the hole thoroughly. For concrete, blow out the dust with compressed air, then brush with a wire bottle brush, then blow again. For epoxy anchors especially, repeat this sequence at least twice. Dust and concrete particles left in the hole can cut load capacity significantly.
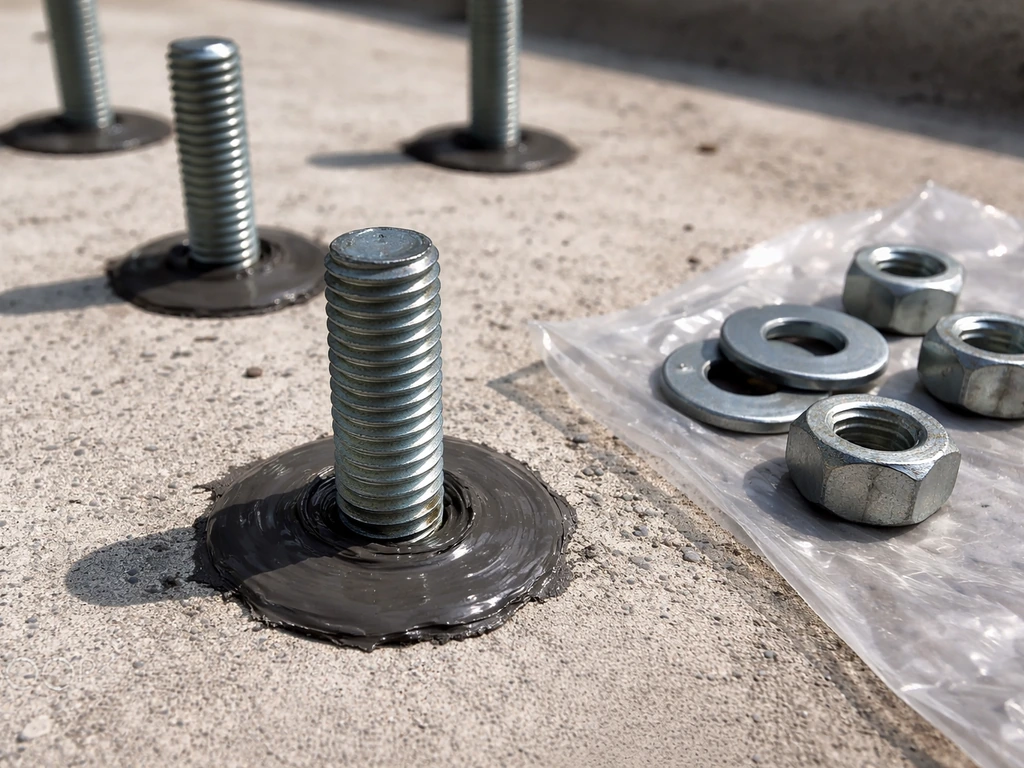
Step-by-step: install the anchors and fasten the gazebo down
These steps cover the most common scenario: a hardtop gazebo with pre-drilled base plates being anchored to a solid concrete patio with 1/2-inch wedge anchors. Adapt the hardware to your surface type based on the section above. If you want to tackle the full project, follow this guide for how to build a patio gazebo from start to finish.
- Gather your materials: 1/2-inch carbide masonry bit, hammer drill, 1/2-inch wedge anchors (length = slab thickness minus base plate thickness, targeting 3.5-inch embedment minimum), washers, nuts, socket wrench or impact driver with socket, tape measure, level, safety glasses, and hearing protection.
- Position the gazebo exactly where you want it and confirm all four legs are level. Use a 4-foot or 6-foot level across the top frame and check each leg. Shim any low legs temporarily before drilling.
- Re-mark the hole centers through the base plate holes onto the patio surface. Remove the gazebo frame to one side.
- Drill each hole to depth using your hammer drill set to hammer-and-rotate mode. Keep the drill perpendicular to the surface. Angled holes cause anchor misalignment and reduce holding strength.
- Clean each hole completely: compressed air, wire brush, compressed air again. For epoxy anchors, follow the manufacturer's hole-cleaning protocol exactly.
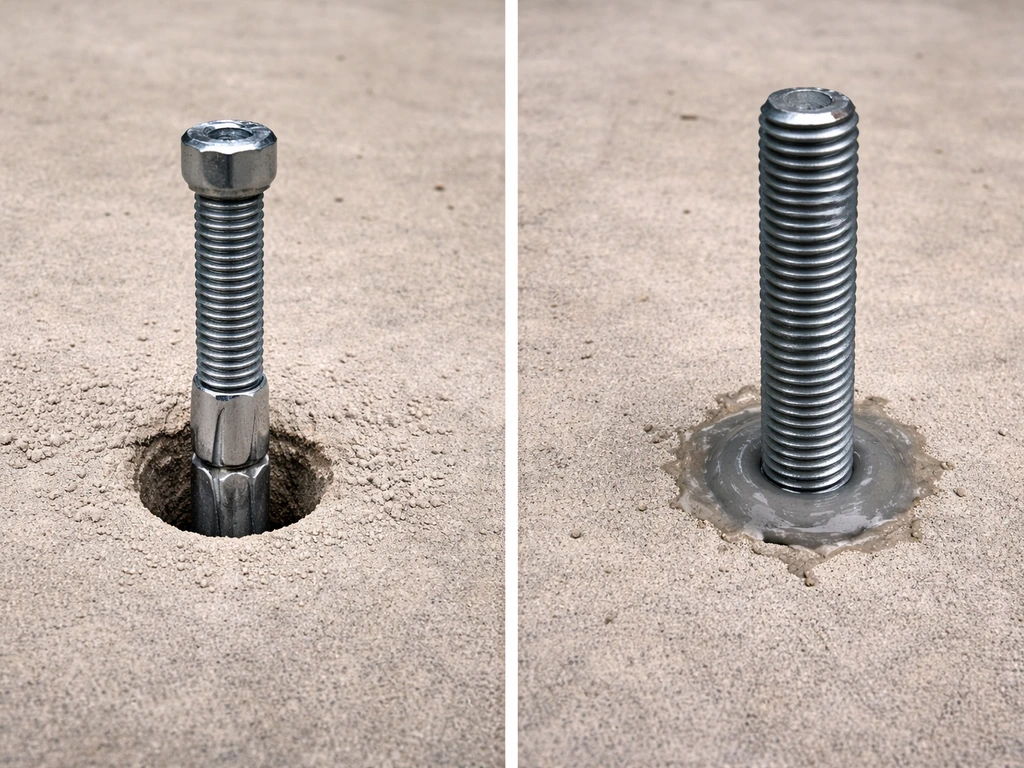
- For wedge anchors: drop the anchor through the base plate hole and into the drilled hole. Tap down with a hammer until the threads are above the surface. Add a washer and nut, then tighten with a socket wrench to the manufacturer's specified installation torque. A 1/2-inch wedge anchor in concrete typically calls for 35 to 50 ft-lbs. Use a torque wrench if you have one; firm wrench resistance without cracking the slab surface is the practical check. Undertorquing is the bigger risk here: under-torqued expansion anchors can displace or fail under load.
- For epoxy anchors: inject epoxy into the hole (from the bottom up to avoid air pockets), insert the threaded rod to depth with a slight twisting motion, and allow full cure time before loading. Most epoxy anchor systems require 24 to 48 hours of cure time at 70°F before applying any load. Don't rush this.
- Once all anchors are set, position the gazebo frame back over the anchor rods, add washers and nuts, and snug everything down. Do a final plumb and level check before fully tightening. Once the frame is confirmed plumb, torque all fasteners to spec.
- Check that every anchor point is fastened. A gazebo with six legs needs anchors at all six base plates. Skipping even one creates a weak point where uplift force concentrates.
Seal penetrations and protect against corrosion
Water getting into anchor penetrations is the main long-term threat to your installation. Water in a drilled concrete hole freezes, expands, and gradually spalls the concrete around the anchor. Even in mild climates, moisture accelerates rust on the anchor hardware and degrades the base plate contact point.
- Use corrosion-resistant hardware everywhere. Hot-dip galvanized or stainless steel anchors and fasteners cost a bit more but last decades outdoors. Standard zinc-plated hardware will rust within a few seasons in most climates.
- Apply a bead of polyurethane or silicone sealant around each anchor penetration at the surface level. This keeps surface water from migrating down into the drilled hole. Smooth it into the gap between the base plate and the patio surface.
- If your base plates sit directly on concrete, place a thin rubber gasket or closed-cell foam tape between the plate and the concrete. This prevents the aluminum or steel plate from sitting in standing water, which dramatically slows galvanic corrosion.
- For pavers or brick with surface-mount brackets, seal any gaps around the bracket footprint where water can pool.
- Re-inspect and re-torque anchors after the first 30 days. Expansion anchors in concrete can experience some pre-load relaxation in the first hours after installation as the concrete settles around the expanded anchor, but retorquing immediately is not needed. A check at 30 days catches any nuts that have vibrated slightly loose.
- After that, check and tighten all fasteners at the start and end of each storm season, or at minimum once a year. A five-minute inspection every spring is far easier than dealing with a shifted or damaged gazebo frame.
Wind load, safety checks, and when to call a pro
Understanding wind load on a gazebo
A 10x12 hardtop gazebo presents a significant sail area to the wind. At 60 mph wind speeds, the lateral force on a typical gazebo can exceed 500 lbs, and uplift forces on the roof can be substantial depending on roof pitch and overhang. At 90 mph, those forces more than double. Most residential concrete patios and the anchoring methods described here can handle wind events up to around 70 to 80 mph when properly installed with multiple anchors at every leg. Beyond that, you're moving into territory where the gazebo frame itself may not be rated for the load, regardless of how well it's anchored.
Safety checks before you consider it done
- Check frame plumb and level one final time with all anchors tightened. A gazebo that leans or twists under wind load concentrates stress on fewer anchors.
- Tug test each leg firmly by hand after anchoring. There should be zero movement at the base plate. Any wobble means an undertorqued anchor or a drilled hole that's too large for the anchor diameter.
- Inspect the base plates for cracks, deformations, or thin flanges. Factory kit gazebo base plates are sometimes thin stamped steel. If yours look flimsy, consider adding reinforcing back-plates (a washer-style plate cut from 1/8-inch steel and placed under the nut) to spread the load.
- Make sure the gazebo frame is fully assembled and all cross-bracing connections are tight before anchoring. Anchoring a loose frame locks in that looseness.
- If you live in a high-wind zone (hurricane, tornado, or sustained high-wind region), check whether your county or municipality requires a permit for a permanent outdoor structure. A permitted installation will need to meet local building code wind-load requirements, which may mandate larger anchors, additional attachment points, or a structural engineer's stamp.
When to call a professional
Most homeowners can handle anchoring a standard hardtop gazebo to a solid concrete patio themselves with the right tools and this guide. If you need the exact steps, this guide also covers how to anchor a gazebo to a concrete patio using common concrete anchor systems concrete patios. But there are a few situations where it's worth getting professional input.
If your patio slab is cracked, thin, or shows signs of significant deterioration, a concrete contractor should assess whether it can take anchors at all before you drill into it. If your gazebo is unusually large (over 14 feet in any direction) or heavy, or if you're in a high-wind or coastal zone, a structural engineer can size the anchor hardware appropriately for your actual wind load conditions.
And if you're anchoring to a wood deck that's more than a few years old, have a contractor check the joist condition first: lagging into rotted framing is worse than not anchoring at all. The goal isn't to discourage DIY, it's to make sure the work you put in actually protects the structure when it matters.
One more thing worth noting: the anchoring approach on a concrete patio is fundamentally different from anchoring on other surface types. If your patio is concrete, the specific techniques for concrete anchoring go deeper than what fits in a general overview. Similarly, if you're working with pavers or a brick patio, there are surface-specific tricks and hardware choices that make a real difference in how well the installation holds up over time.
FAQ
How far from the edge can I place gazebo anchors on a concrete patio?
As a rule of thumb, keep anchors well away from slab edges, typically at least the same distance as your planned embedment (often more conservative near corners). If you must anchor close to an edge, epoxy anchors are usually the better choice, but you should measure your slab thickness and edge distance first because edge breakout can happen even when the anchor is properly torqued.
What if my gazebo base plate holes do not match the anchor spacing I planned?
Test-fit the base plate dry before drilling anything, then align each plate hole with a safe drilling location over usable concrete (or substrate). If alignment forces you too close to an edge or onto a void under pavers, it is better to reposition the gazebo if possible rather than compromise embedment or install anchors into weak areas.
Do I need to remove snow or water pooling before anchoring or after installation?
Yes. Water that sits around anchor penetrations increases freeze-thaw damage and rust, even if you sealed correctly. During the off-season, clear standing water from around legs and check for cracking or rust staining at anchor points, since early signs usually mean moisture is getting into the holes.
How do I prevent anchors from loosening if my patio surface is uneven?
Shimming the gazebo base using only temporary materials is a common mistake. The better approach is to level the contact surface or use a bracket system designed to accommodate minor irregularities, then retighten fasteners after the gazebo settles (for example, after the first few wind events).
Can I use the same anchors for a pop-up canopy as for a hardtop gazebo?
Not exactly. Weighted bags or ground stakes can work for lightweight pop-up styles, but hardtops need mechanical attachment into structural material. If your canopy has rigid legs and a frame that catches strong wind, treat it more like a hardtop and anchor into concrete, substrate below pavers, or deck framing, depending on where the legs land.
What should I do if I hit rebar or post-tension cables when drilling concrete?
Stop drilling and reassess. If you find rebar, you may need to relocate the anchor to avoid weakening the steel bond zone or drilling into areas where load paths change. If post-tension cables are suspected, do not guess, contact a contractor or structural professional, because accidental damage can create serious structural risk.
How many anchors at each leg are enough for a typical 10x10 to 12x14 hardtop gazebo?
Follow the manufacturer specification for the number of anchors and any bolt size requirements, then ensure each leg has multiple attachment points when possible. If you are in a high-wind area, a good practical decision is using more anchors at each leg rather than relying on a single bolt per side, because uplift and shear loads distribute better that way.
Should I use washers or torque to a specific value when installing anchors?
Use the hardware kit specified by the gazebo manufacturer, including washers if they are included or required for the anchor type. For torque, avoid guessing, especially with wedge anchors and sleeve anchors, because over-torquing can damage threads or compromise concrete contact. Under-torquing also allows movement that leads to loosening.
Do I need to seal the drilled holes or anchor hardware after installation?
Sealing is usually a good idea on installations where water can reach the penetration points, particularly in freeze-thaw climates or near downspouts. Epoxy systems often come with their own installation approach, so match the sealing method to the anchor type and follow the system’s required hole cleaning and curing steps.
How do I choose between expansion anchors and epoxy anchors if my slab is thin?
If your slab is thinner than typical residential assumptions, epoxy anchors are often preferred because they can achieve strong holding with a properly prepared hole and controlled bonding. Still, thin slabs can fail even with strong anchors, so measure thickness and consider professional assessment if you see cracks, spalling, or deterioration.
What are signs my gazebo anchoring is not right?
Look for shifting at the base, new cracks radiating from anchor locations, rust streaks that keep reappearing after rain, or visible movement in the frame after gusty weather. Any of these indicate either poor contact, inadequate embedment, or moisture intrusion, and it is better to fix early than wait for major loosening.