You can anchor a gazebo to a brick patio reliably, but the method depends on one critical factor: whether your brick has a solid concrete or compacted footing underneath it. If it does, you'll drill through the brick and into that backing with masonry anchors or wedge anchors, and you'll get a rock-solid connection. If your brick patio is dry-laid on sand or gravel with no concrete base, direct anchoring into the brick itself is a gamble and you'll need a different approach. Get that one thing figured out first, and the rest of the installation is very manageable for a confident DIYer.
How to Anchor a Gazebo to a Brick Patio Safely

Celia Vaughn
22 Jun 2026
First, figure out what's under your brick
Before you buy a single anchor, you need to know what you're drilling into. Brick patios come in two main forms: brick pavers laid on a concrete slab (sometimes called a mortared or slab-backed patio), and dry-laid brick pavers set on a sand or compacted gravel base. The difference matters enormously for anchoring.
To check, look along the edge of your patio for the paver thickness and what's below it. A mortared installation will show a visible concrete slab underneath the brick layer, usually 3.5 to 4 inches of concrete. A dry-laid patio will show sand, stone dust, or gravel below the brick with no concrete. You can also probe at a joint with a screwdriver or thin rod. If you hit solid resistance within an inch or two past the brick surface, you likely have concrete backing. If it keeps going into loose material, you don't.
There's also a third situation worth calling out: some older patios have brick laid directly into mortar beds on top of concrete, where the mortar bed itself is several inches thick. This can still support anchoring, but you want the anchor to reach into the concrete slab, not just the mortar. A mortar bed alone won't give you the shear and pullout resistance you need for a gazebo in wind.
| Brick Patio Type | What's Under the Brick | Direct Anchoring? | Best Approach |
|---|---|---|---|
| Brick on concrete slab | 3.5"+ concrete | Yes | Wedge or sleeve anchors through brick into concrete |
| Brick on mortar bed over concrete | Mortar bed + concrete slab | Yes, with longer anchors | Longer wedge anchors reaching concrete slab depth |
| Dry-laid brick on sand/gravel | Sand, stone dust, or gravel | No | Use weighted base plates or anchor to a frame bolted to ground anchors outside the patio |
| Brick with hollow/unfilled cores | Hollow block or cavity | Not directly | Fill cores with grout first, or anchor into concrete below |
Picking the right anchors for brick-over-concrete
Assuming you have a concrete-backed brick patio (which is the most common setup for a proper outdoor patio), wedge anchors and sleeve anchors are your two best options. Both are mechanical masonry anchors that expand inside the concrete hole to resist pullout. Here's how they compare for this specific job.
| Anchor Type | How It Works | Best For | Considerations |
|---|---|---|---|
| Wedge anchor | Clips expand as nut is tightened, locking into solid concrete | Permanent, high-load installations | Requires solid concrete; do not use in hollow brick or block without grout fill |
| Sleeve anchor | Expansion sleeve spreads outward as bolt is tightened | Slightly easier to install; good for base plates | Slightly less load capacity than wedge anchors of same diameter |
| Concrete screw (Tapcon-style) | Threads cut directly into concrete | Lighter loads, easier removal | Lower shear strength; may not be sufficient for large gazebos in high-wind areas |
| Epoxy/chemical anchor | Adhesive fills the hole and bonds threaded rod in place | Cracked or softer concrete, high-load applications | Longer cure time; less DIY-friendly but very strong |
For most residential gazebo installations, 1/2-inch diameter wedge anchors or sleeve anchors are the sweet spot. They're rated for the shear and tension loads a 10x10 or 12x12 gazebo will put on the base plates, they're widely available at any home center, and the installation process is straightforward with the right drill. If your gazebo is larger than 14x14 feet or you're in a high-wind region (think coastal areas or places with regular gusts over 60 mph), bump up to 5/8-inch anchors or look at epoxy anchors for the extra holding capacity.
One important note on hollow or unfilled brick: wedge anchor manufacturers explicitly warn against installing these anchors into hollow masonry, open-cored brick, or block that hasn't been grouted solid. The expansion mechanism needs the surrounding material to resist outward pressure. If your brick pavers have visible hollow cores, either fill those cores with hydraulic cement or grout before anchoring, or plan to drill completely through the brick layer and embed the anchor fully into the concrete slab below.
Tools, materials, and planning where to drill
What you'll need
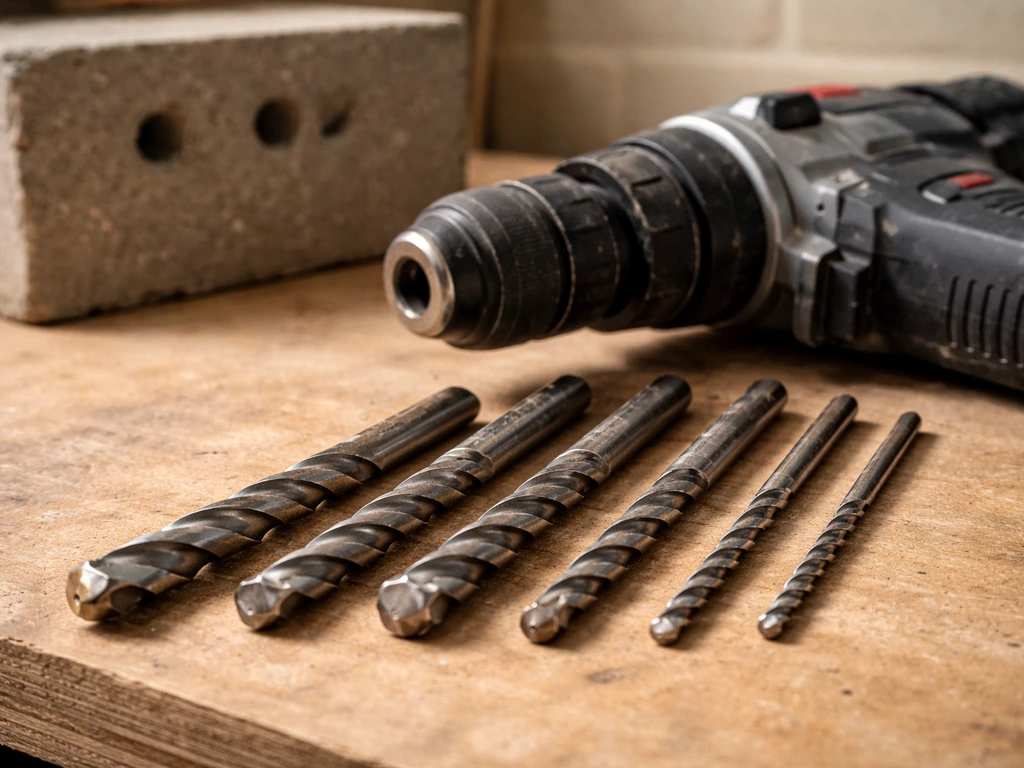
- Rotary hammer drill (not just a standard drill driver; you need hammer action for masonry)
- Carbide-tipped masonry drill bits matched to your anchor diameter (e.g., 1/2" bit for 1/2" wedge anchors)
- Nylon hole-cleaning brush sized for your drill bit diameter
- Compressed air or a shop vacuum (for clearing debris from holes)
- Torque wrench or impact driver with torque-limiting socket
- Bubble level (a 4-foot level is ideal for checking posts)
- Tape measure and chalk line or marking chalk
- Anchor base plates or post base hardware rated for your gazebo post size
- Stainless steel or hot-dip galvanized wedge or sleeve anchors (never plain steel outdoors)
- Exterior-rated sealant or self-leveling caulk for sealing around anchor bases
- Safety glasses and hearing protection
On anchor hardware: always use stainless steel or hot-dip galvanized anchors for an outdoor application. Plain zinc-plated anchors will rust through in a few seasons, especially where water pools around a base plate. The cost difference is small and the longevity difference is massive.
Planning anchor locations before you drill
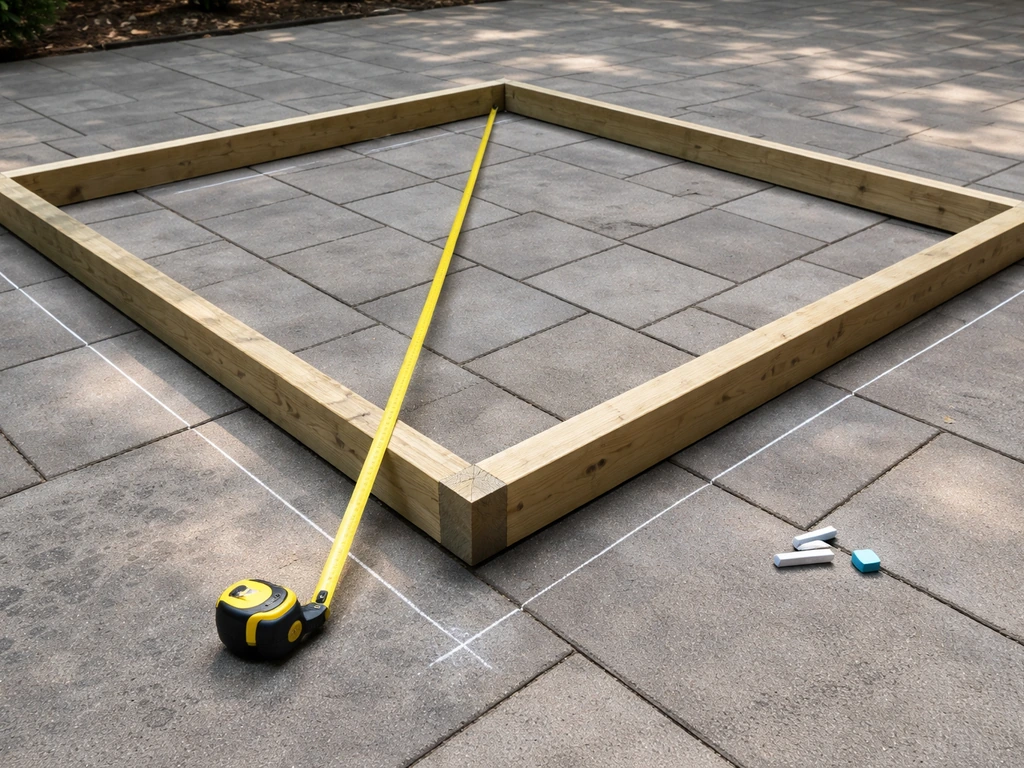
Lay out your gazebo footprint before touching a drill. Set the frame in position and use a chalk line or marking chalk to outline exactly where each post will land. Then check two things: first, that your post locations fall on solid brick (not on a mortar joint, which is weaker), and second, that there's enough space between the anchor hole and the edge of any individual brick paver. As a rule of thumb, keep anchor holes at least 1.5 to 2 inches from any brick edge or joint to avoid splitting. If a post location puts you right on a joint, shift the base plate slightly or use a larger base plate to bridge across to solid brick.
Also measure your diagonal. For a rectangular gazebo, measure corner to corner in both directions. If those two diagonal measurements match, your layout is square. If they don't, adjust before drilling anything. Fixing a post that's off by 3 inches after you've drilled is a real headache.
Step-by-step: drilling and setting your anchors
- Mark the anchor hole centers on the brick surface through the base plate holes. Use a center punch or a sharp nail to make a small dimple so your bit doesn't wander when you start drilling.
- Set your rotary hammer to hammer-drill mode and load the correct carbide-tipped masonry bit. For a 1/2" wedge anchor, use a 1/2" carbide bit. Drill straight down, keeping the drill perpendicular to the surface. Angle matters here: even a slight lean will make the anchor harder to set and reduce its holding strength.
- Drill to the correct depth. For wedge anchors, the total hole depth should be the minimum embedment depth plus about 1/2 inch extra to allow space for debris at the bottom. For most 1/2" wedge anchors, minimum embedment is around 2-1/4 inches into concrete, so drill at least 2-3/4 inches into the concrete layer. Don't forget you're drilling through the brick first (typically 2-1/4" to 2-3/4" for standard brick pavers), so your total hole depth from the surface will be deeper.
- Clean the hole thoroughly. This step gets skipped all the time and it kills anchor performance. Insert a nylon hole-cleaning brush and run it in and out several times to break up the dust lining the hole walls. Then blow out all debris with compressed air or a shop vacuum. Dust at the bottom of the hole blocks the anchor's expansion zone and can reduce holding capacity dramatically.
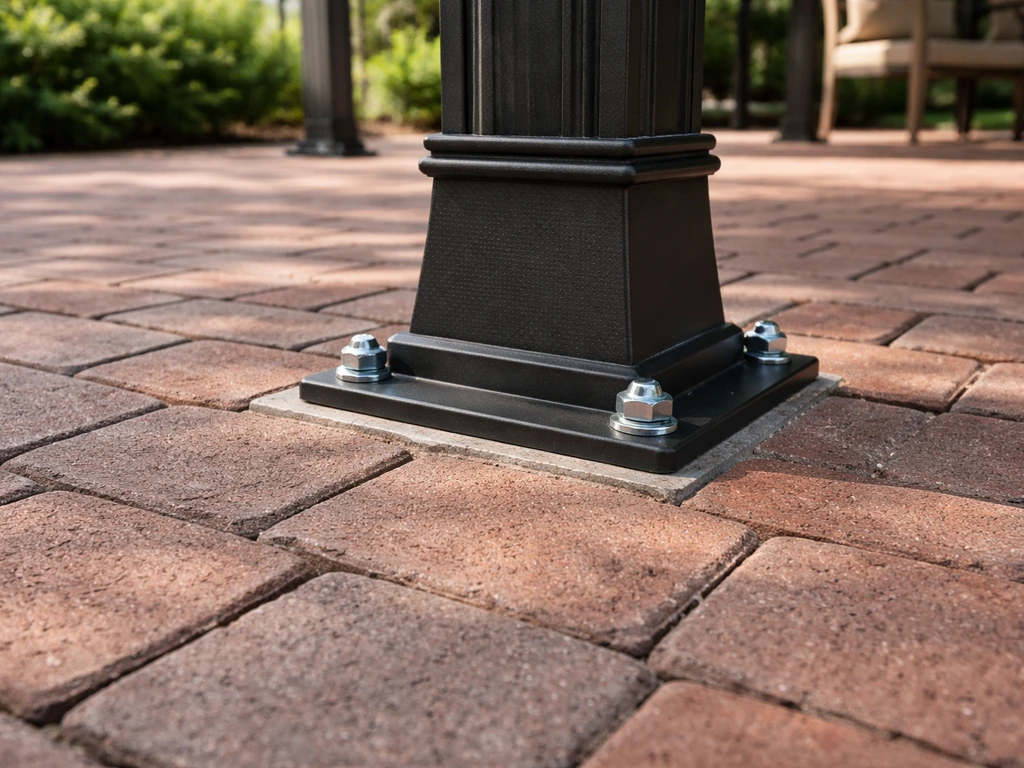
- Insert the anchor through the base plate hole and into the drilled hole. The anchor should slide in until the threaded end protrudes above the base plate. For wedge anchors, there should be at least 4 to 6 threads showing above the nut once seated.
- Hand-tighten the nut first to confirm the anchor is seated properly and the base plate is flush with the brick surface. Then use a torque wrench to tighten to the manufacturer's specified torque for your anchor diameter. A 1/2" wedge anchor typically calls for around 50 to 75 ft-lbs depending on the manufacturer. Do not over-tighten. Over-torquing can cause the surrounding concrete to crack, the anchor threads to strip, or in softer brick, can actually pull or spin the anchor out.
- Repeat for all base plate anchor points before moving any posts into place. It's much easier to adjust or re-drill without a half-assembled gazebo frame in the way.
- Apply a bead of exterior-rated sealant around the base of each base plate after installation. This seals out water that would otherwise sit under the plate, wick under the brick, and accelerate corrosion or freeze-thaw damage.
Leveling, spacing, and checking for wobble
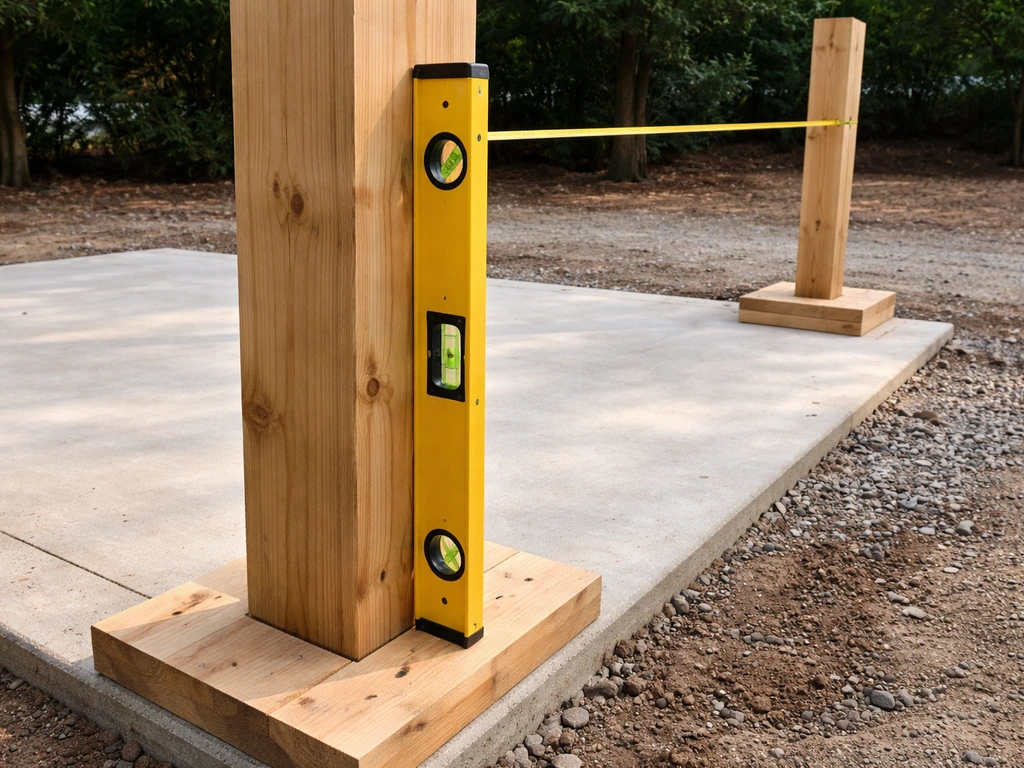
Once your base plates are set and your posts are in place, plumb each post before fastening anything permanently. Use a 4-foot level on two adjacent faces of each post. If a post isn't plumb, loosen the base plate hardware slightly and use thin stainless steel shims between the base plate and the brick surface to bring it into alignment. Do not just force a post into a slightly off-angle base plate and over-tighten the bolts hoping it will be fine. It won't be.
Spacing check: measure post-to-post distances at the base and again at the top once the top beams are connected. If the measurements differ significantly (more than about 1/4 inch), your frame is racking. Add temporary diagonal bracing while you square everything up, then connect the permanent cross bracing or knee braces called for in your gazebo's design.
The wobble test: once the full frame is assembled, push firmly on each corner post with both hands and check for any movement at the base plate connection. blank" rel="noopener noreferrer">A correctly installed wedge anchor in solid concrete won't budge. A technical overview from StructureMag explains that installation torque can affect expansion anchors, and that over-torquing may lead to concrete failure, steel failure, or pullout-type failures depending on the anchor and base material conditions blank" rel="noopener noreferrer">A correctly installed wedge anchor in solid concrete won't budge. If you feel any movement at all, the anchor isn't properly set. Don't move forward with roofing or finishing until that's resolved. Also shake the top rail of the structure laterally. Minor flex in the frame itself is normal, but if the base plates are lifting or rocking, you have an anchoring problem, not a frame problem.
For wind stability specifically, diagonal bracing between the posts (either metal knee braces or structural cross members built into the gazebo design) is what prevents racking in a storm. The anchors hold the structure down; the bracing keeps it from twisting and leaning. If you want your setup to resist uplift, leaning, and vibration, focus on choosing the right anchors and placing them correctly for how to hold a gazebo down on a patio. Both matter equally.
Common mistakes and how to fix them
- Using the wrong drill mode: A standard drill driver with a masonry bit will barely scratch brick and won't reach concrete underneath. You need a rotary hammer drill in hammer-drill mode. This is probably the single most common DIY mistake on this job.
- Drilling into mortar joints instead of solid brick: Mortar is much softer and weaker than brick. An anchor set in a mortar joint will loosen over time. Always center anchor holes in the solid brick unit, not in the joint.
- Skipping the hole cleaning step: Dusty holes are the leading cause of anchors that seem tight at first but loosen after a few months. Clean every hole, every time.
- Wrong anchor length: The anchor must extend deep enough into the concrete layer to achieve the minimum embedment depth. If your brick layer is 2.5 inches thick and you use a 3-inch anchor, almost all of it is in the brick with almost nothing in the concrete. Measure your concrete layer depth and buy anchors accordingly.
- Over-tightening: Cranking down harder than the specified torque doesn't make the anchor stronger. It can crack the surrounding concrete, strip threads, or cause the anchor to spin in the hole. Use a torque wrench.
- Skipping corrosion protection: Plain zinc anchors and base plates will rust and fail within a few years outdoors. Use stainless steel or hot-dip galvanized hardware and seal around the base plates.
- Not checking for underground utilities before drilling: If your patio has any embedded conduit, irrigation lines, or radiant heat, know where they run before drilling. A utility locator or a check of your original patio plans can save a lot of pain.
If you find an anchor is loose after installation, don't just re-tighten it. Pull the anchor out, clean the hole thoroughly again, and either re-install with an epoxy anchor (which will fill any voids and bond to the existing hole walls) or drill a new hole nearby and abandon the compromised one. A loose anchor that gets re-tightened without addressing the root cause will loosen again.
Safety, weatherproofing, and when to call a pro
During installation
Rotary hammer drills kick hard when the bit catches. Keep a firm two-handed grip and don't let anyone stand downrange of the drill. Flying masonry chips are the most common injury on this type of job, so wear safety glasses throughout. If you're assembling a larger gazebo frame, the risk of panels falling during assembly is real. Never work under an unsupported beam or roof panel without bracing it first. Have a second person on site whenever you're lifting anything over 8 feet or connecting overhead members.
Weatherproofing your anchors
Water is the long-term enemy of a well-anchored gazebo. Seal around every base plate with a flexible, exterior-grade polyurethane or silicone caulk. Do not use a rigid caulk that will crack when the structure moves slightly in wind. Leave a tiny gap at the bottom edge of the seal so that any water that does get under the plate can drain out rather than pooling. Check those seals annually and re-apply if you see cracking or separation.
When this is a job for a professional
Some situations genuinely warrant calling in a structural engineer or licensed contractor. If your patio is dry-laid with no concrete base, there's no solid substrate for mechanical anchors and you need an engineered solution. If your patio is dry-laid with no concrete base, the best approach to anchor a gazebo to concrete patio may require engineering, depending on what solid substrate you can reach. If your gazebo is larger than about 16x16 feet, or if it has a solid roof (not a lattice or open-frame canopy), the wind and snow loads can exceed what a DIY anchor layout will safely handle without engineering input. Similarly, if you're in a hurricane zone or an area with design wind speeds above 90 mph, most jurisdictions require a permit and engineered anchorage details anyway. And if you drill into your patio and find crumbling or severely cracked concrete below the brick, stop, assess, and consider consulting a contractor before loading that substrate with a permanent structure.
If you're anchoring a standard 10x10 or 12x12 freestanding gazebo to a solid brick-over-concrete patio in a typical residential setting, this is a very manageable DIY project. But if any of the conditions above apply, the cost of a professional consultation is small compared to the cost of a gazebo that fails in a storm. The anchoring approach for brick patios is closely related to anchoring into concrete directly, and many of the same principles apply whether your top surface is brick, bare concrete, or pavers. If you need to secure a gazebo to a concrete patio instead, the goal is the same: use anchors that hold to solid concrete and seal them correctly secure a gazebo to a brick patio.
Quick checklist before you call the job done
- Every anchor hole was drilled to the correct total depth (brick thickness plus minimum concrete embedment plus 1/2" extra)
- Every hole was cleaned with a nylon brush and blown clear of debris before the anchor was installed
- All anchors were tightened to the manufacturer's specified torque, not just cranked down by feel
- All hardware is stainless steel or hot-dip galvanized
- Every post passes the plumb check on two faces
- Post-to-post spacing is consistent from base to top rail
- The wobble test: push firmly on each post at mid-height. No movement at the base plate
- Exterior sealant has been applied around every base plate
- All connection hardware for the frame (bolts, brackets, screws) is fully tightened
- The structure has been visually inspected from 10 feet away for any visible lean, twist, or gap at the base
Do that final walkthrough before you add any roofing panels, curtains, or lighting. It's much easier to fix a base plate issue now than after the structure is fully dressed out. Come back and do the same check after the first major windstorm, and then once a year every spring. Anchors can loosen over freeze-thaw cycles, and catching it early is a five-minute fix instead of an emergency.
FAQ
How far from a brick edge or mortar joint should I drill for gazebo anchors?
A good rule is 1.5 to 2 inches away from any brick edge or weak joint, because splitting starts at the edge. If your post lands near a joint, shift the base plate slightly or use a base plate that covers more brick area so the anchor does not land on the joint itself.
Can I anchor a gazebo into brick pavers if the patio is dry-laid on sand or gravel?
Usually you should not rely on brick itself in that situation, since mechanical anchors need surrounding material to resist expansion and pullout. The practical options are to drill through the brick layer and embed the anchors fully into the concrete below (if any), or redesign the base/anchorage using an engineered approach that reaches a solid substrate.
What should I do if I accidentally drilled into a hollow part of the brick?
Stop and assess the hole. Wedge anchors generally should not be used in hollow or open-cored brick. Options are to fill the cores with hydraulic cement or grout before anchoring, or drill deeper so the anchor is seated in solid concrete rather than in hollow masonry.
Do I need to seal around the base plates, and what kind of sealant works best?
Yes, seal around every base plate with flexible, exterior-rated polyurethane or silicone caulk to reduce water intrusion and rust. Use a sealant that can handle small movement, and don’t create a watertight barrier at the bottom, leaving a small drainage path if water gets under the plate.
How do I know my gazebo frame is square before I finish tightening everything?
Measure both diagonals, corner to corner, in both directions. If they don’t match, adjust before the final fastening. Fixing a misaligned post after drilling is difficult because base plates and anchor holes limit how much you can move afterward.
Is it safe to reuse anchors if one feels loose after installation?
Don’t just re-tighten. Pull the anchor, clean the hole thoroughly, and re-install using an epoxy anchor if the existing hole has voids, or drill a new hole nearby and abandon the compromised one to avoid a repeat pullout later.
What drill type and safety precautions should I use when anchoring through brick into concrete?
Use a rotary hammer drill for masonry and hold a firm two-handed grip, since bits can grab suddenly. Wear safety glasses, keep people out of the line of fire for masonry chips, and have beams or panels braced during assembly so nothing can fall during overhead lifting.
How often should I check the anchors after installation?
Do a base-plate walkthrough before adding roofing, curtains, or lighting, then repeat after the first major windstorm. After that, check at least once each spring, because freeze-thaw cycles can loosen anchors or allow minor rocking that should be corrected early.
What’s the difference between a frame wobble issue and an anchoring issue?
Some flex in the top structure can be normal, but rocking or lifting at the base plate indicates an anchoring problem. If the base plates move or the anchor connection feels soft, you need to address the anchors before proceeding with the rest of the build.
When should I involve a contractor or engineer even if I see concrete under the brick?
Consider professional input if you find crumbling or severely cracked concrete after drilling, if the gazebo is large (around 16x16 feet or bigger), if you’re adding a solid roof, or if you’re in very high wind areas where permits and engineered anchorage details are commonly required.