To anchor a gazebo to a concrete patio, you drill into the slab with a hammer drill and masonry bit, set wedge anchors or post-base hardware into the holes, and bolt your gazebo's leg plates down tight. The exact anchor size depends on your gazebo's post footprint and your local wind exposure, but for most residential freestanding gazebos a 1/2-inch wedge anchor with at least 2-1/4 inches of embedment into the concrete is the standard starting point. Done right, this takes a few hours and gives you a structure that won't shift or tip in a serious windstorm.
How to Anchor a Gazebo to a Concrete Patio Step-by-Step

Celia Vaughn
8 Jun 2026
Choose the right gazebo type and anchoring approach
Before you touch a drill, figure out what kind of gazebo you have, because the anchoring strategy changes depending on the structure. The two main categories you'll run into are freestanding gazebos (four or more posts that carry all the load independently) and attached or perimeter-supported gazebos (one side ties into your house or a ledger board). Most concrete patio projects involve a freestanding structure, so that's the main focus here.
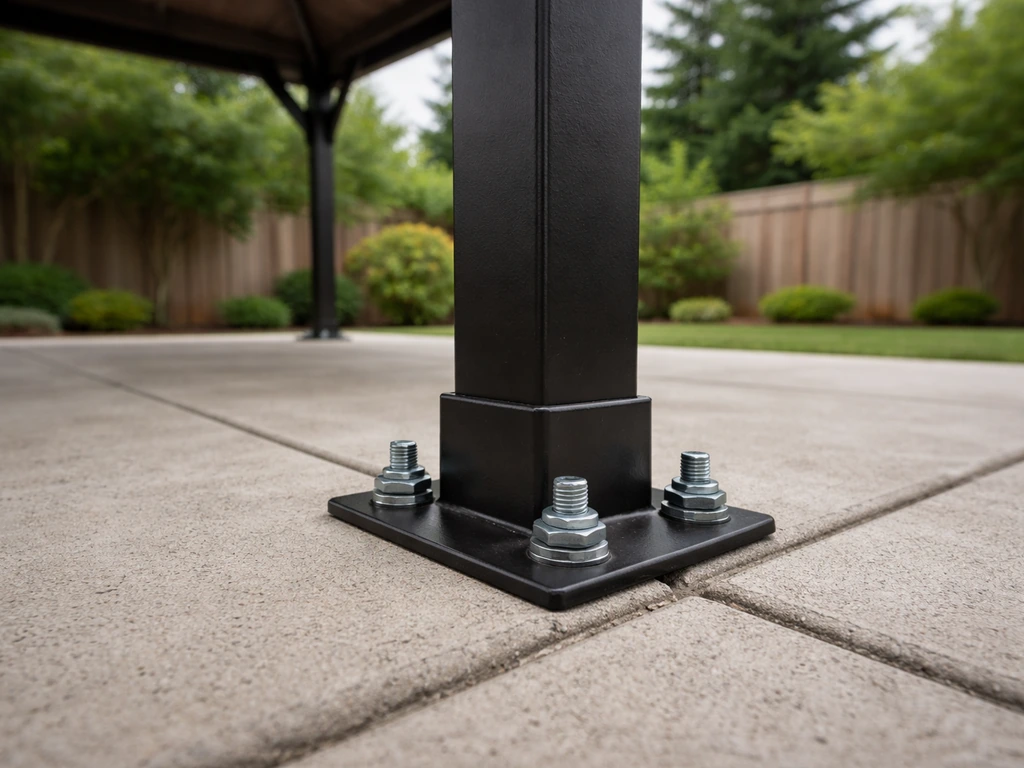
Freestanding gazebos transfer all wind and gravity loads down through their posts into the base connections. That makes the post-to-concrete connection the single most important joint in the whole structure. If you're using a kit gazebo, it almost certainly has a flat steel footplate welded or bolted to each post leg. Your job is to fasten that plate securely to the concrete. If you're building from scratch or using a wood-framed design, you'll install a dedicated post base hardware fitting (like a Simpson Strong-Tie ABA or ABU series post base) first, then set the post into it.
Attached gazebos that connect to a house wall add a ledger-attachment consideration on top of the concrete anchoring. That's a longer conversation, and if your structure ties into the house framing, it's worth reviewing how to build a patio gazebo from the ground up before diving into anchor placement. If you want the gazebo to stay put, learning how to hold a gazebo down on a patio starts with choosing the right anchoring method and setting the post-to-concrete connection correctly anchor placement. For brick patios the approach differs slightly too, since you're dealing with mortar joints instead of poured slab.
One more thing to settle early: permanent vs. semi-permanent. Wedge anchors and epoxy anchors are essentially permanent since removing them leaves a hole. Screw anchors (Tapcon-style) can be removed and reused if you ever want to relocate the gazebo, but they carry lower load ratings. For anything larger than a 10x10 canopy-style gazebo, go with wedge anchors or adhesive anchors.
Prepare the concrete patio surface and locate anchors

Good prep work prevents the two most common anchoring failures: drilling in the wrong spot and drilling into weak or cracked concrete. Start by cleaning the patio surface thoroughly. Any grit, oil, or moss under a footplate will cause it to rock, and a rocking plate is essentially a loose connection even if the bolts are tight.
Next, inspect the slab. Look for visible cracks, spalling edges, or frost heave damage. Avoid placing anchors within 6 inches of a crack or within about 10 inches of the slab edge if you can help it. Most anchor manufacturers specify a minimum edge distance (often 5 to 6 times the anchor diameter), and poured concrete near edges is structurally weaker. If your gazebo layout forces posts right to the edge of the slab, that's a red flag worth taking seriously.
Check slab thickness. Most residential patios are 3.5 to 4 inches thick, but some older slabs are only 2.5 inches. Wedge anchors need a minimum embedment depth (typically 2-1/4 inches for a 1/2-inch anchor), and the hole must go deeper than the embedment depth so the anchor tip has room to expand. On a thin slab you may not have enough depth for a standard wedge anchor, which is when epoxy anchors or surface-mounted base plates with multiple smaller anchors become better options.
To lay out anchor positions, fully assemble your gazebo base and set the whole structure in its final location on the patio. Use a level to confirm the base is sitting flat, shimming if needed. Then take a marker or a scratch awl and blank" rel="noopener noreferrer">mark through each bolt hole in the footplates directly onto the concrete below. Pull the gazebo back, double-check your marks with a tape measure to confirm they're square to each other, then proceed to drilling. If you want the full walkthrough, follow the steps for how to build a patio gazebo, from choosing the right layout to anchoring it securely.
Attachment methods for anchoring to concrete
There are three practical options for anchoring a gazebo to a concrete patio. Each has real trade-offs.
| Method | Best For | Holding Strength | Removable? | Notes |
|---|---|---|---|---|
| Wedge anchors | Most freestanding gazebos, 4+ inch slabs | High | No | Expand mechanically as bolt is tightened; reliable and widely available |
| Epoxy/adhesive anchors | Thin slabs, high-load applications, cracked concrete | Very high | No | Threaded rod set in epoxy; requires cure time (often 24 hrs) before loading |
| Post base hardware (e.g., Simpson ABA/ABU) | Wood-post builds, kit gazebos with open post bottoms | High (depends on anchor used) | No | Base plate is set with wedge or epoxy anchors, then post bolts into plate |
| Concrete screw anchors (Tapcon) | Lightweight canopy structures, temporary setups | Moderate | Yes | Good for 10x10 or smaller; not recommended for full timber or heavy kit gazebos in wind-exposed areas |
For the typical aluminum or steel-framed kit gazebo on a standard patio, wedge anchors are the go-to choice. A 1/2-inch x 3-1/2-inch wedge anchor is a common spec you'll see in gazebo kit manuals. For example, one gazebo kit assembly guide specifies installing anchor bases with 1/2 in. x 3-1/2 in.
anchor bolts to concrete ground and then fastening each post/leg to those anchor bases [A 1/2-inch x 3-1/2-inch wedge anchor is a common spec you'll see in gazebo kit manuals. ](https://www. foreverredwood. com/media/pdf/assembly/SpaGazeboKit.
pdf). The anchor bolt threads through the gazebo's existing footplate hole, drops into the drilled concrete hole, and as you torque the nut, the expansion clip at the bottom bites into the concrete walls. Simpson Strong-Tie's wedge anchor installation specs call for matching the drill bit diameter exactly to the anchor diameter (a 1/2-inch anchor uses a 1/2-inch bit) and drilling the hole at least 1/2 inch deeper than the required embedment to give the anchor tip clearance.
Post base hardware makes the most sense when you're building a gazebo from lumber rather than assembling a kit. You anchor the base plate to the concrete first, let everything set, then drop your 4x4 or 6x6 post into the saddle and through-bolt it. This approach also elevates the post bottom slightly off the concrete, which keeps wood from wicking moisture and rotting.
Step-by-step: anchoring a patio gazebo to a concrete slab
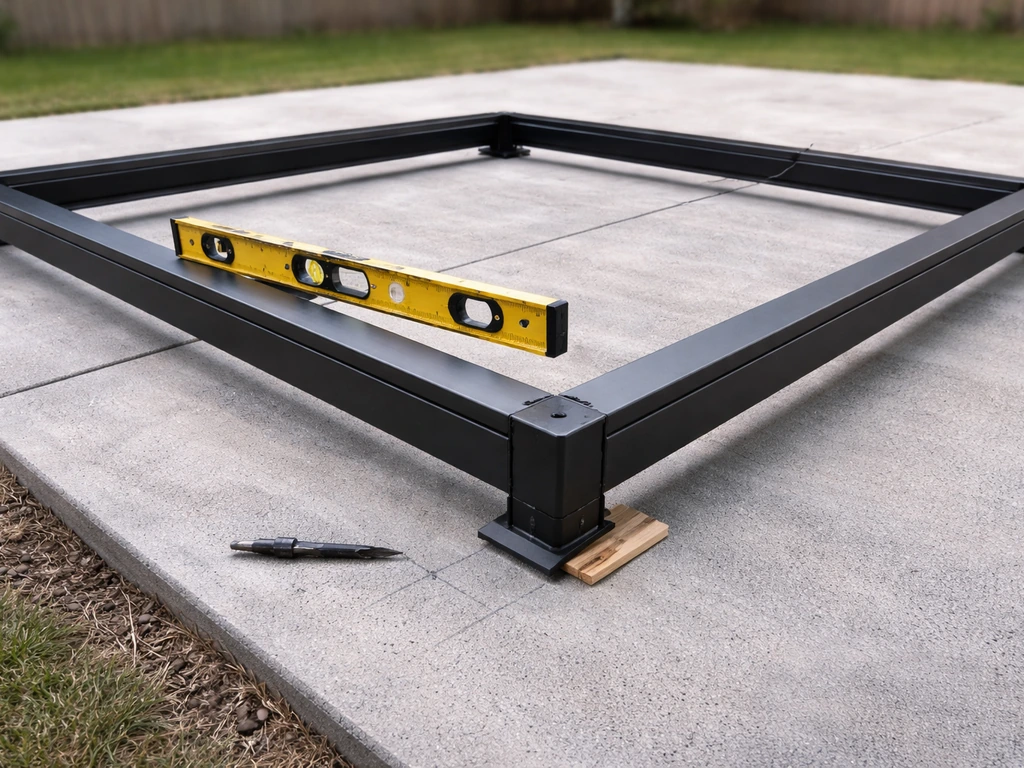
- Assemble the gazebo base frame on the patio in its final position. Level it front-to-back and side-to-side using a 4-foot level. Shim any low corners temporarily.
- Mark anchor hole positions by pushing a marker or scratch awl through each footplate bolt hole to the concrete beneath. Label each mark so you know which post it belongs to.
- Move the gazebo off to the side. Measure diagonals (corner to corner both ways) on your marked layout — they should be equal if the structure is square. Adjust if needed.
- Put on safety glasses and ear protection. Chuck a 1/2-inch carbide-tipped masonry bit into your hammer drill. Drill each marked hole to a depth of at least 3-1/2 inches for a 1/2 x 3-1/2 anchor (the bit tip should reach roughly 1/2 inch past the anchor's embedment requirement).
- Blow out each hole with compressed air or a rubber bulb blower. Concrete dust left in the hole reduces holding strength significantly — this step matters.
- Drop a wedge anchor into each hole with the threaded end up, bolt threads exposed above the surface. Tap it down with a hammer until the expansion clip is fully below the slab surface.
- Reposition the gazebo over the anchors, feeding each anchor bolt up through the corresponding footplate hole. Add the washer and nut finger-tight on each one.
- Re-check that the structure is level and square. Make any final adjustments now — once you torque the nuts, it's locked in.
- Torque each nut with a wrench according to the anchor manufacturer's spec. For a 1/2-inch wedge anchor in normal concrete, typical installation torque is around 40 to 65 ft-lbs depending on the product. Use a torque wrench if you have one, or tighten firmly with a standard wrench until resistance becomes significant — snugging it down with significant force, not just finger-tight.
- Walk around and tug each post by hand to verify there's no rocking or play. The structure should feel solid at the base.
One thing that often goes wrong at step 4: people under-drill the hole depth. The hole has to be deeper than the anchor embedment so the expansion end has somewhere to go. If the hole is too shallow, you can't fully seat the anchor, and you end up with threads exposed and a bolt that sits proud of the footplate. Measure your drill depth with a piece of tape on the bit before you start.
Wind-load, stability, and safety checks
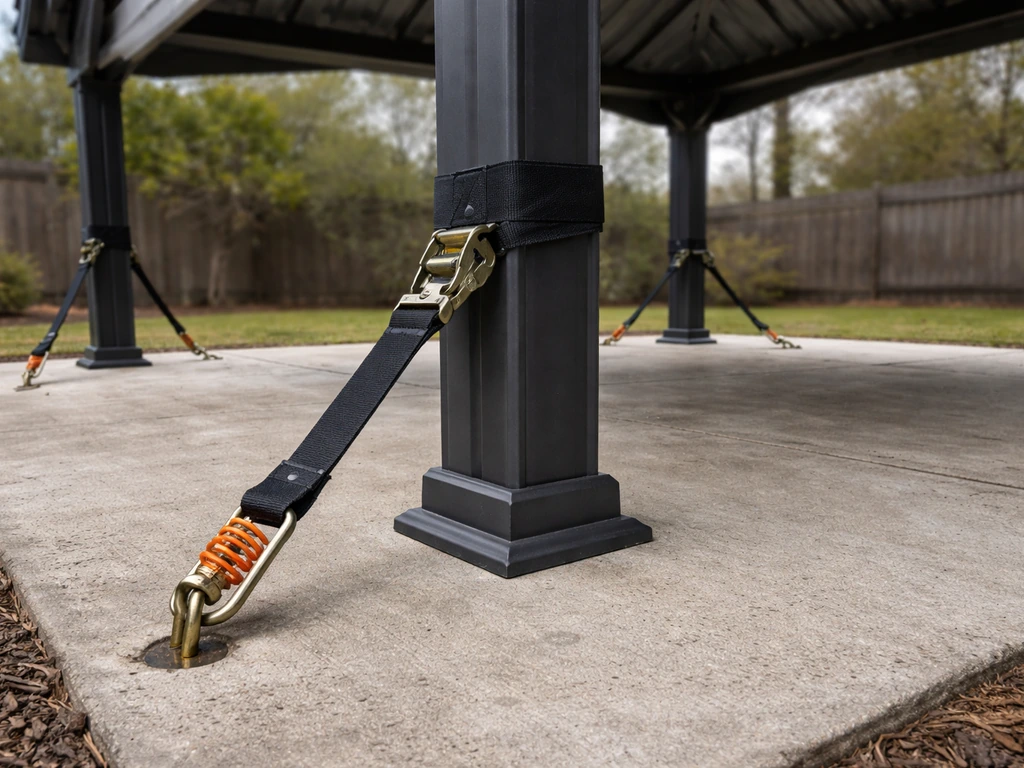
Most residential gazebo failures aren't caused by poor-quality hardware. They're caused by not thinking about racking forces. Racking is what happens when wind pushes sideways on the structure and wants to turn it into a parallelogram instead of a rectangle. Even with perfectly installed anchors, a gazebo with no diagonal bracing can rack and loosen its own connections over time.
Check whether your gazebo has cross-bracing or knee bracing between the posts and the roof frame. Most quality kit gazebos include some form of this. If yours doesn't, or if you're building from scratch, adding diagonal knee braces from each corner post up to the rafter at roughly 45 degrees dramatically increases rigidity. For a freestanding wood-framed structure in a wind-exposed yard, this isn't optional.
Wind exposure matters a lot for anchor sizing. In a low-wind suburban backyard sheltered by fences and trees, two 1/2-inch wedge anchors per post handle a typical 12x12 gazebo fine. In a coastal area, an open yard at the edge of a hill, or anywhere with consistent winds above 90 mph, you need to treat this differently. That means larger anchors (5/8-inch or 3/4-inch), more anchor points per post, or engineer-reviewed footings that go into the ground below the slab. Some areas with hurricane exposure require a permit for any permanent shade structure regardless of size.
After the first major windstorm following installation, go back and check each anchor nut. It's normal for things to settle slightly, and a half-turn of re-tightening early on keeps everything solid long-term. Also check the post-to-plate connection: make sure no fasteners have backed out and that the footplates haven't developed any rocking movement.
Signs you need heavier-duty anchoring
- Your gazebo is larger than 12x16 feet
- The roof is solid (polycarbonate, metal, or shingles) rather than open lattice or fabric — solid roofs catch much more wind
- You're in a high-wind zone (design wind speed above 90 mph)
- The slab is older, visibly deteriorated, or you can see cracks near post locations
- Local code classifies the structure as a permanent building (which usually triggers a permit)
Tools, materials, and common mistakes to avoid
What you'll need
- Hammer drill (not just a regular drill — concrete requires the hammering action)
- 1/2-inch carbide-tipped masonry drill bit sized to match your anchor diameter
- Compressed air or rubber bulb blower for hole cleaning
- 1/2-inch x 3-1/2-inch wedge anchors (or size specified in your gazebo manual), one per bolt hole minimum
- Flat washers and hex nuts to match anchor thread
- Torque wrench or breaker bar
- 4-foot level
- Tape measure and speed square
- Marker or scratch awl for layout
- Safety glasses and hearing protection
- Hammer for seating anchors
Mistakes that bite people
- Using the wrong anchor type: standard drywall or wood screws driven into concrete plugs are not structural anchors. Only use anchors rated for concrete with published load data.
- Under-drilling hole depth: if the hole isn't deep enough, the anchor can't fully expand and you lose most of your holding strength.
- Skipping hole cleaning: dust in the hole dramatically reduces wedge anchor grip. Always blow out the hole before inserting the anchor.
- Anchoring too close to the slab edge or an existing crack: edge and spacing minimums exist because concrete near edges can fracture under load.
- Not re-checking level and square before final torque: once the anchor expands in the concrete, you can't adjust the footplate position.
- Assuming a kit's included hardware is right for your slab: some kit manufacturers include lightweight clips or spike stakes meant for soil or wood decking, not concrete. Always substitute proper concrete anchors.
- Ignoring torque specs: over-tightening can crack the concrete around the hole; under-tightening leaves the anchor underperforming.
When to call a pro
Most homeowners can handle anchoring a standard kit gazebo to a poured concrete patio without professional help. But there are real situations where calling in a structural engineer or licensed contractor is the smarter, safer move, and knowing where that line is matters.
- Your structure is larger than about 12x16 feet or has a solid roof: structures this size often cross the threshold into permit-required territory in most jurisdictions, and a permit usually means an engineer-stamped plan.
- Your concrete slab is in poor condition: cracked, heaving, or deteriorating slabs can't reliably hold anchor loads. A contractor may need to assess whether the slab needs repair or whether you need to core through it and pour footings below.
- You're in a high-wind or seismic zone: wind uplift and lateral loads in these areas require engineered calculations, not rule-of-thumb anchor sizing.
- Your gazebo attaches to the house: ledger connections to house framing are structural, almost always permit-required, and involve flashing and waterproofing details that go beyond concrete anchoring.
- You have any doubt about the slab thickness or reinforcement: if the patio was poured by a previous owner and you don't know whether it has rebar, what the concrete mix was, or how thick it is, a quick assessment before drilling is worth the peace of mind.
- Local code requires a permit for permanent shade structures: always check with your municipality before starting. Putting up an unpermitted structure that later fails creates real liability, and some HOAs also require approval.
The honest bottom line: if your gazebo is a standard 10x10 or 10x12 aluminum or steel kit going onto a solid 4-inch concrete patio in a normal suburban setting, this is a solid weekend DIY project. Get the right anchors, drill clean holes to the right depth, torque everything properly, and you'll have a structure that stays put for years. Step up to a larger or heavier structure, add a solid roof, or put it in a wind-exposed location and you're into territory where spending a few hundred dollars on a permit and engineering review is genuinely worthwhile insurance.
FAQ
Can I anchor a gazebo to a concrete patio without using the kit’s footplate holes?
Yes, but you need to match the anchor type to your attachment point. If your gazebo kit uses flat footplates with bolts through specific holes, you should still drill those locations into the concrete and use the kit’s recommended anchors, not random concrete screws. If your gazebo lacks pre-drilled footplate holes, use a post base hardware system so the post load goes through steel, not directly into wood or plastic base covers.
How do I make sure I drilled the right depth for wedge anchors in concrete?
For wedge anchors, a key rule is hole depth plus correct embedment. Even if the embedment requirement is 2-1/4 inches, the hole must be drilled deeper so the anchor expansion section can seat fully. Measure drill depth on the bit with tape before you start, then vacuum the dust out of the hole because dust can reduce holding power and prevent proper expansion.
What should I do if my patio has patches, resurfacing, or weak-looking concrete?
You generally should not place anchors over thin topping, patch material, or localized “weak” areas if you can avoid it. If your patio has been resurfaced or has obvious patching, probe lightly with a masonry hammer to look for hollow or weak spots, then shift the layout so each footplate sits on sound concrete. If relocation is impossible, consider epoxy anchors and have an installer or engineer verify capacity for that slab condition.
Is surface cleaning really necessary if I’m tightening the bolts hard?
Clean it thoroughly, then verify flat contact before you drill. Grit, moss, paint overspray, or oily residue under the footplate can cause micro-rocking, which slowly loosens fasteners even if the anchors are tightened. Scrape to clean concrete, then set the gazebo and check with a straightedge, shimming only if the base plate is designed to be shimmed.
What are my options if my concrete patio is thinner than 3.5 inches?
It depends on the slab thickness and anchor style. If you cannot reach the required embedment plus clearance for the anchor expansion end, wedge anchors may not be appropriate. In that case, use epoxy adhesive anchors sized for the hole diameter and depth, or switch to a post base hardware approach that uses multiple smaller anchors per plate. For very thin slabs, surface-mounted systems often still need an engineer review because uplift and shear loads can govern.
What if one of my gazebo posts needs to go near the patio edge or a visible crack?
Yes, you can reduce risk by using a layout that respects edge distance and avoids cracks, but you cannot “fix” poor concrete placement with more torque. If a post must sit near an edge or crack, the load path may not be adequate for the standard anchor spec. The practical next step is to re-lay out the gazebo footprint if possible, and if not, consult an engineer for an anchored footing design or a different foundation method.
Can I anchor a gazebo where the patio has spalling or frost-heave damage?
If frost heave or spalling has damaged the surface, anchoring into that compromised zone is unreliable. Spalled or crumbling edges can break away under load, even when anchors initially hold. Remove loose concrete back to solid material if you can, then reassess embedment depth and edge distance. If damage is extensive or the slab is lifting, stop and use a contractor or engineer to decide whether to replace sections.
Do I need larger anchors just because I live in a windy area?
Yes, especially with larger or heavier structures, and with any site that is coastal or exposed to frequent high winds. If your gazebo has a more substantial roof covering, enclosed panels, or an increased sail area, anchor demand rises. The most helpful decision aid is to compare your kit’s wind zone requirements and the manufacturer’s anchor schedule to your local wind speeds, then upgrade anchor diameter, quantity, or use engineered footings when required.
How should I inspect and re-tighten anchors after a big storm?
Re-tighten after the first major storm is smart, and so is a regular check, but the sequence matters. Re-check nuts, then confirm the footplates have not shifted, rocked, or developed gaps. If you see any movement or persistent loosening, stop and investigate brace and racking resistance first, then verify anchor installation details (bit size, hole cleanliness, and embedment).
Can I use reusable screw anchors if I want to relocate the gazebo later?
Often, but only if your gazebo is designed for it. Removable anchors like screw anchors can be reused, but they usually do not provide the same holding strength as properly installed wedge or adhesive anchors in shear and uplift conditions. If you plan to relocate, confirm the load rating for the anchor type and consider whether you are also accepting a higher risk of movement in racking situations.