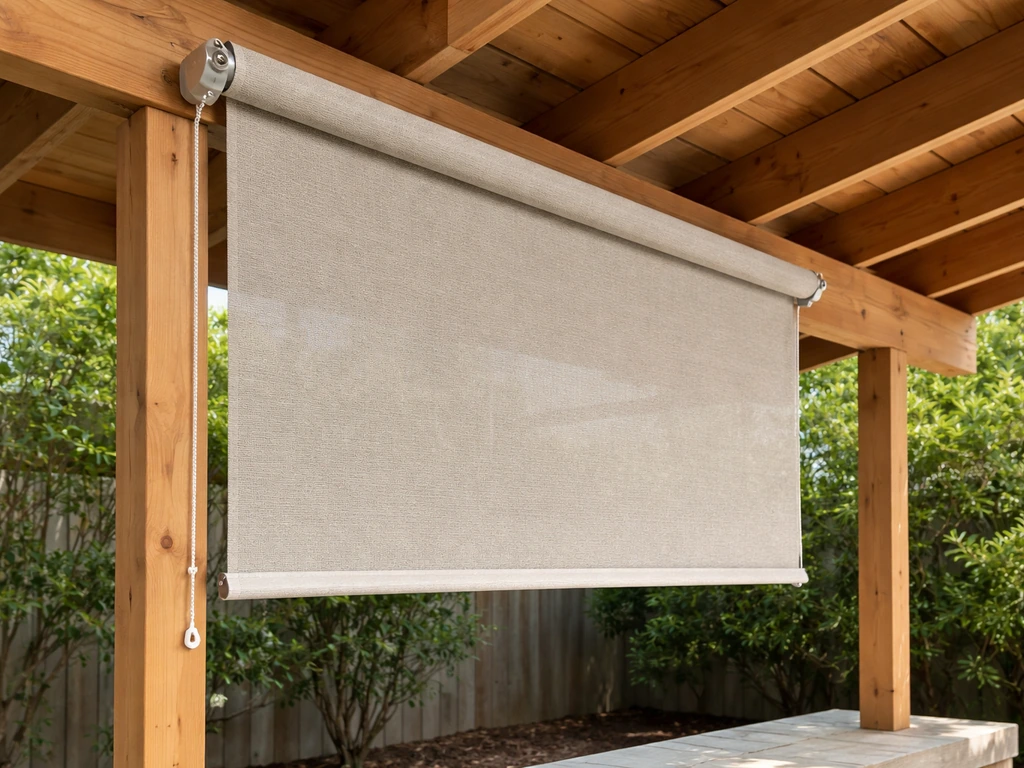
Outdoor patio blinds install in three main stages: measure and plan your layout, mount the brackets level and secure to solid material, then seat and test the shade. Done right, the whole job takes a few hours with basic tools. The tricky part is not the installation itself but making sure you pick the right type of blind for your patio setup and attach it to something genuinely solid, whether that's a wood beam, an aluminum patio cover frame, or a masonry wall. Get those two things right and the rest is straightforward.
How to Install Patio Blinds: DIY Step-by-Step Guide

Celia Vaughn
10 Jun 2026
Types of outdoor patio blinds and which to choose

Not all outdoor blinds are built the same, and the type you choose will directly affect how you install it and how well it holds up in your specific conditions. Here are the main options you'll run into:
| Type | How It Works | Best For | Wind Resistance |
|---|---|---|---|
| Roll-down roller shades | Manual or motorized tube rolls fabric up and down | General shade, privacy, moderate weather | Low to moderate without guides |
| Solar shade / screen fabric roller shades | Same roll-down mechanism but with open-weave fabric | Glare and heat reduction (up to 85%) while keeping the view | Low to moderate without guides |
| Zip-track / side-channel zipper systems | Fabric edges lock into aluminum side channels as it rolls | High wind areas, rain, insects, strong weather | Up to 50–80 mph depending on system |
| Vertical / louvered systems | Individual slats hang from a top track | Wide openings, adjustable light control | Low, not ideal for windy patios |
| Motorized outdoor roller shades | Electric motor drives roll-up mechanism | Convenience, large spans, frequent use | Depends on whether zip-track is included |
For most patio cover situations, a roller shade or solar screen is the most practical choice. If you're in a region with regular wind or you want true weather protection, a zip-track system that locks the fabric into side channels is worth the extra cost. Those side channels prevent the fabric from billowing, flapping, and eventually tearing at the seams, which is the number-one failure point for basic roller shades in exposed locations. If your patio already has a sloped cover or you're dealing with a non-standard angle, that's a separate consideration worth looking into before you buy anything.
Tools and materials checklist for installation
Pull this list together before you start. Nothing is exotic here, but running out to the hardware store mid-install when you're standing on a ladder is annoying and adds time.
- Tape measure (25 ft is ideal for wider patio openings)
- Pencil or chalk marker for marking bracket positions
- Level (a 24" or 48" level works best for long spans)
- Power drill or hammer drill (needed for masonry)
- Drill bits: 3/32" for pilot holes in wood, masonry bit sized to your anchors for brick or concrete
- Screwdriver (Phillips and flathead) or drill with bit set
- Ladder tall enough to reach your mounting height safely
- Stud finder (for wood-framed structures or walls behind cladding)
- Socket wrench or adjustable wrench (for through-bolts on aluminum frames)
- Shims (small wood or plastic wedge shims for leveling brackets)
- Manufacturer-supplied mounting brackets and hardware (never substitute random screws here)
- Corrosion-resistant fasteners: #10 flat head screws for wood mounting, sleeve anchors or Tapcon screws for masonry, through-bolts with washers and nuts for aluminum beam mounting
- Safety glasses and gloves
- A helper for anything wider than about 48" (you really don't want to handle a long roller tube alone on a ladder)
One thing worth calling out: always use the screws and brackets your blind manufacturer provides, at least as a starting point. Swapping in random hardware can void warranties and, more importantly, can cause brackets to fail because the load ratings won't match. If you need to supplement with additional fasteners for masonry or aluminum, match or exceed the manufacturer's spec.
Measuring, planning layout, and finding mounting points
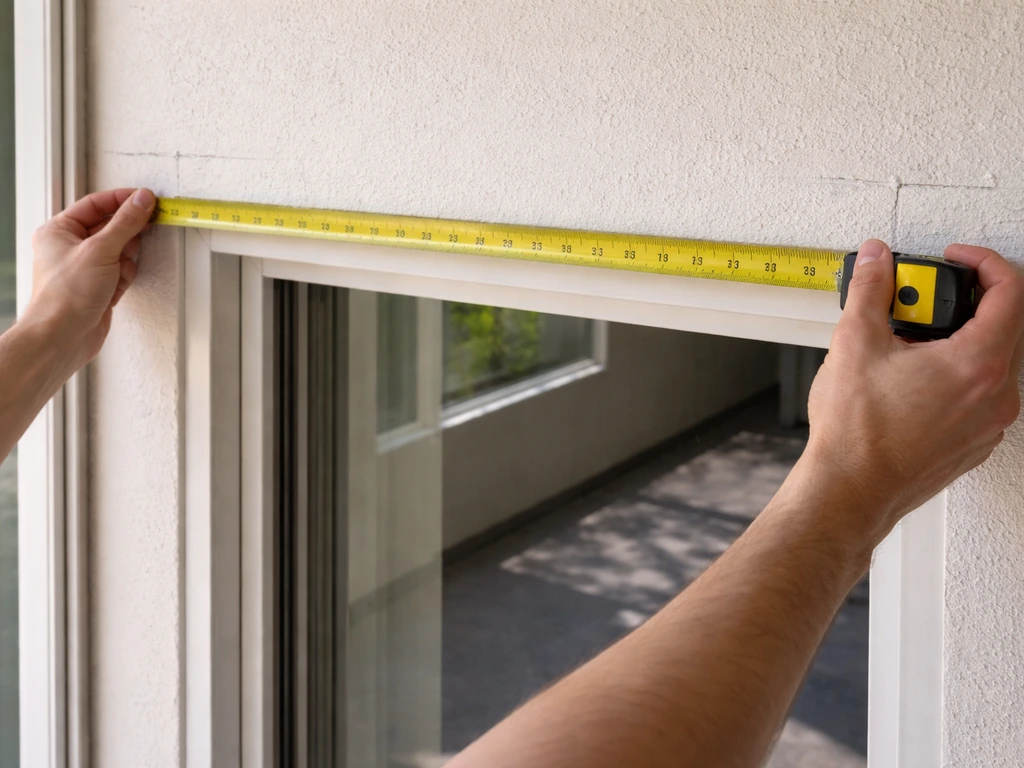
Measure the opening width and the desired drop height before you order or buy anything. Width is the critical one because your blind needs to either fit inside a frame (inside mount) or cover past the edges (outside mount). For an outside mount, add at least 2–3 inches on each side past the opening so you get full coverage without light gaps at the edges.
Many manufacturers ship a measurement card or spec sheet with the blind. Check those numbers against your measurements before you even open the hardware bag. Draper's installation materials, for example, specifically instruct you to verify the bracket spacing against the measurement card provided with the shade. This is not a formality. Bracket width has to match the shade tube width or you'll spend an hour trying to force something that will never seat correctly.
For finding your mounting points, the key rule is: attach only to solid structural material. If you plan to install a shade sail over a patio, the same rule applies: anchor the system to solid structural material, not trim or weak surfaces how to install shade sail over patio. On a wood patio cover, that means the beams, headers, or posts, not just the fascia trim. Use a stud finder if you're mounting to a house wall or any surface where the framing isn't visible. On an open patio cover where the beams are exposed, you can see exactly where to mount, which makes life easier. Mark your bracket positions with a pencil, then hold your level across the marks to confirm they're on the same horizontal plane. If your mounting surface has any bow or crown to it, plan to use shims behind the brackets to correct it. Forcing a bracket tight against an uneven surface will twist it out of alignment and cause the shade to bind when you try to raise or lower it.
For vertical blind systems, keep bracket spacing at no more than 30 inches apart along the top track. Wider spacing allows the track to flex, which causes slat alignment problems over time. For roller shades, you typically need just two end brackets plus any center support brackets the manufacturer specifies for wider spans.
Step-by-step: how to install outdoor patio blinds
These steps cover the most common scenario: mounting an outdoor roller shade or solar screen to a covered patio structure. For a clear, coolaroo-style patio shade setup, follow the same approach: confirm your measurements, choose compatible mounting hardware, and secure the brackets to solid structure coolaroo patio shade. If you are specifically installing shade cloth over a patio, the same mounting principles apply, but you will also want fabric tensioning and extra reinforcement at the edges shade cloth over patio. After you’ve chosen the right patio shade, follow a simple installation flow to mount the brackets, fit the roller, and confirm smooth operation how to install sunshade on patio. A patio shade sail uses similar measuring and mounting principles so you can keep fabric tensioned and safe in wind outdoor roller shade or solar screen. Adjust the fastener type based on your surface material, which is covered in the next section.
- Unbox the blind and lay out all components. Match parts against the manufacturer's parts list before climbing a ladder. Missing a bracket stop now is better than discovering it halfway through.
- Mark bracket positions on your mounting surface. Hold a bracket up at one end, mark the screw hole locations with a pencil. Move to the opposite end, hold the bracket in position, use your level to confirm it's at the exact same height as the first set of marks, and mark those holes too.
- Check level across both bracket positions using your level or a long straightedge. This step is non-negotiable. If the brackets aren't level with each other, the roller tube will drift to one side every time you raise or lower the shade.
- Shim if needed. If your mounting surface isn't perfectly flat or level, slip a shim behind the bracket before you drill. Tap it in until the bracket face sits level, then mark through the holes again. Do not skip shimming and just crank the screws tight on an unlevel surface.
- Drill pilot holes. For wood surfaces, use a 3/32" drill bit for each marked screw location. For masonry, switch to your masonry bit sized to match your anchor. For aluminum, check whether you need to drill through or thread into the existing extrusion.
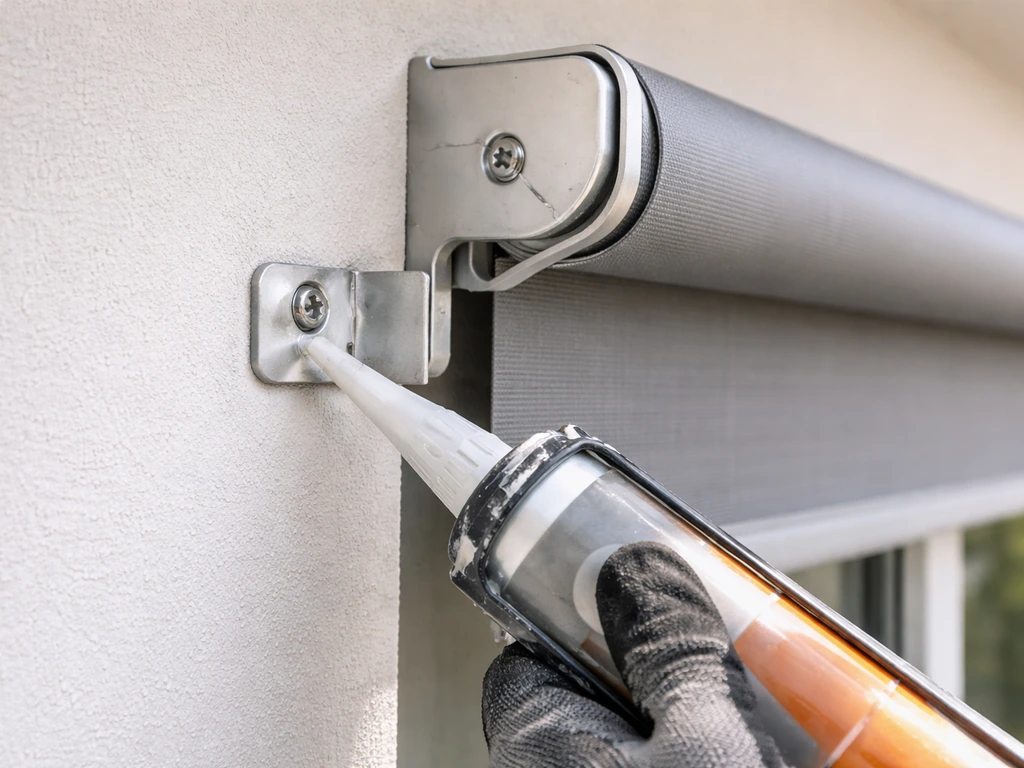
- Attach the brackets using the manufacturer's provided screws or your corrosion-resistant fasteners. On wood, drive screws flush with the bracket face, not countersunk deep. On masonry, set your anchors first, then fasten the bracket. On aluminum, use through-bolts with washers and a nut on the back side where access allows.
- For zip-track systems: install the side channel tracks next. These run vertically down each side of the opening and must be plumb (perfectly vertical). Clamp them in position, check with your level, and fasten them top and bottom before adding intermediate fasteners.
- Seat the shade into the brackets. For cassette-style roller shades, you'll usually hear or feel a click when the tube snaps into the brackets. For zip-track systems, feed the zipper edge of the fabric into the side channel before fully seating the roller at the top.
- Test the operation before finalizing. Lower the shade slowly all the way and watch for any side-to-side drift or binding. If the shade drifts more than about 1/16" to either side, you need to adjust the bracket position (see the troubleshooting step below).
- Adjust for drift if needed. Remove the shade, loosen the screw on the idle (non-spring) side bracket, slide that bracket inward slightly, re-tighten, and reinstall the shade. This closes the lateral gap and eliminates the wobble.
- For motorized units: connect the motor wiring per the manufacturer's guide before seating the shade. Verify the mounting surface can bear the full weight of the motorized headbox, which is significantly heavier than a manual unit.
Attachment methods by surface
Wood posts and beams
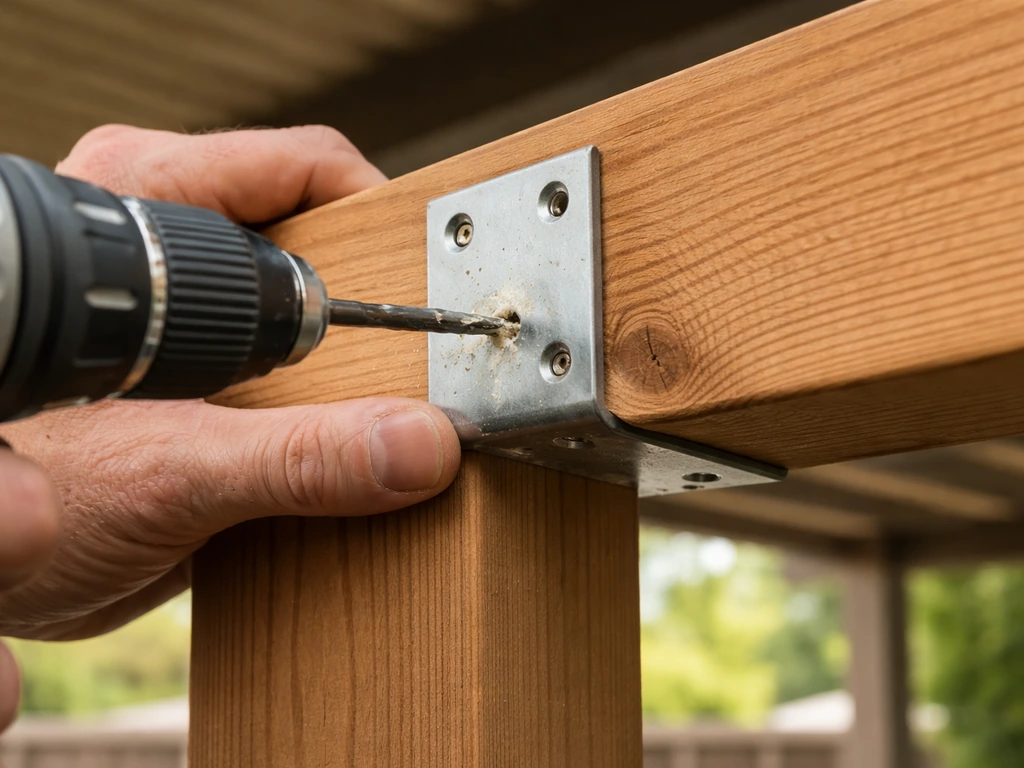
Wood is the most forgiving surface to work with. Drill your 3/32" pilot holes first, every time, even in softer wood. Skipping the pilot hole risks splitting the wood at the bracket edge, which weakens the hold immediately. Use corrosion-resistant screws (stainless steel or hot-dipped galvanized) rated for outdoor use. Standard drywall screws will rust and fail within a season or two in most climates. If you're mounting to a header or beam and the wood is treated lumber, make sure your fasteners are rated for contact with treated material since standard zinc plating corrodes quickly against ACQ-treated wood.
Aluminum patio cover structures
Aluminum extrusion beams are solid but they're hollow inside, which means you can't just drive a screw into them and expect it to hold under load. The right approach depends on whether you have access to the back of the beam. If you can reach behind it, use through-bolts with a washer and nut: drill through the face of the beam, push the bolt through, add a washer on the back, and tighten with a nut. This gives you a genuinely strong connection that won't pull out. If you can't get behind the beam, look for existing mounting slots or channels in the aluminum extrusion (many patio cover systems include a T-slot channel specifically for this), and use T-nuts or T-bolts that slide into the track and tighten from the front. Avoid self-tapping sheet metal screws into thin aluminum walls for anything carrying real load.
Brick, concrete, and masonry walls
Masonry requires a hammer drill and the right anchor. For most bracket loads, sleeve anchors work reliably: drill a hole with a masonry bit sized to match the anchor diameter, vacuum or blow out the dust, tap the anchor in, and tighten until the sleeve expands against the hole walls. Tapcon screws are a faster option for lighter loads and work well in solid concrete or brick. Avoid Tapcons in soft or spalling mortar joints as they won't grip properly. For heavier motorized or wide-span shade systems, step up to heavy-duty sleeve anchors or wedge anchors sized appropriately for the load. Always check that you're drilling into the brick or block itself, not just the mortar joint, for maximum holding strength.
Weatherproofing, safety checks, and final adjustments
Once the shade is seated and operating, go through this checklist before you call the job done. These are the things that separate an install that lasts years from one that causes problems at the first rainstorm.
- Check that all screw heads sit flush with the bracket face. Proud screw heads create a lip where water pools and corrodes the fastener from underneath. If any screws are raised, drive them in until flush.
- Inspect the bracket-to-surface contact on all mounting points. There should be no visible gap between the bracket back and the mounting surface. If you see a gap, the bracket is probably twisted. Loosen, re-shim, and re-tighten.
- For zip-track systems, run the shade all the way down and confirm the fabric edges stay fully seated in the side channels. If any part of the fabric pulls out of the channel during travel, do not operate the shade further. Re-check the channel alignment and make sure the zipper edge is properly engaged at the top before re-testing. Running the fabric outside the channels will damage the zipper edge and eventually tear the fabric.
- Test the full raise and lower cycle three times. Watch for binding, uneven rolling, or any point where the shade hesitates. Binding usually means one bracket is slightly out of level. Uneven rolling means the tube isn't seated evenly in both brackets.
- For motor-driven units, verify the mounting surface weight rating. A motorized headbox can weigh significantly more than the shade alone. If the patio cover beam or header feels in any way loose, flexed, or poorly attached to the main structure, stop and assess before putting additional load on it.
- If you're in a high-wind area, test the shade in a moderate breeze before declaring victory. Zip-track systems should hold steady without fabric movement. Basic roller shades will move in wind and that's expected, but excessive flapping or the shade tube rolling itself up in the wind means your setup needs a bottom bar wind bar or additional retention hardware.
- Apply a bead of clear exterior-rated silicone sealant around any mounting holes that pass through a finished ceiling or fascia where water intrusion is a concern. This keeps moisture from wicking into the substrate behind the bracket.
- Know when to stop and call a pro. If your mounting surface is a load-bearing structural beam that's showing signs of rot, cracks, or prior damage, do not attach anything to it until it's evaluated. If you're working with a motorized system on a complex aluminum patio cover and the wiring isn't straightforward, an electrician is worth the cost.
Most of the time, a standard outdoor roller shade install is a genuine DIY job and there's no reason to overthink it. Measure carefully, mount to solid material, keep everything level, and use the right fasteners for your surface. If you're planning a patio shade structure too, focus on choosing the right frame materials and anchoring points before you mount any blinds or screens. Those four things cover the vast majority of what makes an outdoor blind install succeed or fail. If you're planning a more permanent or structural shade solution, it's worth exploring how patio shade structures, shade sails, and shade cloth systems compare since those options involve different planning and attachment considerations altogether.
FAQ
Can I mount patio blinds to fascia trim or the outer surface only?
Yes, but only if the anchors can reach framing or a rated structural surface. If you have only trim, fascia, or thin panels behind it, the blind can pull out when the fabric loads in wind. If you cannot find studs or posts, switch to an outside-mount plan that lands brackets on beams, headers, or masonry where the hold is structural.
What’s the best way to install patio blinds on a sloped or angled patio cover?
If you have a sloped patio cover, measure bracket positions using the shade’s spec card, then transfer those points along the actual slope. Many people make the mistake of assuming the top of the opening is level, then forcing the brackets to fit, which causes binding during raise and lower. The fix is to shim under brackets where the mounting surface is crowned or out of plane.
How do I confirm my shade width for an inside mount so it actually seats correctly?
For inside mounts, measure the clear opening width at the narrowest point (some frames are not perfectly square), and do not guess bracket-to-tube spacing. If the tube cannot seat, you may be able to adjust bracket location slightly, but if the measurement card does not match your opening, it usually means the shade is the wrong size.
Can I replace the manufacturer screws with whatever fits my drill bit?
Keep screws and anchors at least as large as the manufacturer specifies, and avoid mixing hardware that changes bracket thickness or clearance. A common failure is using a different screw head height or thread type, which can prevent the bracket from clamping correctly or reduce pull-out strength.
How much bracket spacing is too much, and what symptoms show up when it’s wrong?
Not usually. If the bracket spacing is too wide, roller tubes can sag or the fabric can track off-center. For vertical track systems, stay within the manufacturer’s maximum top track spacing (the article notes 30 inches as a limit), and for roller shades use the end brackets plus any required center supports for the span.
My patio blind doesn’t raise smoothly, how do I troubleshoot binding?
If you see jerky motion or the shade binds, first check that brackets are level across both ends and that the tube can rotate freely once seated. Next, inspect for a surface that is bowed, then shim behind the bracket rather than over-tightening. Over-tightening is a common mistake that twists the bracket out of alignment.
What fasteners should I use on treated wood, and what’s the common corrosion mistake?
Use outdoor-rated, corrosion-resistant fasteners and confirm they’re compatible with treated lumber. The article notes that ACQ-treated wood can corrode common zinc plating, so confirm the screw rating for treated-contact environments before you install.
For masonry mounts, what’s the biggest mistake that weakens the hold?
Measure anchor depth and drilling points so you hit concrete or brick material, not just mortar. For masonry, clean out dust with a vacuum or blower before inserting anchors, and tighten only to the specified feel level. Skipping dust removal can reduce grip, especially with sleeve anchors.
How do I tell whether my aluminum patio cover needs through-bolts or T-nuts?
For aluminum extrusion beams that are hollow, front-only fasteners often loosen over time unless you use the system’s designed mounting track, T-nuts, or T-bolts. If you can access the back, through-bolts with a washer and nut are the most reliable connection path for real load.
Do shade cloth and roller shade installs follow the same steps, or do I need extra reinforcement?
If you’re installing shade cloth or a tensioned fabric system, tensioning is not optional. Plan for edge reinforcement and avoid mounting only at the corners, because wind loads spread through the fabric and can peel or deform the attachment points over time.
Which patio blind type holds up best in windy locations, and how do I choose?
If you want the best weather performance, consider zip-track or systems that lock fabric into side channels when wind is frequent. A key decision aid is exposure level: sheltered patios may do fine with basic roller shades, but exposed patios often need side-locked fabric to prevent flapping and seam stress.
What should I check during the final operation test to avoid future wear?
After installation, perform a full up and down cycle and watch for uneven fabric draw or slat drift. If it’s off, adjust before it fully seats in place, then re-check bracket level. This prevents small alignment issues from becoming wear points at the seam or tube ends.