Installing a shade sail over a patio means picking your attachment points first, measuring corner-to-corner between those exact hardware locations (not across your slab), setting your anchors into solid material, and then hanging and tensioning the sail at an angle so it sheds water and stays taut in wind. Do it in that order and the whole project is very manageable for a DIY homeowner over a weekend. If you want a step-by-step walkthrough, follow the patio shade installation process from attachment point planning through hanging and tensioning. Skip the planning steps and you'll end up with a saggy, baggy mess that leaks in the first rain.
How to Install a Shade Sail Over a Patio: Step-by-Step

Celia Vaughn
30 Jun 2026
Pick your shade sail design and measure your patio area
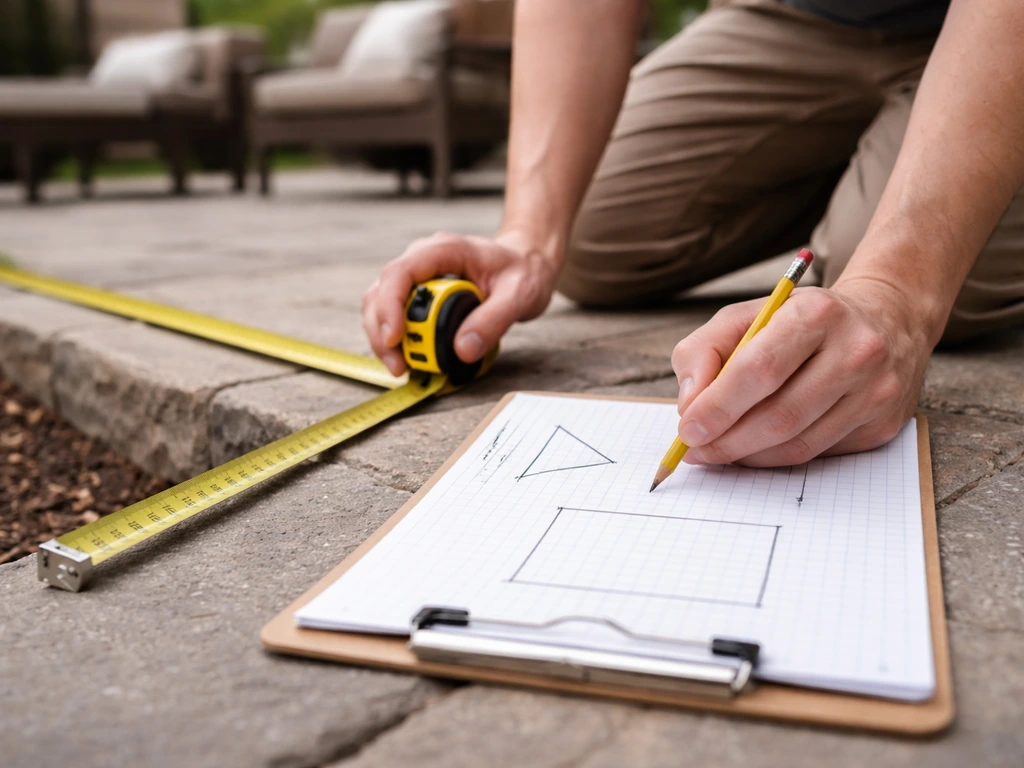
The first decision is shape: triangle or square/rectangle. Triangles are easier to tension and work well for smaller patios or awkward corner situations. Squares and rectangles cover more ground but require four solid anchor points and more precise measurement. For most standard patios, a single large triangle or two overlapping triangles side by side does the job well.
Here's the most important measuring rule: do not measure your patio slab and assume that's your sail size. Measure between the actual fixing points, meaning the center of each pad eye, wall plate, or eyebolt location you plan to use. For a triangle, that's three corner-to-corner measurements. For a quadrilateral, you need all four sides plus both diagonals (think A-to-D and C-to-B). Those diagonal measurements are what a manufacturer needs to pattern a quad sail correctly.
You also need to account for the hardware itself. Each corner connection includes a turnbuckle and a shackle, which together can add 6 to 10 inches of length at each corner. Most manufacturers build this into their sizing, but always confirm. A good rule of thumb: allow at least 10 inches of tensioning margin built into the hardware stack so the sail can pull taut without overloading your anchors.
Height variation between your attachment points matters a lot. If all four corners are at the same height, the sail sits nearly flat, pools water in the middle, and puts extra stress on every anchor. Aim for at least 1 foot of height drop per 10 feet of span between the high and low corners. For a 15-foot span, a 3-foot difference between your highest and lowest corner is a practical target. This slope is what makes the sail drain and stay properly tensioned. You can use the same basic logic when learning how to hang a blind on a sloping patio cover: plan the attachment height differences and then secure the hardware to solid structure.
Choose attachment points and mounting method
You have three main attachment options for a patio shade sail: the house structure itself, existing masonry columns or posts, and freestanding posts you install specifically for the sail. To get started, you will also want a clear step-by-step plan for how to install patio blinds so you can mount them correctly and avoid fit or weather-performance problems. Most residential installs combine at least two of these, for example one or two corners tied to the house wall and one or two corners on new posts at the outer edge of the patio.
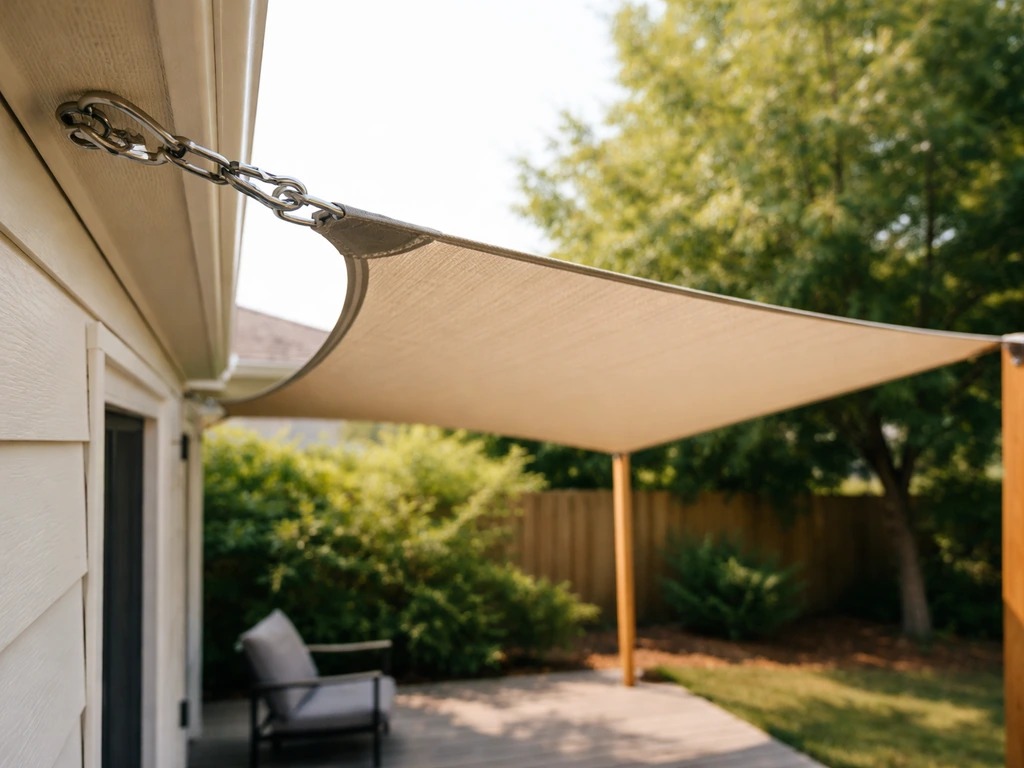
Attaching to the house
Attaching to the house is convenient but you need to anchor into real structure, not just siding or fascia boards. If you are planning how to install a coolaroo patio shade, start by choosing attachment points that can handle the tensile loads, not just the decorative look of the hardware Shade sail. Fascia cladding alone cannot handle the tensile loads a shade sail generates. If your only option is the fascia, you need a dedicated fascia support bracket that transfers the load back into the rafter tails. Stud walls and masonry walls are both solid options when you use the right hardware for each substrate.
Attaching to masonry (brick, block, stone)
Drill into the face of the brick or block itself, never into the mortar joints. For more step-by-step guidance on installing a shade sail on a patio, see how to install sunshade on patio, including how to plan your attachment points and hardware. Mortar is soft and crumbles under sustained tension loads. Use sleeve anchors or chemical/epoxy anchors in solid brick or block for a reliable connection. Size up: a 3/8-inch or 1/2-inch anchor is standard for shade sail loads.
Installing freestanding posts
Freestanding posts give you the most flexibility on placement and height. If you plan to build a freestanding patio shade structure, installing solid posts is often the simplest way to create secure anchor points. Set them in concrete footings sized for your local soil conditions and wind zone. A common guideline is to position the post footprint about 18 inches beyond the sail corner it will anchor, which leaves room for hardware and lets you fine-tune tension. Steel pipe posts or heavy-gauge 4x4 lumber work, though steel handles the lateral load better for larger sails. Lean the post slightly away from the sail (about 10 to 15 degrees outward) so the tensile load pulls it plumb rather than bending it.
Materials and tools checklist
Pulling this together before you start will save you multiple hardware store trips. Here's what a typical DIY shade sail installation over a patio requires: If you want a full walkthrough on the process, follow our guide on how to make patio shade sails from measurement to tensioning.
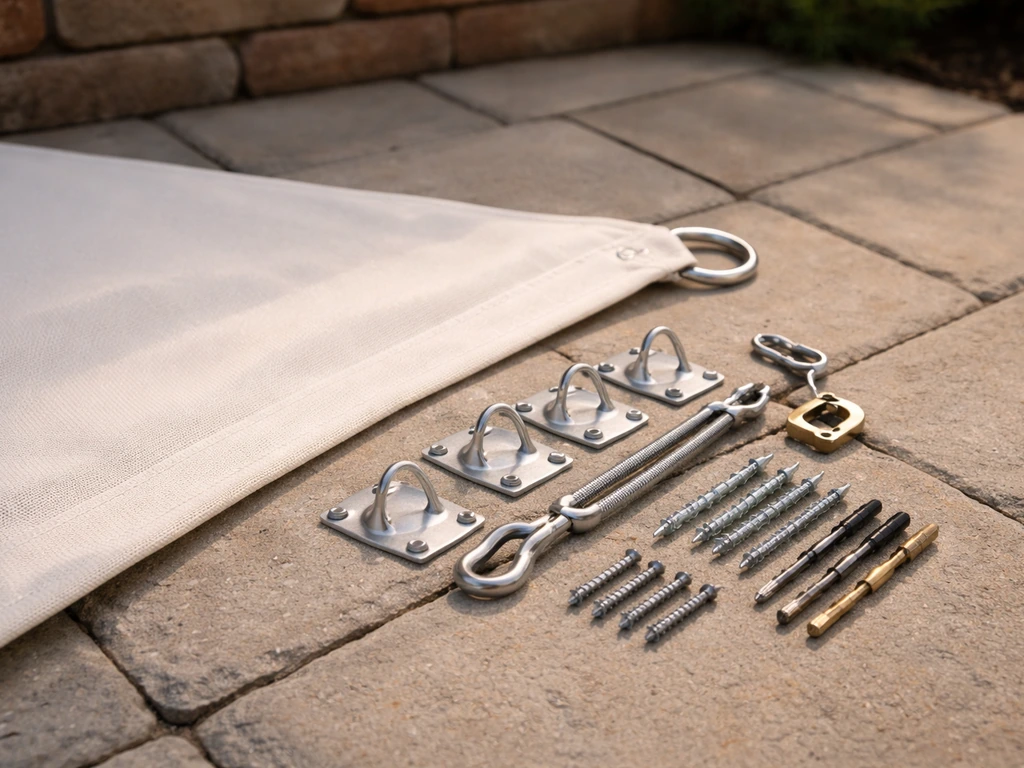
- Shade sail (triangle or quad, sized to your measured fixing points)
- Pad eyes or wall plates rated for the expected load (stainless steel preferred for outdoor use)
- Turnbuckles (one per corner, jaw-jaw or jaw-eye style, sized to match your anchor hardware)
- Shackles (one per corner to connect the sail's D-ring to the turnbuckle)
- Sleeve anchors or chemical anchors for masonry attachment (3/8 in or 1/2 in diameter)
- Structural lag screws (5/16 in x 3 in minimum) for wood stud or rafter attachment
- Fascia support brackets if anchoring to fascia
- Concrete and tube forms for freestanding post footings
- Steel pipe or 4x4 posts if adding freestanding supports
- Post base hardware if posts sit on an existing concrete slab
- Hammer drill with masonry bits (for brick or block)
- Standard drill and driver bits
- Socket wrench set and open-end wrenches for tightening turnbuckles and shackles
- Level and plumb bob
- Tape measure (at least 25 ft)
- Ladder (tall enough to work safely at your highest anchor point)
- Safety glasses and gloves
Budget-wise, a quality residential shade sail in the 12 to 16-foot range runs $80 to $200 depending on brand and material. Hardware for a three-corner setup (pad eyes, turnbuckles, shackles) adds another $40 to $80 in stainless steel. If you're setting posts, add concrete, post material, and post bases. Total DIY cost for a single-sail setup with new posts is typically $300 to $600, compared to $1,000 to $2,500 or more for professional installation.
Step-by-step installation: layout, drilling, anchoring, and setting posts
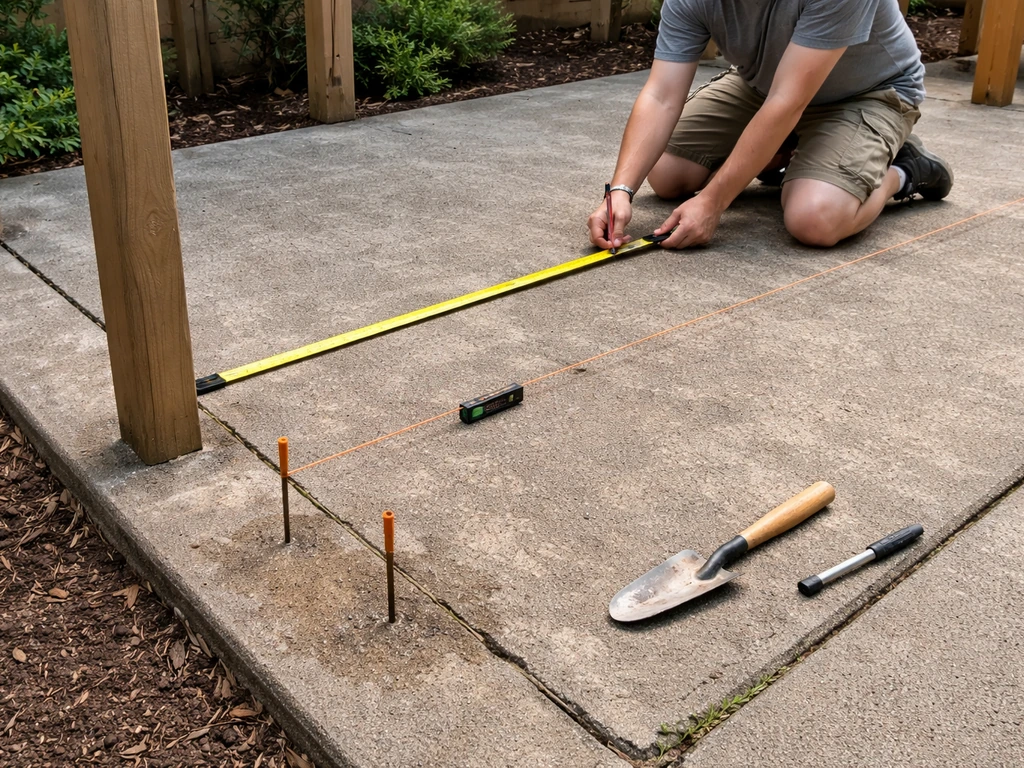
- Mark your corner locations. Stand in the patio area and physically mark where each anchor will go, accounting for height variation. Use string lines to visualize the sail's coverage and confirm you'll get good shade over your main seating area.
- Set freestanding posts first (if needed). Dig footing holes, set posts in concrete, and let the concrete cure for at least 24 to 48 hours before applying any tensile load. Brace posts plumb while the concrete sets.
- Install wall-side anchors. For masonry, drill a pilot hole into solid brick or block (not mortar), insert your sleeve anchor or epoxy anchor, and thread in the eye bolt or pad eye. For wood-framed walls, locate a stud or rafter, drill a pilot hole slightly smaller than your lag screw diameter, and drive the lag screw with a socket wrench until the pad eye plate sits flush and tight.
- Attach pad eyes to posts. At the top of each post, drill and bolt your pad eye plate or weld/bolt a ring depending on post material. Check that every anchor point is level and oriented so the shackle can swing freely toward the sail.
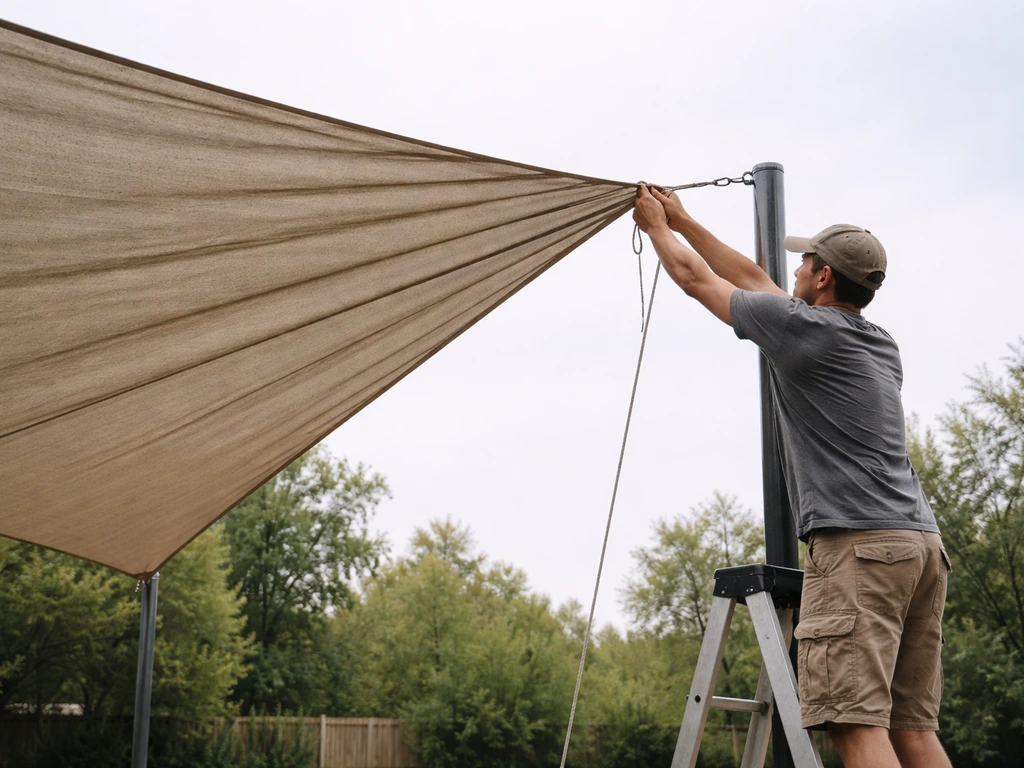
- Do a dry-hang before final tightening. Clip the sail corners to each anchor using your shackles and turnbuckles, but leave the turnbuckles fully open (extended). This lets you see how the sail lays before committing to tension.
- Check your angle. Look at the slope across the sail surface. You want at least a 20-degree angle between the highest and lowest corners — roughly 1 foot of drop per 5 feet of horizontal span — so water runs off instead of pooling.
- Begin tensioning evenly. Start tightening each turnbuckle a few turns at a time, rotating around all corners in sequence rather than maxing out one corner at a time. Even tension prevents the sail from pulling off-center.
Hang and tension the shade sail correctly for best fit and weather performance
Once the sail is clipped to all anchor points with turnbuckles and shackles fully attached but still loose, you're ready to tension. Once the shade cloth is clipped to the anchor points, you can follow the same step-by-step process to tension it properly over your patio how to install shade cloth over patio. The target is firm but not guitar-string tight. A pre-tension of roughly 100 lbs at each corner is a practical working guideline for most residential sails in the 10 to 16-foot range. In practical terms, the sail fabric should feel taut when you press on it with your palm, but the corners should not be pulling so hard that the anchor hardware is visibly bending or the posts are leaning.
Tighten each turnbuckle incrementally: three full turns on corner one, then corner two, then corner three (and four for a quad), then back to corner one. Keep cycling through. This distributes the load evenly and keeps the sail from skewing to one side. Stop when the fabric is smooth and taut with no major wrinkles running diagonally across the field of the sail.
Water drainage relies on your angle. For standard shade cloth (the breathable kind), even a modest slope works fine because some water passes through the mesh. For waterproof shade sail fabric, the manufacturer typically requires a minimum 20-degree angle to guarantee runoff, and you need to hit that threshold during installation, not try to correct it after. If you're installing a waterproof sail and want guidance on choosing the right material, that's really a separate decision that sits alongside choosing standard shade cloth.
Once fully tensioned, lock the turnbuckles in place by tightening the locking nuts against the turnbuckle barrel. Clip split rings or safety wire through the turnbuckle if your hardware includes them. Re-check tension after 48 to 72 hours, because new hardware and anchor points can settle slightly and the sail may need a few extra turns.
Safety, structural considerations, and DIY vs pro decision points
A shade sail in the 12 to 16-foot range puts roughly 100 lbs of sustained tension on each corner anchor, and that load increases significantly in wind. A 60 mph gust can multiply sail forces by several times compared to calm conditions. This is why every anchor point needs to go into solid, structural material, and why choosing the right fastener for each substrate is non-negotiable.
Flat sails concentrate stress at the corners and edges more than angled ones. Any sail is only as strong as its weakest anchor point. If one anchor fails under wind load, the entire sail comes down suddenly and the hardware can become a projectile hazard. Check every component: pad eyes, turnbuckles, shackles, and post bases all need to be rated for the load and in good condition before the sail goes up.
If you're in a high-wind zone (coastal, mountainous, or in a region with frequent 60 mph or higher gusts), consider having a structural engineer verify your post sizing and anchor design before you start. Shade sail wind rating guidance explains that the design may require calculating wind loads for the specific site and can be illustrated with examples like rapidly increasing pressure from lower to higher wind speeds calculate wind loads for the specific site. That's a one-time consultation fee of a few hundred dollars that can prevent a costly or dangerous failure. Many sail manufacturers also note that large sails (generally over 20 feet per side) require proper engineering and patterning to perform safely.
Here's an honest DIY vs pro breakdown:
| Situation | DIY-friendly? | When to call a pro |
|---|---|---|
| Sail under 16 ft, anchoring to solid masonry or studs | Yes | Only if you're uncomfortable with drilling and hardware |
| Attaching to fascia only | Proceed with caution | If fascia support brackets can't be added easily |
| Setting freestanding posts in new concrete footings | Yes, with care | If soil is unstable or you're in a high-wind zone |
| Large sail over 20 ft per side | Not recommended solo | Hire or consult an engineer and experienced installer |
| High-wind coastal or mountain site | Plan carefully | Engineering review strongly recommended |
| Multi-sail overlapping layout | Possible with experience | Pro layout helpful to avoid chafe and tension conflicts |
Working at height is the other safety factor people underestimate. If your highest anchor point is above 10 feet, use a proper ladder with a helper on the ground. Don't try to tension a sail while balancing on a ladder, do the tensioning from the ground using a hook tool or work with a partner who can hold the sail while you tighten.
Troubleshooting common installation issues
Sagging in the middle
This is the most common complaint and it usually has one of two causes: not enough tension or not enough angle. If your turnbuckles are already near their limit, you can't just keep cranking. Instead, check whether your high and low corners have enough height difference. If all corners are close to the same height, no amount of tensioning will pull out the sag, you need to raise one or more anchor points. Even a 12-inch height increase on a single corner can dramatically improve sail geometry.
Diagonal wrinkles in the fabric
Diagonal wrinkles running from one corner toward the center usually mean uneven tension, one side is pulling harder than the other. Back off on the over-tensioned corner by a few turns, then re-tension all corners evenly. Sometimes the sail itself is slightly off-square, which also causes this; if you see wrinkles after careful tensioning, contact the manufacturer because the sail may need to be re-cut.
Misalignment or coverage gaps
If the sail isn't covering where you need it, the anchor points were placed without fully visualizing the sun's angle at your peak use times. Before moving anchors, try adjusting the height of one or two corners (within the range your hardware allows) to shift the coverage footprint. For bigger repositioning, it's easier to move an outer post than to re-anchor into a house wall.
Water pooling
If water is collecting in the center of the sail, your angle is too flat. This is a design problem, not just a tensioning problem. Raise your highest corner anchor point, or lower your lowest corner anchor, to steepen the slope. For waterproof fabric, you need at least a 20-degree slope, and if you're not sure whether you hit that, measure the height difference between your high and low corners and divide by the horizontal distance between them. A 1-foot drop over 5 feet equals roughly a 20-degree angle, which is your minimum target.
Hardware loosening in wind
Wind vibration can back off turnbuckle tension and unthread shackle pins over time. After the first major wind event (anything over 25 to 30 mph), re-inspect every connection. Tighten shackle pins and safety-wire or lock them if they aren't already. Add locking nuts to turnbuckles if you haven't. If your sail is in a routinely windy area, a quick monthly hardware check takes five minutes and prevents bigger problems. This is also a reason many shade sail owners take their sails down for winter, it extends the life of both the fabric and the hardware significantly.
Overlapping sails causing chafe
If you're installing multiple sails, keep at least 18 inches of separation between sail edges where they come close together. Overlapping fabric edges rub against each other in wind and will wear through the fabric and edge reinforcement much faster than UV exposure will. Stagger the heights of adjacent sails so they sit at different levels and naturally move past each other rather than grinding together.
FAQ
Can I install a shade sail by attaching it to fascia boards, trim, or siding instead of solid structure?
Yes, but only if your anchors and hardware are specified for structural shade sail loads. If you mount to a wall, look for a stud or rafter line and use rated lag screws, through-bolts, or engineered brackets that transfer force into the structure, not trim boards. For masonry, ensure you use anchors rated for tension and install into solid brick or block (not mortar), then confirm pull-out performance matches your sail size and wind exposure.
If my fabric is waterproof, is it enough to just tension the sail more to stop water pooling?
Not exactly. Each sail fabric type has different requirements for runoff and stretch, especially between breathable mesh and waterproof materials. For waterproof shade, you should target the minimum angle the manufacturer specifies during setup, then tension. If you miss the angle, re-tension usually will not fix persistent pooling.
Why does my sail still look wrinkled after I tension it, and how do I measure correctly?
Do not use a tape measure from the patio surface to estimate anchor spacing. Confirm your final measurement is center-to-center between the actual attachment locations (pad eye, wall plate hole, or eyebolt center). Also measure corner-to-corner diagonals for quadrilateral sails, because incorrect diagonals often leads to diagonal wrinkles even after careful tensioning.
How tight should I tension the sail at first, and what margin should I keep for later adjustment?
Plan for thermal expansion and wind load by leaving enough tensioning margin at each corner, and do not run turnbuckles to their end range during the initial install. A common mistake is tightening until the fabric looks good immediately, then leaving no adjustment left when the hardware settles after the first wind or after 48 to 72 hours.
What should I do if tensioning can’t remove sag, but my turnbuckles are nearly fully tightened?
If you have a corner height problem and turnbuckles are already near their limit, you generally need to adjust attachment height, not just tension. Raise the low corner by moving its hardware or posts, or increase height on the high corner if your hardware allows. A small change, like 12 inches on one corner, can significantly improve geometry and drainage.
What diagonal wrinkles usually mean, and how do I correct them during tensioning?
If you see wrinkles that repeat in one direction (often from one corner toward the center), it usually means uneven tension or an attachment point that is slightly off from the intended geometry. Back off the over-tensioned corner by a few turns, then re-tension all corners using the incremental corner-by-corner cycle. If wrinkles persist after even retension, the sail may be out of cut or the measured diagonals were off, in which case contact the manufacturer.
When should I re-check tension and hardware after installation?
Re-inspection is worth it after major wind events, after heavy settling periods, and seasonally if you operate the sail year-round. Check after the first significant gust (for example, 25 to 30 mph or higher), then do a quick monthly visual inspection in windy areas, focusing on shackle pins, turnbuckle locking nuts, anchor tightness, and post base alignment.
Can I overlap two shade sails to cover a larger area, or do I need space between them?
For multi-sail setups, yes, you should keep separation where edges come near each other. A practical guideline is to leave about 18 inches between sail edges in the areas they may overlap, because vibration and rubbing in wind can abrade fabric reinforcement much faster than normal UV exposure.
What hardware mistakes most commonly cause early failure, especially in coastal or rainy climates?
Match materials to the environment. Many DIY failures come from using hardware that corrodes or from mismatched fasteners that fail under sustained tension. Use stainless hardware for long life outdoors, and ensure your anchors and post bases are designed for the wind zone you are in.
What should I do if the sail isn’t covering the area I wanted, can I fix it without moving every anchor point?
If your coverage is off, start by evaluating sun angle at your intended comfort hours rather than moving anchors randomly. Adjusting a corner height within the allowed turnbuckle range can shift the footprint without re-anchoring. For bigger coverage changes, reposition outer posts first because reworking house anchors is more disruptive and riskier.
Should I remove my shade sail during winter or storms to extend its life?
You can often reduce wear by managing contact points and vibration. Ensure adjacent sails are separated, stagger heights so they do not grind together, and verify turnbuckles have locking nuts or safety wire in place so they do not back off. When winterizing, fully tensioned fabric can still experience fatigue if left under off-season weather loads, so consider taking it down if your region experiences frequent freezes, heavy storms, or high winds.