
You can absolutely build a patio roof tied into your existing fascia as a DIY project, but the way you attach it matters more than almost anything else. The safest and most common method is running a ledger board along your house wall or rim joist, then hanging rafters off it toward an outer beam supported by posts. That system gives you a true lean-to (shed-style) patio roof that sheds water away from the house, works with wood or aluminum framing, and can be permitted and inspected without an engineer in most jurisdictions. This guide walks you through every decision, from checking whether your fascia and rim joist can actually carry the load, to picking pitch, sizing rafters, flashing the connection, and finishing the whole thing so it lasts 20-plus years.
How to Build Patio Roof Off of Existing Fascia: DIY Guide

What this guide covers and who it's for
This is written for the homeowner who has built a deck, framed a wall, or tackled a roofing project and is ready to take on an attached patio cover. You don't need to be a contractor, but you do need to be comfortable on a ladder, confident with a drill and circular saw, and willing to pull a permit and follow the local process. I'll walk you through three roof styles (lean-to, gable, freestanding), the four main attachment methods (ledger to fascia, lag bolts into the rim joist, masonry anchors for brick, and roof-jack tie-ins), plus everything in between: structural sizing, drainage, flashing, weatherproofing, rough costs, and the moments where I'd honestly recommend calling a pro.
If you're still deciding whether to attach to the house at all, or you're working with a brick or stucco exterior, related guides on attaching a patio roof to a house and attaching a patio cover to a brick house go deeper on those specific scenarios. This article focuses on the fascia and rim-joist connection as the starting point, because that's the most common situation for wood-framed homes with standard roof overhangs.
Lean-to, gable, or freestanding: pick your style first
Before you buy a single board, you need to commit to a roof style. The three realistic options for a DIYer are the lean-to (also called shed-style), the gable, and the freestanding pergola or post-and-beam structure. Each has a different relationship with your house and a different skill ceiling. Use this checklist to land on the right one.
- Choose a LEAN-TO if: your house wall is accessible and structurally sound, you want maximum coverage for minimum complexity, your ceiling height allows a single-slope pitch of at least 1/12 (ideally 3/12 or steeper), and you want the lowest permit and material cost.
- Choose a GABLE ROOF if: you want the look of a true room addition, your patio is wider than about 12 feet (a single lean-to slope gets very tall or very low otherwise), you have intermediate framing experience, and you're prepared for a more complex permit drawing.
- Choose a FREESTANDING POST SYSTEM if: your house wall or fascia is in poor shape, you can't access the rim joist, you have a masonry or brick exterior without a clear structural anchor point, or you simply don't want to penetrate your house envelope at all.
- Lean-to is the best starting point for most DIYers: it's structurally simpler, easier to flash, and the IRC prescriptive rafter tables apply directly without the ridge beam calculations a gable requires.
- If you're unsure whether your rim joist is solid, the freestanding option is always a safe fallback — you avoid all house-attachment risk at the cost of digging footings.
Tools, fasteners, and materials: what you'll actually need
The list below is organized by attachment style. The core framing tools are the same for all three roof types; the fasteners and connectors change depending on what you're attaching to. Don't cut corners on connectors, ICC-ES-listed structural screws and hot-dip galvanized hardware are required by code for exterior ledger connections, not optional upgrades.
Core tools (all styles)
- Circular saw or miter saw for framing lumber cuts
- Cordless drill/driver with a 1/2" spade bit and a 5/8" bit for lag pre-drilling
- Hammer drill with SDS bit (required for masonry anchors)
- 4-foot and 2-foot levels, torpedo level
- Speed square and framing square for rafter layout
- Chalk line, tape measure, stud finder
- Reciprocating saw for cutting fascia or siding back
- Ladder (at minimum a 6-foot stepladder and an extension ladder rated for your roof height)
- Safety harness or fall-arrest anchor if working above 6 feet on a sloped surface
- Caulk gun, flashing scissors/snips, roofing nail gun or hammer
Fasteners and connectors by attachment style
| Attachment style | Primary fastener | Connector hardware | Notes |
|---|---|---|---|
| Ledger to wood rim joist | 1/2" hot-dip galvanized lag screws or SDWS/SDWH structural screws | Joist hangers (LUS or similar), post caps, post bases | Follow IRC R507.9.1.3 spacing tables; pre-drill to avoid splitting |
| Lag into rim joist (through siding) | 1/2" x 4"+ galvanized lags or SPAX PowerLags | Standoff spacers if needed behind ledger | Remove siding or sheathing at ledger to prevent moisture trapping |
| Masonry/brick wall | ICC-ES wedge anchors (Strong-Bolt, Tapcon/Titen HD) or epoxy anchors | Ledger standoff brackets, moisture barrier | Select anchor by substrate — solid brick vs. hollow CMU have different embedment rules |
| Roof-jack / roof tie-in | Structural roof jacks or hurricane ties into existing rafter/top plate | Ridge connector, gable rafter hardware | Requires opening the existing roof; flashing is critical |
| Freestanding post system | Deck screws and structural bolts at beam/post connections | Post bases on concrete footings, beam hangers, post caps | No house attachment; all load goes to footings |
Materials checklist
- Pressure-treated lumber (ACQ or CA treated) for ledger board and any member within 6" of ground or concrete
- Construction-grade Douglas-fir, Southern Pine, or SPF for rafters and ridge beam (check species against the span table you're using)
- Roofing material: metal roofing panels, polycarbonate corrugated sheets, or 3-tab/architectural shingles over OSB sheathing
- Self-adhering ice-and-water barrier for the ledger flashing zone (minimum 24" width)
- Step flashing and Z-flashing (aluminum or galvanized steel, minimum 26-gauge)
- Drip edge flashing for the outer edge of the roof
- Exterior-grade caulk (polyurethane or paintable silicone) rated for outdoor use
- Concrete mix (80 lb bags) or ready-mix for footings if installing posts
- Post hardware: Simpson Strong-Tie or equal post bases, post caps, hurricane ties
Site planning: span, pitch, height, drainage, and usable space
The most common planning mistake I see is starting with a roof size and then trying to make the structure fit, instead of working backward from what the structure can reasonably span. Here's how to plan it correctly.
Sizing the footprint
Measure the width of your patio along the house wall (this becomes your ledger length) and the depth you want the roof to extend outward (this is your rafter span, measured horizontally, not along the slope). A 10-foot horizontal rafter span is achievable with a 2x8 at 16" on center in most species and loads. A 12- to 14-foot span typically needs a 2x10. The IRC R802 span tables (Tables R802.4.1 and related) list allowable horizontal spans for rafters by species, size, spacing, and design load, use those, not rule-of-thumb guesses.
Pitch and drainage
For a lean-to roof, you need a minimum pitch of 1/12 for metal or polycarbonate panels, and at least 2/12 for asphalt shingles (3/12 is better). A 3/12 pitch on a 12-foot span means the ledger sits roughly 3 inches higher than the outer beam, very manageable. A common mistake is setting the ledger too low and ending up with a roof that slopes toward the house, or so little pitch that standing water causes rot within a few years. Always slope water away from the house.
Clearance and usable height
Your finished roof underside at the outer beam should be at least 7 feet above the patio surface for comfortable use. Many homeowners target 8 feet at the beam and 9 to 10 feet at the ledger (for a 3/12 pitch over 12 feet). Check your existing eave height before you commit, if your fascia is only 8 feet above the patio, a steep pitch will put your ledger very high and may conflict with windows or soffits.
Drainage away from the house
- Always pitch the roof away from the house (ledger higher than outer beam)
- Terminate roof panels with a drip edge that extends past the outer beam by at least 1.5"
- Plan where runoff goes — a gutter at the outer beam edge prevents erosion and puddling
- Keep the ledger at least 1" above your existing siding or trim to allow water to clear without pooling at the wall
Permits, code basics, and what triggers an inspection
I'll be direct: if you're attaching a roof structure to your house, you almost certainly need a permit. The IRC requires that structures attached to a dwelling be treated as part of the principal building, which means they must meet all the structural, fire, and zoning requirements that apply to the house itself. Skipping the permit isn't just a code violation, it's a liability problem when you sell and a coverage issue if you have a weather or fire loss.
Permit thresholds vary by city. San Diego exempts patio covers 300 square feet or smaller from the permit requirement, but anything larger still needs one. Portland triggers a permit for attached covers over 200 square feet. Many other cities use similar area thresholds, but the only way to know yours is to call your local building department. Freestanding structures often have different (sometimes lower) thresholds, which is another reason some homeowners go that route.
What inspectors typically check
- Footing depth and diameter (must reach below frost depth in cold climates, or meet local minimums)
- Ledger attachment method and fastener size/spacing (IRC R507.9.1.3 prescriptive tables are the standard reference)
- Post size and bracing against lateral loads
- Rafter size, species, and span (must match an approved span table for your design load)
- Roof sheathing and roofing material installation
- Flashing at the house wall connection
- Setback from property lines (zoning, not just building code — usually checked at permit application)
For your permit application, you'll typically need a site plan (a simple sketch showing the house, the new structure, distances to property lines), a framing plan with member sizes and spacing, and the design loads you used. Most residential DIY projects use IRC prescriptive design, which means you look up your loads in the IRC tables and pick lumber sizes accordingly, no engineer required. If your snow load is above about 50 psf, your span exceeds prescriptive table limits, or you're in a high-wind or seismic zone, the plan checker may ask for a stamped engineering drawing.
Structural essentials: loads, spans, beam and post sizing
Structural sizing isn't as scary as it sounds for a simple lean-to. You need to know two numbers: your design roof live load and your ground snow load. From there, the IRC prescriptive tables do the heavy lifting.
Finding your design loads
The IRC and ASCE 7 are the two governing references. For most of the continental U.S. south of the snowbelt, the governing load is the roof live load, which IRC tables typically set at 20 psf. In areas with significant snowfall, the ground snow load (Pg) from the ASCE 7 hazard maps governs instead. You can look up your site-specific Pg using the ASCE Hazard Tool online, select the ASCE 7 edition your jurisdiction has adopted (commonly ASCE 7-16 or 7-22 as of 2026). The ASCE and IRC treat roof live load and snow load as companion actions, not simultaneous full loads, so you use the larger of the two rather than adding them. See the Roof Loading Reference, ASCE 7 Snow & Wind for site-specific guidance on companion actions and applying ASCE 7 snow and wind provisions Roof Loading Reference — ASCE 7 Snow & Wind.
Rafter sizing
Use IRC Table R802.4.1 (or the equivalent table in your adopted code edition) to size your rafters. The tables list maximum allowable horizontal spans for common species and sizes at 12", 16", and 24" on-center spacing. Remember that IRC spans are measured horizontally, not along the slope. A few common examples for a 20 psf live load with 10 psf dead load, Douglas-fir No. 2:
| Rafter size | Spacing | Max horizontal span (approx.) |
|---|---|---|
| 2x6 | 16" o.c. | ~10 ft 0 in |
| 2x8 | 16" o.c. | ~13 ft 2 in |
| 2x10 | 16" o.c. | ~16 ft 7 in |
| 2x8 | 24" o.c. | ~11 ft 4 in |
| 2x10 | 24" o.c. | ~14 ft 3 in |
These are approximate values for illustration, always verify against the exact IRC table for your species, load, and dead-load assumption. The American Wood Council also publishes an online span calculator that lets you input your specific lumber species, size, spacing, and load to get an allowable span, which is a useful cross-check.
Beam and post sizing
The outer beam carries the ends of all your rafters and transfers the load to the posts. Beam sizing depends on the tributary load width (roughly half your rafter span) and the post spacing. For a lean-to roof with a 12-foot rafter span and posts at 8 feet apart, a doubled 2x10 or a 4x10 beam in Southern Pine or Douglas-fir handles most residential roof loads. Posts for a single-story patio roof are typically 4x4 for spans up to 8 feet and 4x6 or 6x6 for taller posts or longer spans. Your permit reviewer will check these against the IRC beam and column tables, so have your lumber species and load numbers ready.
Picking the right attachment style: honest pros and cons
The attachment style you choose determines the structural integrity of the whole project. Here's how to think through the options based on your house condition, budget, and skill level.
| Attachment style | Best for | Pros | Cons | Skill level |
|---|---|---|---|---|
| Ledger to rim joist (through siding) | Wood-framed homes with accessible rim joist | Strongest IRC-prescriptive option, most inspector-friendly, rigid connection | Requires removing siding/sheathing at ledger zone, critical flashing needed | Intermediate |
| Ledger screwed to fascia only | Light-duty shade structures, not full roof loads | Easy to install | Fascia is NOT a structural member — not code-compliant for a loaded roof ledger | Beginner (but not recommended for full roof) |
| Masonry/brick anchors | Brick or block exterior walls | Works where wood framing isn't accessible | Requires hammer drill, ICC-ES listed anchors, more complex layout | Intermediate-Advanced |
| Roof-jack / roof tie-in | Gable roofs that need to tie into the existing house roofline | Seamless aesthetic, best for gable style | Most complex, requires opening the existing roof, critical waterproofing | Advanced |
| Freestanding post system | Any house type, especially masonry or houses with rot/damage | No house penetrations, avoids attachment risk, simpler permits in some areas | Requires footings, slightly more material cost, leaves a gap at house wall | Intermediate |
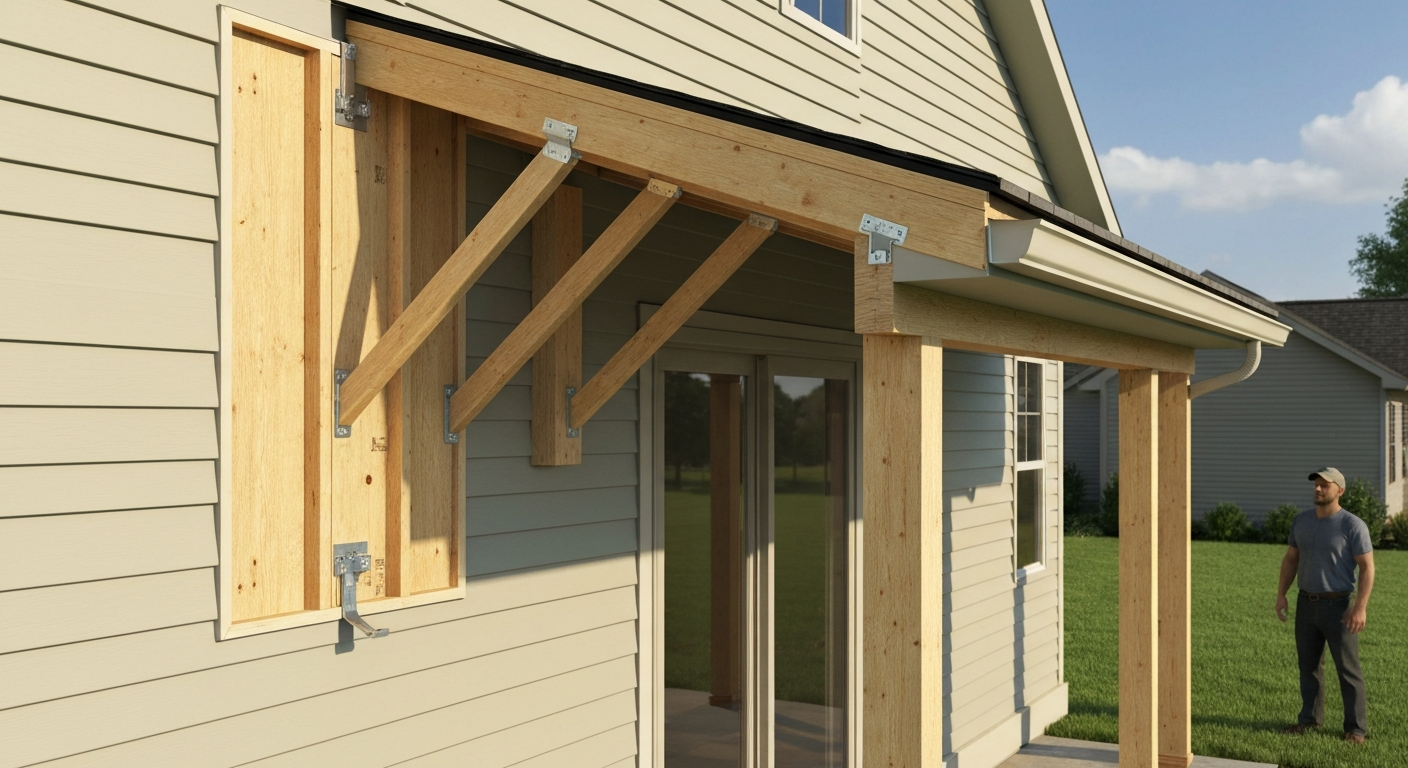
One thing I want to be clear about: attaching your ledger to the fascia board alone is not sufficient for a structural roof. Fascia boards are trim, they're typically a 1x or 2x board nailed to the ends of the rafters, and they're not designed to carry a downward load. What you're actually trying to reach is the rim joist (also called the band joist) behind the fascia, or the wall framing itself. The ledger must be fastened into structural framing, and the fascia is just in the way. I'll explain exactly how to do that in the next section. For a step-by-step walkthrough and diagrams on patio cover roof top attachment, see the detailed guide in our patio cover roof top attachment resource (ID: 8d21ab6f-f0b0-4c88-8b05-1d9896ce5123).
Attachment methods in detail: step by step
This is the heart of the project. I'll walk through each attachment method in the order most DIYers will encounter them, starting with the most common. For step-by-step illustrated instructions and detailed attachment examples, see how to add a patio cover to an existing roof. For step‑by‑step photos and fastening details on how to attach a patio cover to the roof, see the linked guide.
Method 1: Ledger board attached to the rim joist (through or behind fascia)
This is the standard method for a wood-framed house and the one the IRC prescriptive tables are written for. The goal is to get your ledger board bearing directly against the rim joist (band joist) so your lag screws pass through the ledger and bite into solid lumber. For step-by-step guidance on how to attach patio rafters to the house roof, see how to attach patio rafters to house roof.
- Locate the rim joist: Use a stud finder set to 'deep scan' to find the floor framing behind the wall sheathing. The rim joist typically runs horizontally just below the floor-deck level. For a first-floor patio roof, this is usually 8 to 12 inches above the slab or just under the band of siding above the foundation.
- Mark the ledger height: Set your ledger height so the finished roof will slope away from the house at your target pitch. Snap a chalk line across the wall at ledger-board height. The ledger top should sit at least 1 inch below the existing door threshold or sill to prevent water intrusion.
- Remove siding and sheathing at the ledger zone: You must remove the siding and any foam or fiber sheathing in the ledger footprint. Leaving siding or sheathing behind the ledger traps moisture and causes rot within a few years — this is one of the most common mistakes on DIY patio roofs. Use a circular saw set to the depth of the siding only, and a pry bar to remove the pieces cleanly.
- Install a moisture barrier: Apply a layer of self-adhering ice-and-water barrier or roofing felt directly to the exposed sheathing behind where the ledger will sit, extending at least 3 inches above the top of the ledger.
- Cut and position the ledger: Use pressure-treated lumber (same depth as your rim joist, typically 2x8 or 2x10) sized to your ledger length. Hold it against the wall at your chalk line — you should feel it sitting flush against the rim joist.
- Pre-drill and install lag screws: Following IRC R507.9.1.3, use 1/2-inch diameter hot-dip galvanized lag screws or ICC-ES-listed structural screws (Simpson SDWH or SPAX PowerLag are common choices). Pre-drill with a 5/16-inch bit through the ledger and a 1/2-inch bit into the rim joist to avoid splitting. Stagger fasteners in two rows, spaced per the IRC table for your load and joist span (typically 12 to 24 inches on center per row). The lag tip must fully penetrate and extend past the inside face of the rim joist.
- Install Z-flashing at the top of the ledger: Tuck the top leg of a Z-flashing or step flashing under the siding above, so it laps over the top face of the ledger. This is your primary water-shedding detail — don't skip it. Seal the ends with exterior polyurethane caulk.
- Hang joist hangers and install rafters: Use code-listed joist hangers (LUS series or similar) for each rafter location. Install hangers before placing rafters, then slide rafters in and nail with the specified hanger nails (not drywall screws).
Method 2: Masonry anchors for brick or block walls
If your house has a brick or concrete block exterior, you can't lag into a rim joist the usual way. You'll anchor the ledger using ICC-ES-listed masonry anchors, wedge anchors, sleeve anchors, or epoxy (chemical) anchors depending on the substrate.
- Determine your substrate: Solid brick or concrete uses wedge anchors (Simpson Strong-Bolt, Hilti HSL series) with standard embedment. Hollow CMU block requires either a hollow-wall anchor or epoxy anchors — never use wedge anchors in hollow block, as they can pull out at much lower loads.
- Mark anchor locations on the masonry: Lay out anchor positions per the anchor manufacturer's ICC-ES report — typically 12 to 16 inches on center, staggered in two rows, with minimum 2.5-inch edge distance from mortar joints or block edges.
- Drill anchor holes: Use a hammer drill with an SDS carbide-tipped bit matching your anchor diameter. Drill to the embedment depth specified in the ICC-ES report (typically 2.5 to 3.5 inches for 1/2-inch wedge anchors in solid masonry). Clear the hole of dust before setting the anchor.
- Install a moisture standoff: Brick walls collect moisture. Install a pressure-treated ledger with a rubberized moisture barrier or plastic standoff washers so the ledger doesn't sit flush against the brick face.
- Set the anchors: Drive wedge anchors through the ledger and into the masonry hole, then torque the nut to the manufacturer's specification. For epoxy anchors, inject the adhesive, insert the threaded rod, and allow the full cure time (often 24 hours at 70°F) before loading.
- Flash the top of the ledger: Same principle as wood framing — tuck flashing under any veneer or caulk above, and lap it over the ledger face to direct water outward.
Method 3: Roof-jack and roof tie-in for gable roofs
A roof tie-in is used when you want your patio roof to merge with the existing house roofline rather than butting against the wall below it. This is the most complex method and involves opening the existing roof deck, installing a ridge or valley member, and tying your new rafters into the existing structure.
- Locate and expose the existing rafter positions above the attachment zone: From inside the attic or by probing from outside, find the existing rafters at the tie-in point. Your new ridge or valley rafter will bear on these.
- Install structural roof jacks or hurricane ties into the existing rafter or top plate: These connect the new and old structures and transfer lateral and uplift forces. Use manufacturer-specified fasteners — not just whatever nails are handy.
- Cut the existing roof deck opening carefully: Remove only what you need. Working inside a stripped opening, flash aggressively — self-adhering membrane under all cut edges, then step flashing at every rafter bay along the tie-in line.
- Frame your new ridge beam and rafters: The ridge beam for a gable roof is a structural member, sized for your span and load. It bears on posts or gable-end walls. Rafters run from the ridge down to the outer beam.
- Seal and flash the junction: This is the moment where future leaks are born or prevented. Valley flashing (W-metal or continuous rolled aluminum) must lap at least 8 inches on each side, and all cut sheathing edges get sealed with membrane. Re-shingle over the flashing last, working from bottom to top.
Method 4: Freestanding post system
Freestanding means the entire roof load is carried by posts on footings, nothing is attached to the house wall. You still typically run the roof up close to the house and tuck the top edge under the eave or flash it against the siding, but there are no structural fasteners going into the house framing.
- Lay out and dig footings: Use batter boards and string lines to locate footing centers. Footings must be below frost depth in freeze-thaw climates (check your local frost depth — commonly 12 to 36 inches in northern states). For a typical single-story patio roof, a 12-inch diameter footing is usually adequate, but confirm with your local code.
- Pour concrete and set post bases: Use tube forms, pour to within a few inches of grade, and set an ICC-ES-listed adjustable post base (Simpson ABA or ABU series) in the wet concrete. Let cure fully (at least 3 days) before loading.
- Install posts and beam: Set posts plumb, cap with a post cap connector, and install the beam. Brace posts temporarily until the beam is fully connected and the roof is framed.
- Frame rafters back to the house: Run rafters from the beam toward the house. At the house side, rest the rafter ends on a nailer or ledger that is lagged into the siding (not structurally loaded — just for lateral tie and aesthetics), or let them bear on a top plate if you've built a small kicker wall at the house.
- Flash the house-side edge: Even without a structural connection, seal the gap between the roofing material and the house wall with a continuous piece of flashing tucked under the siding above and caulked along the bottom edge.
Flashing and weatherproofing: the details that decide longevity
More patio roofs fail at the flashings than at the structure. Here's the non-negotiable sequence for a lean-to ledger connection:
- Apply self-adhering ice-and-water barrier to the exposed wall sheathing in the ledger zone before the ledger goes on — extend it 6 inches above the ledger top and 2 inches past each end.
- Install the ledger and lag screws, sealing each lag hole with a bead of polyurethane caulk before fully seating the screw.
- Install Z-flashing or step flashing across the top of the ledger: the upper leg goes under the siding above (you'll need to pry it up slightly), and the lower leg laps over the ledger face by at least 2 inches.
- After roofing panels or sheathing are on, apply a continuous bead of caulk where the top of the roofing meets the house wall — but never rely on caulk alone. Flashing does the work; caulk is a secondary seal.
- Install a drip edge at the outer (low) edge of the roof to direct water off the fascia and into a gutter.
- Inspect caulk and flashing annually — particularly after the first winter — and re-seal any cracks before they allow water behind the ledger.
Rough cost and time estimates
Costs vary significantly by region and material choice, but here are realistic DIY ranges for a 12x16-foot (192 sq ft) attached lean-to patio roof as of mid-2026. For a detailed breakdown of expected pricing by material and region, see our guide on how much to build a patio roof attached to a house.
| Item | DIY cost range | Notes |
|---|---|---|
| Lumber (rafters, ledger, beam, posts) | $400–$700 | Pressure-treated and Douglas-fir, current pricing |
| Roofing material (corrugated metal) | $300–$550 | Steel panels; polycarbonate is similar; shingles over OSB run higher |
| Connectors, fasteners, hardware | $150–$300 | Joist hangers, post bases, lags, structural screws |
| Flashing and waterproofing | $80–$150 | Z-flashing, ice-and-water membrane, caulk, drip edge |
| Concrete for footings | $50–$120 | 2–4 footings, bagged mix |
| Permit fee (typical residential) | $100–$400 | Varies widely by jurisdiction |
| Tools (if renting) | $80–$200 | Hammer drill, nail gun, ladder rental |
| Total estimated DIY material cost | $1,160–$2,420 | Labor is your time: plan 3–5 full weekends for a 192 sq ft lean-to |
A contractor-built version of the same structure typically runs $5,000 to $12,000 or more depending on your region and material choices, so the DIY savings are real, but so is the time commitment. Budget 3 to 5 full weekends for a 12x16 lean-to if you're working solo or with one helper.
When to call a pro (be honest with yourself)
This project is genuinely DIY-able for most wood-framed homes, but there are specific situations where I'd hire a structural engineer or a licensed contractor rather than push through:
- Your rim joist or ledger zone shows rot, damage, or insect damage — probe with a screwdriver before you start. If the wood is soft, you need repairs before any attachment.
- Your ground snow load exceeds 50 psf — at that level, IRC prescriptive tables may not cover your spans and an engineer's stamp is worth every dollar.
- You're in a high-wind zone (ASCE 7 basic wind speed above ~130 mph) or a seismic design category C or higher — lateral and uplift calculations go beyond basic prescriptive tables.
- The roof tie-in method is required and you're not confident opening an existing roof — a small leak in the wrong place can cause tens of thousands in damage.
- The permit reviewer asks for an engineered drawing and you're not sure how to produce one.
- You're working above 12 feet without proper fall protection equipment and training.
Common mistakes and how to avoid them
What often goes wrong with patio roofs built off existing fascia usually falls into one of these categories. I've seen (and made) most of them.
- Attaching the ledger to the fascia board rather than the rim joist: Fascia is not structural. Always reach the rim joist or wall framing.
- Leaving siding behind the ledger: This traps moisture and causes rot within a few seasons. Always remove siding and sheathing at the ledger zone.
- Insufficient pitch: A 1/12 slope looks fine when it's built but collects debris and standing water. Minimum 2/12, prefer 3/12.
- Missing or poorly installed flashing at the top of the ledger: This is the single most common source of water intrusion. The flashing must go under the siding above, not just caulked on top.
- Using the wrong fasteners: Standard zinc-plated screws corrode quickly in exterior applications. Use hot-dip galvanized or stainless exterior fasteners throughout.
- Skipping the permit: Unpermitted structures create problems at sale, may not be covered by homeowner's insurance for damage, and can require demolition if discovered.
- Underestimating the footing depth in cold climates: Frost heave on a shallow footing can lift and rack the whole structure within a couple of winters.
Maintenance and inspection after the build
Once the roof is up and inspected, a quick annual check keeps it sound for decades. Every spring, inspect the ledger flashing for gaps or lifted edges, probe the ledger board for soft spots, check all post bases for rust or concrete cracking, and clear debris from the roof surface and gutters. Re-torque any lag screws that have worked loose after the first year. Polycarbonate and metal roofing panels should be checked for fastener backout, the neoprene-gasketed screws can loosen with thermal cycling and need a quick re-drive every few years. A roof that gets this 30-minute annual inspection will outlast one that gets ignored by a decade or more.
FAQ
Do I need a permit to build a patio roof attached to my house?
Probably. Many jurisdictions treat attached patio roofs as part of the primary dwelling and require a building permit; some cities exempt very small covers but most require a permit for attached structures over a threshold area. Check your local building department before planning—they’ll tell you required drawings, loads to use (adopted code edition), setback and flashing rules, and inspection stages.
How do I choose between an attached (lean‑to), attached gable, or freestanding patio roof?
Use this decision checklist: 1) Attachment: attached saves materials and height but requires sound rim joist/wall and permit compliance; freestanding avoids house ties and is simpler if the house connection is unsafe. 2) Drainage & pitch: gable gives better ventilation and appearance; lean‑to is simpler and sheds water to one side. 3) Loads/climate: in high‑snow or high‑wind areas a gable or engineered attachment may be required. 4) Budget & skills: lean‑to is quickest/cheapest; gable and larger attached roofs often need more framing and possibly engineered plans.
What structural checks do I need before designing size and span?
Determine local design loads (ground snow load, basic wind speed, seismic category) from the adopted code or ASCE hazard tools. Use IRC or AWC span tables to size rafters and beams based on those loads. Ensure ledger or post foundations can carry vertical and lateral loads. If loads, spans, or connections exceed prescriptive tables, get engineered calculations.
What’s the difference between attaching to fascia vs the rim joist, and which is correct?
Fascia is a non‑structural trim board; you must not rely on it for structural attachment. Attach to the structural rim/band joist or to structural sheathing/headers behind the cladding. If you cannot access a rim joist or it’s rotten or backed by nonstructural materials, use a freestanding post system or engineered through‑bolts into framing or masonry anchors per manufacturer instructions.
How should I fasten a ledger to a wood rim joist?
Follow prescriptive ledger requirements: use approved structural lag screws or through‑bolts (typically 1/2" or as specified), proper embedment so the tip extends beyond the inside face of the rim joist, correct spacing and edge distances, and hot‑dip galvanized or stainless fasteners for exterior use. Stagger fasteners when required and follow an ICC‑ES‑listed manufacturer schedule or local code table exactly. Flash the ledger above with continuous counter‑flashing and a beveled drip to prevent water intrusion.
How do I anchor a patio roof to brick or masonry?
Use anchors approved for the substrate: expansion/wedge anchors or ICC‑ES‑listed adhesive (chemical) anchors for solid masonry or concrete; for hollow CMU/brick, use sleeve anchors designed for voids or through‑bolts with backing plates or epoxied threaded rod into solid sections. Follow the anchor manufacturer’s embedment depth, edge distance and spacing limits and use corrosion‑resistant materials.