Attaching a patio roof to your existing house comes down to one critical connection: a ledger board fastened directly into your home's framing (for side-wall attachment) or a proper tie-in with flashing where your new roof meets the existing roofline. For a complete walkthrough of how to attach a patio cover to the roof, review the ledger, flashing, and weatherproofing steps in this guide. Get those two things right and the rest of the project follows a logical sequence. Get them wrong and you're dealing with leaks, sag, or a structure that fails in the first big windstorm. This guide walks you through every step, from picking your attachment point to sealing the last piece of flashing.
How to Attach a Patio Roof to an Existing House

Celia Vaughn
13 May 2026
Pick your attachment scenario first
Before you buy a single piece of lumber or aluminum, you need to decide exactly where and how the patio roof will connect to the house. There are three main scenarios, and each one requires a different approach. If you are considering a roof tie-in instead of a simple side-wall ledger attachment, that patio cover roof top attachment approach is often where flashing and planning get more involved.
- Side-wall attachment (most common): The patio roof's high end ties into the exterior wall of the house using a ledger board. The ledger replaces what would otherwise be a beam, and your rafters hang off it. This works well for single-story homes where you're attaching below the eave.
- Existing roofline/fascia attachment: The new patio roof connects to the fascia board or rafter tails at the edge of your existing roof. This is sometimes called a fascia-hung attachment. It can work for simple lean-tos but comes with an important warning: do not rely on rafter tails or the roof projection alone to carry the structural load of your new patio roof. Many jurisdictions explicitly prohibit this without engineered approval.
- Tie-in to the existing roof surface: The most involved option. You cut into or tie into the existing roof deck and integrate the new structure. This requires removing shingles, installing a proper ridge or valley connection, and rebuilding the flashing assembly entirely. It's common when you want a gable-style patio roof that looks like it grew from the house.
For most DIYers, the side-wall ledger attachment is the cleanest and most code-friendly approach. The fascia attachment is workable for lightweight aluminum or wood shade structures. The roof tie-in is genuinely complicated and usually warrants at least a consultation with a structural engineer or experienced roofer. If you're connecting to a brick house, the ledger attachment involves extra hardware steps (more on that in the materials section below). If you’re specifically figuring out how to attach a patio roof to a brick house, you’ll want to plan for the extra ledger attachment steps and waterproofing details that work with masonry.
Pre-build checklist: structure, permits, loads, and safety
This is the step most people skip because they're eager to get building. Don't skip it. Structural problems and permit violations are expensive to fix after the fact.
Check the existing framing
If you're attaching a ledger to the house wall, you need to know what's behind the siding. You're looking for either a rim board/band joist (great for attachment) or wall studs. Pull a section of siding or use a stud finder and probe to confirm stud spacing and size. For a ledger attached to studs, the City of San Diego's prescriptive approach calls for 3/8-inch by 5-inch lag screws at 16 inches on center maximum, which gives you a solid benchmark even if your jurisdiction uses slightly different specs. If you find that your wall framing is deteriorated, has been compromised by moisture, or uses non-standard spacing, stop and fix that first.
Pull the permit
A solid-roof patio cover almost universally requires a building permit. Most jurisdictions require you to submit framing plans showing lumber species, sizes, and spacing; footing/post details; a ledger attachment detail; roof covering type; and sometimes structural calculations. Some cities, like Chula Vista and Douglas County, are explicit about what the plans package must include. City of Chula Vista notes that patio cover permits require specific plan details, including framing and connection information, that inspectors will verify during the permit process Chula Vista and Douglas County, are explicit about what the plans package must include.. An ICC-ES-rated prefab patio cover system (evaluated under Acceptance Criteria AC340) comes with an engineering packet that already documents wind speed, exposure, and allowable snow load, which makes the permit process much easier. If you're building from scratch with wood or metal framing, you may need to have an engineer stamp the plans depending on your local requirements. Check with your local building department before you buy materials.
Understand your load requirements
Your patio roof needs to handle the loads your climate throws at it. AC340 is intended to evaluate patio covers and carports with respect to key performance parameters including wind load and snow load AC340 evaluate patio covers and carports with respect to wind load and snow load. In snow country, that means accounting for roof snow load in your rafter and post sizing. In coastal or open areas, wind load is the dominant concern. AC340-rated systems carry a permanent decal showing allowable roof live/snow load and design wind speed, so you can verify the structure matches your permit. If you're building custom, your lumber sizing and connection hardware have to match the load calculations. Don't guess on this, especially for post spacing and ledger fastener pattern.
Safety basics before you start
- Use proper fall protection if you're working at or near the existing roofline.
- Locate and mark all utilities in the walls before drilling or cutting.
- Have a second person on site when setting beams or attaching ledgers at height.
- Never stand on a ladder while operating a drill or impact driver into a wall ledger. Use scaffolding or a pump jack for that work.
- Inspect the area where the patio roof will drain to. Make sure water won't pool against the foundation or flood a walkway.
Materials and hardware: wood vs. metal connections
The material you choose for your patio roof framing affects every connection decision downstream. Here's an honest comparison.
| Material | Ledger/Attachment Hardware | Pros | Cons |
|---|---|---|---|
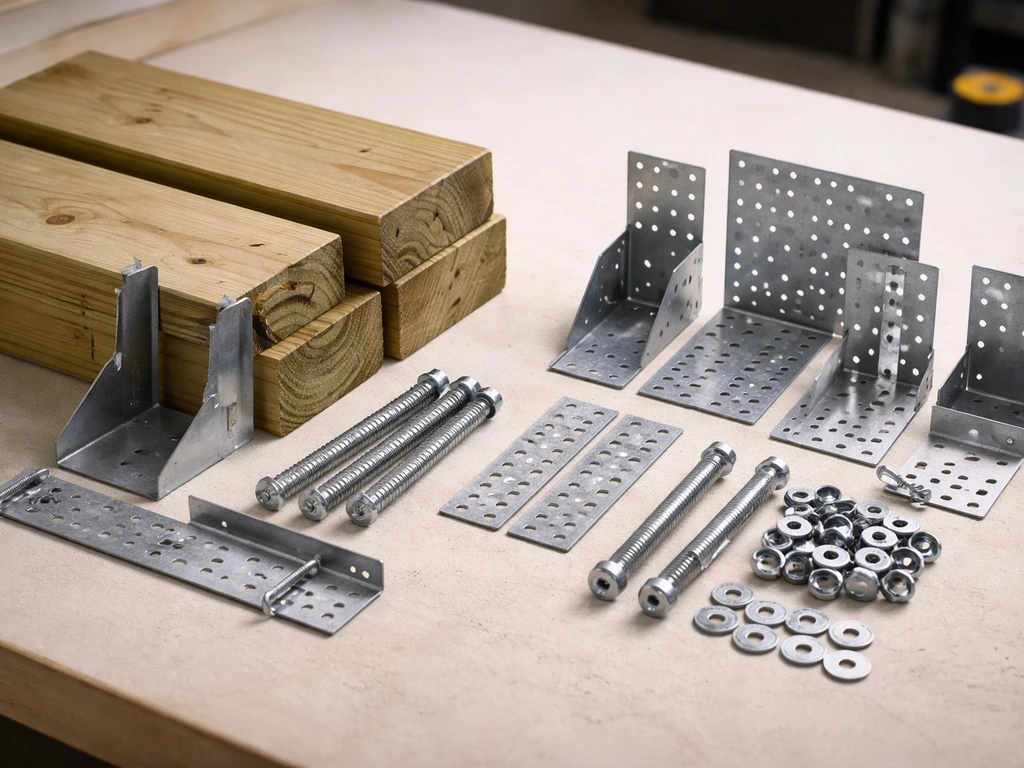
| Pressure-treated wood | Standard lag screws, joist hangers, Simpson LUS or LUC hanger series, post caps | Widely available, easy to cut and modify on site, familiar to most DIYers | Requires painting or staining, susceptible to rot at wall interface if flashing fails, heavier |
| Aluminum (extruded, e.g. Alumawood) | Manufacturer-specific connectors, self-tapping screws, aluminum ledger channel | Lightweight, no painting, corrosion-resistant, engineered systems include hardware kit | Less forgiving of cuts, requires manufacturer's installation sequence, higher material cost |
| Steel/metal framing | Structural bolts, steel column bases, moment connections per engineer's detail | Very high strength, good for large spans or high-wind zones | Requires welding or specialized fasteners, heavier, not typical DIY territory |
| Brick or masonry wall attachment | Simpson BVLZ brick veneer ledger connector or through-bolt with standoff | Engineered solution for a challenging substrate | Requires correct standoff distance, more complex installation, often needs engineer review |
For most homeowners doing a lean-to patio roof on a wood-framed house, pressure-treated lumber with standard structural connectors from Simpson Strong-Tie or USP is the practical choice. The Simpson Deck Connection and Fastening Guide is a solid reference for connector types and IRC-aligned fastener patterns, and most of it applies directly to patio cover framing. For aluminum systems, follow the manufacturer's engineering packet exactly. Substituting hardware on an engineered aluminum system can void both the warranty and the ICC-ES evaluation.
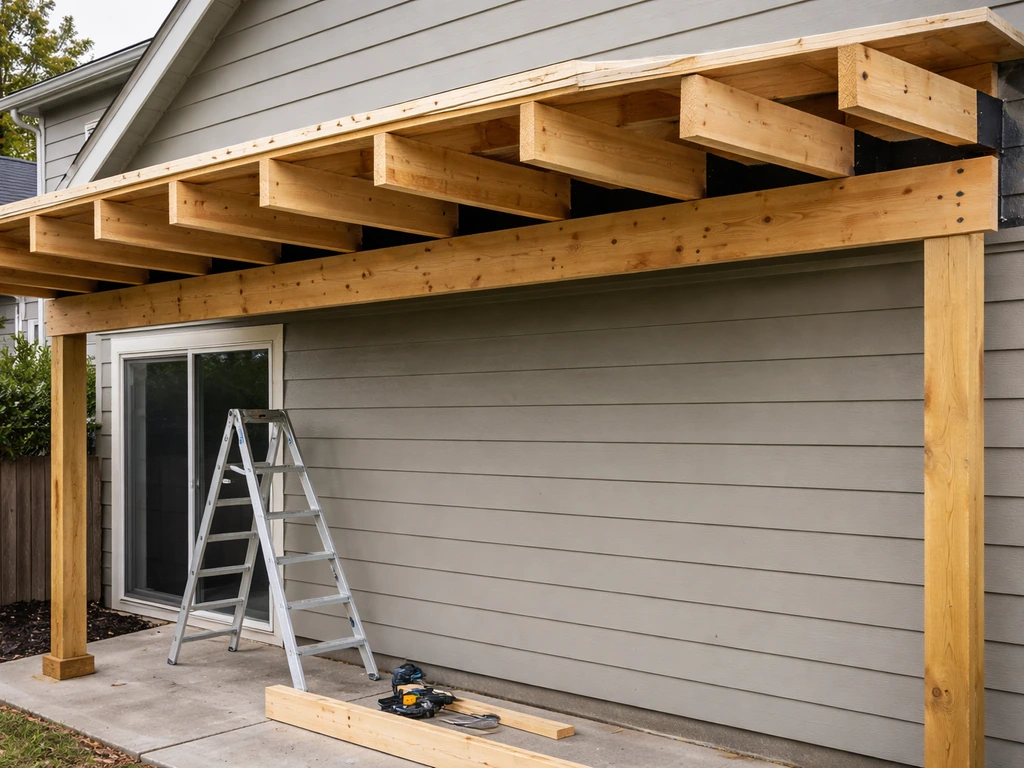
Step-by-step framing attachment to the house
The following steps cover the most common scenario: a lean-to style patio roof attached to a wood-framed house wall with a ledger board, with posts at the outer edge. To attach patio rafters to the house roof, you need to match the rafter layout to your attachment method and use proper flashing at every roof junction to prevent leaks lean-to style patio roof attached to a wood-framed house wall with a ledger board. Adapt as needed for aluminum systems or fascia-hung attachments.
- Lay out the attachment line. Snap a chalk line on the house wall at the height where the top of your ledger will sit. Factor in your desired roof slope (see the slope section below) from this point to the outer edge. A minimum of 1/4 inch per foot (about 1/4:12 pitch) is required by some jurisdictions for solid-roof covers like Escondido's code requirement, but 1:12 or steeper gives you much better drainage.
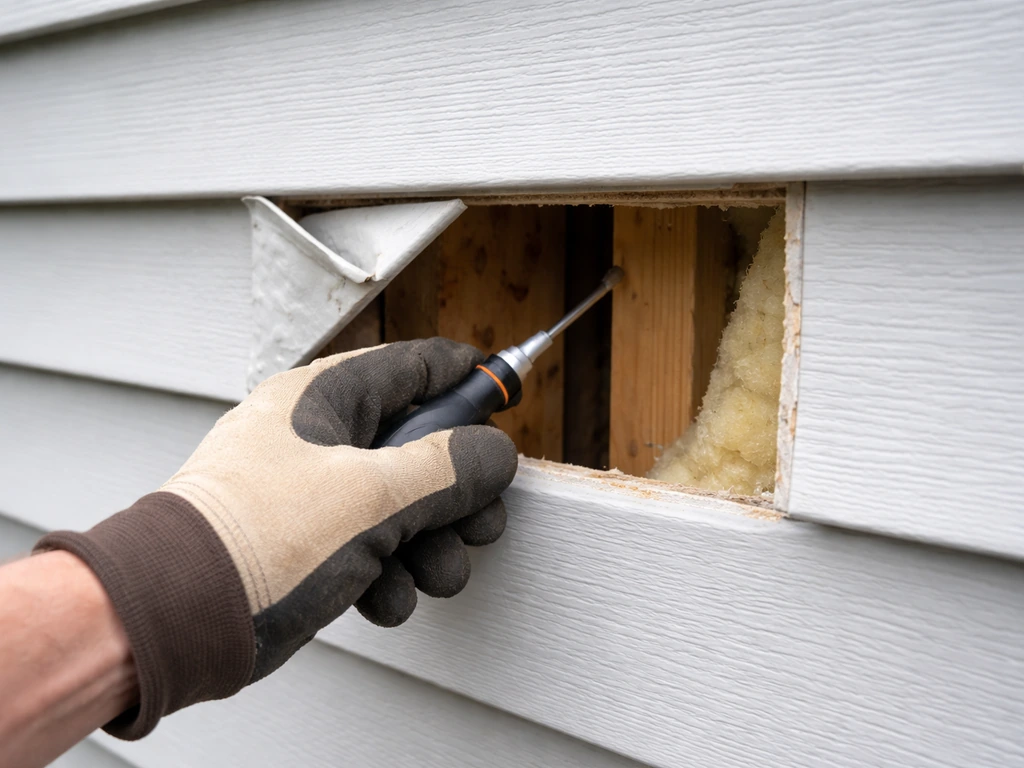
- Remove siding in the ledger zone. Strip siding and housewrap in a strip about 1.5 inches taller than your ledger board will be. This exposes the sheathing so you can tuck flashing properly behind it later. Don't skip this step if you have horizontal lap siding.
- Locate and mark stud or rim board locations. Use a stud finder and confirm with a nail probe or small exploratory hole. Mark center lines clearly. If you have a rim/band joist behind the sheathing, you can fasten continuously into it, which is stronger than stud attachment.
- Cut the ledger board to length. Use the same lumber species and size as your rafters (or one size larger as required by your plans). Pressure-treated lumber is required wherever the board is within close proximity to concrete, masonry, or in a moisture-prone zone.
- Drill pilot holes and fasten the ledger. Using 3/8-inch diameter by 5-inch lag screws (or structural bolts if going through the rim board), fasten through the ledger and sheathing into studs or the rim board. Per prescriptive guidance, space fasteners at 16 inches on center maximum. Pre-drill to avoid splitting. Use a torque wrench or impact driver to seat fasteners fully but without stripping.
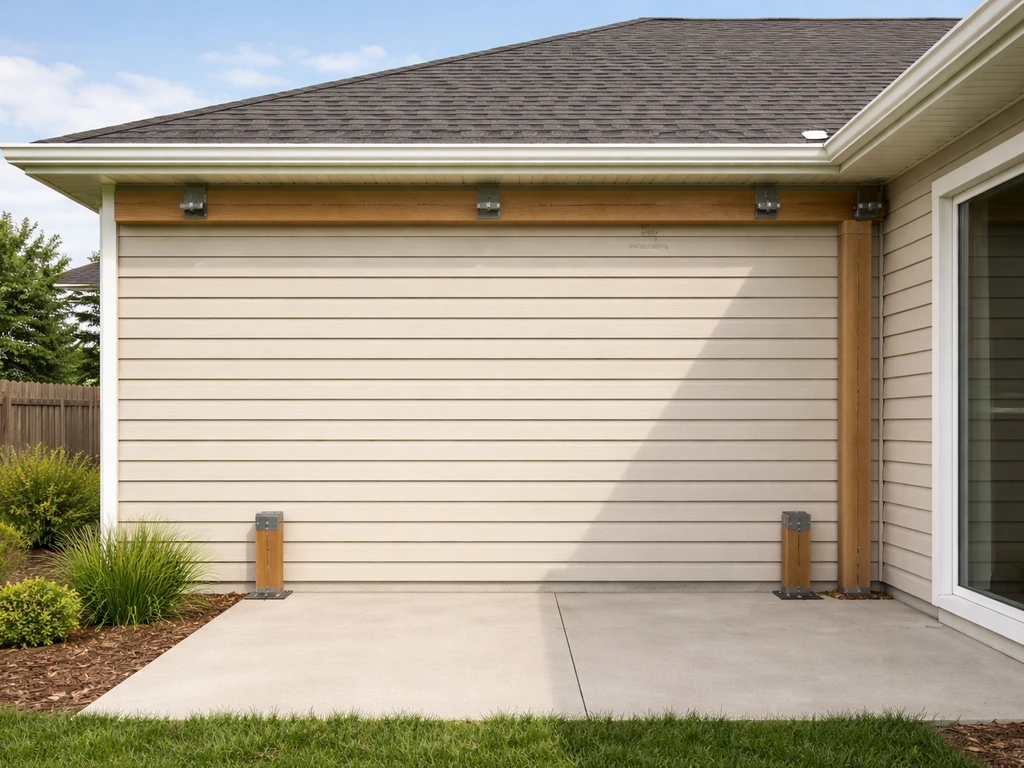
- Set your posts and beams at the outer edge. Install post bases (Simpson ABA or similar adjustable post base anchored to footings) and set posts. Size footings according to your permit/plans, not just what looks right. The beam at the outer edge carries the outer rafter ends and transfers load to the posts.
- Install rafters. Use appropriate joist hangers at the ledger end. At the outer beam, either notch the rafter over the beam (bird's mouth cut) or use a rafter tie connector. Space rafters as specified in your plans, typically 24 inches on center for most residential patio roofs.
- Brace temporarily until sheathing or roofing is installed. A framed structure without sheathing or diagonal bracing can rack. Add temporary diagonal bracing from the wall to the outer beam to keep everything square while you work.
Common mistake: People attach the ledger over the existing siding without removing it first. That leaves a gap behind the ledger that traps water, rots the siding, and eventually compromises the sheathing and framing behind it. Always remove the siding in the ledger area and flash properly. Getting the flashing right is a key part of how to add a patio cover to an existing roof without leaks flash properly.
Weatherproofing: flashing, sealing, and leak prevention
This is where most DIY patio roof projects eventually fail if the builder rushed through it. Water will find every gap between your new roof and the house wall, and it will do it slowly enough that you won't notice until there's rot in your wall framing.
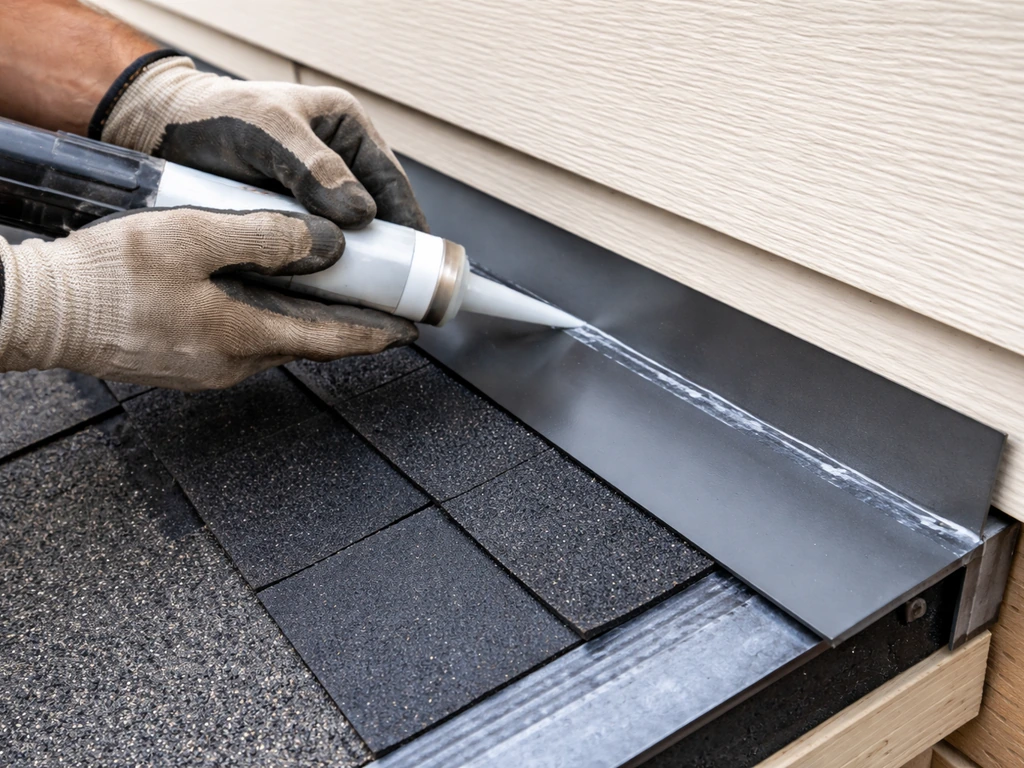
Ledger flashing (the non-negotiable)
Once your ledger is fastened, you need a continuous piece of metal Z-flashing installed above it, tucked under the housewrap or siding above and lapping over the top face and outer face of the ledger. The Z-profile catches water running down the wall and kicks it forward and out past the ledger face rather than letting it soak into the fastener holes. Use pre-bent galvanized or aluminum Z-flashing, minimum 6 inches wide on the wall leg. Seal the top edge where it tucks under the housewrap with flashing tape, not just caulk.
Roof-to-wall flashing (for tie-in attachments)
If your patio roof is tying into the existing roof surface or running up against a wall higher than the ledger (such as in a gable-end configuration), you need step flashing interwoven with your roofing material at every roof-wall intersection. Step flashing is individual L-shaped metal pieces, one per shingle course, woven alternately under the roofing and against the wall sheathing. Over that goes a continuous counterflashing or base flashing assembly depending on the wall material. This is the same assembly used on dormer sidewalls and shed roof additions. Do not substitute a single piece of bent aluminum for step flashing. What often goes wrong here is that DIYers install one long continuous piece of base flashing and call it done, and it leaks within a season because thermal expansion opens gaps at the wall.
Ice and water shield
If you're in a climate where the average daily January temperature is 25°F or lower, IRC-based codes require ice and water shield (ice barrier) at eaves and in valleys. Even if your climate doesn't technically trigger that requirement, installing self-adhering ice and water shield in the first 24 to 36 inches from the eave edge and at the roof-wall junction is cheap insurance and a best practice on any patio roof. Apply it before sheathing is covered and make sure it bonds fully to the deck.
Drip edge and edge sealing
Install metal drip edge at the eave and rake edges of any shingle-covered patio roof. Fasten it to the deck at not more than 12 inches on center. For metal panel roofing (exposed fastener or standing seam), follow the manufacturer's edge treatment details, which typically include a foam closure strip at the eave to block insects and a rake trim piece. Seal all exposed fastener heads on metal roofing with the manufacturer-supplied EPDM-washered screws, and replace any that strip during installation.
Roof slope, drainage, and finishing the build
Slope is not optional. A flat patio roof is a leaking patio roof waiting to happen. The minimum code requirement in some jurisdictions is as shallow as 1/4 inch per foot (1/4:12), but in practice, anything under 1:12 is difficult to make watertight with most roofing materials unless you use a specific low-slope or membrane system. For asphalt shingles, 2:12 minimum is standard. For metal panels, many manufacturers allow 1:12 with their standing seam products. Decide on your slope before you set the ledger height, because that slope has to be built into the difference in elevation between the ledger and the outer beam.
Here's the practical math: if your patio is 12 feet deep and you want a 2:12 slope, the ledger needs to be 24 inches higher than the top of the outer beam (2 inches per foot times 12 feet). Map that out on the house wall before you drill a single hole, and make sure the resulting ledger height still clears any windows or doors it passes near.
For drainage, the low end of the roof (the outer edge) needs somewhere for water to go. Options include a gutter hung from the outer fascia board, a scupper in the outer beam, or simply a well-graded surface below the eave. If you're draining onto a concrete patio, position the drip line so it doesn't run back toward the foundation. In high-rainfall areas, a properly sized gutter is worth doing right, especially if the patio roof is adjacent to a door or high-traffic area.
For sheathing, use 1/2-inch or 5/8-inch OSB or plywood rated for roof sheathing (exposure 1 or better). Install it with the long edge perpendicular to rafters, stagger joints, and leave 1/8-inch gaps at all edges to allow for expansion. After sheathing, follow with underlayment and then your roofing material. If you're using aluminum or metal roofing panels, the manufacturer's sequence typically skips traditional underlayment in favor of foam closures and direct-to-deck panel attachment, but verify this in the specific product's installation instructions.
Plan for inspection checkpoints. Most jurisdictions that require a permit will want a foundation inspection before you pour footings, a framing inspection after structural members and sheathing are in place but before roofing is installed, and a final inspection after the roof covering is complete. Schedule these in advance because delays will stall your project.
When to hire a pro or stop the DIY job
This is the part of the guide most DIY sites gloss over. Here's an honest assessment of where the line is.
- Hire a structural engineer if: your roof span exceeds 12 to 14 feet, you're in a high-wind or heavy-snow zone, you need to attach to masonry or brick, or your local permit office requires stamped plans. An engineer's review typically costs $300 to $800 and is worth every dollar if it means your structure is sized correctly.
- Stop and call a pro if: you open the wall to install the ledger and find deteriorated framing, mold, or evidence of prior water intrusion. Those problems have to be fixed before anything attaches to that wall.
- Get a roofer involved if: your attachment scenario requires cutting into the existing roof surface, integrating with an existing valley, or modifying the existing roof structure. Flashing a patio roof into an existing shingled roof is a skill-specific task that goes wrong frequently when done by inexperienced hands, and a leak in that connection can damage your home's interior.
- Call a permit inspector proactively if: you're unsure whether your attachment detail meets the ledger fastening requirements in your jurisdiction. Many building departments will look at your plans or answer questions before you build, and that conversation is free.
- Hire it out entirely if: you're not comfortable working at elevation near the existing roofline, don't have a second person to help with beam setting, or are working with a material system (like aluminum or steel) you haven't used before. There's no shame in hiring out one phase of the project while doing the rest yourself.
The projects that end up the most satisfying are the ones where the homeowner did the work they were genuinely confident doing and brought in help for the one or two details that were genuinely over their head. Attaching a patio roof to a house is very achievable as a DIY project on a standard wood-framed home, but it's a structural and waterproofing job, not just a carpentry job. Treat it accordingly and you'll have a structure that looks great and holds up for decades. If you want to budget accurately, check factors like size, materials, roofing type, and whether the roof attaches via a ledger to estimate how much to build a patio roof attached to the house.
FAQ
Can I attach the patio roof ledger to the siding without removing it?
You should not. The ledger must land on framing (studs, rim board, or band joist) with the right hardware pattern, and you need flashing that directs water forward and out past the ledger face. Removing the siding only in the ledger area is usually the cleanest way to avoid trapping water behind the ledger.
What if I find rot or moisture damage behind the wall where the ledger will mount?
Stop and repair before you fasten. Replace compromised sheathing and any deteriorated rim joist or studs, then confirm solid, continuous backing for the ledger. Fasteners into questionable framing can loosen under load, and leaks at the ledger fastener line will accelerate the same damage again.
How do I confirm the ledger height and slope without reworking after installation?
Dry-fit the layout with measurements transferred to the house and outer beam before drilling. Build the slope into the elevations (ledger height minus outer beam height) and verify it clears doors and windows along the wall. Recheck after accounting for post/beam thickness, any base plates, and roof decking thickness.
Do I need ice and water shield even if my local code does not specifically require it?
If freezing temperatures are common, it is still a best practice at the eave and at roof-wall junctions, because patio roofs create ice dam conditions similar to main roofs. Install it before sheathing, ensure full adhesion to the substrate, and run it up the wall side where it will tie into flashing.
Is one continuous piece of flashing acceptable instead of step flashing at a roof-wall intersection?
No. Step flashing is designed to work with the roofing course-by-course movement and thermal expansion. A single long piece is more likely to open at seams, especially with shingles or when the wall intersection sees repeated freeze-thaw cycles.
Can I use caulk to seal the ledger area instead of flashing tape?
Caulk is not a substitute for flashing tape and proper metal lapping. Use flashing tape to seal where the Z-flashing tucks under housewrap, and rely on the metal profile and lapping order to shed water. Caulk can fail under movement and will not bridge gaps as reliably as flashed assemblies.
What slope should I plan for if I am using asphalt shingles or metal panels?
Plan around the roofing material system. Asphalt shingle patio roofs generally use 2:12 minimum, and many manufacturers require specific minimum pitches for standing seam or other metal panel types (often as low as 1:12 depending on the product). Match the pitch to the product requirements before locking in the ledger height.
How far apart can posts be on the outer edge?
Post spacing is determined by your roof span, live loads, and the size of your rafters and beams. Use the engineering packet for prefab systems, or use load calculations for custom framing. Avoid guessing, because incorrect spacing often shows up first as sagging at the beam-to-rafter region.
Do I need to leave expansion gaps in the sheathing, and how does that affect flashing?
Yes, leave expansion gaps at sheathing edges (commonly 1/8 inch) and install underlayment and flashing over a consistent deck surface. Do not fill sheathing gaps with sealant in a way that interferes with water management, keep the drainage path governed by the flashing design.
What is the most common inspection failure to prepare for?
Ledger and structural load transfer details. Many inspections focus on whether the ledger fasteners actually hit the required framing, whether the fastener pattern matches the approved plan or engineering packet, and whether posts/footings match the required foundation detail before roofing closes everything in.
Can I substitute different hardware on an engineered patio cover system?
On engineered aluminum and other evaluated systems, substitutions can void the warranty and the ICC-ES evaluation. Use the manufacturer-specified connectors and fastener types, and if you must change anything (like corrosion-rated requirements), get written guidance tied to the original design.