You can absolutely add a patio cover to an existing roof as a DIY project, but it takes more planning than most people expect. The core job is building a lean-to style cover that ties into your house roof at one end and sits on posts at the other, with a ledger board or rafter hangers connecting everything structurally and flashing sealing the joint against water. Get those two things right, the structure and the waterproofing, and the rest is straightforward carpentry or aluminum assembly.
How to Add a Patio Cover to an Existing Roof

Celia Vaughn
2 Jun 2026

Assess Your Existing Roof and Pick the Patio Cover Style
Before you buy a single bolt, spend an hour looking at your existing roof from every angle. The pitch of your house roof, where the fascia sits, whether you have an overhang, and what the roofing material is all determine what kind of patio cover you can realistically attach. A good starting point is planning how your patio roof will tie in to the existing fascia with the right flashing and structural connections. Most homeowners tie into the existing roof somewhere between the ridge and the fascia, which means you're cutting into finished roofing and making a permanent structural connection.
The most common style for a roof tie-in is the lean-to (also called a shed-roof patio cover). If you want the full process for a patio roof attached to a house, make sure the structure is tied in correctly before you waterproof the roof joint attached patio cover. Your new rafters slope away from the house at a lower pitch than the main roof, and everything drains toward the yard.
This is the simplest attachment geometry and the easiest to waterproof. A gable-style attached patio cover is more complex because you're building a miniature peaked roof that butts against the house wall, which creates a valley that must be carefully flashed. For most DIYers doing a roof tie-in, lean-to is the right choice.
Measure your desired cover width (the distance from the house to the outer posts) and depth (how far it runs along the house wall). A typical residential patio cover spans 8 to 14 feet from the house. Beyond 14 feet, you'll almost certainly need an engineer's stamp on your plans because beam sizes and post footings get into territory that isn't covered by simple prescriptive tables. Also note your existing roof's pitch in inches of rise per 12 inches of run, you'll need that number when you calculate where on the roof your new cover will intersect.
Matching Slope and Drainage

Your new patio cover needs a minimum slope of 1/4 inch per foot to drain properly, and 1/2 to 1 inch per foot is better. The attachment point on the existing roof sets the high end; your outer beam sets the low end. Work backward from the desired ceiling height at the posts (typically 8 to 9 feet) and the attachment height on the roof to confirm you have enough drop over the span. If the math leaves you with a nearly flat roof, add more rise at the house end by attaching higher on the roof surface or by raising the ledger.
Permits, Safety, and Basic Structural Planning
Pull a permit. This isn't optional and it isn't just bureaucratic box-checking. Under IRC Section R105, any structural addition to a home requires a permit before work begins. Patio covers are specifically addressed in Appendix I of the 2024 IBC, which requires the structure to carry dead loads plus a minimum vertical live load of 10 pounds per square foot (psf), and higher if your local snow load exceeds that baseline. Your local building department will have a specific checklist, and many now publish patio cover building guides based on the 2024 IRC that spell out exactly what they need to see in your plans.
Wind uplift is the other structural issue that bites people. IBC Chapter 16 requires that the entire load path from roof to foundation resist uplift and sliding forces from wind. In practical terms, that means your rafter-to-ledger connections, ledger-to-framing connections, and post-to-footing connections all need hardware rated for uplift, not just gravity. Simpson Strong-Tie and similar brands make rafter ties, hurricane clips, and post bases specifically for this. Don't skip these just because you're in a mild climate.
Safety while working at roof height is worth being direct about. You'll be cutting into a finished roof surface, working on a slope, and lifting beams overhead. Use proper scaffolding or a pump jack system rather than an extension ladder for the tie-in work. A ladder is fine for occasional access but it's genuinely dangerous as your primary work platform when you're wrestling flashing or hanging rafters. If you're not comfortable at height, that's the piece to hire out.
Quick Load Planning Checklist
- Confirm your local ground snow load (available from your building department or ASCE 7 maps)
- Note your wind exposure category (A, B, C, or D) from your permit application
- Calculate the tributary area each post and beam carries to size them correctly
- Verify footing depth requirements for your frost line
- Check whether your house wall framing can accept the ledger load or if you need a beam on posts
Locate Framing and Choose Your Attachment Method
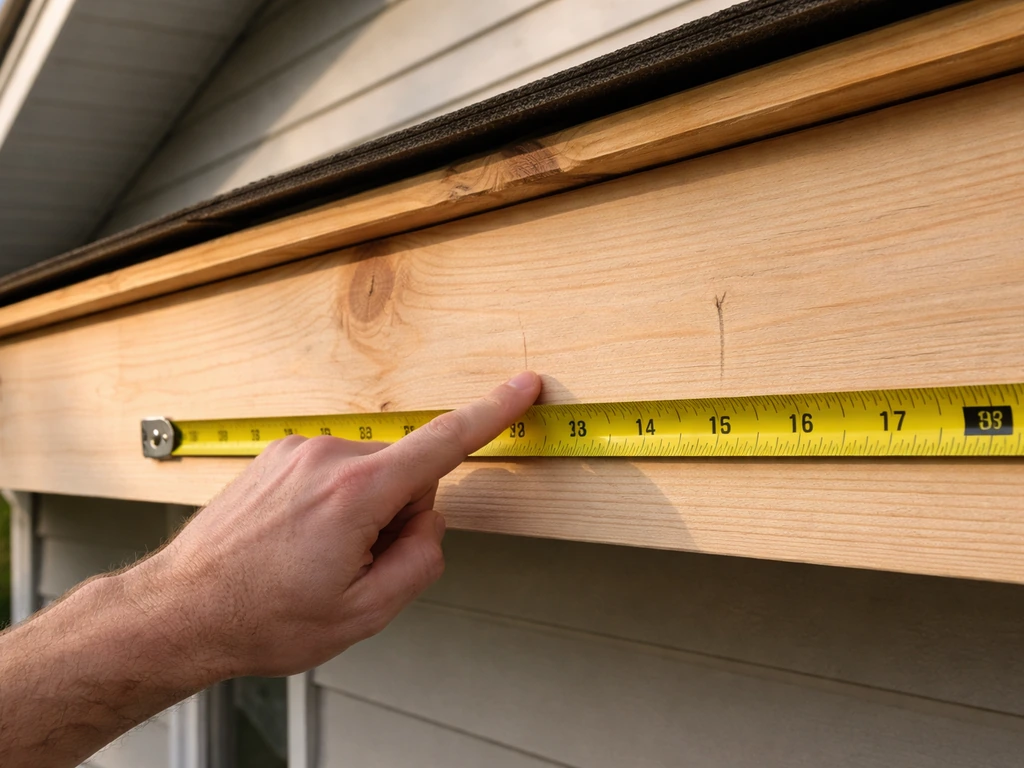
Your patio cover has to attach to something solid, not just the roof sheathing or the fascia board. Once you've located the rafters, you'll know exactly where and how to attach patio rafters to the house roof for a strong, properly flashed connection. From inside the attic (if accessible) or from the exterior using a stud finder, locate the existing roof rafters or trusses. Mark their positions on the exterior. This step is where a lot of DIY projects go sideways: people assume framing is where they expect it and lag into sheathing alone, which has essentially no structural value for a horizontal pull.
You have two main attachment strategies. The first is a ledger board approach, where you sister a 2x8 or 2x10 ledger along the existing roof framing, bolt it into each rafter or truss chord, and hang your new cover rafters off it with joist hangers. If you decide to use a ledger-board connection, see the specifics in how to attach a patio cover to the roof before you drill or bolt anything to the framing.
The second approach uses freestanding posts on both sides of the cover with a beam at the house end, essentially making the cover structurally independent from the house except for a lateral tie. The ledger approach is cleaner and more common for lean-to covers; the post approach is better when the existing framing is inaccessible, runs at a bad angle, or isn't strong enough to carry the additional load.
Ledger Board Fastening
When using a ledger, use 1/2-inch structural lag screws or through-bolts into each rafter at a minimum of two fasteners per rafter, staggered to avoid splitting. The IRC has specific ledger connection tables for decks that are commonly applied to patio covers too. Your ledger needs to be sized to span between rafters without excessive deflection, typically a 2x8 or 2x10 depending on span and load. Don't rely on just nails or construction adhesive for this connection.
Post and Beam Approach
If you go the post-and-beam route, your outer posts sit on concrete footings sized to your local frost depth and load, and the beam at the house end is carried on its own posts anchored to the foundation or a concrete pad. The new cover rafters then span from the house-end beam to the outer beam. This approach adds cost and more footings but it's more forgiving when house framing is complicated, which it often is with older homes or homes with roof trusses where any modification to truss members requires an engineer.
Waterproofing the Roof Tie-In: Flashing, Edges, and Sealing
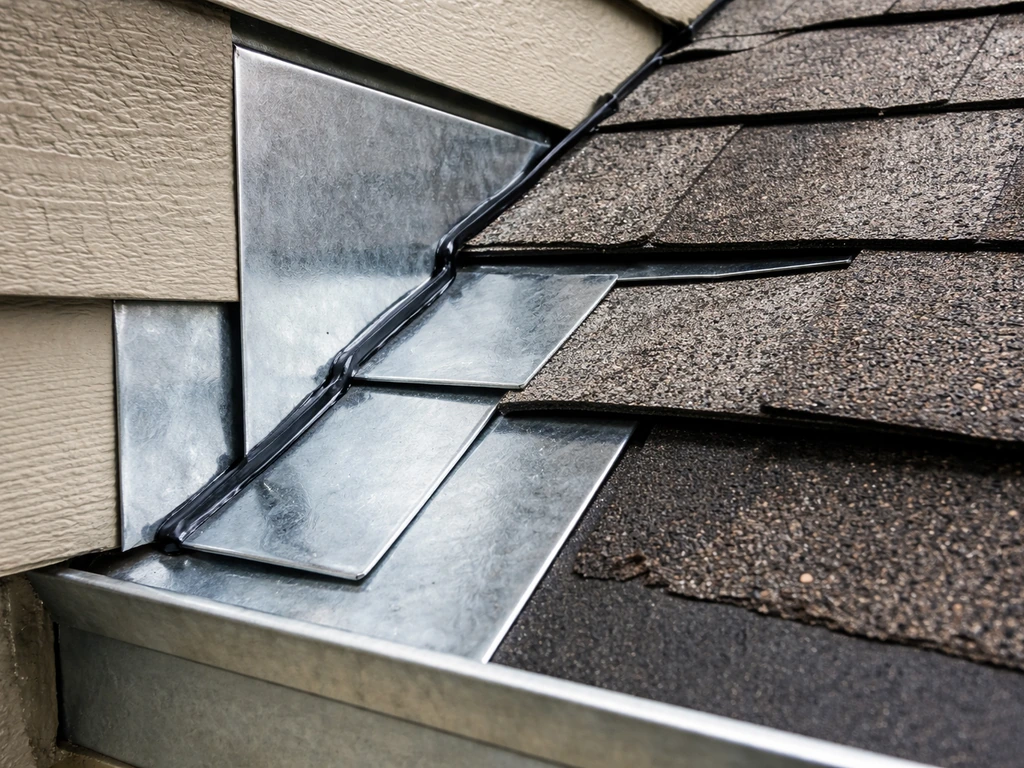
The joint where your new patio cover roof meets the existing house roof is the single most leak-prone spot in the entire project. If you are figuring out the patio cover roof top attachment strategy, treat the flashing and sealed joint details as equally important as the structural tie-in to the existing roof. Get this wrong and you'll have water running into your walls or attic within a season. Do it right and you won't touch it for 20 years.
The standard approach is step flashing combined with counterflashing. Step flashing is individual L-shaped metal pieces (typically 4x4 inches minimum, aluminum or galvanized steel) that weave between each course of shingles on the existing roof as your new cover rises along the slope. Each piece overlaps the one below it by at least 2 inches. On top of the step flashing, a continuous counterflashing piece slides under the existing shingles and covers the top edge of the step flashing, directing any water that gets behind the shingles back onto the cover roofing surface.
At the top of the new cover where it meets the existing roof surface, you'll install a saddle flashing or a base flashing that runs across the full width of the joint. This is the piece most DIYers undersize or skip entirely. It should extend at least 4 inches up under the existing shingles and 4 inches down onto the new cover's roofing material. Apply a compatible roofing sealant (not silicone alone) at all overlapping edges, but don't rely on caulk to do the job that metal flashing should be doing. Caulk is your backup, not your primary defense.
Drip Edges and Gutters
Install a metal drip edge at the outer (low) edge of the new cover before you lay the roofing material. If you're attaching a gutter to the outer beam, the gutter should slope 1/4 inch per 10 feet toward the downspout. Make sure your downspout location works before you frame, because adding one after the fact to a corner post is annoying but changing a downspout that dumps into a planter is a much bigger headache.
Materials and Components: What You're Actually Building With
You have three realistic material systems to choose from: pressure-treated wood framing, aluminum extrusion systems, or light-gauge steel framing. Each has real trade-offs in cost, skill required, and long-term performance.
| Material | Typical Cost (materials only) | DIY Skill Level | Best For | Watch Out For |
|---|---|---|---|---|
| Pressure-treated wood | Moderate ($8–$15/LF for lumber) | Beginner to intermediate | Traditional look, easy to modify, widely available | Needs paint/stain maintenance, check for ground contact ratings |
| Aluminum extrusion kit | Moderate to high ($20–$40/LF installed) | Intermediate | Low maintenance, clean look, lighter weight | Less flexible to modify in the field, requires specific fasteners |
| Light-gauge steel framing | Moderate ($10–$20/LF) | Intermediate to advanced | High-wind areas, long spans, fireproof zones | Thermal bridging, requires metal-specific tools and connectors |
For most DIYers doing a first patio cover, pressure-treated wood framing is the right call. It's forgiving, easy to cut and adjust on-site, and every lumber yard stocks it. Aluminum extrusion kits are worth considering if you want a maintenance-free finish and your span fits within standard kit sizes, typically 8, 10, or 12 feet. They come with matching fascia and channel systems that make the edge detail look professional without a lot of trim carpentry skill.
Key Components You'll Need
- Ledger board or house-end beam (2x8 to 2x12 depending on span and load)
- Outer beam (same sizing as ledger, carried on posts)
- Posts: 4x4 minimum for spans under 8 feet, 6x6 for longer spans or high-wind areas
- Rafters or purlins: 2x6 at 16 inches on center is common for 10-foot spans with light roofing
- Roofing panels: corrugated polycarbonate, aluminum, or solid roofing matching the house
- Structural connectors: post bases, post caps, rafter ties, hurricane clips
- Flashing kit: step flashing, base/counterflashing, drip edge
- Fasteners: 1/2-inch lag screws, structural screws, roofing screws with neoprene washers
- Concrete for footings: typically 80-lb bags mixed on-site for residential post footings
- Gutter and downspout if the cover drains toward the house or a finished area
Roofing Panel Options
Solid roofing (metal panels or shingles matching the house) gives you full weather protection and looks the most integrated. Corrugated polycarbonate panels are popular for covered patios because they let light through, but they do transmit heat and they scratch over time. Solid aluminum panels are a good middle ground: durable, low maintenance, and available in profile shapes that match many existing roof styles. Whatever you choose, follow the manufacturer's minimum slope requirement because some panel systems won't seal correctly below a certain pitch.
Step-by-Step Installation Workflow
This sequence assumes a ledger-attached lean-to cover with wood framing and two outer posts. Adjust for your specific setup, but the order of operations matters: do your structural work before roofing, and do your roofing before any trim or ceiling finishing.
- Mark and dig your post footings to the required frost depth, typically 12 to 42 inches depending on your climate. Pour concrete and set post base hardware (J-bolts or standoff bases). Let concrete cure fully, at least 48 hours before loading.
- Set your posts plumb in the post bases and brace them temporarily. Cut them to height based on your slope calculations. Double-check that the top of the outer posts will put the outer beam at the correct height for your desired slope.
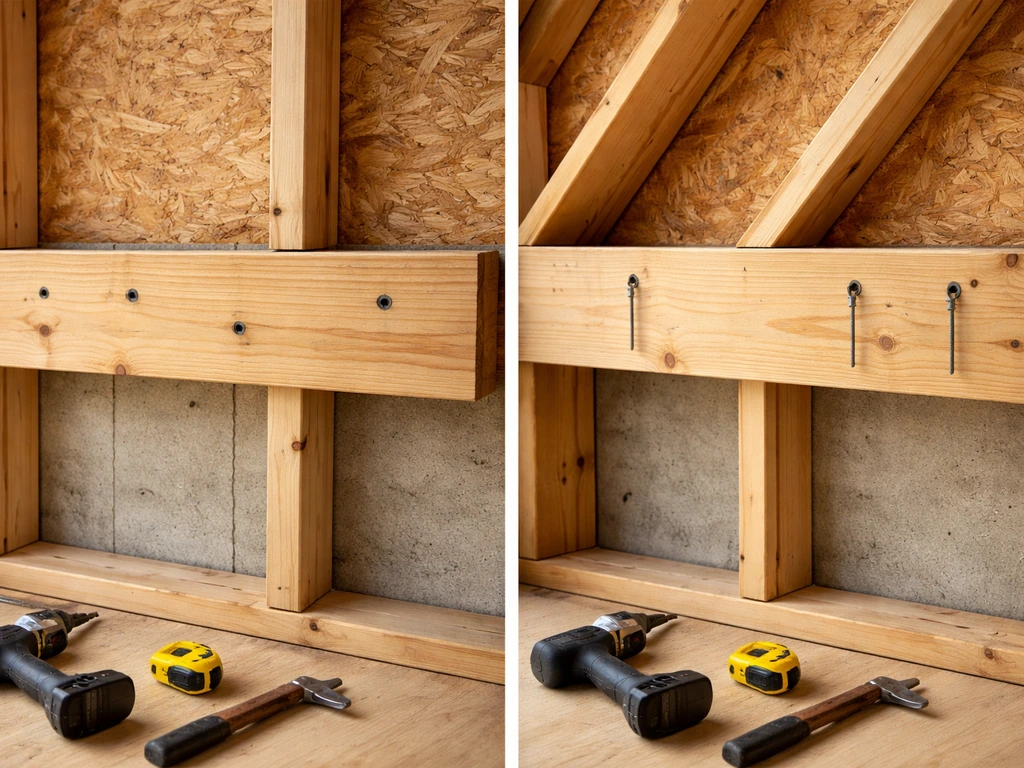
- Install the house-end ledger or beam. Strip the existing roofing back at least 12 inches above the attachment line to expose the roof sheathing and locate rafters. Lag the ledger into each rafter at two points minimum. Apply self-adhering flashing tape over the top of the ledger before installing step flashing.
- Install the outer beam by setting it in post caps on the outer posts. Check level across the full width. This is your reference for all rafter cuts.
- Cut and install rafters from the ledger to the outer beam, using rafter hangers at the ledger end and rafter ties or hurricane clips at the outer beam end. Typical spacing is 16 or 24 inches on center. Check that every rafter is plumb on its vertical face and square to the beams.
- Install blocking between rafters at both the ledger and outer beam to resist lateral racking. Add mid-span blocking if your rafter span exceeds 8 feet.
- Install step flashing along the sides where the new cover meets the existing house wall or roof slope. Weave each piece between shingle courses as you work up the slope.
- Install the saddle or base flashing across the full top of the new cover where it meets the existing roof. Slide it at least 4 inches under the existing shingles. Nail through the flashing only in the upper 2 inches so the lower portion stays free to shed water.
- Lay roofing panels or shingles starting from the low edge (outer beam) and working toward the house. For panels, use roofing screws with neoprene washers in every third rib at supports. For shingles, follow standard starter-course-and-overlay technique.
- Install the drip edge at the outer edge and the rake edges (sides). Install counterflashing over the step flashing, sliding it under the existing shingles at least 2 inches.
- Install the gutter (if used) with appropriate hangers and slope. Connect the downspout and direct it at least 6 feet from the foundation.
- Do a final alignment check: sight down the rafters from the outer beam for straightness, verify all post bases are fully engaged, and check that no flashing edges are exposed or lifting.
Alignment Checklist Before You Call for Inspection
- All posts are plumb in both directions (check with a level on two adjacent faces)
- Outer beam is level across its full length
- All rafters are at the correct on-center spacing and seated fully in hangers
- Hurricane clips or rafter ties are installed at every rafter-to-beam connection
- All lag screws are fully driven and countersunk where required
- Step flashing pieces overlap by at least 2 inches and are properly integrated with shingles
- No exposed roofing nail heads on the finished surface (all nails covered by next overlapping course)
- Roofing panel screws are snug but not overtightened (neoprene washers should compress slightly, not flatten)
- Gutter slope verified with a level before finalizing hangers
- All penetrations sealed with appropriate roofing sealant
Common Problems, DIY Mistakes, and When to Call a Pro
The most common mistake on roof tie-in patio covers is attaching the ledger to the roof sheathing instead of the actual rafters. Sheathing alone cannot carry the load. If you can't locate rafters from outside the house, access the attic and mark them from inside before you start cutting into the roof surface. Second most common: skipping the step flashing and just running a bead of caulk at the seam. Caulk cracks, and when it does, water runs right into the wall cavity. Flashing is the fix; caulk is the backup.
People also consistently undersize footings. A post carrying 1,000 pounds of roof load in wet soil or clay needs a much larger footing than a post in sandy loam. When in doubt, make the footing bigger. The concrete costs almost nothing compared to the labor of replacing a settled post later. Related to this: make sure post bases are rated for the uplift your local wind design requires, not just the gravity load.
What often goes wrong with panel roofing is overtightening the screws, which crushes the neoprene washer and actually creates a leak path instead of preventing one. Hand-tight plus a quarter turn is the right feel. Also watch for panels installed in the wrong direction: most corrugated and standing-seam panels have a required overlap direction relative to the prevailing rain direction.
When the Right Call Is to Hire a Pro
Be honest with yourself about a few scenarios. If your home has roof trusses instead of stick-framed rafters, do not cut, notch, or drill through any truss chord or web member without a structural engineer's approval. Trusses are engineered systems and modifying them without analysis can cause failure. Similarly, if your planned attachment point falls in a hip corner, valley, or any complex roof geometry, the flashing details get complicated fast and a mistake there will leak without being obvious for months.
If you're in a high-wind zone (coastal areas, tornado-prone regions, or anywhere your local code references a design wind speed above 115 mph), have a licensed contractor or structural engineer review your plans before you build. The engineering behind uplift resistance in those zones goes beyond what standard prescriptive tables cover. The same applies if you're adding a large cover over 200 square feet or extending more than 14 feet from the house, where beam and footing sizing gets into custom engineering territory. To get an accurate estimate of how much to build a patio roof attached to the house, budget for materials, engineered attachment details, permits, and labor more than 14 feet from the house.
Finally, if you get up on the roof and find damaged sheathing, deteriorated rafters, or signs of existing water damage at the area where you planned to attach, stop and fix those issues before adding any new load. Attaching a new structure to compromised framing just moves the failure point, it doesn't eliminate it. This is one of those situations where an honest assessment now saves you from a much bigger repair in two years.
Attaching a patio roof to different house types (like a brick wall versus a wood-framed wall) also changes how you anchor the ledger, and those variations are worth researching specifically for your home's construction before you drill the first hole. If you want a patio roof attached to an existing house, make sure you account for the wall construction so your ledger and flashing details match your build attach a patio roof to an existing house.
FAQ
Can I add a patio cover without tying into the existing roof at all?
Yes. A freestanding post-and-beam cover keeps most of the load path off the house and reduces how much you cut into existing roofing. You still need a lateral tie for wind, and you must ensure your beams and footings are sized for uplift and sliding forces, not just gravity load. If the existing roof is hard to access, this approach is often safer than trying to retrofit a ledger.
What if my house has roof trusses, can I still do a ledger-attached lean-to?
Often you can connect, but you cannot cut, notch, or drill truss members without an engineered plan. Even boring for a ledger may violate the design of a truss, depending on where the hole lands. If you can’t reliably identify safe members, consider switching to a post-and-beam system or have an engineer specify exact connection locations and hardware.
How do I find where the rafters are if I can’t see them from the attic?
Start by locating an external fascia area where framing is visible, then use a stud finder only as a rough guide and confirm with exploratory drilling from the exterior. Plan to remove a small section of sheathing in a non-finished spot to verify spacing before committing to the ledger layout. Guessing and lagging into sheathing alone is a common failure point.
Is it okay to attach the ledger to fascia board or sheathing instead of framing members?
No. Fascia and sheathing are not designed to carry the same horizontal and uplift forces as rafters or truss chords. If a ledger connection cannot be made into framing members with proper fasteners, use the post-and-beam approach or redesign with an engineered attachment.
How much slope do I really need, and what happens if the roof is nearly flat?
Minimum drainage slope matters because many patio roof systems require a certain pitch to seal properly at overlaps. If you end up with a nearly flat run, water can linger, seams can back-siphon, and dirt buildup accelerates corrosion. If your math leaves little drop, adjust the ledger height higher on the house end or raise the outer beam so the low-to-high geometry creates real drainage.
Do I need step flashing every course, or can I rely on sealant at the seam?
Use proper flashing, not caulk as the primary water barrier. Sealants can fail or crack due to temperature movement, leaving a channel that water follows into the wall cavity. Step flashing interlocks with shingle courses and counterflashing, which is what keeps wind-driven water from getting behind the joint.
What should I do if my attachment point hits a valley, hip corner, or other complex roof area?
Expect the waterproofing details to change significantly. Those areas create multiple intersecting planes where standard step flashing layouts are harder to execute correctly. In many cases, it is worth redesigning the cover location so the roof tie-in occurs on a simpler field of roof, or hire an installer to execute the custom flashing.
How do I size footings if my soil is clay or wet, and I don’t know the exact bearing capacity?
When soil conditions are unknown or poor drainage is likely, err on the side of larger footings and deeper or wider pads. Wet soil, clay, and freeze-thaw cycles can increase settlement risk. Your local building department or a structural engineer can provide soil-specific requirements, but a practical rule is that concrete cost is usually far less than correcting a settled post later.
What’s the most common wind-related mistake on patio covers?
Underestimating uplift and not using hardware rated for uplift. Many people fasten for gravity load but miss the wind load path, which includes rafter-to-ledger, ledger-to-framing, and post base connections. Use uplift-rated connectors and verify the design wind speed with your local code or an engineer for high-wind zones.
How do I prevent leaks at the screw lines on panel roofing?
Don’t overtighten fasteners. Overcrushing the neoprene washer can create a leak path instead of a watertight seal. Also verify the required overlap direction for your panel type (corrugated and standing-seam products often have a specific overlap orientation tied to prevailing rain).
Can I add a gutter to the outer beam after the patio cover is built?
It’s possible, but it can be difficult to integrate cleanly once framing and roofing are in place. Better practice is to plan downspout routing and gutter slope before you close up the roof, so the outlet location doesn’t end up dumping into a planter, walkway, or another spot that requires later rework.
If I discover damaged sheathing or roof water damage where I plan to attach, should I proceed anyway?
Stop and repair before installing the patio cover. Adding new framing to compromised sheathing or deteriorated rafters can transfer loads into the same weak point and worsen failure. Fixing the existing damage first typically costs less than re-framing and re-flashing after leaks or rot reappear.