To attach a patio cover to your roof, you fasten a ledger board directly to your house's structural framing (not the siding or fascia), then run your patio rafters from that ledger down to a beam supported by posts at the outer edge. The ledger is anchored with 1/2-inch lag screws or structural screws in a two-row staggered pattern, Z-flashing is installed above the ledger to shed water away from the wall, and every fastener penetrates fully into the rim joist or rafter framing behind the sheathing. That's the core of the whole job. Everything below is about doing each of those steps right so the structure stays dry, stays put in wind, and passes inspection.
How to Attach a Patio Cover to the Roof: DIY Steps

Celia Vaughn
29 May 2026
Picking the right patio cover style and roof attachment plan
Before you drill a single hole, you need to know which attachment geometry actually works for your house. The most DIY-friendly option is the lean-to (also called single-slope or shed-style): one end of the cover sits high against the house, the other end drops down toward the yard. It's a single slope, which means straightforward framing, simple drainage, and a clean ledger-to-beam connection. Gable-style and hip-roof patio covers exist and look great, but they require a different structural layout with a ridge and multiple attachment points, so this guide focuses on the lean-to since that's what most homeowners tackle themselves.
You have two basic options for where the house-side connection lands. Option one is a ledger mounted to the house wall below the eaves, which gives the most headroom and is the most common approach. Getting that patio cover roof top attachment right depends on whether you use an under-eave ledger or a top-plate rafter-to-rafter method.
Once you choose that ledger location, you can follow the steps for how to build patio roof attached to house, including the right fasteners and flashing details ledger mounted to the house wall below the eaves. Option two is running your patio rafters up onto the wall's top plate and fastening them to the sides of the house rafters, used when mounting a ledger under the eave won't give you enough vertical clearance or when the geometry just doesn't work.
Walk outside with a tape measure before you decide: if the soffit clearance is at least 7 to 8 feet above the patio slab, the under-eave ledger is your best bet. If not, the top-plate rafter-to-rafter method is your fallback.
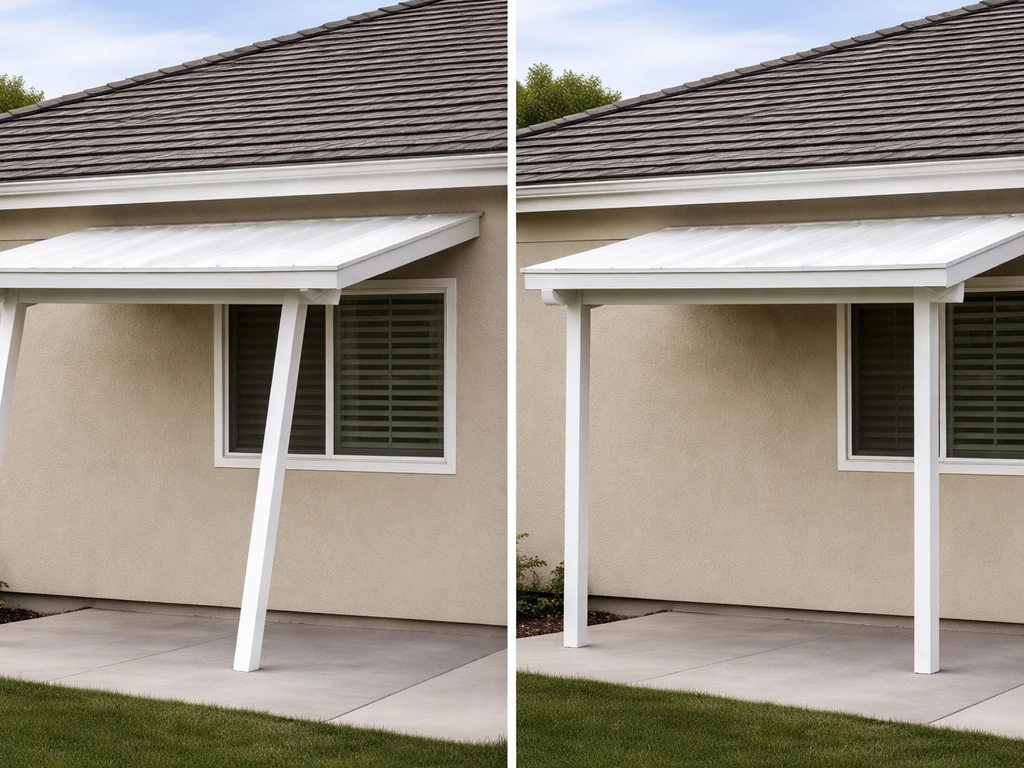
Freestanding patio covers are always an option if your house wall is in questionable condition, if access to the framing is blocked, or if the attachment point geometry just doesn't cooperate. An attached cover, though, gives you a cleaner look and often a more structurally efficient design, so most people choose it when the house framing is sound and accessible.
Tools and materials checklist for roof-to-structure connections
Get these together before you start. Running to the hardware store mid-job when you're on a ladder with holes already drilled is a frustrating way to spend an afternoon.
- Stud finder (electronic, preferably with AC wire detection)
- Long drill bit (6 to 8 inches) for probing framing members through stucco or siding
- Impact driver and corded drill
- Socket wrench set (for tightening lag bolts)
- Circular saw and reciprocating saw
- Speed square, level, and chalk line
- Tape measure
- Caulking gun
- Pry bar (for removing a section of siding where the ledger will sit)
- Safety glasses, gloves, and a solid extension ladder rated for your weight plus tools
- Ledger board: pressure-treated 2x8 or 2x10 lumber
- 1/2-inch hot-dipped galvanized lag screws, minimum 4 inches long (common: 3-1/2 to 4-1/2 inches into framing), or structural screws such as LedgerLOK or Simpson SDWS
- 1/2-inch galvanized washers to use with lag screws
- Joist hanger hardware and structural screws for rafter-to-ledger connections
- Continuous Z-flashing, minimum 4 inches wide (galvanized or aluminum)
- Butyl tape or self-adhering flashing membrane (for sealing behind the ledger)
- Exterior-grade silicone or polyurethane caulk
- Kick-out flashing diverter for each end of the ledger where it meets a wall
- Post bases and post caps (Simpson or equivalent, galvanized)
- Concrete anchors or post-base hardware if posts land on an existing slab
- Pressure-treated lumber for posts and outer beam, sized per your span
On fasteners: if you're using lag screws, go hot-dipped galvanized or stainless. Electroplated zinc screws will corrode in contact with pressure-treated (ACQ) lumber. Structural screws like LedgerLOK simplify the job because they don't require predrilling, and they're code-recognized as an alternative to 1/2-inch lags in most jurisdictions. Either way, confirm the fastener is rated for use with treated lumber before you buy.
Step-by-step: attach the ledger/beam to the house roof framing
This is the most critical part of the whole project. A ledger attached to siding, sheathing, or stucco alone will fail. You need to hit the structural member behind it, which is typically the rim joist (band joist) of your floor framing or the wall's top plates and structural blocking, depending on where your ledger lands vertically. If you are adding a patio cover to an existing roof, you also need to map that exact ledger location to the rafters, rim joist, or top plate so the attachment hits structural framing ledger lands vertically.
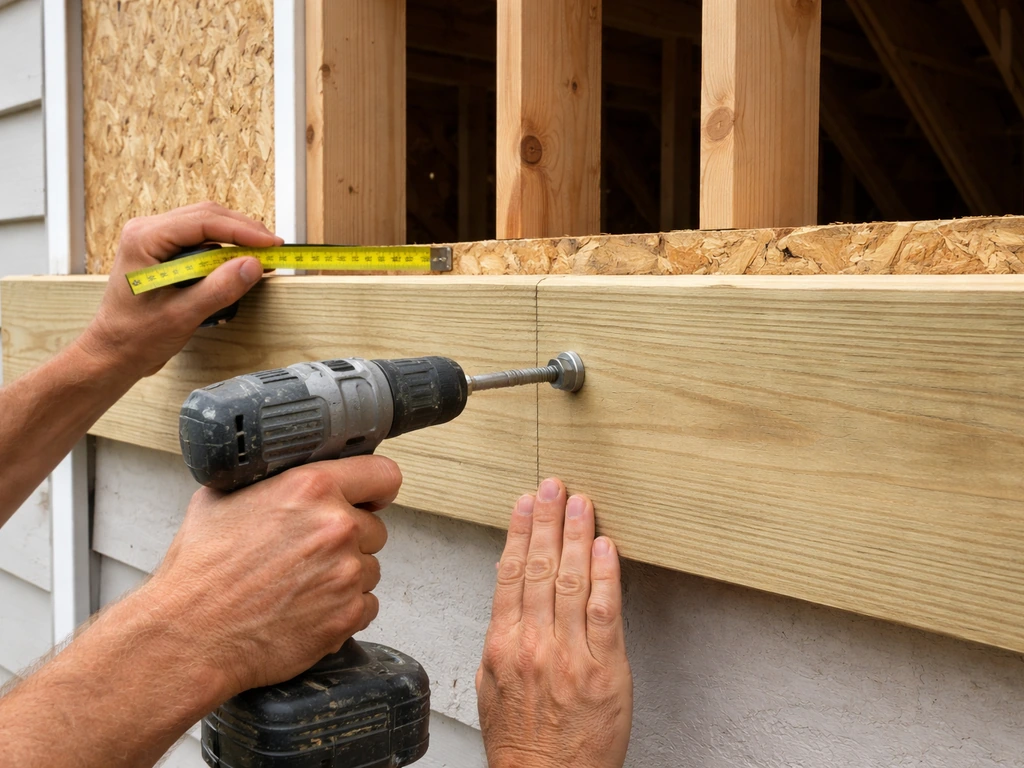
- Mark the ledger height on the house wall. Account for your desired roof slope (typically 1/4 to 1/2 inch of drop per foot of run), then subtract the ledger thickness so the finished top of the ledger sits at the right elevation. The top of the ledger is where your rafters will bear, so get this right before touching the wall.
- Remove siding in the ledger zone. Using a circular saw set to the depth of the siding only (not into the sheathing), cut out a section of siding slightly wider and taller than your ledger board. For stucco, use a grinder with a masonry blade. The ledger needs to sit against the structural sheathing, not float on top of siding.
- Locate the structural framing. Use a stud finder and a long probe drill bit to confirm where your rim joist or wall framing members are. If you can access the attic or interior space, do it: look from the inside to verify your fasteners will actually land in solid wood. This step gets skipped more than any other, and it's the source of most ledger failures.
- Apply a self-adhering flashing membrane to the exposed sheathing in the ledger zone. This is your first line of defense against water that gets past the flashing. Lap it up behind any remaining siding at the top.
- Lift the ledger board into position and clamp or tack it temporarily. Use a level to confirm it's perfectly level before committing.
- Drill pilot holes for lag screws (skip this step if using no-predrill structural screws). For 1/2-inch lags, use a 5/16-inch pilot bit through the ledger and into the framing member.
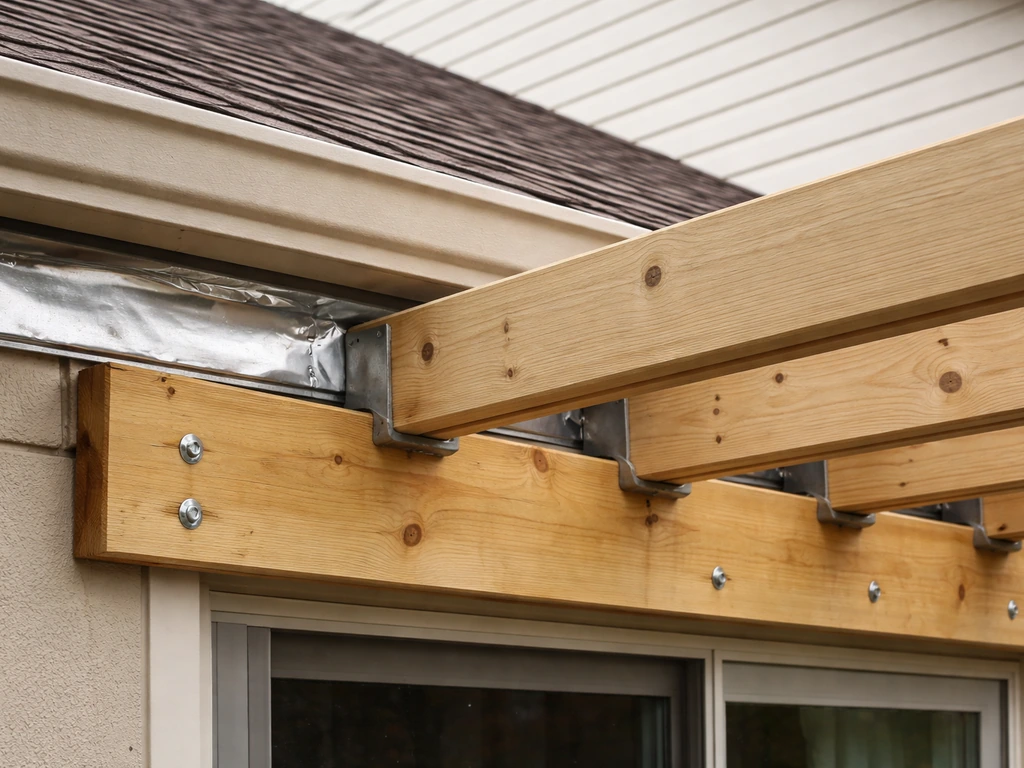
- Install fasteners in a two-row staggered pattern. The rows should be spaced roughly 1-1/2 to 2 inches from the top and bottom edges of the ledger, staggered in a "W" pattern so no two fasteners line up vertically. Space them at the on-center interval specified in IRC Table R507.9.1.3(1) for your joist/rafter span (commonly 16 inches on-center for typical spans). Minimum edge distances: 2 inches from the top edge, 2 inches from the side ends, and at least 3/4 inch from the bottom edge.
- Check fastener penetration. Each lag screw should penetrate fully through the ledger and at least 2-1/2 to 3-1/2 inches into the structural member behind it. If you can see from the inside (attic, crawl space), verify the tip is visible through the framing. A screw that bottoms out in air means it missed the framing member.
- Install the Z-flashing. Slide the horizontal leg of the Z-flashing up behind the siding (or tuck it under the house WRB) above the ledger, and let the lower leg lap over the face of the ledger. Do not caulk the bottom edge of the flashing; it needs to drain freely.
- Re-install siding (or patch stucco) above the flashing and seal the top edge of the Z-flashing to the wall with caulk. The sides get kick-out diverters as described below.
Common mistake: people mount the ledger flat against the siding without removing it first, relying on long lags to span through siding, sheathing, and air gap into the framing. Even if the lags hit framing, you now have a moisture trap between the ledger and the wall. Remove the siding and use a drainage mat or standoff system if your local code requires it.
Rafter/cantilever vs. beam systems: how the cover actually connects
Once the ledger is up, you need to understand what kind of structural system your cover uses, because that changes how everything else goes together.
Ledger-and-beam (standard lean-to)
This is the most common setup. Your rafters run from the ledger on the house side down to a beam supported by posts at the outer edge of the cover. HomeTips’ rafter detailing explains that the way rafters are cut and attached for a house-side patio roof depends on whether the structure is a ledger and beam (single-slope) system or a multi-support setup [cut to bear between a house ledger and an opposite beam](https://www. hometips.
com/diy-how-to/rafters-detailing-fastening. html). The rafters are cut with a bird's mouth notch (or use rafter hangers) to bear on the ledger at the top and on the beam at the bottom. The ledger carries the gravity load at the house side; the beam and posts carry it at the yard side.
Rafter spacing is typically 24 inches on-center for most spans, though some specs call for a maximum of 32 inches on-center for rafter spans up to 10 feet. Check your local plan requirements.
Rafter-to-house-rafter method
When the ledger-under-eaves approach doesn't work geometrically, the patio rafters rest on the house wall's top plate and are fastened to the sides of the existing house roof rafters. This requires access to those rafters (usually through the attic) and careful layout so each patio rafter pairs with a house rafter. It's more involved but sometimes the only option for houses where the eave height is too low.
Beam-only systems (aluminum kit covers)
Alumawood and similar aluminum patio cover kits often use a wall-mounted beam channel instead of a traditional ledger board. The system attaches to the wall framing using lag screws or hex bolts specified by the manufacturer (typically per ICC-ES evaluation reports like ESR-1953), and the aluminum rafters drop into the channel. The attachment principles are the same: you must hit structural framing, follow the specified fastener pattern, and flash the connection. Errors in fastener type or spacing on these systems are common and can be genuinely dangerous in wind, so follow the manufacturer's ICC-ES evaluation report, not just the installation pamphlet.
| System type | Best for | House-side connection | Skill level |
|---|---|---|---|
| Ledger-and-beam (wood) | Most attached lean-to covers | Ledger bolted to rim joist/framing | Intermediate DIY |
| Rafter-to-house-rafter | Low-eave houses, deep overhangs | Rafters sistered to house rafters at top plate | Advanced DIY |
| Aluminum kit beam channel | Pre-engineered aluminum covers | Wall beam bolted to framing per ESR | Intermediate DIY with kit instructions |
| Freestanding beam/post | Problematic walls, rental properties | No house attachment | Intermediate DIY |
Flashing, waterproofing, and sealing at the roof interface
This is where most DIY patio covers eventually develop problems. The ledger attachment zone is a wall penetration and a change in plane: water will try to get in there. Your job is to make sure it can't, and that any water that does get behind the flashing has a path out.
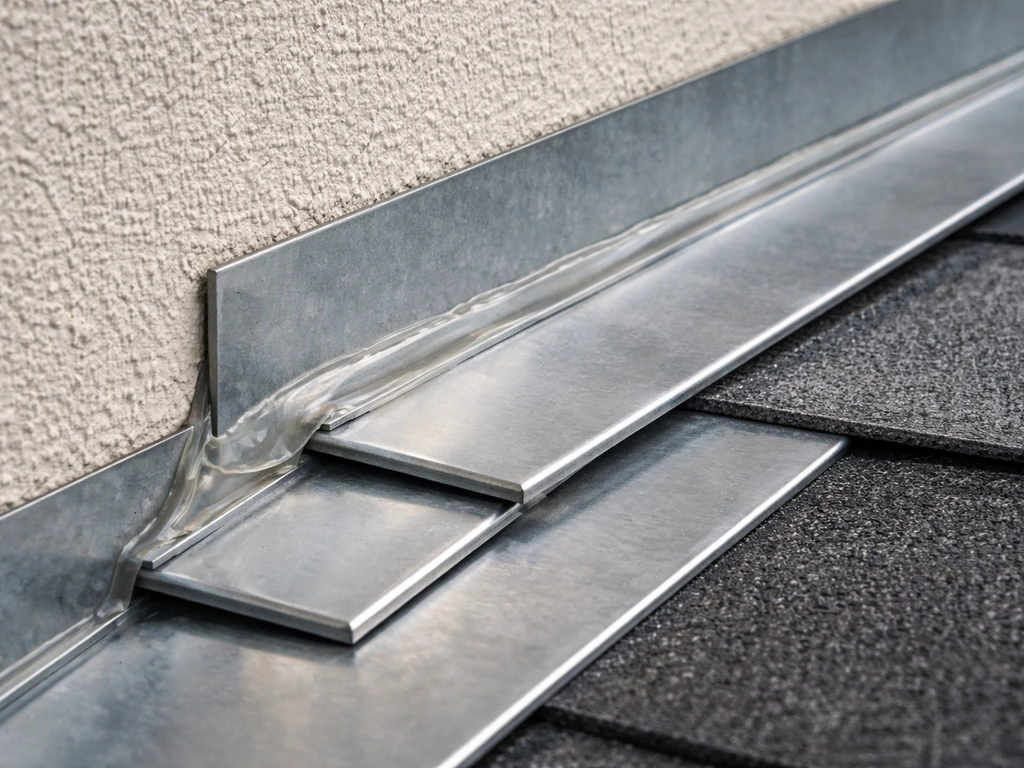
The layering order matters. Think of it from the inside out: first, the structural sheathing on the house wall. On top of that, a self-adhering flashing membrane (or at minimum, felt paper lapped properly). Then the ledger board itself, which should be held slightly off the wall with a drainage gap or a dimple mat if your code requires it. Then Z-flashing installed above the ledger so its upper leg tucks behind the house's water-resistive barrier (WRB) or siding. The Z-flashing lower leg laps over the top face of the ledger. This directs water outward, not behind the ledger.
At each end of the ledger where it terminates at a wall or corner, install a kick-out flashing diverter. This is a bent piece of metal that redirects water running down the wall away from the ledger end and out onto the patio cover surface rather than into the wall cavity. It's required by code (IRC R903.2.1) and skipping it is one of the most common causes of rot and mold at wall-roof intersections. The kick-out flashing installs before the siding goes back on, not after.
For step flashing conditions (where a sloped patio cover roof surface meets the house wall at an angle), use individual step flashing pieces woven in with each course of roofing material, with counterflashing over the top if the wall is stucco or brick. A continuous L-metal flashing can substitute on a sloped roof-to-vertical wall intersection if properly embedded, but step flashing with a kick-out at the bottom is the gold standard.
What you don't want to do: rely solely on a bead of caulk at the top of the ledger or Z-flashing to keep water out. Caulk cracks. Caulk is maintenance, not a primary water barrier. Use it to seal the top edge of the Z-flashing to the wall as a second line of defense, not as the first.
Anchors, fasteners, and spacing: load/strength basics for DIYers
The goal here isn't just "fastened." The goal is a connection that resists gravity loads (the weight of the cover, snow if applicable, and people for maintenance) plus uplift and shear from wind. These forces are why the code is specific about fastener type, size, pattern, and edge distances.
The IRC recognizes two primary fastener options for ledger connections: 1/2-inch hot-dipped galvanized bolts (through-bolts) and 1/2-inch lag screws. Proprietary structural screws like LedgerLOK and Simpson SDWS/SDWH screws are accepted as code-compliant alternatives in most jurisdictions and simplify installation because they don't require predrilling. Check that whatever you use is listed in an ICC-ES evaluation report and is compatible with pressure-treated lumber.
Spacing is determined by IRC Table R507.9.1.3(1), which accounts for joist or rafter span. For a typical patio cover with 8 to 12-foot rafters, you'll commonly end up at 16 inches on-center in a two-row staggered pattern. Fasteners start roughly 2 to 3 inches from the ends of the ledger and follow the spacing table from there. The two rows are typically positioned so neither row is closer than 2 inches to the top edge of the ledger or 3/4 inch from the bottom edge.
For posts on an existing concrete slab, use code-listed post base hardware (Simpson ABA, ABU, or equivalent) anchored with the manufacturer's specified concrete anchors. The anchor embedment depth and critical edge distance from the slab edge are specified in the product's ICC-ES report (see ESR-2488 and ESR-2818 type documents for Simpson hardware). Don't guess at this: a post base anchored too close to a slab edge with inadequate embedment can blow out the concrete under wind uplift.
Wind uplift is real, especially in coastal areas or high-wind zones. The IRC (R507.9.2) requires that ledger connections blank" rel="noopener noreferrer">resist horizontal loads in addition to gravity loads. In practice, this means your rafters need to be positively connected to the ledger with hurricane ties or rafter hangers, not just toe-nailed. Toe-nailing alone is not adequate for uplift resistance.
Safety, permits, and when to hire a pro
Pull a permit. Seriously. This isn't a bureaucratic annoyance; it's the mechanism that protects you. An inspector will verify your ledger attachment and flashing before you close everything up, which means someone with code knowledge is checking your work at the most critical stage. Unpermitted patio covers can create problems when you sell the house, and your homeowner's insurance may not cover a structure that wasn't permitted and inspected.
Most attached patio covers require a building permit. Your permit application will typically need a simple site plan showing the cover dimensions, a framing plan with rafter sizes and spacing, footing/post details, and the ledger attachment method. A good estimate for how much to build a patio roof attached to the house depends on size, materials, and especially the ledger and flashing connection to your existing structure. The permit process also flags issues like setback violations before you build, not after.
On the ladder and roof: work with a partner whenever you're cutting siding or installing flashing at height. A solid extension ladder properly footed and tied off at the top is non-negotiable. Don't lean a ladder against the fascia or gutter; use ladder levelers on uneven ground. When you’re building a patio roof off of existing fascia, plan on removing or working around the gutter and verifying the fascia is structurally sound before you fasten any ledger or beams.
Here's when you should genuinely call a structural engineer or licensed contractor instead of going it alone. First, if you can't confirm where the structural framing members are (no attic access, stucco over block, unknown framing behind multi-layer siding). Second, if the existing house framing shows any signs of rot, damage, or previous structural work that altered the original framing.
Third, if you're in a high-wind zone (ASCE 7 wind speed above 115 mph) or a seismic zone and your cover is more than about 200 square feet. Fourth, if your jurisdiction requires engineered drawings for the permit (some counties do, especially for larger covers or in areas with challenging soil or wind conditions).
The ledger attachment to an existing roof structure is exactly the kind of connection where an unknown condition (rotted rim joist, added insulation blocking, non-standard framing) can turn a DIY project into a structural failure.
If you're attaching to a brick or masonry wall, the attachment method changes significantly since you can't use standard lag screws into a rim joist. If your patio roof is attaching to a brick house, focus on a masonry-anchored ledger and correct flashing so the connection is structural and watertight brick or masonry wall. That situation requires masonry anchors or a different connection strategy entirely. Similarly, if your existing roof has an unusual pitch or you're tying into the roof surface itself rather than the wall below the eave, the flashing details and structural connection become more complex, and those projects benefit from professional input.
Before you drill: your pre-work checklist
Do these things in order before you make a single hole in the house wall. This is the step most DIYers skip in their excitement to start building, and it's the step that prevents the expensive problems.
- Confirm your ledger height and roof pitch geometry on paper. Sketch the cross-section: ledger height, rafter run, outer beam height, and finished roof slope. Make sure you end up with at least 7 feet of headroom at the outer edge.
- Probe and confirm structural framing location. Use a stud finder, a long probe bit, and if possible, look from the attic or interior space. Mark every framing member location on the wall.
- Check the condition of the existing framing. If you can see into the wall cavity or attic, look for rot, previous water damage, or modified framing. Any soft wood or dark staining near where your ledger will land is a stop sign.
- Pull your permit before starting. Bring your sketch to the building department or submit online. Find out if your jurisdiction requires engineered drawings.
- Order all materials including flashing, membrane, and fasteners before you start removing siding. The ledger zone can't stay open to weather for days while you wait for a hardware run.
- Verify your planned fastener type is listed for use with pressure-treated lumber and meets your local IRC adoption year's requirements.
Once those boxes are checked, you're ready to start. The actual installation moves quickly once the prep work is solid. Most DIYers can complete the ledger installation and flashing in a single day if the framing is accessible and materials are on hand. The rest of the cover, posts, beams, and rafters, follows standard carpentry once that house-side connection is done right.
FAQ
How do I find the exact spot on the wall to install the ledger so it hits rim joist or top plate framing?
Use a combination approach: locate studs and rim joist candidates from the attic (or inspection hole), then measure horizontally to confirm where the ledger will land vertically. Before drilling the main ledger holes, drill a small test hole through the WRB area and verify you hit solid framing (not sheathing voids). If you cannot verify framing location from behind the wall area, switch to a freestanding design or get a pro to map the structure.
Can I attach the patio cover to the house siding and rely on long screws to reach framing?
In general, no. Long fasteners that just span siding and sheathing without a proper structural landing create a failure risk and can trap moisture behind the ledger. If your local structure uses thick siding or added layers, you may need to remove siding in the ledger zone and add a drainage gap or specified standoff system so the connection is both structural and water-shedding.
What should I do if I discover rot or water damage in the ledger attachment zone?
Stop and correct the substrate first. Remove the compromised materials back to sound wood or the correct structural member, then treat/repair as required and re-establish a continuous drainage and flashing system. The ledger should never be anchored to softened rim joist or compromised framing, even if you can still find “something solid” with a screw.
How far should the ledger be from the bottom edge of flashing or from roofline details to prevent leaks?
Plan the ledger height so the upper leg of the Z-flashing can tuck correctly into the house water-resistive barrier, and the lower leg can lap over the ledger face. Keep the ledger positioned to match the step flashing or kick-out routing at ends. If your WRB or siding profile prevents proper lapping, adjust the ledger location or flashing type rather than stuffing caulk into the gap.
Are hurricane ties or rafter hangers required if I already notch the patio rafters (bird’s mouth) and toe-nail?
Bird’s mouth bearing helps with gravity loads, but uplift and wind shear control the connection performance. Where the cover is exposed to wind, use code-appropriate connectors (like hurricane ties or rated rafter hangers) so the rafter is positively restrained to the ledger. Toe-nailing alone is not a reliable substitute for uplift resistance.
What if my soffit height is under 7 to 8 feet, can I still use the under-eave ledger method?
You can use it only if you can still create a compliant ledger-to-flashing geometry and maintain the required clearance for safe headroom and connector placement. If soffit clearance is too low or you cannot get the flashing to lap correctly, the top-plate rafter-to-rafter method (accessing attic rafters) is usually the correct fallback, or a freestanding cover may be safer.
Can I use pressure-treated lumber for the ledger but mix fastener metals?
Avoid mixing metals unless specified. Hot-dipped galvanized or stainless fasteners are generally compatible choices for treated lumber, while electroplated zinc is more prone to corrosion with ACQ-treated products. If you have a kit with proprietary hardware, follow its compatibility requirements exactly and confirm fasteners are rated for treated lumber.
How do I anchor posts on an existing concrete slab without cracking or blow-out risk?
Use manufacturer-listed post base hardware and anchors, and install with the exact embedment depth and edge distance from the ICC-ES report for that hardware. Do not reduce embedment to “fit” near a slab edge, and do not drill oversized holes. If the slab edge distance is insufficient, relocate the post, add structural support, or use an alternate foundation strategy rather than guessing.
Is caulk acceptable anywhere in the ledger connection?
Caulk should not be the primary water barrier. If you use caulk, treat it as a secondary seal on top edges of flashing to support the system, not as a substitute for proper membrane lapping, Z-flashing legs, kick-out flashing, and drainage gaps. After installation, check that no caulk is relied upon to “bridge” a flashing that is not lapped correctly.
What inspection or permit documents should I prepare if the inspector asks for my framing plan?
Have your site plan with cover dimensions, a framing layout showing rafter spacing and sizes, ledger attachment method (including fastener type and pattern), and post/footing details. If your jurisdiction requires engineered drawings, be ready with load considerations (snow and wind) and connector details so the inspector can verify the ledger connection and flashing are correct before you close up any areas.
When should I switch from an attached patio cover to a freestanding one?
Choose freestanding if you cannot access structural framing to verify a safe ledger connection, if the wall has uncertain condition (unknown substrate behind stucco or multi-layer cladding), or if the geometry prevents proper flashing lapping. A freestanding design can also reduce risk when excavation or foundation alignment for posts is more straightforward than mapping an existing roof structure.
Can the patio cover attach to a brick or masonry wall using the same ledger approach?
Not with standard lag screws into wood framing. Masonry requires masonry-anchored ledger systems or a different structural strategy (masonry anchors and correct flashing integration). Use a connection method specifically designed for brick or block, and make sure the flashing directs water outward without creating a trapped cavity behind the ledger.