Building a patio roof attached to your house is a weekend-to-two-week project depending on complexity, and most DIY-minded homeowners can pull it off with solid planning, the right fasteners, and one critical rule: your ledger board must connect to actual framing inside the house wall, not just to siding or sheathing. To add a patio cover to an existing roof, you still need to plan the structure, slope, and correct ledger or wall connection details so water and loads are handled safely how to add a patio cover to existing roof. Get that part right, and the rest is straightforward carpentry and weatherproofing.
How to Build a Patio Roof Attached to a House

Celia Vaughn
17 May 2026
Choosing the Right Patio Roof Style
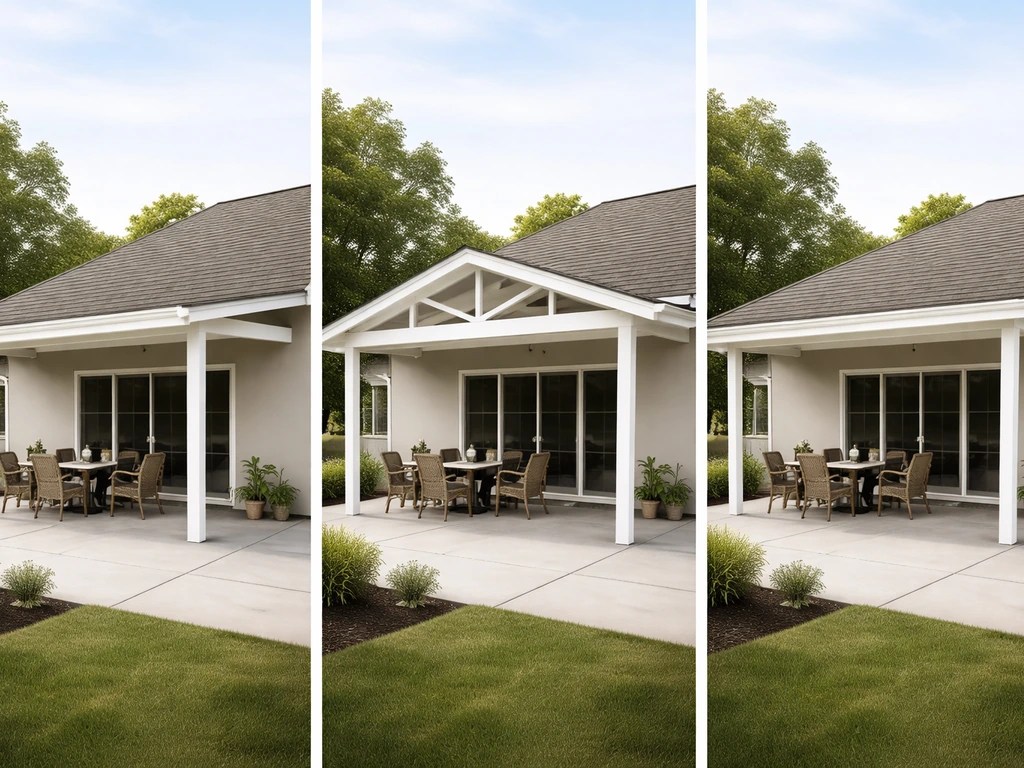
Before you pick up a tool, decide which roof configuration actually fits your space, your house, and your skill level. The three main options are a lean-to (attached), a gable (attached), and a freestanding structure. Each has a different attachment strategy and structural footprint.
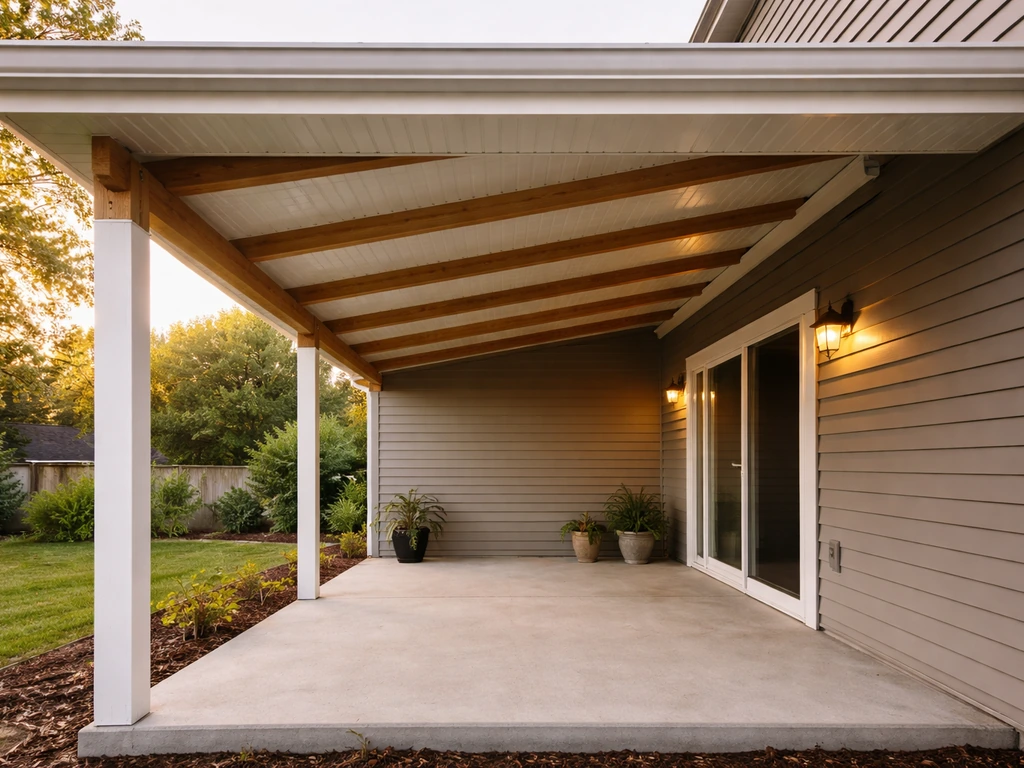
Lean-To (Single-Slope Attached)
This is the most popular choice for DIYers and the most practical for most suburban backyards. One side attaches to the house via a ledger board or beam, and the other side rests on posts. The roof slopes away from the house for drainage. It's structurally simple, requires the fewest materials, and is the easiest to flash properly. If you're building your first patio roof, start here.
Gable-Style Attached Roof
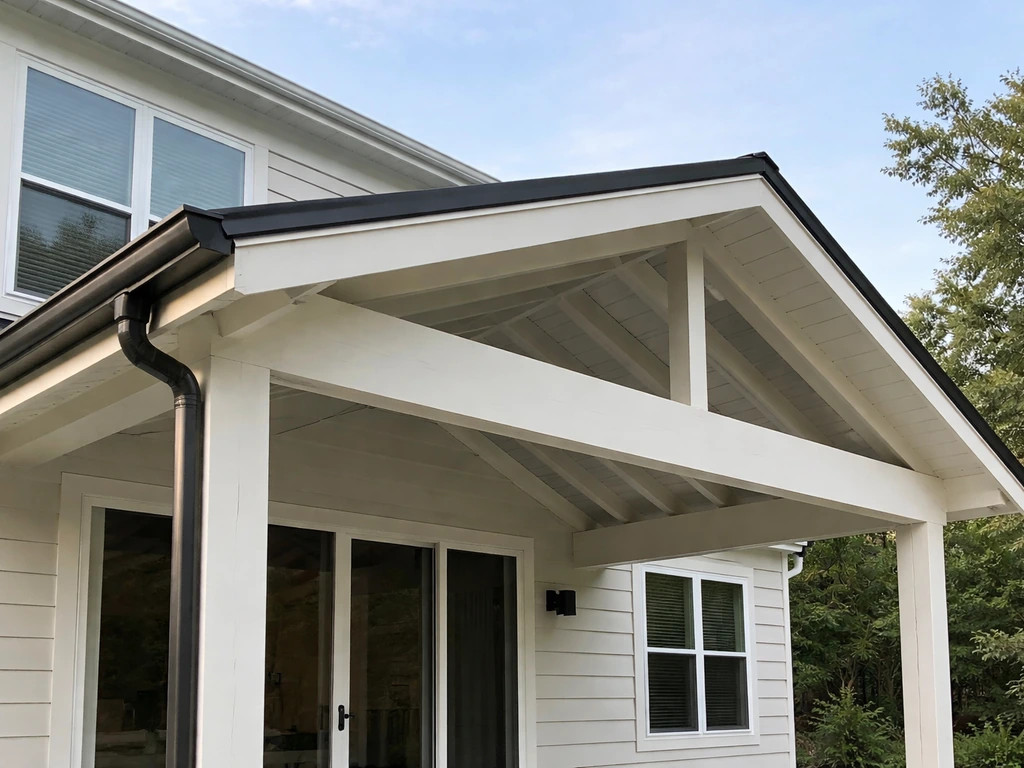
A gable roof has a ridge in the middle and slopes down on two sides. When attached to the house, one end of the ridge ties into the house wall. These look great and add real curb appeal, but they're structurally more complex, require more precise framing, and the attachment point at the house needs careful detailing. Expect to spend more time on both planning and waterproofing the peak connection.
Side-Attached and Freestanding Options
A side-attached cover runs perpendicular to the house wall rather than parallel, which changes how loads transfer and where you put your footings. Freestanding structures avoid the house attachment entirely, which sidesteps a lot of structural and waterproofing complexity at the cost of needing more posts and deeper footings. There are specific scenarios where freestanding is the smarter call, and we'll cover those separately below.
Planning, Measurements, and Design Basics
Good planning here saves you from expensive fixes later. The three things to nail before you buy a single piece of lumber are: your roof slope, your structural dimensions, and your local load requirements.
Roof Slope and Drainage
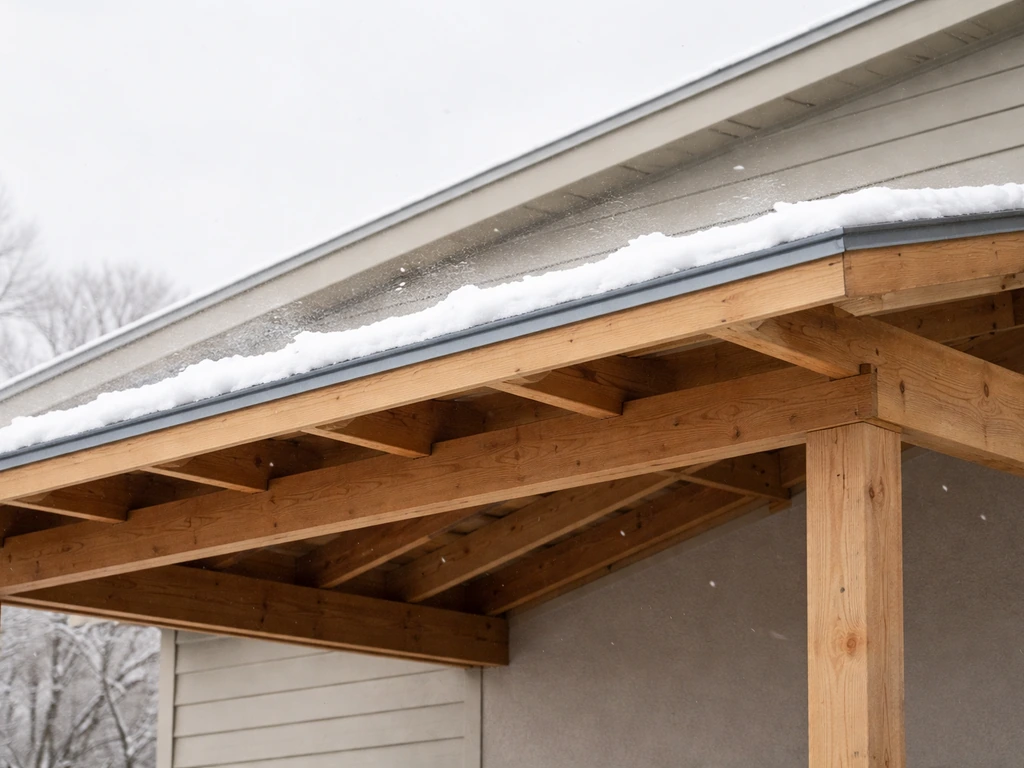
The absolute minimum slope for a patio cover roof is 1/4 inch of drop per foot of run. This is the code minimum cited by the IRC and IBC for low-slope roofs, and it's the standard used by aluminum patio cover systems like Alumawood as well. In practice, that means a 12-foot-deep patio cover needs at least 3 inches of total drop from the house wall to the outer edge.
More slope sheds water faster and reduces the risk of ponding, which is the enemy of any flat or low-slope roofing material. If you're using corrugated metal or polycarbonate panels, you can often get away with the minimum. If you're using solid roofing with a membrane, go steeper when you can.
Snow and Wind Load Calculations
Your patio roof has to handle the same snow and wind your house does, plus some extra exposure risks because the structure is lower, broader, and often open on the sides. The standard reference for these loads is ASCE 7, which your local building department uses to set design requirements. ASCE 7 includes snow-load provisions such as rules for low-slope roof snow loads in Chapter 7 [ASCE 7 includes snow-load provisions, including rules for low-slope roof snow loads (Chapter 7)](https://amplify.
asce. org/content/standard/9780784415788/part/provisions/standard-chapter/s7). ASCE’s Civil Engineering Source also notes that [ASCE 7 guides provide detailed descriptions of wind, seismic, and snow provisions](https://www. asce.
org/publications-and-news/civil-engineering-source/article/2021/03/02/guides-offer-practical-help-with-load-provisions-of-asce-7-16/) to help determine design loads. You don't need to read the whole standard yourself, but you do need to know your local ground snow load (available from your building department or county GIS maps) and your basic wind speed zone. What often goes wrong here is that DIYers skip the load calculation entirely and undersize their beams or post spacing. Many municipalities publish simplified prescriptive tables for patio covers that do the math for you.
Look for those first since they specify minimum rafter sizes, minimum beam sizes, and maximum post spacing based on your local loads. Use them.
Measuring and Laying Out the Structure

Start by measuring the full width of your patio and deciding how deep you want the cover to extend from the house. Mark both dimensions clearly. For the ledger height, you need to account for your chosen slope: if the ledger attaches at 9 feet and your cover is 12 feet deep with a 1/4-inch-per-foot slope, your outer beam sits at 8 feet 9 inches. Sketch this out on paper before you start. Also mark where your support posts will go, keeping in mind local code tables for maximum post spacing, and flag where your footings need to be dug. Batter boards and string lines are your best friends here for getting everything square and level.
Materials and Tools for a DIY Patio Roof
The three main material systems DIYers work with are wood, aluminum, and metal (steel or corrugated panels). Each has real trade-offs in cost, effort, and longevity.
| Material | Pros | Cons | Best For |
|---|---|---|---|
| Pressure-Treated Wood | Widely available, easy to cut and fasten, familiar to most DIYers, strong | Requires sealing/staining, can rot if not properly protected, heavier | Traditional look, full structural framing, areas with moderate weather |
| Aluminum (Alumawood-style kits) | Lightweight, corrosion-resistant, low maintenance, pre-engineered kits simplify design | More expensive upfront, harder to modify on the fly, limited to kit dimensions | Low-maintenance cover over a patio slab, DIYers who want a defined system |
| Metal (corrugated steel/polycarbonate panels) | Affordable panels, fast to install, great for rain protection | Can be loud in rain, needs careful fastening for uplift, expansion/contraction issues | Budget builds, workshop-style aesthetics, high-rain climates |
For a wood build, use pressure-treated lumber rated for ground contact on any posts and for the ledger board. Use standard Douglas fir or SPF for rafters. For fasteners, code requires corrosion-resistant hardware throughout: hot-dip galvanized or stainless-steel joist hangers, lag screws, and post bases. If you're mixing treated wood and metal connectors, stainless steel is the safest choice to avoid galvanic corrosion. For aluminum kits, the manufacturer supplies most components and the fastener specs are defined in their engineering documents. Follow them exactly.
Tools You'll Need
- Circular saw or miter saw (for cutting lumber to length and angle)
- Drill/driver and impact driver (for lag screws and structural connectors)
- Level (4-foot minimum) and a laser level for setting consistent heights
- Speed square and framing square
- Tape measure and chalk line
- Post hole digger or rented auger for footings
- Concrete mixing tub or access to a mixer
- Reciprocating saw (for removing siding at ledger location)
- Caulk gun and a tube of flashing sealant
- Safety glasses, hearing protection, and work gloves
How to Attach the Roof to Your House (and Do It Right)
This is the most important part of the entire project. The ledger board is the single most failure-prone connection in any attached outdoor structure. Get it wrong and you're looking at a collapsed roof, water damage behind your siding, or both. If you want a patio cover that’s secure, make sure you follow proven methods for how to attach a patio cover to the roof.
Find Real Structure to Attach To
Your ledger must fasten into the house's rim joist, band joist, or structural framing, not just the sheathing, siding, or stucco. Use a stud finder to locate rim joist or blocking locations. A fascia detail is especially important when your patio roof is built off existing fascia, because you still need to tie the ledger area into real framing and properly flash the connection stud finder.
If your house has masonry veneer or brick siding at the attachment zone, be aware that codes in many jurisdictions prohibit using that masonry as ledger support. If you are planning to attach a patio roof to a brick house, make sure the ledger board actually ties into structural framing and not just the brick or veneer. Learn the key steps, including how to choose the right ledger board and flash the connection, when figuring out how to attach a patio roof to a brick house. You'd need to attach through it to the wood framing behind, or reconfigure the design.
If you're not sure what's behind your wall, open it up and look before you commit.
Ledger Board Connection
Use structural lag screws or through-bolts spaced per your local code or the AWC deck construction guide. The American Wood Council is explicit that ledger connections must use positive anchorage to resist both vertical (gravity) loads and lateral (horizontal) loads. Nails driven into the side of the framing in withdrawal (pulling straight out) are not acceptable as the primary connection method. Typical spacing for 1/2-inch lag screws is every 16 inches along the ledger, staggered slightly up and down. Check your local prescriptive tables for the exact schedule based on your roof load.
Waterproofing: Flashing the Ledger
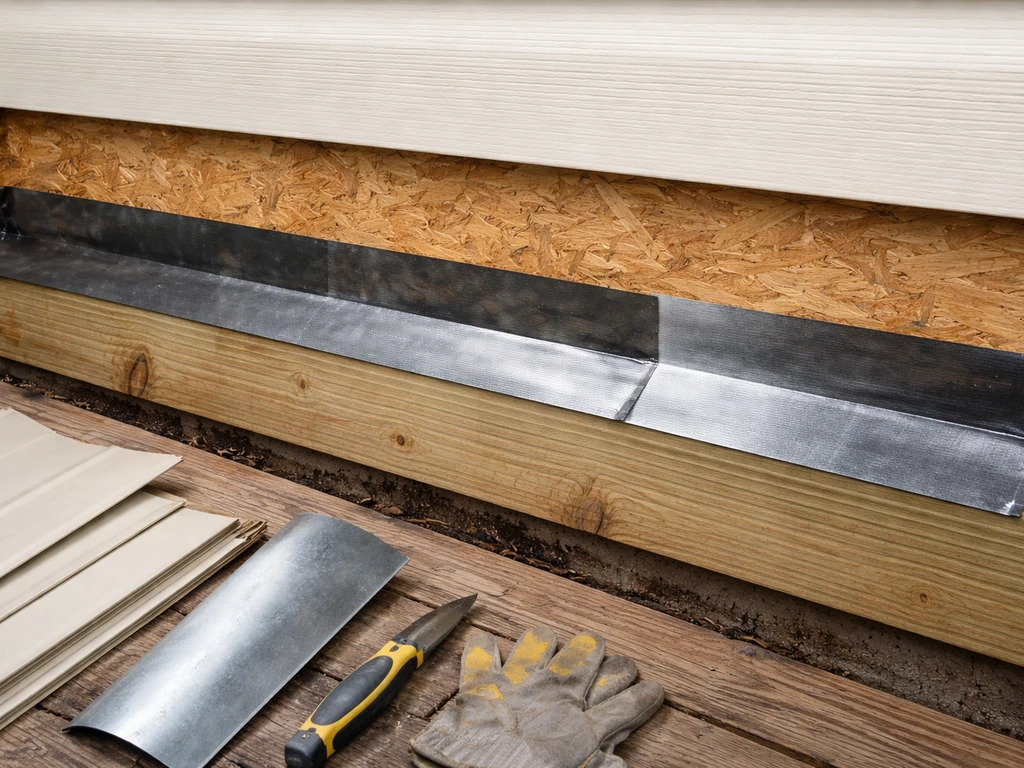
Water infiltration at the ledger is a silent killer. Here's the proper sequence: remove the siding at the ledger location down to the sheathing, slip self-adhering flashing tape over the top of the area, install the ledger board, then install galvanized Z-flashing that tucks up under the remaining siding above and laps down over the top of the ledger.
The Z-flashing should be capped tightly against the siding course above it and sealed with a flexible, paintable sealant at the top edge. Where the ledger meets a sidewall, you'll need step flashing integrated into the wall's weather-resistant barrier (house wrap or felt paper) in a shingle-lap pattern. The IRC requires individual step flashing pieces that are at minimum 4 inches high and 4 inches wide at roof-wall intersections, woven into each shingle course as you go up.
Any housewrap or WRB laps should overlap by at least 6 inches to maintain a continuous drainage plane.
Aluminum Kits: Wall Attachment with C-Channel
Aluminum patio cover systems use a wall-mounted C-channel hanger as the house-side connection. The roof panels slide into the channel and are secured with sheet-metal screws. The channel itself still needs to be lagged into structural framing, and you still need proper flashing above it. If you are installing a patio cover roof top attachment on an aluminum kit, remember the wall-mounted connection still has to be lagged into structural framing and flashed correctly above the C-channel. Don't skip that step just because it's an aluminum system. Water doesn't care what the panel material is.
Step-by-Step Build Process for an Attached Patio Roof
This sequence follows real construction order for a wood-framed lean-to style attached patio roof. Adjust for your specific material system, but the order of operations is largely the same.
- Pull your permit first. Do not start digging until you have approval. More on this below.
- Lay out the footings. Mark the center of each post location with a stake. Dig footing holes to the depth required by your local frost line, typically 12 to 42 inches depending on your climate. Diameter should match your local code tables, commonly 12 to 18 inches for residential patio covers.
- Pour the footings. Mix and pour concrete, then set post anchor hardware (not the posts yet) into the wet concrete. Use a level and string line to make sure all anchors are aligned. Let concrete cure for at least 48 hours before loading.
- Install the ledger board. Remove siding at the ledger location, install self-adhering flashing tape behind the ledger zone, then fasten the ledger into the structural framing with code-compliant lag screws. Use a level to make sure it's perfectly horizontal. This board controls the height of your entire roof.
- Set the posts. Drop your posts into the anchors and brace them plumb with temporary diagonal braces. Do not remove bracing until the beam is connected.
- Install the beam. Set the outer beam on top of the posts and secure it with post caps rated for your load. The beam height should be calculated to match your target roof slope relative to the ledger.
- Install the rafters. Rafters run from the ledger to the outer beam. Use rafter hangers at the ledger end and either notch the rafter to sit over the beam (bird's mouth cut) or use rafter ties at the outer end. Space per your local code tables, typically 24 inches on center for most light patio loads.
- Add blocking and purlins if needed. Blocking at the ends prevents lateral racking. If using metal or polycarbonate panels, install horizontal purlins across the rafters to support the panels.
- Install roofing material. Work from the outer edge toward the house. For corrugated panels, lap each row by at least one corrugation and use pre-drilled holes with neoprene-washer screws. For shingles or membrane, follow standard low-slope installation practices.
- Install ledger flashing. Once roofing is down, install the Z-flashing at the top of the ledger, tucking it under the siding course above. Seal the top edge with sealant. This is your primary water defense at the house junction.
- Finish and inspect. Add fascia trim, any gutters you want, and post trim. Then call for your inspection.
When Not to Attach: Building a Freestanding Patio Roof
Sometimes attaching to the house is the wrong call. If your house wall at the patio location has complex windows, doors, or existing architectural features that make ledger placement impractical, or if your wall construction is something you can't positively connect to (like certain older masonry walls), a freestanding structure is a legitimate and often simpler alternative.
The main difference in a freestanding build is that you're adding a second row of posts and footings along the house side instead of a ledger. Those footings need to be just as robust as the outer ones. You also need to address lateral stability more aggressively since there's no house wall to brace against. This means knee bracing between posts and beam, or diagonal bracing in the plane of the roof framing. The spacing between your two rows of posts becomes your rafter span, so keep it reasonable: 10 to 14 feet is manageable for standard lumber sizes without needing engineered beams.
Wind uplift is the main structural concern with freestanding roofs. Because the structure isn't connected to the house, all the uplift force has to be resisted by the post anchors and footings alone. Make sure your footing depth and anchor hardware are rated for your local wind speed, and that you're using hold-down hardware at the post bases, not just basic post caps.
One practical note: even with a freestanding structure, you'll likely want to run a trim or fascia piece close to the house for appearance and to limit the gap where debris and birds can enter. Just don't let that trim piece carry any structural load from the roof.
Permits, Inspections, and When to Call a Pro
Do You Actually Need a Permit?
Almost certainly yes, if you're attaching the structure to your house and it's larger than about 200 square feet. Most jurisdictions require a building permit for any attached patio cover. Even many freestanding covers trigger permit requirements above a certain square footage. The permit process typically requires you to submit a simple site plan showing the structure dimensions, the distance from property lines, and the attachment method. Many municipalities publish pre-approved patio cover plan guides with prescriptive tables for lumber sizing that make the permit process much faster. Search your city or county building department website for a residential patio cover handout before you start designing.
What Inspectors Will Check
Expect at least two inspections: one for footings before concrete is poured, and one for framing after the structure is up but before roofing covers everything. Some jurisdictions add a final inspection after roofing and flashing. The inspector will look at footing depth and diameter, ledger connection hardware and fastener pattern, post anchor installation, rafter sizing and spacing, and flashing at the house connection. Having your permit-approved plans on site speeds things up considerably.
Safety Basics You Can't Skip
- Call 811 (in the US) before digging any footing holes to locate buried utilities
- Use fall protection when working at height, especially on ladders near the house eave
- Never work alone when setting posts or lifting beams, even with a relatively lightweight structure
- Check that all structural connectors carry a code compliance documentation such as an ICC-ES evaluation report, not just a load rating from the packaging
- Use corrosion-resistant fasteners throughout: hot-dip galvanized or stainless steel depending on your material system and exposure level
Honest Assessment: When to Hire a Pro
This project is genuinely DIY-able for a capable homeowner comfortable with basic framing and concrete work. But there are specific scenarios where you should bring in a structural engineer or licensed contractor. If your house is older construction and you're not certain the rim joist or framing at the attachment zone is sound, get a professional to assess it before you start loading it.
If you're in a high-wind zone (hurricane or tornado country) or an area with significant snow loads, the load calculations need to be accurate and the connections need to be engineered. If your municipality requires stamped engineering drawings for the permit, hire an engineer to produce them. The cost of a structural consultation is small compared to the cost of a failure or a failed inspection that requires tearing out completed work.
Cost varies widely, but getting clear estimates for labor, materials, permits, and engineering is the key to figuring out how much to build a patio roof attached to the house. Attaching to a brick or masonry house wall also introduces enough complexity in the connection design that it's worth a professional's eyes before you proceed.
If you're confident in your framing skills, have a relatively straightforward house wall to work with, and are building in a moderate climate with manageable snow and wind loads, this is a project you can absolutely own from start to finish. Plan carefully, pull the permit, use the right hardware, and flash the ledger properly. Those four things determine whether this project lasts 30 years or becomes a headache in year three.
FAQ
How do I find where my rim joist or blocking is behind the siding so the ledger can be fastened correctly?
Use a stud finder to locate rim joist/band joist or solid blocking, then confirm by probing for fasteners or tapping, if your siding allows. If you cannot positively verify location, remove a small section of siding at the ledger line to inspect and mark the framing before installing the ledger, this avoids the common mistake of attaching to sheathing only.
Can I use the ledger board as a straight attachment, or do I need to account for uneven house walls?
You should plan to correct out-of-plane walls. Measure wall high spots and low spots along the ledger location and shim or re-set the ledger so it sits in a consistent plane. If you leave the ledger twisted or bowed, you will create uneven flashing gaps and can misalign rafter framing.
What is the best way to waterproof the ledger if my house has vinyl siding versus stucco?
The sequence changes by finish, but the goal is the same: stop water before it reaches the sheathing. With siding, you typically remove panels down to the sheathing for the flashing system, then reinstall. With stucco, you may need cut lines and proper WRB integration, do not rely on sealant alone, and verify that you can flash the wall paper or WRB in a shingle-lap pattern.
Is 1/4 inch per foot always enough slope for a patio roof attached to a house?
It is often the minimum for low-slope systems, but it can be insufficient in conditions that cause frequent ponding (very mild climates, heavy debris, or long runs). If you see any chance of water sitting, increase slope and consider routing gutters or using a roof material intended for flatter applications, especially if using solid decking with membrane.
Do I need gutters, or is flashing alone sufficient to handle runoff?
Flashing protects the house connection, it does not manage runoff at the edges or prevent water from dumping at footings. If the outer edge discharges onto a walkway, planting area, or soil that erodes easily, plan a gutter, splash blocks, or a drainage route. This is especially important for attached covers where runoff concentrates in one direction.
How do I prevent roof uplift and “racking” on an attached patio cover during high winds?
For uplift, use the correct hold-down or positive anchorage hardware pattern specified by your load assumptions, and ensure connectors are rated for wind uplift, not just structural gravity. For racking, include diagonal bracing or lateral restraint in the roof framing, and keep post spacing and beam sizes within the limits in your prescriptive tables or design.
Can I attach a patio roof to a deck ledger or existing posts instead of mounting directly to the house structure?
Sometimes you can, but only if the connection transfers loads to structural framing, not to a non-structural surface. A deck ledger or rim board may not be designed for roof loads, so you still need to verify the underlying structure, and the patio roof connection should be engineered or confirmed with local prescriptive guidance.
What is the safest way to handle a roof-wall intersection when the ledger meets a side wall or a return?
Use step flashing at the intersection integrated with the wall weather-resistant barrier, and maintain proper overlaps on WRB seams. Also, confirm there is a continuous drainage path, water should always have somewhere to go, cap edges tightly, and avoid stacking flashing in a way that traps water behind siding or wrap.
What are common reasons patio roof permits get rejected or require rework?
Common issues include ledger attachment to non-structural materials, missing flashing details at the house connection, oversized spans or undersized members relative to local snow and wind requirements, and unclear property line or setback dimensions on the site plan. Keep your permit-approved plan available during inspection so the inspector can match what is built.
If my patio cover is close to 200 square feet, do I definitely need a permit?
You likely do, but the exact trigger varies by municipality. Instead of relying on a rule-of-thumb threshold, check your city or county’s patio cover guidance for both attached and freestanding structures, because some areas treat partially enclosed or larger attached covers differently.
When should I stop DIY and hire an engineer or contractor?
Consider professional input if you cannot verify the ledger bears on rim joist or blocking, your house wall is masonry with uncertain structural backing, you are in a high snow or high wind zone, or your local permit requires stamped engineering. Also, if you find rot or water damage behind the attachment area, replace affected framing before moving forward.