You can build an outdoor covered patio yourself in a weekend or two if you plan carefully, pull the right permits, and pick a design that matches your skill level. The basic process goes like this: choose your cover style, measure and lay out the space, get your permit, frame the structure, install roof panels with proper flashing, and add gutters and drainage. The hardest part for most people isn't the actual building, it's the planning and permitting phase. Get that right and the build itself is very manageable. If you want a more detailed walkthrough of how to add a patio cover step by step, follow the full guide next.
How to Build an Outdoor Covered Patio: Step-by-Step Guide

Celia Vaughn
29 May 2026

Choose your patio cover style first
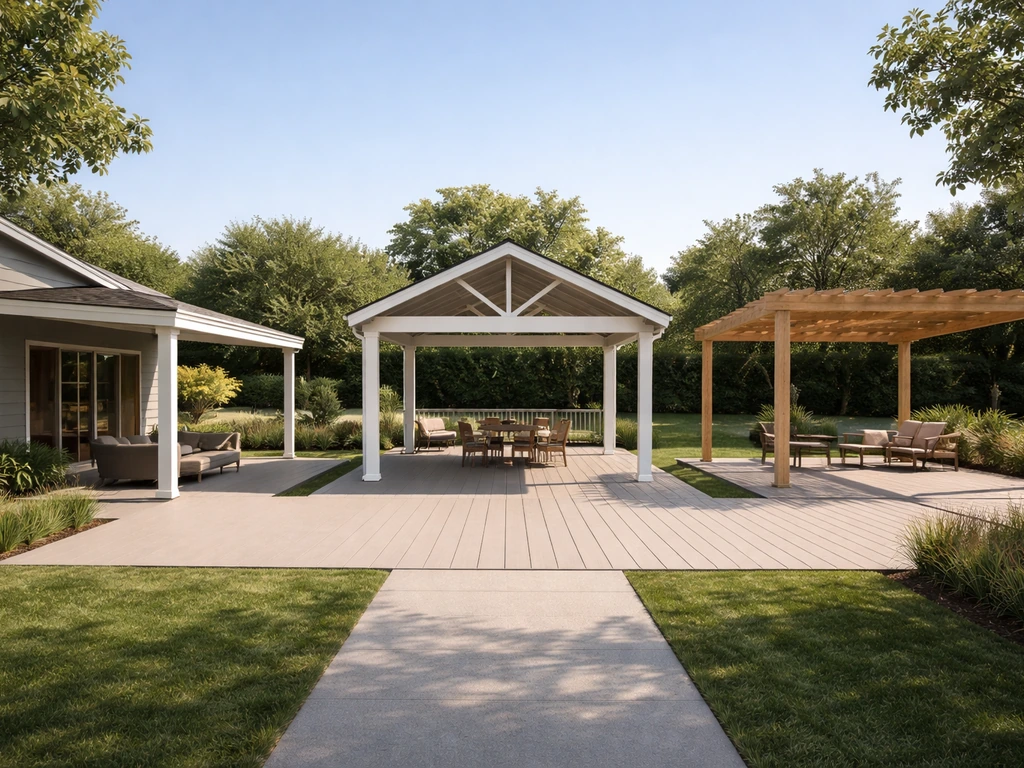
Your style choice drives every other decision, so it's worth spending real time here before you buy a single board. There are three main configurations most homeowners build.
- Lean-to (attached shed roof): The simplest and most popular option for DIYers. One side attaches to your house via a ledger board, and the roof slopes away from the house. Low material cost, easier permit path, and fewer posts to deal with.
- Gable roof: A pitched roof with a ridge in the center, either attached to the house or free-standing. Looks more like an extension of the home, handles snow load better, and adds more headroom. More complex to frame but very doable with basic carpentry skills.
- Free-standing pergola or pavilion: No house attachment required, which is a big advantage if your home's framing doesn't allow a ledger or you want the patio away from the house. Needs four or more posts anchored into footings.
For most attached builds, a lean-to is the smart starting point. If you're specifically building something attached directly to the house, that process has its own attachment considerations around ledger connections and flashing at the wall. A free-standing covered patio, on the other hand, gives you more flexibility on placement but requires concrete footings for every post.
On roof pitch: even a simple lean-to needs enough slope to shed water. A minimum pitch of 1:12 (1 inch of rise per 12 inches of run) is the bare floor for most roofing materials, but 2:12 or steeper is much better in practice, especially with metal panels or polycarbonate. Corrugated polycarbonate installation guides specifically flag minimum pitch requirements for water shedding, and going too shallow is one of the most common mistakes on DIY patio covers. If you're in a rainy climate, go with at least 3:12.
Measure, plan the layout, and handle permits before you build anything
Measure your patio slab or the area you're covering, then add a foot or two of overhang on any exposed sides if you want real rain protection. Standard residential covered patios run 10x12 to 16x20 feet, but size it to what you actually use. The header height at the house wall matters too: you want at least 8 feet of clear headroom at the low side, and the ledger or beam needs to attach where there's solid framing in the house wall or rim joist.
Now for permits. I know it's tempting to skip this step, but please don't. Most jurisdictions in the US follow the International Residential Code (IRC), which is the residential baseline for structural, energy, and safety requirements. The 2024 IRC includes Appendix BF specifically for patio covers, which relaxes some requirements compared to full additions (since patio covers are considered recreational outdoor living structures), but you still typically need a permit for anything structural.
A good example: Fort Collins, Colorado spells it out clearly in their patio cover guide, stating that any patio cover taller than 8 feet at any point requires a permit, and that engineered stamped plans may be required depending on conditions or if electrical is included. Your jurisdiction will have similar thresholds. Check with your local building department before you start, not after.
What you'll typically need to submit: a simple site plan showing your property lines and where the structure sits, a framing plan with dimensions and materials, and sometimes a structural engineering letter if your span or snow/wind load is significant. Many building departments have a simple patio cover checklist online. Call them, describe the project, and ask what's required. It's usually a 20-minute conversation that saves you a stop-work order later.
Pick your materials and build your shopping list

The three main structural material choices are pressure-treated lumber, aluminum, or steel. Here's how they actually compare for a DIY covered patio build.
| Material | Best For | Typical Cost (relative) | DIY Friendliness | Maintenance |
|---|---|---|---|---|
| Pressure-treated wood | Classic attached or free-standing builds, easy to cut and fasten | Low to moderate | High — standard tools, familiar to most DIYers | Moderate — needs sealing/staining every few years |
| Aluminum (kit or custom) | Lightweight, rust-proof builds; great for coastal or humid climates | Moderate to high | Moderate — requires aluminum-specific fasteners and cuts | Very low — wash occasionally, that's it |
| Steel/metal framing | Heavy-duty free-standing or commercial-style builds | Moderate | Lower — needs metal cutting tools and welding for some connections | Low if galvanized or powder-coated |
For the roof panel itself, your main options are corrugated or standing-seam metal panels, polycarbonate panels (clear or tinted), or solid roof sheathing with shingles or rolled roofing. Metal panels are the most popular choice for DIY patio covers: they're lightweight, durable, relatively easy to cut with a circular saw and metal-cutting blade, and they install fast. Polycarbonate is great if you want natural light under the cover. Solid sheathing with shingles gives the most finished look but takes the most time and skill.
Basic tool and material checklist
- Circular saw with wood blade (and a metal-cutting blade if using metal panels)
- Drill/driver with bits and driver tips
- Level (4-foot and torpedo), tape measure, chalk line, speed square
- Post hole digger or rented power auger (for free-standing builds)
- Hammer, framing nails, structural screws, joist hanger hardware
- Pressure-treated 4x4 or 6x6 posts, 2x6 or 2x8 framing lumber (size per your span)
- Ledger board (same dimension as rafters, minimum 2x8 for house attachment per IRC deck ledger guidance)
- Concrete and tube forms for post footings
- Roof panels (metal, polycarbonate, or sheathing — sized to your roof area)
- Roofing screws with neoprene washers for metal panels
- Drip edge (aluminum or galvanized steel)
- Butyl tape or compatible sealant for panel overlaps
- Flashing (step flashing or continuous Z-flashing for house wall connection)
- Gutters, downspouts, and gutter hardware
- Safety gear: safety glasses, gloves, hard hat, fall protection if working above 6 feet
Frame the structure and attach it safely
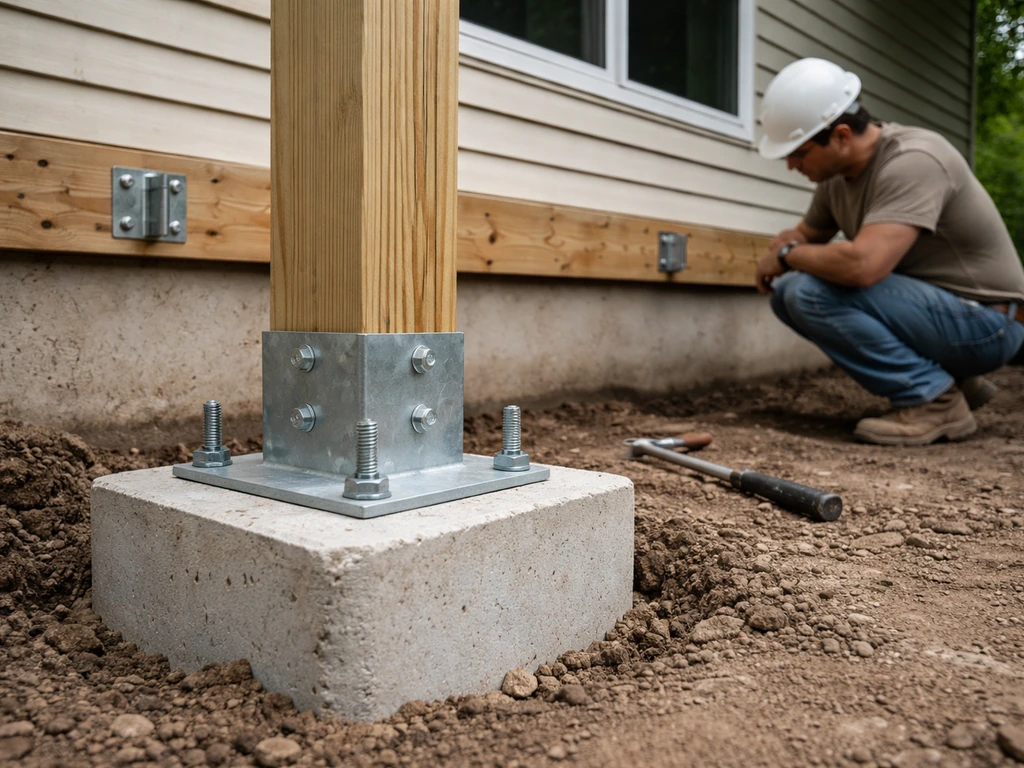
If you're building a free-standing cover, start by digging and pouring your footings. Most jurisdictions require footings to extend below the frost line, which varies by region from about 12 inches in warmer climates to 48 inches or more in northern states. Set post bases in the wet concrete (do not just bury wood posts directly in concrete if you can avoid it, because this traps moisture and accelerates rot). Use a level and bracing to hold posts plumb while the concrete cures, typically 24 to 48 hours before loading them.
For an attached lean-to, the ledger board is your most important structural element and the area where mistakes cause collapses. The Windsor, CO building guide makes this explicit: correct attachment of the patio cover to the existing home is critical to preventing collapse, and attachment requirements depend on geographic load conditions. Here's how to do it right. Locate the rim joist or band joist of your house (usually directly behind the siding, above the foundation).
Remove a section of siding to expose it. Use structural lag screws or through-bolts to fasten the ledger directly to the rim joist, not just into the siding or sheating. Per IRC ledger connection requirements, use minimum 2x8 nominal lumber for the ledger with appropriate fastener patterns. Flash above and around the ledger before you reinstall siding (more on this in the next section).
Once your ledger or beam is in place, install your rafter hangers and set your rafters. Space rafters 16 inches or 24 inches on center depending on your roof panel span ratings and local snow load. Use structural screws or nails appropriate for treated lumber (standard bright nails corrode quickly in contact with modern pressure treatment). At the outer beam, toenail or use rafter ties to secure each rafter. Diagonal bracing between posts or knee braces at the beam-to-post connection add significant rigidity, especially for free-standing structures.
Install roof panels, waterproofing, and flashing
Before any panels go on, blank" rel="noopener noreferrer">install your drip edge around the perimeter. This is a step a lot of DIYers skip or do wrong. The drip edge should blank" rel="noopener noreferrer">extend at least 1/4 inch below the roof sheathing edge and extend back up onto the roof deck a minimum of 2 inches. When you're lapping two sections of drip edge together, overlap them by at least 2 inches. Fasten drip edge with roofing nails spaced no more than 12 inches apart. At the eave (low side), drip edge goes on first, under the underlayment. At the rake (sides), it goes on over the underlayment. Getting this backwards is a very common mistake that leads to water wicking up under the panels.
For metal panels, follow the manufacturer's installation manual for fastening patterns and lap requirements. The Metal Construction Association's installation guidance is clear that you should follow manufacturer specs because fastening methods and lap dimensions vary by panel profile. General rule: panels should overhang the eave drip edge by about 1 inch. Fasten with self-drilling roofing screws that have neoprene washers, and don't over-tighten or you'll compress the washer and create a leak point. For shallow-pitched roofs under 6:12, the JLC Field Guide recommends at least a 4-inch end-lap on metal panels, plus sealant or butyl tape at every overlap seam to prevent wind-driven rain from working up through the joint.
If you're using corrugated polycarbonate, the rules are similar. A single corrugation side overlap is usually sufficient, but for long spans you need a minimum end-lap (check your specific panel's guide, but 6 to 8 inches is typical). Always lap upper panels over lower ones so water flows over seams, not into them. Use foam closure strips at the eave and ridge to fill the corrugation voids and keep out insects and debris without blocking expansion.
At the wall where the patio roof meets the house, flashing is non-negotiable. Install Z-flashing or step flashing that tucks behind the house siding above and laps over the top of the roofing panel below. If you're using one continuous piece, it should overlap any adjacent pieces by at least 8 inches when more than one length is needed. The goal is a continuous water-control layer that always drains outward, never trapping water against the house framing. After the flashing is in, reinstall the siding over it (not behind it), with a small gap between the siding bottom and the roof surface.
Finishing touches: drainage, gutters, and getting it inspected
Gutters aren't optional if your covered patio is right next to the house or if you're in a climate with meaningful rainfall. Without them, the concentrated roof runoff from your new cover will pour directly onto your patio slab and potentially undermine the foundation. A single 4-inch or 5-inch K-style gutter across the low eave with one downspout per 20 to 30 feet of run is usually adequate. Slope the gutter at least 1/4 inch per 10 feet toward the downspout. Direct downspouts at least 6 feet away from the foundation, or connect to a buried drain line if your code allows.
If you're adding lighting, a ceiling fan, or outdoor outlets under the cover, now is the time before you close up any framing. Outdoor electrical work must comply with NEC requirements: GFCI protection on all outdoor receptacles, and weatherproof or rain-tight covers on any surface-mounted boxes for lights or outlets. Since the IRC incorporates NEC electrical provisions for residential work, your building inspector will check this. If electrical feels outside your wheelhouse, subcontracting just that portion to a licensed electrician is a smart call and usually not expensive.
Once the build is done, schedule your final inspection if your permit required one. Walk the inspector through what you built and have your permit paperwork on site. Most inspectors for straightforward patio covers are quick and helpful. If something needs to be corrected, they'll tell you exactly what. Don't skip the inspection to avoid hassle, because an uninspected structure can create problems when you sell the home or make an insurance claim.
DIY vs. hiring a pro: be honest with yourself
The lean-to style attached or free-standing covered patio is genuinely within reach for a motivated DIYer with basic carpentry skills. That said, there are specific situations where calling a structural engineer or licensed contractor is the smarter move, not the easy way out.
- Your local building department requires stamped engineering plans (common for larger spans, heavy snow load areas, or structures over 200 square feet)
- You're in a high-wind or seismic zone and the code requires specific hold-down hardware or foundation design
- The attachment point on your house has unclear or non-standard framing (older homes, steel framing, or SIPS construction)
- You're building a gable roof cover that requires ridge beam sizing calculations
- Any part of the project involves gas lines or significant electrical work beyond a simple outlet
- The project is over 400 square feet or taller than 10 feet, where load calculations become more complex
Even if you hire out the structural framing, you can often save money by doing your own site prep, panel installation, gutters, and finish work yourself. A partial DIY approach is completely legitimate. Getting a one-hour structural consultation with an engineer for a modest fee is also worth every cent if you have any doubt about your ledger attachment or post sizing. The goal is a covered patio that's safe and lasts decades, not just one that looks good in photos the first summer.
Cost-wise, a basic DIY lean-to covered patio with wood framing and metal panels typically runs $15 to $40 per square foot in materials depending on your region and material choices. Hiring the whole job out usually doubles or triples that. The middle ground, buying materials yourself and hiring labor only, often lands around 30 to 50 percent less than a full contractor bid.
If budget is a primary driver, there are also specific design approaches and material substitutions that can cut costs significantly without compromising safety or durability. If you want to keep costs down, focus on smart material choices, simple designs, and efficient planning so you do not pay for unnecessary upgrades how to build a patio cover cheap.
FAQ
Can I build a covered patio directly on my existing house without permits?
Yes, but only if you confirm code requirements for your roof covering and load path. If your design relies on the house for structure (a ledger/beam connection), a “retrofit” that misses solid rim joist or band joist framing is a common failure point. Ask your building department whether they require engineered stamped plans when spans, snow load, or attached ledger size exceed certain thresholds.
What usually triggers a permit for a patio cover (and when can it be exempt)?
Not always. Even if patio covers are treated as recreational structures in some cases, many jurisdictions still require permits when the cover is taller than a set height at any point, when it changes stormwater runoff, when it includes electrical, or when you need structural work like footings or a ledger. Call your building department and ask what triggers permitting in your exact scenario, including post depth and attachment type.
How do I avoid leaks with metal or polycarbonate roof panels?
For metal and polycarbonate, you can be close to right and still get leaks if laps and fastening sequence are off. Use the manufacturer’s instructions for the specific panel profile, confirm end-lap and side-lap requirements for your pitch, and do not rely on “looks tight” fastener placement. Over-tightening fasteners can crush gaskets and create a leak path, especially in hot sun.
How do I know what size posts and beams to use?
Sizing the post and beam is not guesswork, especially in areas with wind and snow. Use local design criteria (often through the permit plan process) and match your rafter spacing to the roof panel span rating. If your span is large or the roof is steeper than typical, a structural engineer can quickly verify post spacing, beam size, and bracing, which is usually cheaper than rebuilding.
What’s the correct way to attach a lean-to ledger to the house?
If you cannot find where the house has solid framing, do not fasten to siding or sheathing as your main connection. Locate the rim joist or band joist, and use through-bolts or structural lag screws into that member, with flashing installed so water always sheds outward. When you cannot access solid framing, that’s a strong sign you should adjust the design or get a structural consultation.
Do I have to pour concrete footings, and how deep should they be?
Plan for frost depth and drainage together. Set footings below the local frost line, keep post bases out of standing water, and brace posts plumb while concrete cures (24 to 48 hours is typical). Also confirm whether your jurisdiction requires concrete thickness and rebar, since “good enough” footings are a frequent inspection failure.
Do I really need gutters, or is an overhang enough?
More than you think. If the patio is near a foundation, gutters and downspouts are a practical requirement to prevent soil erosion and foundation water exposure. Ensure downspouts discharge at least several feet away from the foundation or to an approved buried drainage connection, and slope the gutter toward the downspout (a small error can still cause overflow at heavy rain).
What are the biggest drip edge mistakes that cause water damage?
If your cover roof is low-slope, the drip edge and underlayment order matters as much as the flashing. At the eave, drip edge typically goes first under the underlayment, at the rake it goes over, and the overlap between drip edge sections must be sufficient. If you mix the sequence, water can wick under the roof edge even with good-looking seams.
Can I install outdoor outlets or a ceiling fan under the patio cover myself?
You can, but it changes the requirements. Outdoor lighting, fans, and receptacles mean you need GFCI protection, proper weather-rated boxes, and correct cable routing so water cannot enter at penetrations. If you plan to run conduit or add outlets under the cover, ask the inspector what inspection points they want before closing walls or ceilings.
When should I hire a contractor or structural engineer instead of DIY?
Often you can partially DIY, but electrical and any uncertain structural connections are the usual “get help” zones. A licensed electrician for wiring and a quick engineer review for ledger sizing or post spacing can prevent expensive corrections. If you’re unsure about snow load, wind exposure, or attachment locations on the house, pay for targeted expertise rather than guessing.
What should I gather before I call the building department for a patio cover permit?
Yes, and it’s worth doing early. The permit process usually asks for a site plan, basic framing details, and sometimes engineered letters if spans or loads exceed typical ranges. Before you buy materials, request your building department’s patio cover checklist and ask whether they need roof pitch, snow load inputs, and attachment details shown on drawings.
What’s the right order of operations for finishes after the roof is installed?
Finish work is where DIYers often “waste money twice.” Make sure framing, flashing, roof panel layout, and drainage are finalized before committing to lattice, ceiling finishes, or trim, because later adjustments can require redoing sealants and fascia details. If you want a ceiling or under-roof insulation, confirm ventilation and moisture management requirements first to avoid trapping condensation.