You can build a basic attached lean-to patio cover for $1,500 to $4,000 in materials if you do the work yourself, compared to $8,000 or more for a professionally installed version. The key is picking the right style for your budget, keeping your span short, and using pressure-treated lumber with a simple polycarbonate or metal panel roof. A straightforward lean-to on a 10x12 or 12x16 patio is genuinely manageable for a motivated DIYer over a long weekend or two, and that is the style this guide focuses on first before covering pergola and gable options as comparisons. If you follow the steps in this guide for an attached lean-to, you will have a solid outdoor covered patio that is easier to weatherproof and maintain.
How to Build a Cheap Patio Cover: DIY Step by Step

Celia Vaughn
3 Jun 2026
Pick the Right Style: Lean-To vs. Pergola vs. Gable
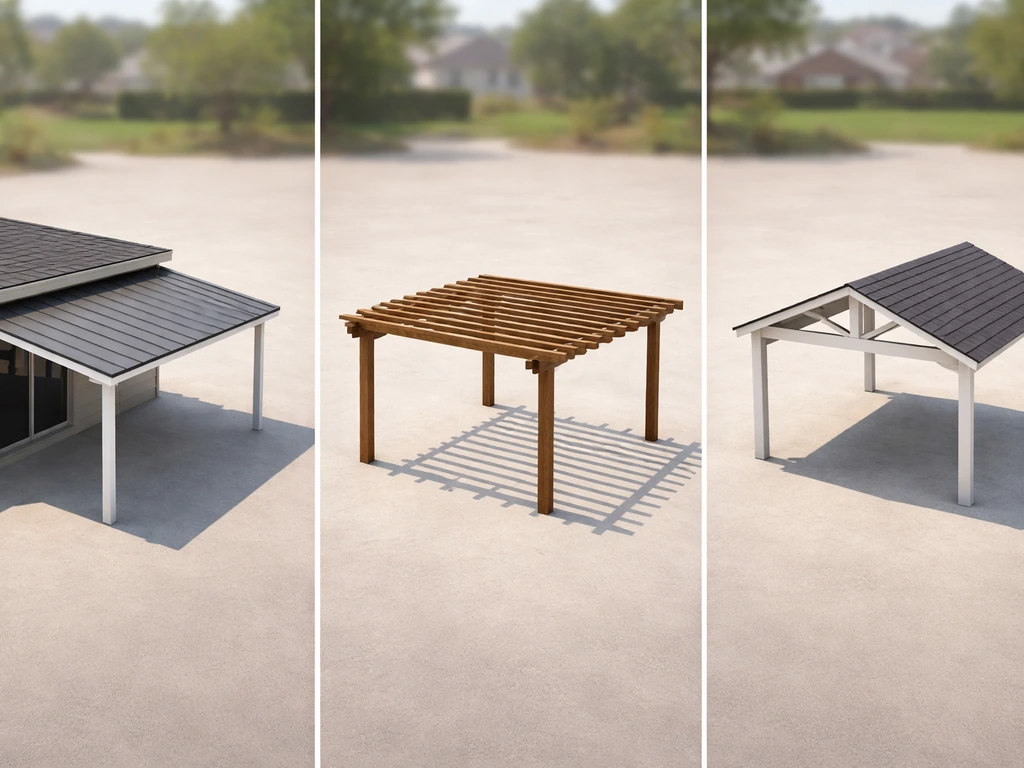
Style is the biggest lever you have on cost. Get this decision right before you buy a single board.
| Style | DIY Material Cost (est.) | Typical Installed Pro Cost | Complexity | Best For |
|---|---|---|---|---|
| Lean-to (shed roof) | $1,500–$4,000 | $8,000–$14,000+ | Low | Attached patios, tight budgets, first-timers |
| Pergola (open slat) | $800–$2,500 | ~$5,000+ | Low–Medium | Shade without full waterproofing |
| Gable roof extension | $4,000–$9,000+ | $70–$155/sq ft installed | High | Larger patios, matching home roofline |
The lean-to is the cheapest and fastest option by a wide margin. It uses a single sloped roof plane that pitches away from your house, so you only need a ledger board at the top, posts at the outer edge, and rafters in between. There are no ridge boards, no valley cuts, and no complex framing. If your goal is a covered patio you can actually use in rain, this is where to start. A good next step is to follow these instructions on how to add a patio cover while you choose the right style and roof panels covered patio. If you want help visualizing how to add a covered patio to your house, use this article’s lean-to steps as a starting point and then adjust for your roof and permitting needs.
A pergola is cheaper on materials because it skips full roofing panels, but it does not keep you or your furniture dry. If shade is your only goal, a pergola works and costs less. If you want real weather protection, add polycarbonate panels over the rafters or plan for a solid roof from the start. Retrofitting waterproofing onto a pergola later usually costs more than just building it right the first time.
A gable roof looks great and matches most home rooflines, but it roughly doubles the framing complexity and material cost. HomeGuide's 2026 data puts professionally installed gable roof extensions at $70 to $155 per square foot, which on a 12x16 patio runs $13,000 to $29,000. The DIY savings are real, but gable framing requires accurate rafter cuts, a ridge board, and sometimes an engineer-stamped plan. Save the gable for your second build or if you have solid framing experience.
Plan the Size, Layout, and Permitting Before You Start
Every patio cover project should start with a permit conversation, not a lumber run. Most municipalities require a permit for any permanent attached structure, and skipping it can cause real problems at resale or after storm damage. The permit process also forces you to produce a simple drawing with dimensions, post locations, and roof slope, which is actually useful planning work anyway.
Call your local building department or check their website before you finalize your design. Tell them you are building an attached lean-to patio cover and ask what they need: a site plan, a framing plan, or a load calculation. Many jurisdictions have a prescriptive path for simple patio covers that does not require an engineer, as long as you stay within standard span tables and keep the structure under a certain size (commonly under 200 square feet). If your area requires full engineered drawings, budget $300 to $800 for that stamp.
For sizing, a 12x16 foot cover is a practical sweet spot. It covers a standard patio table and chairs with room to move, uses common lumber lengths without cuts, and keeps your post spacing at 8 feet or less, which is within safe span limits for standard 2x6 or 2x8 rafters. Common mistake: people make their patio cover too shallow front-to-back. Anything under 10 feet of depth barely covers the patio furniture when the sun is low.
- Measure your patio slab and add 6 to 12 inches of overhang on open sides for better rain coverage
- Check your setback requirements: most areas require at least 3 to 5 feet from property lines for any structure
- Confirm whether you are in a high-wind or snow zone, which affects rafter sizing and footing depth
- Note where your existing roof eaves and gutters are before choosing the ledger attachment height
- Take photos of your house's siding and sheathing construction before you start any attachment work
Roof slope matters more than most beginners expect. A minimum pitch of 1:12 (1 inch of rise for every 12 inches of run) is the bare minimum to drain water, and 2:12 or 3:12 is much better if you are using polycarbonate or metal panels. Flatter roofs collect debris and pool water, which eventually causes leaks even with good materials. If your ledger height and post height allow it, aim for at least 2:12.
Budget Materials List and Where to Save Real Money
Here is a realistic materials list for a 12x16 foot attached lean-to cover with four posts, pressure-treated framing, and twin-wall polycarbonate panels. Prices reflect 2026 mid-range retail from big-box stores. Local lumber yards sometimes beat these prices on large orders, so always get a quote.
| Item | Quantity | Est. Unit Cost | Est. Total |
|---|---|---|---|
| 4x4 PT posts, 8 ft | 4 | $18–$24 | $72–$96 |
| 2x8 PT rafters, 14 ft | 8 | $28–$36 | $224–$288 |
| 2x8 ledger board, 16 ft | 1 | $38–$50 | $38–$50 |
| 2x6 or 2x8 beam (front), 16 ft | 1 | $38–$50 | $38–$50 |
| 4x4 PT post bases (with anchor bolts) | 4 | $14–$20 | $56–$80 |
| Joist hanger hardware (per rafter) | 8 | $3–$5 | $24–$40 |
| Ledger lag screws (structural) | 14 | $2–$3 | $28–$42 |
| Twin-wall polycarbonate panels (26x96 in) | 8 | $45–$65 | $360–$520 |
| Polycarbonate closure strips and tape | 1 set | $30–$45 | $30–$45 |
| Aluminum drip edge and flashing | 30 linear ft | $1.50–$2.50/ft | $45–$75 |
| Concrete (tube form, 60 lb bags) | 8 | $8–$10 | $64–$80 |
| Exterior screws, caulk, misc hardware | 1 lot | $50–$80 | $50–$80 |
| TOTAL ESTIMATE | $1,029–$1,446 |
That range puts raw materials under $1,500 for a basic build if you shop carefully. Where does the budget creep? Roofing panel choice is the biggest one. Polycarbonate twin-wall is the sweet spot: it is lightweight, transmits diffused light, and costs about $2 to $3 per square foot at big-box stores. Corrugated metal panels are similarly priced and more durable but completely block light. Solid wood tongue-and-groove decking looks beautiful but adds $400 to $900 and requires a real roofing membrane over it. Avoid cheap single-layer corrugated polycarbonate panels (the wavy kind sold in packs), they yellow and crack within three to five years in direct sun.
Cost-saving swaps that actually work: Use 4x4 posts instead of 6x6 for spans under 8 feet. Buy pressure-treated lumber rated for ground contact (labeled .40 or UC4B) only for the posts that go into concrete; the rest of your framing can use above-ground rated lumber and save a few dollars per board. Check for lumber deals on slightly bowed boards for non-structural trim pieces. Use aluminum Z-flashing instead of custom-bent copper at the ledger, it performs identically for this application.
Structural Design: Posts, Beams, Spans, and Loads
A patio cover has to be designed to carry real loads, not just look stable. The IBC 2024 Appendix I requires that patio covers sustain dead loads (the weight of the structure itself) plus a minimum vertical live load of 10 pounds per square foot (psf), and that they resist applicable wind and seismic loads for your region. In snow country, your design snow load almost always controls instead of the 10 psf minimum, so check your local ground snow load (Pg) with your building department before finalizing rafter sizes.
For a 12x16 lean-to with posts spaced 8 feet apart, here are practical sizing guidelines that work in most low-to-moderate load zones:
| Member | Recommended Size | Notes |
|---|---|---|
| Posts | 4x4 minimum, 6x6 preferred over 10 ft tall | Set in concrete, ground-contact PT lumber |
| Ledger | 2x8 or match existing floor joist depth | Lag-bolted into rim joist or wall studs, not sheathing |
| Front beam | Two 2x8s sistered, or single 4x8 | Carries rafter ends at outer edge |
| Rafters | 2x6 at 24 in o.c. for spans up to 10 ft; 2x8 for 10–14 ft | Increase size or add intermediate beam in snow zones |
| Footings | 12-in diameter tube, 36–48 in deep in freeze zones | Check local frost depth requirement |
Wind uplift is a real concern that beginners often underestimate. Roof panels and rafters can be peeled off by wind if the connections are just nailed and not properly tied. Use Simpson Strong-Tie hurricane ties (H2.5A or equivalent) at every rafter-to-beam connection and proper joist hangers at the ledger. Their ZMAX-coated connectors are the right choice for pressure-treated lumber environments; standard G90 galvanized connectors can be used with certain PT wood treatments but check Simpson's current compatibility guidance because different wood preservatives (ACQ, CA, MCA) have different corrosion requirements.
Post footings are where most amateur builds fail eventually. A post base set in concrete with a standoff connector (like a Simpson ABA post base) keeps the wood post elevated above the concrete surface, which dramatically reduces rot. Never embed a wood post directly in concrete without a standoff if you can avoid it. Dig your footings below local frost depth, pour a 3-inch gravel drainage layer at the bottom, and set the anchor bolt while the concrete is still wet so it is perfectly positioned.
How to Build It: Step-by-Step for a Lean-To Patio Cover
This sequence assumes an attached lean-to cover on an existing concrete patio slab. Adjust footing placement if you are working on a wood deck or bare ground.
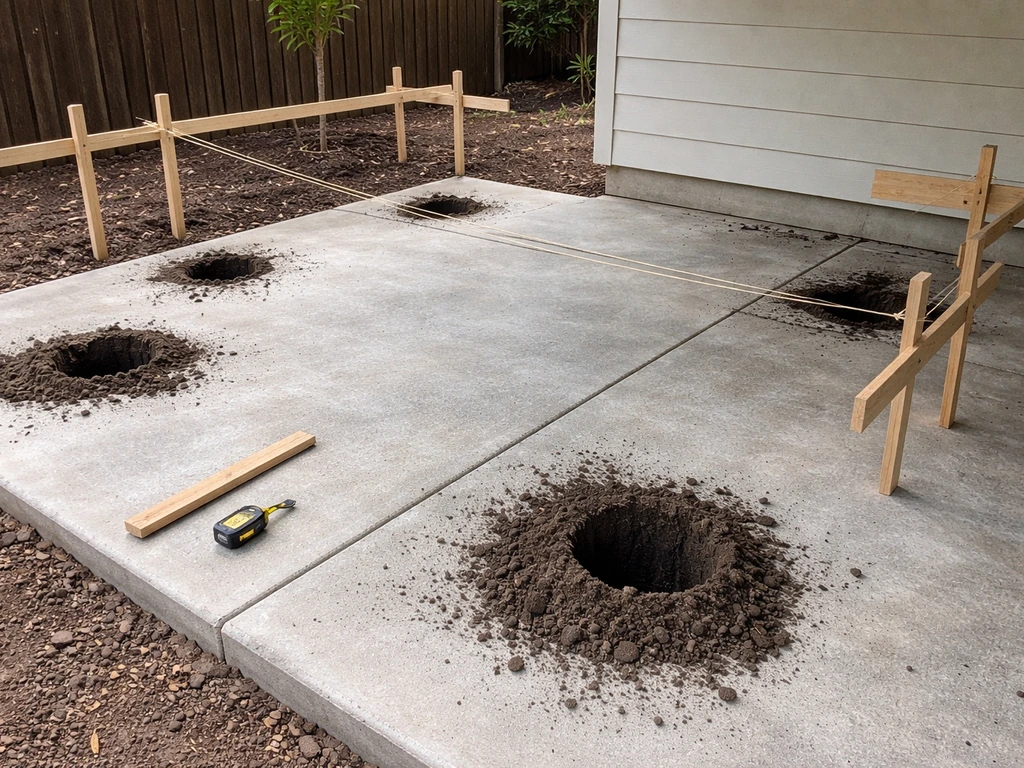
- Mark and dig footings: Lay out your post locations with batter boards and string lines. Dig footing holes to your local frost depth (typically 24 to 48 inches depending on climate). A rented power auger saves about two hours of hard work per hole.
- Pour footings and set anchors: Mix and pour concrete in tube forms. While still wet, press in your post base anchor bolts and verify they are plumb and in the correct position using your string lines. Let cure for 24 to 48 hours before loading them.
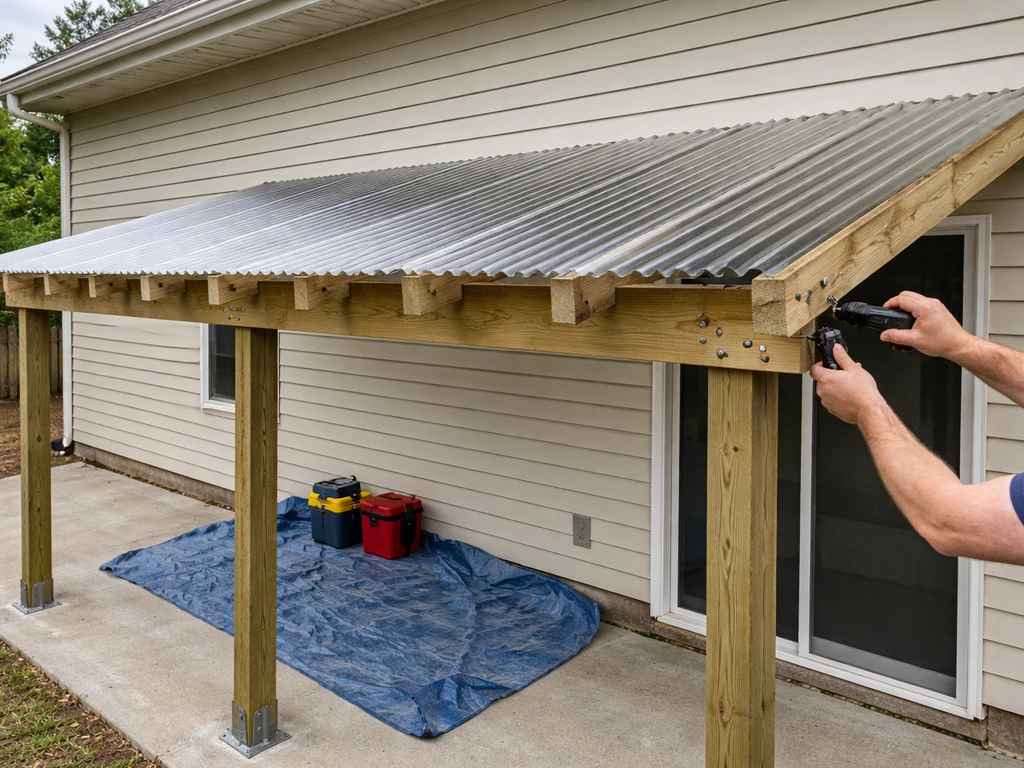
- Install the ledger board: This is the most structurally critical step. Find your wall studs or rim joist with a stud finder, snap a level chalk line at the correct height, and lag-bolt the ledger using 1/2-inch by 3-1/2-inch structural lag screws into studs every 16 inches or into the rim joist. Remove siding first so the ledger sits against the sheathing or directly on the rim board. Common mistake: people lag into just the siding and sheathing with no stud engagement, and the ledger pulls out under load.
- Install posts: Attach your post bases to the anchor bolts, set posts plumb using a level, and brace them temporarily with 2x4 stakes. Do not cut posts to final height yet.
- Install the front beam: With posts plumbed and braced, calculate your final post heights by measuring from the ledger height and accounting for your desired roof slope. Cut posts to height, then set and fasten the front beam on top using post cap hardware. Double-check that beam is level across its full length.
- Cut and install rafters: Calculate rafter length using your span and slope. Make a plumb cut at the ledger end and a tail cut at the overhang end. Install joist hangers on the ledger first, then set rafters into hangers and toe-nail or hurricane-tie them to the front beam. Space at 24 inches on center for most panel types.
- Install roofing panels: Polycarbonate twin-wall panels should run with the flutes (the internal channels) going from ridge to eave so condensation and water drain out the bottom. Seal the top (ridge) end of each panel with solid closure tape and the bottom (eave) end with vented closure tape. Pre-drill all screw holes slightly oversized to allow thermal expansion. Use neoprene-gasketed roofing screws, not standard wood screws.
- Install drip edge and trim: Apply aluminum drip edge at the eave and rake edges before or with the panels (confirm with your panel manufacturer's spec). Caulk all penetrations with a compatible sealant. Install fascia boards on the front beam and exposed rafter tails for a clean finish.
Attachment, Flashing, and Keeping Water Out
The ledger-to-house connection is where most patio cover leaks start. If you are specifically trying to learn how to build a patio cover attached to house, use the attachment and flashing steps below as your main guide. Water gets behind the ledger, saturates the sheathing, and eventually rots the rim joist or wall framing. Do this right and it will last 20 years. Do it wrong and you are dealing with rot repairs within five.
After the ledger is lag-bolted in place, install step flashing behind your siding above the ledger, then add a continuous piece of aluminum Z-flashing (also called drip-cap flashing) on top of the ledger with the upper leg tucked behind the siding and the lower leg sitting over the ledger face. The goal is to create a water-shedding path that directs any water that gets behind the siding down and over the ledger, not into the wall cavity. Seal the top of the Z-flashing to the siding with a bead of paintable exterior caulk, but do not seal the bottom edge or you trap water.
At the eave edge where your roof panels or rafters meet the open air, kick-out flashing prevents water from running down the rafter tails and along the siding instead of draining clear of the wall. This is especially important at the junction where the lean-to roof meets the house wall at its sides. It is a small piece of metal bent at about 110 degrees that kicks water outward off the roof. Roofing supply houses stock it in aluminum or copper; use aluminum to avoid galvanic corrosion with your other metal components.
For drainage on the finished roof, confirm that your slope creates positive drainage toward the outer edge and that your front fascia and drip edge direct water away from the house foundation. If your patio is enclosed on sides, plan for a gutter on the front beam to manage concentrated runoff. A 10x16 roof in a moderate rainfall area can dump 100 gallons of water in a single inch of rain, and all of it needs somewhere to go that is not your footings.
What often goes wrong here: people install the ledger on top of existing siding rather than cutting the siding back and going behind it. That creates a gap that traps water and provides no real flashing path. Always cut the siding back at least 1 inch above the ledger and install step or counter flashing into that gap.
Tools, Timeline, and When to Call a Pro
Tools You Will Need
- Circular saw and miter saw (for rafter angle cuts)
- Drill/driver with long bit for lag screws
- Impact driver for structural screws
- Level (4-foot and torpedo levels)
- Post-hole digger or rented power auger
- String lines, batter boards, and stakes for layout
- Chalk line and tape measure
- Tin snips for flashing cuts
- Safety glasses, gloves, and hearing protection
- Ladder rated for your working height
Realistic Timeline
For a two-person team with basic carpentry experience, a 12x16 lean-to cover typically breaks down like this: permit application and approval (1 to 3 weeks, varies by jurisdiction), layout and footing work (half day), concrete cure (1 to 2 days waiting, no work time), framing and ledger installation (1 full day), roofing and flashing (1 full day), trim and cleanup (half day). Total hands-on work time is about two and a half to three days spread over a week or two. If you are doing this solo and learning as you go, budget four to five build days.
When to Hire a Pro or an Inspector
There are specific moments in this build where professional input is worth every dollar. If your jurisdiction requires engineered drawings, do not try to fake it with a hand sketch. A structural engineer's stamp costs $300 to $800 and protects you legally and structurally. If you are unsure about your wall's framing construction (some homes have unusual sheathing, ICF walls, or steel studs), have a contractor look before you start drilling. If you are in a high-wind zone (coastal areas or tornado-prone regions), connection engineering matters more than the span tables suggest, and a local pro who knows the regional code will catch things general guides miss.
Also hire out the electrical work if you want lights or a ceiling fan. Running a new circuit to an outdoor covered structure requires a licensed electrician in most areas and is not a DIY shortcut worth taking. Budget $400 to $900 for a simple outdoor circuit with one or two boxes.
Maintenance That Keeps a Budget Build Standing for 20 Years
A lean-to cover built with pressure-treated lumber and proper hardware should last 20 to 30 years with basic maintenance. What kills these structures early is neglect at predictable failure points: the ledger flashing, the post bases, and the roofing panel fasteners.
Every spring and after any significant storm, walk the cover and check these things specifically: look for any gap or separation at the Z-flashing above the ledger and re-caulk if the sealant has cracked or peeled. Check each post base for standing water or discoloration around the post base connector, which signals trapped moisture. Inspect every roofing panel fastener for backing out or missing gaskets, and replace any that are not seated flush. Tap each polycarbonate panel near an edge; a hollow sound near the closure tape means the tape seal has failed and water is infiltrating the flutes.
For polycarbonate panels specifically: clean them with mild soap and water using a soft cloth, never abrasive pads or solvents. The UV-inhibiting coating is on the outer surface and scratching or chemically damaging it causes yellowing and brittleness within a few seasons. Most twin-wall polycarbonate panels carry a 10-year UV warranty if properly maintained.
For wood framing: apply a penetrating exterior wood sealer to any unfinished cut ends annually for the first two years. After that, inspect all structural connector hardware (joist hangers, post caps, hurricane ties) for surface rust. A small amount of surface oxidation on galvanized connectors is cosmetic; active red rust flaking off the base metal means you need to replace that connector before it loses load capacity. Catching one bad connector early costs about five dollars and 20 minutes. Ignoring it can mean a failed beam connection.
If you are in a snow-load region, check the roof mid-winter when you get a significant accumulation. More than 2 to 3 inches of wet, heavy snow on a 10 psf-designed cover starts to push limits. Clear it with a soft roof rake from the ground rather than climbing on the panels. This is the same logic that FEMA snow-load safety guidance emphasizes for any low-slope residential roof: staying off the structure during loading conditions and monitoring for any signs of deflection or unusual sounds under load.
The cheapest patio cover is the one you maintain. An hour of inspection and a few dollars of caulk and touch-up sealer every spring is the difference between a structure that looks good at year 20 and one that needs to be torn down at year 8. Build it right, flash it properly, and check it every season, and your DIY budget cover will outlast a lot of professionally installed ones that skipped the details.
FAQ
What is the absolute cheapest way to build a patio cover while still keeping it weatherproof?
Use the attached lean-to layout, keep the roof pitch at least 2:12, and choose twin-wall polycarbonate or similarly priced roof panels. The biggest “cheap but functional” win is spending on correct flashing at the ledger and proper drainage, because that protects the house connection from rot, which is where the expensive failures happen.
Can I build a patio cover directly over an existing patio slab, or do I need to add footings even on concrete?
You still need footings for the posts. A concrete patio slab does not replace structural post supports because the loads transfer down through the posts. Place the post bases on concrete and set the anchor bolts correctly, but drive new footings below frost depth when your local code requires it.
How do I decide my post spacing if I want to avoid custom lumber sizes and extra cuts?
Start with the span your rafter/beam sizes can handle (and your local load requirements), then keep post spacing at or below 8 feet for typical DIY-grade framing. If you can’t maintain 8 feet, expect to upsize members or add a beam, which can erase the savings from a “cheap” build.
Is it okay to install the ledger on top of siding to save time?
Usually not. Installing on top of siding creates a gap that traps water and prevents an effective flashing path. Cut the siding back at least about 1 inch above the ledger and install step or counter flashing into that opening so water sheds over the ledger instead of behind it.
Do I need gutters on a cheap patio cover?
Often no for the covered area itself, but you may need one if the roof is close to a wall and runoff concentrates in one spot, or if your patio is enclosed on sides. A simple check is after a hard rain, confirm downspouts and the front edge drip direct water away from footings and foundation, and add a gutter if you see pooling or a fast stream aimed at the posts.
What roof slope should I target if I’m using polycarbonate panels?
Aim for 2:12 if your ledger and post heights allow it. 1:12 drains, but it’s more likely to trap debris and increase the chance of leaks over time, especially where wind-driven rain blows toward the house.
Can I use cheaper single-layer corrugated polycarbonate to lower costs further?
It’s a risky cost-cut. Single-layer wavy polycarbonate tends to yellow and become brittle faster in strong sun. Twin-wall panels last longer and add stiffness, and they usually cost only slightly more per square foot once you factor in fewer replacements.
How do I keep wind from peeling off roof panels or rafters?
Use proper connectors, not just nails. Install hurricane ties (or equivalent) at rafter-to-beam connections, use joist hangers where required at the ledger, and ensure the panel fasteners and gaskets are correct for your panel type. In high-wind areas, also plan for more robust connection design than span tables alone.
What’s the most common mistake that makes patio covers rot prematurely?
Bad ledger flashing and sloppy house connection sealing. The cover might look fine for a year, but water finds the path behind the ledger, saturates sheathing, and then causes rim joist or wall framing damage. Correct step flashing plus a drip-cap style Z-flashing, with the bottom left unsealed, is a key prevention detail.
How should I set post footings if I’m working on a deck instead of concrete?
Do not assume the deck structure can carry the patio cover posts. Footing design may require freestanding posts with new concrete foundations or a code-approved ledger approach. Confirm the load path with your permitting office, and adjust footing placement because deck framing and deck surface drainage are not the same as a slab-supported base.
Do I need an engineer-stamped plan for every patio cover?
Not everywhere, but many jurisdictions require engineered drawings for attached structures once size or design details exceed prescriptive limits. Your building department may offer a prescriptive path under a threshold area (often around 200 square feet), but the only reliable answer is what your local code allows for your specific dimensions and roof system.
Can I add electrical outlets, lights, or a ceiling fan myself to save money?
Most places require a licensed electrician for new exterior circuits, especially if you’re adding a fan or running cable through exterior-rated systems. If you want to save money without taking risks, you can pre-plan the wiring route and box placement, then have the electrician handle the final connections and weatherproofing.
What maintenance checks matter most, and how often should I do them?
Check at least in spring and after major storms. Focus on ledger flashing integrity (re-caulk if seals fail), post bases for trapped moisture or discoloration, and roofing panel fasteners for backing out or missing gaskets. For polycarbonate, confirm the closure tape at edges still seals properly by tapping the panel near closures.
How do I clean twin-wall polycarbonate without damaging the UV coating?
Use mild soap and water with a soft cloth. Avoid abrasive pads, solvents, and harsh cleaners because the UV protection is on the outside surface, and damaging it speeds up yellowing and brittleness.