Adding a patio cover is a realistic DIY project for most homeowners, but it requires real planning before you touch a single board or post. The core workflow goes like this: pick your cover style and attachment method, pull the permit, buy materials, frame the structure, attach it safely to the house or set footings for a freestanding version, then finish with roofing panels, flashing, and drainage. Done right, you end up with a watertight, structurally safe shade structure that can last decades. Skip the planning steps, and you end up with leaks, code violations, or worse.
How to Add a Patio Cover: DIY Steps, Materials, and Cost

Celia Vaughn
6 Jun 2026
Decide your patio cover type and attachment method

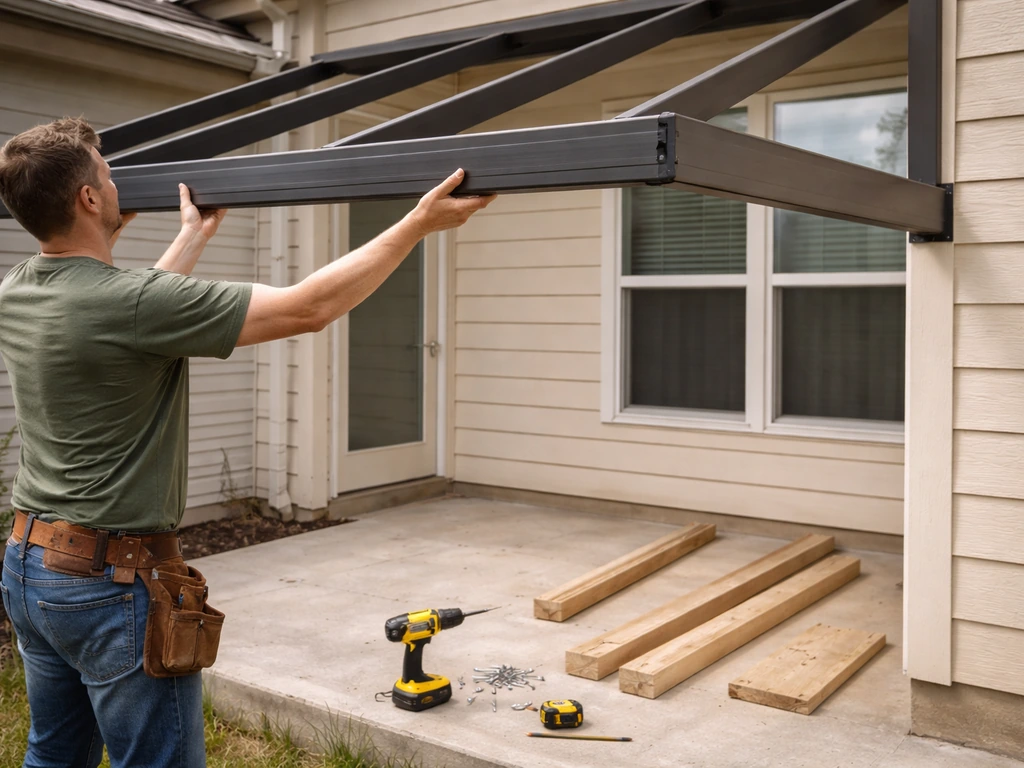
Before you buy anything, nail down what type of cover you're building. This single decision drives your material list, permit requirements, footing needs, and complexity level. The most common options are an attached lean-to (one side fastened to the house, the other supported by posts), a freestanding structure (posts on all corners, no house connection), and a gable roof (two slopes meeting at a ridge). For most DIYers, an attached lean-to is the sweet spot: simpler framing, fewer posts, and you skip one pair of footings entirely because the house carries that load.
Attachment method matters almost as much as cover style. The most common approach for an attached cover is a ledger board: a horizontal piece of dimensional lumber (or aluminum extrusion for kit systems) bolted directly into the house's rim joist or wall framing. Some aluminum kit manufacturers like Try-Tech also offer a roof-top attachment, where the ledger connects up under the existing roof eaves rather than to the wall. Try-Tech's example non-insulated patio cover instructions include an installation step for attaching a ledger board to the house framing using 1/4" × 4" lag screws, using their marked layout ledger connects up under the existing roof eaves rather than to the wall. Freestanding covers skip all of this and rely entirely on post footings for support. If you're planning an attached cover, know that your siding type will dictate exactly how the ledger goes up, because you handle stucco, lap siding, and wood differently when it comes to flashing and fastening.
| Cover Type | Attachment Method | Complexity | Best For |
|---|---|---|---|
| Attached lean-to | Ledger to house wall or roof | Low-Medium | Most DIYers, cost efficiency |
| Freestanding | Post footings only | Medium | No wall access, detached patios |
| Gable roof (attached) | Ledger + ridge beam + rafters | Medium-High | Larger spans, aesthetic priority |
| Pergola/lattice cover | Ledger or freestanding | Low | Partial shade, minimal budget |
Measure, plan your layout, and check permits and building codes
Measure your patio space carefully before anything else. Sketch the footprint to scale, including the house wall, any existing concrete slab, and where posts will land. You need the width (parallel to the house), the projection (how far it extends out from the house), and your ceiling height at the house wall and at the outer posts. These three numbers feed every calculation that follows: beam sizing, rafter span, post height, and required footing depth.
On permits: do not skip this step. Most jurisdictions require a building permit for any patio cover attached to the house, regardless of size. Detached structures often have a size threshold. For example, the City of Morgan Hill, CA requires a permit for any cover exceeding 120 square feet or attached to the house. Even where a permit technically isn't required, code compliance still is, as Chula Vista, CA makes explicit in their code language. Chula Vista also clarifies that if a permit is not required, the patio cover must still comply with applicable building codes code compliance still is. When you pull a permit, expect to submit framing plans showing dimensions, species, member sizes, and spacing for footings, posts, beams, and rafters, along with a ledger attachment detail and your roof covering type. Douglas County, CO is a good example of a typical submittal requirement list. Check your own local building division's website first, and call them if anything is unclear.
Load requirements are set by code and non-negotiable. The 2024 IRC (Appendix BF) and IBC (Appendix I) both require patio covers to support all dead loads plus a minimum live load of 10 psf (pounds per square foot). If you're in a snow climate, your design snow load likely controls instead and will be higher than 10 psf. The code is clear: design for whichever is greater, live load or snow load. Your local building department will tell you the ground snow load for your area. Wind and seismic loads also apply under the IBC, so if you're in a high-wind or seismic zone, your framing plan needs to account for those too.
Choose your materials: wood vs. aluminum vs. metal
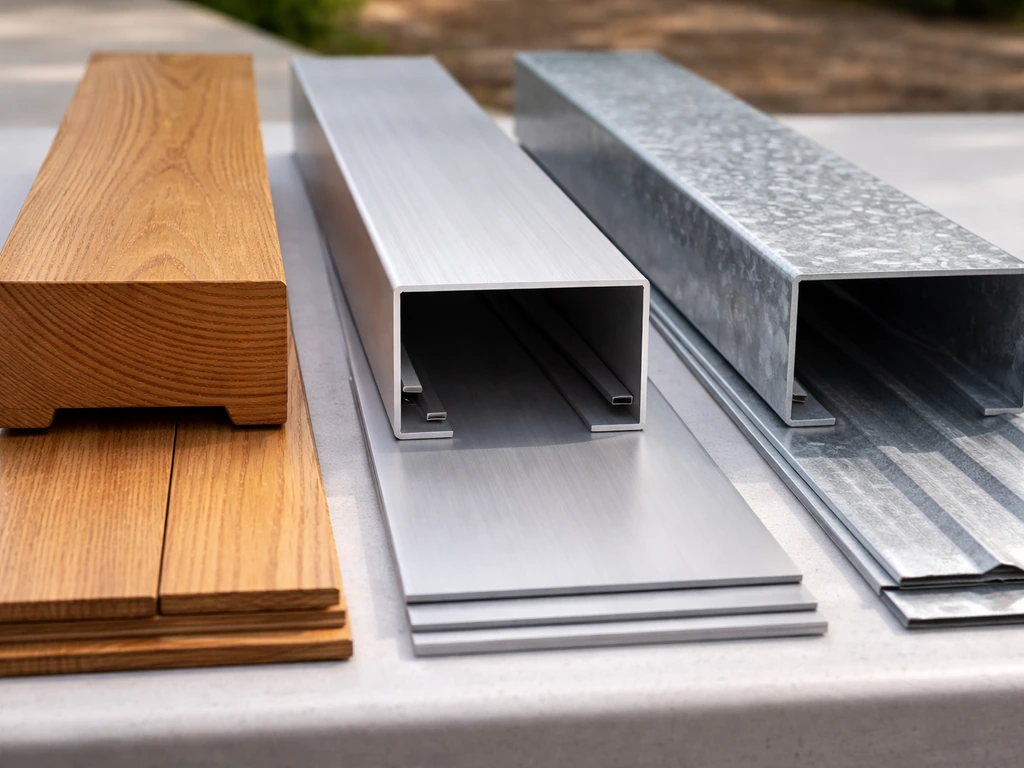
The two main structural material paths are wood framing and aluminum kit systems. Both work well. The right choice depends on your budget, your skill set, your aesthetic preference, and how much long-term maintenance you're willing to do.
| Material | Upfront Cost | Maintenance | DIY Friendliness | Longevity | Best For |
|---|---|---|---|---|---|
| Pressure-treated wood | Low-Medium | Moderate (staining, sealing) | High (familiar tools) | 15-25+ years | Custom sizing, traditional look |
| Cedar/redwood | Medium-High | Moderate | High | 20-30+ years | Aesthetics, natural rot resistance |
| Aluminum kit system | Medium | Very low | Medium (kit instructions) | 30-40+ years | Low maintenance, modern look |
| Steel/metal framing | Medium-High | Low (if coated) | Low (welding often needed) | 30+ years | Long spans, commercial feel |
Wood is forgiving if you're new to framing because you cut it with familiar tools and fasten with common hardware. Pressure-treated lumber is the go-to for posts and ledgers because it resists ground contact and moisture. Use cedar or redwood for exposed rafters if you want a cleaner look. The downside is ongoing maintenance: wood needs periodic sealing or staining to stay sharp and structurally sound.
Aluminum kit systems like Alumawood come as pre-engineered panels and extrusions that snap or screw together. They're genuinely low-maintenance once installed. The catch is that dissimilar metal contact matters: if aluminum touches raw steel fasteners in a wet environment, you can get accelerated corrosion. Use stainless steel (300 series), hot-dip galvanized, or cadmium-coated fasteners when working with aluminum components. This is spelled out in product evaluation reports and reinforced by the Aluminum Association's own design guidance.
For roofing panels on a solid-roof cover, your main options are aluminum or steel corrugated/ribbed panels, polycarbonate panels (let light through), or a built-up surface using plywood sheathing with asphalt shingles or TPO membrane. Polycarbonate works well for partial-light applications and is easy to cut and fasten. For a fully opaque, weathertight roof, ribbed metal panels or shingle-over-sheathing are your most durable choices.
Prepare the site and build your material and tool list
Site prep means clearing the patio area, marking post locations with stakes and string, checking for square using the 3-4-5 triangle method, and calling 811 to have underground utilities located before you dig any footings. If you're building on an existing concrete slab, post bases anchor directly into the concrete with wedge anchors or post-base hardware, no digging required. If you're setting posts in ground, check your local frost depth and dig accordingly so footings don't heave in winter.
Tools you'll need
- Tape measure, chalk line, and speed square
- Level (4-foot minimum) and string line with line level
- Post hole digger or rented power auger for in-ground footings
- Circular saw and miter saw (for wood) or metal-cutting blade/snips (for aluminum panels)
- Drill/driver with #2 Phillips and square bits
- Impact driver (strongly recommended for lag screws)
- Caulk gun and tube of exterior polyurethane or silicone caulk
- Ladder (6-foot and extension) rated for your weight plus tools
- Safety glasses, gloves, and hearing protection
Core material list (attached lean-to, wood framing)
- Ledger board: pressure-treated 2x8 or 2x10 (match your rafter depth), length = cover width
- Posts: 4x4 or 6x6 pressure-treated, quantity and height per your layout
- Beam: doubled 2x8 or 2x10 (or LVL for longer spans) across the outer post tops
- Rafters: 2x6 or 2x8 at 16" or 24" on center, spanning ledger to beam
- Hardware: structural post bases, post caps, joist hangers, rafter ties, hurricane ties
- Lag screws: 1/4" x 4" minimum for ledger attachment to house framing (or per your plan)
- Z-flashing and ice-and-water shield membrane for ledger waterproofing
- Roofing panels or sheathing plus underlayment/roofing material
- Concrete for footings (if setting posts in ground)
- Exterior caulk and paint/stain as needed
Step-by-step build: framing, attachment, and waterproofing
Work through the build in this sequence. Skipping steps or working out of order is the most common source of problems on DIY patio cover projects.
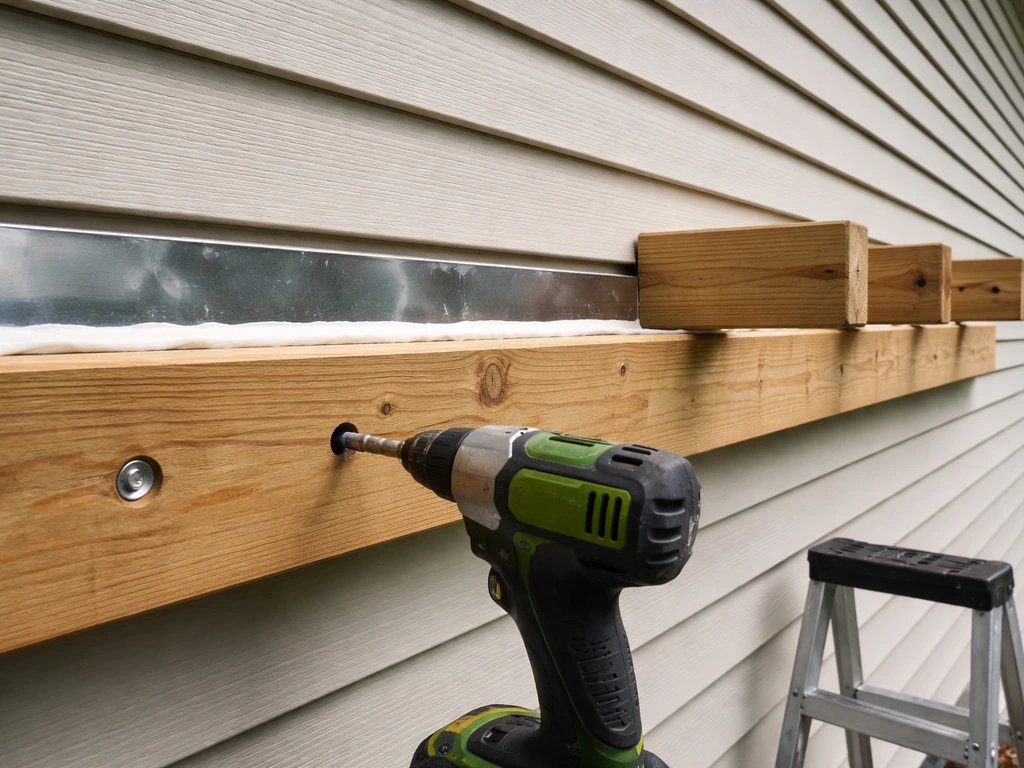
- Locate the ledger height on the house wall. The ledger top typically sits about 1.5 inches below the finished ceiling height you want inside the cover, accounting for the ledger board depth. Mark a level line across the wall at that height.
- Remove or cut back siding along the ledger line. You need to fasten the ledger into the house's rim joist or wall studs through the sheathing, not just into siding. Use a stud finder to locate framing behind the wall.
- Install the waterproofing membrane behind the ledger location. Stick a self-adhering ice-and-water shield membrane to the sheathing, extending it several inches above where the ledger will sit. This goes on before the ledger goes up, not after.
- Mount the ledger board using 1/4" x 4" lag screws (minimum) driven through the ledger and sheathing into solid house framing at each stud location. Pre-drill to avoid splitting. Two lags per stud, staggered, is standard. Tighten fully.
- Install Z-flashing over the top of the ledger, tucking the top leg up behind the siding above. The flashing should extend across the full ledger length and lap down over the ledger face. This is the line of defense that keeps water from running behind the ledger and into your wall.
- Set your post locations on the outer edge of the patio. If on a slab, drill for wedge anchors and mount post bases. If in ground, pour concrete footings to frost depth, set J-bolts, and let cure 24-48 hours before setting posts.
- Cut posts to height and set them in post bases, plumbing them in both directions with a level. Brace temporarily with 2x4 diagonal braces nailed to stakes in the ground.
- Install the outer beam across the post tops, secured with post caps. For spans over 10 feet, use an LVL or doubled 2x10 minimum rather than single-member lumber.
- Cut and hang rafters from ledger to beam using joist hangers at the ledger end and rafter ties or toe-nailing at the beam end. Maintain consistent spacing (16" or 24" on center, per your plan). Add hurricane ties if you're in a wind-prone area.
- Check the entire frame for square and level before any roofing goes on. Diagonal measurements corner-to-corner should match. Adjust post bracing as needed, then make all fasteners final.
Roof pitch is critical for drainage. A minimum slope of 1/4 inch per foot (1/4:12) is the floor for low-slope patio roofing, and that holds whether you're using metal panels, polycarbonate, or a membrane system. Below that pitch, water pools and you get leaks. Set your ledger height and outer beam height to produce at least that slope across the full projection. If you're covering a wide patio (12 feet or more of projection), bump the slope up to 1/2" per foot to be safe.
Roofing panels, finishing, optional add-ons, and maintenance
Once framing is done and inspected (if required by your permit), put the roof on. For corrugated metal or aluminum ribbed panels, run them perpendicular to the rafters starting at the low end (outer edge) and lapping each panel uphill over the previous one by at least one full rib. Use roofing screws with neoprene washers, driven through the high points of the ribs, not the valleys, to avoid leak points. Seal the ridge and any wall interface with a compatible foam closure strip under the top panels, then cap with metal ridge trim and caulk the seams.
If you're putting down sheathing and shingles, nail 1/2" plywood to the rafter tops, then run synthetic underlayment from low to high (each row lapping 4" over the one below), then lay shingles per the manufacturer's pattern. At the house wall, install step flashing: individual L-shaped pieces interwoven with each shingle course, running up the wall and lapped by the next course above. Then add a continuous counter-flashing over the step flashing tucked into a saw cut in the siding or masonry. This layered approach is the only reliable way to keep that wall-to-roof junction watertight long-term.
Drainage matters at the outer edge too. If your patio cover has a solid roof, the outer beam edge needs to shed water away from the patio. A simple aluminum drip edge or gutter along the outer beam does the job. A 4-inch K-style gutter with one downspout per 20 feet of run handles typical rain loads. Slope the gutter 1/8" to 1/4" per foot toward the downspout. Secure the downspout to route water at least 6 feet away from the house foundation.
Optional add-ons worth considering
- Ceiling fans: rough in a junction box rated for ceiling fan use in the center rafter bay before decking the ceiling; add a 20-amp circuit from the panel
- LED recessed lighting: plan wiring runs before installing any ceiling material
- Shade screens or drop curtains: attach to outer beam using track hardware for flexible sun/privacy control
- Gutters with leaf guards: reduces cleaning cycles in wooded yards
- Decorative fascia board along the outer beam face: improves curb appeal and hides the beam-gutter interface
Maintenance: what to do and when
- Inspect ledger flashing annually: look for lifted edges, gaps, or caulk cracks, and re-seal immediately
- Clean gutters twice a year (spring and fall) to prevent overflow that saturates the ledger area
- Re-stain or re-seal wood components every 2-3 years depending on sun and moisture exposure
- Check all hardware (post bases, joist hangers, lag screws) every 3-5 years for corrosion or loosening
- Inspect roof panel screws annually: neoprene washers compress over time and may need retightening or replacement after 5-7 years
Safety, structural red flags, common mistakes, and when to call a pro
The biggest structural mistake homeowners make is undersizing the beam. A doubled 2x8 might look beefy, but on a 16-foot span with 12 feet of rafter projection and a 30 psf snow load, it's nowhere near adequate. Always size your beam using a span table or structural calculator, not guesswork. If your span tables are confusing, this is exactly the moment to consult a structural engineer. It typically costs $200-500 for a simple review and it's the cheapest insurance you can buy on a project like this.
Common mistakes that cause real problems after the fact: not installing ledger flashing properly (leads to rot inside the house wall, which you won't discover until it's expensive), setting posts without adequate footings for your frost depth (posts heave and the whole structure goes out of level), skipping hurricane ties in wind-prone areas (rafters can lift off the beam in high winds), and using the wrong fasteners with aluminum (raw steel screws and aluminum in a wet environment corrode and seize within a few years).
Safety on the job: work with a partner whenever you're lifting beams or rafters into place. A doubled 2x10 beam at 12 feet long weighs roughly 40-50 pounds, and positioning it accurately at height while alone is genuinely dangerous. Use a proper ladder rated for your weight, keep three points of contact, and never lean a ladder against a rafter you haven't secured yet. If your cover is more than 10 feet off the ground, consider renting scaffolding for the roofing phase.
Know when to stop and call a professional. Hire an engineer or licensed contractor if: you're in a high seismic or wind zone and don't have stamped plans, your beam spans exceed 14-16 feet and you can't get a clear span table answer, your ledger must attach to a masonry or concrete wall (specialized anchor systems required), or your jurisdiction requires a permit with inspections and you're not confident in your framing plan. Electrical work for fans and lighting should be done by a licensed electrician unless you're in a jurisdiction that permits homeowner electrical work and you're comfortable with the code. The structural framing itself is DIY-friendly for most people with basic carpentry experience. The ledger-to-house connection and waterproofing are where the detail work really matters, so slow down on those steps.
If this is your first time building an attached structure, it's worth knowing that a simpler version of this project is covered in more depth in guides focused specifically on building a patio cover attached to the house and on building an outdoor covered patio from scratch. Those walkthroughs can help you zero in on your specific situation, whether that's an attached versus freestanding structure or building on a tighter budget. If you want a cheaper patio cover, focus on the simpler attached layout, choose more affordable materials, and buy only what you need after your measurements are set. The full planning-to-install workflow above gives you the complete picture, but your actual build will always be shaped by your specific site, climate zone, and local code requirements.
FAQ
Can I add a patio cover without attaching it to the house, and still avoid permits in my area?
You may reduce some ledger-specific issues, but you should not assume no permits. Many jurisdictions treat detached covers as structures too, especially above a square-foot threshold. Confirm both attachment type and size, because the permitting trigger often changes based on whether the cover is attached and how much it projects.
What happens if my yard has poor drainage or a slight slope under the patio?
Water pooling around post bases and footings can undermine stability over time. Grade the area so runoff moves away from the footing line, then keep the gutter and downspout routing aimed away from the foundation and any areas where soil will stay saturated.
How do I choose between polycarbonate and metal roofing if I want privacy and weather protection?
Polycarbonate can look bright and let in light, even when you choose tinted sheets. If you want true privacy and minimal glare, opt for opaque ribbed metal or shingles over sheathing. Also confirm the panel thickness and fastener spacing, because underspec spacing can lead to cracking in hail or thermal expansion gaps.
Do I need plywood sheathing under shingles, or can I nail shingles directly to rafters?
For typical shingle systems, you generally need a nailable sheathing layer for nail support and a consistent substrate. Skipping sheathing can cause patchy nail seating and faster leaks. If you are using asphalt shingles, follow the shingle manufacturer’s nailing requirements and minimum deck spec.
How far apart should posts be, and what determines that spacing?
Spacing is driven by your beam sizes, rafter span, and the loads your design must resist (live load, snow load, wind). Increasing post spacing forces larger beams and often larger or deeper footings. If you use span tables, verify the controlling load case in your local area, not just the bare span length.
What is the most common ledger flashing setup mistake on attached patio covers?
A frequent problem is treating flashing as a single piece rather than a layered system that directs water outward and up. If flashing is not integrated so each shingle or water layer overlaps correctly, water can travel behind siding and rot the structure. Plan for a continuous counter-flashing detail where the ledger meets the wall.
If my cover is within a few feet of a power line or service mast, can I build it myself?
You should treat overhead utilities as a hard stop for DIY planning. Contact your utility provider to verify clearance requirements and whether temporary shutoff or rerouting is needed. Never position posts, ladders, or long beams in a way that could come within the utility’s clearance distance.
Can I use the existing house rim joist for the ledger if I do not know if it is structural?
Do not assume rim joist framing can take patio cover loads. If the rim area is damaged, rotted, or only partially structural, you can create a hidden failure point. In uncertain cases, open up behind siding enough to confirm framing members, or get an engineered detail for where the ledger actually bears on structural lumber or a properly anchored system.
What should I do about thermal movement and expansion gaps with aluminum kit systems?
Allow space for expansion and contraction, especially at rigid wall interfaces and where panels join. Using the wrong gap widths or over-tightening fasteners can cause buckling or stress on connections during hot and cold cycles. Follow the kit’s panel and fastener spacing guidance, and avoid sealing every joint in a way that traps movement.
Should I seal all seams and fastener penetrations on a metal roof?
Not every joint should be permanently sealed, and over-sealing can trap water or make future panel replacement harder. Use sealants only where the system specifies (for example ridge closures and specific overlaps), and rely on correct lap orientation, proper screws with neoprene washers, and correct fastener placement for the waterproofing.
When do I need an engineer or stamped plans for a DIY patio cover?
Consider professional input if you have long spans that do not cleanly match common span tables, the ledger must attach to masonry or concrete, or you are in a high wind or seismic jurisdiction without local prescriptive allowances. Also get help if you cannot clearly identify the structural connection points on the house, because ledger detailing is a high-risk failure location.
What’s the safest way to stage materials and measurements before digging footings?
Do all layout and verification before you dig, including marking post locations, checking the patio remains square using a 3-4-5 method, and confirming your projection and ceiling heights match the roof slope requirement. Calling 811 should happen before excavation, and you should re-check the string line after utilities are located to prevent rework.