Adding a covered patio to your house is a straightforward project for most DIYers, but it has a few non-negotiable steps: pick the right style for your space, pull a permit, attach the ledger board correctly with flashing, size your rafters for the load, and slope the roof so water runs away from the house. Do those things right and you'll have a solid structure that passes inspection and lasts decades. Skip them and you'll end up with a leaky, wobbly roof that may have to come down. This guide walks you through every stage, from the first planning decision to the final coat of paint.
How to Add a Covered Patio to Your House Step by Step

Celia Vaughn
27 May 2026

Decide what patio cover style fits your space
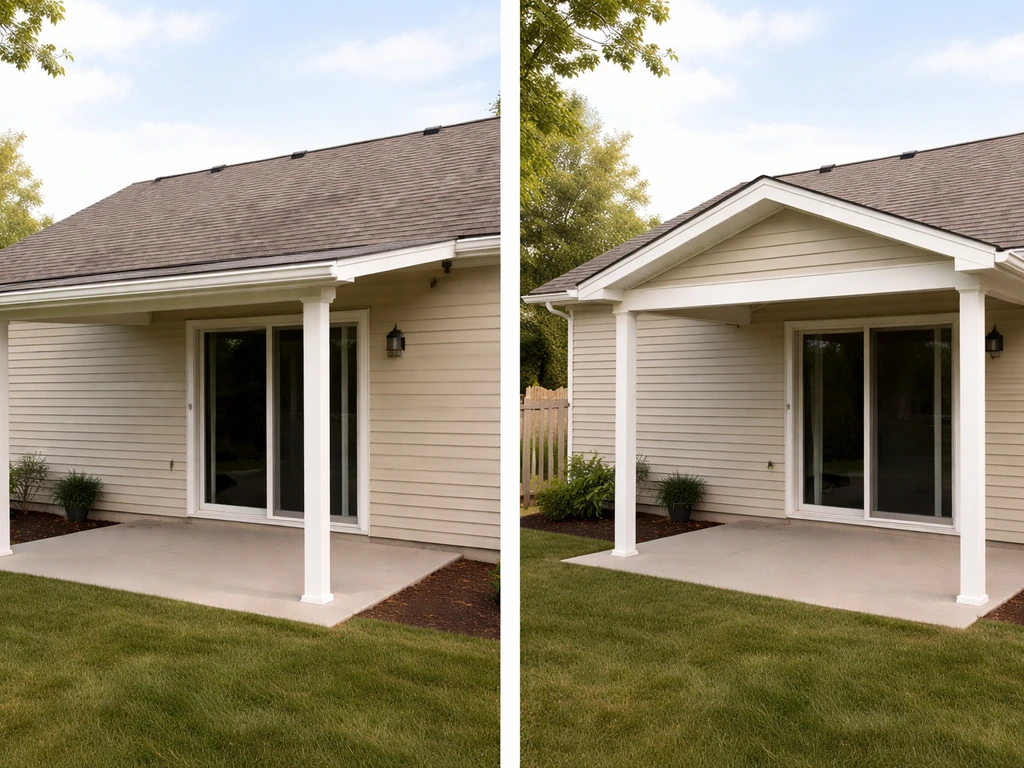
For most homeowners attaching a cover to the back of a house, the choice comes down to two styles: a lean-to (single-slope, also called shed-style) or a gable. A lean-to is simpler to build, faster to permit, and cheaper on materials. The roof pitches in one direction away from the house, which makes drainage obvious and framing clean. A gable roof has a ridge in the middle and two slopes pitching outward, which looks more like a permanent room addition, handles larger spans better, and creates more headroom at the center. It's also more complex to frame and typically costs more.
A lean-to makes sense if your patio is 12 to 14 feet deep or less, your house wall is tall enough to give you usable headroom after the slope, and you want to build it yourself in a weekend. A gable makes sense if the patio is wide and deep, you want it to look architecturally matched to the house, or you need interior headroom across the full span. Both styles can be built in wood, aluminum, or steel. If this is your first patio cover build, start with the lean-to. You can always add a gable to a future detached structure once you've got the basics down.
Check permits, zoning, HOA rules, and utility and structural constraints
Before you touch a shovel, spend one afternoon on research. This step saves you from tearing out work later.
Permits and building code
Any attached patio cover in the US almost certainly requires a building permit. The 2018 International Building Code Appendix I (the section specifically written for patio covers) requires them to be designed for dead loads plus a minimum vertical live load of 10 psf, and to resist wind and seismic loads for your area. The structure is limited to one story and a maximum height of 12 feet. Most jurisdictions have adopted this or a very similar standard. When you go to the permit counter (or the city's online portal), you'll typically need a site plan showing setbacks, a framing plan with member sizes, and sometimes basic load calculations showing your design meets the 10 psf live load minimum and the local wind speed requirement. Some jurisdictions accept an engineer-stamped kit packet if you're using a manufactured aluminum cover system.
Zoning and setbacks
Call or visit your local planning department and ask for the setback requirements for a covered patio structure. Setbacks vary widely: in some areas you need 5 feet from the property line, in others it's 3 feet, and in some zones it's zero if the structure is open on the sides. Confirm whether your lot has any easements that would affect placement. If you're in an HOA, check the CC&Rs for rules about patio covers, approved materials, colors, and required approval processes before you do anything else.
Utilities and structural constraints
Call 811 (the national dig-safe line) before any post footings go in the ground. Buried gas, water, and electrical lines can be shallower than you'd expect. On the house side, locate the wall framing, rim joist, and any existing utilities in the wall before you plan your ledger attachment. Use a stud finder and, if needed, a small inspection hole to confirm what's behind the siding. If the wall has a large window or door opening where you planned the ledger, you may need to shift the attachment point or consult a framer.
Measure, plan your layout, and choose your materials
Getting the measurements right
Measure the width of your house wall where the cover will attach. Then measure out from the house to where you want the outer edge of the cover to land. Common patio depths run 10 to 16 feet. Note any obstacles: HVAC condensers, hose bibs, gas meters, or existing concrete that will affect post placement. Sketch a top-down plan to scale on graph paper (or use a free tool like SketchUp). Mark post locations, the ledger line on the house, beam locations, and rafter direction. You'll need this plan for your permit application anyway.
Choosing between wood, aluminum, and steel

Each material has a real trade-off. Here's a straight comparison so you can pick based on your situation:
| Material | Cost (relative) | DIY difficulty | Maintenance | Best for |
|---|---|---|---|---|
| Pressure-treated wood | Low to moderate | Easy to moderate | Stain/seal every 2-3 years | Budget builds, easy local sourcing, classic look |
| Aluminum (Alumawood style) | Moderate | Easy with kit systems | Very low (wash occasionally) | Low-maintenance, HOA-friendly, corrosion-free |
| Steel/metal | Moderate to high | Moderate to hard | Paint touch-up, rust prevention | Long spans, commercial-grade durability |
| Cedar or redwood | Moderate to high | Easy to moderate | Oil/seal every 1-2 years | Aesthetics, natural resistance to rot |
For most DIY homeowners, pressure-treated lumber is the easiest starting point because you can source it at any home center, cut it with standard tools, and find plenty of local framing help if you get stuck. Aluminum kit systems (sold by the panel and beam foot) are excellent if you want a cleaner finished look with almost no upkeep. Steel is harder to work with unless you have welding or metal fabrication experience. Whatever you choose, buy material rated for exterior/outdoor exposure and confirm it meets your local code for the application.
Design the roof system: slope, drainage, wind and uplift, and attachment plan
Roof slope
Slope is the single most important drainage decision you'll make. For a lean-to, the high side attaches to the house and the low side faces out. You want at least 1/4 inch of drop per foot of horizontal run. So a 12-foot-deep patio cover needs a minimum of 3 inches of drop from the house side to the outer beam. More is better for faster drainage. A common residential lean-to pitch is 2:12 (2 inches of rise per 12 inches of run), which gives you 24 inches of drop over 12 feet and looks proportional. If you're using a flat-style membrane roof, the EPDM minimum of 1/4 inch per foot is the floor, not the ideal. For corrugated metal or polycarbonate panels, 1:12 or steeper is more typical.
Wind and uplift resistance
Wind doesn't just push sideways; it creates uplift that tries to peel the roof off. This is why the code requires wind load design, not just gravity load design. The 2018 IRC Chapter 3 ties roof-covering wind-performance calculations to wind loads from IRC Table R301.2(2), adjusted for height and exposure using Table R301.2(3). The IBC requires patio covers to resist the minimum wind loads set for your location (based on your local design wind speed and exposure category). In practical terms, this means using code-compliant rafter-to-beam connections (hurricane ties or equivalent metal connectors, not just toenails), proper post-to-beam connections, and the right anchor hardware at the ledger. Using incorrect or undersized fasteners is one of the most common structural failures in DIY patio covers. For aluminum structural members, the IRC also specifies a deflection limit of L/60 under total load, which affects which panel thickness you can use for a given span.
Ledger board attachment
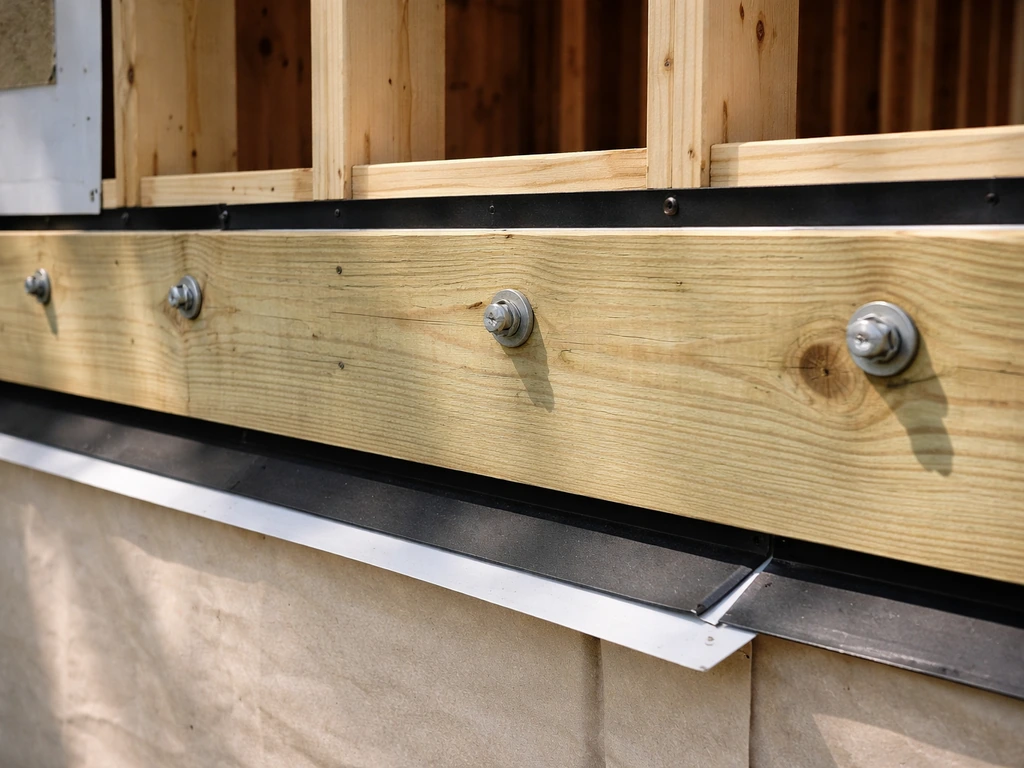
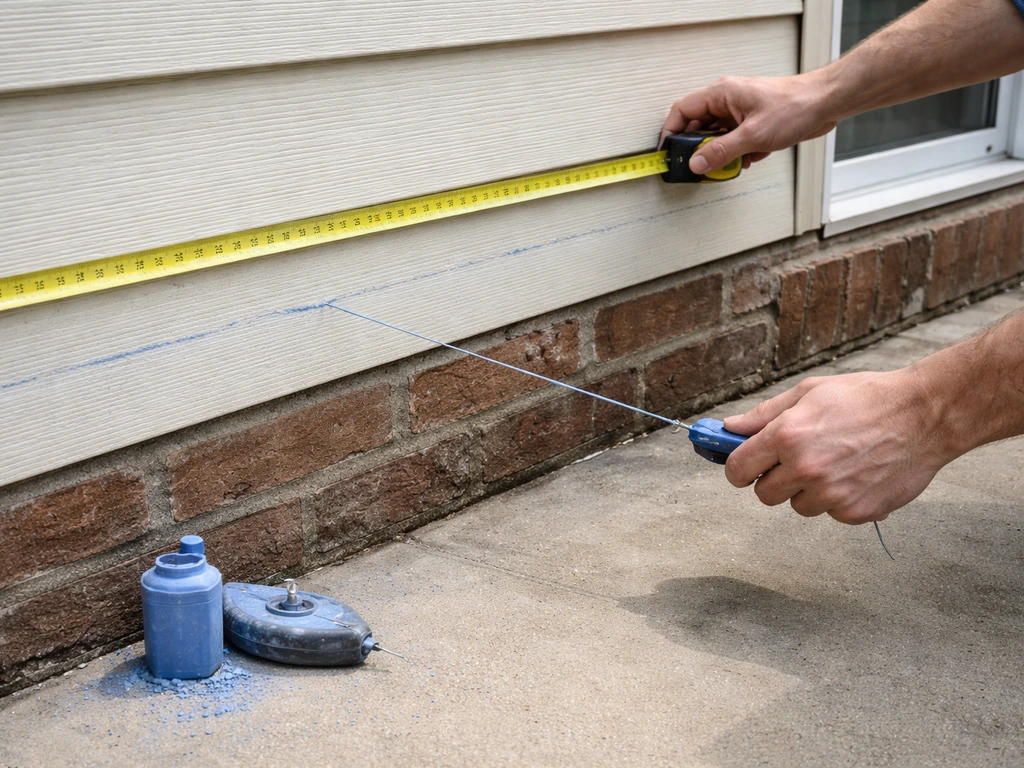
The ledger board is the board you bolt to your house wall; it carries the inner end of every rafter and transfers all that load into the house framing. Getting this right is critical. The ledger must attach to a structural element, typically the rim joist or band joist, not just through sheathing or siding. Use lag bolts or structural screws (not standard wood screws or nails) at a spacing your permit plans specify. Strip the siding back where the ledger sits and install Z-flashing above the ledger so water can't run behind it and rot the rim joist. Ledger failure from poor attachment or water infiltration is one of the most documented structural failure points in attached outdoor structures. If you're attaching through brick veneer, the brick is not a structural element; you need to fasten through to the wood framing or use an approved masonry anchor system and still address the water management detail.
Step-by-step build for common attached styles
Lean-to patio cover (attached)
- Lay out post locations and dig footings to your local frost depth (or per permit requirements). Typical footings for a 10 to 16-foot patio cover are 12 to 16 inches in diameter and 18 to 36 inches deep depending on soil and frost line. Set post anchors or pour tube forms with anchor bolts while concrete is wet.
- Install posts plumb and brace them temporarily. For a lean-to, the outer posts support the outer beam; the house wall handles the inner load via the ledger.
- Cut and install the ledger board. Strip siding, snap a level chalk line at the correct height (accounting for your planned slope), attach the ledger with lag bolts into the rim joist at 16-inch spacing or per your engineered plan, then install Z-flashing above it. Caulk the flashing top edge with a compatible exterior sealant.
- Set the outer beam on top of the posts. Use post caps rated for the connection. Double-check the beam is level across its length.
- Cut rafters to length with the correct plumb and bird's-mouth cuts if using lumber. Space rafters at 24 inches on center for most patio cover applications (confirm with your material's span table). Install rafter-to-ledger and rafter-to-beam connections using metal hurricane ties or equivalent hardware on every rafter.
- Install the roof decking or panels. For solid roofs: lay OSB or plywood sheathing, install drip edge at the outer edge, add underlayment, and apply your finish roofing material (corrugated metal, asphalt shingles, polycarbonate panels, etc.). For aluminum insulated-panel systems, follow the manufacturer's panel-locking and fascia instructions.
- Install gutters at the outer low edge to direct water away from the patio slab and foundation. A 3-inch or 4-inch K-style gutter with a downspout is typical. This step is often skipped and always regretted.
- Frame any knee walls or open rafter tails as desired, add fascia boards, and complete any trim work.
Gable patio cover additions
A gable build follows the same footing, post, and ledger steps above, but instead of a single sloped beam, you're framing a ridge board in the center and two sets of rafters that pitch outward from it. The ridge must be supported at its outer end (typically by a post or a structural header framed into a gable end wall). Gable-end framing adds complexity, and the outward-sloping rafters mean both the outer and inner eaves need gutters or drip edge detailing. If you're new to roof framing, the lean-to is a better starting project. The gable concepts are covered in more depth in the dedicated guide on how to build a patio cover attached to house. That guide covers common planning, materials, and roof framing steps so you can compare your gable plan to a lean-to workflow build a patio cover attached to house. If you're mainly trying to control cost, you can also follow a lean-to plan and choose budget-friendly materials and hardware for how to build a patio cover cheap the dedicated guide on how to build a patio cover attached to house. For a full walkthrough of how to build a patio cover attached to house, including layout, framing, and installation details, follow the step-by-step guide.
Finishing details, lighting and fans, and long-term maintenance
Gutters and water management
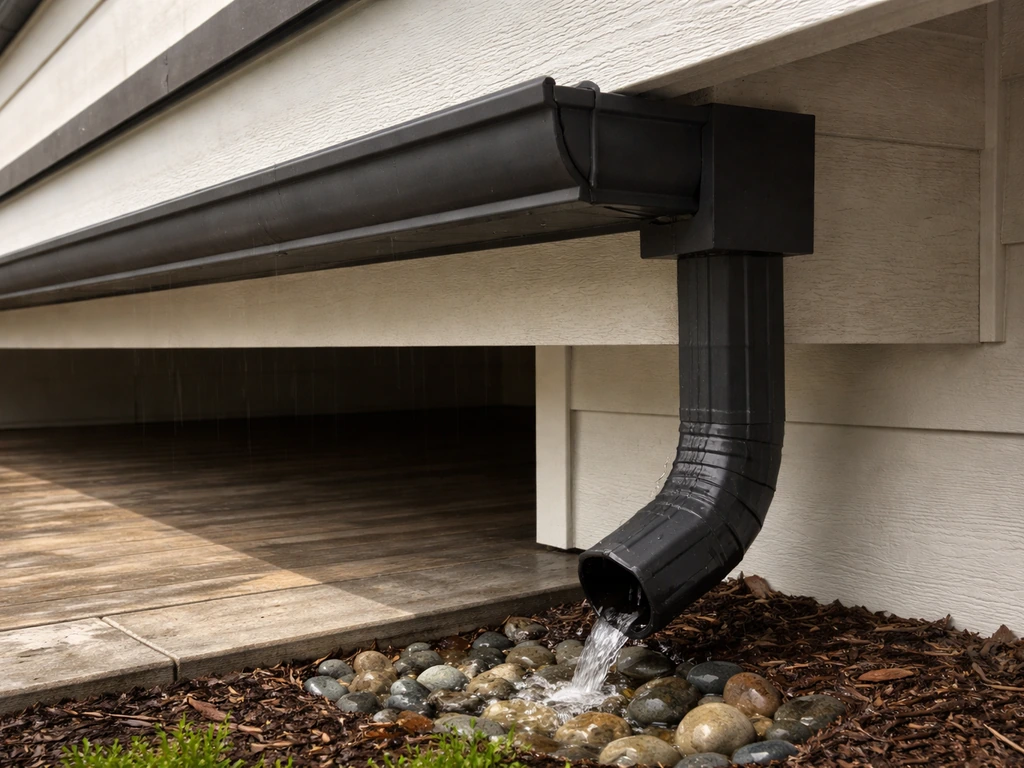
A drip edge at the low eave is the minimum. Gutters are strongly recommended for any solid roof cover. Without them, rain sheeting off a 12-foot cover hits the patio edge and splashes mud on the house foundation and siding. Size downspouts generously (one 3-inch downspout handles about 600 square feet of roof in most climates) and direct them at least 6 feet from the foundation.
Adding lights and ceiling fans
Outdoor lighting and a ceiling fan transform a patio cover from a rain shelter into a usable outdoor room. A few rules that matter here: any ceiling fan installed under a patio cover must be rated for damp or wet locations depending on how exposed it is. A fan under a solid roof in a covered but open-sided patio is typically a damp-location application; a fan where it can receive direct rain spray needs a wet-location rating. Using a dry-rated indoor fan outdoors causes corrosion, motor failure, and is a safety hazard. Outlet boxes that support ceiling fans must be listed and rated for fan use (not just light fixtures), because fan motors create sustained vibration loads a standard light box isn't designed for. Run NM cable (standard Romex) only in dry indoor spaces: it cannot be used in wet or damp locations, so any wiring in the patio cover structure needs to be in conduit or rated outdoor wiring (UF cable or THWN in conduit). The City of Menifee aluminum patio cover inspection requirements specify that Type NM cable shall not be used in wet or damp locations NM cable (standard Romex) only in dry indoor spaces. All outdoor receptacles need to be weather-resistant and GFCI-protected. If you're not comfortable with electrical rough-in work, this is the one sub-task worth paying an electrician for.
Long-term maintenance
- Wood structures: inspect annually for rot at the ledger and post bases (the two highest-moisture points), re-stain or seal every 2 to 3 years, re-tighten any hardware that has backed out due to wood movement.
- Aluminum systems: wash with mild soap and water once a year, inspect sealant at the ledger and wall flashing every 2 to 3 years and re-caulk as needed.
- Metal roofing panels: check fastener washers annually as they degrade before the metal, re-seal any penetrations around conduit or pipe runs.
- Gutters: clean at least twice a year (more if you have overhanging trees) and check that downspout extensions are directing water away from the foundation.
- All systems: after any significant wind event, walk the perimeter and look for lifted panels, loosened rafter ties, or displaced flashing before the next rain.
When to DIY vs hire a pro (and how to get safe structural guidance)
Most straightforward lean-to patio covers on a single-story house with standard framing are reasonable DIY projects if you're comfortable with basic carpentry, can follow a permit set, and are willing to do the prep work (checking utilities, locating framing, getting the ledger attachment right). The build is not technically complicated; it's more about discipline in planning and following code-required details.
Hire a structural engineer or licensed contractor when any of these apply:
- Your permit jurisdiction requires an engineer-stamped plan and you aren't using a pre-engineered kit system that comes with one.
- You're attaching to a two-story wall, a wall with significant window/door openings, or any wall where you're not confident about what structural member is behind the siding.
- You're in a high wind zone (design wind speeds above 115 mph) or a high seismic zone where the code demands more detailed load analysis.
- The patio cover will connect to the existing roof system rather than a flat wall below the eave (a much more complex structural tie-in).
- Your house has a non-standard framing system: SIPs panels, ICF walls, steel framing, or older balloon framing.
- The structure is over 400 to 500 square feet, which many jurisdictions treat as a threshold for requiring a licensed contractor.
- You discover rot, damaged framing, or other structural issues in the house wall during your inspection.
Getting a structural consultation doesn't mean handing the whole project to a contractor. Many structural engineers offer a one-time review of your plan drawings for a few hundred dollars and will provide stamped calculations you can submit for the permit. That cost is well worth it for peace of mind and code compliance. Alternatively, look into manufactured aluminum patio cover kit systems from suppliers like Palram, ACT, or similar: many of these come with ICC evaluation reports (like ICC-ES evaluation reports) that your building department will accept in place of custom engineering, which simplifies the permit process considerably.
The bottom line: plan carefully, pull the permit, get the ledger attachment and flashing right, size your members for the 10 psf live load minimum and your local wind speed, and you'll end up with a covered patio that adds real value to your home and passes every inspection. If any part of the structural picture gets murky, getting a pro involved early is always cheaper than fixing it after the fact.
FAQ
Can I add a covered patio without attaching it to the house (freestanding instead of ledger-attached)?
Yes, but it changes the structural design. A freestanding patio still needs posts, beams, and a roof engineered for wind, and many jurisdictions still require permits and load calculations. Also plan for drainage at the edge, because water runoff will no longer be managed by a roofline tied into the house.
What if my house wall is brick veneer or exterior stone instead of wood framing?
You generally cannot treat brick veneer as the structure for ledger attachment. The ledger must be fastened to the underlying framing, or you must use an approved masonry anchor system with water-management details. Expect to locate framing through siding carefully and, in many cases, involve a contractor or engineer to document an approved attachment method.
How do I handle an existing roof overhang or gutters where the patio cover will meet the house?
You may need to reroute or extend gutters and modify downspouts so runoff from both roofs does not concentrate on one spot near the foundation. Plan a continuous drip edge or edge flashing at transitions, and confirm headroom and swing-clearances for doors that may open toward the new cover area.
Is there a minimum roof cover height I should plan for over the patio?
Most code requirements focus on structure loads and clearances, but comfort and usability often drive design. A practical approach is to set the low side high enough to clear people walking under it, and the high side high enough to avoid bumping with seating or grill equipment. Check local building code for any clearance requirements and consider your door thresholds.
Do I need gutters for a lean-to if my roof pitch is steep?
A drip edge at the low eave is the minimum, but gutters are still strongly recommended for solid roofing. With a steep pitch, water moves faster and can overshoot the patio edge, increasing splashback on the patio and staining the foundation. If you skip gutters, increase the drip-edge projection and add splash guards at the landing zone.
What’s the biggest mistake DIYers make with ledger boards?
Two issues dominate: fastening to non-structural material and failing to manage water. The ledger must be attached to a structural element like rim or band joist, and Z-flashing (or an equivalent flashing system) must be installed so water cannot travel behind the ledger and into the wall assembly.
How far apart should patio posts be?
Post spacing depends on your roof type, member sizes, span, and the permit design. Rather than guessing, follow the layout in your permit drawings or kit instructions, because spacing changes the required rafter and beam sizes and affects deflection. If you are using panels like polycarbonate sheets, member spacing also controls how much sag the roof will have under snow or live load.
Can I use flat-style roofing on a covered patio?
You can, but it requires careful drainage planning. Flat-style systems still need a controlled slope for runoff, even if the visible surface looks near-flat, and you must use roof membrane products and details designed for the slope you build. If you truly build it flat with no effective slope, water pooling increases leak risk and shortens service life.
What kind of electrical work is safe to DIY under a patio cover?
Outdoor lighting and receptacles are often DIY-friendly only if you can follow applicable electrical code requirements for wet or damp locations. The article already notes the key limitation that cable types like standard NM are not for damp or wet areas. A common practical step is to have an electrician set up the conduit plan and box ratings, then you can install fixtures and complete finishes if permitted in your area.
Do building permits always require full structural calculations?
Not always. Some jurisdictions accept an engineered kit packet with evaluation documentation, which can reduce the amount of calculation you submit. Still, many permit reviewers expect basic load compliance and a site plan showing setbacks, and they may request clarifications if your plan deviates from the kit’s recommended layout.
When should I hire a structural engineer versus just following a patio cover kit?
Hire a pro when your site conditions are unusual, such as large spans, snow load concerns in your region, attachment to complex wall assemblies (brick veneer, unusual siding systems), or any design that changes the kit’s engineered layout. Even with a kit, an engineer review can be worthwhile if you are modifying rafters, changing post spacing, or altering how the roof transitions at the house.