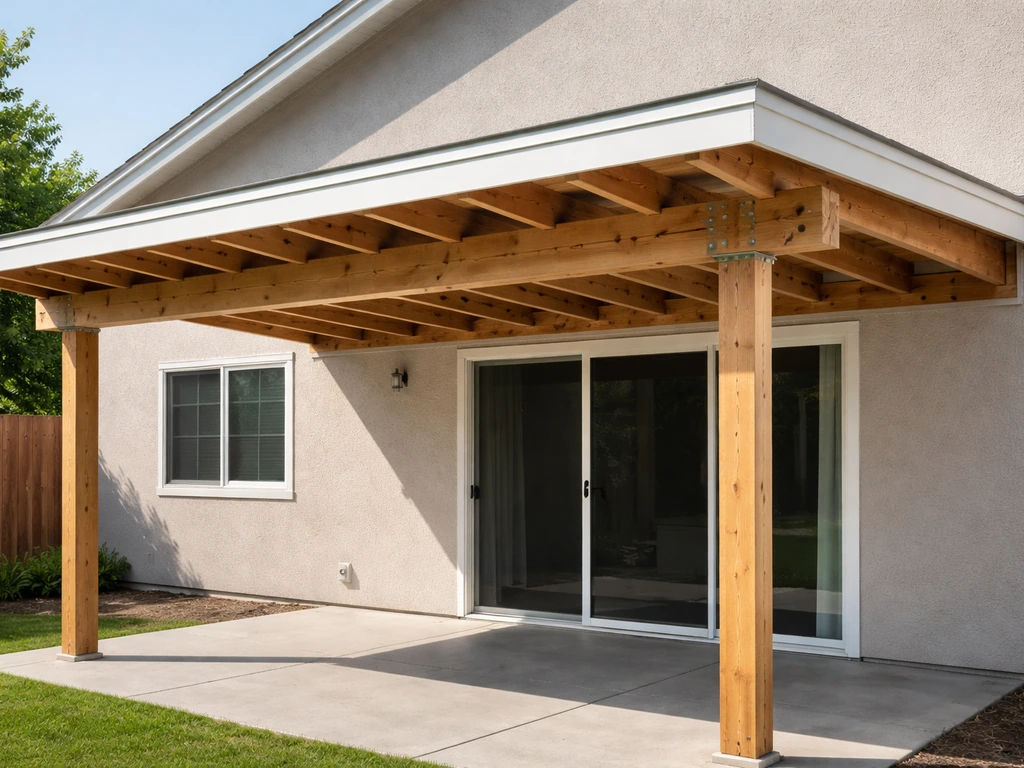
Building a patio cover attached to your house is a weekend-to-two-week project depending on size and material, and it starts with bolting a ledger board to your home's rim joist, then running rafters out to a beam supported by posts. If you're going freestanding instead, you skip the ledger entirely and set two rows of posts in concrete footings. Both approaches are realistic DIY builds, but the attachment detail on a house-connected cover is the part that makes or breaks the project structurally and water-tight, so that's where most of this guide spends time. If you want a practical walkthrough, follow these steps for how to add a patio cover from planning and sizing to building the structure and weatherproofing it attachment detail.
How to Build a Patio Cover Attached to the House

Celia Vaughn
15 May 2026
Pick attached vs. detached patio cover for your site
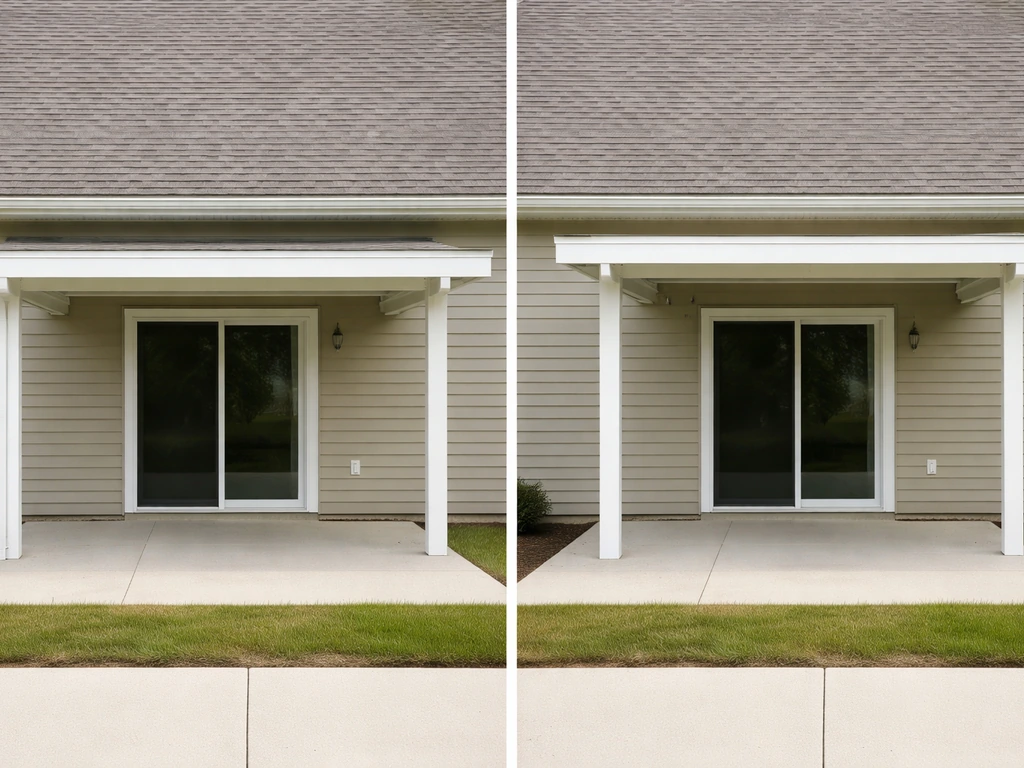
The choice usually comes down to three things: where your patio sits relative to the house, what your house wall looks like behind the siding, and how much you want the structure to blend in architecturally. An attached (lean-to style) cover shares the house wall as one side of its support, so you need fewer posts and it tends to look like it was always part of the house. A freestanding or detached cover stands on its own four or more posts with no connection to the structure, which gives you flexibility in placement and avoids any risk of water intrusion at the wall.
Choose attached if your patio is directly against the house wall, you want a clean integrated look, and you're comfortable drilling into the rim joist (the framing member just below the first floor or the band joist behind the siding). Choose freestanding if your patio is offset from the house, if the wall behind the attachment point is a masonry veneer or EIFS stucco (both make ledger attachment trickier), or if you simply want to avoid opening up the wall at all. Freestanding covers also tend to be easier to permit and build in phases.
| Factor | Attached (Lean-To) | Freestanding |
|---|---|---|
| Post count | 2 posts minimum (outer beam only) | 4+ posts (both sides) |
| Structural connection to house | Yes — ledger into rim joist | None |
| Water/weatherproofing risk | Higher — ledger flashing required | Lower — no wall penetration |
| Cost | Usually lower (less lumber/posts) | Slightly higher (more posts and footings) |
| Permit complexity | Moderate — ledger details required | Moderate — footing sizes required |
| Best for | Patio directly against house | Offset patio or masonry walls |
Design basics: sizing, layout, roof slope, and drainage
Start by measuring your patio slab or intended coverage area. A common residential patio cover runs 12 to 20 feet wide and 10 to 16 feet deep, but the design is fully scalable. Once you have the footprint, you need to decide on slope. For drainage, the minimum roof pitch on a patio cover is about 1/4 inch per foot (roughly a 1-in-48 slope), but I'd recommend 1/2 inch per foot at minimum to keep water moving off reliably. On an attached lean-to, the high side of the slope is the ledger at the house, and the low side drains toward the yard, away from the foundation, that direction is non-negotiable.
For structural sizing, the 2021 IRC and most local codes derived from it require patio covers to handle a dead load plus a minimum vertical live load of 10 psf (pounds per square foot), and snow loads wherever those exceed that minimum. Wind loads from your local climate zone also apply. These numbers drive your rafter span, beam sizing, and post spacing. A good rule of thumb: 2x6 rafters at 24 inches on center can span roughly 10 to 12 feet depending on species and grade, while a doubled 2x8 beam can carry about 10 feet of span between posts. If your project is larger than that, step up the lumber or reduce spacing. When in doubt, run your sizes by a local building department plan checker, they'll tell you fast.
Lay out your design on graph paper or a simple sketch app before you buy anything. Mark: the ledger location on the house wall, outer post locations, beam path, rafter direction, and where the water drains. This sketch becomes your permit drawing too, so make it legible. Cities like Chula Vista, CA require a site plan plus construction details showing post sizing and spacing, rafter span and spacing, and beam and footing size, so your sketch should include all of those dimensions.
Materials and system options: wood vs. aluminum vs. metal

There's no universally correct material choice here. Each one has a real trade-off between upfront cost, long-term maintenance, DIY-friendliness, and look.
Wood (pressure-treated or Douglas fir)
Wood is the most DIY-accessible material and the one most local lumber yards stock in every size you'll need. Pressure-treated lumber for posts and the ledger, with Douglas fir or hem-fir for rafters and beams, is the classic combination. It cuts with standard tools, accepts standard hardware, and is easy to modify on the fly. The downside is ongoing maintenance: paint or stain every few years, and watch for rot at any post base or ledger connection. Use PT lumber rated for ground contact (UC4B or UC4C) at any post set in or near soil.
Aluminum patio cover systems
Pre-engineered aluminum patio cover kits are popular because they're essentially maintenance-free, come in standard widths and depths, and include pre-punched parts that bolt together. Many systems are sold with engineering already done, which can simplify the permit process. The trade-off is cost (usually higher per square foot than wood), less flexibility in custom sizing, and the need to follow the manufacturer's instructions exactly, you can't easily substitute a longer rafter or a different post spacing. For a standard rectangular patio against a stucco or siding wall, aluminum kits are genuinely great. For an unusual shape or a large span, wood gives you more control.
Steel and metal framing
Steel tube or light-gauge metal framing shows up in patio covers where span requirements exceed what standard wood can handle economically, or where a modern industrial look is the goal. It's strong, durable, and doesn't rot, but it requires welding or specialized bolted connections and is harder to cut and drill without metal-specific tools. Unless you're comfortable with metalwork or hiring a fabricator for the structural parts, this is the toughest DIY path of the three. That said, a steel post with wood rafters is a practical hybrid that plenty of builders use.
| Material | Upfront Cost | Maintenance | DIY Friendliness | Best Use Case |
|---|---|---|---|---|
| Pressure-treated wood | Low–Medium | Moderate (paint/stain) | High | Any custom size or shape |
| Aluminum kit system | Medium–High | Very low | Medium (follow kit specs) | Standard rectangular patios |
| Steel/metal framing | Medium–High | Low | Low (needs metalwork skills) | Long spans, modern aesthetics |
Attached-to-house build: the ledger connection and weatherproofing
This is the most critical part of the whole project, and it's where most DIY mistakes happen. The ledger is the horizontal board that bolts to your house framing and carries the high end of your rafters. Get this right and everything else is straightforward. Get it wrong and you risk water damage behind your siding, or worse, a structural failure if the ledger pulls away from the wall.
Finding and connecting to the rim joist
The ledger needs to attach to solid framing, specifically the rim joist (also called the band joist), the horizontal framing member that runs along the outer edge of your floor system. On a single-story house or at the roof line of a single-story section, this is typically 8 to 10 inches of solid lumber sitting just below the floor decking or just below the first-floor sill plate. You'll find it behind the siding. Remove a section of siding and sheathing to expose the rim joist directly. Never attach a ledger just to siding, sheathing, or stucco, those materials can't take the load.
Per the 2021 IRC (and consistent with the 2009-onward requirements), deck and covered patio ledgers must be connected with 1/2-inch diameter bolts or lag screws, sized and spaced per Table R507.9.1.3(1). A typical pattern is staggered lags at 12 to 16 inches on center, but your permit may call for something specific based on your joist span and roof load. Use structural hex-head lag screws with a washer, driven into pre-drilled pilot holes. Don't skip the pilot holes, splitting the rim joist defeats the whole purpose.
Flashing and weatherproofing at the ledger
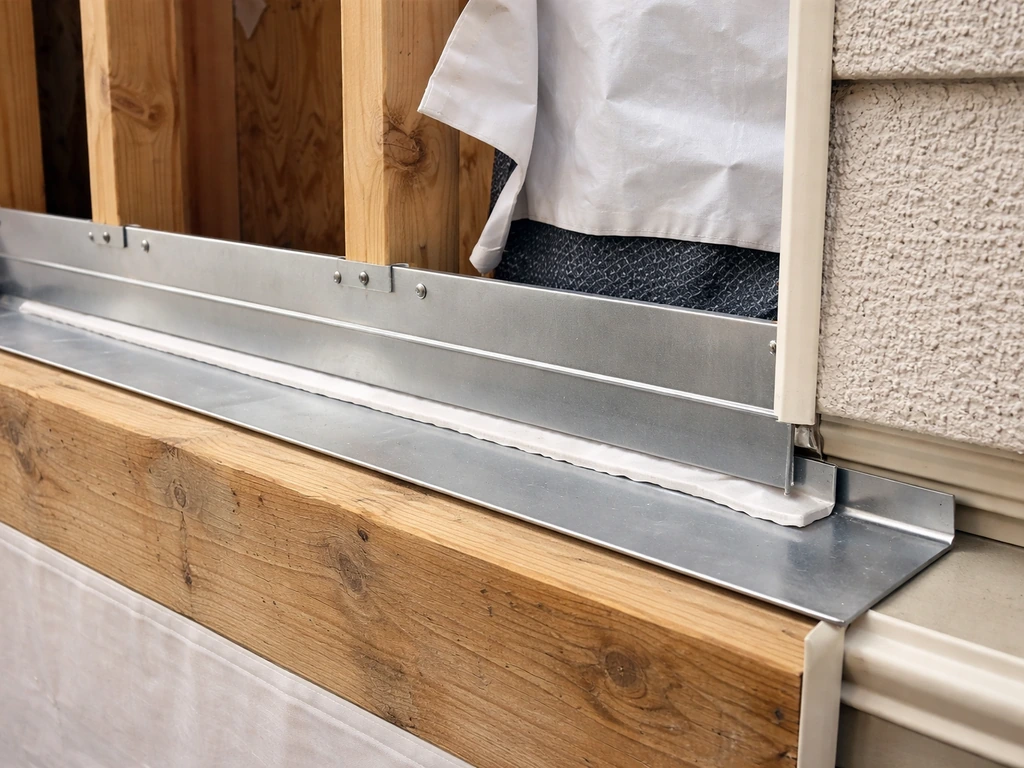
Water intrusion behind the ledger is the number one cause of hidden rot in attached patio covers and decks. The fix is proper flashing installed before the ledger goes on. Use metal Z-flashing (galvanized or aluminum) tucked up behind the siding above the ledger, then lapped over the top face of the ledger board. The flashing should extend past the ledger ends by at least an inch on each side and direct water outward, not into the wall. Run self-adhesive waterproof membrane (like a window flashing tape) on the house sheathing behind where the ledger will sit. Then bolt the ledger through the membrane and flashing into the rim joist, and seal around each lag penetration with roofing sealant or flashing tape.
A common mistake here is installing the ledger tight against the siding without removing the siding first. Water will wick behind the ledger and rot both the siding and the rim joist within a few years. Remove the siding in the ledger zone, flash the sheathing, then reinstall the siding butted to (but not behind) the ledger.
Rafter hangers and load path
Attach rafters to the ledger using code-compliant metal rafter hangers (Simpson LUS or equivalent). Toe-nailing alone isn't adequate under current codes for this connection. The hangers transfer vertical load from the rafter down into the ledger and then into the house framing. On the outer end, rafters bear on a beam, which bears on posts, which bear on footings. Every joint in that load path should use structural hardware, post caps, beam-to-post connectors, and post bases anchored into your concrete footings.
Freestanding build: posts, footings, and keeping the structure square
A freestanding patio cover doesn't touch the house at all. You're building a complete four-post (or more) structure that stands on its own, typically positioned a few inches away from the house wall to allow for drainage and flashing on the house side. The gap between the roof edge and the house wall is usually covered with flashing or a fascia to direct water away from the wall.
Footing size and depth
Every post needs a concrete footing that extends below the frost line in your area (check with your local building department, this ranges from 12 inches in mild climates to 42 inches or more in cold ones). Footing diameter is typically 12 to 18 inches for residential patio covers, but your permit will specify. Dig the hole with a power auger (rentable for about $75 to $150 a day), pour concrete, and set a galvanized post base anchor while the concrete is wet. Let it cure at least 48 to 72 hours before loading it. Common mistake: setting posts directly in concrete without a base anchor. That traps moisture at the post bottom and the post rots in 5 to 10 years.
Keeping the structure square and plumb
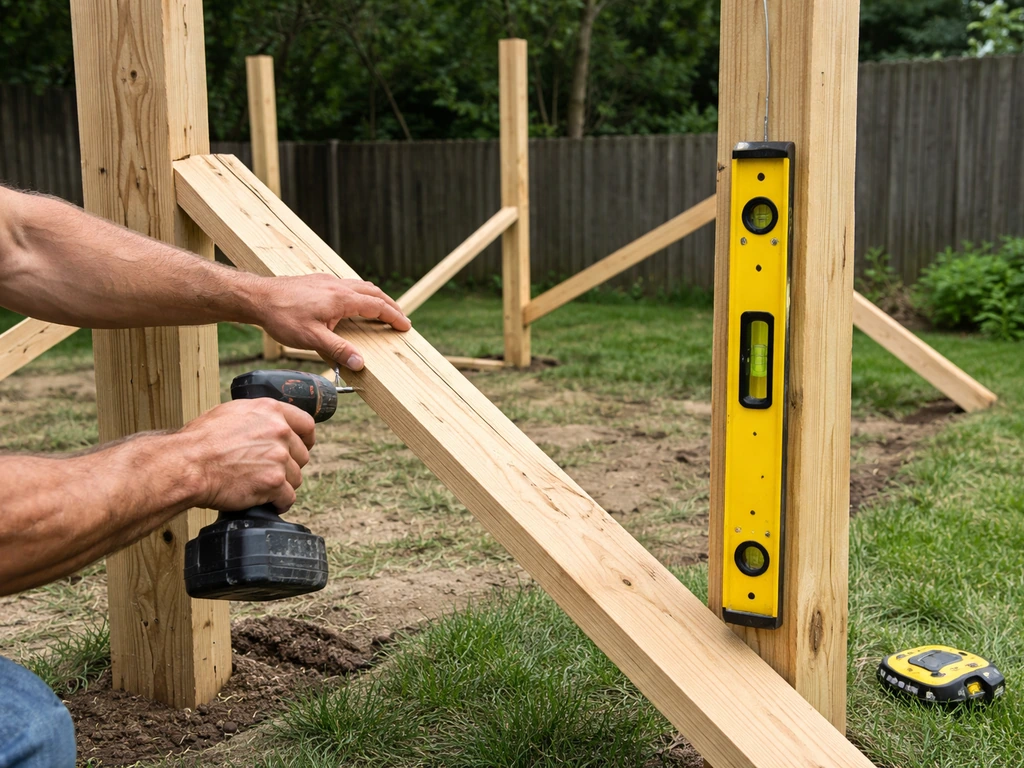
Once posts are set, brace them temporarily with 2x4 diagonal bracing to adjacent stakes in the ground before you start framing the beam. Use a level on two faces of each post to confirm plumb. Measure diagonal distances corner to corner to confirm the layout is square, the two diagonal measurements should match within 1/4 inch. If they don't, shift the post bases slightly before the concrete fully cures. Getting this right before beams go up saves a huge headache later.
Beam installation on a freestanding structure typically involves a doubled or tripled beam running along each side (parallel to the house), sitting on top of the posts in post caps. Rafters then run perpendicular between the two beams. Brace the completed frame against racking (twisting) with diagonal knee braces or structural gussets at each post-to-beam connection, your local code will specify which is required.
Step-by-step build flow and DIY checklists
Here's the sequence that works for both attached and freestanding builds, with the attached-specific steps called out. Plan on two to four weekends for a typical 12x16 wood build if you're working with one helper.
Pre-build phase
- Measure your patio and sketch the layout with all dimensions, post locations, and rafter direction.
- Determine your roof slope and confirm drainage direction is away from the house.
- Select your material (wood, aluminum kit, or metal) and size your structural members using span tables or a plan checker.
- Submit for permit and wait for approval before breaking ground.
- Call 811 (US) or your local dig-safe line to mark underground utilities before digging any footings.
- Gather tools: circular saw, drill/driver, level, tape measure, chalk line, post hole digger or auger, concrete mixer or bags, speed square, framing square.
Foundation and posts
- Lay out post locations with batter boards and string lines. Confirm square by checking diagonals.
- Dig footings to code-required depth and diameter.
- Pour concrete and set post base anchors. Let cure 48 to 72 hours minimum.
- Set posts in anchors, plumb on two axes, and brace temporarily.
- (Attached builds: locate and expose the rim joist. Install flashing membrane on sheathing. Install ledger board with 1/2-inch lags per IRC Table R507.9.1.3(1). Flash over top of ledger with Z-flashing.)
Beams and rafters
- Install beam(s) on post caps. Check level across the full beam length.
- Install rafter hangers on the ledger (attached) or mark rafter layout on both beams (freestanding).
- Cut rafters to length with correct bevel at each end to match roof slope.
- Install rafters one at a time, starting from one end. Nail through hangers with specified hanger nails (not common nails — use hanger nails).
- Install blocking between rafters at the ledger end and at the outer beam for lateral stability.
- Add diagonal knee braces at each post-to-beam connection if required by your plan.
Roofing and trim
- Install roof decking (plywood, polycarbonate panels, or aluminum cover panels depending on your system).
- For solid roofs: install roofing underlayment, then finish roofing (corrugated metal, shingles, or roll roofing). Ensure slope drains to outer edge.
- Install fascia on the outer rafter ends.
- Install a gutter on the low (outer) edge if needed to direct water away from the patio.
- (Attached builds: install flashing at the house wall where the roof meets the siding above the ledger. This is a second line of defense behind the ledger flashing.)
- Paint, stain, or seal all wood members if using untreated or finish-grade lumber.
Material and tool checklist at a glance
- Pressure-treated 4x4 or 6x6 posts (UC4B for post bases near grade)
- Doubled 2x8 or 2x10 beam lumber (size per span tables)
- 2x6 or 2x8 rafters (size per span and spacing)
- Ledger board (same dimension as rafters, pressure-treated)
- 1/2-inch lag screws or structural bolts with washers (ledger attachment)
- Post base anchors, post caps, rafter hangers (Simpson or equivalent)
- Concrete (80-lb bags or ready-mix)
- Z-flashing and self-adhesive waterproof membrane (attached builds)
- Roofing material of choice (panels, shingles, corrugated metal)
- Circular saw, reciprocating saw, drill/driver, impact driver
- 4-foot level, framing square, speed square
- String lines and batter boards for layout
- Post hole auger (rent if not owned)
- Safety glasses, hearing protection, work gloves
Permits, safety, and when to hire a pro
Almost every jurisdiction requires a permit for a patio cover attached to a house, and most require one for freestanding structures above a certain size (commonly 200 square feet). The permit process typically requires a site plan showing your property and where the structure sits, plus construction details including post sizing and spacing, rafter span and spacing, beam size, and footing dimensions. Some jurisdictions also require a structural engineering letter if your spans or loads exceed standard tables. Don't skip the permit, unpermitted structures create real problems at resale and may need to be torn down.
Inspections happen at stages: usually after footings are dug but before concrete is poured (so the inspector sees the depth and diameter), and again after framing is complete but before any roofing covers the structural connections. Schedule these in advance and don't cover up work before an inspector sees it. The Dacono, CO 2024 IRC patio cover guide, for example, lists required submittal items including ledger attachment details, rafter and joist details, and beam and hanger specifications, that's representative of what most jurisdictions want to see.
Safety items that aren't optional
- Call 811 before any digging — hitting a gas or electrical line is not a recoverable mistake.
- Use a ladder rated for your weight plus tools and never lean a ladder against an unsecured rafter.
- Wear eye protection when cutting, drilling, or mixing concrete.
- Don't frame in high winds — even temporary bracing can fail if a gust catches a large beam.
- Use only code-approved structural hardware — don't substitute standard screws for structural lag screws.
When to bring in a professional
Most homeowners comfortable with basic carpentry can handle a standard patio cover build. But there are a few situations where calling a structural engineer or licensed contractor is the smarter move. If your house wall at the attachment point is masonry, EIFS stucco, or any material that isn't wood-framed, the ledger connection needs engineered anchors and an engineer's sign-off. If your roof span exceeds 20 feet in any direction, standard tables may not apply and an engineer should size your members. If your local jurisdiction requires stamped engineering drawings (some do for any covered structure), just get the engineer upfront rather than being surprised after submittal. And if at any point you open the wall and find rot, mold, or unexpected framing, stop the patio project and address the house issue first.
Building a covered patio from scratch, whether it's attached to your house or standing on its own, is one of the more satisfying DIY projects you can take on. This guide also helps with the practical steps you need when you want to build an outdoor covered patio, whether attached or freestanding how to build an outdoor covered patio. The work is physical but not highly technical, the materials are available at any home center, and the result adds real usable space to your home. The key is doing the planning and permitting work up front so the actual build goes cleanly. If you're still deciding whether to connect to the house or go freestanding, or if you're trying to keep costs down, those are worth thinking through carefully before you commit to a design and buy materials. A cheaper patio cover often comes down to smart material choices and the right attachment and drainage details so you avoid costly rework later keep costs down.
FAQ
Can I attach the patio cover ledger to siding or sheathing if I can’t find the rim joist?
If you cannot fasten into solid wood rim or band framing, do not plan to “shim” through siding or sheathing. Most jurisdictions require engineered ledger anchors for non-wood walls (brick veneer, EIFS, stucco systems over foam, or masonry), and the wall may need reinforcement before you can legally transfer the load.
What’s the correct flashing order to prevent water from getting behind an attached patio cover ledger?
Use Z-flashing or an equivalent concealed flashing at the house side, installed behind the siding so water moves outward, then lap any waterproof membrane in the shingle direction. Also seal each ledger penetration after drilling, so water cannot follow the bolt path behind the ledger.
If I leave a small gap between the roof edge and the house, can I treat it like a freestanding cover?
If the patio cover is attached, a 1/2-inch-thick gap is not a substitute for proper flashing and an engineered separation detail. You still need the right slope and a sealed flashing/fascia strategy at the house wall, plus code-compliant lateral bracing to resist wind racking.
Do snow and wind loads change the way I size rafters, beams, and posts for a patio cover?
Yes, but you must treat snow and wind design as first-class constraints. Many covers fail because owners size spans for dead load only; once snow drift, gusts, or exposure category increases, you typically need tighter rafter spacing, deeper beams, or an engineer’s redesign.
How do I verify rafter and beam sizes if my patio cover is larger than the common 12x16 range?
Don’t rely on “typical” lumber spans if your local code uses different live load assumptions or your house attachment point has an unusual framing layout. Confirm by checking your local plan checker, especially for larger footprints, cantilevered edges, or longer rafters than the guide’s rule-of-thumb range.
Is toenailing rafters to the ledger ever acceptable for an attached patio cover?
Most attached builds use joist hangers for the ledger-to-rafter connection, not toenails. If you can’t install the hanger because of a layout conflict, modify the framing so the hanger fits the rafter thickness and ledger width rather than mixing connection methods.
Can I skip conventional flashing and just use waterproof tape and sealant around the ledger bolts?
Typically no. Bolting through a membrane or into flashing is fine when it is designed as part of a water-shedding system, but the membrane must be compatible with your siding type and installed where the ledger sits. If you’re unsure, use a window-flashing style tape system intended for exterior wall penetrations.
What should I do if I discover rot or mold on the rim joist when I open the siding?
If you find rot or soft rim joist during ledger installation, stop and correct the underlying framing before continuing. Replace rotted members to sound wood, then reflash. A ledger bolted into compromised wood can loosen and create an ongoing water-entry path.
Do I still need diagonal bracing if I’m building a freestanding patio cover?
For freestanding covers, you still need lateral stability. Temporary bracing helps during construction, but once framed you need permanent racking resistance (code-specified braces, gussets, or an engineered bracing layout), otherwise wind can rack the posts and deform the roof.
At what stages should I expect inspections for an attached patio cover versus a freestanding one?
Many areas require a permit for attached covers even when they’re “small,” and inspection timing matters. Plan for a footing inspection before concrete placement and a framing inspection before roof covering so the inspector can verify post bases, ledger connection details, and rafter hangers.
Why is a galvanized post base anchor important for freestanding patio covers?
Avoid setting posts directly in concrete without a post base anchor. The anchor keeps the wood elevated and allows proper drainage, reducing trapped moisture at the bottom, which is one of the most common causes of post rot in freestanding systems.
What if my available space limits how much I can slope the patio cover roof?
If your roof pitch is too low, you may get standing water, accelerated membrane wear, and leaks at seams over time. A practical decision aid is to confirm minimum slope for your roofing material, then align the high side so drainage flows away from the house side in all seasons.
When is it smarter to hire a structural engineer instead of relying on table-based member sizing?
For unusual shapes, long spans, or any project where the plan checker asks for stamped details, a structural engineer can prevent expensive redesign. Even if DIY-friendly, it can be worth paying early when your attachment is on non-standard wall framing or when you exceed common span assumptions.
After flashing and ledger installation, how can I confirm the water-tightness before finishing everything?
If you’re replacing siding in the ledger zone, reinstall it with proper clearances so it does not direct water back toward the ledger. Then do a quick water-test strategy (hose test from the roofline direction, or after rain) to confirm flashing laps behave correctly before you close up more areas.