You can build a patio cover with a metal roof yourself in a single weekend to a week, depending on size, if you start with a solid plan, pull the right permit, and don't skip the flashing details. The basic sequence is: choose your layout, plan and permit it, set posts or attach a ledger, frame the roof structure, install drip edge and underlayment, lay the metal panels with proper fasteners and sealant, then finish with trim and gutters.
How to Build a Patio Cover with a Metal Roof

Celia Vaughn
13 May 2026
Most DIYers with basic carpentry skills can handle a lean-to attached patio cover or a simple freestanding structure. The parts that trip people up are the ledger attachment, getting the slope right for drainage, and sealing the panel laps so water can't sneak in. This guide walks through every stage so you know what you're doing before you pick up a single tool.
Pick the right patio cover layout and metal roof style
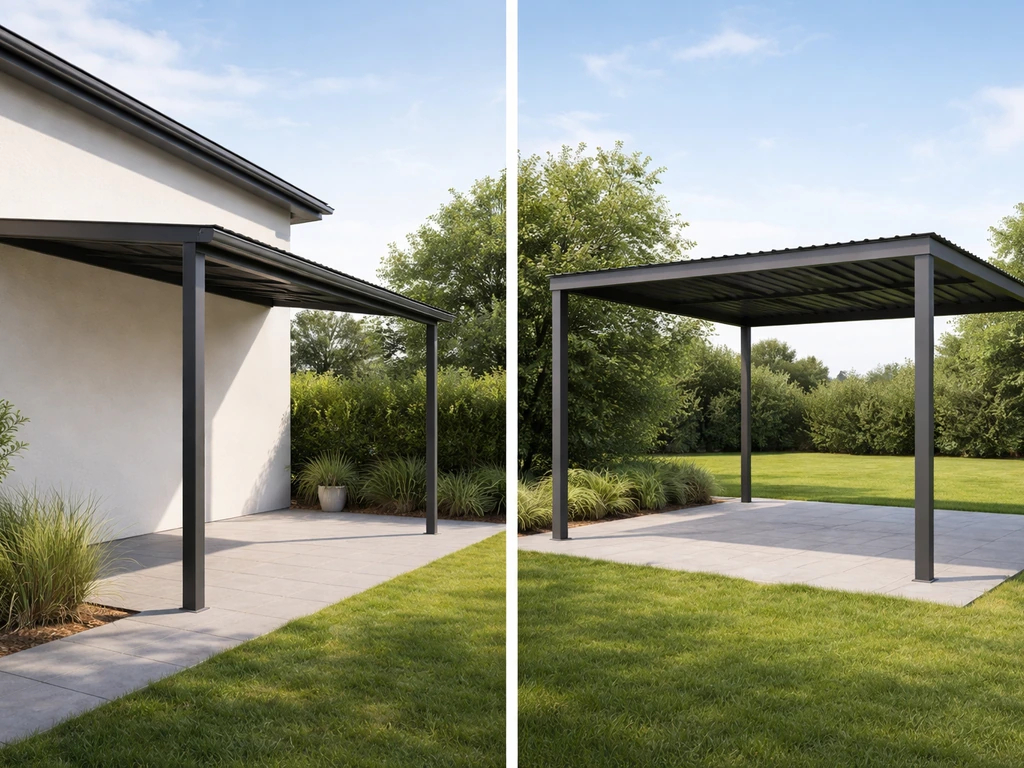
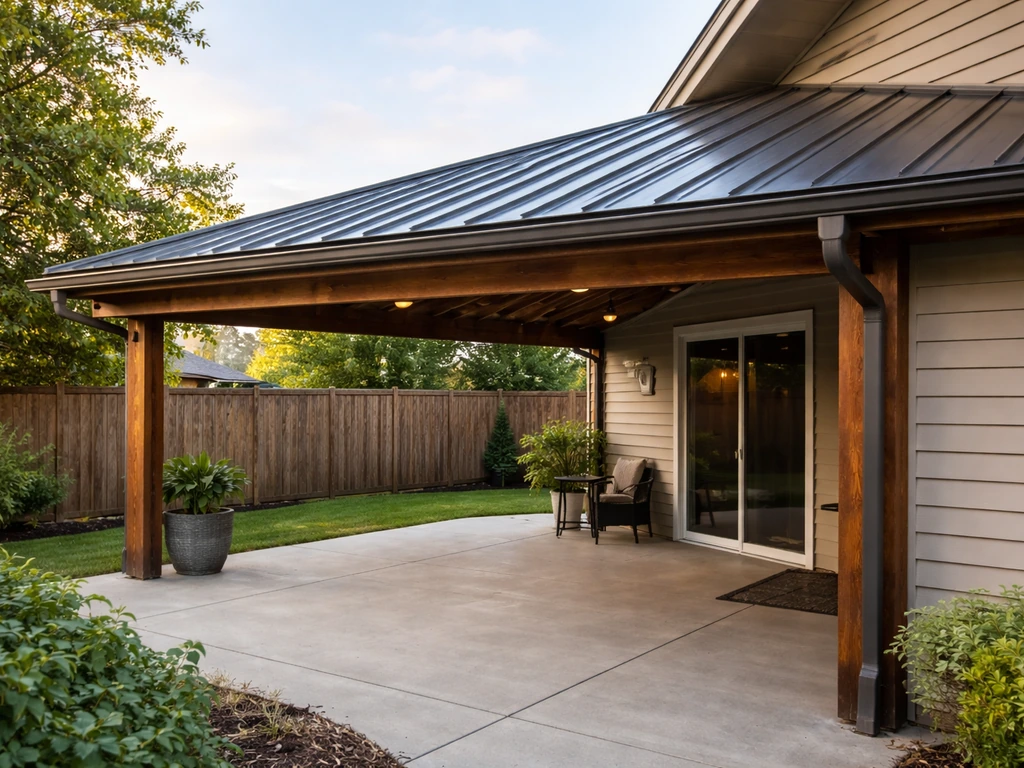
The first real decision is whether your cover will be attached to the house or freestanding. An attached lean-to (also called a shed-roof patio cover) is the most popular choice because it uses the house wall as one side of the structure, which means fewer posts and less material. A freestanding structure works better when you can't attach to the house, need clearance for a sliding door, or want a pergola-style look with a solid roof. Both configurations are recognized by most building codes as accessory structures, so permits are generally straightforward, but the attachment details differ significantly.
On the roof style side, you have a few options that work well with metal panels. A simple single-slope (shed roof) is the easiest to build and drain. A gable roof looks more finished and handles snow and rain well, but requires more framing work and two sets of rafters meeting at a ridge. A hip roof is the most complex and rarely worth the effort for a basic patio cover. For most homeowners building their first metal-roof patio cover, a lean-to shed roof is the right call.
For the metal roofing itself, corrugated panels are the most DIY-friendly and least expensive option. They're widely available at home centers and farm supply stores, cut easily with a circular saw and metal blade, and forgive minor misalignment because the overlapping ribs hide small gaps. Standing seam metal roofing looks more polished and is more watertight, but the clips and seaming require more precision and sometimes specialized tools. If you want a deep dive on corrugated panel installation, that's covered in detail elsewhere on this site. This guide focuses on the full build, from the ground up, which applies to either panel type.
Planning, permits, measurements, and tools/materials checklist
Check your local building department before you buy anything. Most jurisdictions treat patio covers as one-story accessory structures, and under codes derived from the International Building Code, they're defined as one-story structures not exceeding 12 feet in height above grade level. Many areas require a permit for anything over a certain square footage (often 200 sq ft) or for any attached structure. Some cities, like Phoenix, publish residential patio cover guidelines with their own rafter span tables and maximum overhang limits (typically 12 inches), so pull the local handout if one exists, it can save you hours of calculation.
For measurements, you need the width and depth of the area to be covered, the height at the house wall (for an attached cover), and the desired height at the outer posts. The difference between those two heights over the depth gives you your roof slope. A minimum slope of 1/4 inch per foot is the absolute floor for metal roofing to drain properly; 1 inch per foot is more comfortable and more common for patio covers. For a 12-foot-deep roof, 1 inch per foot means the outer beam sits 12 inches lower than the ledger at the house.
Tools you'll need
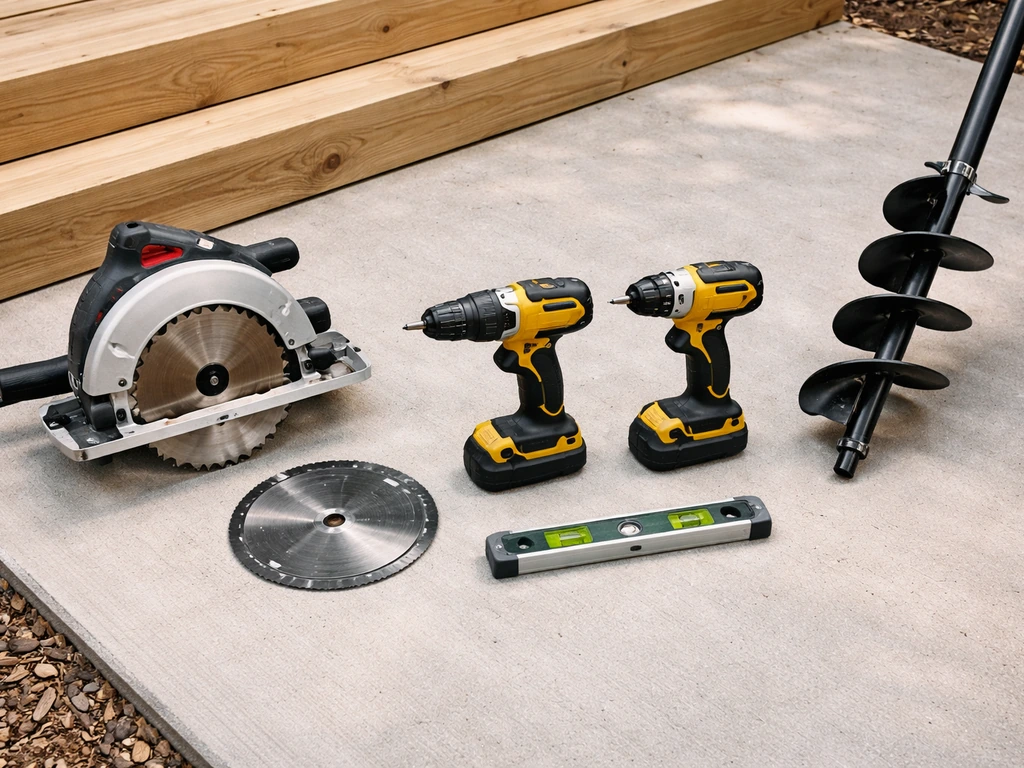
- Circular saw with a fine-tooth wood blade and a separate metal-cutting blade
- Power drill and impact driver
- Post hole digger or rented gas auger (for freestanding builds)
- Level (4-foot minimum), speed square, and tape measure
- Chalk line and string lines for layout
- Hammer and nail gun (framing nailer speeds things up significantly)
- Safety glasses, gloves, and hearing protection
- Ladder and, ideally, a second set of hands for setting posts and beams
Materials checklist
- Pressure-treated 4x4 or 6x6 posts (for freestanding, or if ledger posts are needed)
- Pressure-treated lumber for the ledger board (attached builds)
- Beam lumber (doubled 2x8, 2x10, or LVL depending on span and load)
- Rafter lumber (2x6 or 2x8 at 24 inches on center is typical for spans under 12 feet)
- Metal roofing panels (corrugated or standing seam) sized to your roof area plus 10% waste
- Roofing underlayment (synthetic felt or ice-and-water membrane for cold climates)
- Drip edge flashing in the appropriate metal and profile
- Ridge cap, gable trim, and closure strips (foam or rubber to seal panel ribs)
- Lag screws, structural screws, joist hangers, post bases, and hurricane ties
- Roofing screws with neoprene washers (for exposed-fastener panels)
- Butyl tape/sealant for panel laps and penetrations
- Concrete (for footings or post bases)
- Gutters and downspouts (highly recommended)
Structural design basics: framing, loads, slope, and drainage
Patio covers need to handle real loads, not just the weight of the panels. Building codes require a minimum live load of 10 psf (pounds per square foot) for patio covers, and in snow country that number goes up based on your ground snow load category. Wind is often the governing load for open patio structures, particularly in coastal or high-wind zones where fastener patterns get tightened up significantly. Your permit reviewer or a structural engineer can tell you the design loads for your area, and if you're in a wind or seismic zone, it's worth having someone check your connection details.
For framing, the load path runs from panels to rafters to beam to posts (or ledger) to footings or the house foundation. Every connection in that chain needs to be sized correctly. Typical rafter spacing for a patio cover is 24 inches on center for spans under 12 feet, and you'd step down to 16 inches for longer spans or heavier loads. Your local guidelines likely include a rafter span table, which is far easier than doing the math yourself. Don't exceed a 12-inch overhang past the outer beam without checking it against your local limits.
Slope and drainage are non-negotiable with metal roofing. Aim for at least 1 inch of drop per foot of run, more if you expect heavy rain or snow. At low slopes, panel end laps become critical leak points, and even a well-installed corrugated roof will leak at the laps if the slope is too shallow. For drainage, plan for gutters on the low side of the roof. Without them, the runoff creates an erosion trench along your patio edge and can splash muddy water onto furniture and siding.
Building the attachment: ledger/house connection or freestanding posts/footings
Attaching to the house with a ledger
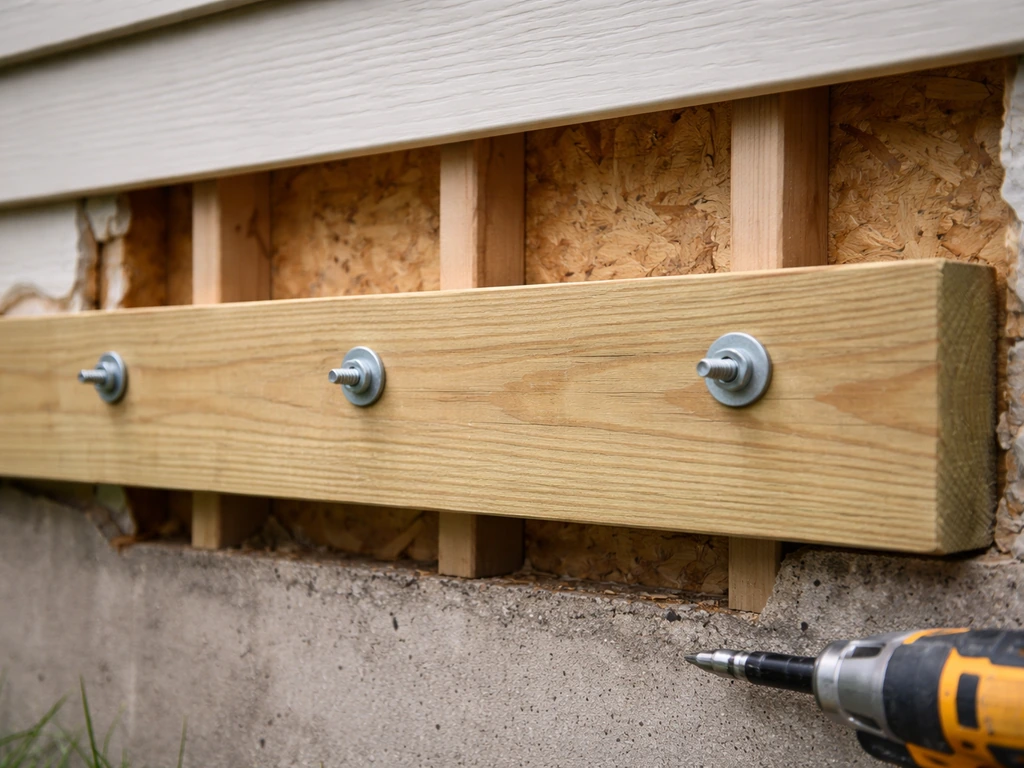
The ledger is the board you bolt directly to the house wall. It carries the high side of the roof and transfers that load into the house structure, which is why this step demands the most attention. First, find the right height. Measure up from the finished floor or patio surface to where the ledger needs to sit so the roof clears any doors, has proper slope, and doesn't exceed the height restrictions (attached patio covers must connect to a structure whose mean roof height doesn't exceed 30 feet under most evaluated product codes). Mark a level line across the wall at that height.
If the house has siding, cut and remove a strip of it where the ledger will sit so you're bolting into the sheathing and framing, not just siding. Use pressure-treated lumber for the ledger board itself. Lag screws or structural through-bolts at 16 inches on center, driven into the rim joist or wall studs, are the standard fastening method. Stagger them slightly vertically to avoid splitting the framing. Flash the top of the ledger with Z-flashing tucked up under the siding above before installing the ledger, not after. This is the number one place an attached patio cover leaks, and a few minutes of flashing work here prevents years of rot.
Setting freestanding posts and footings
For a freestanding structure, posts sit on footings. Footing depth depends on your frost depth. In areas with zero frost depth, you can use post bases anchored to a concrete slab at least 3.5 inches thick, as long as the column load doesn't exceed 750 pounds per column. In most of the country you'll need to dig below frost line, which can be anywhere from 12 inches in the Southeast to 48 inches in the upper Midwest. Call 811 to mark utilities before you dig, no exceptions.
Set tube-form concrete footings with J-bolt post bases, or use a wet-set post base. Either way, get the bases perfectly level and in alignment with each other before the concrete cures, because fixing a misaligned base after the fact is miserable. Use batter boards and string lines to locate each footing accurately. For post size, 4x4 posts work for most residential patio covers under 10 feet tall; 6x6 is better for taller or wider structures and gives you more margin for notching a beam or dealing with wind loads.
Framing the roof: rafters, trusses, spacing, and bracing
Once your ledger or posts and beams are set and level, you frame the roof. For a lean-to, rafters run from the ledger (or top plate of the house-side beam) down to the outer beam on top of the posts. Cut a bird's mouth (a small notch) at the bearing points so each rafter sits flat on the beam rather than just resting on a corner. This is a basic carpentry cut, and there are plenty of visual guides for it. The depth of the bird's mouth should not cut more than one-third of the rafter depth or you weaken the member.
Hang each rafter with a metal joist hanger at the ledger end and toe-nail or use a hurricane tie at the outer beam. Hurricane ties aren't optional in wind-prone areas and are good practice everywhere. Space rafters at 24 inches on center for spans up to about 10 to 12 feet with 2x6 lumber, or 16 inches for longer spans or if you're installing sheathing (plywood) rather than running panels directly on the rafters. If you're using corrugated metal directly on open rafters, 24 inches is fine for most panel gauges.
Lateral bracing matters more than most DIYers expect. A rectangular patio cover can rack (lean sideways) under wind load unless you add diagonal bracing in at least one bay of each direction. On a freestanding structure, knee braces from post to beam (cut at 45 degrees) are the easiest solution. On an attached structure, the house wall provides lateral resistance on one side, but the outer posts still need bracing or a rigid knee-brace connection.
Install waterproofing, flashing, and prep for metal panels
This stage is where most DIY metal roofs either succeed or fail over time. Get it right and you'll have a dry patio for decades. Rush it and you'll be chasing leaks every spring. The sequence matters: drip edge, then underlayment, in the right order at eaves and rakes.
At the eave (the low edge), install the drip edge flashing first, before the underlayment. Then lap the underlayment over the top of the drip edge. At the rake edges (the sloping sides), the underlayment goes on first and the rake drip edge overlaps on top of the underlayment. This difference in order is specified in the IRC and exists for a reason: water running off the eave drops cleanly off the drip edge, while water on the rake runs onto the drip edge rather than under the underlayment. Mix up this order and you create a water entry point.
For underlayment, a synthetic product like a 30-pound-equivalent synthetic felt is a good baseline. In cold climates or areas with ice dams, add an ice-and-water shield membrane from the eave edge up at least 24 inches, and further if your climate requires it. When fastening synthetic underlayment, space fasteners at about 12 inches on center in both horizontal and vertical overlaps.
Don't leave it exposed to UV for more than a few weeks or it will degrade before your panels go on. Alpha30’s installation guidance similarly notes that you should not leave the synthetic underlayment exposed to UV for extended periods, since it can degrade before the panels are installed don't leave it exposed to UV for more than a few weeks.
If your patio cover attaches to the house wall at the high end, you need step flashing and a continuous piece of counter-flashing tucked into the wall or under the siding. This transition from roof plane to wall is the second most common leak point after the ledger. Z-flashing running the full length of the wall-to-roof joint, with sealant at the top edge, is the minimum. A proper counter-flashing tucked into a mortar joint or reglet is better for masonry walls.
Metal roof installation: panel layout, fasteners, sealing, and finishing trims
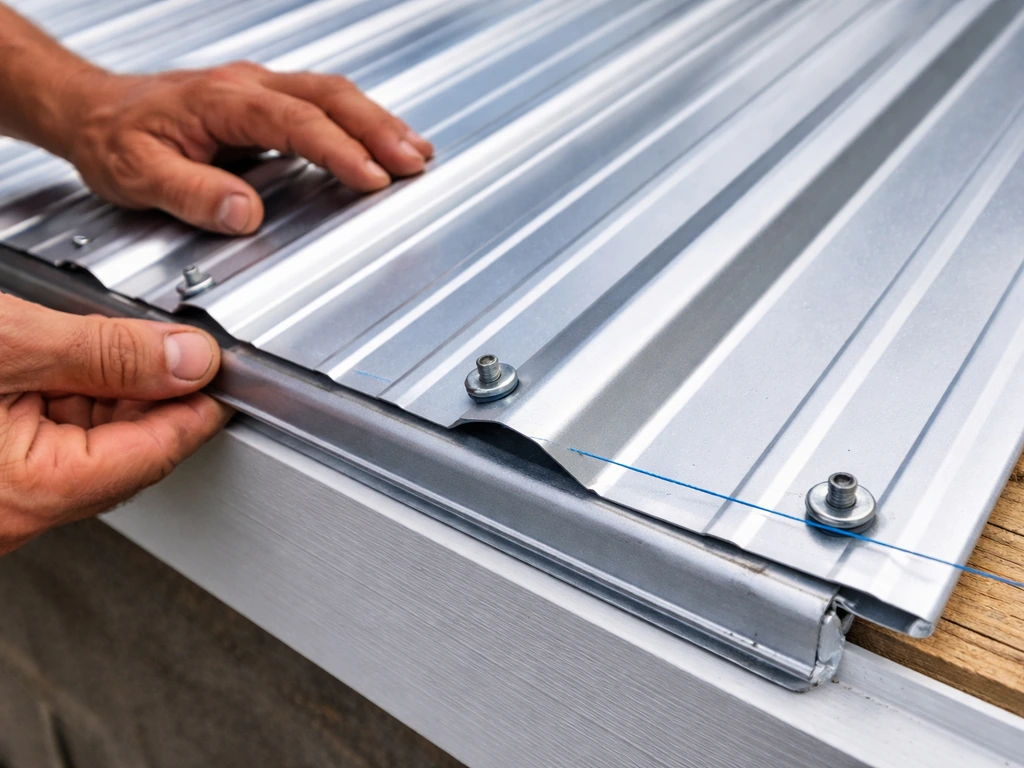
Start at one end of the roof and work toward the other. Snap a chalk line parallel to the eave edge as a registration line for your first panel. Metal America notes that a “drip edge” defines the bottom edge of the roof plane and gives the panels a surface to register against during installation registration line for your first panel. The first panel sets the alignment for everything that follows, so take your time getting it square. Most corrugated and ribbed panels should overhang the eave drip edge by about 1 to 1.5 inches so water drips clear of the framing.
For exposed-fastener panels, drive roofing screws (hex-head with neoprene washer) through the high rib of corrugated panels, not the valley. The standard spacing is 12 to 24 inches along each rafter or purlin, adjusted tighter (closer to 12 inches) in high-wind zones. Don't over-drive the screws: the neoprene washer should compress slightly but not bulge out. An over-driven screw distorts the washer and creates a leak path. Under-driven screws can back out over time. Practice on a scrap piece first.
Panel overlaps are where leaks hide. At side laps (where panels overlap each other side by side), one rib is the minimum overlap for corrugated; two ribs is better in wet climates. At end laps (where one panel overlaps the end of the panel below on the slope), install fasteners 3 to 3.5 inches up from the end of the upper panel, and run a bead of butyl tape sealant just downslope of those fasteners. This placement puts the sealant between the weather and the fastener line, which is exactly where you want it to intercept any water that wicks into the lap.
Foam closure strips are worth using at the eave and ridge. These are pre-formed foam pieces that match the panel profile and fill the open corrugation gaps at the edges, blocking insects, birds, and wind-driven rain from getting under the panels. Fasten them with the panel, don't just glue them in place.
Finish with the ridge cap (if it's a gable roof), rake trim, and gutter installation along the eave. Gutters on a metal-roof patio cover are highly recommended. Metal roofs shed water very fast, so the volume hitting the edge during a storm is significant. A 5-inch K-style gutter with downspouts at each end handles the flow on most residential patio covers and keeps the water directed away from the foundation and patio surface.
Safety, common mistakes, and when to hire a pro
Safety first on every stage
Working on a roof, even a low-slope patio cover, means fall risk. Use a stable ladder, wear slip-resistant footwear, and don't work alone when setting beams or panels. Metal panels have sharp edges straight from the factory, so heavy gloves aren't optional. When cutting metal with a circular saw or angle grinder, hot metal shavings fly in all directions and will rust-stain your new panels if they land on them. Blow off or sweep up shavings immediately after every cut. Eye protection for every cut, every time.
Common mistakes that cause problems later
- Skipping or missequencing the drip edge and underlayment — this creates a guaranteed leak path
- Not flashing the ledger-to-wall joint before installing the ledger board
- Too little roof slope — anything under 1/4 inch per foot will pond water at panel laps
- Over-driving roofing screws and distorting the neoprene washers
- Missing butyl sealant at panel end laps on lower-slope roofs
- Not bracing the frame laterally before loading it with panels
- Skipping the permit — this can affect your homeowner's insurance and create issues when you sell
When to bring in a professional
Most homeowners can handle a straightforward patio cover build, but there are situations where calling a structural engineer or licensed contractor is the smart move. If you're attaching to a structure with questionable framing, an older home with deteriorated rim joists, or a masonry wall that needs anchors, have an engineer check your ledger connection design.
If you're in a high-wind zone (ASCE wind speed over 130 mph), hurricane-prone coastal area, or high-snow-load region, the connection engineering needs to be verified. If your local permit reviewer asks for stamped plans and you're not sure how to produce them, a structural engineer can do that for a few hundred dollars, which is far cheaper than having to tear out and redo a non-compliant structure. The framing, underlayment, and panel installation parts of this project are genuinely DIY-able.
The code compliance and attachment engineering parts are where you want to be honest about your limits.
If you're focused specifically on the metal panel installation step, the full process for installing corrugated metal panels and standing seam options on patio structures is covered in more depth in other guides on this site, including posts on how to install a metal roof on a patio cover and how to build a tin roof patio cover for shed-style applications.
Posts on how to install a metal roof on a patio cover walk through the panel, sealing, and trim steps. But if you're starting from scratch and want the whole build, this is the sequence to follow. For shed-style patios, see the detailed walkthrough for how to build a tin roof patio cover, including framing, slope, and sealing the panel laps.
If you are wondering how to install a corrugated metal roof over a patio, use the panel layout, overlap, and sealing steps below to avoid common leak points.
FAQ
Do I need an underlayment if I’m using metal panels on a patio cover?
Yes, underlayment is still recommended because it protects from condensation and any minor laps or fastener imperfections. Use the eave to rake order described in the build process, and in ice-dam or freeze-thaw areas add an ice-and-water membrane along the low edge before the main synthetic layer.
What slope is the minimum to prevent leaks on a metal-roof patio cover?
Plan for at least 1/4 inch per foot as an absolute floor, but 1 inch per foot is a safer target for patio covers. If you’re forced into a flatter slope by the height of doors or code limits, you should be extra strict about panel overlap, end laps, and sealant placement on laps.
How do I choose between corrugated panels and standing seam for a patio cover?
Corrugated panels are generally easier and more forgiving for DIY because small alignment issues can be hidden by overlapping ribs. Standing seam is more watertight by design, but it demands more precision with clips and seaming, and it often performs best when installed with the correct seam tools and procedures.
Can I attach the ledger into siding and hope it holds?
No. The ledger should be fastened into structural framing, typically the rim joist and studs, after removing the siding strip where the ledger sits. If you only anchor into siding, you risk a loose attachment and accelerated rot where water gets into the wall line.
What happens if my roof panels overhang more or less than planned at the eave?
Too little overhang can cause runoff to land near the fascia and splash under trim, while too much can exceed local limits or increase wind lift forces. Follow your permit or local guideline maximum overhang (often around 12 inches) and keep the eave overhang consistent across the entire run.
How close should roofing screws go to the panel ends and laps?
On many corrugated systems, fastening near laps is more critical than fastening pattern alone. For end laps, fasteners are typically placed about 3 to 3.5 inches up from the end of the upper panel, and sealant (for example, butyl tape) should be positioned downslope of the fastener line to intercept wicking water.
Is it okay to seal over the screw heads with extra caulk?
Avoid relying on caulk as the primary waterproofing method. The correct fixings (roofing screws with neoprene washers into the high rib) and correct compression matter most. If you add sealant, do it only where the system calls for it, such as specific lap transitions, and do not overfill areas that prevent proper drainage of the lap.
How do I prevent the patio cover from racking in high wind?
Add diagonal bracing or a rigid knee brace connection, at least in one bay in each direction. A rectangular cover can twist under wind even if it seems square during construction, so make sure bracing connects to both the posts and beams, not just to the roof framing.
Do I need gutters on a metal-roof patio cover?
Gutters are strongly recommended because the low edge receives concentrated runoff during storms, and it can erode the patio perimeter and splash onto siding or foundation surfaces. A properly sized gutter with downspouts at each end helps keep water directed away from the wall and away from traffic areas under the cover.
How long can underlayment be left exposed before installing panels?
Do not leave synthetic underlayment out in UV for long periods. Aim to install panels within a few weeks, and keep the underlayment covered as much as possible to prevent degradation that can reduce its protective function.
What’s the best way to flash the roof-to-wall joint on an attached patio cover?
Use flashing at the wall transition, not just the ledger. The typical approach is Z-flashing along the joint with a continuous counter-flashing piece tucked into a wall channel or under siding, so water is directed away from the sheathing and doesn’t run behind the siding.
Should I use foam closure strips at the eave and ridge?
Yes, they help seal the panel profile at the edges to block insects, birds, and wind-driven rain. Install them with mechanical fastening where required by the panel system, since “glue only” installation can let gaps open as temperatures change.
Can I build this with the roof panels directly on rafters, or do I need sheathing?
You may be able to set corrugated panels directly on rafters depending on the panel gauge and span, but if you use sheathing you should adjust rafter spacing accordingly. If your local code, permit reviewer, or panel manufacturer calls for sheathing, follow that requirement since it changes deflection and fastening patterns.
When should I hire a structural engineer or contractor for a metal-roof patio cover?
Consider an engineer when wind or snow loads are higher than typical, when the structure must attach to an older or questionable wall framing, or when the permit office requires stamped calculations. Also consider it for ledger attachment into masonry or for unusual clearance constraints where the roof shape or connections must deviate from standard lean-to details.