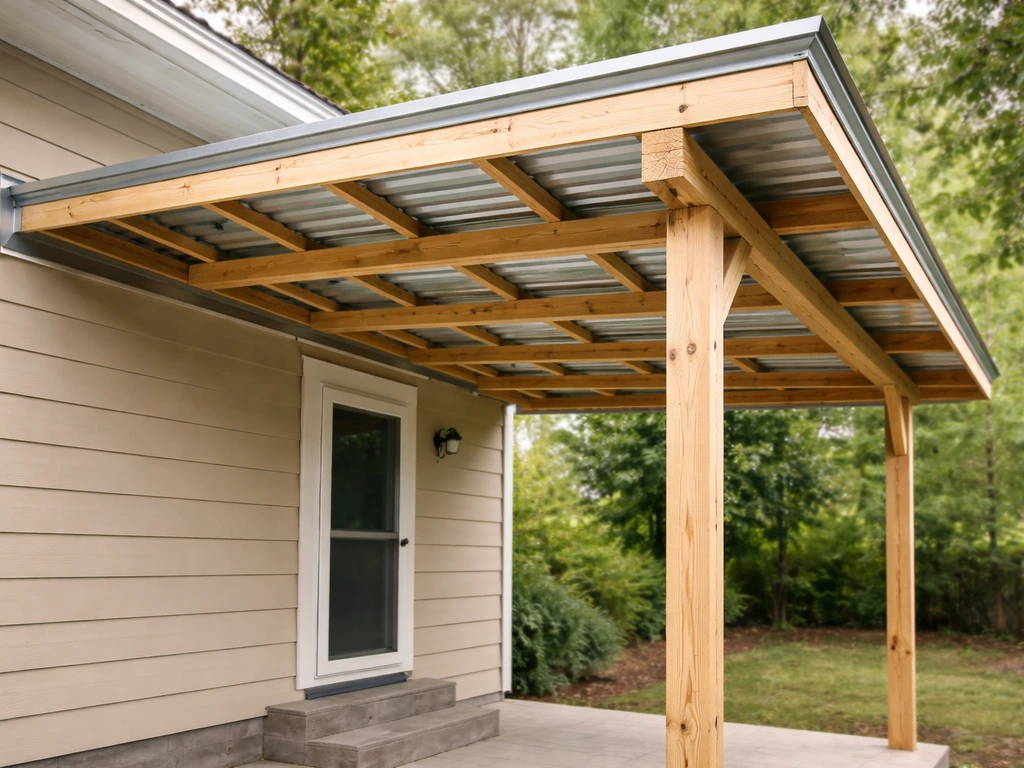
You can build a tin roof patio cover yourself in a weekend or two with basic carpentry tools, a few bags of concrete, some lumber, and corrugated metal panels. The general process goes like this: decide on your roof style and pitch, lay out and dig your post footings (or attach a ledger to the house), build the support frame, then install underlayment, flashings, and your metal panels from eave to ridge. Done right, a corrugated metal patio cover is one of the most durable, cost-effective shade structures you can build. Done wrong, it leaks at every seam and sags in the first heavy snow. This guide walks you through each step so you get it right.
How to Build a Tin Roof Patio Cover: DIY Step-by-Step

Celia Vaughn
29 Apr 2026
Pick your roof style and nail down the pitch first

Before you buy a single screw, you need two decisions locked in: what shape is the roof, and how steep is it? These choices control almost everything else, from how much lumber you need to whether your panels will leak.
Lean-to vs. gable vs. free-standing
A lean-to (also called a shed-style) patio cover is the most practical choice for most DIYers. One edge attaches to the house via a ledger board, the other side is held up by posts. Water sheds away from the house. It's simple, strong, and uses the least material. A gable roof gives you a peaked center ridge and sheds water to both sides, which looks great but requires more framing, a ridge beam, and two sets of rafters. It's doable as a DIY project, just more complex. A free-standing structure (no ledger attachment) works when you're building away from the house or when your home's wall framing can't safely accept a ledger. You'll need posts on all four corners and a beam on the house-side as well. For most people tackling their first metal roof patio cover, a lean-to attached to the house is the sweet spot of simplicity and function.
The right pitch for corrugated metal panels
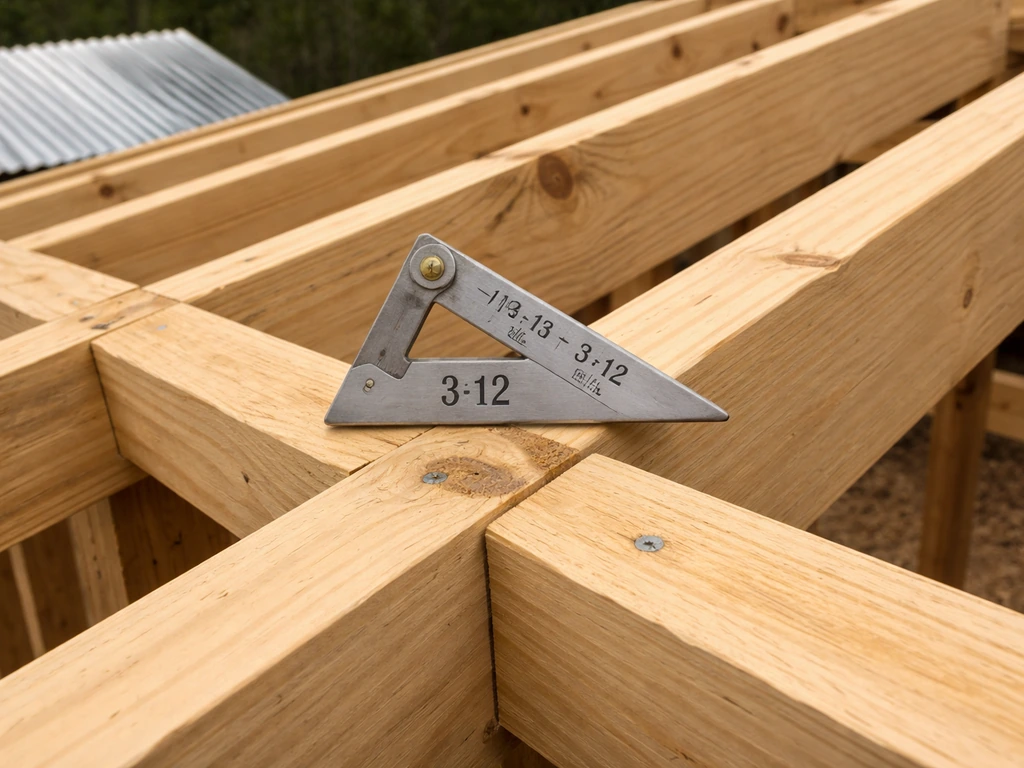
Corrugated and exposed-fastener metal panels need a minimum pitch of 3:12, meaning the roof rises 3 inches for every 12 inches of horizontal run. Some manufacturers push this to 2:12 as an absolute floor, but if you go below 3:12, most installation guidelines require you to upgrade from standard felt underlayment to a fully adhered Ice and Water Shield product. Below 2:12, water can actually work backward through panel laps and end laps regardless of how well you seal them. If your patio depth is 12 feet and you want water to shed cleanly, aim for the roof to drop at least 3 feet from house to outer edge. A 4:12 or 5:12 pitch is even better for drainage and looks more intentional architecturally.
What you need: materials, tools, and how to choose your panels
Framing materials
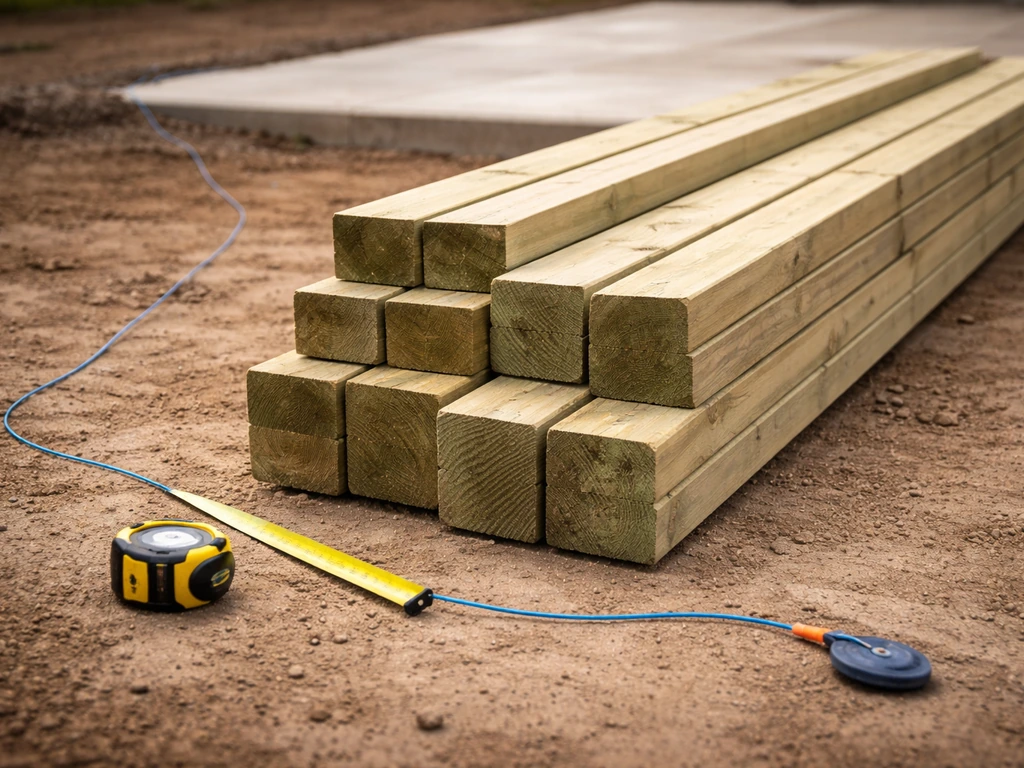
For a standard residential patio cover, pressure-treated lumber is your best bet for posts and ledgers since those parts contact or come close to concrete and soil. Use #2 or better Southern Yellow Pine or Douglas Fir for rafters and purlins. A common rafter size for spans up to 12 feet is 2x6 at 24 inches on center. For the ledger and outer beam, step up to 2x8 or double 2x6. If your span exceeds 14 feet, do yourself a favor and consult a span table or a structural engineer before framing.
Tin and corrugated metal panels
The term 'tin roof' is really shorthand for corrugated steel or galvanized steel panels. The most common DIY-friendly profile is 2.67-inch corrugated or 7/8-inch corrugated steel. Both are widely available at farm supply stores, big-box home centers, and metal roofing suppliers. Standard panels come in 26 or 29 gauge steel with Galvalume or painted Galvalume coatings. For a patio cover exposed to weather, 26 gauge Galvalume or a quality painted finish will outlast the structure. Panel widths are typically 36 inches, and you order them in custom lengths. Buy them long enough to run from ridge to eave in one piece whenever possible, which eliminates end laps and the leaks that go with them. When end laps are unavoidable, the overlap should be at least 36 inches, sealed with butyl tape.
Fasteners, trim, and sealants
For corrugated panels, use 1.5-inch or 2-inch self-drilling hex-head screws with an EPDM rubber washer bonded to the head. These are sometimes called 'roofing screws' or 'Tek screws with neoprene washers.' Never use standard wood screws or drywall screws on a metal roof panel. The washer compresses to create a weathertight seal around the penetration, and overdriving it is the number one cause of leaks. You want the washer barely compressed, not pancaked flat. Plan on fastening every 12 inches at eaves and ridges, and every 24 inches in the field. Butyl tape is your sealant of choice at all laps and under trim pieces. It stays flexible, doesn't dry out, and bonds to metal. Have a tube of polyurethane sealant on hand for any odd penetrations.
| Item | What to Buy | Notes |
|---|---|---|
| Panels | 26 ga. 7/8" corrugated Galvalume or painted steel | Order custom lengths to minimize end laps |
| Roofing screws | 1.5"–2" hex-head self-drilling with EPDM washer | One per rib at eaves/ridge; every other rib in field |
| Underlayment | 30# felt or synthetic (Ice & Water Shield for <3:12 pitch) | Overlap 6" on slopes under 3:12 |
| Ledger hardware | Structural lag screws (1/2" x 3") or through-bolts | Into studs, not just sheathing |
| Post bases | Code-approved adjustable post bases | Set in concrete footings |
| Butyl tape | 1" or 1.5" butyl sealant tape | Use at all end laps, ridges, and trim joints |
| Trim pieces | Eave trim, ridge cap, rake trim (pre-bent to match panel profile) | Match metal coating to panels |
Tools you'll need
- Post hole digger or rented power auger
- Level (4-foot and torpedo)
- Tape measure, chalk line, speed square
- Circular saw with a metal-cutting blade (or tin snips for trimming panels)
- Cordless drill and hex-head driver bit (go slow on screw driving)
- Caulking gun
- Safety glasses and heavy leather gloves (metal edges are razor sharp)
- Ladder and, ideally, a second set of hands
- Concrete mixing equipment or pre-mixed bags
Site prep: measure, lay out, and mark before you dig anything
Measure your patio space carefully and sketch it out to scale. Note where the house wall is, where any existing concrete slab or pavers are, and where utility lines might be buried. Call 811 (in the US) before any digging, no exceptions. Decide on your patio cover's finished dimensions: width along the house and depth out from the house. Standard patio covers run 10 to 20 feet wide and 8 to 14 feet deep, but size to fit your space.
Mark post locations on the ground using stakes and batter boards. For a lean-to, you'll have a line of posts along the outer edge. For corrugated metal, you will also want to carry that layout through to the rafter spacing and panel pitch minimums so water drains correctly how to install a corrugated metal roof over a patio. Common post spacing is 8 to 10 feet on center for standard lumber sizing. Use the 3-4-5 triangle method to ensure your layout is square: measure 3 feet along one line, 4 feet along the perpendicular, and the diagonal should be exactly 5 feet. Double-check by measuring corner to corner diagonally across the whole layout. Both diagonals should match.
Mark your rafter layout on the house wall and outer beam at this stage too. Standard rafter spacing for corrugated metal panels is 24 inches on center. Most manufacturer installation guides specify a maximum purlin or rafter spacing of 2 feet on center for standard corrugated profiles, so don't stretch this unless you're using a heavier panel and have confirmed it with the panel manufacturer's load tables.
Build the support frame: footings, posts, and beams
Dig and pour your footings
Post footings need to go below your local frost depth. The frost line (frost depth) is the depth to which soil and groundwater are expected to freeze, and building codes use it to prevent frost heave damage to foundations blank" rel="noopener noreferrer">Post footings need to go below your local frost depth.. In warm climates, 12 to 18 inches is typical. In cold climates, it might be 36 to 48 inches or more. Check your local building code. A standard footing for a patio cover post is a 10-inch or 12-inch diameter hole filled with concrete, with a code-approved post base set before the concrete cures. Use a post level or hold a level against two faces of the post base to make sure it's perfectly plumb before the concrete sets. Give it 24 to 48 hours before loading it with any weight.
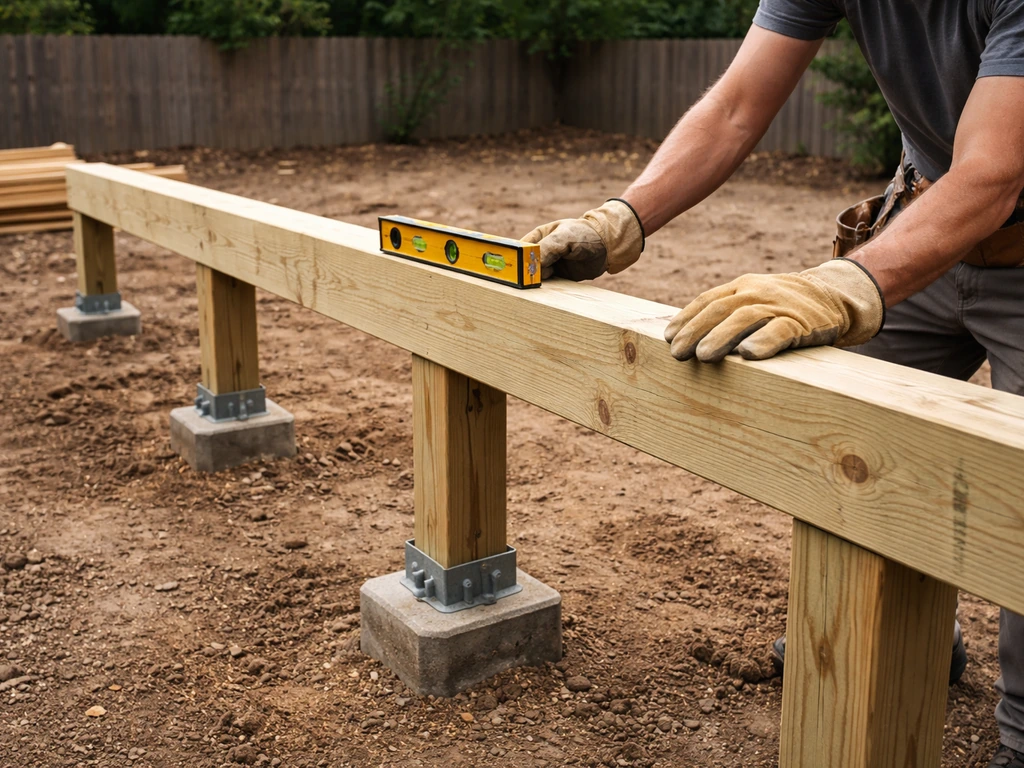
Set posts and install the beam
Cut your posts to the correct height accounting for the slope. If your ledger attaches to the house at, say, 9 feet, and you want a 3:12 pitch over a 12-foot-deep cover, your outer beam sits 3 feet lower, at 6 feet. Temporarily brace posts plumb with 2x4 kickers staked into the ground. Once posts are plumb and at the right height, install the outer beam. For spans up to 12 feet with posts 8 feet on center, a doubled 2x8 beam is typically sufficient, but verify with your local code or a span table. Toenail or use structural beam-to-post connectors (Simpson Strong-Tie type hardware) to lock the beam to the post tops. Hangers and connectors are not optional here, especially in wind or snow country.
Attach to the house with a ledger, or set up a free-standing structure
This is the step that trips up more DIYers than any other, and it's where most patio cover failures originate. The ledger board carries half the roof load and transfers it to your house's framing. If it's not bolted into actual studs or rim joists, it will eventually pull away, and that failure can be sudden and catastrophic.
Installing the ledger board
Locate the wall studs with a stud finder. The ledger should be bolted through the house sheathing and into the studs or rim joist using structural lag screws (minimum 1/2 inch diameter by 3 inches) or through-bolts. Two fasteners per stud location, staggered vertically. Before attaching, check what's behind the wall: if the ledger is going to siding, you need to flash it properly so water can't infiltrate behind the siding and rot the wall. Cut the siding back, slip metal z-flashing behind the siding above the ledger, and seal the top edge of the flashing to the wall with appropriate sealant. The ledger attachment to an existing structure is consistently identified as a critical engineering point and a common failure mode, so if you're at all unsure about what your wall framing can handle, get a structural engineer's opinion or pull a permit and have an inspector check it.
Free-standing option
If you're building away from the house or your wall framing isn't suitable for a ledger, go free-standing. You'll need posts and a beam on the house side as well, mirroring the outer side. The beam on the house side can sit close to the wall (6 to 12 inches away) without attaching to it. Free-standing structures are actually simpler to engineer because they don't depend on the existing structure's integrity, but they do require more posts and more concrete.
A word about permits
Most municipalities require a permit for a patio cover that attaches to the house or exceeds a certain square footage (commonly 200 square feet). Permit requirements vary widely, but they often include a site plan, framing plan, and sometimes an engineering letter for the ledger connection. Check with your local building department before you start. Getting caught without a permit can mean tearing it all down. Getting a permit, on the other hand, means an inspector will catch mistakes before they become your problem permanently.
Install underlayment, flashings, and your metal panels
Underlayment first
Even on a patio cover, underlayment is worth installing. It gives you a layer of protection during construction, adds secondary waterproofing if a panel seam ever fails, and helps manage condensation. For a pitch of 3:12 or greater, 30-pound felt or a quality synthetic underlayment works fine. For pitches below 3:12, use a self-adhering Ice and Water Shield product across the full surface. Install underlayment starting at the eave and working up toward the ridge. Overlap horizontal courses by at least 4 inches, or 6 inches on slopes below 3:12. Fasten with flat-head galvanized roofing nails or cap nails, spaced about 12 inches apart in each course.
Flashings before panels
Install eave drip edge along the lower edge before the first panel goes on. At the house wall, install a step or continuous wall flashing that tucks behind the siding above and laps over the first panel. This is the most leak-prone spot on any attached patio cover, so take your time here. Use pre-bent metal flashing that matches your panel profile at the eave, and seal the top edge to the wall. If your cover has a valley (where two roof planes meet), install valley flashing before any panels in that area.
Setting and fastening metal panels
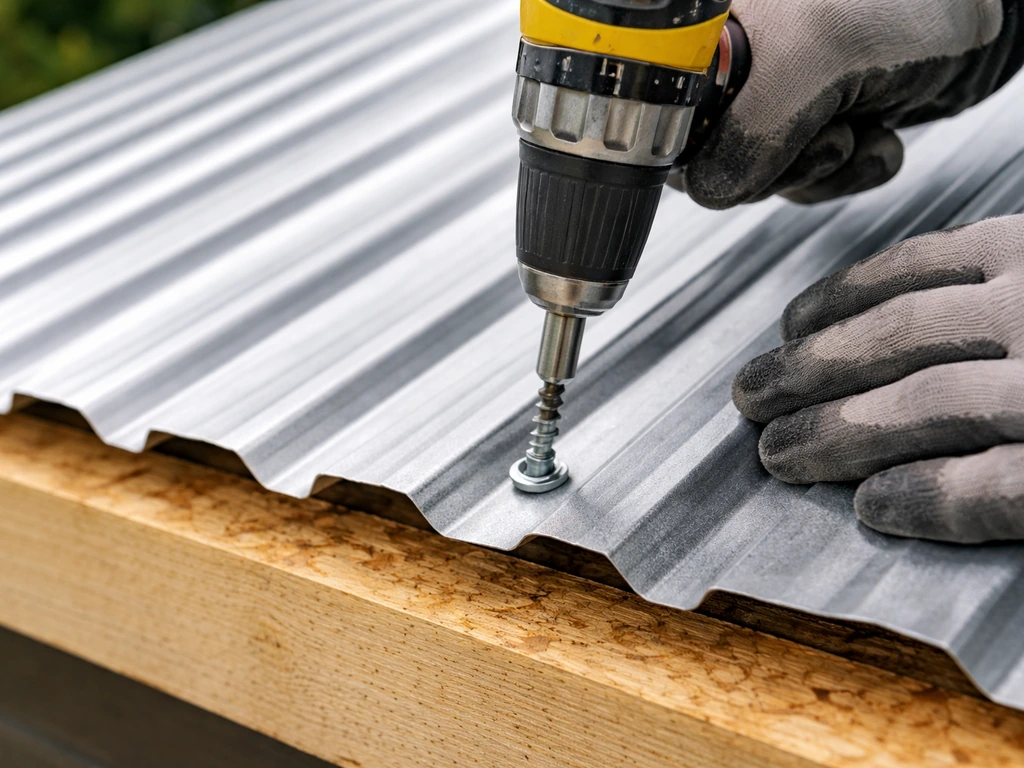
Start at one end of the roof (the end away from prevailing wind is the right approach, so the overlap faces away from the wind). Set the first panel with its edge aligned with the rake trim line, and make sure it overhangs the eave by about an inch. Fasten at the eave purlin first, then work up the panel. Drive screws through the panel crown (the high rib, not the valley) for corrugated profiles. This is important: fastening in the valley can cause leaks because water pools there. Space screws about 12 inches apart at the eave and ridge, and every 24 inches in the middle of the panel. Each subsequent panel overlaps the previous one by one rib (for most corrugated profiles). Don't skip the side laps, and apply butyl tape under any end laps before laying the overlapping panel.
The single most common fastening mistake is overdriving screws. Set your drill clutch or use a screw gun with a depth stop. The EPDM washer should be slightly compressed and just starting to bulge at the edges, not crushed flat. An overdriven washer cracks or distorts and will leak within a season or two. An underdriven screw won't seal either. It takes a few test screws to find the right feel, so practice on a scrap piece first.
Finish details: edges, ridge caps, drainage, and making it leak-proof
Ridge cap and eave trim
If your structure has a ridge (gable style), install a ridge cap over butyl tape placed along the top rib of the last panel on each side. Fasten the ridge cap through both layers into the ridge purlin below, spacing screws about 12 inches apart. Pre-formed ridge caps matched to your panel profile will have foam closures that fit into the corrugations and block insects and debris while still allowing some airflow. At the eave, eave trim or a fascia board covers the exposed panel edge. Snap it into place or screw it through the face into the fascia board.
Rake trim and end closures
The rake edge (the sides of the roof running up the slope) gets rake trim, also called barge trim. Install it over the panel edge and fasten it through the panel and into the end rafter. Seal the underside with butyl tape before fastening. End-wall closures (foam or pre-formed metal pieces that fill the corrugated valleys at the eave and ridge) keep out birds, bats, and leaves. Don't skip these, especially on a patio cover where the underside is occupied space.
Wall flashing at the house
The transition between your metal roof panels and the house wall needs continuous flashing. The flashing should run at least 4 inches up the wall behind the siding and 4 inches out onto the roof panels. Seal the top edge to the wall with polyurethane or a matching sealant. This joint is where most patio cover leaks happen, and it deserves extra attention. Apply butyl tape under the base of the flashing before it lays onto the panels.
Drainage and ventilation
On an open patio cover, ventilation is less of a concern than on an enclosed building. But if you've added a ceiling or soffit below the roof panels, you want some airflow between the panels and the ceiling to prevent condensation from building up and dripping down. Leave a small gap at the eave or use vented ridge closures. Metal panels can sweat significantly on cool mornings in humid climates, and that moisture needs somewhere to go. A simple 1-inch gap at the eave is often enough on an open-air patio cover.
Final leak check
Once all trim is on, run a garden hose over the roof starting at the low end and working up. Check inside for drips at the wall flashing, every fastener, any end laps, and the ridge. Mark any wet spots with chalk and address them while you're still set up. Nine times out of ten, any leaks trace back to one of four causes: an overdriven screw, a skipped bead of butyl tape, a poorly fitted flashing, or an end lap that didn't get sealed. All of these are fixable the same day.
Common mistakes and when to call a pro
The most common pitfalls on a DIY tin roof patio cover are: setting the roof pitch too low (under 3:12) without upgrading the underlayment and sealing system, spacing rafters or purlins too far apart for the panel profile (stick to 24 inches on center maximum for most corrugated panels), overdriving or underdriving fasteners, skipping butyl tape at laps and trim, and inadequate ledger connections. In a Reddit discussion of ledger board safety, people describe common concerns about ledger attachment and how building inspectors interpret requirements inadequate ledger connections. These aren't catastrophic if you catch them during construction, but fixing them after the fact is miserable.
Call a structural engineer or licensed contractor if: you're spanning more than 14 to 16 feet between supports and aren't confident in your beam sizing, your soil is soft, sandy, or marshy and footing depth is uncertain, you're attaching a ledger to a wall and can't positively identify solid framing behind it, your area has significant snow loads and you need to verify your framing can handle them (the IRC requires snow load to be factored into roof framing design), or your local jurisdiction requires stamped drawings for a permit. The cost of an hour with a structural engineer is trivial compared to a roof collapse. Projects related to installing corrugated metal roofing panels, building patio covers with metal roofs, and attaching metal roofing to existing structures share many of these same structural and waterproofing considerations, and the same rules about respecting pitch minimums and fastener technique apply across all of them. Projects related to installing corrugated metal roofing panels, building patio covers with metal roofs, and attaching metal roofing to existing structures share many of these same structural and waterproofing considerations, and the same rules about respecting pitch minimums and fastener technique apply across all of them metal roof patio cover. For more detailed guidance, see the full walkthrough for how to build a patio cover with a metal roof, including framing choices and waterproofing steps.
Your next steps today
- Measure your patio space and sketch out the cover dimensions, deciding on lean-to vs. gable and your target pitch (aim for 3:12 or better).
- Call your local building department and ask what's required for a patio cover permit in your zone, specifically about ledger attachments and footing depth.
- Call 811 to schedule a utility locate before you plan any footing locations.
- Visit a local metal roofing supplier or farm supply store to look at corrugated panel profiles in person and get a quote for your square footage (add 10% for waste).
- Pull together your material list using the table in this guide, check what tools you already own, and rent or borrow what you don't.
- Lay out your footings and start with the ledger or first post: committing to those two points means your project is underway and everything else follows logically from there.
FAQ
Can I build a tin roof patio cover with a flatter pitch than 3:12?
Plan for a minimum roof pitch of 3:12 for standard corrugated panels and typical felt or synthetic underlayment. If you must build flatter for aesthetics or clearances, you generally need a fully adhered Ice and Water Shield system across the roof, plus more careful sealing at end laps and transitions. Also expect faster deterioration of trim flashings on flatter roofs because water dwells longer at seams.
Where do panel end laps matter most, and how do I prevent leaks from them?
Avoid a “single run” of panels that forces you to create small end laps mid-span if you can order custom lengths. If an end lap is unavoidable, seal it with butyl tape and use an overlap of at least 36 inches. The bigger your roof length, the more important it is to prevent end laps from landing in locations that see heavy runoff concentration.
What’s the correct way to flash the metal roof patio cover where it meets the house wall?
Do not rely on underlayment alone to stop leaks if the wall flashing is wrong. Use continuous flashing at the ledger or wall transition, with the base sealed using butyl tape and a top edge sealed where it meets the wall. The flashing should lap behind siding correctly, then extend onto the roof panels so water has a direct path away from the house.
Do I need ventilation under the metal panels if my patio cover has an enclosed ceiling?
If your structure is pitched and open-air, you typically leave a small eave gap so moisture can escape. If you install a ceiling, soffit, or any closed underside, you need ventilation between the panels and the ceiling (for example, a vented closure or a deliberate gap at the eave) because metal panels can produce condensation in humid climates.
How do I avoid overdriving screws (and how can I tell I’m using the right screw depth)?
Set a drill clutch or use a depth stop, the goal is a washer that is slightly compressed with edges just starting to bulge, not crushed flat. Do a test run on scrap metal, then retest after your drill changes torque. Leaks often show up at penetrations within a season when the washer is pancaked.
What fasteners should I use for corrugated tin roof panels?
For corrugated panels, use self-drilling hex-head roofing screws with an EPDM rubber washer bonded to the head, sometimes sold as Tek style roofing screws with neoprene or EPDM. Do not use standard wood screws or drywall screws, because they do not provide the same sealed penetration and can allow water paths at the fastener.
How should ridge caps and closures be installed on a gable roof patio cover?
If you create a ridge, use a ridge cap system matched to your panel profile, with butyl tape under the cap at the top rib. Install through both layers into the ridge purlin below. If you skip foam closures or use the wrong closure style, insect intrusion and debris buildup become common and can interfere with drainage at the ridge.
What should I change for framing if my area gets heavy snow?
If your locale uses higher snow loads, you cannot assume the same rafter or purlin spacing that works in mild regions. You need framing that accounts for factored snow loads, and you may need denser spacing or larger members than a DIY “typical” layout. When in doubt, confirm with a span table, local code requirements, or a structural engineer.
Can I attach the ledger into just the sheathing or siding when building a lean-to patio cover?
Yes, but you must verify what is behind the siding and how the ledger attaches. Use studs or rim joists, and fasten with through-bolts or structural lag screws into solid framing. If you cannot positively locate adequate backing, use an engineered or permitted approach, or switch to a free-standing design that does not depend on the existing wall.
How deep should the post footings be, and what’s the right way to set post bases?
Use a code-approved post base set before the concrete cures, and ensure the post is plumb with a post level (or a level against two faces) before the concrete sets. Footings must be below local frost depth, in cold climates this can be substantially deeper than DIYers expect. Don’t rush loading the structure, give the concrete time to cure before installing heavy framing.
What’s the best way to pressure-test or hose-test the roof for leaks before finishing?
Most patio cover failures that leak or shift are fixable only while you have access. During a hose test, start at the low end and work up, then inspect from underneath at the wall flashing, every fastener line, each end lap, and the ridge. If a leak appears, address the exact fastener or seam while the roof is still open to adjustments.